 |
| DIY Copper Bookmark |
I have always been a maker. At the moment, I find myself fascinated with copper as canvas. There is something entirely mesmerizing about painting with fire on copper. Over the past few days, I have experimented with the creation of copper bookmarks. I'd like to share the process for those who might enjoy giving this a try.
You can do so much with copper, but I am focusing, right now, on hammered, stamped, and annealed copper. I call the annealing of my pieces "painting with fire." It is my absolute favorite part of this project. When you take a torch to copper, you never know exactly how the finished piece will look. I am always delighted to see the surprising effects of heat on my metal works of art.
My M.O. (modus operandi) happens to be the repurposing of materials. I love nothing more than to bring new life to those things that have unseen, or unused, potential. In this case, I was fortunate enough to reclaim some small copper sheets that were the remnants of a solar installation. Though the metal was scratched and tarnished, with irregular edges, I knew it held great promise, and a beauty to be found when its true colors were revealed. These are the steps I took to transform the copper.
Step One: Cutting the Copper
I first considered using a hacksaw to cut the copper sheets into bookmark-sized pieces. After trying that, I decided it would be much faster and easier to use my Dremel Saw-Max with the metal cut-off wheel. That worked perfectly. The important thing was to protect the surface of the copper using painter's tape.
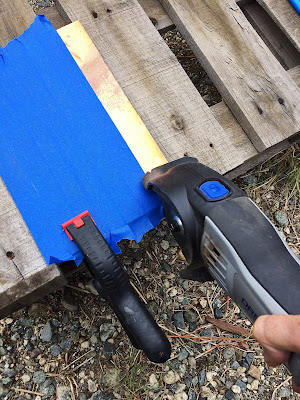 |
| Cutting the Copper Using Dremel Saw-Max |
Step Two: Filing the Rough Edges
After cutting the copper, the edges needed to be deburred to remove the sharp slivers of metal. I used a round file for this step.
 |
| Filing the Metal Burrs |
Step Three: Rounding the Corners
Because the corners of the bookmark were sharp, the next step was to use my Dremel rotary tool, with a sanding bit, to gently round off those points.
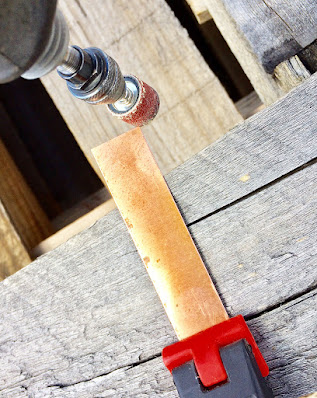 |
| Rounding the Corners Using Dremel Rotary Tool |
Step Four: Cleaning the Copper Surface
Before heating the copper, I needed to clean off the surface tarnish, fingerprints, etc. The simple way to do this is with fine steel wool (00 grade) and a little elbow grease. When I was done, the copper was nice and shiny (see the center image below). I chose to leave some of the character marks (a few nicks and minor scratches). My work is not meant to have a machined look. I want it to be wabi-sabi (where the imperfection is the beauty).
 |
| From Tarnished to Bright, Shiny Copper |
Step Five: Painting With Fire
I love this step! My bookmark blank is now laid on a moist sand mound. I place the front side of the bookmark facing down (because that is the side of the copper that will have the most colorful effect after I torch the back side). I use a mini butane torch to paint (anneal) the copper. Basically, I just heat the metal until it begins to turn vibrant purple, blue, and fuschia colors. The possibilities are endless and no two "paintings" are ever the same.
 |
| Butane Mini Torch and Fuel |
 |
| Painting With Fire - Torching the Copper Blank |
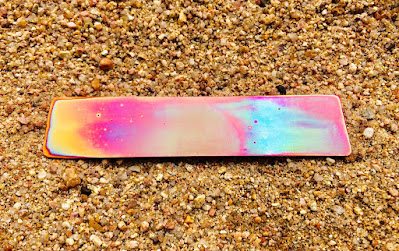 |
| Newly Torched Copper Bookmark |
 |
| The Infinite Variety of Fire - Painted Copper Bookmarks |
Step Six: Water Bath
Using a forceps, I then plunge the hot metal into a cool water bath. Next, I pat dry the copper with a soft cloth. (It's also important to wear clean, soft gloves so you don't mar the metal surface with fingerprints, etc.)
 |
| Cooling the Torched Copper in a Water Bath |
At this point, I used metal stamps (Impress Art uppercase alphabet set) to imprint a message on the front of the bookmark. This is the hardest part of the process. Getting the spacing and impressions right can be extremely challenging. I had to leave the perfectionist in me out of the equation and just go for it. What will be, will be! And that is okay. It is the charm of handmade art.
 |
| Stamped Copper - Rumi Quotation |
Step Eight: Edging the Bookmark
Depending on the look you want, you can leave the edges of the bookmark plain, but I wanted a hammered copper look. This is where I used a ball-peen hammer to make some shallow depressions all around the perimeter of the piece.
 |
| Creating Hammered Copper Edge Using Ball-Peen Hammer |
Step Nine: Finishing the Piece
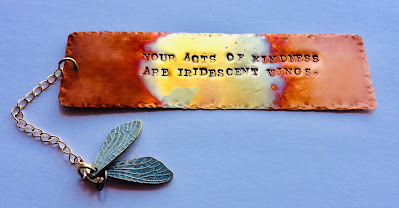
I used a tiny bit in my Dremel rotary tool to drill a hole in the end of the bookmark (for attaching a chain and embellishments). Next, I applied a finish wax (a natural carnauba wax) to protect the surface from fingerprints, tarnish, etc. Finally, I chose a pair of wing charms to be a whimsical play on my chosen sentiment.
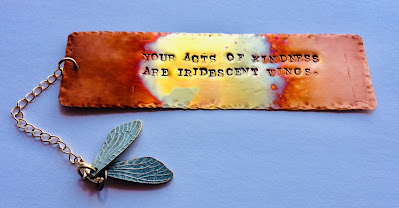 |
| Finished Copper Bookmark |
Your acts of kindness are iridescent wings of divine love,
Which linger and continue to uplift others
Long after your sharing. ~Rumi
I may consider creating a few custom bookmarks for my Etsy store. Most likely, though, these pieces will be offered as gifts because they are truly a labor of love.
Note: The author may receive a commission from purchases made using links found in this article. “As an Amazon Associate, Ebay (EPN) and/or Esty (Awin) Affiliate, I (we) earn from qualifying purchases.”


