Showing posts with label Crafts & DIY. Show all posts

Tuesday, June 23, 2026

Yard Decorations, Rock and Cement Yard Decor

Many of you know that I create art that I add to online products that people can purchase. Some know that I also create art for my garden. This is my review of this activity.

outdoor decor
My first creation was when I decided that the somewhat large rock, looked like it would make a perfect fun frog! I cleaned up the rock and coated it with an all purpose sealer that is weather resistant. The brand I used is Delta Ceramcoat, but couldn't locate the exact item on Amazon. I did however find Delta Ceramcoat Multi-Surface Paints that are good for a variety of surfaces. Amazon included a variety of paints from Ceramcoat, and I believe I saw one that was weather resistant. I would still use the undercoat sealer and final coat sealer though. I usually add 2-3 coats of the final sealant.

As for another alternative, I would give this sealer from Americana a try. It is listed as weather resistant and is good for both indoor and outdoor.

After I applied the undercoat sealer and let it dry, I commenced with painting the froggy features. He is cool and fun! Then I finished with an outdoor sealer made for acrylic paints. I just use the sealers that you can find in the art section for acrylics. Americana is one of my favorites.

As you can see in the photo above, the frog is back in the corner, and looks pretty cool! He has been outside for years, as of this writing, and the paint hasn't chipped at all. He has sat out in full sun, full weather, and then more recently under the overhang from our roof. He has faired very well!

My next creation was Mr. Turtle. Poor Mr. Turtle. He was my first try at painting on cement, which wasn't the real issue. The problem was, I think, that Mr. Turtle was hollow inside. So although he was pretty easy to move around weight wise, his surface didn't hold up. I thought he was going to do as well as Mr. Frog. But oh well. I did apply the various coatings, and gave him a cool look.


outdoor decor


He looked pretty good while he was still indoors. But the weather was too much for this hollow critter. I do plan to put some spackling on his back and maybe give him an abstract bandage. We'll see!

Onto Miss. Colorful Bird. This piece is also cement but is solid through. I did not have the issues with this that I had with Mr. Turtle. I don't know if different companies use different types of cement or not, or if it was just from not being solid. I believe I got Mr. Turtle from a garden center; it may have been Lowes. I purchased the bird from Target.

Anyway, Miss Colorful Bird still looks beautiful. Her painted feathers has been outdoors for months now, and she is still looking good. I have not sat her out in full weather like I did Mr. Frog. I hesitate after seeing what happened to Mr. Turtle. So everyone from now on is being placed under the overhang from the roof.

If you were to venture in to painting some outdoor decor for show, I would recommend to buy more solid pieces, or keep the piece indoors. As with all of them, I do recommend a sealer for porous surfaces that are meant for acrylic artistic paints. I have not used the paint meant for houses. And then finish with a final sealer of 2-3 coats. The main paint that I used is from Americana, which is a multi-surface paint, but doesn't not mention being weather resistant, so it will definitely need to be sealed.

If you are looking for concrete animals to paint, you can check out this page on Amazon. There are a variety of options there, including flat type stones. I did not have good luck with that and would recommend choosing something thicker and more solid. Customers have had a good experience with concrete items purchased from Stone Freedom on Amazon.

Happy painting.

Cheryl Paton


Note: The author may receive a commission from purchases made using links found in this article. “As an Amazon Associate, Ebay (EPN), Esty (Awin), and/or Zazzle Affiliate, I (we) earn from qualifying purchases.”


Friday, June 19, 2026

Easy No Sew Bunny House Quilt Magic Kit Reviewed

bunny house quilt magic kit
After months of having to focus on responsibilities and work, Mom and I finally claimed a day for crafts.  We turned off all electronic devices and appliances so there would be no distractions or other things going on in the background.  Just craft time together!  

I had purchased two Quilt Magic kits for us to make, fully planning for me to make one and Mom to make the other.  As it turned out, we decided to make the first one together.  I cut out the pattern pieces and Mom tucked most of the pieces of the design in place.

Because this was the first Quilt Magic project for Mom, I intentionally selected one with fewer, bigger pieces.  I wanted one that would develop quickly.  The kits I have made in the past took days to finish.  The Quilt Magic Bunny House was finished in a day.  

Hopefully we will find another day to make the second one together soon.  Since they are complimentary to each other, I would like to hang them in my kitchen at the same time.

This kit is perfect for a beginner.  You can feel the sense of accomplishment early on and start getting excited about the pretty image going together piece by piece right in front of you.  The colors of the fabrics are vibrant and beautiful.  And, who doesn't love a white bunny!


#973 Bunny House Quilt Magic Kit

bunny house quilt magic kit

The kit comes with everything you need except the punch tool, scissors and an iron.  You will want to iron all the creases in the fabric before you begin. 

Kit Includes

  • Pre-cut Formboard 
  • Fabric
  • Instructions
  • Finished Size 12" x 12"
  • Once cut, there are 50 total fabric pieces 

The Bunny House Quilt Magic kit is perfect for beginners!  The sides and corners are all individual pieces that are tucked into the formboard, but the entire center image is one piece.

This kit is new to the Quilt Magic line and may not be available everywhere yet.  I am not an affiliate at Mary Maxim, but I am not going to leave our crafting readers without a known resource to purchase the fabulous Bunny House Quilt Magic Kit

The frame is optional but it does have a hole in the back top for hanging.  

I previously published a tutorial on How to Make a Quilt Magic Wall Hanging.  Simply click the link to read it for step by step instructions.    


Here are two other easy beginner Quilt Magic kits with a large single image piece in the center, plus the Quilt Magic tool and frame.

 Quilt Magic Snowlady Skater No-Sew Quilt KitCheck Price Quilt Magic 464501 Punch Tool, 5.5Check Price Quilt Magic Christmas Penquin No-Sew Quilt KitCheck Price Quilt-Magic Oak Frame - 12Check Price

 Read More Crafts & DIY Reviews On
ReviewThisCrafts.com!


House of Sylvestermouse


Note: The author may receive a commission from purchases made using links found in this article. “As an Amazon Associate, Ebay (EPN), Esty (Awin), and/or Zazzle Affiliate, I (we) earn from qualifying purchases.”


Wednesday, June 3, 2026

Play-Doh Flower Sets Reviewed for Mom

Play-Doh Flower Sets for mom on Mother's Day or on any day!

Here's a super simple, super affordable gift idea for mom on Mother's Day or any day of the year. It is a small Play-Doh set by Hasbro called Tulips and Daffodils. 

Recommended for individuals aged 3 and up, it is perfect for gifting to mom who will be able to use the floral-scented play dough as fun crafting activity with her child.  The set includes molds for creating two flowers, a tulip and a daffodil, plastic stems and leaves and a small flower-pot style planter. Find your Tulip and Daffodil Play-Doh set here, on Amazon.

It is noteworthy that this is not the first or only flower-themed Play-Doh set. If you are interested, I suggest visiting eBay by clicking this link to see all of the new, used and vintage floral Play-Doh sets that are available. 

Discover the Play-Doh Magic Bloom Flower Garden set.

In my opinion, the most valuable and interesting retired floral set is the Magic Bloom Flower Garden, which is shown above. When it appears, it sells fairly quickly on reselling sites like eBay with a new set selling from $50 to $100. See for yourself the Magic Bloom Flower Garden sets available on eBay  right now by clicking here.

Note, if you buy a retired Play-Doh set you may have to replace the dough though given the availability of that product in single or multiple can sets, that will not be an onerous or expensive challenge.

See you
at the toy store!
Brenda
Treasures By Brenda

MORE PLAY-DOH:

Discover Play-Doh's Airplane Explorer set.

Check out the medical doctor-themed set, which is styled after the iconic Operation game.

Love camping? They'll love Play-Doh's campfire-themed set.


Note: The author may receive a commission from purchases made using links found in this article. “As an Amazon Associate, Ebay (EPN), Esty (Awin), and/or Zazzle Affiliate, I (we) earn from qualifying purchases.”


Monday, May 11, 2026

Upcycle Bird Feeder Review

Quick, fun and easy DIY to use extra ice cream cones and turn into Bird Feeders. You know ... the ice cream sundae bar at the birthday party and that bowl of cones that sat out all day and are now nice and stale? Or the package you dropped and turned the cones into crumbles!


DIY bird feeder


Materials

Scrap twine, thin rope or pipe cleaners

Bird Seed

Ice Cream Cones

Peanut Butter

Sharp ish tool to make holes in the cone

How To Make The Ice Cream Cone Bird Feeder

  1. Turn cone upside down.
  2. Poke a hole on each side across from each other.
  3. Feed string or twine through hole and make a loop. 
  4. Tie the loop. This will be your hanger.
  5. Cover all or parts of the cone with peanut butter.
  6. Sprinkle a paper plate with bird seed.
  7. Roll cone around the bird seed to cover the peanut butter.
  8. Gently press birdseed into peanut butter.
  9. Find your favorite tree branch and hang.
Enjoy!


Note: The author may receive a commission from purchases made using links found in this article. “As an Amazon Associate, Ebay (EPN), Esty (Awin), and/or Zazzle Affiliate, I (we) earn from qualifying purchases.”


Monday, March 2, 2026

Reviewing the Rivers Shawl Crochet Pattern by Rich Textures Crochet

The Rivers Shawl crochet pattern is a beautiful and versatile pattern with interesting texture and pretty drape. Whether you crochet for yourself or as gifts for others, this is an excellent pattern to choose. 

photo and text for Rivers Shawl crochet
My Rivers Shawl with Mandala Gradient yarn colorways 

While focused on making items for my first donation to a local care home, I have tried to focus on shawls, lap blankets, and other items that the residents would find functional and enjoyable. I am thrilled about this pattern and highly recommend it.  

Rivers Shawl Crochet Pattern by Rich Textures Crochet

As soon as I saw the photo of this pretty shawl pattern, I hoped that it wouldn't be too difficult for me to complete. Wonderful news!  I've completed several projects with this pattern using different yarns. I am very happy with each of the projects and plan to continue with this pattern.

Pattern information:

  • listed at the skill level - Easy
  • finished size is 18 x 64 inches
  • worked in rows - a 6 row repeat
  • written pattern uses American English crochet terms
  • pattern is worked in rows
  • stitches used: chain, double chain, half double crochet, single crochet, slip stitch and triple stitch
  • available in a video tutorial and written pattern (see links below)

I consider this size as a wrap shape, due to the long rectangular shape, rather than a triangular shape which is what I consider a shawl. Due to the original rectangular shape, this wrap is easily reduced in size to lap blanket size and would easily be increased in size to a sofa throw size.

My Personal Thoughts About the Rivers Shawl Pattern

While I've crocheted for decades, I crochet slowly so it takes a very long time to finish projects. Since I'm attempting to make over 20 blankets for gift, I was very happy that this pattern works up quickly.  I also have trouble with multi-row repeats or patterns that require counting and keeping track of rows. I almost did not try this pattern since it is a 6 row repeat.  How fun when I realized, after completing about 18 rows, that there are 2 rows of single crochet followed by a 3rd (and 6th) row of the single, half double, double, and triple crochet pattern.  That 3rd and 6th row is the same stitch combination. However, it begins on a different stitch, making it seem like a different pattern. That is what causes the "waves" to alternate; row 3 starting with a single chain and row 6 starting with the triple. After these rows have repeated into the blanket it is fairly easy to make sure you are on the right track by checking to see if your current stitch pattern row lines up with pattern two rows below.

Yarns I've Chosen Thus Far.

Puzzle Premiere. To begin, I chose Puzzle Premiere yarn because it is size 5 weight and works up quickly. It is also a self-striping (although, I wouldn't call it stripes exactly). Which means few tails to work in from yarn color changes. Because the yarn is slightly thicker than the pattern creator used, I used a smaller crochet hook to make up for the size difference.

photo of a crochet sample
Puzzle Premiere 

Mandala Gradient. Then I used Mandala Gradient cakes for the next project. It is a size 4, worsted weight yarn. That is the size the pattern creator used for her Rivers Shawl. Mandala Gradient yarn created a beautiful color pattern and a soft piece. 

Other Yarns. This pattern has enough texture that it would look pretty with both smaller weight yarns and with solid color yarns. I think this pattern would make wonderful baby blankets in DK or Sport weight yarns. Yes. A baby blanket is next on my list for this pattern.

Related Links:

Rich Textures Crochet video tutorial and free written pattern on the Rich Textures Crochet website.


Note: The author may receive a commission from purchases made using links found in this article. “As an Amazon Associate, Ebay (EPN), Esty (Awin), and/or Zazzle Affiliate, I (we) earn from qualifying purchases.”


Monday, February 2, 2026

The Knitted Scarf that Reignited My Desire to Master Tunisian Crochet

The beautiful knitted Sophie Scarf has taken the yarn art world by storm. This is a retro style scarf with a modern, knit pattern.  This scarf reminds me of fashionable women in the 1950's, women such as Audrey Hepburn, and has reignited my desire to build my Tunisian crochet skills. 

text and photo related to Tunisian crochet


Knitted Sophie Scarf

As far as I can determine, the original Sophie Scarf knit pattern was created and offered by Petite Knit.  It is no wonder that this small scarf, with a pleasing shape, and I-cord edging became popular. It is a handmade item that many people would choose to wear. It is functional and pretty. 

Of course, with all things viral or popular, the copycat versions appeared overnight. 

If you are a knitter, or if you are a person who supports small business, I hope you will find Petite Knit and use her pattern or support her by interacting on her social media pages. I will include those links below.

Crochet Scarf Versions

I enjoy crocheting. There are many beautiful crochet stitches and a vast variety of patterns available from beginner to expert. There are some crochet Sophie Scarf (or skinny scarf) copycat patterns that I like. Some of those feature ribbing, thicker yarn, and bigger stitches. I have plenty of those patterns saved for later. They often have a more rustic look that would pair great with Carhartt, denim, or similar jackets and coats.

However, in my opinion, knit makes a prettier, more delicate, stitch and lends itself better to certain items; sweaters, socks, and many styles of scarves are handmade wearables that I think are often prettier done in knit.  

Tunisian Crochet

I think that Tunisian crochet is a wonderful blend between the knit and crochet outcomes. Tunisian crochet is created with one hook that is often the length of a knitting needle but with a crochet hook on the tip. Tunisian crochet, in my opinion, creates a more fine stitch than crochet. 

Don't misunderstand me. I love crochet. When making afghans, chunky hats, thick scarves and slippers I feel that I will always gravitate toward crochet. But now that I have decided to make 

The best difference between knitting and Tunisian crochet, for myself, is that when I drop a knitting stitch, or make a mistake, I can NOT successfully backtrack and fix the mistake or pick up the dropped stitch. With Tunisian, like crochet, each row starts with one loop on the hook. I can rip out the mistake back to the beginning of the row, and continue on with the project. 

But I Don't Wear Scarves

That is right, I don't wear scarves. Nor do I gravitate toward trends, especially fashion trends. So why am I head over heels with this scarf trend?

Gifts.  Gifts that I think the receivers will love. 

Over the past couple of months, I have focused on creating crochet items to donate to the local care home.  I feel that the elderly who live in a care facility are often overlooked. I am planning to donate lap blankets, hats, shawls and such.  As soon as I saw the Sophia Scarf trend I thought of women's fashions and the women who may have worn that trend in their youth.

While I recently wrote that I am learning knit, thanks to switching to wooden knitting needles that help me to control the yarn, I am very slow when knitting. I make many mistakes and I am not yet able to fix mistakes. I end up scrapping an entire project when knitting. However, when I am finished working on these projects with the self-imposed timeline, I WILL continue to practice knitting and WILL begin to make the knit Sophie Scarves by Petite Knit. They are just that pretty. 

I made a very brief video to show friends and family my newest project. You are welcome to look. I realize that I misspoke and named the wrong Hepburn in the video. 


Related Links:

I believe the original, knit Sophie Scarf pattern was created by Petite Knit. You can find that pattern on the website. 

For Tunisian Crochet inspiration, I highly recommend checking out HookLoopSarah on Instagram for beautiful photos of her talented yarn work. It is difficult to believe that her sweaters are handmade. But I believe it since I've followed her for almost 10 years now. I used her very brief tutorials on her YouTube channel for reminders and pointers with Tunisian crochet. You can also find her on her website.  


Note: The author may receive a commission from purchases made using links found in this article. “As an Amazon Associate, Ebay (EPN), Esty (Awin), and/or Zazzle Affiliate, I (we) earn from qualifying purchases.”


Friday, January 23, 2026

Crafts in the House of Sylvestermouse Reviewed

crafts
Have Fun and Craft On!
Let's Play, Create and Make A Lifetime of Treasures 

I love handmade gifts and crafts! I guess I have been crafting all of my life. I honestly cannot remember a time that I did not have a hook or needle of some kind in my hand or a project in some phase of construction. 

One of the most frustrating problems a crafter or needlework enthusiasts faces, is getting patterns, ideas, or instructions without spending a lot of money. The supplies alone will often deplete any crafting budget. 

Because I understand the real desire to make original treasures, I am sharing some of my own personal ideas and instructions for making unique heirlooms. I have also written several articles that teach basic skills for beginners. 


Cross Stitch Memories

cross stitch sampler

My favorite needlework is cross stitch. It is certainly one of the easiest forms of needlework and there are tons of patterns and kits readily available. 

I started cross stitching when I was in jr. high school (It is called middle school today). One of my earliest projects is still one of my favorites. I cross stitched the flowers in the photo for my grandmother. I made one for my mother as well. My mom helped me make them into pillows. 

After my grandmother died, my step grandfather put a lot of her personal treasures in boxes. He later gave some of them to my mother. She discovered the pillow among those items and brought it back to me. The pillow was stained and the cross stitch cloth was "aged." I cut the cross stitch design off of the pillow and carefully cleaned it with Woolite in my kitchen sink. This cross stitch heirloom now resides in my bible. A world of memories right there in that one little square. 

Tutorial:  Visit How to Cross Stitch on Crafters Kingdom 


Beaded Ornaments ~ A Gift to Cherish from Year to Year

beaded ornament
Another one of my favorite craft projects is beaded ornaments. They are fairly easy and require very little talent. They do, however, demand patience since they entail working with small beads and pins. 

Not only do I enjoy making these ornaments for our family tree, I like making them to give a gifts. The ornament in the photo was a gift I made for my son. I bet you can guess his favorite color. 

In just a few hours, I made a lovely treasure, a precious gift and a lasting tradition. 

Tutorial:  Visit How to Make Beaded Ornaments


Crochet With Love

crochet doily
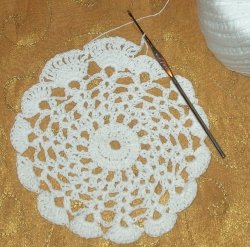
When it comes to home décor, there is nothing prettier than the lacy effect of a crocheted doily or tablecloth. 

I enjoy browsing in antique stores and it never fails to bring tears to my eyes when I see a beautiful crocheted afghan or tablecloth in one of the display cabinets. I know from experience how many hours are lovingly stitched in these beautiful heirlooms. I simply can not imagine selling one of these family treasures. I am always tempted to buy them, take them home and give back the love they deserve. 

Tutorial:  Visit Beginner Crochet  


Beaded Easter Eggs

beaded egg
If you are really looking for something original, this craft project is for you! 

Out of sheer determination to find a new, unique gift for my children one Easter, I dreamed up these eggs. They are really very easy and require a minimal investment for the supplies. I actually made the first few with beads and glue I already had in my craft supplies. 

They make a great surprise or grand prize in the traditional Easter egg hunt. 

Tutorial: Visit How to Make Beaded Easter Eggs


Let's Party ~ Mad Hatter Style

mad hatter's hat
I made this Mad Hatter's Hat for my son right before the debut of the new Tim Burton's Alice in Wonderland movie. 

Yes, he actually wore it to the movie on opening day! Can you imagine how much fun he had with his group of college friends when they donned their "Alice" attire and stormed the theater doors? I wish I could have been there. I would have at least like to have had a picture, but you know kids, they don't worry about such things. 

Tutorial: Visit How to Make a Mad Hatter's Hat 
like Johnny Depp's in Tim Burtons Alice in Wonderland Movie


My Decoupaged Purse

decoupage

One of my most treasured gifts is the decoupaged wooden purse that my grandmother decoupaged for me when I was a young girl. 

I love all of the photos on the purse, but the photo on the right shows my favorite picture.  I have always loved giraffes and I always had long, blonde hair.

I loved it when she originally gave it to me back in the 70's. I carried it everywhere I went and actually used it as my everyday purse. My grandmother died several years ago and I treasure the gifts she so lovingly and painstakingly made for me. I can't touch this purse without thinking of how her hands touched it so many times as she turned a wooded box into a beautiful work of art just for me. 

Tutorial: Visit How to Make a Decoupaged Wooded Purse


A Very Special Valentine

sailors valentine
I love the stories behind the original sailor's valentines! 

I can assure you, the sailor's valentines that I have made reflects a greater depth of love than those 19th century sailors felt for their valentines. 

In the tutorial linked below, I have told about the origin of the Sailor's Valentine and given instructions to make your own. There really isn't a prettier way to express your love. 


Tutorial:  Click here for - How to Make a Sailor's Valentine


Beaded Cross Stitch Pin 

Beaded Cross Stitch Ghost
Embellishing cross stitch with shining beads is simply a joy! 

I love adding beads to my cross stitch. The beads add another dimension to cross stitch. 

I use the beads to highlight and accentuate focus areas of my cross stitch work. I love the way the little beads will pick up and reflect light and color. 

I made the beaded cross stitch pin for my son for Halloween. As I was making it, I took the time to take lots of pictures to show in an article. 

Here is my Tutorial:  How to Make a Beaded Cross Stitch Pin 


Halloween Ghost 

fleece ghost tutorial
I made the original ghost over a decade ago for my son who just loves ghosts and anything Halloween. 

This is my own pattern with step by step instructions and photos, which I have shared exclusively on Crafters Kingdom. 

I hope you enjoy my friendly ghost!  I am certain he will enjoy being with you.


Tutorial: How to Make a Halloween Ghost with Fleece 


A Unique and Impressive Holiday Centerpiece 

holiday centerpiece
During the holidays, we decorate our homes with glitter and sparkle that reflects the beauty of the lights on our trees and in our hearts. 

I originally made this centerpiece with beaded fruit for autumn and Thanksgiving, but when it was time to decorate for Christmas, I changed the floral picks to gold and red berries. 

Since I was changing it out anyway, I photographed the process and wrote an article describing the steps to make a sleigh centerpiece. Regardless of the holder or vase, the steps in the article below will show you exactly how to make you own original arrangement. 

Tutorial: How to Make a Christmas Sleigh Centerpiece 


Some Things Really Are Just Too Easy 

glass ornaments
These ornaments are probably the easiest crafting project I have ever made. 

You will be surprised and thrilled to find out just had simple these ornaments are to assemble. 

We had a bit of an unplanned craft party one year when our family was gathered during the holidays. I had just purchased some glass ornaments and I had a wild idea for all of us to make something and exchange them with each other. 

These ornaments are the results of our afternoon of antics and fun. A wonderful memory! 

They smell good too! 

Tutorial: How to Make Quick & Easy Glass Ornaments 


Just Playing Around - Making a Pincushion 

felt pincushion
As a seamstress, I can really appreciate a large pincushion. If it is pretty, that makes it even better. 

I was inspired by a pattern book that gave some basic instructions on how to construct a felt pincushion. 

Intrigued, I gathered my supplies, called my mother and we went to work creating our own pincushions. I also created the article below. I have given step by step instructions with lots of photos so you, too, can create a felt pincushion. 

This really is a very easy project. The hardest part is choosing the supplies. 

I will never again look at my pincushion without thinking of the day my mother and I were just playing around! 

Tutorial: How to Make Felt Cupcake Pincushions 


Mosaic Picture 

mosaic picture kitMosaic pictures are rather impressive when complete, but they don't have to be hard to make. 

Several years ago, I made the raccoon mosaic picture for my father for his birthday and he loves it. 

Making the mosaic was not hard since I used a kit, but I do have several tips and suggestions for making the craft easier. 

This is a craft that does take a good bit of time, so organization and taking your time is key to successfully creating a beautiful mosaic picture. 


Tutorial: How to Make a Mosaic Picture


__________________

This tutorial directory page was originally published on a website that is not longer in existence and All Photos are the Exclusive Property of Sylvestermouse.  

© 2010 Cynthia Sylvestermouse 


More Craft Tutorials by Sylvestermouse

 How to Make a Very Easy Afghan with Loop Yarn How to Make a Christmas Spider Ornament How to Make a Pom-Pom Bee How to Make a Quilt Magic Kit Wall Hanging


 Read More Crafts & DIY Reviews On
ReviewThisCrafts.com!


House of Sylvestermouse


Note: The author may receive a commission from purchases made using links found in this article. “As an Amazon Associate, Ebay (EPN), Esty (Awin), and/or Zazzle Affiliate, I (we) earn from qualifying purchases.”


Thursday, December 18, 2025

DIY - My first activity book

I made this DIY book for my daughter when she was a toddler. I will share with you some basic instructions for each of the pages, should you decide to make one for any young children in your life.

book page sample


Each page is made with a heavy type weight of tshirt type material. The stitched on designs on each page will be done before sewing the top pages together with their blank back page. The double thickness of the thick tshirt will make the pages more appealing and also more durable. There are seven completed pages in all, including the cover. Therefore, you will need to cut fourteen squares, approximately eight inches square each.

Make the applique designs on each page, before sewing the front part of the page to the back part of the pages.

On the cover page, I stitched the letters, using zigzag stitches to spell out - My first activity book. I chose a different color thread for each word. You could also write the letters with non-toxic fabric paint, which can be found on Amazon.

I will now go in the order of how I arranged the pages in this book. I went from the easiest for my daughter to be able to accomplish, to the next hardest and so on.

For all of the appliqued designs in this book, I made them with two layers of material, making them more sturdy for many multiple times of play and learning, and also many multiple times of machine washing. The pages will be able to be separated from the yarn binding, for easier washing.

For all of the designs, I used leftover material from other projects I had done.

The first page consists of a watch, bracelet design, attached to the page with elastic. I used one piece of elastic and stitched the folded edges of elastic onto the decorative top. I chose polka dots for the top layer of the bracelet design, and some white fabric for the back of the bracelet design. You can choose any type of design that you want. I did a tight zigzag stitch in a circle shape, and then trimmed the edges off. The doubloe layers of fabric for the designs will also be more durable.

You will want to add each appliqued deisgn to the tshirt fabric, before stitching the front (top) page to the back pages, so that loose threads, etc. are hidden.

On this first page, I stitched on the year, and then added zigzag stitching for, by Mom. You can personalize this page with your own date and or from, if you like.


book page sample


For the second page, I cut out the basic shape for a pair of pants. Two layers of this fabric are sewn together, and the edges hemmed. I stitched on two belt loops on the pants, and stitched on Velcro pieces on the inner pieces of the belt so that the belt would work. The outer edges of the pants are stitched to the tshirt material, leaving the waist area and the leg bottoms open. It's fun for the kids to stick their fingers in the legs, etc. You could use a snap for the pants, and forego the belt and belt loops.

book page sample


For the third page, I made a pocket with a snap. Again, the pocket is made with double layers of material. I chose a denim material for the pocket. Since it was a thicker and more sturdy material; I just did a basic straight stitch for secure this item to the page material, instead of the zigzag stitch. You could also use a loop and button to close the pocket flap.

book page sample


For this next page, I made a shirt that has two buttons. The dinosaurs was a fun fabric that I had on hand. Like, the pants, the shirt is made of two layers of fabric, and I did a zigzag stitch around the outer edges, leaving the neck, sleeve bottoms, and shirt bottom open, so the kids can open it up. I like using somewhat large and colorful buttons. The larger size will be easy for the young child to handle. Here is where you can find colorful buttons on Amazon.

book page sample


This page features a purse that has a zipper on the inside. The purse itself can be made with one large rectangle that is folded to make a flap over the lower part. You probably won't find a zipper short enough to fit the purse opening; I just extended the rest of the lower part of the zipper beyond the end of the fabric and cut it off. I used zigzag stitches to help secure the zipper in place; I used a nylon zipper. Here is where you can find nylon zippers on Amazon. The back of the purse is open on top, giving the kids an extra place to slide their hands into, but you can stitch that part down if you like.

book page sample


The last page turned out to be my favorite. It features a fun shoe shape that has a tongue, and has eyelets applied for lace a shoe string through. I stitched the shoe string in place, between the two bottom eyelets, so that it can't be removed. I chose a corduroy material for this for its thickness and softness as well. A canvas material could also work great for the shoe. Here is where you can find eyelets for fabric on Amazon. Be sure to get a kit with a tool, if you don't already have one.

book page sample


Note:

All of these pages are just what I did. Hope my directions are helpful. However, you can do other ideas if you like. For instance, a hook and loop shirt if you don't want to do buttonholes. You can do a Velcro strap on the shoe. You could do a snap on the pants, do a loop and button on the pocket, etc. So yeah, have fun with it; the choices are yours.

Assembly:

Each page is sewn together, with right sides together, on three sides. I then cut the corners of the two corners that will form the inner edges of the completed pages. That will make turning the pages right side out, easier. After the pages are turned right side out, the open outer edge is stitched together. (This is the back edge of the pages.) I used a zigzag type stitch that was on my sewing machine to finish off the open edge. I used various decorative stitches around the three closed edges, each with a different colored thread. This helps the page edges to lay flatter.

I marked three holes on where I will place the eyelets, on what is the binder side of the pages. The eyelets I used for this, measure 5/8 inch. With leftover yarn I had on hand, I made a braid with three different colors. I used approximately two yards of each color of yarn. I wove the warn through the eyelets, from each end, criss crossing in the middle, and then tied a bow on an end. This way, the yarn can be untied and the book disassembled when the pages need to be washed.

Hope this makes enough sense for you to make your own awesome First Activity Book.

If you are desire to purchase a sewing machine, I recommend Brother. My current machine and previous machine are both by Brother. Here is a link for Brother sewing machines on Amazon, if you are interested.

All the best.

The images used here were used on another blog that I did in 2013, on a site which no longer exists.

Cheryl Paton


Note: The author may receive a commission from purchases made using links found in this article. “As an Amazon Associate, Ebay (EPN), Esty (Awin), and/or Zazzle Affiliate, I (we) earn from qualifying purchases.”


Monday, October 20, 2025

Reviewing My Turned Wood Crochet Hook by A Couple 2 Tree

My son recently gave to me a handmade, beautiful and thoughtful gift. He had purchased a handmade wood crochet hook with a metal tip. Exactly the type of crochet hook I have grown to love.  This crochet hook was made by A Couple 2 Tree and my son found them at a booth during the Connecticut Renaissance Faire 2025.

photo of text and crochet hook

Turned Wood Crochet Hooks

The crochet hook my son chose for me is a combination wood and epoxy handle with a commercial made metal tip.  The wood is light colored. The epoxy appeared only white to me initially. But I quickly discovered that it has a very subtle glimmer. A glimmer that reminds me of the Aurora Borealis or the Milky Way. All of you who know me, know that I do not gravitate  toward big bling or neon bright colors. But I love a subtle sparkle, like the sheen of a peacock's chest feathers and dragon fly wings. 

With this thicker epoxy and wooden handle, it is easier for me to use for longer periods of time. This would make a great gift for folks with grip difficulties such as arthritis.  The epoxy and wood are smooth and silky, but not slippery. I am currently using this hook for a project and find it to be very comfortable. 

In addition to wood-handled crochet hooks, A Couple 2 Tree also offers other great gift items:

  • Bottle Openers
  • Ice Cream Scoops
  • Coffee Scoops
  • Charcuterie boards
  • Decorative Items and Fidgets: Eggs and Mushrooms
  • Bowls 

The combinations of wood, metal, epoxy, and fractal burning make unique, one-of-a-kind items that are unique gifts.


Supporting Small Businesses

This small business, according to social media and website information, has been a small, part time hobby/passion for years and has just begun to turn toward full time. I celebrate that leap of faith and following a passion. A Couple 2 Tree appears to have offered the majority of their items during fairs and festivals. They do have a website and an Instagram page. If you don't see a large selection, or the item you would like, on the website I encourage you to leave a message.  When I had left a message, I received a response that same day (despite it being during the time they were at the Renaissance Faire)

One Wish - Maybe

There is only one thing that I might (or might not) like added to my next A couple 2 Tree crochet hook. Because of the handmade handle, the spot where the metal crochet hook size is usually displayed is covered. Perhaps, if the size of the hook (for example, a US hook size is "G") could somehow be stamped into the flat end of the handle, it would be useful and wouldn't mar the beautiful aesthetics of the rest of the handle.  But perhaps, it would mar the appearance of the handle.  Or make a roughness that would snag my yarn. I am not familiar with epoxy so I'm not sure if the size could be place there discreetly or not.  However, unlike very experienced crocheters I cannot determine the size of the hook by sight alone. I have to hold it up to other crochet hooks for comparison in order to remember which size this is.

Fortunately, my son reported that he spoke with the helpful folks with A Couple 2 Tree, who helped determine which sizes of yarn I most often use (worsted) and the size hook that I most use. 

For more information:

Check out the A Couple 2 Tree website for more information.

I am very hopeful that you will support this small business owner with his wood shop business. However, I realize that some folks prefer using Amazon.  In that case, there are many Wood Crochet Hooks to choose from.


Note: The author may receive a commission from purchases made using links found in this article. “As an Amazon Associate, Ebay (EPN), Esty (Awin), and/or Zazzle Affiliate, I (we) earn from qualifying purchases.”


Monday, September 15, 2025

Reviewing Mary Maxim: Exclusive Yarn and Crafts

I have recently received my first order from Mary Maxim. I am delighted both about the Bag-O-Day Crochet Tonal Hues yarn and about the variety of craft items offered by Mary Maxim. With more brick and mortar crafting stores closing over the past few years, it has been important to me find the reliable online sources. Mary Maxim quickly jumped to the top of my list of favorite crochet, yarn, and craft suppliers. I was reminded of my good first impression when I received the printed catalog in the mail.

photo and text of Mary Maxim catalog
So excited about the projects shown in the catalog

Mary Maxim: Exclusive Yarn and Crafts

I've only learned about MaryMaxim.com in the past year or two. This is a four generation, family owned and operated craft business with a history in the United States and Canada. 

They offer:

  • Yarn (wide range of fiber, weight, and brands)
  • Knit & crochet (kits, hooks, needles and accessories)
  • Crafts (plastic canvas, paint-by-number, needlework, beaded kits, and diamond painting)
  • Jigsaw Puzzles
  • Patterns (vintage, modern, and patterns by popular individual designers)
  • Gifts and Home
  • Gift cards

When I heard talk about Mary Maxim on social media, I hadn't recalled hearing of them previously. Yet, while doing some research, I found that they have been in existence for over 65 years and one of their vintage catalog covers looked so very familiar. We very well may have had Mary Maxim patterns in my childhood home (my mother crocheted and I learned how to crochet at a very young age). 

I am over-the-moon excited about the Tonal Hues yarn that I ordered from Mary Maxim. This yarn was designed by Crystal at Bag-O-Day Crochet and is available exclusively from Mary Maxim. The colorways are gorgeous. The yarn is soft and luxurious. 

photo of Tonal Hues yarn
Tonal Hues yarn 

Mary Maxim also has craft kits available. For example, I would like to buy a particular crochet afghan pattern. That pattern is an exclusive pattern and includes the amount of yarn required for that pattern. I sometimes have difficulty choosing the yarn that is best suited for a particular pattern and this takes the guess work out of it. 

If you enjoy crafting, and aren't familiar with Mary Maxim, I hope you check out their website and/or request a free catalog. 


Note: The author may receive a commission from purchases made using links found in this article. “As an Amazon Associate, Ebay (EPN), Esty (Awin), and/or Zazzle Affiliate, I (we) earn from qualifying purchases.”


The Review This Reviews Contributors


SylvestermouseSylvestermouseDawn Rae BDawn Rae BMbgPhotoMbgPhotoBrite-IdeasBrite-IdeasWednesday ElfWednesday ElfOlivia MorrisOlivia MorrisTreasures by BrendaTreasures by BrendaThe Savvy AgeThe Savvy AgeMargaret SchindelMargaret SchindelRaintree AnnieRaintree AnnieLou16Lou16Sam MonacoSam MonacoTracey BoyerTracey BoyerCheryl Paton Cheryl PatonRenaissance WomanRenaissance WomanBarbRadBarbRadBev OwensBev OwensBuckHawkBuckHawkDecorating for EventsDecorating for EventsHeather426Heather426Coletta TeskeColetta TeskeMissMerFaeryMissMerFaeryMickie_GMickie_G


Review This Reviews is Dedicated to the Memory of Our Beloved Friend and Fellow Contributor

Susan DeppnerSusan Deppner

We may be apart, but
You Are Not Forgotten


“As an Amazon Associate, Ebay (EPN) and or Etsy (Awin) Affiliate, I (we) earn from purchases.” Disclosure Statement

X