Showing posts with label Decor. Show all posts

Sunday, November 24, 2024

5 Textured Wall Ideas to Help You Add Interest to Your Space

5 Textured Wall Ideas to Help You Add Interest to Your Space

Transform Your Space with These 5 Stunning Textured Wall Ideas

Did you know that textured walls are one of the 2025 home decor trends?

When decorating your home, textured walls are the secret ingredient to adding depth, warmth, and personality to any room.

Whether creating a bold statement or a subtle layer of interest, these ideas will inspire you to reimagine your walls in ways that evoke emotion and style. 

Let’s explore five fabulous textured wall ideas, complete with tips on color, balance, and how to maximize each option.


1. Faux Brick Walls: The Charm of Urban Sophistication

Faux brick walls bring the rugged charm of a city loft into your home without the structural overhaul. These panels or wallpapers mimic the texture and appeal of exposed brick, creating a cozy yet industrial vibe.

What It Adds:
Brick walls add a sense of authenticity and character to your space, perfect for creating a warm, inviting atmosphere. Use them in a living room or home office to make the space feel grounded and stylish.

Color Tip:
Go with classic red bricks for a rustic charm or whitewashed bricks for a lighter, more modern feel. To avoid overwhelming a room, balance the texture with smooth surfaces, like sleek furniture or polished floors.

Designs to Preview Here.


2. Textured Paint Techniques: Subtle Sophistication

Textured paint was a hot trend in the 1990s, and I added it to my home as well. Fortunately, this textured look is making a comeback! Because I still have it featured in my hallways. I find it very durable, especially when you seal the sponge work with a sealer. 

Textured paint techniques, like sponging or rag rolling, bring soft, layered textures to your walls, evoking a sense of movement and depth. These techniques work wonderfully in bedrooms, hallways, or bathrooms for a soothing yet elegant touch.

What It Adds:
This option adds a luxurious, artistic flair to any room, drawing the eye while remaining understated. It’s perfect for creating an intimate, serene space.

Color Tip:
Choose soft hues like lavender, sage green, or pale blue for a calming effect. Avoid overly bold colors, as they can make the texture feel chaotic. Stick to a monochromatic palette to keep things cohesive.


3. Wood Paneling: Rustic Warmth with Modern Appeal

Wood paneling should have a modern flare—not those found in 1960s basements. Unless you love that, then go for it.

Whether reclaimed or new, wood paneling or shiplap makes a space feel cozy and organic. Vertical or horizontal slats can create illusions, like making a ceiling appear higher, or a room appear longer.

What It Adds:
The natural texture of wood infuses warmth and a tactile quality into a room, making it feel grounded and serene. It’s especially effective in dining areas or bedrooms.

Color Tip:
Light oak or ash wood brings brightness, while darker shades like walnut create a dramatic, moody vibe. Pair dark wood with light-colored walls or ceilings to avoid making the room feel heavy.


4. 3D Wall Panels: Drama and Depth

3D wall panels create a dynamic visual experience for a bold, modern look. These panels, available in geometric, floral, or abstract designs, turn any wall into a statement piece.

What It Adds:
These panels add drama, sophistication, and a futuristic vibe. They’re perfect for accent walls in living rooms or behind a bed as a headboard feature.

Color Tip:
White or neutral panels keep the design crisp and modern, while bold colors like navy or emerald green make a room pop. Use sparingly, as too much texture and color can overwhelm a space.

3D Wall Designs to Preview Here


5. Grasscloth Wallpaper: Organic Elegance

Here comes the 1980s. We created a featured grasscloth wall in our first apartment in 1982! Oh, and I loved it, and I still love grasscloth.

Grasscloth wallpaper is made from natural fibers like jute, sisal, or bamboo. It gives walls a soft, woven texture, perfect for creating a tranquil, spa-like ambiance.

What It Adds:
Grasscloth brings an organic, earthy feel to a room, creating a sense of calm and balance. It’s ideal for home offices, libraries, or even entryways.

Color Tip:
Earthy tones like beige, olive, or sand enhance the natural vibe. Because grasscloth has subtle patterns, pairing it with solid-colored furniture is best to maintain balance.

Grasscloth Wallcovering on Amazon.


How to Avoid Overwhelming a Space with Textured Walls

  • Start Small: Use texture on a single accent wall rather than an entire room to keep the look balanced.
  • Coordinate Colors: Choose complementary colors across textured and non-textured surfaces for harmony.
  • Balance with Simplicity: Pair textured walls with minimalist decor to let the walls shine without creating visual clutter.
  • Play with Lighting: Proper lighting can beautifully highlight textures, so use spotlights or wall sconces to add depth and drama.


Note: The author may receive a commission from purchases made using links found in this article. “As an Amazon Associate, Ebay (EPN) and/or Esty (Awin) Affiliate, I (we) earn from qualifying purchases.”


Tuesday, October 22, 2024

Gobble Up the Fun with Thanksgiving Inflatables

 When the leaves start falling and the weather begins to cool we all know it's time for Halloween. The decorations come out inside and out. Every year we decorate outside for Halloween. After all the kids have had fun and the candy is all gone the decorations are stored away until next year.

Gobble up the fun with Thanksgiving inflatables
Reviewing our Thanksgiving Turkey

Every year when Halloween is over and the decorations are put away Fran would always say we don't have any Thanksgiving decorations for the yard. She solved that problem last year and bought this 6-foot inflatable for the yard. We now have a giant gobble of joy in our front yard to celebrate Thanksgiving.

From the moment we took it out of the box, the inflatable turkey's sheer size was inspiring and comical. He is an undeniable presence in our yard at 6 feet tall and with a goofy smile. All you have to do is secure him with the included strings and stakes.

Setting him up is as easy as pumpkin pie. Plug him in, and in a matter of seconds, you have a full-blown turkey with holiday cheer. The colors are bright and festive, with rich reds, oranges, and yellows that scream "fall". The material is thick and durable, and it is designed to handle some gusty fall winds and unpredictable autumn weather.

One more feature is he has a built-in LED light making it perfect to light up your yard at night. The soft internal glow makes it impossible to miss and ensures your holiday spirit shines even after dark.

So, should you get this inflatable turkey? Absolutely. If you want your home to be the talk of the neighborhood, if you want to make people smile as they walk by, and if you want to tell the world you're 100% ready for Thanksgiving, this is for you. We had so many people stop to admire him after we put him in the yard.

Find more Product reviews on Review This here:

ReviewThisProductReviews.com

Amazon has a large selection of Thanksgiving Inflatables


Note: The author may receive a commission from purchases made using links found in this article. “As an Amazon Associate, Ebay (EPN) and/or Esty (Awin) Affiliate, I (we) earn from qualifying purchases.”


Tuesday, May 21, 2024

The Classic Record Player Stand - Reviewed

 In this age of digital streaming, there is something undeniably charming about spinning vinyl records on a classic turntable. Our daughter bought Fran a classic turntable for her birthday this year. Since we didn't have a place for it we had to find a record player stand. 

The classic record player stand - reviewed

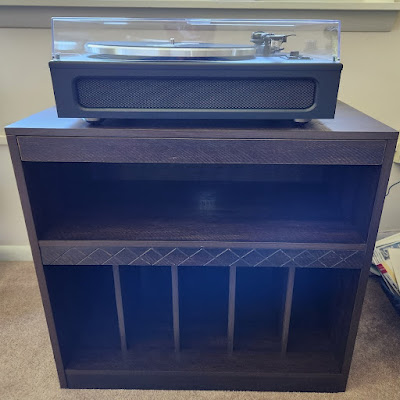
Fran began a search for what she wanted to buy for our new turntable. Yes, now we have another piece of furniture in the house. She found this Amil Series stand from Mazefur with more of a contemporary style. It's perfect for the new turntable and fits nicely in our living room.

The stand was very easy to assemble with excellent easy-to-follow instructions. The top surface offers a stable platform for our turntable, with enough space to accommodate even a larger model. 

The stand has a sleek pull-out drawer at the top, a shelf right below the drawer, and plenty of storage space for our extensive collection of vinyl records to be stored safely.

Many turntables on the market today have built-in CD players, ours does not. The shelf below the drawer will be perfect for a CD player, as we also have an extensive collection of CDs. The shelf has wire management access on the back panel for easy installation of the wires.

There are many styles of record player stands to choose from. We like the style of the one we purchased, but you can find many stands that offer a retro look to bring you back in time.

Find more Product Reviews on ReviewThis here:

ReviewThisProductReviews.com

Below are just a couple of styles you will find on Amazon.


Note: The author may receive a commission from purchases made using links found in this article. “As an Amazon Associate, Ebay (EPN) and/or Esty (Awin) Affiliate, I (we) earn from qualifying purchases.”


Tuesday, April 30, 2024

Reviewing Renovating Old Pine Furniture Project


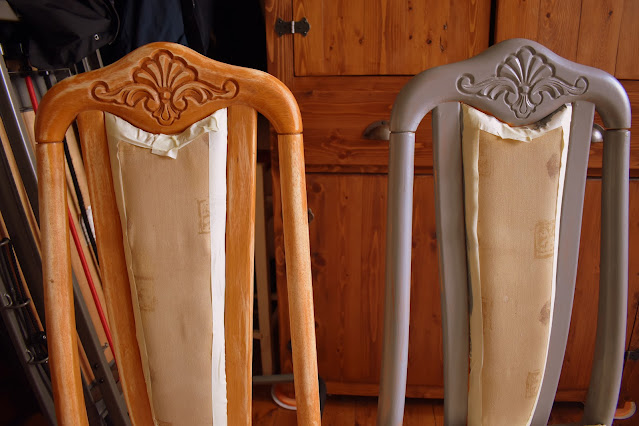
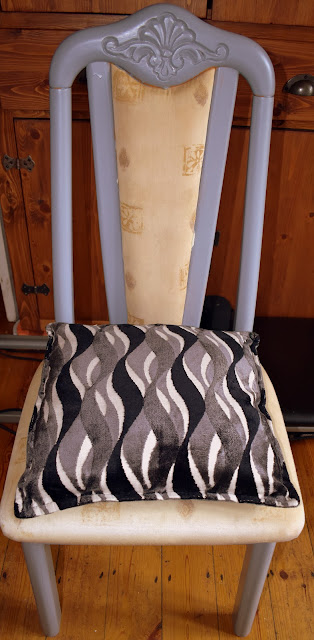
Two Pine chairs one sanded, one painted grey

This review covers an easy DIY project to renovate old unremarkable furniture into something to grace our homes and fit with existing decor. 

In our case we wanted a new dining table and chairs but the only ones we could find to fit our space and circular were very expensive. We did however find a lovely circular table and four chairs that were perfect for our needs and very comfortable at a very good price, but the issue was that they were a quite horrible orange pine colour.

I am not usually an advocate of painting wood. If it is beautiful oak, mahogony, rosewood or reclaimed wood I will not paint it. 

However orange pine with a shiny finish is just not to us all that beautiful and did not fit in with the rest of our decor ideas for the dining room. 

I am not deterred by a minor issue like this and we really liked the style and comfort of this dining set. So we bought the dining set and went about cleaning, sanding and painting. 

Here I will tell you what we did with the chairs. 


Step One Sanding Down Pine Chair

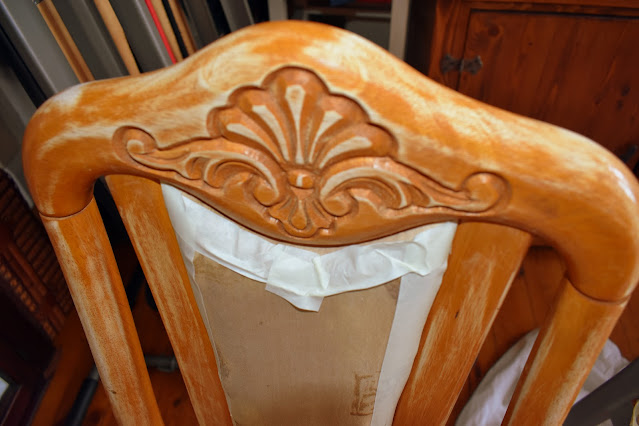
First it was important to sand down the wood. It had a shiny surface to it and I did not think even the best paint would go on well over such a shiny surface. 

With some furniture paints they declare that you do not need to sand down first so it is always best to  check the instructions and perhaps do a patch test to make sure if you need to sand or not. 

So we sanded it with a fine sandpaper until all the shiny orange paint was no more! 

It is important to do this step carefully and take your time as skimping on this preparation will affect the whole project.

I don't have a workshop or anywhere to do this kind of work so for me it was a case of clearing a room and laying down dust sheets and working on the floor. Of course a work table or ideally a workshop would be wonderful but this project is perfectly possible with none of this.  


Pine chair sanded and masked ready to paint


Step Two Cleaning The Chair

Next I cleaned the whole chair including the seat cushion and back.

The wood was cleaned with sugar soap and the chair with an upholstery cleaner. There is no real skill to this, all this took was time and following the cleaning instructions.

Then we left it all to dry.

Close up of design on chair sanded


Step Three Masking Tape 

With a project like this it is important to use masking tape to mask off all the areas that you do not want to paint. I do find this step rather boring but it is necessary. 

It is worth spending a little time over this as it is a lot more difficult to remove paint from where you do not want it than to simply mask it off beforehand and does make the painting process easier. 


Step Four Painting The Wood

After laying down sheets I set about painting the whole chair. 

It needed to be done in two steps so that I could reach the whole wooden parts of the chair. So involved the chair standing up and laying down to reach it all. 

As I had two chairs on the go at the same time this was possible to do without wasting time. 

We chose a light grey colour. It did take two coats to cover the wood. I would always recommend two coats. A darker colour may have covered the wood more thoroughly with one coat but I always think two coats gives better coverage and longevity.


Two pine chairs one sanded and one painted grey


Furniture Paint. 

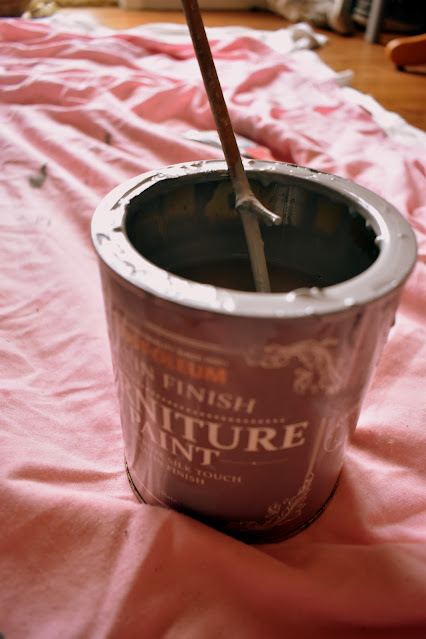
We used Rust Oleum Satin Finish Furniture Paint. It says on the tin it is a superior satin silky finish in slate grey.

I found that this paint went on very well and smoothly. I found it a really good paint to use.  It did not have an overpowering smell and did not give me a headache as many paints do. It went on well although was a little drippy, so it was essential to have sheets down. It is necessary to stir it well before starting to paint. 

The clean up is so easy as it is water based so it is just a case of wiping off most of the excess paint then washing in water. 

If I had a workspace I might have used a Rustoleum furniture spray paint which may have speeded things up. However I was doing this project in winter in our dining room so a spray paint would not have been a good idea in these circumstances. 

Any good furniture paint can be used, just choose the finish, application method and colour you like. I tend to go for water based and low odour for ease of use in the home and clean up afterwards. 


Tin of furniture paint


Due to the space and how intricate some of the work was I used a small paintbrush and I think this was a good idea so that there was more precision.

After the first coat the finish did not look all that good but I always expect this. 

I left it to dry thoroughly then applied a second coat and this is where the magic happens as the pine disappeared and the beautiful slate grey colour saturated the wood. I an no expert but I think the finish, even in the more difficult intricate parts is pretty good. 


Close up of painted chair


Finished Pine chair painted grey project


The four chairs took me two days to do at a fairly relaxed pace with lots of coffee breaks! It is a straightforward project that anyone could do really. All it takes is time and patience and a few basic painting skills. 


The Supplies You Need For This Furniture Project

Furniture Paint or Rustoleum paint 

Sandpaper 

A small paintbrush

Masking Tape

Old sheets, dust sheets or anything you have to protect the floor


We think it was a worthwhile project and we now have a lovely dining set at a fraction of the price. 

If we ever get fed up of the colour  or go for a different scheme, it will be very easy to change with a light sanding and a coat of new paint.


More Reviews


Reviewing Restoring A Metal Garden Swing Seat


More Reviews By Raintree Annie


Crafts & DIY Reviews By Contributors On Review This Reviews


Product Reviews By Contributors On Review This Reviews


Note: The author may receive a commission from purchases made using links found in this article. “As an Amazon Associate, Ebay (EPN) and/or Esty (Awin) Affiliate, I (we) earn from qualifying purchases.”


Tuesday, March 26, 2024

Methods to Remove Wallpaper

Wallpaper can be used to change the look of any room or create a beautiful accent wall. Sometimes people use wallpaper to cover blemishes on a wall. Either way, you may have some wallpaper in your home and want to remove it. Today I will be reviewing, three different methods of removing wallpaper. 

Methods to Remove Wallpaper

I am not an expert or professional by any means. As the saying goes; I'm a jack of all trades but a master of none. Over the years I have used every one of these methods at one time or another.

Method 1: Steam Removal

  • You can rent or buy a wallpaper steamer.
  • Fill the steamer reservoir with water to the fill line.
  • Attach the handle and hose to the steamer plate.
  • Plug in the machine and turn it on. Wait 5 or 10 minutes for it to build up steam.
  • Place the steamer plate on the wall, and hold it for 20 to 30 seconds. Remove the plate and scrap the wet wallpaper with a putty knife.
  • You will want to score the section of wall you are steaming with a scoring tool or razor knife before placing the steamer plate. Do not press hard while scoring the wallpaper as you may damage the wall.

Method 2: Water and Vinegar

  • Mix equal parts of hot water and vinegar in a spray bottle or a bucket.
  • Spray to sponge the solution on a four-foot section of the wall.
  • Wait about five minutes to allow the solution to work.
  • Scrap the wet section with a putty knife to remove the wallpaper.
  • Again, score the wall section first with a scoring tool or razor knife.
Method 3: Chemical Liquid Stripper
  • There are different brands of liquid strippers available. I have always used DIF by Zinsser. It's pre-mixed and ready to use.
  • Score the wallpaper with a razor knife or scoring tool.
  • Spray it onto the wallpaper, and wait a few minutes before scraping it with a putty knife.
With any of these three methods, you will want to tape off the baseboard and about 12 inches onto the floor with plastic. This will make clean up easier.

You may have to repeat the method, sometimes on the first try the wallpaper will come off leaving the backer.

Tip: If you're removing wallpaper from Drywall be careful not to use too much water and oversoak the walls. Too much water may damage the drywall.

There is more work to be done after the wallpaper is off:

After the wallpaper is off, remove any remaining glue residue from the walls. For this, use hot water and a sponge and wipe the walls clean. 

Before painting, I always use fine-grained sandpaper and lightly sand the walls. Now, patch any cracks or small holes in the walls before painting with a good primer. Then, paint your finish coat in your desired color. Happy wallpaper removal!

Find more DIY Projects and Decor here:


Note: The author may receive a commission from purchases made using links found in this article. “As an Amazon Associate, Ebay (EPN) and/or Esty (Awin) Affiliate, I (we) earn from qualifying purchases.”


Wednesday, March 13, 2024

How to Organize Your Messy Linen Closet With Pop-up Storage Bins

A cluttered linen closet can be a source of frustration, especially when you're searching for that elusive missing pillowcase from a set of sheets or the washcloth from a particular set of towels. Fear not! In this guide, I’ll review an easy and efficient way to organize your linen closet using pop-up fabric storage bins labeled with index cards inside clear plastic pockets. Say goodbye to the linen closet chaos and hello to a well-organized and visually pleasing storage space for your sheets, towels, tablecloths, napkins, spare blankets and pillows, out-of-season comforters, and holiday table runners.

It's time for spring cleaning!

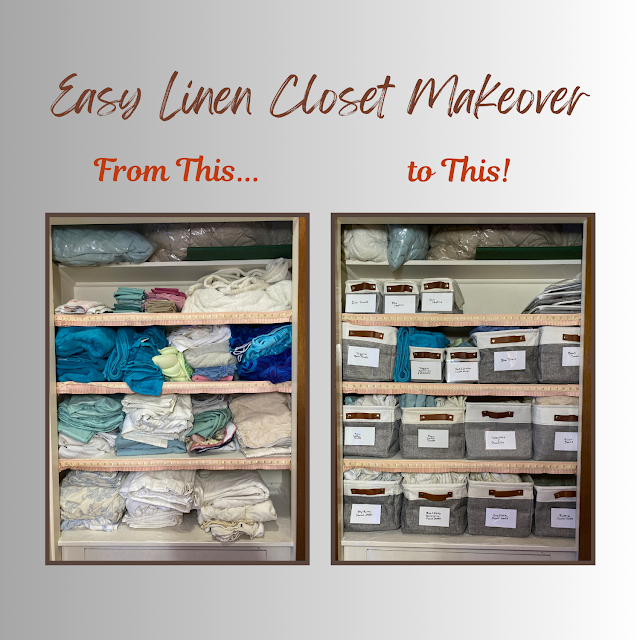
Easy linen closet makeover

I am not neat and well-organized by nature. However, I dislike living in a cluttered environment, as does my husband. So, periodically, we tackle an area of particular irritation to de-clutter and organize. Our most recent project was our overstuffed and extremely messy linen closet.

Our easy linen closet makeover was a smashing success, so I put together a step-by-step guide to decluttering and organizing a messy linen closet. (My fellow Review This Reviews contributor Barbara also wrote a linen closet organization guide several years ago that you might want to check out.)

Photograph Your Messy Linen Closet Before You Begin Organizing

I encourage you to take before-and-after photos to document the transformation. Our “before” closet was so bad that I didn’t photograph it and now I wish I had! The "before" photo you see above was taken in the middle of the process, after we had pulled everything out, sorted it into piles, discarded items we no longer need or use, and organized the linens we're keeping. It would have been far more impactful to show our real "before" linen closet next to our finished, organized "after" result, as well as a feel-good reminder of all we accomplished during this DIY home organization project.

Step 1: Assess, Sort, and Weed

Decluttering is the first step towards achieving an organized and functional space. Before diving into the organization process, take a moment to assess your linen closet's contents.

We pulled everything out of our closet, dumped them on our king-size bed, and then sorted all our sheets, pillowcases, towels, blankets, tablecloths, napkins, and other miscellaneous items into piles by category. Then came the hard part: deciding what to let go of or store elsewhere (such as the rarely used sheets for our sofa bed).

Set aside any worn-out, torn, stained, or mismatched linens, towels, or items you no longer need. Be as ruthless as you can. Decide what to discard or recycle and what to donate, then put those items into the trash, bags, or boxes, as appropriate, labeling the containers for recycling or donation.

Step 2: Group, Arrange, and Label Your Remaining Linens

Next, put everything else back in the closet, grouping related items and arranging them in whatever way you prefer to maximize shelf space and optimize organization. Be sure to leave some shelf space open to accommodate future purchases or gifts.

Tip: I suggest putting the linens you use most frequently on the most easily accessible shelves and reserving the highest and lowest shelves for the items you need to remove or put back less often ( such as comforters, extra blankets, guest linens, and holiday tablecloths).

Using scrap paper, make a temporary label for each pile on the shelves (e.g., blue towels, pink towels, striped flannel sheets). Personalize these labels in any way that makes sense to you (e.g., Mom’s Quaker lace tablecloth and napkins). Then place these temporary labels on top of each pile until you have your storage bins and labeling materials.

Messy linen closet without storage bins or labels
Our linen closet after we weeded out what we didn't need to keep.
It's organized, but still messy and the linens don't fit the space well.

Step 3: Measure, Then Select Fabric Storage Bins or Baskets

Pop-up fabric storage bins or baskets are a game-changer for maximizing space and bringing order to your closet both functionally and visually. These collapsible fabric bins make it easy to group similar items and access them effortlessly. Choose appropriate size bins to accommodate different types of linens, from large king-size sheet sets to small dish towels.

Measure your piles of linens, the width of your linen closet shelves, and the space between each shelf, then select a variety of coordinated bins in different sizes to fit. This allows you to customize your storage solution without investing in a custom closet makeover solution. The pop-up storage bins we selected are inexpensive and the workmanship is not perfect, but the price was right and they come in a wide range of sizes and shapes. It was also important to us to have bins that fold down when not in use because we wanted to keep some extras to allow for future expansion of our linen closet's contents. However, if you don't mind spending more, you can find a wide array of attractive storage bins to suit a variety of tastes and home decor styles.

If you have large, bulky items like comforters that won't fit inside even the largest pop-up storage bins, you may want to put them in airtight vacuum compression storage bags designed for this purpose, which will not only keep these items clean but also compress them to fit more easily on your closet shelves and save space.

Step 4: Unfold and Label the Bins

To make it easy to find what you need at a glance, you will want to label your pop-up storage bins. We decided to use self-adhesive clear plastic 3” x 5” pockets and index cards for labeling the fronts of our bins and ordered them from Amazon along with our bins. We chose the 3”x5” size because they matched the width of our smallest bins but were still large enough to accommodate labels with several lines of text when needed.

When your bins, plastic pockets, and index cards arrive, unfold the bins and press against the sides to prop them open. (The sides won’t stay completely straight until you fill the bins.)

Attach a clear plastic pocket to the front of each bin. We ordered self-stick plastic pockets but discovered that they didn’t adhere well to the fabric bins over time, so you will want to stitch, glue, or rivet the pockets to the bins. We've ordered a rivet tool and some rivets for attaching ours more securely. We will use the rest of the self-adhesive pockets and index cards to label storage cartons, where the adhesive will work perfectly. 

Using a permanent marker and index cards, write a new, permanent label for each pile of linens on your closet shelf to replace the temporary label.

This simple and effective labeling system allows for quick identification without having to rummage through each bin, and the clear plastic pockets protect the index card labels from becoming worn or dog-eared.

Step 5: Arrange Your Linens in the Labeled Bins

Take one pile of related linens and place it into the appropriately sized bin. Insert the index card label into the clear plastic pocket and return it to the closet shelf. Repeat with the remaining piles, bins, and labels.

This systematic approach not only keeps everything organized but also makes it easier to find what you need when you need it.

Then take a photo of your newly neat and organized linen closet and savor the contrast vs. your "before" picture.

Organized linen closet with labeled storage bins
Our formerly crammed, messy linen closet is organized and labeled,
so everything is easy to find and accessible. Now we just need to
remove the old, frilly, decorative pink shelf edging we inherited!

Step 6: Maintain Regularly

To keep your linen closet organized and efficient, commit to regular maintenance. Fortunately, this system makes it easy to maintain because, as my grandmother used to say, there’s “a place for everything and everything in its place.”

Periodically review the contents of each bin, refreshing, replacing, or rearranging items as needed. This ongoing effort will prevent the return of clutter and keep your linen closet in top-notch shape.

Messy Linen Closet Makeover Supplies

My husband chose a tailored storage bin style for this project, but the pretty baskets with the quatrefoil pattern would be a lovely, more feminine choice.

Enjoy Using Your Neat, Organized Linen Closet!

Transforming your linen closet into an organized storage space is a satisfying and easily achievable DIY project. With the help of pop-up storage bins labeled with index cards inside clear plastic pockets, you can create a system that not only streamlines your storage but also adds visual appeal. Enjoy the benefits of a tidy, accessible linen closet, where finding the perfect set of sheets or towels or your favorite tablecloth and napkins is a breeze.

Happy organizing!


How to Organize Your Messy Linen Closet With Pop-up Storage Bins by Margaret Schindel

Read More Decor Reviews by Our Review This Reviews Contributors

Read More Home Decor Reviews by Our Review This Reviews Contributors

Read More Product Reviews by Our Review This Reviews Contributors


Note: The author may receive a commission from purchases made using links found in this article. “As an Amazon Associate, Ebay (EPN) and/or Esty (Awin) Affiliate, I (we) earn from qualifying purchases.”


Monday, March 4, 2024

Reviewing Etsy as a Source for Succulent Shopping

Did you know that Etsy is a great place to buy plants?  I did not know that until recently. I was shopping for succulents and saw so many good reviews on many Etsy plant shops that I decided to give it a try. I received my order from QueenofSucculents this week and was thrilled.

Text and photos about succulent plants


I was having a long-distance chat with my grandson recently. I was telling him what I was going to try to winter-sow outside. And vegetables that I wanted to try to grow this year. I listed onions, spinach, lettuce, and so on. He asked if he could make a suggestion. Of course I said yes. I thought he'd tell me about his favorite vegetable. Instead, he listed several interesting and rare succulents.

FUN!  Many years ago, I lived where hens and chicks (plants) grew outside. And believe it or not, some sort of cactus grew outside in Indiana. I've also enjoyed growing Aloe Vera and Christmas Cactus indoors off and on over the years. But I haven't had any of those plants for quite awhile.

One of the "rare" or "interesting" plants he listed was a Haworthia Obtusa. I'd never heard of that particular plant so I looked it up. Wow! It was interesting. 

With our conversation, I had an urge to have some succulent plants again. And how much better if I could find some Haworthia Obtusa's to grow. I did buy some succulents at a semi-local garden center and nursery. 

Succulent Shopping on Etsy

There are so many varieties of Succulents on Etsy. Many types, colors, and prices. There are many shops with great customer ratings and customer photos of the plants they purchased. The difficult thing about choosing a succulent shop was narrowing it down to just one shop for my first order.

I narrowed it down to QueenofSucculents.  I was still hesitant. I expected that it was unlikely that my plants received would be the plants in the shop photos. But they were!  I received exactly what I was looking at when I ordered. 

My plants were packed in a way that kept them safe; a combination of peanuts, paper, and what looked like the stuffing used for stuffed animals. 

I also received a teeny-tiny free gift - the cutest little succulent plant ever. Along with a Smart Plant Care card and a thank you/general care card.

I am very pleased with my order and my plants and look forward to adding to  my collection of succulents - as soon as I prove to myself that I can keep these plants alive for awhile! 

Two Highly Recommended Etsy Succulent Shops:

QueenofSucculents  - Based in Santa Cruz, California. All succulents have been "grown by us, hand-picked from nurseries, or imported from Korea". 

RareSucculents  - A succulent farm in Massachusetts


Note: The author may receive a commission from purchases made using links found in this article. “As an Amazon Associate, Ebay (EPN) and/or Esty (Awin) Affiliate, I (we) earn from qualifying purchases.”


Thursday, February 8, 2024

Review of Candle Warmer Lamps

Lamp  with Candle

 I love the wonderful scents that candles provide in my home, but I was always leery of having a burning flame.  I tend to forget about them and then they burn down too far.  Well for Christmas I received a wonderful candle warming lamp.  I had never seen one before and wasn't sure how they worked, but I can tell you now they are wonderful.  They are a great way to get light and the wonderful smell from a scented candle without having to worry about a flame and any fire hazard.

Features of my Candle Warmer Light

  • Dimmable
  • No Smoke
  • No Flame
  • Timer
My lamp is also very attractive and makes a wonderful addition to our decor.  It has a square wood base and a metal light stand.  The base will hold candles of many sizes.  I currently have one of the larger round candles in it as you can see pictured above, but I have also put other smaller candles in glass jars.  The base is a non-skid and non-scratch bottom that works well on any furniture.

I love the timer feature.  I can turn on the lamp and set the timer for 2,4,or 8 hours and then not worry about it again.

The light is dimmable, and the brightness will determine how soon the scent begins to flow through your home.

The lamp came with two 50-watt GU10 halogen bulbs, so there is no need to buy extra bulbs.

Another great feature is that the melting of the candle occurs from the light source and thus does not leave a hole like flames, this will double the life of the candles.

Great for Gifts

These candle warmer lamps come in a variety of styles and would make great gifts.  I can see them as a wonderful idea for Valentines Day, Birthdays and Mothers Day.

My lamp came from Amazon and I found that they have many different options.  Here are links to a couple of different Candle Warmer Lamps.


Note: The author may receive a commission from purchases made using links found in this article. “As an Amazon Associate, Ebay (EPN) and/or Esty (Awin) Affiliate, I (we) earn from qualifying purchases.”


Most Recent Reviews on Review This Reviews


Search for Reviews by Subject, Author or Title

The Review This Reviews Contributors


SylvestermouseSylvestermouseDawn Rae BDawn Rae BMbgPhotoMbgPhotoBrite-IdeasBrite-IdeasWednesday ElfWednesday ElfOlivia MorrisOlivia MorrisTreasures by BrendaTreasures by BrendaThe Savvy AgeThe Savvy AgeMargaret SchindelMargaret SchindelRaintree AnnieRaintree AnnieLou16Lou16Sam MonacoSam MonacoTracey BoyerTracey BoyerCheryl Paton Cheryl PatonRenaissance WomanRenaissance WomanBarbRadBarbRadBev OwensBev OwensBuckHawkBuckHawkDecorating for EventsDecorating for EventsHeather426Heather426Coletta TeskeColetta TeskeMissMerFaeryMissMerFaeryMickie_GMickie_G


Review This Reviews is Dedicated to the Memory of Our Beloved Friend and Fellow Contributor

Susan DeppnerSusan Deppner

We may be apart, but
You Are Not Forgotten


“As an Amazon Associate, Ebay (EPN) and or Etsy (Awin) Affiliate, I (we) earn from purchases.” Disclosure Statement

X