Showing posts with label DIY projects. Show all posts

Wednesday, June 5, 2024

The Ultimate Compact, Lightweight, Wearable Toolkit With Useful Tools

My husband is a serious tool aficionado. The Christmas and birthday gifts on his wishlist often include specific tools to add to his extensive collection. He is extremely picky about his tools but doesn't like to overpay. So, whether he buys them for himself or asks for them as gifts, he always chooses high-quality tools that are also well-priced, delivering good value.

After considerable research, he designed a small but well-appointed, versatile, lightweight tool kit that he could wear on his belt on weekends, when he typically works on DIY, home, and auto repair projects. This past Christmas, his gifts wishlist included the components he would need to bring that design to life.

In this review, I will share his ingenious compact, lightweight, wearable toolkit configuration, including everything you need to replicate it. With Father's Day coming up, this would make a terrific Father's Day gift!

The Ultimate Compact, Lightweight, Wearable Toolkit

How to Assemble the Ultimate Compact, Lightweight, Wearable Toolkit

Here is everything you need to know to replicate my husband's clever design. Of course, you can customize this wearable toolkit to suit your needs and preferences, using this design to spark your imagination.

What You Will Need

Front of OneTigris phone pouch
The front flap of the OneTigris phone pouch has a strap with a stitched loop and a latch to secure the contents. There is also a wide strip of hook-and-loop (like Velcro) material (the loop side) for attaching items to the front flap.

Interior of OneTigris phone pouch
The body of the pouch features two pockets: a smaller one in front that zips closed (for money or small accessories or, in our case, tools and attachments) and a larger, padded one behind it that holds your mobile phone and is lined with a soft, velvety material to protect against scratches. There are also two elastic side loops, one on either side.

Back of OneTigris phone pouch
The back has a sleeve that slides onto your belt, with two MOLLE straps with loops and snap closures.

Rocktol 29-in-1 Multitool
The Rocktol 29-in-1 Multitool has a wide array of functions. Most notable are the needle nose pliers, replaceable wire cutters, saw, and (most important for John's compact, wearable toolkit configuration) a ¼-inch bit driver. It also comes with a small pouch and collection of double-ended bits that my husband rarely uses, which he stores in this pouch separate from his wearable tool kit.

VIM Tools small Flex Socket Ratchet to T Handle Wrench Set with Socket Extension and Adapter and DEWALT 7-piece bit driver set
The VIM Tools 1/4-inch Small Flex Socket Ratchet to T Handle Wrench Set with Socket Extension and Adapter and the DEWALT 7-Piece Bit Set with 6-in-1 Flip and Switch Driver System are key additions to the Rocktol multitool in this compact wearable toolkit. The 1/4-inch drive ratchet has a locking swivel head and an extension that can fit into either the ratchet or the Rocktol multitool 1/4-inch driver. The DEWALT 1/4-inch bit driver set also can fit into either the ratchet or the multitool 1/4-inch driver, or even into the ratchet extension for extra reach. It comes with four double-ended bits (8 bits total) that fit into two carriers and can also fit directly into the ratchet or the Rocktol multitool 1/4-inch driver.

Stanley PowerLock 3-foot tape measure and EGUKU LED Bright Mini Portable Clip-on or Keychain EDC Flashlight
The Stanley 3-foot x 1/4-inch PowerLock Key Tape Measure is designed to fit on a keychain, although for our purposes it will clip onto the pouch's carabiner. It features a locking mechanism to hold the tape extended when needed. The EGUKU LED + COB Bright Mini Portable Clip-on or Keychain EDC Flashlight is extremely small and compact, but very bright for its size. It has five settings: LED high, LED low, COB high, COB low, and COB strobe. The clip on the back can be attached to a pocket, the neck of a shirt, etc.

Flashlight on wearable tool kit
It's surprising how brightly this very small flashlight can light up a dark area! My husband clips his to one of the side loops so that when he slides the wearable tool kit pouch to the side of his belt, the light faces forward. The spotlight also swivels 180° so you can aim the light at whatever you are working on.


Configuring and Assembling Your Wearable Toolkit

While the pouch is not a perfect fit for all the tools, it works remarkably well. My husband loves his and uses it all the time. On weekends, it is his constant sidekick. Here is how it is put together.

The assembled toolkit

  1. Cut two short lengths of self-adhesive hook-and-loop tape and discard the loop side. Attach one of the hook sides to the yellow main body of the DEWALT extension bit set. Attach the other hook side to the back of the Stanley PowerLock tape measure.
  2. Remove the extension rod from the ratchet set and replace it with the body of the DEWALT bit driver set and one of the bit sets. Slide this assembly into the loop on the phone pouch's flap, making sure the hook tape strip you adhered to the yellow DEWALT bit driver body is secured to the pouch flap's loop tape strip.
  3. Place the Rocktol multitool and replacement saw blades, the remaining DEWALT bit set, and the ratchet extension rod into the zippered front pocket of the pouch. (You won't be able to zip the pocket when filled with these items, but the latched strap will secure them in the pocket.)
  4. Place your phone in the lined larger pocket.
  5. Clip the flashlight to one of the side loops (left or right, depending on which side of your belt you plan to wear the toolkit, so that the light will face forward).
  6. Clip the Stanley tape measure's keychain loop to the pouch's carabiner, then close the front flap, latch the top strap, and attach the hook tape strip on the back of the tape measure to the loop tape strip on the front of the pouch (so it stays out of the way until needed).
Interior view of assembled wearable tool kit
Here's a view inside the assembled wearable toolkit.

Small But Mighty

wearable toolkit

As you can see, this entire wearable toolkit is small and compact. Despite its diminutive size, however, it can handle the majority of routine DIY projects and repairs without having to lug around heavier, full-size tools. Here are just a few of the things my husband uses it for:

  • DIY projects
  • Household repairs
  • Automotive projects and car repairs
  • Bicycle repairs
  • Model railroad projects and repairs
  • Trimming and pruning plants and small branches
  • Miscellaneous uses, such as cutting wires, tightening or loosening screws or nuts and bolts (especially in hard-to-reach or tight spaces), bending and filing wire and lightweight metal, opening shipping boxes and product packaging, task lighting for work areas, lighting dark hallways/passages

A Terrific Gift (and Not Just for Men)

While this compact, lightweight, wearable toolkit makes a great Father's Day gift, it's also a gift that both men and women who use hand tools for DIY projects, repairs, hobbies, etc., would appreciate.

Although it doesn't eliminate the need for full-size tools completely, you might be surprised at how rarely you need to haul them out once you have this well-equipped, compact, wearable tool kit on your belt.


The Ultimate Compact, Lightweight, Wearable Toolkit With Useful Tools by Margaret Schindel


Read More Product Reviews by Our Review This Reviews Contributors

Read More DIY Reviews by Our Review This Reviews Contributors

Read More Gift Reviews by Our Review This Reviews Contributors


Note: The author may receive a commission from purchases made using links found in this article. “As an Amazon Associate, Ebay (EPN) and/or Esty (Awin) Affiliate, I (we) earn from qualifying purchases.”


Thursday, May 2, 2024

Black & Decker Cordless Drill - Reviewed

 Having the right tools for your DIY project makes all the difference between frustration and satisfaction. One of these indispensable tools is my Black & Decker cordless drill, the perfect companion for many of my home improvement tasks.

Black & Decker Cordless Drill - Reviewed

Black & Decker Cordless Drill Features:

Design and Build Quality: Black & Decker is a renowned name in the realm of power tools. My first impression is the drill is lightweight and fits comfortably in my hand, even for extended periods of use. The grip is rubberized, providing both comfort and control.

Performance: The Black & Decker Cordless Drill is equipped with a powerful motor and effortlessly tackles many drilling and driving tasks efficiently. Over the years I have used my cordless drill to drill holes and drive screws into wood, metal, and plastic with ease. The variable speed control allows for seamless adjustment for any of these tasks.

Battery Life and Charging: The Black & Decker is equipped with a 20V lithium-ion battery, it offers extended runtime, minimizing interruptions during long projects. Although, I have never had a project long enough where I ran out of power. I recommend a second battery if you consistently use the drill for long projects. That way you always have one charged.

Versatility and Ease of Use: The variable speed control makes it easy to transition between drilling and driving applications. The keyless chuck feature makes it easy to change drill and driving bits. Additionally, the drill has an LED light to illuminate the work area.

Value: The Black & Decker Cordless stands out as a compelling option with its performance, durability, and affordability. The Black & Decker is a reasonable price for all of the performance. I also purchased the handy accessory kit you see in the photo with many driver bits and drills. With that kit, I have always had whatever I needed for the task.

Find more product reviews on Review This

ReviewThisProductReviews.com

This Black & Decker Drill and accessory kit make the perfect Father's Day gift.
BLACK+DECKER 20V MAX Cordless Drill and Driver, 3/8 Inch, With LED Work Light, Battery and Charger Included (LDX120C)BLACK+DECKER 20V MAX Cordless Drill and Driver, 3/8 Inch, With LED Work Light, Battery and Charger Included (LDX120C)BLACK+DECKER 20V MAX Cordless Drill and Driver, 3/8 Inch, With LED Work Light, Battery and Charger Included (LDX120C)BLACK+DECKER Drill Bit Set/Screwdriver Bit Set Combo, 109-Piece (BDA91109)BLACK+DECKER Drill Bit Set/Screwdriver Bit Set Combo, 109-Piece (BDA91109)BLACK+DECKER Drill Bit Set/Screwdriver Bit Set Combo, 109-Piece (BDA91109)


Note: The author may receive a commission from purchases made using links found in this article. “As an Amazon Associate, Ebay (EPN) and/or Esty (Awin) Affiliate, I (we) earn from qualifying purchases.”


Tuesday, March 26, 2024

Methods to Remove Wallpaper

Wallpaper can be used to change the look of any room or create a beautiful accent wall. Sometimes people use wallpaper to cover blemishes on a wall. Either way, you may have some wallpaper in your home and want to remove it. Today I will be reviewing, three different methods of removing wallpaper. 

Methods to Remove Wallpaper

I am not an expert or professional by any means. As the saying goes; I'm a jack of all trades but a master of none. Over the years I have used every one of these methods at one time or another.

Method 1: Steam Removal

  • You can rent or buy a wallpaper steamer.
  • Fill the steamer reservoir with water to the fill line.
  • Attach the handle and hose to the steamer plate.
  • Plug in the machine and turn it on. Wait 5 or 10 minutes for it to build up steam.
  • Place the steamer plate on the wall, and hold it for 20 to 30 seconds. Remove the plate and scrap the wet wallpaper with a putty knife.
  • You will want to score the section of wall you are steaming with a scoring tool or razor knife before placing the steamer plate. Do not press hard while scoring the wallpaper as you may damage the wall.

Method 2: Water and Vinegar

  • Mix equal parts of hot water and vinegar in a spray bottle or a bucket.
  • Spray to sponge the solution on a four-foot section of the wall.
  • Wait about five minutes to allow the solution to work.
  • Scrap the wet section with a putty knife to remove the wallpaper.
  • Again, score the wall section first with a scoring tool or razor knife.
Method 3: Chemical Liquid Stripper
  • There are different brands of liquid strippers available. I have always used DIF by Zinsser. It's pre-mixed and ready to use.
  • Score the wallpaper with a razor knife or scoring tool.
  • Spray it onto the wallpaper, and wait a few minutes before scraping it with a putty knife.
With any of these three methods, you will want to tape off the baseboard and about 12 inches onto the floor with plastic. This will make clean up easier.

You may have to repeat the method, sometimes on the first try the wallpaper will come off leaving the backer.

Tip: If you're removing wallpaper from Drywall be careful not to use too much water and oversoak the walls. Too much water may damage the drywall.

There is more work to be done after the wallpaper is off:

After the wallpaper is off, remove any remaining glue residue from the walls. For this, use hot water and a sponge and wipe the walls clean. 

Before painting, I always use fine-grained sandpaper and lightly sand the walls. Now, patch any cracks or small holes in the walls before painting with a good primer. Then, paint your finish coat in your desired color. Happy wallpaper removal!

Find more DIY Projects and Decor here:


Note: The author may receive a commission from purchases made using links found in this article. “As an Amazon Associate, Ebay (EPN) and/or Esty (Awin) Affiliate, I (we) earn from qualifying purchases.”


Tuesday, June 7, 2022

Flex Seal Liquid Rubber - Reviewed

 Flex Seal liquid rubber in a can is a liquid rubber sealant coating. Flex Seal can be brushed on, rolled on, poured, or dip something to create a rubber coating.

Flex Seal Liquid Rubber - Reviewed

Flex Seal is an easy-to-use liquid coating that dries to form a watertight rubberized seal. Once Flex Seal is cured it will seal out water and moisture on a variety of surfaces.

Projects that I have used Flex Seal For:

Closet Corner

My basement closet corner was the very first project where I used Flex Seal. The wall and baseboard were wet and turning black from mold.

I was walking around the hardware store trying to figure out how to fix this and that is when I found Flex Seal. I had seen it advertised on television so I thought why not give this a try.

After we cleaned all of the mold from the wall and baseboard, I painted the area with a primer. Then, I brushed the Flex Seal onto the wall, baseboard, and even part of the floor.

As you can see in the photo, after two years there is no moisture or mold. 


Outdoor table
This is our outdoor dining table. I told Fran last year that this would be it for this table, next year we will have to get a new one.

It is a glass top table with a metal edge. The problem is that over the years the edge rusted. I have restored this table a couple of times and really thought it was time to get rid of it.

The edge rusted to the point where it had some holes. I filled the holes with a product called JB Weld SteelStick, sanded it down, brushed Flex Seal over the edge, and then spray painted to match the color. 

We just may get one more year out of this table.


My third project for Flex Seal was to seal some leaking gutters. The end caps and seams on the house gutter were leaking when it rained. 

I brushed on Flex Seal to all of the seams and end caps on the gutters and the problem was solved. This I don't have a photo of because there was no way that I was going back up the ladder to take pictures.

I'm very pleased with the performance of Flex Seal on the projects that I have used it on. I am sure there are many more uses for Flex Seal. It comes in a liquid, spray, and caulking I believe you can buy it in white or black.

Flex Seal Liquid, 16 oz, Clear, Liquid Rubber Coating Sealant, Waterproof, Flexible, Breathable, and UV Resistant, Roof Repair, Basements, RV, Campers, Trailers, Marine, EPDM, MasonryFlex Seal Liquid, 16 oz, Clear, Liquid Rubber Coating Sealant, Waterproof, Flexible, Breathable, and UV Resistant, Roof Repair, Basements, RV, Campers, Trailers, Marine, EPDM, MasonryFlex Seal Liquid, 16 oz, Clear, Liquid Rubber Coating Sealant, Waterproof, Flexible, Breathable, and UV Resistant, Roof Repair, Basements, RV, Campers, Trailers, Marine, EPDM, Masonry


Note: The author may receive a commission from purchases made using links found in this article. “As an Amazon Associate, Ebay (EPN) and/or Esty (Awin) Affiliate, I (we) earn from qualifying purchases.”


Wednesday, September 23, 2020

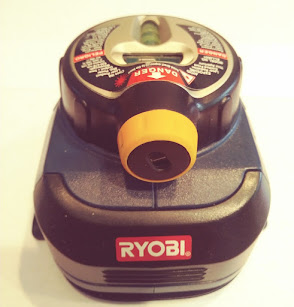
RYOBI Laser Level Review

RYOBI Laser Level Review

There are always projects to do around the house. Some are big projects, and some are small projects.

Whatever the project is in my house I like to tackle it myself. I'm not the best handyman but I can hold my own when comes to work around the house.

I've learned some tricks over the years to help me get by with most of my own projects.

One day I was in our local hardware store and noticed this laser level. My first thought was why would I ever need one of these. 

Then I thought, wait a minute, one of my problems was hanging pictures or adding a shelf on the walls and keeping them straight.

I can tell you that I've patched up many holes in the walls fixing my mistakes while hanging pictures and shelves. Well, not anymore because this little laser level makes it so easy even I can do it.

 I now have pictures and shelves that are perfectly level. Although, I do miss those words from Fran, "that's not straight". This handy little tool helped me fix all of my mistakes.

wooden wall shelf

This shelf is now perfectly level, but that wasn't always the case with this shelf. This shelf requires it to be hung from two points on the backside. There are two notches that screws fit into on the back of the shelf. Trying to get the second screw level with the first screw was a nightmare for me.

The laser level made this easy, just set the first screw, then mount the laser level on the wall. Line it up to the centerline of the first screw, using the level on the tool to make sure it's level. Now, measure and mark the wall on the laser line for the second screw. Wow!! Perfect every time.

Some other projects that my laser level made easy, hanging wallpaper, and borders, pictures, and curtain rods. I had to add some new posts for our deck, I used the laser level to determine the correct height of each post. I even lined up the photo eyes on my garage door with it. So, it turns out that I really did need one of these.

RYOBI Laser Level Features:

  • Vacuum suction will seal to smooth walls
  • The laser beam will shoot around corners which makes hanging shelves or wallpaper around the room easy.
  • Tacks will hold the level in place on textured walls.
  • The laser beam will shoot a distance of 30 feet.
  • Easily mounts to a tripod. (tripod is not included)

Ryobi ELL1002 Air Grip Compact Laser Level with Tripod Mounting and Corner Rounding Capability (AAA Batteries Included)Ryobi ELL1002 Air Grip Compact Laser Level with Tripod Mounting and Corner Rounding Capability (AAA Batteries Included)


See more Product Reviews Here: ReviewThisProductReviews.com


Note: The author may receive a commission from purchases made using links found in this article. “As an Amazon Associate, Ebay (EPN) and/or Esty (Awin) Affiliate, I (we) earn from qualifying purchases.”


Thursday, March 21, 2019

DIY Pallet Book Nook

decorative wall and window seat
Pallet Wood Feature Wall and Window Seat
When I purchased my current country home, many of the features that most appealed to me were the quirky, whimsical touches that made it so unlike all of the other cookie-cutter properties.  After moving in, though, I discovered a few things that were just a little too different for my taste.  Still, in renovating those oddities, I wanted to remain true to what had drawn me to this house in the first place: the use of character wood (weathered wood that captures your imagination).

In today's post, I am sharing part one of a two-part series focused on creating a DIY pallet book nook from a previously unused space in my upstairs bedroom.  We will start with the woodworking elements of the project and then finish with handcrafted decorating touches (a homemade cushion, pillows, rug, and other decor to cozy up the space).

Because I have poured so much of myself into my master bedroom renovations, it has become my favorite room in the entire house.  One last improvement remained to make this space visually and functionally cohesive.  There was a funky "hallway" in the room that housed my exercise bike (because it didn't lend itself to much else).  The thing that really bugged me about that long, narrow space was a weird, uneven application of drywall.  I couldn't knock that wall down because it housed my closet and was most likely structural (helping support the roof).  And, hanging, mudding, texturizing, and painting new sheetrock just wasn't on my bucket list.  Been there, done that.  Not my idea of a good time.  So, what to do?

drywall before finishing
Funky Drywall Before Renovation
Recycled pallets are the answer to most of the truly pressing needs in my world.  Seriously.  Pallet wood can right most wrongs.  It just requires a little—well, okay, a lot—of elbow grease.  I'm good with that.  The finished product has always proven worth it.  We'll just skip over the less than scintillating details of finding, hauling, deconstructing (pulling a massive number of ornery nails), and refinishing (cutting, sizing, planing, and sanding) a tall pile of pallets.  On to step eight.

marking the drywall
Tape Marks Studs Where Planks Will Be Nailed
With the feature wall pallet planks ready for installation, I prepped the wall by finding and marking the studs.

adding wall strips
Leveling Wall Sections With Lath
Next, I applied thin strips of wood lath to level the two sections of drywall, which will provide a more solid backing when nailing in the pallet planks.  The wainscoting pictured above consists of three framed pieces of corrugated metal topped by a chair rail.  It provides a nice contrasting texture, as well as adding a reflective surface to lighten up the space.

pallet wood on walls
Oh the Tales This Wall Could Tell
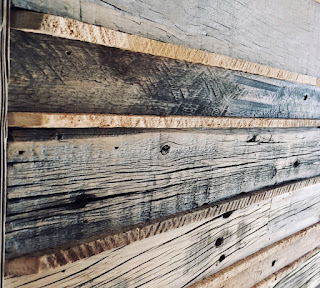
When I nailed in the rows of pallet wood, I decided to alternate different widths and colors.  I left all of the wood in its natural state, as the original saw blade marks, nail holes, knots, and checking is what adds personality.  As I started working on this step, I got the inspiration to separate rows of planks with horizontally placed strips of recycled lath removed from inside the plaster walls of an old ranch house.  The definition of the chiseled edges of lath created an effect similar to the chinking seen between bricks.  Really, though, it is the history of that lath, and the story it tells, that adds so much value and interest to the feature wall.

wood pallet window seat
Rustic Pallet Window Seat 
No book nook would be complete without a window seat.  Again, I used rustic pallet parts, purposely choosing planks with nail streaks, and then trimming the bench with pallet skids.  Where there was fresh wood from making the cuts, I applied chalkboard spray paint, and then sanded off most of it to blend the color with that of the naturally weathered surfaces.

feed and seed sign
Books Feed and Seed the Mind
Above the window, I created a decorative king post truss trim that matches the actual support truss on the front of my house.  I like the way it ties everything together.  While working on this truss, I happened to find the metal  Feed & Seed sign at Tractor Supply Co.  It seemed like the perfect message for my new space, as books certainly do feed and seed our minds.  When I got home with the sign, I was amazed that it fit exactly in place between the truss and the window.  That never happens.  I knew then that it was meant to be.

finished book nook window seat
My Nook is Ready for Accessorizing
With the construction work done, I am now in the process of accessorizing my new nook.  I have selected fabrics and will soon start sewing the window seat cushion and pillows.  Stay tuned for part two of this DIY series when I post the final reveal.  So, what do you think?  Could you see yourself curled up with a book in this sunny space?


Note: The author may receive a commission from purchases made using links found in this article. “As an Amazon Associate, Ebay (EPN) and/or Esty (Awin) Affiliate, I (we) earn from qualifying purchases.”


Friday, February 22, 2019

DIY Upcycled Drawer Pet Bed

cat drawer day bed
Grizzly was quick to call dibs on this new drawer daybed.
One of the ways I express love for my animals is by making them things.  I'm always on the lookout for fun DIY projects for my kittens and pups.  While cruising Pinterest for inspiration, I came across something I could not wait to try: making a cozy pet bed by upcycling a drawer.  At the time I didn't have any old drawers, but then, like it was meant to be, I came upon a dresser that someone had abandoned.  Just like that I had four oak drawers that needed to be saved from a premature trip to wherever unloved drawers go.  I'd like to share with you how I took those vintage discarded drawers and gave them a new purpose in life. This is a simple weekend project that anyone can enjoy.

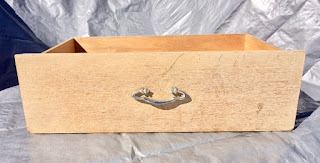
empty drawer

First, pick up a used drawer that will fit your pet.  You may find one at a garage sale or thrift store.  Since my pups are too big for a drawer, I'm making these beds for my kitties.   Given that they sleep most of the time—well, except for my wild child, Minnie—a custom bed is the gift they will use more than anything else.

painted drawer

Next, remove the hardware and sand the surfaces in preparation for your choice of finish.  At the moment, I'm in love with chalkboard paint, so I primed my drawer with it (Tip: Use the spray paint.  It goes on much smoother.).  Though a chalky soft black color may seem like an odd choice, I knew that I wanted to cover it with a white paint that would give it a stylish grunge look.  The nice thing about a dark primer is that it immediately enhanced the drawer's imperfections.

mini trellis and glass candle holders

Now it's time to use your imagination to come up with a unique twist on decorating your pet bed.  When I came upon this cute mini trellis at Dollar Tree, I knew exactly what I wanted to do.  It became the muse for a kitten daybed.  On the same shopping trip, I found these fluted glass candle holders.  They gave me the idea for an unusual set of legs for the daybed.  This is my MO as a maker: using things in unexpected ways.  Never one to be a copycat, I get my thrills from coming up with something really different.

mini trellis

Here's where sizing adjustments happen.  After determining the desired height of the daybed ends, I used my cordless Dremel with the cut-off wheel to shorten the trellis.  If you don't have a Dremel, you can use a hacksaw for this step.  I tried it both ways and the Dremel is definitely the easier and faster method.

drilling holes in drawer sides

Time to drill some holes to insert the trellis into the drawer's side panels.  I used a 1/8th inch bit to drill holes that are 3 1/2 inches deep.  This step required some care, as the wood panels are pretty narrow (about 1/4th inch wide).  I didn't want to accidentally drill through the side of the drawer.  By taking it slowly, I kept the holes where I wanted them to be.

white caulk

So, let's get back to those glass candle holder/wannabe legs I mentioned earlier.  After spray painting them with chalkboard paint, I used white chalk to highlight the fluted edges, creating a kind of pinstriping.  An important last step is to spray the containers with a clear matte sealer to keep the chalk from smearing or wearing off.

canning jar lid

At this point, I needed to screw lids for the jar legs onto the bottom of the drawer.  I replaced the candle holder insert with a regular mouth canning jar lid.  Because drawer bottoms are very thin, I bolstered the thickness by attaching strips of wood lath.  This ensured that the sharp points of the screws wouldn't poke through inside the drawer and pose a hazard to my kitten.  Once the lids were in place, it was just a matter of attaching the fluted legs.

cat drawer day bed

The final steps included creating a name plaque for my kitten and placing luxurious bedding inside the drawer.  I chose a silky faux fur rug for the mattress.  It will be easy to clean by just tossing it in the washer.  As for the pillows, I simply rolled up a comfy fleece blanket.  Easy peasy.

cat in cat drawer day bed

I was anxious to get up this morning to see who might be snuggled up in the drawer daybed.  Though I created the bed for Minnie Pearl, the kitten I rescued last August, I didn't think I would find her snoozing.  I haven't actually ever seen her sleep.  She is way too busy with her kitten shenanigans.  I was very happy to find my senior cat, Grizzly Girl (aka Miz Grizz), curled up in Minnie's place.

cat and mouse game

All throughout the day, my girls have been vying for a spot in the new bed.  Mission accomplished.  My heart is full.  I decided I better get a head start on converting another drawer.  While I was working on it this afternoon, Sugar Bear was "helping" me.

cat in cat drawer day bed

This bed has a cathedral theme.  I found a gothic garden fence for the headboard, which reminds me of stained glass windows, and experimented with an antique crackle finish for the front of the drawer.  I'm actually using plant hangers for the legs.  Go figure!  I invite you to stop back by for updates and additional photos, as I still have two more drawers to go (and two more lovely felines to feature).  Crazy cat lady?  Nah.  I'm still one cat short of crazy.


Note: The author may receive a commission from purchases made using links found in this article. “As an Amazon Associate, Ebay (EPN) and/or Esty (Awin) Affiliate, I (we) earn from qualifying purchases.”


Most Recent Reviews on Review This Reviews


Search for Reviews by Subject, Author or Title

The Review This Reviews Contributors


SylvestermouseSylvestermouseDawn Rae BDawn Rae BMbgPhotoMbgPhotoBrite-IdeasBrite-IdeasWednesday ElfWednesday ElfOlivia MorrisOlivia MorrisTreasures by BrendaTreasures by BrendaThe Savvy AgeThe Savvy AgeMargaret SchindelMargaret SchindelRaintree AnnieRaintree AnnieLou16Lou16Sam MonacoSam MonacoTracey BoyerTracey BoyerCheryl Paton Cheryl PatonRenaissance WomanRenaissance WomanBarbRadBarbRadBev OwensBev OwensBuckHawkBuckHawkDecorating for EventsDecorating for EventsHeather426Heather426Coletta TeskeColetta TeskeMissMerFaeryMissMerFaeryMickie_GMickie_G


Review This Reviews is Dedicated to the Memory of Our Beloved Friend and Fellow Contributor

Susan DeppnerSusan Deppner

We may be apart, but
You Are Not Forgotten


“As an Amazon Associate, Ebay (EPN) and or Etsy (Awin) Affiliate, I (we) earn from purchases.” Disclosure Statement

X