 |
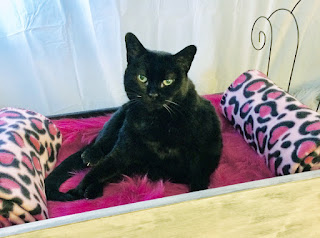
| Grizzly was quick to call dibs on this new drawer daybed. |
One of the ways I express love for my animals is by making them things. I'm always on the lookout for fun DIY projects for my kittens and pups. While cruising Pinterest for inspiration, I came across something I could not wait to try: making a cozy pet bed by upcycling a drawer. At the time I didn't have any old drawers, but then, like it was meant to be, I came upon a dresser that someone had abandoned. Just like that I had four oak drawers that needed to be saved from a premature trip to wherever unloved drawers go. I'd like to share with you how I took those vintage discarded drawers and gave them a new purpose in life. This is a simple weekend project that anyone can enjoy.
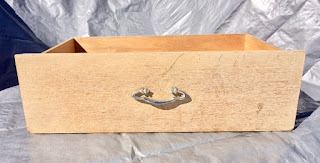
First, pick up a used drawer that will fit your pet. You may find one at a garage sale or thrift store. Since my pups are too big for a drawer, I'm making these beds for my kitties. Given that they sleep most of the time—well, except for my wild child, Minnie—a custom bed is the gift they will use more than anything else.
Next, remove the hardware and sand the surfaces in preparation for your choice of finish. At the moment, I'm in love with chalkboard paint, so I primed my drawer with it (Tip: Use the spray paint. It goes on much smoother.). Though a chalky soft black color may seem like an odd choice, I knew that I wanted to cover it with a white paint that would give it a stylish grunge look. The nice thing about a dark primer is that it immediately enhanced the drawer's imperfections.
Now it's time to use your imagination to come up with a unique twist on decorating your pet bed. When I came upon this cute mini trellis at Dollar Tree, I knew exactly what I wanted to do. It became the muse for a kitten daybed. On the same shopping trip, I found these fluted glass candle holders. They gave me the idea for an unusual set of legs for the daybed. This is my MO as a maker: using things in unexpected ways. Never one to be a copycat, I get my thrills from coming up with something really different.
Here's where sizing adjustments happen. After determining the desired height of the daybed ends, I used my cordless Dremel with the cut-off wheel to shorten the trellis. If you don't have a Dremel, you can use a hacksaw for this step. I tried it both ways and the Dremel is definitely the easier and faster method.
Time to drill some holes to insert the trellis into the drawer's side panels. I used a 1/8th inch bit to drill holes that are 3 1/2 inches deep. This step required some care, as the wood panels are pretty narrow (about 1/4th inch wide). I didn't want to accidentally drill through the side of the drawer. By taking it slowly, I kept the holes where I wanted them to be.
So, let's get back to those glass candle holder/wannabe legs I mentioned earlier. After spray painting them with chalkboard paint, I used white chalk to highlight the fluted edges, creating a kind of pinstriping. An important last step is to spray the containers with a clear matte sealer to keep the chalk from smearing or wearing off.
At this point, I needed to screw lids for the jar legs onto the bottom of the drawer. I replaced the candle holder insert with a regular mouth canning jar lid. Because drawer bottoms are very thin, I bolstered the thickness by attaching strips of wood lath. This ensured that the sharp points of the screws wouldn't poke through inside the drawer and pose a hazard to my kitten. Once the lids were in place, it was just a matter of attaching the fluted legs.
The final steps included creating a name plaque for my kitten and placing luxurious bedding inside the drawer. I chose a silky faux fur rug for the mattress. It will be easy to clean by just tossing it in the washer. As for the pillows, I simply rolled up a comfy fleece blanket. Easy peasy.
I was anxious to get up this morning to see who might be snuggled up in the drawer daybed. Though I created the bed for Minnie Pearl, the kitten I rescued last August, I didn't think I would find her snoozing. I haven't actually ever seen her sleep. She is way too busy with her kitten shenanigans. I was very happy to find my senior cat, Grizzly Girl (aka Miz Grizz), curled up in Minnie's place.
All throughout the day, my girls have been vying for a spot in the new bed. Mission accomplished. My heart is full. I decided I better get a head start on converting another drawer. While I was working on it this afternoon, Sugar Bear was "helping" me.
This bed has a cathedral theme. I found a gothic garden fence for the headboard, which reminds me of stained glass windows, and experimented with an antique crackle finish for the front of the drawer. I'm actually using plant hangers for the legs. Go figure! I invite you to stop back by for updates and additional photos, as I still have two more drawers to go (and two more lovely felines to feature). Crazy cat lady? Nah. I'm still one cat short of crazy.
Note: The author may receive a commission from purchases made using links found in this article. “As an Amazon Associate, Ebay (EPN), Esty (Awin), and/or Zazzle Affiliate, I (we) earn from qualifying purchases.”


