Showing posts with label recycled. Show all posts

Thursday, September 2, 2021

DIY Cable Spool Cat Scratching Post


DIY Cable Spool Cat Scratching Post
Stenciled Cable Spool

I'm that person who can't pass up an abandoned cable spool.  When I saw this little spool, I knew it wanted to go home with me.  So, I adopted it, spiffed it up, and gave it a new life.  Here's how to turn a cable spool into a cat scratching post or mini table for your porch or patio.  


recycled cable spool
Recycled Cable Spool

Step 1: Pick up a small spool anywhere wires or cables are used or sold.  I found this one at a big box home improvement store.


cable spool taken apart for refinishing
Spool Parts Ready for Prepping

Step 2: Separate the parts in preparation for sanding, painting, and finishing the wood.  All I had to do was unscrew the top bolts to release the three sections.


sanding a cable spool
Sanding the Spool

Step 3: Sand the spool's top and bottom wood sections.

Step 4: Decide how you want to treat the wood.  I chose to lightly torch the wood to accent the grain and give it nice warm tones without stain.


wood sealant
Sealing the Wood - Spar Urethane

Step 5: Seal the wood and cardboard spool parts with an indoor/outdoor Spar Urethane.  I used a spray application to make it quick and easy (and fast-drying).  


medallion stencil
Boho Medallion Stencil

Step 6: Decorate the spool top if desired.  I happened to have the perfect sized stencil (Boho Medallion) on hand for another project.  I chose to use a charcoal colored chalk spray paint that was a lovely balance to the natural wood (and a match with the metal spool bolts).  


sisal rope wrapped around a cable spool
Sisal Rope Wound Around Spool

Step 7: Reassemble the spool.  Wrap sisal rope around the cylinder.  It took a little bit more than 50-feet of 3/8" sisal.  


completed DIY Cable Spool Cat Scratching Post
Recycled Cable Spool (After)

This was a really enjoyable DIY project.  Though I imagine using this recycled spool as a scratching post for my rescue cats, I can also see using it as a small end table on my porch.  I'm picturing it as a coffee table situated next to my Adirondack chair, or as a sweet little piece of furniture for the catio I'm building.

Who says it has to have only one use?  How do you envision it?  I'd love to hear your ideas in the comments below.


Note: The author may receive a commission from purchases made using links found in this article. “As an Amazon Associate, Ebay (EPN) and/or Esty (Awin) Affiliate, I (we) earn from qualifying purchases.”


Thursday, August 5, 2021

Upcycled DIY End Table Pet Bed

Upcycled DIY End Table Pet Bed
Upcycled End Table Pet Bed

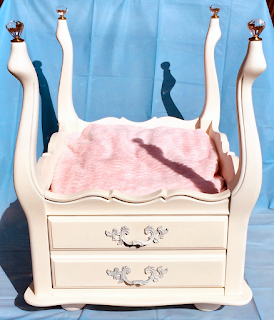
As a continuation of my DIY series on repurposed furniture projects, I present to you my latest pet bed creation.  These upcycled end table dog or cat beds are extremely popular with both fur babies and their pet parents.  I speak from direct experience.  My animals spend nearly all of their time in these beds.  

The four-poster pet bed featured here can be easily completed in a weekend.  Here's a quick rundown of the process I used to bring new life to a vintage end table.  

Supplies Needed: 

  1.  Vintage End Table
  2.  Sand Paper or Sanding Sponge
  3.  Paint (I used Rust-Oleum Chalked Spray Paint - Chiffon Cream)
  4.  Bun Feet (optional)
  5. Finials (I used crystal drawer knobs; lamp finials are another great option)
  6. Clear Coat Sealer (I used the Rust-Oeum Chalked Paint Matte Topcoat)
Tools Used:
  1. Screwdriver
  2. Hack Saw
  3. Sander
  4. Drill
  5. Pliers
  6. Brad Nailer

vintage end table
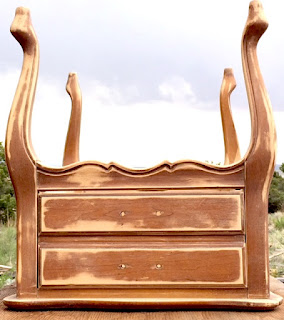
Vintage End Table (Before)

I started with a quick shopping trip to the Habitat for Humanity ReStore and the Goodwill Store.  This vintage end table was perfect for my project and easy on my budget (eight dollars).  It's nice to get a bargain while supporting a cause near and dear to my heart.

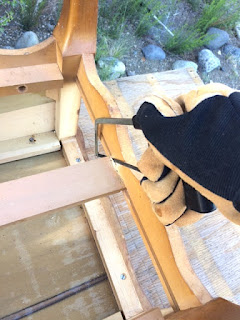
Step One: Flip table. Pull out drawer. Remove inner drawer supports to clear space for bed. I simply used a mini hack saw to cut the cross piece and then a screwdriver to remove the two side supports. 

upside down end table with drawers removed
End Table With Drawer Removed


cutting out the drawer base of a vintage end table
Cutting Out Drawer Brace


removing screws
Unscrewing Side Drawer Support


Step Two: Remove drawer pulls by unscrewing inside hardware.  Save parts for later.

removing handles
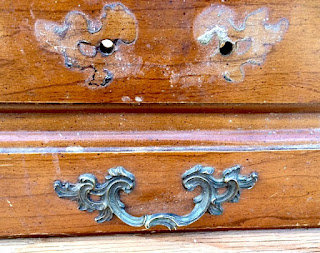
Removing Drawer Pulls

Step Three: Pull off the plastic leg disks used for leveling and protecting the floor.  Discard.

removing plastic leg disks
Removing Plastic Leg Disks

Step Four: Cut off the back part of the drawer and reinstall drawer front (I cut it with a hacksaw leaving an inch of the drawer's side and then used a brad nailer to affix it).  As you can see from the second photo, the drawer takes up room needed for the pet bed.  However, the drawer face is needed for the front side of the cabinet.  I considered using the drawer to make a little step up into the princess bed.  That would be a fun option if you have a tiny dog that could use a boost.


vintage end table prepared for refinishing
Drawer Front/Side After Cut-Off


end table drawer
Drawer Inside Table (Before)

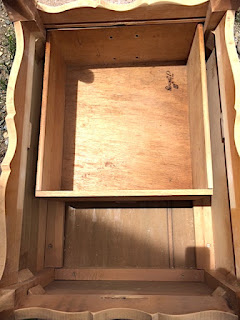
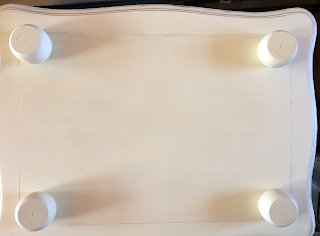
Step Five: Install supports and false bottom for bedding area.  The wood pieces will provide enough depth to drill in the bolts for the bun feet (from the other side). The veneer of the end table top was too thin for the bolts and bolt inserts, hence the wood blocks covered by a sheet of masonite.

false bottom of vintage end table
Supports For False Bottom

masonite covering
Masonite Covering Bottom Supports

Step Six: Sand wood in preparation for two fresh coats of paint.

preparing and sanding a vintage end table
Paint Prep - Sanding

Step Seven: Prime and paint with two coats of Rust-Oleum Chiffon Cream chalked paint.

spray paint
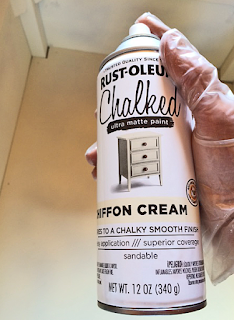
Chiffon Cream Spray Paint

Step Eight: Seal the paint with a clear finish. I used the Rust-Oleum matte topcoat.

clear topcoat
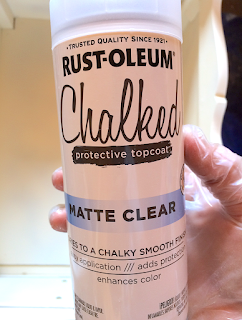
Clear Topcoat Protective Finish

Step Nine
: Attach bun feet. This was done by drilling holes for the bolt inserts.

bun feet
Bun Feet Installed With Threaded Inserts

Step Ten: Screw in finials atop the legs.  I love the rainbows that wash over the bed when sunlight shines through the prisms.

crystal finials
Crystal Finials Installed

Step Eleven: Reattach the drawer pulls after painting them.  I used the same creamy chalk paint.

painted drawer pulls on painted end table
Painted Drawer Pulls Back In Place

Step Twelve: Select fabric and make a cozy bed cushion/pillow.  I used foam cushions and two fabric selections: one is a fleece damask pattern in pink and chocolate; one is a super soft ribbed pink chenille.  Which do you like best?  

fleece bed cushion
Damask Fleece Bed Cushion

chenille bed cushion
Pink Ribbed Chenille Bed Cushion

So there you have it.  Upcycling is a fun way to exercise your imagination while feeling great about saving an item from a premature demise.  Why send something to the landfill when it has plenty of life left in it?  

I like to think this old end table is pretty pleased to be looking better than ever and to be enfolding the life of a beloved pet.  There's nothing like being needed and valued.  

Interested in more pet bed demos?  Check out my DIY upcycled dresser drawer beds.  My cats adore them.

Stay tuned for upcoming DIY demo projects.  Up next is an antique door hall tree and a vintage metal suitcase coffee table (recent Habitat for Humanity ReStore finds that I could not resist).


Note: The author may receive a commission from purchases made using links found in this article. “As an Amazon Associate, Ebay (EPN) and/or Esty (Awin) Affiliate, I (we) earn from qualifying purchases.”


Thursday, March 21, 2019

DIY Pallet Book Nook

decorative wall and window seat
Pallet Wood Feature Wall and Window Seat
When I purchased my current country home, many of the features that most appealed to me were the quirky, whimsical touches that made it so unlike all of the other cookie-cutter properties.  After moving in, though, I discovered a few things that were just a little too different for my taste.  Still, in renovating those oddities, I wanted to remain true to what had drawn me to this house in the first place: the use of character wood (weathered wood that captures your imagination).

In today's post, I am sharing part one of a two-part series focused on creating a DIY pallet book nook from a previously unused space in my upstairs bedroom.  We will start with the woodworking elements of the project and then finish with handcrafted decorating touches (a homemade cushion, pillows, rug, and other decor to cozy up the space).

Because I have poured so much of myself into my master bedroom renovations, it has become my favorite room in the entire house.  One last improvement remained to make this space visually and functionally cohesive.  There was a funky "hallway" in the room that housed my exercise bike (because it didn't lend itself to much else).  The thing that really bugged me about that long, narrow space was a weird, uneven application of drywall.  I couldn't knock that wall down because it housed my closet and was most likely structural (helping support the roof).  And, hanging, mudding, texturizing, and painting new sheetrock just wasn't on my bucket list.  Been there, done that.  Not my idea of a good time.  So, what to do?

drywall before finishing
Funky Drywall Before Renovation
Recycled pallets are the answer to most of the truly pressing needs in my world.  Seriously.  Pallet wood can right most wrongs.  It just requires a little—well, okay, a lot—of elbow grease.  I'm good with that.  The finished product has always proven worth it.  We'll just skip over the less than scintillating details of finding, hauling, deconstructing (pulling a massive number of ornery nails), and refinishing (cutting, sizing, planing, and sanding) a tall pile of pallets.  On to step eight.

marking the drywall
Tape Marks Studs Where Planks Will Be Nailed
With the feature wall pallet planks ready for installation, I prepped the wall by finding and marking the studs.

adding wall strips
Leveling Wall Sections With Lath
Next, I applied thin strips of wood lath to level the two sections of drywall, which will provide a more solid backing when nailing in the pallet planks.  The wainscoting pictured above consists of three framed pieces of corrugated metal topped by a chair rail.  It provides a nice contrasting texture, as well as adding a reflective surface to lighten up the space.

pallet wood on walls
Oh the Tales This Wall Could Tell
When I nailed in the rows of pallet wood, I decided to alternate different widths and colors.  I left all of the wood in its natural state, as the original saw blade marks, nail holes, knots, and checking is what adds personality.  As I started working on this step, I got the inspiration to separate rows of planks with horizontally placed strips of recycled lath removed from inside the plaster walls of an old ranch house.  The definition of the chiseled edges of lath created an effect similar to the chinking seen between bricks.  Really, though, it is the history of that lath, and the story it tells, that adds so much value and interest to the feature wall.

wood pallet window seat
Rustic Pallet Window Seat 
No book nook would be complete without a window seat.  Again, I used rustic pallet parts, purposely choosing planks with nail streaks, and then trimming the bench with pallet skids.  Where there was fresh wood from making the cuts, I applied chalkboard spray paint, and then sanded off most of it to blend the color with that of the naturally weathered surfaces.

feed and seed sign
Books Feed and Seed the Mind
Above the window, I created a decorative king post truss trim that matches the actual support truss on the front of my house.  I like the way it ties everything together.  While working on this truss, I happened to find the metal  Feed & Seed sign at Tractor Supply Co.  It seemed like the perfect message for my new space, as books certainly do feed and seed our minds.  When I got home with the sign, I was amazed that it fit exactly in place between the truss and the window.  That never happens.  I knew then that it was meant to be.

finished book nook window seat
My Nook is Ready for Accessorizing
With the construction work done, I am now in the process of accessorizing my new nook.  I have selected fabrics and will soon start sewing the window seat cushion and pillows.  Stay tuned for part two of this DIY series when I post the final reveal.  So, what do you think?  Could you see yourself curled up with a book in this sunny space?


Note: The author may receive a commission from purchases made using links found in this article. “As an Amazon Associate, Ebay (EPN) and/or Esty (Awin) Affiliate, I (we) earn from qualifying purchases.”


Most Recent Reviews on Review This Reviews


Search for Reviews by Subject, Author or Title

The Review This Reviews Contributors


SylvestermouseSylvestermouseDawn Rae BDawn Rae BMbgPhotoMbgPhotoBrite-IdeasBrite-IdeasWednesday ElfWednesday ElfOlivia MorrisOlivia MorrisTreasures by BrendaTreasures by BrendaThe Savvy AgeThe Savvy AgeMargaret SchindelMargaret SchindelRaintree AnnieRaintree AnnieLou16Lou16Sam MonacoSam MonacoTracey BoyerTracey BoyerRenaissance WomanRenaissance WomanBarbRadBarbRadBev OwensBev OwensBuckHawkBuckHawkDecorating for EventsDecorating for EventsHeather426Heather426Coletta TeskeColetta TeskeMissMerFaeryMissMerFaeryMickie_GMickie_G


Review This Reviews is Dedicated to the Memory of Our Beloved Friend and Fellow Contributor

Susan DeppnerSusan Deppner

We may be apart, but
You Are Not Forgotten


“As an Amazon Associate, Ebay (EPN) and or Etsy (Awin) Affiliate, I (we) earn from purchases.” Disclosure Statement

X