Showing posts with label home improvement. Show all posts

Sunday, August 14, 2022

Simple DIY Home Hacks

 I'm certainly not a professional or an expert on home improvement or repairs, but I have learned some things over the years. Here is a review of some simple DIY home hacks that I have used over the years.

Simple DIY Home Hacks

The estimated cost of minor home repairs is said to be about 1% of the cost of your home per year. So, as the value of your home increases so do your repair costs.

Some of these hacks may save you a little money and some may save some time. These are just some tips that I have used myself over the years.

DIY Home Hacks:

Easy plumbing hack
This one is an easy plumbing hack. It's late night and all the stores are closed, and suddenly you find a leak under your sink in the drain pipe. What do you do?

Since there is no water pressure involved in drain pipes, simply wrap some electrical tape tightly around the leak.

This will stop the leak temporarily until you can replace the broken drain pipe.


Clogged drain

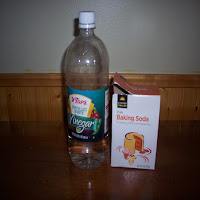
If you have a slow-running drain try some baking soda and white vinegar. Pour 1/2 cup of baking soda into the drain, have a stopper or washcloth handy. Then, pour 1/2 cup of white vinegar into the drain and quickly cover with the stopper or washcloth.

Wait about a minute and then flush with boiling or hot water. To keep my drains running free I do this about once a month. This really works for slow-running drains. If your sink is completely clogged you are going to need a drain cleaner or plunger.


Bees wax

Are you planning some interior painting? Painting around windows can be tedious work. Personally, I like to free-hand paint around windows. But, if you don't have a steady hand you can really make a mess on the windows, and create some extra work to remove the paint.

Applying masking tape takes some time, and is also a real pain to do. Try this, use a stick of Bees Wax and apply it to the window. Be careful not to get any wax on the wood that you're going to paint. Now, paint around the window, and after the paint dries wipe off the Bees Wax. The paint will not stick to the wax.


Denatured alcohol
Denatured Alcohol can be used for many things, such as cleaning glass, metal, and fuel for marine stoves.

This is another painting hack. If you are painting your walls and accidentally drip some onto the finished wood trim and you don't see it until it dries.

Denatured alcohol will remove latex paint without affecting the finish on the wood trim.

Just gently rub the paint spots with a rag wet with the alcohol.


One more hack that I have is removing old window glazing. This one applies only if you have old-style windows. The new windows today do not have window glazing. I don't have a photo because I haven't used this hack in years.

If you happen to have old windows, the glazing over time will dry out and crack.  It's not difficult to apply new glazing around the window, but removing the old glazing can be a pain.

To make this job easy use a heat gun or propane torch, the heat will soften the old glazing to make it easy to remove. A word of Caution: Be careful not to overheat, too much heat will crack the glass. After removing to old glaze, clean the area with a brush, and then brush on some linseed oil before applying the new glaze.

Find more Diy Tips on ReviewThis Here: ReviewThisCrafts.com

ReviewThisDecor.com


Note: The author may receive a commission from purchases made using links found in this article. “As an Amazon Associate, Ebay (EPN) and/or Esty (Awin) Affiliate, I (we) earn from qualifying purchases.”


Sunday, April 10, 2022

How to Fix a Gap at the Bottom of a Door - A Review


Our laundry room door opens to the garage. We recently noticed that time created a gap at the bottom that allowed light, and gawd knows what else to come through!

I did a lot of reading and research to decide which product my husband should use to repair this problem.

Things We Had to Consider:
  • It's a metal door and being a door to the garage, it's a fire door.
  • Products we could DIY
  • However, feel free to double-check and get a professional opinion on the best products to use with a fire door. We're happy with the product we selected.
  • Affordability
  • Easy to install

Information We Needed Before We Decided on the Best Product:

  • The depth and width of the door
  • A close measurement of how big the open gap is at the bottom of the door (between the floor and the door)
  • To choose a fire-rated product
  • Something that was affordable and that we could do ourselves

Allow Me To Save You Some Time:

I researched for hours to find what we thought would be the best product to solve our problem. 

The biggest problem was the endless number of products to choose from!

We chose two products for our exterior door:
  1. U-Shaped Door Bottom with Drip Cap (To fit a 1(3/4)" door width)
  2. Door Draft Stopper for Exterior/Interior Doors - Weather Stripping Door Sweep. Here's the one we purchased from Amazon Canada. Here's a similar product on Amazon USA - It's not the exact same, but very close.

1. The U-Shaped Door Bottom:

This product also comes with a door sweep on it. The benefit for us is that it helped fill in the gap at the bottom of the door. 


It also has a "drip cap." We really didn't need a drip cap since our door is in the garage and not exposed to the elements; however, I preferred the extra coverage the drip cap provided. Plus, it looks nice.

This product slides onto the bottom of the door but needs to be secured with the enclosed screws. You'll need a drill for that.

Our door depth measured 1(3/4)," and the u-shaped door bottom slid on perfectly. 

Our door is 30" wide, and the product comes as one whole piece measuring 36" wide. 

My husband cut the metal piece to fit our door using a Dremel Tool with a cutting disk. Hubby said you could also use a hacksaw. 

His tip is to be sure to measure the width correctly (double-check it) before you begin cutting.

Here's what a Dremel tool looks like:


Here's a close-up of the cutting disks:


2. Door Draft Stopper for Exterior/Interior Doors

This product is pretty easy to put on the door. My hubby's tip is to ensure the door is clean before putting it on. The product sticks on, so it only makes sense that you'll want to have a good clean surface. 

You'll have to cut it to fit your door. 

Here are the easy instructions indicated on the box that came with our product:


Here are a few photos of our actual door - which badly needs painting!


This is the Metal Slide On Door Sweep - View from the Outside of the Door


This is the weather guard on the inside of the door


Note: The author may receive a commission from purchases made using links found in this article. “As an Amazon Associate, Ebay (EPN) and/or Esty (Awin) Affiliate, I (we) earn from qualifying purchases.”


Sunday, September 8, 2019

7 Ways You Can Make the Ceiling Look Higher in a Room

7 Ways to Make the Ceilings Look Higher


1. Use Draperies to Create the Illusion of a Higher Ceiling

If you've longed for high ceilings but know the likelihood of that happening is slim to nil, use a visual trick with floor-to-ceiling draperies. Instead of putting the curtain rod directly above the window frame, place the curtain rod at ceiling height level. Install the rod on the wall or the ceiling, however, it's more common to see the rod on the wall. By having the drapes start at the ceiling, your eyes are drawn upwards giving the room the illusion of height.


2. Do You Have a Popcorn Ceiling with a Ridge?

When popcorn ceilings were popular, some were designed with a three or four-inch ridge of smooth drywall. If your home has this, paint that small ridge around the room the same color as the walls. Having this ridge painted draws the eye upward and gives the room the illusion of having a higher ceiling.
Simple Trick to Create the Feeling of a Higher Ceiling

3. Use Striped Wallpaper or Striped Painted Walls

Just like we wear stripes to create height, stripes on the wall do the same thing. If you're a fan of stripes there are several ways to introduce them into a room; on one wall, on all walls (whoa), or above matching or contrasting colored wainscotting.


4.  Furniture Should Be Low Profile and Add a Cabinet or Bookcase to Ceiling Height

Avoid using bulky furniture in a room where your goal is to create a feeling of height. Lower profile furnishings are smaller and provide more space between the ceiling and furniture thus giving the room an added sense of height.

Budget permitting, add an open bookcase or cabinet (not too bulky) that goes from floor to ceiling. Again, the bookcase draws the eye upwards and the low profile furniture provides the illusion of contrasting height.


5. Use High Gloss Paint on the Ceiling

Really? Yep. This one takes guts. First of all, you'll need a clean, smooth, flawless ceiling to work with. High gloss paint will create a beautiful reflection of the room below, which will, in turn, make the ceiling seem higher. However, if your ceiling isn't prepared properly, beware, because high gloss paint will show every flaw!

Do a bit of research before tackling this. The brave decorator will be happy to know, if done right this technique is outstanding and can make a room feel double in height.


6. Use Pot Lights or Flush Mounted Ceiling Lights

Flush mounted lights or pot lights help a room's ceiling feel higher. Lower hanging lights consume part of the space and thus feed the eye information that the room is standard or low height.


7. Yes, We're Finally at the Obvious One, Mirrors

First, let's talk about mirrors on the wall. If you can mirror an entire wall, bonus. In the first home we owned (decades ago), we used floor-to-ceiling wall-to-wall mirrors around the entry of our front door. We wanted the foyer to feel roomier.

During that time, smoked mirrored glass was popular, as was beveled glass. We used the beveled glass mirrors on one wall in the dining room, and smoked mirrors on the entire wall surrounding the front door. It worked beautifully. Although decorating trends have changed, you can still use this mirroring technique. Choose one wall in the room, and mirror the entire wall.

If using floor-to-ceiling wall-to-wall mirrors isn't an option, try clumping together three or more framed mirrors and placing them higher up on the wall. In other words, bring the eye upwards to those mirrors and position them so they'll reflect light and other parts of the room. They don't have to go to the top of the ceiling. Simply start higher up and work your way downwards.

Finally, yes, you can mirror the ceiling. If there's money in the budget, the designs and styles to choose from are practically endless. You may need a professional to tackle this project!


Note: The author may receive a commission from purchases made using links found in this article. “As an Amazon Associate, Ebay (EPN) and/or Esty (Awin) Affiliate, I (we) earn from qualifying purchases.”


Sunday, August 4, 2019

Getting Ready to Sell Your Home - 7 Simple and Necessary Improvements that Don't Require Renovations

Getting Ready to Sell Your Home Without Renovating

If you're getting ready to sell your home but can't afford any major renovations, lets review a list of updates you can do that won't cost a fortune.

1. Declutter

When getting ready to sell, the first step is to declutter your entire home. Include the basement, sheds, and garage as well. Go through all cupboards and closets and get rid of or store items you don't/won't need during the selling process. Remove unnecessary knick-knacks. Keep coffee and end tables sparingly decorated with lamps, candles and plants.

About the garage: Empty out the clutter so prospective buyers can easily determine whether their car(s) will fit inside. 

2. Paint Rooms

Painting can be time consuming, but it's an affordable first step to give your home a face lift before selling. Keeping the color scheme neutral will attract a broader range of potential buyers. Think in terms of grey, tan, beige, or white. Keep the baseboards and doors a nice crisp white. Avoid multi-colored baseboards! White baseboards provide a lovely border against the wall, rug/floor. Add pops of color with accessories only. Colorful pillows and throw blankets can bring interest to a space.

3. Create a Feature Wall(s)

A feature wall is an affordable and faster way to give your home something extra.  As an example, in the master bedroom, consider a focal wall behind the bed. Ideas for feature walls include faux brick, real brick, vinyl designs, wainscoting, and murals. Anything 'peel and stick' is the easiest.

4. Remove Personal Photos

Some sellers resist doing this. The general thought by those who aren't keen on removing their personal photos is that they feel displaying photos promote the family aspect of their home. However, that's not the way to think about this. 

When potential buyers walk into a home, they're not thinking about your family, they're thinking about how their own family will fit with the property. 

From the moment a buyer steps onto a prospective property they're analyzing the 'feel' for their own family. Emotion guides that process and a multiple combination of the smallest things move buyers closer to a decision. Looking at photos of your family is a distraction to the natural flow of this thought process. Why add a distraction? Let the buyers achieve an emotional connection to your home without disruption.

Your photos represents 'your' house, no photos allow the buyer to imagine their family in this new home. 

5. Clean, Clean and Clean

Let's go through a quick cleaning list:
  •  Declutter kitchen counters, shine kitchen sinks, wipe the cupboards and clean appliances
  •  Clean the grout on all tiles (floors, backsplash, bathtubs)
  •  Scrub bathrooms spotless!
  •  Steam clean all carpets and wash floors
  •  Vacuum your entire home
  •  Wash all the bedding, fluff pillows, and make a pretty bed (it's the focal point!)
  •  Steam clean couches and chairs
  •  Touch up any wall scuff marks with paint where applicable
  •  Ensure all light bulbs work
  •  Wash all the windows and screens
  •  Double check that all closets and cupboards are organized. Buyers will open them!
  •  Rid your house of unsavory pet and cooking odors - Try essential oils
  •  Give your pet area and/or litterbox a thorough disinfecting - Think good smells
  •  Trim overgrown trees, weed the garden and present a lovely entry way by ensuring there's a clear path to the front door.
6. Do You Have Pets?

If you have pets, and are able to, have your fur babies stay with friends or family during the selling process. If you can't arrange that, ensure your pets are secured or removed from the house before a buyer views your home. 

7.  Staging Your Home

Not everyone can afford a professional stager. However, you may reconsider staging when you read about the return on that investment! On average having your home professionally staged costs between .5 to 1 percent of a homes value. But get this: According to the National Association of Realtors for every $100 invested in staging, the potential return is $400! 

If you can't afford a professional stager, complete these fundamentals:
  •  Minimize furniture in smaller rooms
  •  Position furniture so that people can walk through a room naturally without having to walk around pieces to get to doorways
  •  Use simple window coverings, leave them open for viewings
  •  Bring energy to a room by adding plants where applicable
  •  Display baskets of fresh fruit and/or herbs in the kitchen
  •  Turn on lamps and lights before viewings
  •  Ensure the laundry is completed and your mudroom or front closet is organized
  •  Clear the entry way of coats, shoes and boots
  •  Put a lovely seasonal wreath on the front door


Note: The author may receive a commission from purchases made using links found in this article. “As an Amazon Associate, Ebay (EPN) and/or Esty (Awin) Affiliate, I (we) earn from qualifying purchases.”


Sunday, July 7, 2019

A Quick Review of Unique Ways to Add Value to Your Home

Unique Ways to Add Value to Your Home

If you're a fan of extreme home décor, you'll want to take a look at the professional designs featured below. There's a link to each in points 1, 2 and 3.

You can hire a decorator or use these designs to inspire your DIY side. Visit each of the three featured professional designs to view the architecture, color combinations and accessories.

1. Professionally Designed Baby Rooms with a Nautical Theme

If you love the crisp, fresh and airy feel of nautical décor, you'll appreciate these four creative designs. One features a boat shaped crib, while the others utilize the walls and floors for the greatest impact. The fourth baby room has a partial seafoam colored wall and soft rustic wood floors. It's my favorite. The space is open, airy and cheerful. The few pops of color use carefully positioned accessories. Check out the baby room designs here.

2. Design an Indoor Playhouse Using the Area Under a Staircase

Whether the staircase is on the main or lower level, that unused area can serve a purpose. Some of the playhouse designs featured at the link below are over-the-top, but they make an excellent addition to the higher use and value of the home itself. If you're lucky enough to know a handy person, use these ideas to inspire your own unique under-the-stairs design. If a playroom isn't practical, design the area for storage, a closet, or a pet house.  Check out the staircase playhouse designs here.

3. Add a Dog Washing/Cleaning Station to Your Home

This particular design will require a renovation. If you're planning to make structural changes to your home consider a dog washing or cleaning station. Some of the designs are extremely elaborate while others are as easy as removing the laundry sink and replacing it with a walk-in or walk-up mini shower. A dog washing station, which also serves other purposes, will add value to your home and best of all is a perk most houses don't have. You'll separate yourself from the crowd with this particular addition. Take a look at several pet washing stations here.

Features in a Home that Buyers Prefer

Home Buyer Must Haves
The above suggestions qualify as perks. Adding any one of them can help to generate a quicker and/or higher price.

Most sellers understand a home must be prepped for sale with neutral color tones. However, neutral doesn't mean lacking in texture and distinctive elements. To secure the undivided attention of a potential buyer, don't hesitate to add textured walls, wainscoting, unique storage ideas, feature walls, or, money permitting, some of the above perks.

If you're renovating before selling, Extraspace.com lists 15 features buyers prefer.

You're more than likely familiar with most of their suggestions; hardwood floors, open concepts, modern kitchens and finished basements.

However, they mention a few less standard ideas such as a full bathroom on the main level and flexible rooms (rooms left to the discretion of the buyer). A full bathroom on the main level is a tremendous idea especially in combination with a main floor guest room. With an aging population and multi-family living, a home with this feature can appeal to several demographics.
Your home is your sanctuary until you decide to sell. You can always change the colors, but it's difficult to change the layout. When renovating, think ahead and renovate wisely.


Note: The author may receive a commission from purchases made using links found in this article. “As an Amazon Associate, Ebay (EPN) and/or Esty (Awin) Affiliate, I (we) earn from qualifying purchases.”


Thursday, March 21, 2019

DIY Pallet Book Nook

decorative wall and window seat
Pallet Wood Feature Wall and Window Seat
When I purchased my current country home, many of the features that most appealed to me were the quirky, whimsical touches that made it so unlike all of the other cookie-cutter properties.  After moving in, though, I discovered a few things that were just a little too different for my taste.  Still, in renovating those oddities, I wanted to remain true to what had drawn me to this house in the first place: the use of character wood (weathered wood that captures your imagination).

In today's post, I am sharing part one of a two-part series focused on creating a DIY pallet book nook from a previously unused space in my upstairs bedroom.  We will start with the woodworking elements of the project and then finish with handcrafted decorating touches (a homemade cushion, pillows, rug, and other decor to cozy up the space).

Because I have poured so much of myself into my master bedroom renovations, it has become my favorite room in the entire house.  One last improvement remained to make this space visually and functionally cohesive.  There was a funky "hallway" in the room that housed my exercise bike (because it didn't lend itself to much else).  The thing that really bugged me about that long, narrow space was a weird, uneven application of drywall.  I couldn't knock that wall down because it housed my closet and was most likely structural (helping support the roof).  And, hanging, mudding, texturizing, and painting new sheetrock just wasn't on my bucket list.  Been there, done that.  Not my idea of a good time.  So, what to do?

drywall before finishing
Funky Drywall Before Renovation
Recycled pallets are the answer to most of the truly pressing needs in my world.  Seriously.  Pallet wood can right most wrongs.  It just requires a little—well, okay, a lot—of elbow grease.  I'm good with that.  The finished product has always proven worth it.  We'll just skip over the less than scintillating details of finding, hauling, deconstructing (pulling a massive number of ornery nails), and refinishing (cutting, sizing, planing, and sanding) a tall pile of pallets.  On to step eight.

marking the drywall
Tape Marks Studs Where Planks Will Be Nailed
With the feature wall pallet planks ready for installation, I prepped the wall by finding and marking the studs.

adding wall strips
Leveling Wall Sections With Lath
Next, I applied thin strips of wood lath to level the two sections of drywall, which will provide a more solid backing when nailing in the pallet planks.  The wainscoting pictured above consists of three framed pieces of corrugated metal topped by a chair rail.  It provides a nice contrasting texture, as well as adding a reflective surface to lighten up the space.

pallet wood on walls
Oh the Tales This Wall Could Tell
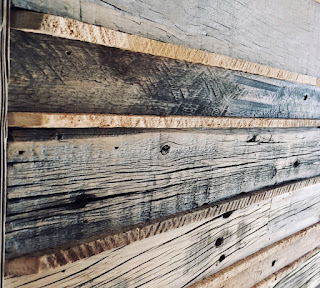
When I nailed in the rows of pallet wood, I decided to alternate different widths and colors.  I left all of the wood in its natural state, as the original saw blade marks, nail holes, knots, and checking is what adds personality.  As I started working on this step, I got the inspiration to separate rows of planks with horizontally placed strips of recycled lath removed from inside the plaster walls of an old ranch house.  The definition of the chiseled edges of lath created an effect similar to the chinking seen between bricks.  Really, though, it is the history of that lath, and the story it tells, that adds so much value and interest to the feature wall.

wood pallet window seat
Rustic Pallet Window Seat 
No book nook would be complete without a window seat.  Again, I used rustic pallet parts, purposely choosing planks with nail streaks, and then trimming the bench with pallet skids.  Where there was fresh wood from making the cuts, I applied chalkboard spray paint, and then sanded off most of it to blend the color with that of the naturally weathered surfaces.

feed and seed sign
Books Feed and Seed the Mind
Above the window, I created a decorative king post truss trim that matches the actual support truss on the front of my house.  I like the way it ties everything together.  While working on this truss, I happened to find the metal  Feed & Seed sign at Tractor Supply Co.  It seemed like the perfect message for my new space, as books certainly do feed and seed our minds.  When I got home with the sign, I was amazed that it fit exactly in place between the truss and the window.  That never happens.  I knew then that it was meant to be.

finished book nook window seat
My Nook is Ready for Accessorizing
With the construction work done, I am now in the process of accessorizing my new nook.  I have selected fabrics and will soon start sewing the window seat cushion and pillows.  Stay tuned for part two of this DIY series when I post the final reveal.  So, what do you think?  Could you see yourself curled up with a book in this sunny space?


Note: The author may receive a commission from purchases made using links found in this article. “As an Amazon Associate, Ebay (EPN) and/or Esty (Awin) Affiliate, I (we) earn from qualifying purchases.”


Thursday, March 17, 2016

Best Cleaning Cloth? The Ultimate Cloth

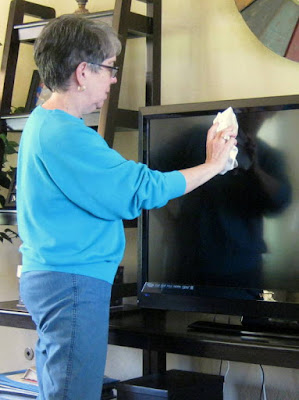
Use the Ultimate Cloth to dust and clean the TV and other electronics
Use an Ultimate Cloth to safely dust and clean
the TV and other electronic devices.
Time for housework? Weekend chores? Spring cleaning? If you dread cleaning house, perhaps you're not using the right tools. Because I believe no one should hate housework, I decided to share this review and personal testimonial about one of my very favorite cleaning tools, the best cleaning cloth I've ever used, the Ultimate Cloth.

You've heard of microfiber, I'm sure. As great as a microfiber cloth may be, the Ultimate Cloth is better. Why? Because it does a better job of cleaning, capturing and holding onto dirt. The Ultimate Cloth is made from MiraFiber which consists of fine, synthetic fibers, smaller than microfiber, that are so tiny they work amazingly well to grab and trap dust, dirt, and grease rather than just pushing it around.

Another great thing about the Ultimate Cloth is that it's machine washable and reusable. In fact, the cloth comes with a 5-year guarantee. Use it, wash it, and use it again, over and over for years. I've had my Ultimate Cloths for nearly four years and continue to use, wash, and re-use the same ones.


Streaky Glass and Mirrors? You Need the Ultimate Cloth!


I like the Ultimate Cloth better than regular microfiber cloths and prefer them especially for cleaning glass and mirrors, the TV screen, and even the screen on my Fire tablet and my phone. These cloths work beautifully in the kitchen on our stainless steel refrigerator, stove, and microwave, too. I also have one dedicated to the bathroom where I use it regularly to wipe down the shower walls and glass shower door.
The Ultimate Cloth makes quick work of fingerprints on stainless steel refrigerators and other appliances.
Dampen an Ultimate Cloth to easily clean smudges
and fingerprints from your stainless steel appliances.

Wet an Ultimate Cloth then wring it out well to clean fingerprints off painted surfaces such as walls, cabinets, or doors (inside or out). Our dog, Daisy, has a tendency to rub against the edge of the kitchen cabinet as she turns one particular corner so when I notice that the oil from her hair has accumulated there, it takes just seconds to dampen an Ultimate Cloth and easily wipe that greasy surface grime from the painted cabinet.

To use an Ultimate Cloth, always start by washing it out well (or run it through the washer) to remove any lint that might be left behind in the manufacturing process. Use a clean cloth dry for electronics, but otherwise dampen it slightly and wring it out well for most other surfaces.

Note that the cloth itself won't scratch, but never rub any surface with a cloth that has gotten especially dirty or has been used to clean greasy surfaces or if the cloth might have picked up any solid particles which could scratch the surface you want to use it on.

When you order, buy an extra pack of Ultimate Cloths to use on the car. Dedicate one to cleaning the windows, dusting the dashboard, or cleaning leather or vinyl surfaces inside. Use another when you wash the outside of the car. They work really well to clean hub caps, too, but don't re-use the same cloth on the paint until you've washed the cloth well to remove any grime or grease.

While the Ultimate Cloth can be used dry for some surfaces (like electronics screens) and cleans well with just water for most other surfaces, if you prefer to use a spray or other chemical cleaner on some surfaces, that's fine. Just remember to throw the cloth in the wash when you're finished so you don't accidentally use the chemical on a surface where you shouldn't.

The following under 3-minute video provides lots of information and will probably answer most of your questions about MiraFiber, so I'd suggest you watch it to learn more.


Machine Washable. Bleachable. Comes With a 5-Year Warranty.


Use this link to order a set of two Ultimate Cloths from Vat19. Since that company charges a flat shipping rate, you might want to order a couple of packs or more (they actually make a thoughtful gift) to have on hand. 

The price might seem high for a cleaning cloth, but I can honestly say that I've gotten more than my money's worth and I have no problem at all justifying the cost. And when I think how many paper towels I might have used in their place over these past few years, there's just no doubt at all that I've gotten my money's worth, and I believe that you will, too. 

Thanks for reading my Ultimate Cloth review. I can honestly say these are the best cleaning cloths I have ever used and I recommend them highly.

~Susan
Meet the Reviewer

Photos belong to the author


Posted by Susan Deppner

Susan Deppner

About the Author

Susan Deppner is a baby boomer, a cancer survivor, and a Southerner who believes in the Golden Rule. She enjoys writing about food, faith, and fitness; health, home, and holidays; people, places, pets, and patriotism, and more. Follow Susan on Twitter, Facebook, and Pinterest.


Note: The author may receive a commission from purchases made using links found in this article. “As an Amazon Associate, Ebay (EPN) and/or Esty (Awin) Affiliate, I (we) earn from qualifying purchases.”


Sunday, April 19, 2015

Review of a Twin Bed King Connector

Turning Twin Beds into a King Size Bed is Easy and Affordable

This is a practical solution for a teen whose outgrown twin beds, or for a guest room where it's necessary to alternate between twin beds and a large single bed.

If you've ever pushed two twin beds together, you know exactly what the problem is; the gap in the middle.

Without a twin bed king converter, we've gotten around this problem by putting several toppers on the mattresses.

However, if you move around a lot when you sleep, the gap is still an issue. Movement slowly splits the twin beds apart.

So being the creative sort, I placed non-skid padding under the mattresses to prevent the mattresses from splitting apart. Although that was an affordable way to address the movement of the mattresses, it didn't solve the dip in the middle.

This is Where a Twin Bed Connector Comes In

The one featured below has straps that wrap around the twin beds. It keeps the beds together.

You may still feel a dip or gap, however, if you place a mattress cover and other toppers on before the sheet, it should be barely noticeable.

Overall this is an affordable solution to transitioning a kids room to a teens room. You can keep the twin beds and convert them into a king for the growing youngster.

Most teens want a bigger bed, and if their room is already furnished with twin beds, this is a viable solution. Best of all, you don't have to buy a king sized bed!

How to Make it Look Nice:

If the room you're making over isn't going to be switched back and forth between twin and king, then it's easy to dress up the bed so it looks like it's always been a king bed.

  • If you have two headboards and you're able to remove them, then you could either go with an improvised headboard attached to the wall that's the width of both mattresses, or elect to skip a headboard altogether and simply deck the bed out with many pillows.

  • If you opt for pillows as the backdrop, without a headboard, you can use a bolster at the head of the bed so the pillows don't appear to be resting directly on the wall. I've done this myself, and it looks really nice.

  • Use a king sized bed skirt. With one skirt going around both beds. Without the appearance of two headboards, nobody will notice the beds were once twin beds.

  • I can't stress enough how padding the mattress with various covers makes a difference; I've used a mattress cover as well as a thick foam mattress pad and it really gives the bed that one piece feel.

The Bed Sheets and the Bedding

Two twin beds, especially with extra padding on top, is a little bigger than a standard king size bed; not much bigger, but enough of an issue that you'll need over sized or deep pocket king sized bed sheets. We love Jersey Knit Bed Sheets because they're stretchable, and they'll work nicely to solve this problem. However, if you're not a fan of Jersey Knit Sheets, then be sure to get king sized bed sheets with deep pockets.


The Non-Slip Padding Mentioned Above 
Ultra Stop Non-Slip Indoor Rug Pad, Size: 4' x 6'Ultra Stop Non-Slip Indoor Rug Pad, Size: 4' x 6'
Above I talk about the non-slip padding I put between the box spring and mattress, well I actually used ones designed to hold area rugs in place.

For us they worked perfectly. This one measures 4 feet by 6 feet, so I just bought a couple for each twin bed, and positioned them on the box spring so as to cover a good portion. I would position them to go over the gap in the bed as well. The Grand Fitted Quilted Mattress Pad Cover Hypoallergenic (Stretches to 18The Grand Fitted Quilted Mattress Pad Cover Hypoallergenic (Stretches to 18

Mattress Pad Cover

Here's an example of a king sized mattress pad cover that you can put over the twin bed king connector and mattress.

This one has 20 inch deep pockets as well, so if you want to put a layer of foam underneath (for added comfort) you should have a enough room. I would say, if you had to choose between the non-slip pads above and this, choose this. It's the best way to pull the mattresses together after you've used the twin connector.


Note: The author may receive a commission from purchases made using links found in this article. “As an Amazon Associate, Ebay (EPN) and/or Esty (Awin) Affiliate, I (we) earn from qualifying purchases.”


Sunday, April 12, 2015

How to Prevent a Door from Hitting A Wall or Closet with a Door Stop Hinge

How to Prevent a Door from Hitting A Wall or Closet with a Door Stop Hinge
Door Stop Hinge
Do you have a mirrored closet door that needs to be protected from a door handle that hits it when opened? And, of course, being a mirrored closet, a regular doorstop won't work?
A Review of a Product that Solves the Problem!
After some research, I found the perfect door stop to use that literally takes minutes to install, doesn't require any drilling, and won't stand out as an eyesore.
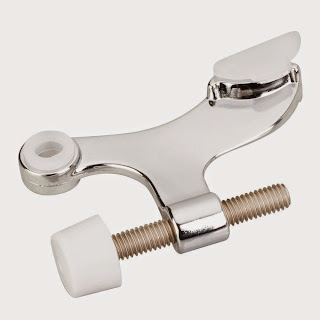
Hinge Pin Door Stops are a terrific little gadget that simply slips into the top hinge pin of the door, causing the rubber protector to stop against the door frame and thus prevent the door or door handle from hitting the wall, closet door, or mirrored closet door beside it.
Several of the rooms in our home have mirrored closet doors that are close to the main entry door of the room itself. 
The main washroom in our home is an example; when you open the washroom door, the handle can crash into the mirrored closet door and potentially break the glass. 
The floor in our washroom is ceramic, so a floor-mounted door stop would be too much work to install, not to mention the awful thought of drilling into the ceramic!
How to Prevent a Door from Hitting A Wall or Closet with a Door Stop Hinge
The Hinge We Installed to Protect
Our Mirrored Closet Doors
So, after hunting for a solution, I came across the wonderful little gadget called a 'door stop hinge.' My husband literally put it on the door in five minutes.
We also used one for a door where the door would hit the wall before it would hit the door stop; for years, it bothered me that our door was getting marked up, and now, after repainting our door and placing a hinge pin door stop in the top Hinge...problem solved.


Note: The author may receive a commission from purchases made using links found in this article. “As an Amazon Associate, Ebay (EPN) and/or Esty (Awin) Affiliate, I (we) earn from qualifying purchases.”


Sunday, February 1, 2015

A Personal Double Oven Review - What's Good and Not So Good About It!

Review of a Double Oven

If You're Thinking About Getting a Double Oven Stove - Here's some Feedback
For years, I insisted that once we were in the market for a new stove, we would get a stove with a double oven. We have a large family, and a double oven is necessary to handle the large meals required when everyone gets together for a celebration - especially Christmas!
Finally, a new stove was required; finally, we got that Double Oven Stove.
Since then, I have learned a few things about double ovens and decided to share them with those looking for the same type of stove.
What I Like About the Double Oven Stove
  1. It's convenient when you have to prepare a large meal. The second oven is handy, especially for warming up pre-made dishes.
  2. It looks imposing and modern.
  3. Love not having to clean stovetop inserts like we had to with the old stove.
  4. We've had it for a few years, and so far, there's been no problem with it
  5. We took the extra step of getting a double oven stove with a convection oven - that's handy once in a while
  6. It's self-clean (which I really appreciate)
  7. Cooks the food nicely
  8. Easy to use
What I Don't Like About a Double Oven Stove
  1. There are two types of Double Oven Stoves I could have selected - One with the smaller oven on top and the larger oven on the bottom and the other with two ovens the same size (The two different choices are featured on this page) - I went with the former: The smaller oven on the top, although very convenient, it has a few limitations: Because the heating elements are so close to the food, the food can burn, so you have to oversee it. In fact, I do not put cakes and pies in the top oven to bake anymore - The first time in my life that I ever burnt a homemade chocolate cake was by placing the cake in the smaller oven to bake! The element is too close to the cake, so I suspect that was the problem. The stoves with the two ovens the same size likely wouldn't produce this result!
  2. I'm not a fan of flat-tops (so I discovered). Yes, they have advantages (they look good, and there are no grills to clean). However, it is too easy for my liking. We keep it clean, but it could be better than when we bought it.
  3. Our old stove had an electrical outlet built into it, this newer model oven doesn't
  4. Although the convection oven is handy occasionally, it's a waste of money for our family. So, if I had to choose another one, I would select one without a convection oven built-in. We just need to use it more to justify the added cost.
In Summary, would I invest in a Double Oven Range again?
The answer to that is yes. I say yes because it's in an affordable price range for us, and although point number 1 in the 'don't like' column above bothers me, the convenience of having two ovens without doing a significant renovation is worth it.
If I were doing a complete kitchen reno, then no, I wouldn't get this double oven stove; I would have two separate ovens installed, one above the other, and get a stand-alone stovetop installed on the counter.


Note: The author may receive a commission from purchases made using links found in this article. “As an Amazon Associate, Ebay (EPN) and/or Esty (Awin) Affiliate, I (we) earn from qualifying purchases.”


Tuesday, July 1, 2014

Weapons of Mass DIY Destruction


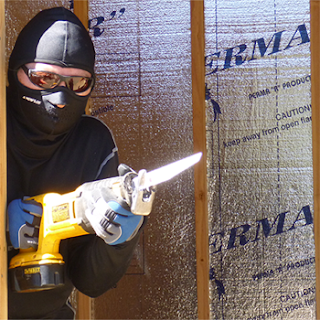
demonstrating construction tools
Black Ops "Do or Di" - Anything is Possible
There are construction tools and then there are weapons of mass destruction.  We’re not talking nukes here.  Who needs nuclear fire power when one has a reciprocating saw that can pretty much destroy anything in its path? 

Yesterday, when I pulled that DEWALT saw out of its case, nothing seemed ordinary about my DIY mission.  Pulling the trigger on that bad boy transformed a seemingly mundane task into a black ops mission. 

Suddenly, I was able to rip through wood, metal, drywall—you name it—with ease.  The power at my fingertips made me invincible.  When put in a “Do or Di” DIY situation, this is the tool you want in your arsenal.
Check out my new product review, featuring current covert activities, then give Squidoo a try.  What is it that awakens your inner ninja?  Is there a product in your life that transforms you into a force to be reckoned with?  We want to read all about it.  

And now I am being called to duty.  There is a top-secret mission with my name on it. #TrySquidoo


Note: The author may receive a commission from purchases made using links found in this article. “As an Amazon Associate, Ebay (EPN) and/or Esty (Awin) Affiliate, I (we) earn from qualifying purchases.”


Tuesday, June 3, 2014

Writing Down the Bones


room studs
Anatomy of my Future Playshop
There is something powerfully transformative about the act of creation.   I have always known that the opportunity to create is my greatest motivator.

Each day, as I stand within the skeleton of the twelve-by-twelve DIY studio I am building, I feel a sense of awe at what can be built with one’s own hands, mind, and will.

If you are a DIY or HGTV junkie like I am, perhaps you have heard talk of homes that have good bones.  In the world of construction, bones matter.

I find it astonishing that these thin sticks I nail together in the right configuration of joints and ribs are so incredibly strong.  There is elegance in the simplicity… an understated beauty.

When the time came, yesterday, to cover the bones, for the exoskeleton is an important part of the structural integrity, I took a few moments to appreciate that which I would not be able to see moving forward. 

Having thoughtfully selected each individual bone, and cared for it during the process of building an inner sanctum for nurturing creativity, this was a moment to savor and celebrate.

This morning, as I write this post, I think of Natalie Goldberg’s classic book, Writing Down the Bones.   Freeing the writer within is about bones just as building a life is about good bones.  Writing down the bones is about expressing essence.  In writing about the essentials of our lives, we experience the creation of the world over and over again. 

I encourage you to write down your bones.  Free the builder within by becoming an essential part of our Squidoo community.  I can’t wait to see what you create with your own hands.


Note: The author may receive a commission from purchases made using links found in this article. “As an Amazon Associate, Ebay (EPN) and/or Esty (Awin) Affiliate, I (we) earn from qualifying purchases.”


Most Recent Reviews on Review This Reviews


Search for Reviews by Subject, Author or Title

The Review This Reviews Contributors


SylvestermouseSylvestermouseDawn Rae BDawn Rae BMbgPhotoMbgPhotoBrite-IdeasBrite-IdeasWednesday ElfWednesday ElfOlivia MorrisOlivia MorrisTreasures by BrendaTreasures by BrendaThe Savvy AgeThe Savvy AgeMargaret SchindelMargaret SchindelRaintree AnnieRaintree AnnieLou16Lou16Sam MonacoSam MonacoTracey BoyerTracey BoyerRenaissance WomanRenaissance WomanBarbRadBarbRadBev OwensBev OwensBuckHawkBuckHawkDecorating for EventsDecorating for EventsHeather426Heather426Coletta TeskeColetta TeskeMissMerFaeryMissMerFaeryMickie_GMickie_G


Review This Reviews is Dedicated to the Memory of Our Beloved Friend and Fellow Contributor

Susan DeppnerSusan Deppner

We may be apart, but
You Are Not Forgotten


“As an Amazon Associate, Ebay (EPN) and or Etsy (Awin) Affiliate, I (we) earn from purchases.” Disclosure Statement

X