Showing posts with label Home Renovation. Show all posts

Sunday, September 8, 2019

7 Ways You Can Make the Ceiling Look Higher in a Room

7 Ways to Make the Ceilings Look Higher


1. Use Draperies to Create the Illusion of a Higher Ceiling

If you've longed for high ceilings but know the likelihood of that happening is slim to nil, use a visual trick with floor-to-ceiling draperies. Instead of putting the curtain rod directly above the window frame, place the curtain rod at ceiling height level. Install the rod on the wall or the ceiling, however, it's more common to see the rod on the wall. By having the drapes start at the ceiling, your eyes are drawn upwards giving the room the illusion of height.


2. Do You Have a Popcorn Ceiling with a Ridge?

When popcorn ceilings were popular, some were designed with a three or four-inch ridge of smooth drywall. If your home has this, paint that small ridge around the room the same color as the walls. Having this ridge painted draws the eye upward and gives the room the illusion of having a higher ceiling.
Simple Trick to Create the Feeling of a Higher Ceiling

3. Use Striped Wallpaper or Striped Painted Walls

Just like we wear stripes to create height, stripes on the wall do the same thing. If you're a fan of stripes there are several ways to introduce them into a room; on one wall, on all walls (whoa), or above matching or contrasting colored wainscotting.


4.  Furniture Should Be Low Profile and Add a Cabinet or Bookcase to Ceiling Height

Avoid using bulky furniture in a room where your goal is to create a feeling of height. Lower profile furnishings are smaller and provide more space between the ceiling and furniture thus giving the room an added sense of height.

Budget permitting, add an open bookcase or cabinet (not too bulky) that goes from floor to ceiling. Again, the bookcase draws the eye upwards and the low profile furniture provides the illusion of contrasting height.


5. Use High Gloss Paint on the Ceiling

Really? Yep. This one takes guts. First of all, you'll need a clean, smooth, flawless ceiling to work with. High gloss paint will create a beautiful reflection of the room below, which will, in turn, make the ceiling seem higher. However, if your ceiling isn't prepared properly, beware, because high gloss paint will show every flaw!

Do a bit of research before tackling this. The brave decorator will be happy to know, if done right this technique is outstanding and can make a room feel double in height.


6. Use Pot Lights or Flush Mounted Ceiling Lights

Flush mounted lights or pot lights help a room's ceiling feel higher. Lower hanging lights consume part of the space and thus feed the eye information that the room is standard or low height.


7. Yes, We're Finally at the Obvious One, Mirrors

First, let's talk about mirrors on the wall. If you can mirror an entire wall, bonus. In the first home we owned (decades ago), we used floor-to-ceiling wall-to-wall mirrors around the entry of our front door. We wanted the foyer to feel roomier.

During that time, smoked mirrored glass was popular, as was beveled glass. We used the beveled glass mirrors on one wall in the dining room, and smoked mirrors on the entire wall surrounding the front door. It worked beautifully. Although decorating trends have changed, you can still use this mirroring technique. Choose one wall in the room, and mirror the entire wall.

If using floor-to-ceiling wall-to-wall mirrors isn't an option, try clumping together three or more framed mirrors and placing them higher up on the wall. In other words, bring the eye upwards to those mirrors and position them so they'll reflect light and other parts of the room. They don't have to go to the top of the ceiling. Simply start higher up and work your way downwards.

Finally, yes, you can mirror the ceiling. If there's money in the budget, the designs and styles to choose from are practically endless. You may need a professional to tackle this project!


Note: The author may receive a commission from purchases made using links found in this article. “As an Amazon Associate, Ebay (EPN) and/or Esty (Awin) Affiliate, I (we) earn from qualifying purchases.”


Sunday, August 4, 2019

Getting Ready to Sell Your Home - 7 Simple and Necessary Improvements that Don't Require Renovations

Getting Ready to Sell Your Home Without Renovating

If you're getting ready to sell your home but can't afford any major renovations, lets review a list of updates you can do that won't cost a fortune.

1. Declutter

When getting ready to sell, the first step is to declutter your entire home. Include the basement, sheds, and garage as well. Go through all cupboards and closets and get rid of or store items you don't/won't need during the selling process. Remove unnecessary knick-knacks. Keep coffee and end tables sparingly decorated with lamps, candles and plants.

About the garage: Empty out the clutter so prospective buyers can easily determine whether their car(s) will fit inside. 

2. Paint Rooms

Painting can be time consuming, but it's an affordable first step to give your home a face lift before selling. Keeping the color scheme neutral will attract a broader range of potential buyers. Think in terms of grey, tan, beige, or white. Keep the baseboards and doors a nice crisp white. Avoid multi-colored baseboards! White baseboards provide a lovely border against the wall, rug/floor. Add pops of color with accessories only. Colorful pillows and throw blankets can bring interest to a space.

3. Create a Feature Wall(s)

A feature wall is an affordable and faster way to give your home something extra.  As an example, in the master bedroom, consider a focal wall behind the bed. Ideas for feature walls include faux brick, real brick, vinyl designs, wainscoting, and murals. Anything 'peel and stick' is the easiest.

4. Remove Personal Photos

Some sellers resist doing this. The general thought by those who aren't keen on removing their personal photos is that they feel displaying photos promote the family aspect of their home. However, that's not the way to think about this. 

When potential buyers walk into a home, they're not thinking about your family, they're thinking about how their own family will fit with the property. 

From the moment a buyer steps onto a prospective property they're analyzing the 'feel' for their own family. Emotion guides that process and a multiple combination of the smallest things move buyers closer to a decision. Looking at photos of your family is a distraction to the natural flow of this thought process. Why add a distraction? Let the buyers achieve an emotional connection to your home without disruption.

Your photos represents 'your' house, no photos allow the buyer to imagine their family in this new home. 

5. Clean, Clean and Clean

Let's go through a quick cleaning list:
  •  Declutter kitchen counters, shine kitchen sinks, wipe the cupboards and clean appliances
  •  Clean the grout on all tiles (floors, backsplash, bathtubs)
  •  Scrub bathrooms spotless!
  •  Steam clean all carpets and wash floors
  •  Vacuum your entire home
  •  Wash all the bedding, fluff pillows, and make a pretty bed (it's the focal point!)
  •  Steam clean couches and chairs
  •  Touch up any wall scuff marks with paint where applicable
  •  Ensure all light bulbs work
  •  Wash all the windows and screens
  •  Double check that all closets and cupboards are organized. Buyers will open them!
  •  Rid your house of unsavory pet and cooking odors - Try essential oils
  •  Give your pet area and/or litterbox a thorough disinfecting - Think good smells
  •  Trim overgrown trees, weed the garden and present a lovely entry way by ensuring there's a clear path to the front door.
6. Do You Have Pets?

If you have pets, and are able to, have your fur babies stay with friends or family during the selling process. If you can't arrange that, ensure your pets are secured or removed from the house before a buyer views your home. 

7.  Staging Your Home

Not everyone can afford a professional stager. However, you may reconsider staging when you read about the return on that investment! On average having your home professionally staged costs between .5 to 1 percent of a homes value. But get this: According to the National Association of Realtors for every $100 invested in staging, the potential return is $400! 

If you can't afford a professional stager, complete these fundamentals:
  •  Minimize furniture in smaller rooms
  •  Position furniture so that people can walk through a room naturally without having to walk around pieces to get to doorways
  •  Use simple window coverings, leave them open for viewings
  •  Bring energy to a room by adding plants where applicable
  •  Display baskets of fresh fruit and/or herbs in the kitchen
  •  Turn on lamps and lights before viewings
  •  Ensure the laundry is completed and your mudroom or front closet is organized
  •  Clear the entry way of coats, shoes and boots
  •  Put a lovely seasonal wreath on the front door


Note: The author may receive a commission from purchases made using links found in this article. “As an Amazon Associate, Ebay (EPN) and/or Esty (Awin) Affiliate, I (we) earn from qualifying purchases.”


Sunday, July 21, 2019

Three Over the Top Home Decor Additions that Few People Can or Will Do

Three Over The Top Home Decor Additions
Will Over the Top Additions Add Value to Your Home?

Let's review how the other side lives. Or rather how those who aren't afraid to take their home above and beyond what's considered standard decorating protocol.

I have to admire people with a free decorating spirit. It takes a lot of faith, trust, pixie dust, and yep, cold hard cash to add the extreme décor ideas featured below.

1. How about A Slide Inside the Home? Huh?

Yes, that's right, it's an actual professionally designed slide. They tend to be added beside staircases. Certainly a practical solution when your knees hurt, or for the kids. Those ankle biters will leap out of bed in the morning just to slide down for breakfast. If you're curious what these look like, check out several spectacular designs here.

2.  You Have the Slide, Now Add the Swings? What?

The choices for adding a swing range from actual swings to swing benches. Swing benches can be open on both sides, or completely closed. And yep, they're not just for porches and patios. The uniqueness comes from adding them to the kitchen, bedroom or living room. They're quite spectacular and you can bet, popular with guests. Curl up with a book and swing inside your home. If you'd like to check out how professional designers tied swings into a décor theme, you can find more information here.

3. Homes with a Secret Passageway, Really?

Really. When the budget isn't an issue, you're only limited by your imagination or better yet, your decorator's imagination. Secret passageways can be staircases that lift and open to a secret room, crawl space cubbies that connect rooms together, or rooms hidden behind walls and bookcases. If you'd like more information on this over-the-top home décor idea, you can read more here.

Does Any of this Add Value to Your Home?

Of course, yes, adding anyone of the above outstanding unique items to your home will add value. But let's examine the word "value".

Value can meaning selling for more, selling quickly or just plain selling. The market dictates which category your sale will fall into.

The value of a home ranges from area to area. A house in the country is generally less expensive on a per square foot basis than a home in the city. City to city prices range substantially as well.

To determine whether it's worth adding an expensive perk to your home (slides, swings, secret rooms), you have to first know the upper limit price range for your area.

If your home is already close to or at that upper price range, making expensive additions may not generate a return. However, if you're making this addition and plan on staying in your home for many years (5, 10 or more), you have a good chance at recouping that investment.

On the bright side, if your home isn't at the higher price range for your neighborhood, making additions like this can help you reach that plateau and/or help you sell your home faster.

Always bear in mind that recessions come in cycles, and selling your home during a recession isn't easy. With anyone of these perks, you'll have an edge, but that doesn't mean during a downturn you'll recoup your decorating investment.

Not to worry if you're selling in an up-market; if your home is staged and filled with perks, you could do well on that selling price! If your home is situated among large estates where each home is unique, making any of the above outlined additions will generally add value.

If you're a real estate stats junkie (like I am), have a ton of fun reading value assessments and projections for the USA here and Canada here at GlobalPropertyGuide.

Although you're reading general stats, you should never apply these generalizations to your area. Even in a declining economy some areas can continue to do well. General stats merely help you secure a global picture. Combine that global information with your local area to help you assess saleability, timing and price.

Here's something I like to do to help assess the long term hold of a piece of property: Look up the population projections for your city or area. What is the ten/twenty year growth analysis by your local state/provincial municipal governments? You can find this information online. If the numbers are through the roof, then there's a high probability your property will increase substantially over time.

So, if your wallet permits any of these wild and funky additions and your home's price is destined to go onwards and upwards for years to come, go for it!

Other unique perks for your home here


Note: The author may receive a commission from purchases made using links found in this article. “As an Amazon Associate, Ebay (EPN) and/or Esty (Awin) Affiliate, I (we) earn from qualifying purchases.”


Sunday, July 7, 2019

A Quick Review of Unique Ways to Add Value to Your Home

Unique Ways to Add Value to Your Home

If you're a fan of extreme home décor, you'll want to take a look at the professional designs featured below. There's a link to each in points 1, 2 and 3.

You can hire a decorator or use these designs to inspire your DIY side. Visit each of the three featured professional designs to view the architecture, color combinations and accessories.

1. Professionally Designed Baby Rooms with a Nautical Theme

If you love the crisp, fresh and airy feel of nautical décor, you'll appreciate these four creative designs. One features a boat shaped crib, while the others utilize the walls and floors for the greatest impact. The fourth baby room has a partial seafoam colored wall and soft rustic wood floors. It's my favorite. The space is open, airy and cheerful. The few pops of color use carefully positioned accessories. Check out the baby room designs here.

2. Design an Indoor Playhouse Using the Area Under a Staircase

Whether the staircase is on the main or lower level, that unused area can serve a purpose. Some of the playhouse designs featured at the link below are over-the-top, but they make an excellent addition to the higher use and value of the home itself. If you're lucky enough to know a handy person, use these ideas to inspire your own unique under-the-stairs design. If a playroom isn't practical, design the area for storage, a closet, or a pet house.  Check out the staircase playhouse designs here.

3. Add a Dog Washing/Cleaning Station to Your Home

This particular design will require a renovation. If you're planning to make structural changes to your home consider a dog washing or cleaning station. Some of the designs are extremely elaborate while others are as easy as removing the laundry sink and replacing it with a walk-in or walk-up mini shower. A dog washing station, which also serves other purposes, will add value to your home and best of all is a perk most houses don't have. You'll separate yourself from the crowd with this particular addition. Take a look at several pet washing stations here.

Features in a Home that Buyers Prefer

Home Buyer Must Haves
The above suggestions qualify as perks. Adding any one of them can help to generate a quicker and/or higher price.

Most sellers understand a home must be prepped for sale with neutral color tones. However, neutral doesn't mean lacking in texture and distinctive elements. To secure the undivided attention of a potential buyer, don't hesitate to add textured walls, wainscoting, unique storage ideas, feature walls, or, money permitting, some of the above perks.

If you're renovating before selling, Extraspace.com lists 15 features buyers prefer.

You're more than likely familiar with most of their suggestions; hardwood floors, open concepts, modern kitchens and finished basements.

However, they mention a few less standard ideas such as a full bathroom on the main level and flexible rooms (rooms left to the discretion of the buyer). A full bathroom on the main level is a tremendous idea especially in combination with a main floor guest room. With an aging population and multi-family living, a home with this feature can appeal to several demographics.

Your home is your sanctuary until you decide to sell. You can always change the colors, but it's difficult to change the layout. When renovating, think ahead and renovate wisely.


Note: The author may receive a commission from purchases made using links found in this article. “As an Amazon Associate, Ebay (EPN) and/or Esty (Awin) Affiliate, I (we) earn from qualifying purchases.”


Thursday, October 4, 2018

Bagster Review

Have you ever started a home improvement project and found the debris begins taking on a life and area of its' own?  Improving one's home can be like opening Pandora's Box; one never knows what you will find lurking in, under, or behind an older home which brings the inevitable problem of how to dispose of construction debris.

We recently demolished an old and small wooden deck. Somehow the little deck turned into a very large pile of debris which seemed to keep growing and growing. Remodeling can be like cutting your own bangs; once you start it is hard to stop. Since we were demolishing the deck... well, of course we should cut down the old unwieldy bush and then could not ignore the well worn railroad ties around the garden bed which had outlived their usefulness.
the bagster


Where and how to dispose of all these goodies? Even though the pile kept growing the size did not warrant renting a dumpster. At the suggestion of the carpenter the Bagster was investigated to help unload our pile of construction debris.


What Is The Bagster?

The Bagster is a disposable bag which can hold up to 3,300 pounds of debris or waste. The purchase of the Bagster allows access to the Bagster Pick Up and Disposal Service operated by Waste Management. It is an on demand debris removal also referred to as a dumpster in a bag.
the bagster


Dumpster or Bagster

In my area it is difficult to rent a small dumpster due to the booming construction industry for both pros and DIYers. Small dumpsters are difficult to rent and one must also have the room to park the dumpster.

It was clear when the deck (it looked so small) was being removed and parked on the lawn this was more construction debris then anticipated. The pike kept growing ! Who knew such a little deck could produce so much construction debris? The dirt was also filled with concrete from the original construction of the house over 50 years ago.

Now what? Enter the Bagster.

the bagster


Where To Find The Bagster

I purchased the Bagster from Amazon  for $29.95. For our project we needed 1.5 Bagsters so of course not wanting to pass up the opportunity to clean out the garage we made great use of the remaining area in the Bagster.

the bagster


Note: Review the Do’s and Dont's as to the type of materials accepted in the Bagster. We had old pieces of odd shaped concrete which had been hanging around the garage for years we happily filled up the remainder of the Bagster. Actually everything we wanted to put into the Bagster was on the Do list for our area.

Schedule The Bagster Pick Up

The system worked flawlessly. I used the online scheduler at approximately midnight on a Monday. I received a confirmation email of the order and subsequent emails throughout the progress of my order through the process.On Wednesday morning at approximately 5:30 am I heard a rumble outside and it was the very large crane/truck arriving to pick up the 2 Bagsters. Shortly after the pick up I received an email completing the process.

Pricing Of the Bagster Pick Up

The pricing of the Bagster and debris removal is two fold: the cost of the Bagster plus the cost of the removal by Waste Management. The cost varies per area and the flat rate can be obtained on the Bagster website. Two Bagsters plus the pick up charge was lower than the cost of renting a small dumpster and so much more convenient!

The Yellow Bagster Handles

The Bagster deceptively indeed holds ALOT of debris.It is critical the yellow handles “touch” for the Bagster to be picked up by the truck as a large crane must be able to lift the
Bagster up by grabbing the handles.


This information is clearly stated on the Bagster bag instructions and the website and do not ignore! 

Coupons

Online scheduling allows a customer to take advantage of a discount off the pick up price of more than one Bagster. Coupons are also available online by searching Bagster coupons.

Recommendation 

I highly recommend the Bagster. It worked flawlessly from start to finish. I’m still surprised how much construction debris can fit into one Bagster. Quick, convenient and on demand debris removal fit our construction project perfectly.


Note: The author may receive a commission from purchases made using links found in this article. “As an Amazon Associate, Ebay (EPN) and/or Esty (Awin) Affiliate, I (we) earn from qualifying purchases.”


Sunday, September 10, 2017

Basic Cupboard Storage Ideas to Consider When You're Doing a Kitchen Makeover

Photo Via Pixabay
Kitchen Renovations Begin in the Mind - If You've Ever Tackled a Kitchen Renovation You Know Exactly What that Means

Once the reno-bug bites us, our thoughts are consumed with trying to add all the things we've always wanted in our soon-to-be brand new kitchen.

Let's review a quick list of the basics to consider when you first start the project.

Break down your kitchen cupboards into categories, then search out the options for each.

See the Pinterest Photos below for Examples of Each.

DISHES (Plates, Cups, Mugs, Casseroles etc)
  1. A pull-out China cupboard. Check it out below in the Pinterest board! It looks very similar to the pullout shelves you see in a pantry cupboard, except the pullout shelves are designed to store your dishes.
  2. Large deep pull-out drawers that fit your plates, saucers and bowls.
  3. Open slots where your plates simply slide in and are revealed in the room, adding a decorative component.
POTS & PANS & COOKIE SHEETS
  1. Pull-out drawers are a standard solution, however there are various designs to decide upon. Check them out below in the Pinterest Board.
  2. A pull-out shelf in a cupboard where you can easily access your items. There are various styles of pull-out shelves to consider; some are metal with funky sorting slots, and others are simply open so you can organize them any way you choose.
  3. Keep them out in the open as a decorative feature by hanging them on a specially designed wall or above a center island.
  4. For all your cookie sheets and long narrow pans, add a section where you simply slide them into a cupboard for easy access. You'll see several ideas in the Pinterest Board below.
SMALL APPLIANCE STORAGE
  1. Create a small appliance storage cupboard in your kitchen, easily accessible from the counter. Include shelves that utilize the entire height of the kitchen cabinetry and fill the closing cupboard with your daily items; blender, coffee machine, vitamix, toaster, and all the other funky small kitchen appliances.
  2. Create a Coffee Serving Cupboard - They're so Cool! Take a look at some of the ones featured below in the Pinterest Board. Have all things coffee included in your coffee cupboard and simply close the cupboard for a clean finished look.
SPICE CABINETS
  1. Spice storage tends to come in two options, vertical and horizontal. Pull-out cupboards beside the stove tend to be the most popular choice, but you can also consider a pull-out drawer with slots for each spice to fit for easy label reading.
  2. Construct open shelves on the backsplash that hold all your spice needs. You'll see an example of several below.
  3. Create a narrow shelving system built onto the inside of a pantry door that holds all your spices. Again, you'll see an example in the Pinterest board below.
FOOD STORAGE
  1. When a full pantry isn't an option, try upside down wire racks installed on an angle inside your cupboards to hold your canned goods. You'll see an example of one below in the Pinterest board.
  2. Designate one section of cupboards from top to bottom with pull-out shelves to hold all your food items.
  3. Use the inside of a small pantry door to hold a good portion of your food items.
A Unique IDEA if Your Kitchen Space Allows:

If you've ever watched HGTV you may have already seen this: A Kitchen without upper kitchen cabinets.

The upper section of the kitchen simply features open shelves on the wall that highlight decorative useful items.

But where will all your 'stuff' go? In your huge walk-in pantry that's where!

Design a pantry (Butler's Pantry) that's almost like another small kitchen. Include a wine fridge, shelves for all your dishes, small appliances and food. Put the microwave in there too. Be sure to check out some of the Butler Pantrys featured below, they're awesome!


Note: The author may receive a commission from purchases made using links found in this article. “As an Amazon Associate, Ebay (EPN) and/or Esty (Awin) Affiliate, I (we) earn from qualifying purchases.”


Sunday, June 25, 2017

It's Easy to Combine Rustic and Modern Decor - A Decorating Review You Can Try

Add a Brick Wall to Warm Up a Contemporary Space
It's not an exaggeration to say young people today tend to prefer a cleaner, slick, modern décor theme.

In fact, if you've recently visited renovated or new homes currently for sale, you've probably noticed that Staged homes are geared toward a contemporary look.

What about People who Prefer the Combination of Two Types of Decorating Schemes? Tying a Little Old with a Lot of New?

Let's take a look at the above featured photo as a how-to guideline for combining rustic with modern.

The obvious focal point and the one that adds the rustic aspect to the space is the brick-wall treatment. The exposed brick contributes an old world tradition to an otherwise modern youthful space.

With exposed brick, you're essentially decorating one (or two) walls to add a cozy, warm, inviting feeling to the space.

Contemporary décor, void of softer tones, texture and color, can come across as cold and uninviting. Texture is especially critical when you want to add warmth. With walls and floors being the two largest most impactful parts of a room, put-your-brave-on and go for it - add texture.

But Exposed Brick is Too Hard to Do Right?

Wrong. Most people avoid it because they're not ready to hire a craftsman to install the brick. However, if you're wearing-your-brave, take that leap, do it! The professional install will only add
Dress-up Your Brick Wall with Canvas Art
and Creative Lighting
value (in most cases) to your home.

But guess what, you can DIY this project. That's right. Yes you can. Faux brick is something you can find and order online, and depending on the type of brick you choose, most go up with a peel and stick backing.

DIY faux brick walls are the easiest and least expensive way to add texture to your space. If you're too nervous to try a large wall, order just enough to do a small feature wall in your home. Once it's up, then decide if it's a look you're interested in pursuing further.

In terms of accents against an exposed brick wall, incorporate furniture with wood and rod iron. Rod iron in particular looks outstanding against exposed brick. Closely check the above photo and you'll see that the chairs have rod-iron legs on them.

Another point of interest in the above photo, is the mix of wood tones. Since the wood flooring, painted walls and kitchen area are completed in light colors within the same family and the exposed brick is in a darker shade in the tan/light brown family, the wood table set works perfectly.

So although you're looking at a space with white/grey/blonde wood floors and a darker wood table, it flows beautifully because the exposed brick wall ties the entire space together.

Give it a try!


Note: The author may receive a commission from purchases made using links found in this article. “As an Amazon Associate, Ebay (EPN) and/or Esty (Awin) Affiliate, I (we) earn from qualifying purchases.”


Sunday, March 5, 2017

Add 'Greenery' to Your Decor This Year - Pantone's Color of the Year for 2017

Mug Here - Featuring Greenery
Each Year Pantone Assigns a Color for the Year - Happy Renewal to You, Because it's Greenery!

You may be wondering how Pantone selects the color and you're correct if you've concluded that it's a reflection of the current mood and expression of the time.

On Pantone's website you'll read words like 'rejuvinate' and 'revitalize' appropriately used to describe why Greenery was selected.

It's safe to say, the need for reconnection during these stressful times makes almost ridiculous sense! The calming rebirth of nature and our need to make our way back to it, is offered up through Greenery's yellow/green soothing reassuring combination.

Redecorating and Choosing Colors

If we're planning a redecorating project or are starting from scratch, choosing colors can be challenging. However, the color palette is the first best place to start, with the exception being when we're using colors from an existing piece of furniture or accessory as the base.

When we're decorating a room from the beginning and need guidance choosing a color palate to work with 2017's color Greenery, Pantone's 2017 page is a time saver; check out their suggested pairings. When there, scroll down and you'll see the ten palates by name with color suggestions for each.

Each palate shows colors along with color numbers, making them easy to find when shopping for matching paint, furniture and accessories.

For 2017 the named Pantones Palates Are:

Transitions
Ethereal Material
Grand Canyon
Forest Floor
Rev It Up
Fathomless
Analogous
Moody Blooms
Deep Rooted
Calm it Down

Be sure to check out these palates; why struggle trying to choose colors ... Pantone is a very helpful resource.

Greenery is nature's neutral, so take a deep breath and enjoy your spring decorating projects as you create a space that reflects vitality, beauty and renewal.


Note: The author may receive a commission from purchases made using links found in this article. “As an Amazon Associate, Ebay (EPN) and/or Esty (Awin) Affiliate, I (we) earn from qualifying purchases.”


Sunday, July 12, 2015

Unique Wall Decorating Idea for Washrooms!

Quotes for the Bathroom Wall
The Washroom Quote We Featured

The Twitter Principle - I call these 'Mom's Visual Tweets'

A few years ago, we updated our main washroom, and one of the accessory items I wanted to place on the wall was a quotation that didn't relate to the room itself.
Typical washroom quotes normally involve something about brushing your teeth or maybe soaking in the tub. However, you don't have to limit your choices. You can easily select words usually reserved for a bedroom, kitchen, living room, or office.
I elected to go this route mainly because it's the one room I know I'll have the kids' undivided attention in! I'm using what I call 'The Twitter Principle' - I call these Mom's Visual Tweets. Especially since some of my boys are men now, reading a short, profound message is much more effective than mom (a.k.a ME) blurting out one-liners! Not to mention that short quotes qualify as NOT too much information!

I've also placed quotes on the fridge for the family to read, but since our washroom was recently updated, I used a small space on the wall to feature this lovely message:

Washroom with Wall Quote
Our Washroom with Wall Quote - Wall Quotes
However, don't feel you have to be limited to being profound and deep with your word choices; you can also choose fun quotes, especially if the washroom is deemed a 'kid space,' or you can have a quote personalized and simply select your own words. 
The above photo shows the canvas quote I put on our own washroom wall, as well as a photo that shows you how I used a small section of the wall to feature it. You can see that you only need a little wall area to find a space for a quote.

Reading and gathering quotes and sayings is one of my favorite hobbies, so much so that I've created quite an extensive Pinterest board about quotes: 

Follow Barbara Tremblay Cipak's board Favorite Quotes on Pinterest.
Have fun decorating!


Note: The author may receive a commission from purchases made using links found in this article. “As an Amazon Associate, Ebay (EPN) and/or Esty (Awin) Affiliate, I (we) earn from qualifying purchases.”


Sunday, April 19, 2015

Review of a Twin Bed King Connector

Turning Twin Beds into a King Size Bed is Easy and Affordable

This is a practical solution for a teen whose outgrown twin beds, or for a guest room where it's necessary to alternate between twin beds and a large single bed.

If you've ever pushed two twin beds together, you know exactly what the problem is; the gap in the middle.

Without a twin bed king converter, we've gotten around this problem by putting several toppers on the mattresses.

However, if you move around a lot when you sleep, the gap is still an issue. Movement slowly splits the twin beds apart.

So being the creative sort, I placed non-skid padding under the mattresses to prevent the mattresses from splitting apart. Although that was an affordable way to address the movement of the mattresses, it didn't solve the dip in the middle.

This is Where a Twin Bed Connector Comes In

The one featured below has straps that wrap around the twin beds. It keeps the beds together.

You may still feel a dip or gap, however, if you place a mattress cover and other toppers on before the sheet, it should be barely noticeable.

Overall this is an affordable solution to transitioning a kids room to a teens room. You can keep the twin beds and convert them into a king for the growing youngster.

Most teens want a bigger bed, and if their room is already furnished with twin beds, this is a viable solution. Best of all, you don't have to buy a king sized bed!

How to Make it Look Nice:

If the room you're making over isn't going to be switched back and forth between twin and king, then it's easy to dress up the bed so it looks like it's always been a king bed.

  • If you have two headboards and you're able to remove them, then you could either go with an improvised headboard attached to the wall that's the width of both mattresses, or elect to skip a headboard altogether and simply deck the bed out with many pillows.

  • If you opt for pillows as the backdrop, without a headboard, you can use a bolster at the head of the bed so the pillows don't appear to be resting directly on the wall. I've done this myself, and it looks really nice.

  • Use a king sized bed skirt. With one skirt going around both beds. Without the appearance of two headboards, nobody will notice the beds were once twin beds.

  • I can't stress enough how padding the mattress with various covers makes a difference; I've used a mattress cover as well as a thick foam mattress pad and it really gives the bed that one piece feel.

The Bed Sheets and the Bedding

Two twin beds, especially with extra padding on top, is a little bigger than a standard king size bed; not much bigger, but enough of an issue that you'll need over sized or deep pocket king sized bed sheets. We love Jersey Knit Bed Sheets because they're stretchable, and they'll work nicely to solve this problem. However, if you're not a fan of Jersey Knit Sheets, then be sure to get king sized bed sheets with deep pockets.


The Non-Slip Padding Mentioned Above 
Ultra Stop Non-Slip Indoor Rug Pad, Size: 4' x 6'Ultra Stop Non-Slip Indoor Rug Pad, Size: 4' x 6'
Above I talk about the non-slip padding I put between the box spring and mattress, well I actually used ones designed to hold area rugs in place.

For us they worked perfectly. This one measures 4 feet by 6 feet, so I just bought a couple for each twin bed, and positioned them on the box spring so as to cover a good portion. I would position them to go over the gap in the bed as well. The Grand Fitted Quilted Mattress Pad Cover Hypoallergenic (Stretches to 18The Grand Fitted Quilted Mattress Pad Cover Hypoallergenic (Stretches to 18

Mattress Pad Cover

Here's an example of a king sized mattress pad cover that you can put over the twin bed king connector and mattress.

This one has 20 inch deep pockets as well, so if you want to put a layer of foam underneath (for added comfort) you should have a enough room. I would say, if you had to choose between the non-slip pads above and this, choose this. It's the best way to pull the mattresses together after you've used the twin connector.


Note: The author may receive a commission from purchases made using links found in this article. “As an Amazon Associate, Ebay (EPN) and/or Esty (Awin) Affiliate, I (we) earn from qualifying purchases.”


Sunday, April 12, 2015

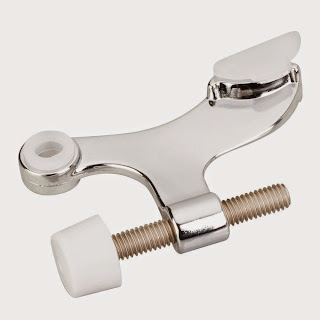
How to Prevent a Door from Hitting A Wall or Closet with a Door Stop Hinge

How to Prevent a Door from Hitting A Wall or Closet with a Door Stop Hinge
Door Stop Hinge
Do you have a mirrored closet door that needs to be protected from a door handle that hits it when opened? And, of course, being a mirrored closet, a regular doorstop won't work?
A Review of a Product that Solves the Problem!
After some research, I found the perfect door stop to use that literally takes minutes to install, doesn't require any drilling, and won't stand out as an eyesore.
Hinge Pin Door Stops are a terrific little gadget that simply slips into the top hinge pin of the door, causing the rubber protector to stop against the door frame and thus prevent the door or door handle from hitting the wall, closet door, or mirrored closet door beside it.
Several of the rooms in our home have mirrored closet doors that are close to the main entry door of the room itself. 
The main washroom in our home is an example; when you open the washroom door, the handle can crash into the mirrored closet door and potentially break the glass. 
The floor in our washroom is ceramic, so a floor-mounted door stop would be too much work to install, not to mention the awful thought of drilling into the ceramic!
How to Prevent a Door from Hitting A Wall or Closet with a Door Stop Hinge
The Hinge We Installed to Protect
Our Mirrored Closet Doors
So, after hunting for a solution, I came across the wonderful little gadget called a 'door stop hinge.' My husband literally put it on the door in five minutes.
We also used one for a door where the door would hit the wall before it would hit the door stop; for years, it bothered me that our door was getting marked up, and now, after repainting our door and placing a hinge pin door stop in the top Hinge...problem solved.


Note: The author may receive a commission from purchases made using links found in this article. “As an Amazon Associate, Ebay (EPN) and/or Esty (Awin) Affiliate, I (we) earn from qualifying purchases.”


Tuesday, April 8, 2014

Tile in a Snap


tiled home entry
SnapStone Floating Tile
Seven years ago I bought a new home that was about 70 percent complete.  Part of the 30 percent that remained to be finished included flooring in two bedrooms, the upstairs loft, a half bath, pantry, laundry room, and stairwell.  To make the house immediately livable, I put in some flooring that was trendy at the time.  I figured if a product passed the Divine Design test of my HGTV guru, Candice Olson, it was certainly more than worthy of installation in my home.

I’m still happy with most of the flooring I installed, but I have since rescued a dog.  Anyone who has cared for larger dogs knows they can be hard on flooring.  The area that has taken a beating is the stairwell landing where Toby likes to hang out by a picture window that gives him a place to keep an eye on what’s happening in our world.  I need to install a tougher material that can take heavy traffic.

Having decided on tile, since my animals love to soak up the sun in front of that window, I have been researching DIY options.  How I love to come across web pages that show an innovative home improvement product in action.  There are many websites pushing products, but few that are exceptional when it comes to demonstrating an actual installation.  I appreciate a how-to presentation that is honest in sharing what went right as well as lessons learned.

Here’s one of the best Squidoo lenses I found.  KateHon demos a fabulous floating tile flooring option while sharing before and after photos of a bathroom renovation.  I can see myself installing this tile floor in my home.  How about you?

Have you published a home improvement product review?  If so, stop by and let me know.  I hope to feature your work.  You can find me at Home Renovation Central and "Do or Di DIY."


Note: The author may receive a commission from purchases made using links found in this article. “As an Amazon Associate, Ebay (EPN) and/or Esty (Awin) Affiliate, I (we) earn from qualifying purchases.”


Tuesday, March 11, 2014

Uniquely Brilliant

ostrich egg carvings
Photo Credit: Ostrich Egg Carvings
This morning I have several things on the brain that might seem unrelated at first glance:  Seth Godin, orchids, Dremel tools, dentures, "peticures," and egg carvings.  You just never know what you’re going to find here when I start writing at 2:30 a.m.  I enjoy being surprised by the things percolating in my brain at this hour.

So what is the connection?  The interwoven thread is that of being indispensable and uniquely brilliant.  I am, of course, thinking about Seth Godin’s book about linchpins.  One of the things Seth asks us is if we are indispensable.  I had always hoped to be seen in that way but in reality, when I first read his book, I had not yet experienced an organization that didn’t constantly remind my colleagues and I that we could be easily dispensed of and replaced. 

What makes you or I indispensable, or, in the definition of a human linchpin, essential?  We learn by reading Seth’s book that it is our unique brilliance.  And, our unique brilliance has to do with the artistry of our hearts and souls.  We become indispensable when we turn each day into a work of art. 

That explains where the title of this post and Seth Godin come into play.  You may still be wondering how I’m going to work in the orchid, false teeth, peticure, carving, and Dremel angles.  This has to do with the artistry, unique brilliance, and essence of those who make Squidoo such an incredibly creative unworkplace.

Unworkplace?  That’s right.  Squidoo is not typical in any way.  In this creative community, each writer is constantly encouraged to pour his or her indispensability into each interaction (with others and with stories).  So what is the work in an unworkplace?  It’s emotion, and passion, and delight.  It is being the work of art that we already are in essence.

That brings us to the rest of the story, as Paul Harvey would say.  A while back, I issued a challenge for creative souls to share reviews of their favorite Dremel tools.  In my “Do or Di” DIY world, the Dremel is indispensable.  It is uniquely brilliant.  It’s the one tool I would never want to be without.  I haven’t found anything that my Dremel cannot do.  It is a linchpin.

While visiting Dremel reviews on Squidoo, I have been continually amazed and delighted by the ingenious ways in which my fellow writers use their Dremel tools and accessories.  Please take a few moments to celebrate with me the unique brilliance of those who have demonstrated there are no limits to what two linchpins (human and Dremel) can accomplish in concert with one another.  

Denise McGill saves the day with her Dremel dentistry brilliance.  While Nathanville upcycles a plastic tumbler into an orchid pot using his Dremel.  Then there are the amazing egg carvings presented by Craft-E-Mom.

After checking out their artistry, might you join us as the newest member of our Squidoo Linchpin Collective?  We’d love to have the opportunity to appreciate the indispensable artistry and unique brilliance of you.


Note: The author may receive a commission from purchases made using links found in this article. “As an Amazon Associate, Ebay (EPN) and/or Esty (Awin) Affiliate, I (we) earn from qualifying purchases.”


Tuesday, February 25, 2014

Do or Di DIY


hammer head
My Third Eye
When I was taking a high school Probability and Statistics class, believe me, an improbability in itself, my good friend and I sat in the back row repeating our mantra over and over again: “Ours is not to question why, ours is but to do or die.”  Then we would laugh.  Crisis averted. 

Sometimes DIYers get in a situation that begins to feel a little do-or-die.  I know I felt that way at least a couple of times during my recent kitchen renovation project.  That’s when you begin to ask: Whose idea was this?  What was I thinking?  How do I get myself out of this mess?

Home renovation, like grief, can offer up many stages: denial, anger, acceptance, and, finally, thank goodness, relief.  Geesh.  All I wanted was to reface my cabinets.  I didn’t know I was signing on for any heavy-duty emotional stuff.  I must admit, it was pretty cathartic.

I’ve decided there really should be home renovation support groups.  It is not unusual to need some therapy while in the midst of living in a home that is torn to smithereens.  DIY adventures are rarely neat and tidy.  We can all use a little encouragement to stay the course and push through to the other side.  It really is worth it.

Because I didn’t have a support group cheering me on during my kitchen facelift, I have decided to start one for all of you DIY brave hearts out there.  Our group meetings will take place on Facebook and Squidoo.  Therapy and cookies will be provided free of charge.  Just bring your renovation issues.  Of course, you are entirely welcome even if you have never experienced one single moment of DIY angst.  You can be our well-adjusted home renovation poster child. 

We have a new Facebook hangout.  I call it “Do or Di DIY” (the “Di” is me, Squidoo’s Home Renovator Contributor).  Please stop by and use your greatest DIY tool, your thumb, if you feel moved to do so.  A little love goes a long way.  And now, please pass the cookies... greatest therapy known to womankind.


Note: The author may receive a commission from purchases made using links found in this article. “As an Amazon Associate, Ebay (EPN) and/or Esty (Awin) Affiliate, I (we) earn from qualifying purchases.”


Tuesday, February 4, 2014

Ask Yourself Out on a Date

lowes storefront
Photo Credit: Renaissance Woman

The next time you are looking for writing inspiration, or a creative boost, take yourself on a date.  I first got this idea from Julia Cameron’s bestselling book entitled The Artist’s Way.  Cameron encourages us to schedule time for a weekly artist’s date.

The kind of date you choose will depend on your particular writing niche.  My most recent date, because I contribute to the home renovation niche, took me to Home Depot and Lowe’s.  I wanted to experience the hottest new home improvement products and gather firsthand information regarding trending do-it-yourself projects.

In addition to sparking ideas for my next home renaissance project, which involves natural ledgestone tile and cable lighting, the date made it possible for me to snap some photos, obtain product samples, and take home everything I needed to immediately get to work on both my renovation projects and related product reviews. 

stone tiles
One of the Hottest New Natural Stone Tile Products
Photo Credit: Renaissance Woman
You may not be a DIY artist, but the same concept applies to any niche.  Your date might take you to a bookstore, party store, craft supply store, electronics emporium, theater, museum, cooking class, local festival, or even an organic foods cooperative.  The point is to go somewhere stimulating.

After last week’s artist date, I was inspired to write about the Dremel Saw-Max, my newest home renovation tool.  To my delight, that review was featured as a Review of the Day.  Had I not gone on my artist date, I might never have written that review. 

Best of all, I now have two new love interests in my life – Max and Ledge Stone.  I’ll be writing more about Ledge, as he is featured in an upcoming product review.  I just know you are going to love his rock solid presence and craggy good looks.  Who knew DIY dates could be so romantic?  Stay tuned to discover who ends up being my Valentine’s Day date.

What kind of creative date might you choose for your writing niche?


Note: The author may receive a commission from purchases made using links found in this article. “As an Amazon Associate, Ebay (EPN) and/or Esty (Awin) Affiliate, I (we) earn from qualifying purchases.”


Most Recent Reviews on Review This Reviews


Search for Reviews by Subject, Author or Title

The Review This Reviews Contributors


SylvestermouseSylvestermouseDawn Rae BDawn Rae BMbgPhotoMbgPhotoBrite-IdeasBrite-IdeasWednesday ElfWednesday ElfOlivia MorrisOlivia MorrisTreasures by BrendaTreasures by BrendaThe Savvy AgeThe Savvy AgeMargaret SchindelMargaret SchindelRaintree AnnieRaintree AnnieLou16Lou16Sam MonacoSam MonacoTracey BoyerTracey BoyerRenaissance WomanRenaissance WomanBarbRadBarbRadBev OwensBev OwensBuckHawkBuckHawkDecorating for EventsDecorating for EventsHeather426Heather426Coletta TeskeColetta TeskeMissMerFaeryMissMerFaeryMickie_GMickie_G


Review This Reviews is Dedicated to the Memory of Our Beloved Friend and Fellow Contributor

Susan DeppnerSusan Deppner

We may be apart, but
You Are Not Forgotten


“As an Amazon Associate, Ebay (EPN) and or Etsy (Awin) Affiliate, I (we) earn from purchases.” Disclosure Statement

X