Showing posts with label textures. Show all posts

Sunday, November 24, 2024

5 Textured Wall Ideas to Help You Add Interest to Your Space

5 Textured Wall Ideas to Help You Add Interest to Your Space

Transform Your Space with These 5 Stunning Textured Wall Ideas

Did you know that textured walls are one of the 2025 home decor trends?

When decorating your home, textured walls are the secret ingredient to adding depth, warmth, and personality to any room.

Whether creating a bold statement or a subtle layer of interest, these ideas will inspire you to reimagine your walls in ways that evoke emotion and style. 

Let’s explore five fabulous textured wall ideas, complete with tips on color, balance, and how to maximize each option.


1. Faux Brick Walls: The Charm of Urban Sophistication

Faux brick walls bring the rugged charm of a city loft into your home without the structural overhaul. These panels or wallpapers mimic the texture and appeal of exposed brick, creating a cozy yet industrial vibe.

What It Adds:
Brick walls add a sense of authenticity and character to your space, perfect for creating a warm, inviting atmosphere. Use them in a living room or home office to make the space feel grounded and stylish.

Color Tip:
Go with classic red bricks for a rustic charm or whitewashed bricks for a lighter, more modern feel. To avoid overwhelming a room, balance the texture with smooth surfaces, like sleek furniture or polished floors.

Designs to Preview Here.


2. Textured Paint Techniques: Subtle Sophistication

Textured paint was a hot trend in the 1990s, and I added it to my home as well. Fortunately, this textured look is making a comeback! Because I still have it featured in my hallways. I find it very durable, especially when you seal the sponge work with a sealer. 

Textured paint techniques, like sponging or rag rolling, bring soft, layered textures to your walls, evoking a sense of movement and depth. These techniques work wonderfully in bedrooms, hallways, or bathrooms for a soothing yet elegant touch.

What It Adds:
This option adds a luxurious, artistic flair to any room, drawing the eye while remaining understated. It’s perfect for creating an intimate, serene space.

Color Tip:
Choose soft hues like lavender, sage green, or pale blue for a calming effect. Avoid overly bold colors, as they can make the texture feel chaotic. Stick to a monochromatic palette to keep things cohesive.


3. Wood Paneling: Rustic Warmth with Modern Appeal

Wood paneling should have a modern flare—not those found in 1960s basements. Unless you love that, then go for it.

Whether reclaimed or new, wood paneling or shiplap makes a space feel cozy and organic. Vertical or horizontal slats can create illusions, like making a ceiling appear higher, or a room appear longer.

What It Adds:
The natural texture of wood infuses warmth and a tactile quality into a room, making it feel grounded and serene. It’s especially effective in dining areas or bedrooms.

Color Tip:
Light oak or ash wood brings brightness, while darker shades like walnut create a dramatic, moody vibe. Pair dark wood with light-colored walls or ceilings to avoid making the room feel heavy.


4. 3D Wall Panels: Drama and Depth

3D wall panels create a dynamic visual experience for a bold, modern look. These panels, available in geometric, floral, or abstract designs, turn any wall into a statement piece.

What It Adds:
These panels add drama, sophistication, and a futuristic vibe. They’re perfect for accent walls in living rooms or behind a bed as a headboard feature.

Color Tip:
White or neutral panels keep the design crisp and modern, while bold colors like navy or emerald green make a room pop. Use sparingly, as too much texture and color can overwhelm a space.

3D Wall Designs to Preview Here


5. Grasscloth Wallpaper: Organic Elegance

Here comes the 1980s. We created a featured grasscloth wall in our first apartment in 1982! Oh, and I loved it, and I still love grasscloth.

Grasscloth wallpaper is made from natural fibers like jute, sisal, or bamboo. It gives walls a soft, woven texture, perfect for creating a tranquil, spa-like ambiance.

What It Adds:
Grasscloth brings an organic, earthy feel to a room, creating a sense of calm and balance. It’s ideal for home offices, libraries, or even entryways.

Color Tip:
Earthy tones like beige, olive, or sand enhance the natural vibe. Because grasscloth has subtle patterns, pairing it with solid-colored furniture is best to maintain balance.

Grasscloth Wallcovering on Amazon.


How to Avoid Overwhelming a Space with Textured Walls

  • Start Small: Use texture on a single accent wall rather than an entire room to keep the look balanced.
  • Coordinate Colors: Choose complementary colors across textured and non-textured surfaces for harmony.
  • Balance with Simplicity: Pair textured walls with minimalist decor to let the walls shine without creating visual clutter.
  • Play with Lighting: Proper lighting can beautifully highlight textures, so use spotlights or wall sconces to add depth and drama.



Note: The author may receive a commission from purchases made using links found in this article. “As an Amazon Associate, Ebay (EPN) and/or Esty (Awin) Affiliate, I (we) earn from qualifying purchases.”


Thursday, April 25, 2019

Review of Texturing Technique in Photoshop

Pink Daisy with texturing technique applied on photo by mbgphoto

A favorite technique of mine in Adobe Photoshop is texturing.  The photo above shows a photo of a flower with a textured background.  This photo is actually a combination of two different photographs that I shot.  The foreground is the daisy flower and the textured background is a photograph of my windshield with ice on it.  On this post I will review some of the steps needed to create this photo and then show some other photographs I created using this procedure.


Creating a Textured Background

There are many places online that you can buy textured backgrounds, but I like to create my own using parts of photographs that I have taken.  Here are a few from my library.  They include a couple of sky images, a brick wall, fire (from my fireplace) and the icy windshield that I used in the introductory photo.


photo background created by mbgphotophoto background created by mbgphotophoto background created by mbgphoto

photo background created by mbgphoto


Steps to Create Textured Photo Composite

The steps below are the ones I used to create my textured background images.  There are several different ways to do different procedures in PS(Photoshop) but these are the ones I find easiest for me.  I have never taken a class on PS, but rather have taught myself through the use of the tutorials on PS (great for the basics) and YouTube tutorials you can find online for many different specialty techniques.  Here then are the steps used to create the photo like the one at the top of this post.
  •   I first Open a background photo in PS. I used my icy windshield background for the photo at the top of this post. I also always make a duplicate copy of the background photo.
  • Next I click on file and then Place Embedded to select the photo that I want in the forefront.  In this case my daisy photo. The new photo will come in on top of the background photo and I will then stretch or reduce it to make it the same size as the background photo.
  • The next step is to pick out the area of the photo that you want to highlight.  In the case of the daisy photo I use the Quick Selection tool to outline the main daisy.  I then click the  button at the top that says Select and Mask.
  • This will open a new window that will give you the opportunity to use sliders to bring in as much of the background texture as you want.  Play with the sliders till you get the desired effect and click done.
  •   This will bring you back to the main screen where you will now click the little square at the bottom of the layers column that adds the layer mask.(when I first started I always got hung up because I forgot this important step.)
  • Next you will tweak the sliders for the layer mask to get exactly the effect you desire.
  • Now you just save your work and you have created a beautiful photo with a textured background.
  • This took a lot of practice for me to get all the steps right so don't get discouraged if at first you don't succeed.

    Samples of my Textured Background Photos

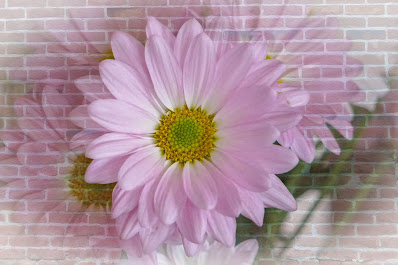
    pink daisies with brick background photo by mbgphoto
    Daisy  with Brick Wall Texture

    Eastern Bluebirds photo by mbgphoto
    Bluebirds with Sky Texture Background

    candle through lensball with textured background by mbgphoto
    Candle in Crystal Ball with Fire textured background

    Photoshop Texture Book on Amazon


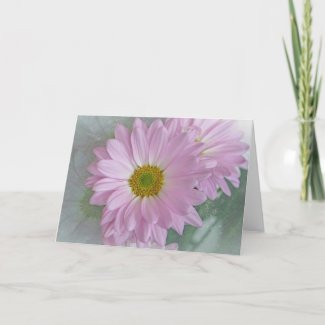
 Zazzle Card with Textured Photo


Note: The author may receive a commission from purchases made using links found in this article. “As an Amazon Associate, Ebay (EPN) and/or Esty (Awin) Affiliate, I (we) earn from qualifying purchases.”


Most Recent Reviews on Review This Reviews


Search for Reviews by Subject, Author or Title

The Review This Reviews Contributors


SylvestermouseSylvestermouseDawn Rae BDawn Rae BMbgPhotoMbgPhotoBrite-IdeasBrite-IdeasWednesday ElfWednesday ElfOlivia MorrisOlivia MorrisTreasures by BrendaTreasures by BrendaThe Savvy AgeThe Savvy AgeMargaret SchindelMargaret SchindelRaintree AnnieRaintree AnnieLou16Lou16Sam MonacoSam MonacoTracey BoyerTracey BoyerCheryl Paton Cheryl PatonRenaissance WomanRenaissance WomanBarbRadBarbRadBev OwensBev OwensBuckHawkBuckHawkDecorating for EventsDecorating for EventsHeather426Heather426Coletta TeskeColetta TeskeMissMerFaeryMissMerFaeryMickie_GMickie_G


Review This Reviews is Dedicated to the Memory of Our Beloved Friend and Fellow Contributor

Susan DeppnerSusan Deppner

We may be apart, but
You Are Not Forgotten


“As an Amazon Associate, Ebay (EPN) and or Etsy (Awin) Affiliate, I (we) earn from purchases.” Disclosure Statement

X