


A favorite technique of mine in Adobe Photoshop is texturing. The photo above shows a photo of a flower with a textured background. This photo is actually a combination of two different photographs that I shot. The foreground is the daisy flower and the textured background is a photograph of my windshield with ice on it. On this post I will review some of the steps needed to create this photo and then show some other photographs I created using this procedure.
Creating a Textured Background
There are many places online that you can buy textured backgrounds, but I
like to create my own using parts of photographs that I have taken.
Here are a few from my library. They include a couple of sky images, a
brick wall, fire (from my fireplace) and the icy windshield that I used in
the introductory photo.
   |


Steps to Create Textured Photo Composite
The steps below are the ones I used to create my textured background
images. There are several different ways to do different procedures in
PS(Photoshop) but these are the ones I find easiest for me. I have
never taken a class on PS, but rather have taught myself through the use of
the tutorials on PS (great for the basics) and YouTube tutorials you can
find online for many different specialty techniques. Here then are the
steps used to create the photo like the one at the top of this post.
- I first Open a background photo in PS. I used my icy windshield background for the photo at the top of this post. I also always make a duplicate copy of the background photo.
- Next I click on file and then Place Embedded to select the photo that I want in the forefront. In this case my daisy photo. The new photo will come in on top of the background photo and I will then stretch or reduce it to make it the same size as the background photo.
- The next step is to pick out the area of the photo that you want to highlight. In the case of the daisy photo I use the Quick Selection tool to outline the main daisy. I then click the button at the top that says Select and Mask.
- This will open a new window that will give you the opportunity to use sliders to bring in as much of the background texture as you want. Play with the sliders till you get the desired effect and click done.
- This will bring you back to the main screen where you will now click the little square at the bottom of the layers column that adds the layer mask.(when I first started I always got hung up because I forgot this important step.)
- Next you will tweak the sliders for the layer mask to get exactly the effect you desire.
- Now you just save your work and you have created a beautiful photo with a textured background.
-
This took a lot of practice for me to get all the steps right so don't get discouraged if at first you don't succeed.
Samples of my Textured Background Photos
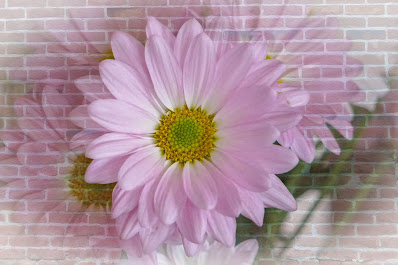 Daisy with Brick Wall Texture
 Bluebirds with Sky Texture Background

Candle in Crystal Ball with Fire textured background Photoshop Texture Book on Amazon


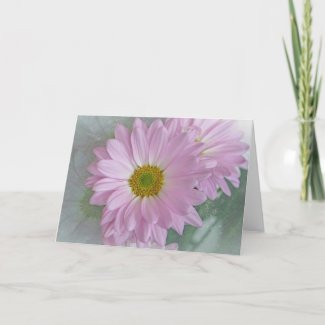
Zazzle Card with Textured Photo
Note: The author may receive a commission from purchases made using links found in this article. “As an Amazon Associate, Ebay (EPN), Esty (Awin), and/or Zazzle Affiliate, I (we) earn from qualifying purchases.”
FOLLOW US ON:


Thanks for the very simple instructions, I know what I'll be doing on the weekend! I tried following some instructions a while ago to create a similar effect to your intro image (mine was a rose on rippled glass), but they were a lot more complicated than yours so I never tried again and worked on other techniques instead!
ReplyDeleteBest of luck. Feel free to messenger me if you have any problems.
DeleteExcellent Photoshop tutorial Mary Beth! I admit, I get very frustrated when trying to use Photoshop, but I do love your texturing technique. You instructions sound easy enough for even me and made me wish to drop all of my responsibility today and play on Photoshop. All of you photos are lovely, as usual, but I absolutely love the photo of the bluebirds with the sky background. I have seen your photo before and wondered how in the world you captured those birds so perfectly perched with that gorgeous background. Now I know the secret! Still, you must have an incredible amount of patience to draw so carefully around the details (like the bird feathers and all of the daisy petals). The results are stunningly gorgeous!
ReplyDeleteThat Quick Selection Tool makes it easy to outline objects, you just go up the middle and it gets in all the edges of the flowers etc. You may have to make a few tweaks but it is easy. If you try it and have any questions just let me know.
DeleteI've never tried Photoshop, but love the effects that can be created. I've tried outlining an image before with another program, but find it very difficult to do well. Mainly because I have to use my mouse with my right hand and I'm left-handed, so everything comes out wobbly and poorly outlined. :) This is quite close to what I was trying to do with my crochet critters on Etsy -- for instance, put my crochet clam on the beach in a beach photo I have. Would love to utilize backgrounds for certain things. Thanks for your instructions, Mary Beth.
ReplyDeleteThanks for your comments. Let me know if you need any help changing backgrounds on your crochet critters. I would be happy to help.
DeleteMary Beth, I love the custom textures you create and the wonderfully clear, step-by-step instructions you provided for making them! I used to have access to Photoshop at work but no longer do, and I really miss it. (I'm currently using PicMonkey online and while it has a lot of great tools, it can't do all the things Photoshop can.)
ReplyDeleteMargaret Thanks for your comments. I have Adobe Creative Cloud which gives me access to both Lightroom and Photoshop. I still have lots to learn but that is what makes it fun.
DeleteI'd love to be able to do that, but I never got beyond trying to use Photoshop elements. Your instructions look like I could follow them. They are very clear -- just what I need. Do you think this would also work in Elements? I'm quite sure I'd never use all the features in Photoshop, and I'm still not even sure what Lightroom is for. I rarely get beyond, cropping, resizing, and adding text. Have you thought of writing a tutorial in book form for using Photoshop and Lightroom?
ReplyDeleteThanks Barb for your kind comments. I would think that you could also do this procedure in Photoshop Elements. I used to use Elements and it has many of the same features.
DeleteThanks for your confidence but I don't feel qualified yet to write a tutorial on Photoshop and Lightroom. I still have so much to learn but I love the journey!
Your tutorials on photography are always informative. Love the tips and I'm learning from your articles!
ReplyDeleteYou are so talented Mary Beth. I know I will come back and go through your instructions, but I'm not sure that my outcomes will be as pretty. You really have a great eye for beauty and putting things together.
ReplyDelete