Wednesday, December 1, 2021

Luscious Low Carb Keto Triple Peppermint Cheesecake Brownies Recipe

Peppermint and chocolate are a flavor match made in heaven, especially around the holidays! These luscious, big, fudgy low carb peppermint cheesecake brownies feature a yummy a mint cheesecake swirl and are topped with a melted peppermint chocolate bar topping.

My new low carb peppermint cheesecake brownies recipe is so rich and decadent, no one will guess they are a keto friendly treat unless you tell them. You, your family and your holiday guests of all ages will love them! 

Here’s my review of this quick and easy low carb keto mint brownies recipe.

Triple Peppermint Cheesecake Brownies - Keto, Low Carb and Luscious

Although this image show them in an 8-inch square pan cut into 16 squares, which I did for the first batch, I now bake them in a 9-inch square pan and cut them into 20 rectangular bars (four "columns" and five "rows") for a larger serving, which is how I have written the recipe.

However, these are so rich that you can easily cut them into smaller portions and still have a very satisfying portion with fewer calories and carbs if you prefer.

How to Make Keto Triple Peppermint Cheesecake Brownies

Makes 20 brownies.

Tools, Supplies and Equipment

9" square pan (I love my heavy-duty USA Pan Bakeware 9-inch Square Cake Pan, Nonstick & Quick Release Coating)

If You Care unbleached baking parchment

Electric mixer with mixing bowl

A second mixing bowl (I used the 3-quart bowl from my OXO Good Grips 3 Piece Stainless Steel Mixing Bowl Set with non-skid bottoms, which I love)

Silicone spatula

Table knife (for swirling the cheesecake and brownie batters)

Cooling rack

Aluminum foil

Ingredients

Butter or coconut oil (to grease the corners of the pan and the baking parchment)

For the peppermint cheesecake batter: 

8 oz full fat cream cheese, softened 

1 egg, room temperature 

3/4 teaspoon Watkins pure peppermint extract 

3 tablespoons BochaSweet sugar replacement granulated sweetener (my favorite, but often out of stock) or Swerve granular sugar replacement 

For the chocolate fudge brownie batter: 

1 bag Good Dee's Soft Baked Keto Brownie Mix, Double Batch Bag 1 lb bag 

1 cup (2 sticks) Kerrygold salted butter (or other grass-fed butter), melted and cooled 

4 large eggs, room temperature 

1 teaspoon Watkins pure peppermint extract 

56g (132 chips) Lily’s peppermint white chocolate baking chips (no sugar added)

For the mint chocolate topping layer:

2.5 oz (70 g) bar of The Good Chocolate zero sugar 65% dark chocolate peppermint

Directions

Preheat the Oven and Prepare the Baking Pan.

  • Preheat the oven to 350 °F.
  • Cut two lengths of unbleached baking parchment to fit the 8-inch square baking pan, leaving at least one piece long enough for the ends to hang over the edges of the pan. (I like to cut both pieces long.) The overhanging ends will serve as handles to help you lift out the baked and cooled brownies.
  • Grease the corners of the pan and the baking parchment (excluding the overhanging flaps) with butter or coconut oil. Set the prepared pan aside.

Make the Peppermint Cheesecake Batter.

  • Put the softened cream cheese into the bowl of the electric mixer and beat until soft and smooth, scraping the bottom and sides often with the silicone spatula.
  • Add the egg, peppermint extract and BochaSweet sweetener. Beat on medium speed until well blended. Set the peppermint cheesecake batter aside.

Make the Peppermint Chocolate Chip Brownie Batter.

  • Empty the 1-lb. bag of Good Dee's Soft Baked Keto Brownie Mix, Double Batch into the second mixing bowl. Stir in the melted and cooled butter with the silicone spatula until well combined. 
  • Stir in the 4 eggs and peppermint extract until well blended. (Do not beat, whip or overmix the brownie batter.)
  • Stir in the peppermint white chocolate baking chips.

Layer and Marble the Brownie and Cheesecake Batters.

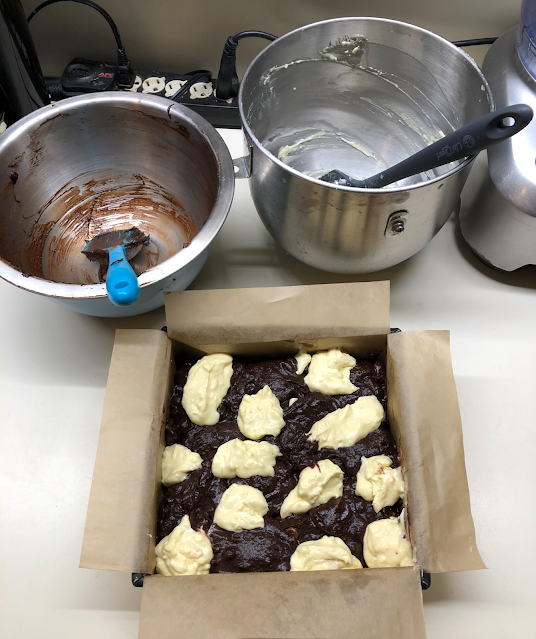
  • Spread half the chocolate brownie batter in an even layer in the prepared pan. Top with half the peppermint cheesecake batter, dropping it onto the brownie batter layer in large, evenly spaced dollops.

First layers of peppermint brownie batter with dollops of peppermint cheesecake batter
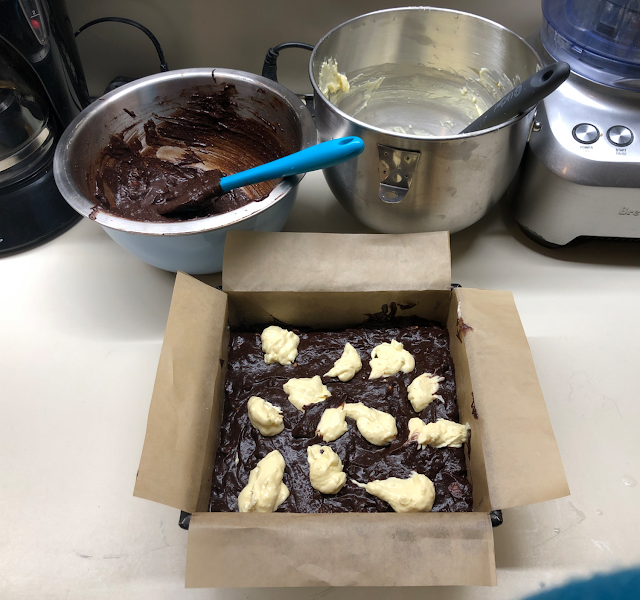
  • Scrape the remaining chocolate brownie batter into the pan, covering the peppermint cheesecake batter without disturbing it too much. 

Remaining peppermint brownie batter dollops covering the peppermint cheesecake batter dollops

  • Then, drop dollops of the remaining peppermint cheesecake batter over the top. If possible, try to stagger the locations of these dollops to place them in between the previous cheesecake dollops. (If you can’t tell where the lower dollops are when they are covered by the brownie batter, no worries!)

Remaining peppermint cheesecake batter dollops added

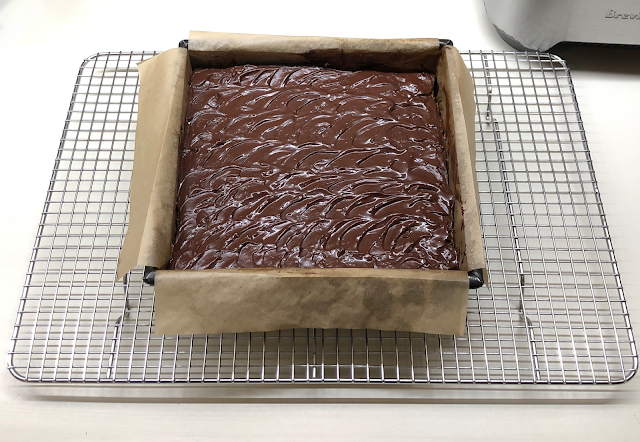
  • Swirl a table knife through all four layers of batter so it’s loosely marbled, taking care not to mix the batters too much. You want the chocolate brownie batter to remain brown and the peppermint cheesecake batter to remain white as much as possible.

Peppermint brownie and peppermint cheesecake batters marbleized in the pan

Bake the Brownies and Add the Mint Chocolate Topping.

  • Place the pan in the preheated oven and bake at 350 °F for 30–40 minutes, just until the center tests almost done with a toothpick. The brownies will continue to bake in the hot pan as they cool.
  • As soon as the brownies test done, move the pan to a cooling rack.
  • Immediately unwrap The Good Chocolate dark chocolate peppermint bar and break it along the score lines into six squares. Place the chocolate squares on top of the piping hot brownies, spacing them evenly about 1.5 inches away from the edges of the pan.

Hot, baked peppermint cheesecake brownies topped with squares of The Good Chocolate dark chocolate peppermint bar

  • Carefully lay a sheet of aluminum foil over the top of the hot pan, tenting the foil loosely so it doesn’t touch the surface of the chocolate. Do not try to crimp/seal the edges of the foil to the edges of the pan.
  • Remove the foil after about 15 minutes and set it aside. Carefully spread the melted chocolate over the brownies in a thin, even layer.

Melted peppermint dark chocolate squares spread over top of brownies in pan

Finish Cooling, Chill Briefly and Cut Into Squares.

  • Allow the brownies to continue cooling in the pan on the cooling rack for at least an hour.
  • Cover the cooled pan of brownies with the reserved foil and place it in the refrigerator for 60-90 minutes, just until the surface of the mint chocolate topping layer firms up.
  • Use a spatula to loosen the parchment from the edges of the pan, if necessary. Run a sharp knife under hot water and immediately wipe it dry, then use the warmed knife to slice through just the hardened mint chocolate coating layer to score it into 16 squares, as shown. Then score a line down the center of each square to make 32 rectangles (not shown).
Note: The photo shows the dark chocolate peppermint candy bar coating scored into 16 squares, which is how I had cut them before I photographed them. Once we tasted them and realized just how rich these brownies are, we subsequently decided to cut each big square in half to make narrower brownie bars.

Scoring the chilled and hardened mint chocolate topping layer while still in the pan

  • Use the overhanging baking parchment paper handles to lift the uncut brownies out of the pan and onto a cutting board. 
  • Using the scored lines in the chocolate coating as a guide, cut the brownies into 32 pieces.
  • Place them in a covered food storage container, layered between waxed paper or parchment paper, if necessary, and refrigerate until ready to serve.

Finished keto triple peppermint cheesecake brownies on a decorative Christmas serving platter
These low carb keto triple peppermint cheesecake brownies are so rich and decadent, we decided to cut them in half after I photographed them and we tasted them.

Nutrition Facts

Calories and Macros (Estimated)*:

Serving: 1 brownie (1/20 recipe)

Calories: 207

Net Carbs: 2.5g

Total Carbs: 23.9g

Fiber: 8.5g

Sugar: 0.2g

Added Sugar: 0.0

Sugar Alcohols: 3.2

Protein: 3.8g

Fat: 18.3g

Saturated Fat: 10.6g

Cholesterol: 79.1

*This nutrition data was calculated by the Carb Manager Premium app after I entered the ingredients and amounts into the Create Custom Recipe function.

A Delicious and Festive Christmas Gift (Especially for Anyone Following a Low Carb or Keto Diet!)

I have always loved giving homemade Christmas cookies and other festive baked goods to family members and friends around the holidays. A beautifully wrapped holiday-themed decorative tin lined with a doily and filled with these fabulous low carb keto triple peppermint cheesecake brownies would make a festive and much appreciated gift for anyone. For someone who is watching their sugar and carbs, make sure to include the recipe. Better yet, make up a low carb keto holiday gift basket including these brownies, the recipe and the ingredients so your gift recipient can make more of them after the ones you gifted them have been eaten!

The Perfect Pairing of Low Carb Keto Holiday Dessert Recipes

For the ultimate holiday sweet treats indulgence, pair my Low Carb Keto Peppermint Cheesecake Brownies Recipe with my Ultimate Keto Hot Chocolate Recipe!

Luscious Low Carb Keto Triple Peppermint Cheesecake Brownies Recipe by Margaret Schindel

Posts About My Keto Diet Journey

My First Year on The Keto Diet

Preparing to Succeed on the Keto Diet, Part One

Preparing to Succeed on the Keto Diet, Part Two

Low Carb Muffins & Cupcakes: Treats to Enjoy on a Keto Diet

Low Carb Keto Chocolate Yogurt Granola Chip Pudding Recipe

Good Dee’s Keto Cookie Low Carb Baking Mix Review

Hamama Microgreens Growing Kit Review & Success Tips

My Favorite Hamama Microgreens Seed Quilt Accessories

Keto Cheddar Cheese Biscuits With Chives Recipe

The Ultimate Keto Hot Chocolate Recipe

The Best Low Carb Keto Gift Ideas: Keto Gift Guide

The Best Low Carb Keto Cinnamon Muffins

Wholesome Yum Keto Bread Mix and Yeast Bread Recipe

The Good Chocolate 100% Organic No Sugar Dark Chocolate Review

The Best Advice to Maintain Your Keto Diet Weight Loss

My New Irresistibly Delicious Keto Cheese Crackers Recipe

Luscious Low Carb Keto Triple Peppermint Cheesecake Brownies Recipe

Quick & Easy Livlo Blueberry Scones Keto Baking Mix Review

Snack Better With The Best Healthy Keto Cookie Dough Bites

The Best Quick and Easy Low Carb Keto Pizza Recipe

The Best Quick and Easy Low Carb Keto Shortcake Cupcakes Recipe

Comparing the Best Keto-Friendly Chocolate Hazelnut Spreads - No Added Sugars

The Best Low Carb Keto Sandwich and Burger Buns Mix

Blueberry Biscuit Scones — New, Easy, Low Carb Keto Recipe

The Best Keto Pizza Crust Mix With 0 Net Carbs

An Unusual, Delicious Strawberry Chocolate Tea With 0 Calories

Delicious Sugar-Free Keto Cookies That OREO Fans Will Love

Healthy Pistachio Cherry Chocolate Chip Marshmallow Cereal Treats Recipe

Easy, Decadent, High Protein, Sugar-Free Rocky Road Cottage Cheese Ice Cream

The Best Quick & Easy Low Carb Sausage and Ricotta Calzones

How to Make Refreshing Vanilla Italian Soda (With or Without Cream)


Reviews of the Keto Diet by Barbara C. (aka Brite-Ideas)

My Personal Keto Testimonial

How I Stayed Committed to the Ketogenic Way of Eating

Read More Recipe Reviews by Our Review This Reviews Contributors

Read More Product Reviews by Our Review This Reviews Contributors

Read More Reviews About Health and Wellness by Our Review This Reviews Contributors

Read More Holiday Reviews by Our Review This Reviews Contributors

Read More Christmas Reviews by Our Review This Reviews Contributors


Note: The author may receive a commission from purchases made using links found in this article. “As an Amazon Associate, Ebay (EPN), Esty (Awin), and/or Zazzle Affiliate, I (we) earn from qualifying purchases.”


Tuesday, November 30, 2021

The Benefits Of Bodyblade For Health And Fitness Reviewed

bodyblade for exercise


I originally bought the Bodyblade piece of exercise equipment for my husband.

He was keen to get fitter but doesn't want to go to a gym and needs something he can pick up and work on quickly whenever he feels like it.

I was thrilled when my husband took to using it right away! It is always nice when a gift is well received.

The Bodyblade is very convenient. In our experience, it takes a few minutes to get used to the actions required and the different exercises were not difficult to learn.


bodyblade propped against brick wall


What Is The Bodyblade? 

The Classic Bodyblade we have is a long flexible rounded edged blade about four foot long and a few inches wide. It is made of a sturdy, firm yet comfortable material that is easy to hold. It consists of a section in the middle that is slightly thicker for your hands to hold onto and is essentially a long flexible strong blade. 

It arrived quite quickly and really almost as soon as you get it out of the packaging you can start using it. There was no complicated assembly to frustrate us. Just unpack it and get going!

I would recommend that you read the instructions and watch the instructional DVD of course, but it is easy to follow the instructions and simple to use.

Do consult with your healthcare provider if you have any health issues, are pregnant or have not exercised in a long time before using any exercise equipment.

Bodyblade was created by Bruce Hymanson, a Californian physiotherapist. It was designed to help build strength, balance and stabilisation and has many benefits. 


Here is a short YouTube Video by Bruce Hymanson explaining how this piece of exercise equipment works.

Bodyblade How It Works 


 Starting The Bodyblade Exercises

As we both have some health issues we started slow and very gentle with this exercise, which we found was perfectly possible to do.

As you are driving the speed and mobility of the blade it is very much under your control. You are in complete control of the intensity of the exercise using a push-pull movement with your hands. We found it best to be standing with feet about shoulder-width apart and knees softly bent standing on a flat stable surface. 

We started doing the exercises for just one exercise per minute and built up very slowly until doing several exercises in one session. At first, we found it better to learn and do the exercises standing still. 

As I have back issues that can be aggravated by new exercises I never attempt to do all the exercises in one go, I always split them up over the course of a week. I do need to avoid some advanced exercises or reduce the intensity of some of them.

Hubby tends to pick it up and do the exercises whenever he feels like it, sometimes for a few minutes, other times for a longer exercise session. We both feel like we have had a good safe workout from it.

In fact, I believe it suits very gentle workouts and would suit a more demanding workout. You can of course combine it with other types of exercise. Most of all the exercises are quite fun and not too difficult to learn. Start with the basics and get the technique right, then you can gradually progress working to your tolerance and fitness level. 


bodyblade held by man for demonstration of use


Learning How To Use The Bodyblade

With the Bodyblade kit I bought, there is a DVD and a wall chart for you to learn the technique and exercises. If you are a beginner I would advise you to buy a Bodyblade with these extra essentials so that you can learn and know what you are doing. 

I do think it is worthwhile watching the videos and looking over the wall chart before you start using the Bodyblade. That way you will understand the technique and what all the different exercises can do for you.

It is so easy to fit in a few minutes of exercise whenever you have time.

bodyblade exercise equipment

Getting Used To The Rythmn Of the Bodyblade

This is the grip and push-pull technique that you really need to master to get benefits from the Bodyblade. Some people seem to get it quickly while others take longer, but do take time to master the technique. 

If you don't get it within a few minutes this can be a little frustrating. However do not give up as it can be learned, just needs time in some cases. There are also YouTube Videos by the inventor to help us learn.

It is best to spend a little time getting the rhythm and technique good first. You do need to hold the center of the blade very gently. You do not need to grip hard, in fact, the softer and more gentle your grip the better. Then it is simply mastering the push-pull action.

We found it easier to learn the technique while holding the blade in front of the body with both hands first, then graduate onto holding the blade above your head, behind your back and so on. Then progress on to holding the blade with one hand for the side exercises. 

You can feel when you get it right and once into the rhythm it does feel natural. Once you master the technique it seems to stay. Then you can build up the time and variety of exercises.


bodyblade held in front of wood fence

Which Parts Of The Body Does BodyBlade Target?

I thought initially that it would be only my arms that would get the training, but after using it I find that I can also feel it most in my quadriceps and core abdominals too. It is great to feel that you have had a workout in a very short space of time.

We found it best when starting out to split up the workouts into short sessions but you will know what is right for you and your fitness levels. 

As you continue to use it you can see and feel toning and firming of the muscles.


Watch this YouTube Video by Bruce Hymanson, to see the 12 minute BodyBlade Super Six workout -the six basic exercises targeting many parts of the body, as well as a reasonable cardio workout.


What To Wear When Exercising With BodyBlade

You can exercise in full gym gear if you want but equally we often just do a few minutes in whatever we are wearing.

We usually exercise with the Bodyblade in a T-shirt, joggers and trainers. Really as long as you can easily and freely move and put your arms side to side and above your head, whatever you are wearing is OK. 

I would advise comfortable flat proper exercise shoes though as you need to maintain good posture. I wouldn't try it wearing restrictive clothing or high heels!


Storing The Bodyblade 

The Bodyblade does not weigh much and is so easy to store, it takes up very little room. We just prop it up against a wall and you hardly notice it is there.

Most exercise equipment takes up so much space and some are complicated to set up, but this is hardly noticeable in our home. You could easily store this even if you are short on space, you just need enough room for an item about a couple of inches wide and four foot high. 

The ideal piece of exercise equipment is one that is easy to store and easy to use. Anything complicated or cumbersome to set up does put off a lot of us bothering. The Bodyblade is perfect for ease of storage and use. 


bodyblade propped against wood fence


Is Bodyblade A Fun Exercise?

What is a fun exercise is very subjective of course. However, I do not find it boring. It does not seem to be necessary to do long complicated workouts to get some benefit. Equally, if you are already fit you can move on to relevant more advanced exercises. 

You can do twelve or twenty-minute exercises or you can split those up into shorter more manageable blocks if that is better for you. I do prefer to use it while following a Video as I find it more fun that way. 

There are many videos targetting areas of the body and increasing in difficulty and intensity. 


Here is a slightly more demanding 22 minute BodyBlade Power 10 workout by Bruce Hymanson on YouTube. You will see how you can incorporate more cardio into the workout once you have mastered the basics. 


My husband got the Bodyblade rhythm and technique very quickly and really enjoys it.  

I tend to use it for a session once or twice a week.  It is one of the quickest forms of exercise to do as there is no setup or preparation of equipment and is especially useful when I am short on time but want to do something good for myself, even if I don't feel like exercising. 

We can use it in any room we choose or even outdoors when it's warm.

There are quite a few Bodyblade videos you can buy or watch on YouTube free which are a fun way to exercise along with others and to supplement and advance the exercises you can do. So this is also an exercise that can grow with you.  

You do have to concentrate so time passes very fast and then you are done!


Is It Worth Buying The Bodyblade? 

Overall for us, it has been an excellent purchase.

We can both use it as often as we like at any time of day, It is very sturdy, stores easily is very quiet to use and is effective.

As there is really nothing to break or get damaged I can see us having it for many, many years so certainly very cost-effective.

There is also no driving to the gym or setting up any equipment. As it is so light and so easily stored you could take it many places with you if you want to exercise while on holiday or visiting family and friends.

If you would like a piece of exercise equipment you can use anytime at home, that is easily and unobtrusively stored, relatively easy to master, can be built up from beginner to more demanding workouts, is long-lasting and relatively inexpensive you may like to consider the Bodyblade. 


More Health And Fitness Reviews:-

The Benefits Of Using A Rebounder For Health And Fitness

Health Reviews By Contributors On Review This Reviews


Note: The author may receive a commission from purchases made using links found in this article. “As an Amazon Associate, Ebay (EPN), Esty (Awin), and/or Zazzle Affiliate, I (we) earn from qualifying purchases.”


Monday, November 29, 2021

Battleship Classic Board Game Reviewed


Battleship Classic Board Game Reviewed

Battleship is a classic naval combat board game of strategy and excitement. In this board game, you will search the ocean floor to destroy your opponent’s fleet of ships.

The board game was first introduced by Milton-Bradley in 1967 as a plastic board and peg game. The game battleship comes from earlier versions of a pencil and paper game from the 1930s.

Battleship has also evolved into many electronic versions of the game today. The game I had growing up was the original plastic board and peg game. I have spent many hours playing this game with my brothers and friends.

The game we have today is the same, but it was made by Hasbro. I have never tried one of the electronic versions but thought about it many times. Today I play the same battleship game with my grandchildren that I played growing up.

How to Play Battleship:

Each player has a fleet of five ships consisting of the following:

Class of Ship                       #of Hits to Sink the Ship

Aircraft Carrier                                  5

Battleship                                          4

Destroyer                                          3

Submarine                                        3

Patrol Boat                                        2

Battleship classic board game

Each player has a plastic case with two grids, white pegs, and red pegs. One grid is the ocean floor, this is where you place your fleet of ships either horizontal or vertical. The upper grid is to record your misses with white pegs and your hits with red pegs.

 You can also use your ocean floor to track your opponent's misses with white pegs. This is an option and I never use it.

A player calls out a location on the grid and the opposing player says either hit or miss. If it is a miss the first player marks the location with a white peg, so he doesn’t call that location again. If it is a hit, then he places a red peg in that location and the opposing player places a red peg in the ship that was hit.

Now, the first player must figure out if the ship is placed horizontal or vertical on the opposing player’s grid. Once a player has sunk the other player's entire fleet, he wins the game.

Battleship is just another classic game that has been around for many years and will provide hours of fun.

For more classic toys and games visit me at

 Cherished Toy Finds


Find more toys on Review This Here

ReviewThisToyReviews.com

 Battleship Board Game for ages 7 and up makes a perfect gift for hours of fun.

Hasbro Gaming Battleship GameHasbro Gaming Battleship GameCheck the Price


Note: The author may receive a commission from purchases made using links found in this article. “As an Amazon Associate, Ebay (EPN), Esty (Awin), and/or Zazzle Affiliate, I (we) earn from qualifying purchases.”


Sunday, November 28, 2021

The Bone Code by Kathy Reichs – A Book Review

Skull & cross bones image


The Bone Code is the latest in Kathy Reichs' Temperance Brennan crime series. 


Plot Summary 


The Bone Code book cover
The Bone Code available on Amazon

Tempe Brennan is on her way to help a friend on the Isle of Palms on the South Carolina coast whose home is damaged by a hurricane. Before she gets there she receives a call from the Charleston coroner who needs her help with two bodies found in a medical waste container which has been tossed ashore by the storm.

As Tempe investigates, she recognizes many of the details as being identical to those of an unsolved case she handled in Quebec years earlier. She then travels to Montreal to gather evidence.

Meanwhile, health authorities in South Carolina are becoming alarmed as a human flesh-eating contagion spreads. Tempe is so focused on identifying the container victims that she doesn't initially register how the murders and the pestilence may be related.  But she does realize one unsettling fact ~ that someone is protecting a dark secret, and they are willing to do anything to keep it hidden.

The Bone Code gives us a sinister look at a shocking way genetics can be put to use.


Author Kathy Reichs


Author Kathy Reichs
Author Kathy Reichs.
Source: Wikimedia Commons
Kathy Reichs is an American Crime Writer. She is also a forensic anthropologist associated with the University of North Carolina at Charlotte and the Laboratoire des Sciences Judiciaires et de Médecine Légale in Quebec, Canada. 

Reichs' main character (Tempe) in her Temperance Brennan crime series is based on her own life.  And the television show Bones is loosely based on her book series. 


Summary


The Bone Code is the 20th book in the Temperance Brennan series of crime novels by Kathy Reichs. It is Temperance Brennan's most astonishing case yet and will keep you on the edge of your seat. 


*Book Review of The Bone Code written by Wednesday Elf


Note: The author may receive a commission from purchases made using links found in this article. “As an Amazon Associate, Ebay (EPN), Esty (Awin), and/or Zazzle Affiliate, I (we) earn from qualifying purchases.”


Saturday, November 27, 2021

Reviewing Joy Ellis' Nikki Galena Series

 Have you heard of the novelist Joy Ellis?   I discovered her and her Matt Bollard series by a happy coincidence and am now devouring her Nikki Galena Series of books.


Joy Ellis Nikki Galena Series of books
Joy Ellis - Nikki Galena Series of Books


Joy Ellis writes police murder mysteries based in England's Fenlands which provides a really atmospheric background to the novels and makes me really want to visit some of the desolate villages of the Fen and photograph them .... although there does seem to be a few too many murders occurring!

Now at the time of writing, there are 13 Nikki Galena books and I have read 8 of them with number 9 waiting for me on my Kindle.   I recommend reading these books in order as you build up relationships with the members of Nikki's team and understand their backstories that way.

In the first book, we meet a pretty angry, hostile DI Nikki Galena and are introduced to her new DS Joseph Easter who she really didn't want to work with.   As the book evolves we see that they actually make a great team and we also get to meet the other members of her team based in Greensborough.

I actually downloaded books 1-5 as a book set on my Kindle and I really recommend doing that as some of the threads, especially that of a certain villain continue throughout these books.  If you have enough of Inspector Nik and her crew by this time you will at least rest easy knowing certain things have reached a conclusion.

Personally, I wanted to continue so I downloaded book 6, Captive on the Fens.  This book introduced us to a new character and a totally unexpected twist that relates to an existing character which really led to a very neat transition of team members in the next book.

I then downloaded another set and this was for books 7-9.

I totally recommend getting book sets because you really don't want to stop at just one book with these characters.  I feel like it's watching one of your favourite tv shows and you want to tune in each week to see how they're going - that's how good Joy Ellis is at creating characters.

I was able to download all of these books for free as part of my Kindle Unlimited membership which I have mentioned before and thoroughly recommend.

If you enjoy shows like Midsommer Murders and Vera and you also enjoy reading then I think you'll love this series of books by Joy Ellis.  Joy Ellis is compared to Peter May, J M Dalgliesh and Ann Cleeves (the author of Vera - totally agree with this comparison) and was nominated for Crime and Thriller Book of the Year at the British Book Awards 2021 for The Patient Man.   This book is part of her Jackman & Evans series which is next on my list to read after I finish all of the Nikki Galena books.

Have you read any Joy Ellis books?


Note: The author may receive a commission from purchases made using links found in this article. “As an Amazon Associate, Ebay (EPN), Esty (Awin), and/or Zazzle Affiliate, I (we) earn from qualifying purchases.”


Friday, November 26, 2021

Lego Gingerbread House Set #10267 Reviewed

Lego Gingerbread House
The Lego Gingerbread House is the perfect set for Christmas time!

Many of us enjoy decorating gingerbread houses for Christmas, but we hate to throw away our hard work after the season has passed.  While a real gingerbread house is eatable, I've actually never known anyone who ate one. Therefore, building a gingerbread house that doesn't get old, go stale and wind up in the trash, is awesome!

Over the years, Lego has branched out considerably.  They now have hundreds of sets that are created with older, experienced Lego builders in mind.  This allows kids who grew up building Legos to continue their hobby with advanced, bigger sets.  These sets also offer families the opportunity to build together by allowing younger children to handle the easier parts, while the more experienced Lego builder takes on the more intricate details and the overall assembly.  

Many of the Creator sets have small accessory pieces which are perfect for those family members who want to be a part of the fun, but worry they will do something that will mess up the design.  

The Lego Gingerbread House set has several small accessories that include a gingerbread girl, a train, a rocking horse, a few gifts, a Christmas tree and interior furniture.  These "parts" of the overall set are perfect for grandparents who were not previously Lego builders.  They are a great way to learn how to build Legos.  Plus, they allow everyone to be part of the building fun!  No one has to be left out simply because they don't know how to build a Lego set.

Bring your family together this holiday season by building this wonderful Lego Gingerbread House that will never decompose.  Plus, it is a fabulous Christmas decoration! 


Lego Gingerbread House set
This Image Shows the Backside of the Finished Gingerbread House
Check Out All of the Awesome Home Decor Included in the Set


Details of The Lego Gingerbread House Set - #10267

The Lego Creator Gingerbread House set has almost 1500 pieces (1,477 pieces to be exact) and provides hours of building entertainment.

 LEGO Creator Expert Gingerbread House 10267 Building KitCheck Price

Features Include:

  • Gingerbread House with Frosted Roof & Candy Cane Columns
  • Gingerbread Man & Woman
  • Baby & Carriage
  • Christmas Tree
  • Snow Blower
  • Candy Cane Signposts
  • Train
  • Gifts
  • Candy Design Furniture 
  • Battery (included) Operated Light Brick for the Fireplace

Completed Gingerbread House measures:
8" high x 10" wide x 5" deep.

Just the right size to make an adorable centerpiece for your holiday dinner table or buffet! 


Check Out More Toy Reviews at
ReviewThisToys.com
Or
Reviews on Lego Sets
Right Here On Review This Reviews!

House of Sylvestermouse


Note: The author may receive a commission from purchases made using links found in this article. “As an Amazon Associate, Ebay (EPN), Esty (Awin), and/or Zazzle Affiliate, I (we) earn from qualifying purchases.”


Thursday, November 25, 2021

Happy Thanksgiving from Review This Reviews


pumpkin sitting on a tree trunk photo by mbgphoto
Happy Thanksgiving

Today is Thanksgiving Day in the USA.  From the Staff of Review This Reviews we wish you a very Happy and Thankful Day.

Thanksgiving Day History

On this Thanksgiving Day, I thought I would share a few history facts for your enjoyment.  If you'd like you could use these to share or quiz family and friends as you gather for the holiday.  They could make great conversation starters too.   My reference for this information is history.com.  
  • It is commonly thought that 1621 was the year of the first Thanksgiving in America.  During the fall of this year the Colonists and the Wampanoag Indians shared a feast to celebrate the harvest.
  • The first Thanksgiving was not just one day but was a three-day festival.
  • The most likely menu for this feast was deer, Indian corn, fowl, barley and nuts, lobster and mussels.
  • This first feast did not become an annual tradition for centuries later.
  • In 1789 George Washington declared a national holiday for Thanksgiving and it was celebrated that year on Thursday, November 26th.  But still it did not become an annual holiday nationwide.
  • In 1827 Sarah Josephia Hale (she is an author best known for the writing the nursery rhyme "Mary Had a Little Lamb") started a 30-year campaign to make Thanksgiving an annual holiday.  She even published recipe cards for Turkey, Stuffing, and Pumpkin Pie.

  • Finally in 1863 during the Civil War, President Abraham Lincoln proclaimed a National Day of Thanksgiving to be held each year in November.

Thanksgiving Traditions Today

Menu

Today the most common Thanksgiving menus include:
  • Turkey
  • Dressing
  • Mashed Potatoes
  • Cranberry Sauce
  • Pumpkin Pie
After these staples that are common to most American households each family adds their own touch to the Thanksgiving feast.  In our family we add green bean casserole, hot rolls, and a sweet potato dish with a sweet topping.

Parades

Another tradition in America is the Thanksgiving Parade.  For those that don't go to a parade they may watch the big Thanksgiving Day parade from New York City on television.

Volunteering

Volunteerism is big on Thanksgiving too.  Communities collect food for the needy and serve hot meals for those less fortunate.

Pardoning a Turkey

In 1989 President Bush came up with a new quirky tradition of pardoning a turkey.  This tradition has carried on with each President since that time.  This is a fun tradition that is seen on the "news" each year.  The turkey will then be able to live out its life on a farm.

Fall Harvest photo by mbgphoto
Fall Harvest

As you and your family celebrate the holiday may you take time out to remember to be thankful.

Happy Thanksgiving 


Note: The author may receive a commission from purchases made using links found in this article. “As an Amazon Associate, Ebay (EPN), Esty (Awin), and/or Zazzle Affiliate, I (we) earn from qualifying purchases.”


Wednesday, November 24, 2021

Winter Time and Birds, Some Good Advice Regarding Pigeons! A DIY Project!

Every Winter the Birds Come Calling! 

I guess that's because we (my other half and I) love to see and feed the birds during the coldest months of the year.  There is something wonderful in seeing even the plain little sparrows munching on suet cakes that we have made or bought. The winter months can be tough on little birds as they need a lot of energy just to keep their tiny bodies warm.

birdhouse with icicles


Image by Kurt Bouda from Pixabay

There is one bird though, that I do not want on my balcony!  I do NOT want pigeons!

Why?  Pigeons are very dirty birds.  They like to make their homes in high spaces!  If they can find a spot out of the wind and elements, they will call that spot home!  They will also chase away any of the smaller birds that I really do like having around my balcony in the winter months.  So what can I do?
pigeon


Well, I was checking out ways to keep the pigeons from even wanting to come onto my balcony, but the availability of food for the smaller birds is what is attracting them.  So if there is no food there will be no birds and I will miss out on some really fun times watching these little critters. I need to do something else that will make the pigeons look for other lodgings.

Pigeons are spooked easily,  so one method of deterring them is to hang windchimes and balloons so that there is always movement and sound happening.  Hopefully they will find a quieter place to call home!

While thinking about this problem and the solutions I had an idea that would do the trick. I came across a whole stack of old CD disks that we no longer needed or wanted.  Old operating systems on CD's were taking up space and were really not necessary for our computer operations.  One side of the disk has a label on it and the other side has beautiful rainbow colors!   So I took a dozen or so of these disks and set to work.

I drilled a hole in the disk about an inch inside the outer rim!   Then just thread some wire or garden twine through the hole and leave enough string/rope to make a loop big enough to pass the disk through it. You can hang them all at the same level or vary the lengths as you please.   Then take all of your strung CD's outside and hang them with the loop around a cord or light string.  .  

At our home we have a string of lights on our balcony because we love to sit out there evenings during the summer months!  This string of lights is now lit for the holidays and it looks amazing with my hanging CD's!  Just check out the short video I took!  You can see the effect it has in the daytime and at night!  


The sunlight plays on the discs sending light all around the balcony!  It does not take much wind to make them spin and when they are spinning light beams are playing all around the balcony.  I am so pleased with the outcome.  They are quite pretty with their rainbow colors and they themselves are not at all noisy!  Even in the windiest of days if the CD's bang around, you just hear a little clicking sound.  


Evenings on the balcony are so pretty with rainbow hues being seen from all corners.  I have a mirror on the one side and my lights and the disks are nicely reflected in it.  It makes it seem like I have twice as many lights and CD's on the balcony!  I personally love the look!

What do you need to accomplish this for yourself?  A DREMEL TOOL is great for drilling the holes or you can use a regular drill with a fairly small bit (depending on the size of your cord).   If you don't have lights to hang these from, you can make a line with any kind of twine and fasten it with some hooks to where ever you want these hanging. .You can also use Christmas hooks to hang these from an eaves-trough.  Vary the lengths of the cords or keep them all the same, that is up to you entirely.  

What I have found in just the short time that these have been up, is that the little birds are not scared of the light show, but the pigeons are not coming to roost anymore.  Hopefully this will keep them away. 

I checked into other methods of keeping pigeons off the balcony, but they involve either hurting the birds or making the railings uncomfortable not just for the birds but for us as well.  I don't want to hurt anything, but don't want to encourage those pigeons to roost on my balcony.  

I will let you know how it works, but, for right now it seems to be doing the trick!  No pigeons were harmed during this trial and I suspect they won't be hurt or harmed in any other way while these are on my balcony!


Note: The author may receive a commission from purchases made using links found in this article. “As an Amazon Associate, Ebay (EPN), Esty (Awin), and/or Zazzle Affiliate, I (we) earn from qualifying purchases.”


The Review This Reviews Contributors


SylvestermouseSylvestermouseDawn Rae BDawn Rae BMbgPhotoMbgPhotoBrite-IdeasBrite-IdeasWednesday ElfWednesday ElfOlivia MorrisOlivia MorrisTreasures by BrendaTreasures by BrendaThe Savvy AgeThe Savvy AgeMargaret SchindelMargaret SchindelRaintree AnnieRaintree AnnieLou16Lou16Sam MonacoSam MonacoTracey BoyerTracey BoyerCheryl Paton Cheryl PatonRenaissance WomanRenaissance WomanBarbRadBarbRadBev OwensBev OwensBuckHawkBuckHawkDecorating for EventsDecorating for EventsHeather426Heather426Coletta TeskeColetta TeskeMissMerFaeryMissMerFaeryMickie_GMickie_G


Review This Reviews is Dedicated to the Memory of Our Beloved Friend and Fellow Contributor

Susan DeppnerSusan Deppner

We may be apart, but
You Are Not Forgotten


“As an Amazon Associate, Ebay (EPN) and or Etsy (Awin) Affiliate, I (we) earn from purchases.” Disclosure Statement

X