Beaded bracelets are wonderful accessories that can add a pop of color to any
outfit. Unlike necklaces and earrings, bracelets allow you to enjoy looking at
them throughout the day while you’re wearing them. Vintage beaded coil wrap
bracelets from the 1940s and 1950s designed by top jewelry icons of that era,
such as Miriam Haskell and Robert DeMario, are coveted by vintage jewelry
collectors. They have also come back into fashion repeatedly, for good reason.
While bracelets with clasps can be quite challenging to fasten and unfasten,
even with a
bracelet helper tool, beaded coil wrap bracelets made with memory wire are a cinch to put on and
take off your wrist. During my three decades of designing, making and,
periodically, selling one-of-a-kind beaded jewelry, my coil wrap bracelets
featuring vintage beads have remained among my most popular jewelry designs,
regardless of fashion trends.
In this jewelry tutorial, I’ll review how I made my most recent memory wire
coil wrap bracelet with a mix of contemporary and vintage beads, which is a
birthday gift for a very dear friend. The friend for whom I made this one owns several beaded coil wrap bracelets I’ve designed for her in different colors. She loves wearing them so much that when I asked her what type of jewelry she would like me to make as her birthday gift this year, she requested another coil wrap bracelet, this time in shades of olive green.
These beautiful, classy, distinctive
bracelets make wonderful gifts for any jewelry lover (including yourself), and especially for someone who
has difficulty putting on or taking off her favorite bracelets with clasps.
Beaded Memory Wire Wrap Bracelet Tutorial
Materials, Tools and Supplies You Will Need
-
Assorted beads in a range of sizes, shapes, materials and surface
finishes.
-
I used a combination of rare vintage glass beads, vintage Swarovski
crystals, contemporary glass beads, including Japanese and Czech seed
beads and glass pearls, and small (2mm and 3mm) 14k gold-filled
beads.
-
I've written an article on
The Best Sources for Vintage Beads, Findings and Jewelry Components, if you are interested in using vintage beads in your memory wire beaded
coil wrap bracelet designs. Buying beaded jewelry at thrift stores,
auctions and estate sales and taking them apart can be a great way to buy
more unusual and vintage beads less expensively.
-
You can also make beautiful bracelets with inexpensive beads from the
crafts store, if you prefer.
-
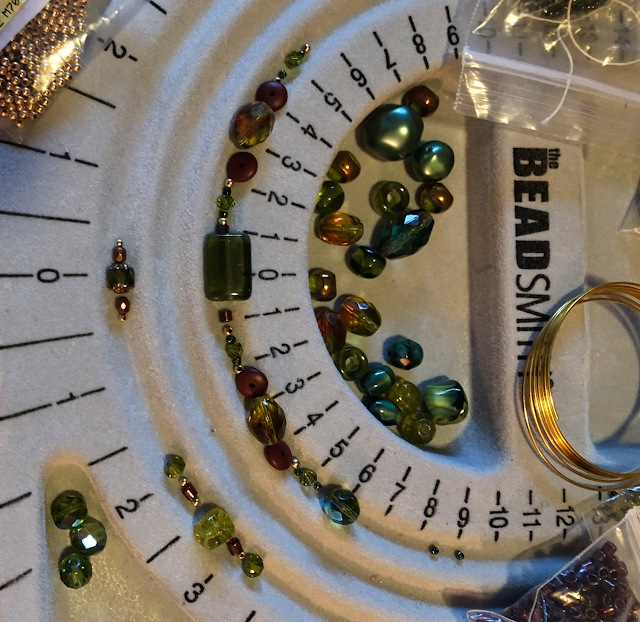
A bead board.
-
While not strictly required, a bead board will make it much easier to plan
out, play "what if" and rework parts of your design.
-
The BeadSmith bead board I use has three channels for designing
multi-strand bracelets and necklaces, a flocked surface to help keep beads
from rolling around too much as you are laying out your jewelry designs,
six recessed compartments of different sizes to hold and organize beads,
findings and other jewelry components, and a plastic cover to protect your
work-in-progress from dust and keep your laid-out design in place in
between work sessions.
- Steel bracelet memory wire.
-
Memory wire cutters.
-
Memory wire is extremely hard steel wire that will ruin the cutting jaws
regular jewelry wire cutters intended for softer metal wire, such as
silver, gold or copper. I highly recommend using either memory wire cutters made specifically for this purpose or a heavy-duty wire cutter from the
hardware store.
-
An old, heavy-duty toenail clipper with straight or
slanted (but not curved) jaws that you don't mind ruining is another option.
-
Bead stoppers.
-
These are steel coil spring clamps that prevent beads from slipping off
stringing wire. I find they are also useful when stringing beads on memory
wire bracelets.
-
I have both the basic
Beadalon wire bead stoppers, which I am showing in this project because they are less expensive, and
the cushioned
Soft-Flex wire bead stoppers, which I prefer because they are more comfortable to use and less likely
to escape from your fingertips.
-
As an alternative, you can try using
ribbed clear silicone ear wire clutches, if the holes fit your memory wire.
-
Memory wire end caps.
- Memory wire end caps are half-drilled metal beads that are glued onto the
trimmed ends of the memory wire to keep the rest of the beads in place on
the finished memory wire wrap bracelet and leave a smooth, rounded end
that won't scratch or snag on clothing.
- Choose silver-plated or gold-plated end caps to match your wire or spacer/accent beads.
-
Alternatively, you can use heavy-duty memory wire looping pliers to turn a small loop at each end of the wire. Finishing the ends with small
loops also gives you the option of making and attaching beaded dangles to
them.
- Strong, two-part epoxy glue that dries clear.
-
Wooden toothpicks and scrap cardboard.
- Toothpicks and pieces of cardboard cut from shipping cartons or cereal boxes are the perfect disposable mixing tools and palettes for preparing and applying small amounts of clear two-part epoxy to the ends of the wire.
-
Close-fitting latex or
nitrile exam gloves.
- You'll wear these to protect your fingers while sliding small spacer beads and memory wire end caps onto the epoxy-coated wire ends. Choose gloves that are aren't too large, too loose or too thick to maintain the dexterity required to hold the small memory wire end cap
beads securely and quickly maneuver the wire into the small holes before the epoxy sets.
- I find that unpowdered nitrile exam gloves work great for this purpose.
-
Ultra-fine point permanent marker.
Step 1: Choose Your Color Scheme and Assemble a Varied Selection of Beads
to Design With
First, decide what your main color will be. Choose a wide variety of beads in
different shades of that color, sizes, shapes and finishes. Then, decide on a
couple of complementary accent colors. Start with a broader selection than you
think you will need. I find that I can never predict exactly which beads will
end up in my final design, and the more choices you have to play with, the
more creative you can be.
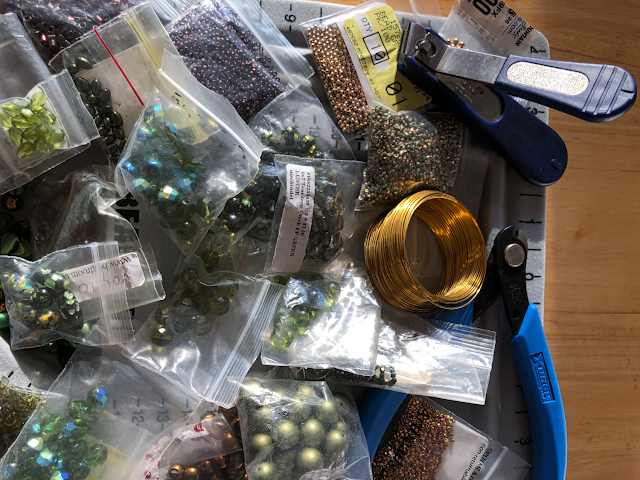
My friend wanted the dominant color of her bracelet to be olive green. This
photo shows just some of the light to dark olive-toned vintage and
contemporary beads I selected from my very large collection for this design,
along with some small accent beads in gold, bronze and deep red shades, from
garnet to cinnabar.
Step 2: Cut Your Memory Wire to the Desired Finished Number of Coils, Plus
Some Extra
A memory wire wrap bracelet can have as few as two coils or as many as you can
fit on your arm! I usually prefer to make by beaded coil wrap bracelets either
three or five coils wide.
Although it's possible to leave the entire memory wire coil uncut until you
have finished stringing all your beads from one end, I find it much easier to
cut the purchased memory wire coil to a more manageable length and add beads
from both ends, since I always make multiple design adjustments as I go along.
It's important to cut the wire longer than you want your finished bracelet to
be, for a few reasons. You need enough extra wire at both ends to hold onto as
you get closer to stringing the last of your beads and to allow space to clamp
the wire ends with the bead stoppers so the beads won't slide off one end
while you are adding beads to the other end. Also, the width of the beads will
increase the diameter of the coils, so if you start with just three coils of
wire you might end up with only two coils once the beads have been added.
Wider or longer beads also prevent the memory wire from curving as much, which
also enlarges the beaded coils and takes up more of the wire.
So, if I'm planning to make a three-wrap beaded coil bracelet, especially if I
will be including 8mm and larger focal beads in the center of my groupings, I
will usually cut five or six coils memory wire and then trim the excess
after all my beads have been strung and I am happy with the design.
Remember to use either a memory wire cutter or another heavy-duty wire
cutter whose cutting jaws won't be ruined by this very hard wire!
Step 3: Begin Playing With Design Ideas
You can string your beads in a random pattern, if you wish. The most important
thing is to have a harmonious mix of bead colors, shapes, sizes and
finishes.
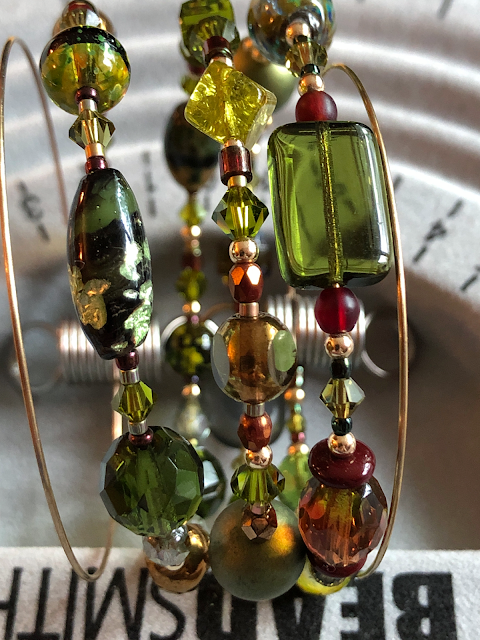
I prefer creating memory wire wrap bracelet designs that combine apparent
randomness with symmetry. I do this by creating "bead stations," small
groupings of odd numbers of beads in symmetrical patterns, usually featuring a
larger bead in the center flanked by smaller and medium-size beads
interspersed with tiny spacer beads. I find that this creates a pleasing
"rhythm" and "flow" to the design.
Occasionally, I will include a larger grouping of symmetrically arranged
beads, such as the one I experimented with in the upper channel of the
three-strand bead design board shown in the photo above.
Step 4: Start Stringing Your Beads Onto the Memory Wire
Once you feel comfortable with the initial direction of your beaded coil wrap
bracelet design, it's time to start stringing your beads onto the memory wire.
Clamp a bead stopper about half a coil away from one end, then start stringing
the beads in your desired order or pattern.
I usually repeat some of the smaller and medium-size spacer beads from one
"bead station" grouping when designing the adjacent grouping, making slight
changes and using a different center focal bead for each successive
pattern.
Step 5: Adjust as Needed So the Bead Stations Complement Their Neighbors,
Both to the Sides and On the Other Coils
I've found that it's nearly impossible to create a final multi-strand beaded
coil wrap bracelet design before stringing the beads on the memory wire.
While the mechanics of cutting memory wire, stringing beads and finishing the
ends are fairly simple, designing the bracelet so that the colors, sizes,
shapes and patterns of each bead grouping complement not only the ones to
either side on the same coil but also their counterparts on the adjacent coils
is definitely a challenge (a bit like playing the
three-dimensional chess game from Star Trek, lol).
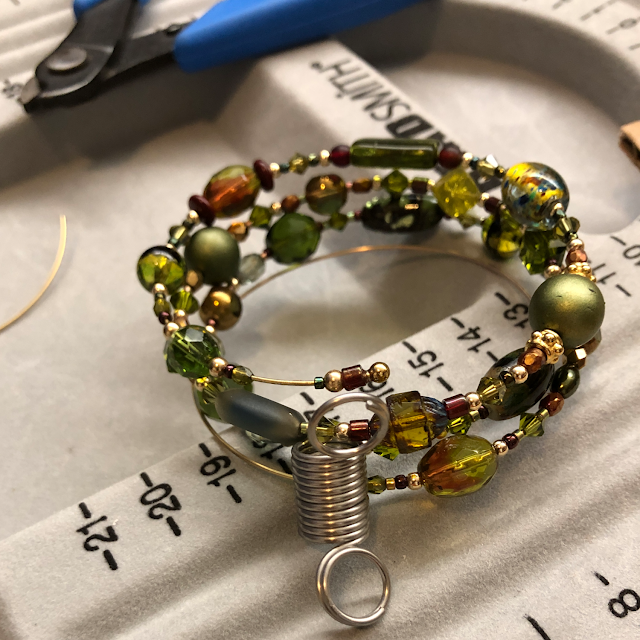
As you can see from the photos, my final design turned out to be
significantly different from the initial pattern groupings I was experimenting
with at the beginning in order to get all three parallel beaded coils to fit
together nicely.
Step 6: Do a Final Alignment Check
Snug the beads down firmly, gently stretching the coils apart and adjusting
the bead stopper clamps, if necessary, to ensure there are no gaps where the
wire shows between the beads.
Then, do a final check to make sure you're happy with the way the beads on
each coil align with those on the other coils. Even though I am careful to
keep re-snugging the beads as I go, I usually have to make a few minor
adjustments after snugging the beads one last time.
Step 7: Glue The Last Several Beads to One End of the Bracelet, Then Trim
the Memory Wire and Glue on the End Cap
Place one end of the memory wire into the jaws of the memory wire cutter.
Using just enough force on the handles to compress the wire without cutting
through it, make adjacent, parallel grooves along the first 1/2-inch of one
end of the memory wire. This will create some "tooth" on the smooth metal
surface to help the epoxy adhere better. Use an ultra fine point permanent
marker to place a small mark about 3–4 mm from the tip of the wire.
Next, prepare a very small amount of the J-B Weld clear two-part epoxy. Put on
your exam gloves, then squeeze equal amounts from both sides of the syringe
dispenser onto a scrap of cardboard and mix them together thoroughly and
quickly with a clean toothpick..
Clean off the tip of the toothpick, then use it to pick up a drop of the
prepared epoxy mixture and apply it to the small section of wire where you
made the grooves, starting at the mark you made about 3–4 mm from the
tip and spreading it inward along the remainder of the grooved section.
Quickly remove the bead stopper clamp and slide the last several beads down
onto the glued section of wire, taking care not to get any of the epoxy on the
last 3–4 mm of the grooved end of the wire. Slide one more bead down next to
the glued beads, replace the bead stopper next to it to keep the glued beads
in place while the epoxy sets, then prop the bracelet with the exposed tip of
the wire facing upward.
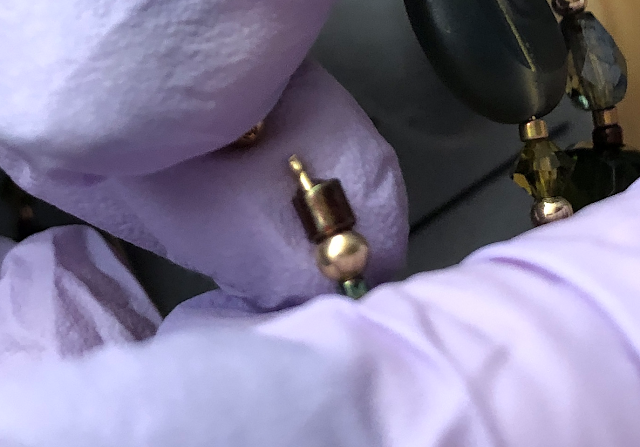
When the epoxy has not only set but also cured, tug firmly on the glued beads
to make sure they are securely attached. Then, slide a memory wire bead cap
onto the clean end of the memory wire to gauge how much of the wire to trim. Remove the end cap and use the memory wire cutters to remove the excess length.
Helpful Tip
Trim a little
less wire from the end than you think you need to. Removing a bit more, if
necessary. However, if you trim off too much, there won't be enough wire to
allow the epoxy to bond it securely to the end cap. It's better to leave the wire
a smidge too long and have a tiny gap between the last bead and the end cap
than to trim it too short.
|
|
Coat the tip of the trimmed and ridged wire end with a dab of epoxy
and align the end cap hole.
|
|
|
Then, quickly and carefully, push the end cap firmly onto the glued
tip of the memory wire.
|
Using a fresh piece of cardboard and a fresh toothpick, prepare another small
amount of two-part epoxy. Quickly apply a dab to the exposed end of the
trimmed wire, align the hole of the memory wire end cap and guide it onto the
wire tip. Hold the end cap securely in place for at least 60 seconds, applying
pressure from the end with a clean, gloved fingertip. Slowly and carefully
remove the pressure, then prop the bracelet with the freshly glued end
pointing upward, so that gravity continues to pull it down onto the clipped
wire tip.
Allow the epoxy to cure fully, then give the end cap a tug to make sure it is firmly secured to the end of the wire before moving on to Step 8.
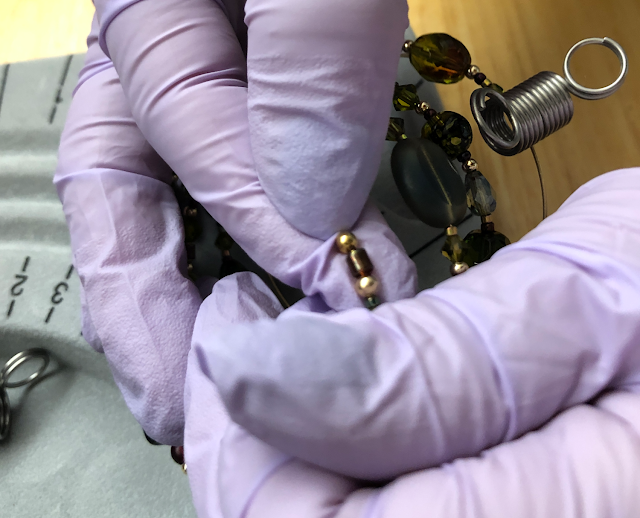
Step 8: Trim and Glue the Other End of the Bracelet
Finishing the second end is a bit trickier than the first. Slide the loose beads down the bracelet wire, snugging them firmly against the glued beads at the other end. Use the ultra fine point permanent marker to mark the wire at the last loose bead. Then, carefully slide several beads off that end of the wire
and place them in order in a channel of the flocked bead board,
making note of which end of the row of beads was at the end of the wire.
Use the memory wire cutters to indent parallel lines into the section of
memory wire adjacent to the remaining strung beads, as before. Put on the exam
gloves, prepare a small amount of epoxy, re-snug the beads and apply the glue
to the section of exposed wire between the end of the strung beads and the
mark you made. Quickly slide the beads you removed back onto the wire in the
correct order and snug them down onto the glued section. Wipe off any visible
epoxy that might have squeezed out onto the adjacent exposed wire. Replace the
bead stopper and allow the epoxy to cure fully.
When the glue has cured, carefully remove the bead stopper and tug firmly on
the glued beads to ensure that they remain firmly attached to the wire.
Examine the adjacent wire carefully, scraping off any tiny areas of cured
epoxy residue with a utility blade.
Trim the excess wire, testing the length of the remaining exposed wire at the
tip with the memory wire end cap and leaving just slightly more than the depth
of the end cap bead hole. If necessary, use the memory wire cutter to impress
additional closely-spaced parallel indents into the exposed wire end.
Prepare a small amount of epoxy and glue on the bead cap, applying pressure
with a gloved fingertip for at least 60 seconds as before, then prop the
bracelet with the freshly glued tip facing up and allow it to cure fully.
Tug on the end cap bead to ensure it is well secured to the end of the wire.
|
|
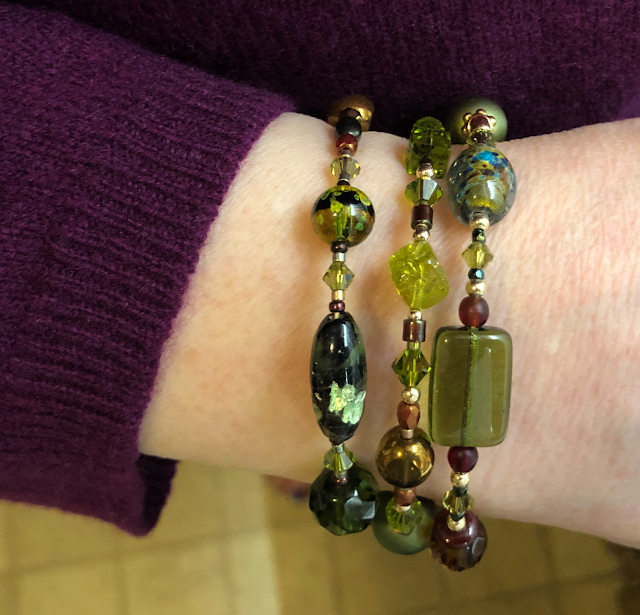
I'm modeling the finished, one-of-a-kind, vintage beaded memory wire wrap bracelet I designed
and made as a birthday gift for my dear friend Sally.
|
Wear or Give Your Beaded Coil Wrap Bracelet With Pride!
Although I collect rare vintage glass beads and Swarovski crystal beads and
love to use them in my jewelry designs, making beautiful beaded memory wire
coil wrap bracelets can be as easy or challenging and as inexpensive or costly
a project as you decide to make it.
Wouldn't it be fun to get some inexpensive beads from craft stores and find
and disassemble beaded jewelry at bargain prices from yard sales and thrift
shops, then pick up some memory wire, a heavy duty wire cutter and some epoxy
and invite your favorite teens or college students over for a jewelry making
"play date?"
I hope you decide to give this beaded coil wrap bracelet project a try. If you
do, I would love to see what you make!
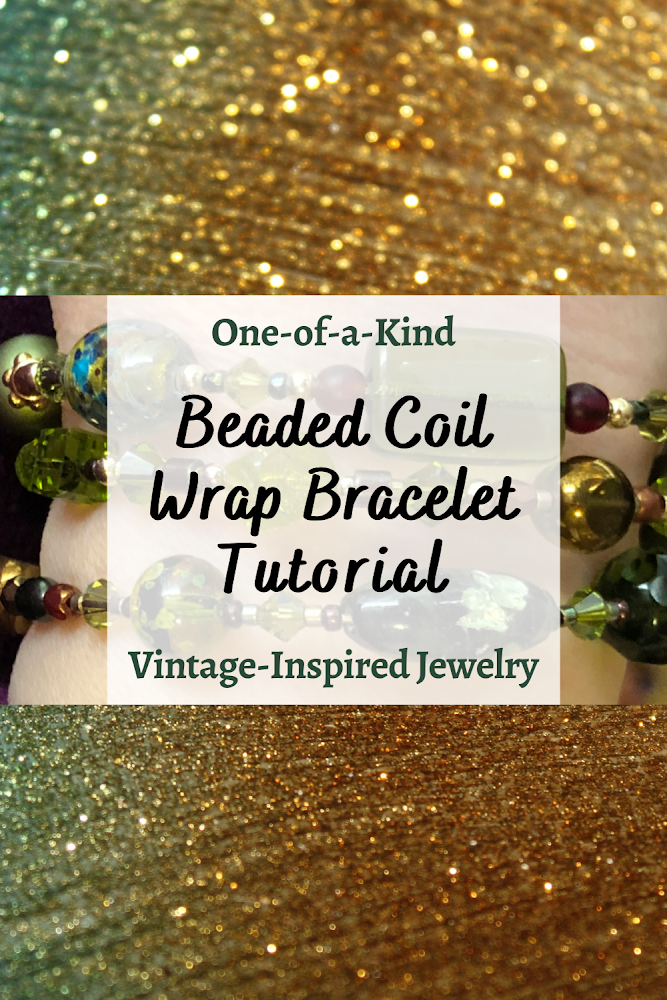
How to Make a Stylish Beaded Coil Wrap Bracelet by Margaret Schindel
Read More Crafts & DIY Reviews by Our Review This Reviews Contributors
Read More Gifts Reviews by Our Review This Reviews Contributors
Note: The author may receive a commission from purchases made using links found in this article. “As an Amazon Associate, Ebay (EPN), Esty (Awin), and/or Zazzle Affiliate, I (we) earn from qualifying purchases.”