Monday, August 9, 2021

Reviewing Growing Annual Sweet Pea Plants And Flowers

sweet pea flowering plant growing on wrought iron

 
Of all the annual flowers I think sweet peas are my favourite. I love the beautiful flowers and the delicious scent. They are climbers and so great to have flowers that take up very little space. They are also so beautiful in a vase in the house.

They are annuals which means that they set seeds, grow and produce flowers and seed pods, then die all in one year. You cannot usually keep them from year to year, but you can buy new seeds each year quite inexpensively. 

Sweet peas are so easy to grow and care for and are worth anyone having a go. This article is about growing and enjoying sweet peas, not growing them for showing or breeding which is more specialised. 

sweet pea flowering plant


 Buying Sweet Peas Seeds


 You can buy sweet pea seeds from many places. Here are a couple of things to look out for.

I love my sweet peas to be scented so if you do want scent make sure it says scented on the packet.

Some scents are stronger than others and that is a personal choice. Check carefully if you prefer a floral, fruity, musky, fresh or heavy scent. 

If you are wanting a particular colour then you will need to look specifically for that colour. I often buy a packet of just white or cream. If you are planning to pick them for a wedding these colours are particularly beautiful. 

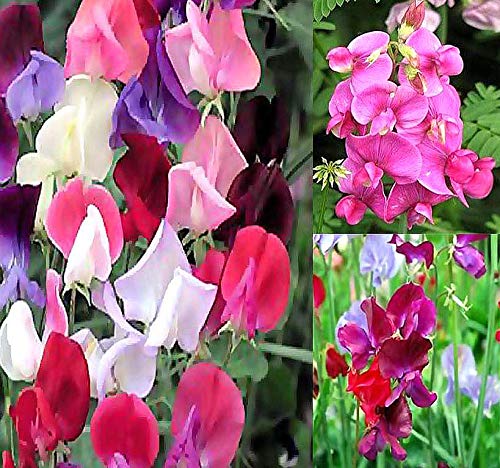
Many seed packets are mixed colours but you may choose from pinks and purples to burgundy and reds. 

Some Sweet Peas are the older or even heritage varieties, others are more modern so again it is a choice of what you enjoy. There really is something for everyone! 

sweet pea plant against wood fence


 Sowing Your Sweet Pea Seeds


 There are a huge variety of sweet pea seeds for sale. You can buy them in multi-colored packs or packs of for example cream or white only. Check the packet carefully for if they are fragrant or not as well.

Some will have longer stems than others so if you really want to grow them mainly for the house it is better to choose long-stemmed varieties for vases. Otherwise, it does not matter. There are heritage and new varieties and really we are spoiled for choice! 

 Once you have made your choice or like me decided you cannot choose so buy several different packets, you can sow seeds in Spring or in Autumn. 

The autumn sowing will mean earlier flowers but you will need to look after them over autumn/winter. This means you will need a frost-free place for them to be all autumn and winter and will need to keep an eye on them.

 The Spring sowing will result in later flowers but the whole process is during spring and summer and you will not need a special place for them.

 I generally sow in Spring but if I had space in a greenhouse or cold frame I would do an autumn sowing as well to prolong the flowering season. 

 Sweet peas are not too fussy about soil. For the seeds, I use a mix of any ordinary compost with some grit added for extra drainage.

 Sweet peas generally germinate well. I sow mine in either small pots or plug trays or even in toilet roll holders. They do develop long roots so a taller container is better.  Any container that is not too large but is long enough for nice deep roots to form is good.

pink sweet pea flowers


 Planting Out Sweet Pea Plants


Once you can see the roots have formed well and the plants have several proper leaves we can think about planting out. However, it is very important that we only plant out after the frosts have finished for the year. This can be tricky to predict but know your local weather conditions from year to year.

Where I live we are usually safe from late May/early June. Then it is simply a matter of digging a hole slightly larger than the plants' rootball and you can plant the whole plug out into the garden. Carefully fill in around the planting hole and gently firm in. 

 It is worth noting that If you have kept your plants in warm sheltered conditions then I would advise that you take them out in the daytime and back in at night for a period of one to two weeks to acclimatize them to outdoor conditions gradually before planting out for good.

a variety of sweet pea flowers

Do only plant out strong healthy plants. If they are too thin and weak or struggling they will quickly become prey to slugs and will not grow well or at all. So plant out only the strong growing healthy ones. The weaker ones can either be discarded or I like to give them a chance by continuing to grow on in a small pot. Give them all a really good soaking with water after you have planted them. 

I would advise planting out on a day that is not too hot and sunny just so that they do not get too stressed. A warm but not too hot day is about right. They do like moisture-retentive soil which is fine on our clay mix soil. However, if you have sandy or chalky soil it is best to dig a large hole much bigger than the area you are going to plant in and fill it with good compost, manure or similar to enrich the soil. Then put your supports in and plant the sweet peas. 

 Sweet peas can also be planted out into large pots and grown up a tripod in the pot. I think they look rather lovely this way and you can see all the way around the pot which makes for better viewing and easier picking. The soil can be ordinary compost with a little grit or perlite mixed in for better drainage.

Sweet peas do like a sunny spot if possible. In a large pot they will require much more watering than in the ground, so never let them dry out, the soil must be kept moist. 

deep red sweet pea flowers


 Tieing in Sweet Peas


Most sweet peas are self-climbers so they produce curly tendrils that latch on to any support and grow upwards. Some do need tieing in regularly as they have no tendrils. I usually buy the self-clinging ones and provide support for them to grow up.

Support can be anything from canes with string, a tripod with additional string, or another tall plant they can scramble up. I have grown mine this year up Bamboo canes and also alongside our Metal Garden Swing Seat tied in with ordinary string. 

I tie in a few stems to begin with to give them a good start, then every so often if they are growing too far out from the support. I just use soft string and tie loosely so as not to damage the stems. 

sweet pea flowering plant against wood fence


 Picking Sweet Pea Flowers. 


This is the beauty of sweet peas, you must regularly pick the flowers! For many plants, you have to make the decision to either pick the flowers for a display in the home or to have the flowers in the garden. With sweet peas, you get the best of both worlds!! You must pick the flowers in order to get more flowers! 

So usually once a week I go over all our sweet peas in the back garden. Then once a week on another day I pick all those in the front garden. That way I always have sweet peas in the garden and a vase or two of sweet peas in the house.

an arrangement of sweet pea flowers in a variety of colors


When you pick them use a sharp pair of scissors and cut right at the base of the stem so that you get as long a stem as possible. Put them in water immediately. I carry a jar of water with me and they go in straightaway. Then I can transfer to a prettier jar, glass, or vase in the house. 

 If you don't pick the flowers regularly they will quickly go to seed and you will see these seed pods like in the photo.
I left these without picking to show you and now there will be no more flowers on that specific plant for the rest of the year. So the motto is to keep picking the flowers!!  

sweet pea plant seed pods


 Watering And Feeding Sweet Pea Plants.


 If it rains regularly you may not need to water at all. However, we have been having a heatwave here and so I do water the ground thoroughly soaking it about once or twice a week. Do not water the plant's leaves only the soil.

Once the flowers start to appear I give them a fertiliser feed about once a week with a high potash feed, something like a tomato feed is good, but if I forget they are always just fine.


Sweet Pea Flowers In The Home


The flowers are so pretty and the scent is so gorgeous that it would not be summer without sweet peas in our home. They can scent a room beautifully and look so pretty. I just pick them with longest stems possible and pop them in a vase or as here in a wine glass. I like them to look natural and so I just pop them in the vase as they fall.

 Some people may want to do more flower arranging or make a gorgeous arrangement with other flowers which would be stunning.  I just pop them in a vase by themselves which I think looks pretty.  They last around a week in the vase then by then there are more from the garden. 

 Flowers are always fleeting though and so for a more permanent record of the flowers and plants in our garden and countryside, I do take a lot of photos each year and make some into greetings cards and gifts, you can see some of them on my Blog Raintree Earth Design. 

However you grow them in the garden or in a container, to enjoy in the garden or pick for the home, Sweet peas are such easy beautiful annuals to grow and enjoy. Adults and children can grow them and they are a lovely introduction to growing annuals.

 Their scent is so beautiful and there are many different scents, the colours are many and varied and you will never tire of them.

sweet pea flowers in a glass vase


More Gardening  And Wildlife Articles


Reviewing The Growing And Care Of Bottlebrush Plant


Note: The author may receive a commission from purchases made using links found in this article. “As an Amazon Associate, Ebay (EPN), Esty (Awin), and/or Zazzle Affiliate, I (we) earn from qualifying purchases.”


Sunday, August 8, 2021

Don't be Afraid of Color and Patterns When Designing a Vintage Room

Don't Be Afraid of Color and Patterns When Decorating

Using color in home decor can terrify some people.

There's a difference between 'not liking pattern and color' and being afraid to try it. 

If your decorating nature leans toward neutral colors and very few patterns, then this article isn't for you. 

I prefer color, patterns, texture, interest, and depth when I decorate a space. I'm not one to walk into a furniture showroom and head towards the modern pieces. However, I have several people in my family who absolutely prefer a neutral decor that focuses on clean lines, fewer pieces, and basic shapes and patterns.

A Step Back Into the 1800s 

Our family room isn't exactly the epitome of the 1800s. However, I added pieces to that space over the years to further enhance its vintage feel. The only two parts that are modern are the TV and the gas fireplace. 

The recent addition of my mother's personal, high-quality needlepoint work, with their ornate frames, became the finishing touch this space needed. I'm blessed to have six pieces of my mother's personal creations in my home. They fit our decor perfectly.

Don't Be Afraid of Color and Patterns When Decorating
An Old Meets New Family Room Decor Theme

Choose a Rug with a Pattern

In this article, I explain how to select a patterned rug to go with a patterned sofa. Essentially, it states that if you plan a lot of color and pattern in your room, keep the pattern on the rug fairly minimal and keep it to the edge of the carpet. Let the center part of the rug have larger neutral sections, with bits of patterned items spread sporadically throughout.

Don't choose a geometric, contemporary, or modern rug to go into a space where you want the feel to be old-world. Although you may like to mix and match modern with vintage, you need to approach that particular design with intention. Intention involves thinking about each piece you have, the balance of each piece, and how they contribute to the final look.

In our case, we wanted the family room to have a rich, deep, hotel-lobby feel that crossed into the realm of vintage and old world.

Ultimately for us, the room's emotion was about coziness, warmth, and depth; vintage decor ticks many of those boxes.

Art Work With a Vintage Feel - Not Just the Art Work, But Also the Frames

Admittedly we just added my mother's personal artwork to the room. The three places we added her personally crafted needlework was above two lamps and above a chair. The vintage look to the frames, along with her incredible needlepoint, completes the space.

My mom created these pieces nearly 50 years ago, in the 1970s. The three pieces are now part of our family room; Blue Boy, Red Boy, and Pink Lady. The photos below don't do it justice! They look outstanding in our color-rich family room.

Here are Mom's Handcrafted Pieces

Don't Be Afraid of Color and Patterns When Decorating
Blue Boy - Handcrafted by Georgette Tremblay

Don't Be Afraid of Color and Patterns When Decorating
Pink Lady - Handcrafted by Georgette Tremblay

Don't Be Afraid of Color and Patterns When Decorating
Red Boy - Handcrafted by Georgette Tremblay

Ultimately color choices for a room are a personal choice. However, don't let fear of decorating with color, 'color' your decorating bravery. 

Quick Summary of What to Consider When Decorating with Color

  1. Keep the room balanced - especially if you're fearful of decorating with color. 
  2. Choose a few areas with patterns (such as the drapes, pillows, and rugs) and go with solid tones for the rest (the walls, the furniture, and lamps/lighting) - This is the easy way to take that leap into color.
  3. For the Batman-Brave, put a bit of pattern in everything BUT keep certain accessories solid in color, such as the lamps, the drapes, and the tables. Take your color and pattern bravery out on the sofa, the rug, the pillows, and the art.
  4. Keep the family of colors complimentary. Here's an excellent article explaining complementary colors.
  5. Decide upon the mood you want for your room; comfortable, airy, lush, cheerful, cool, warm - whatever you want. Check out this article for more on that topic.
If you like funky, creative decor, be sure to check out Funkthishouse.com.


Note: The author may receive a commission from purchases made using links found in this article. “As an Amazon Associate, Ebay (EPN), Esty (Awin), and/or Zazzle Affiliate, I (we) earn from qualifying purchases.”


Saturday, August 7, 2021

Sleep Headphones for Side Sleepers

 I'm reviewing my Musicozy Wireless Sports Headwear aka headband speakers which I use when I'm sleeping.

Let's talk about the best sleep headphones for side sleepers
Photo by Lou16, image design via Canva

Let's start with why I was looking for some headband speakers.   I have been on a bit of a health journey since the beginning of 2018.   This journey first focused on my nutrition (learn more here), then on the exercise component of good health as well as personal development.

I had always thought that personal development was a great idea for some people, but I didn't need it!  I really believe that some of the personal development practices I used helped keep me on track with my journey while enriching my life in so many ways.   If you're thinking about starting a personal development journey yourself I recommend working through The Magic by Rhonda Byrne.  

As life got in the way I started spending less time on my personal development, my morning journaling, affirmations, reading dwindled from 30 mins to 20 to 10 until I stopped doing any work at all.   Initially, I didn't really notice it, but gradually changes took place and I found myself in a really negative headspace. 

I was talking to my daughter about things and somehow the conversation shifted to sleeping and she told me she listens to affirmations and meditations as she's going to sleep.   The idea intrigued me as I thought that would be great, except I didn't think my husband would be impressed if he had to listen to them!

Not long after our conversation, my husband had to go away for work for a week so I decided to see if I could sleep listening to some of the offerings on YouTube.   Now a couple had voices that really annoyed my so it may take you a while to find the perfect fit for you, but I did find a channel that I liked.   I listened as I was going to sleep and after a couple of days, I was convinced that I needed to find a way to keep this practice up.

My daughter recommended I look for some headband speakers so I turned to Amazon.   I searched for headband speakers and then I saw that some mentioned side sleepers so I narrowed my search to these.   I ended up buying the Musicozy Wireless Sports Headwear (the official title on the box), they were actually listed on Amazon as Musicozy Sleep Headphones Headband.

Musicozy Wireless Sports Headwear - The Review

There were lots of headband speakers to choose from and I wish I could say that I did a lot of research to narrow down my choice but I basically looked for ones that said they were suitable for side sleepers, that connected to Bluetooth and weren't too expensive.   The reason I didn't want to spend too much is that I really wasn't sure I'd be able to sleep with them.

I had narrowed it down to two different ones and was trying to decide if I wanted black or the grey marl when I saw that Musicozy had an animal print design - decision made!

 So the company says (in italics):

  • Wireless headphones with excellent sound quality - the sound quality really is good, but they do say on Amazon that they are noise-canceling which they are not.  For my purposes, that's fine as I want to hear if there are any noises at night, but if you're looking at using them at the gym they may not be for you.
  • Built-in microphone, hands free talking - I haven't used the microphone as I have only used them for listening while I sleep and I can't see any reviewers talking about this feature
  • Effective wireless range up to 10 meters/33 feet - personally I have my phone on my bedside table so I haven't tested the range, but I have read a few reviewers who find they can walk around their house and remain connected.
  • Three buttons control all music/call functions - I love that there are only three buttons (I only use the middle one) as I will often wake up in the early hours and want to take it off so I can just press the middle button, without the need of my glasses or the light, to turn it off and put it on the side before going back to sleep. 
  • Built-in rechargeable li-polymer battery - on Amazon it says that the charging takes 1-2 hours and it will hold the charge for 10 hours.   I am sure mine holds the charge longer than 10 hours.  The first time I charged it I did find it a little fiddly to do, but not sure if that was just me!  It's very easy and I usually put it on charge in the morning as I'm doing things so I don't know how long it actually takes.

Note for side sleepers


I sleep on my side and although the speakers are thin I will admit that I still wasn't convinced that I should lie on my side so the first night I slept on my back which resulted in snoring which resulted in a grumpy husband and sore throat!

The next couple of nights I actually slept on my side but I rested my head on my arm so that I wasn't pressing down on the speakers.  This was quite comfortable, but I woke up during the night and took the headband off.   Finally, on the fourth or fifth night, I just rested my head on the pillow as usual and it was really good.   I did find that I could turn the volume down slightly when I wasn't on my back or rested on my arm so that was good.

I definitely found that I could sleep on my side with these speakers and recommend them to any fellow side sleepers out there.

Note for people sharing a bed


The big test for these speakers was whether or not they disturbed my husband's sleep.   Some nights he can be a light sleeper and when something wakes him up it will take him a long time to go back to sleep.   His response to my sleep headphones - "I couldn't hear a thing".

In summary, I am really happy with my purchase and hope that my review has helped anyone who would like to listen to meditations, affirmations or music while drifting off to sleep.


Note: The author may receive a commission from purchases made using links found in this article. “As an Amazon Associate, Ebay (EPN), Esty (Awin), and/or Zazzle Affiliate, I (we) earn from qualifying purchases.”


Friday, August 6, 2021

Presque Isle Lighthouse in Presque Isle State Park in Erie, PA Reviewed

Presque Isle Lighthouse
When we helped move our daughter to Buffalo, NY, there were a few sites we wanted to take time to see along the way.  One of those sites was the Presque Isle Lighthouse in Presque Isle State Park.  

We spent the night in Erie, PA on the way to NY, but didn't have time to visit the Erie lighthouses until we were on our way back home.  Since we drove the U-haul truck to Buffalo, I'm really glad we waited to go to Presque Isle State Park in a car instead of the truck.  

The park was full of guests visiting the beaches, fishing, biking, walking the trails, and of course, visiting the lighthouses.  Even though there was a lot of traffic, most of the people seemed to be there for the beaches, swimming, or other water activity.  This allowed us easy parking and access to the Presque Isle Lighthouse.

While I love lighthouses, I tend to prefer the lighthouses that have a lighthouse keeper's residence. Perhaps, I romanticize the historical accounts of lighthouse keepers, but there is no doubt they served to save many lives.  I consider them heroes who diligently tended the lights every night, all night long, in order to keep others safe.

Today, the Presque Isle Lighthouse is a public museum and is on the National Register of Historic Places.  Guests are allowed to freely walk around the grounds, visit the gift shop, or even climb the 78 steps up to the top of the lighthouse. 


A Bit of History of the Presque Isle Lighthouse

Presque Isle Lighthouse


As you can see on the date brick, the lighthouse building was started in 1872, but actually put into service in July of 1873.  
(You may need to click the photo to enlarge it to see the date clearly)

We were standing on these grounds and I took this picture 148 years later in July of 2021.

The lighthouse was originally lit by an oil lamp inside a Forth-order (smaller than a First-order) Fresnel lens which was removed in 1962. It currently uses an isophase light (dark & light periods of equal length).  

The four bedroom house was home to a lighthouse keeper and family until 1944.

When built, the tower was 40 ft. tall.  In 1896, an additional 17 ft was added to the tower.  By comparing the two pictures below, you can see where that 17 feet were added.  The bricks was later painted white to make the tower more visible during daylight hours.

Presque Isle LighthouseUnited States Lighthouse Board, Public domain,
via Wikimedia Commons

Presque Isle LighthousePhoto by @Sylvestermouse (2021)


I loved visiting this historical location and I loved that it was being "appreciated" by so many guests.  If you find yourself near Erie, PA, be sure to stop by Presque Isle State Park and enjoy all of the surroundings and climbing the stairs to the top of the Presque Isle Lighthouse.


More Articles About the Presque Isle Lighthouse

  • You can read more of the real history of Presque Isle Lighthouse by clicking here.
  • Our Contributor, Mary Beth, also shared several of her gorgeous photos of the Presque Isle Lighthouse and two other Erie Lighthouses here on Review This Reviews. You can see her photos by clicking here.


 See More Travel Reviews & Recommendations On
Review This Travel!


House of Sylvestermouse


Note: The author may receive a commission from purchases made using links found in this article. “As an Amazon Associate, Ebay (EPN), Esty (Awin), and/or Zazzle Affiliate, I (we) earn from qualifying purchases.”


Thursday, August 5, 2021

Upcycled DIY End Table Pet Bed

Upcycled DIY End Table Pet Bed
Upcycled End Table Pet Bed

As a continuation of my DIY series on repurposed furniture projects, I present to you my latest pet bed creation.  These upcycled end table dog or cat beds are extremely popular with both fur babies and their pet parents.  I speak from direct experience.  My animals spend nearly all of their time in these beds.  

The four-poster pet bed featured here can be easily completed in a weekend.  Here's a quick rundown of the process I used to bring new life to a vintage end table.  

Supplies Needed: 

  1.  Vintage End Table
  2.  Sand Paper or Sanding Sponge
  3.  Paint (I used Rust-Oleum Chalked Spray Paint - Chiffon Cream)
  4.  Bun Feet (optional)
  5. Finials (I used crystal drawer knobs; lamp finials are another great option)
  6. Clear Coat Sealer (I used the Rust-Oeum Chalked Paint Matte Topcoat)
Tools Used:
  1. Screwdriver
  2. Hack Saw
  3. Sander
  4. Drill
  5. Pliers
  6. Brad Nailer

vintage end table
Vintage End Table (Before)

I started with a quick shopping trip to the Habitat for Humanity ReStore and the Goodwill Store.  This vintage end table was perfect for my project and easy on my budget (eight dollars).  It's nice to get a bargain while supporting a cause near and dear to my heart.

Step One: Flip table. Pull out drawer. Remove inner drawer supports to clear space for bed. I simply used a mini hack saw to cut the cross piece and then a screwdriver to remove the two side supports. 

upside down end table with drawers removed
End Table With Drawer Removed


cutting out the drawer base of a vintage end table
Cutting Out Drawer Brace


removing screws
Unscrewing Side Drawer Support


Step Two: Remove drawer pulls by unscrewing inside hardware.  Save parts for later.

removing handles
Removing Drawer Pulls

Step Three: Pull off the plastic leg disks used for leveling and protecting the floor.  Discard.

removing plastic leg disks
Removing Plastic Leg Disks

Step Four: Cut off the back part of the drawer and reinstall drawer front (I cut it with a hacksaw leaving an inch of the drawer's side and then used a brad nailer to affix it).  As you can see from the second photo, the drawer takes up room needed for the pet bed.  However, the drawer face is needed for the front side of the cabinet.  I considered using the drawer to make a little step up into the princess bed.  That would be a fun option if you have a tiny dog that could use a boost.


vintage end table prepared for refinishing
Drawer Front/Side After Cut-Off


end table drawer
Drawer Inside Table (Before)

Step Five: Install supports and false bottom for bedding area.  The wood pieces will provide enough depth to drill in the bolts for the bun feet (from the other side). The veneer of the end table top was too thin for the bolts and bolt inserts, hence the wood blocks covered by a sheet of masonite.

false bottom of vintage end table
Supports For False Bottom

masonite covering
Masonite Covering Bottom Supports

Step Six: Sand wood in preparation for two fresh coats of paint.

preparing and sanding a vintage end table
Paint Prep - Sanding

Step Seven: Prime and paint with two coats of Rust-Oleum Chiffon Cream chalked paint.

spray paint
Chiffon Cream Spray Paint

Step Eight: Seal the paint with a clear finish. I used the Rust-Oleum matte topcoat.

clear topcoat
Clear Topcoat Protective Finish

Step Nine
: Attach bun feet. This was done by drilling holes for the bolt inserts.

bun feet
Bun Feet Installed With Threaded Inserts

Step Ten: Screw in finials atop the legs.  I love the rainbows that wash over the bed when sunlight shines through the prisms.

crystal finials
Crystal Finials Installed

Step Eleven: Reattach the drawer pulls after painting them.  I used the same creamy chalk paint.

painted drawer pulls on painted end table
Painted Drawer Pulls Back In Place

Step Twelve: Select fabric and make a cozy bed cushion/pillow.  I used foam cushions and two fabric selections: one is a fleece damask pattern in pink and chocolate; one is a super soft ribbed pink chenille.  Which do you like best?  

fleece bed cushion
Damask Fleece Bed Cushion

chenille bed cushion
Pink Ribbed Chenille Bed Cushion

So there you have it.  Upcycling is a fun way to exercise your imagination while feeling great about saving an item from a premature demise.  Why send something to the landfill when it has plenty of life left in it?  

I like to think this old end table is pretty pleased to be looking better than ever and to be enfolding the life of a beloved pet.  There's nothing like being needed and valued.  

Interested in more pet bed demos?  Check out my DIY upcycled dresser drawer beds.  My cats adore them.

Stay tuned for upcoming DIY demo projects.  Up next is an antique door hall tree and a vintage metal suitcase coffee table (recent Habitat for Humanity ReStore finds that I could not resist).


Note: The author may receive a commission from purchases made using links found in this article. “As an Amazon Associate, Ebay (EPN), Esty (Awin), and/or Zazzle Affiliate, I (we) earn from qualifying purchases.”


Wednesday, August 4, 2021

What's Bugging You in August? A Product Review

August is the month that many people look forward to!  Why?  Well, it's the month that lots of fresh produce becomes available right across the country!

Every year my sweetie and I look forward to those open air "Farmer's Markets".  We love to let our farmer friends know how much we appreciate their work and the produce that is available is so fresh!  You know it was just picked! 
 
vegetables
Image by Innviertlerin from Pixabay


Tomatoes, cucumbers, beans, peaches, cherries, and all manner of produce is there for your enjoyment.

The only problem that we have ever had with all this fresh produce around is those nasty Fruit Flies!  They seem to develop overnight, find my nice fresh fruit and drive me crazy!

Washing and drying the produce does not seem to help in keeping those nasty little flies away.  After a day or two,  the fruit flies seem to have invaded my kitchen and I'm hard pressed to get a handle on them.  Now it doesn't help much that I love making home-made tomato sauce and the fruit flies seem to love cut tomatoes more than anything else!  I just start making my sauce and it seems like there are fruit flies everywhere.  
 

What can you do to solve this problem?


Well, I have been researching ways to get rid of these pests!  I don't want to use "Raid" or other chemicals in my kitchen, after all, those sprays end up on everything.  Plus they are not very effective unless you get the sprays right on the bugs.  I don't want to be breathing or eating anything that has been sprayed.  So that leaves me with looking for some natural ways to get rid these pests.  

Natural traps consist of something that will ultimately bring the bugs to you.  If you check out You Tube they will show you how to make traps using a glass with vinegar and some liquid soap in the bottom.  Cover the glass with plastic wrap.  Then poke a few holes in the plastic wrap with a toothpick.  The vinegar will attract the fruit flies and they will crawl into the little holes.  Once they are in, it's hard for them to find the holes to get back out.  Most will drown in the liquid in the bottom of the glass.  You can check out the how to right here if you want to go that route!  Home Made Fruit Fly Traps

Personally, I have tried this method and while it works for some fruit fly removal, I find that I have more flies that are not at all attracted to it.  And it seems that they multiply exponentially making the problem just that much worse.

Now I have found another way to get rid of these pests and not just fruit flies, but also mosquitos and fungus gnats as well.

There is nothing more annoying than heading off to sleep when you hear that buzzzzz of an errant mosquito that found it's way into your home.  Don't they always seem to follow you right into the bedroom?  Well, the method I'm employing in my home will take care of that pest too!

Fungus gnats in my houseplants should also be a problem solved with my newfound method of pest removal.  So the fact that this product will take care of them as well, just makes this product even better.  I do love my houseplants, and yes, I have had a problem with fungus gnats in the past.  

Now I'm sure you are interested in knowing what this method is and so I'm going to share it with you!
KATCHY is an indoor electronic bug zapper!  It sits on your kitchen counter (or bedroom or livingroom) and goes to work when you are sleeping.  It emits a blue light that these bugs find attractive and once they are close enough, a powerful fan draws them into the core of this gadget.  They are funneled down to the bottom and get themselves stuck on the glue board.  Once in, they will never fly out again.   


I love that it comes in either black or white and it's affordable!  There are  No Chemicals  used with this product either so no fumes to worry about, no smells and no residual films on home surfaces!

While I was looking for something that would work during the summer months, I'm sure that this will work all year long ridding my home of those other pests that live throughout the year. Katchy is the Number one rated home pest control traps on Amazon with lots of people giving it a big thumbs up!

It's a winner in my books for more than just ridding myself of those nasty fruit flies, but also the mosquitos, fungus gnats and moths.  

I hope this helps you have a much better summer with all the fresh produce you can eat!  Without the bugs to bug you!  Happy Summer everyone!


Note: The author may receive a commission from purchases made using links found in this article. “As an Amazon Associate, Ebay (EPN), Esty (Awin), and/or Zazzle Affiliate, I (we) earn from qualifying purchases.”


Tuesday, August 3, 2021

Ocean Prey by John Sandford – A Book Review

Ocean Prey book cover


Mystery Writer John Sandford has written 30 books in the Lucas Davenport 'Prey' Series and 12 books in the Virgil Flowers Series. With Prey Series Book #31, Sandford combines these two entertaining characters into one story and has them working together to solve a crime. 


Ocean Prey is a Lucas Davenport and Virgil Flowers Novel.


Main Characters in John Sandford's two well-known suspense/mystery series.


The Virgil Flowers Series


The  main character of the series, Virgil Flowers, is described as tall, lean, late thirties, three times divorced, with long hair. He often wears t-shirts featuring rock bands. Virgil works at the Minnesota Bureau of Criminal Apprehension (BCA). He is good friends with Lucas Davenport and is frequently mentioned in various 'Prey' novels.


The Lucas Davenport 'Prey' Series


Davenport has been a police officer, a Minneapolis detective and Minnesota Bureau of Criminal Apprehension investigator.  In later books, including Ocean Prey, he now works for the U.S. Marshall's Office.  Lucas is tall with black hair, gray at the temples, blue eyes, and dark complexion.


Although each character has been mentioned occasionally in each other's series (as they are friends), this is the first book where they are featured working together on the same case.


Synopsis of Ocean Prey


Fan-favorite heroes Lucas Davenport and Virgil Flowers join forces on a deadly maritime case   


Ocean Prey book cover
An off-duty Coast Guardsman, fishing with his family, spots a snazzy craft with extra horsepower picking up a surfaced diver who was apparently alone without a boat in the middle of the ocean. This doesn't make sense. The Coast Guardsman calls in this suspicious behavior.  The three Guardsmen who come out to investigate are shot and killed.


Since they are federal officers killed on the job, the FBI investigates. When the case stalls out, the FBI calls in the U.S. Marshall's office in the form of Lucas Davenport and his team. 


When the case turns lethal, Davenport brings in a detective whose biggest asset is having a fundamentally criminal mind: Virgil Flowers. 

Working undercover posing as a deep sea diver, with Davenport and the FBI supporting him in the background, Virgil infiltrates the group of notorious drug runners operating off the coast of Miami. They want the men responsible for the deaths of the Coast Guardsmen, but also the head of the organization which has been bringing in tons of illegal drugs in an unusual way. The main goal is to shut down the entire operation once and for all. 


Summary


Ocean Prey brings us an outstanding and exciting story starring Sandford's two favorite characters, Lucas Davenport and Virgil Flowers. This may be a suspenseful mystery story, but it is also filled with humor of the type frequently used by police personnel to lesson the tension.  The jokes and wisecracks among the characters made me smile often, and actually laugh out loud in two places. A very enjoyable read. 


Quick Links:


Ocean Prey Book Review written by

Wednesday Elf


Note: The author may receive a commission from purchases made using links found in this article. “As an Amazon Associate, Ebay (EPN), Esty (Awin), and/or Zazzle Affiliate, I (we) earn from qualifying purchases.”


Most Recent Reviews on Review This Reviews


Search for Reviews by Subject, Author or Title

The Review This Reviews Contributors


SylvestermouseSylvestermouseDawn Rae BDawn Rae BMbgPhotoMbgPhotoBrite-IdeasBrite-IdeasWednesday ElfWednesday ElfOlivia MorrisOlivia MorrisTreasures by BrendaTreasures by BrendaThe Savvy AgeThe Savvy AgeMargaret SchindelMargaret SchindelRaintree AnnieRaintree AnnieLou16Lou16Sam MonacoSam MonacoTracey BoyerTracey BoyerCheryl Paton Cheryl PatonRenaissance WomanRenaissance WomanBarbRadBarbRadBev OwensBev OwensBuckHawkBuckHawkDecorating for EventsDecorating for EventsHeather426Heather426Coletta TeskeColetta TeskeMissMerFaeryMissMerFaeryMickie_GMickie_G


Review This Reviews is Dedicated to the Memory of Our Beloved Friend and Fellow Contributor

Susan DeppnerSusan Deppner

We may be apart, but
You Are Not Forgotten


“As an Amazon Associate, Ebay (EPN) and or Etsy (Awin) Affiliate, I (we) earn from purchases.” Disclosure Statement

X