Thursday, August 11, 2016

Review of a Tour of a Major League Baseball Stadium

Busch Stadium View photo by mbgphoto
Busch Stadium View
If you are looking for an interesting place to take children on a tour, I would suggest a major league baseball stadium.  In July my granddaughters, age 10 and 12, were visiting us and it was a hot and sticky July summer in St. Louis.  I was looking for an interesting place to spend some time with them when someone suggested a tour of the baseball stadium.

Busch Stadium in St. Louis opened in April of 2006.  This huge stadium has seats for 43,975 people and offers a beautiful panoramic view of the downtown skyline.  Fellow Review This author, Pat, wrote about her visit to the stadium in this article

I went online and found information about the tour of Busch stadium and was delighted to find out that tickets  included a tour of the stadium and a visit to the Cardinal Hall of Fame and Museum.

Tour of Busch Stadium

Our tour of Busch Stadium started just outside Gate 3 of the stadium.  This gate has a statue of baseball great Stan Musial just outside the gate and the entrance to the gate is a tribute to the Eads Bridge with a large bridge-like structure arching over the entrance.  The Musial statue is often a meeting place for fans coming to the ballpark.  Here is a photo of my granddaughters and myself by the statue.  You will also note part of the bridge entrance in the background.
Stan Musial Statue at Bush Stadium photo by mbgphoto

The tour of the stadium took about an hour and we visited The Redbird Club, the Champions Club, the broadcast booth and the Cardinal dugout.  Here are some photographs from each of those areas.
Cardinal Dugout at Bush Stadium photo by mbgphoto


 In this photo my granddaughters are sitting in the Cardinal dugout.  It was fun to sit where the Cardinals sit during the games.  It was also fun next time we watched a game on TV to say we had sat there too!


Cardinal Baseball Cards at Bush Stadium photo by mbgphoto
The Redbird Club is an area where fans can buy tickets and enjoy food in an indoor glassed area.

Their tickets also include seats in front of the area to view the game from outside.  It is a nice way to enjoy the game, but also be able to get in from the heat.  One of the walls in the club was very interesting.  It was covered with replicas of oldtime Cardinal baseball cards.
From the Broadcast Booth at Bush Stadium photo by mbgphoto
View from the Broadcast Booth

The girls enjoyed seeing the broadcast booth and they were able to sit in the same seats the announcers sit in when they announce the games.

World Series Trophy at Bush Stadium photo by mbgphoto


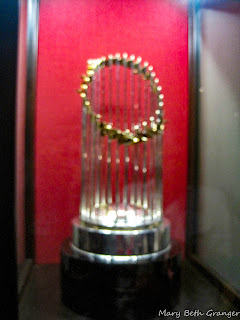
The Champions club is another indoor seating area.  In this club are several of the world series trophies that the Cardinals have won over the years. 


Ballpark Village

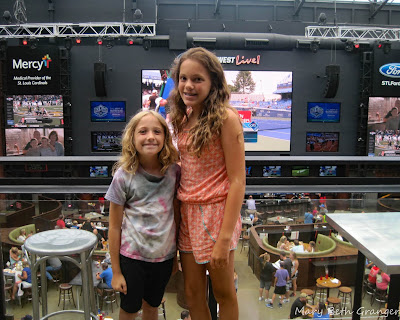
Across from Busch Stadium is the newest dining and entertainment district in St. Louis.  This area houses several restaurants along with the Cardinal Hall of Fame and Museum.  The area is being built in stages and in the future there will be more retail along with a hotel and residential opportunities.  There will also be more parking.  Ballpark Village is a "happening" place to be, both during home and away games.  Many fans gather to watch the games on the big screen TV's and enjoy food and drinks in the area restaurants.  We stopped at Cardinal Nation and had lunch before we went to the museum.  We found the food excellent and very reasonably priced.  The photo below shows the girls in Ballpark Village.
at Bush Stadium photo by mbgphoto

Cardinal Hall of Fame and Museum

The Hall of Fame and Museum has something for everyone.  This 8000 square foot museum is packed with over 16000 items of baseball memorabilia and thousands of archived photographs.  My husband really enjoyed looking over all of the memorabilia and the girls enjoyed some of the interactive displays.
Cardinal Memorabilia at Bush Stadium photo by mbgphoto
Display from Museum

Two of the displays that the girls really enjoyed were the mock broadcasting booth and the display where they could hold actual bats from former and present Cardinal players.
at Bush Stadium photo by mbgphoto

In this photo the girls are trying enjoying trying out their broadcasting skills. They would first watch and listen to a broadcast of an exciting play at a past game, then they would be able to see the play and they would record themselves giving the play by play. When they were finished it would be replayed for them to see how they did. Both girls enjoyed this display.
photo by mbgphoto

In this photo, Ella is trying her hand at batting. The display held several bats from Cardinal greats both past and present and a docent was there to hand you one bat out of the case that you chose. You first had to put on plastic gloves before handling the bat. Ella decided to try out a bat from Ozzie Smith.

Postcard from my Photograph

This postcard shows the St. Louis skyline from inside Busch Stadium.
St. Louis Skyline
St. Louis Skyline by mbgphoto
Look at St louis arch Postcards online at Zazzle.com


Note: The author may receive a commission from purchases made using links found in this article. “As an Amazon Associate, Ebay (EPN) and/or Esty (Awin) Affiliate, I (we) earn from qualifying purchases.”


Wednesday, August 10, 2016

Review: My Husband Loves Using Magnesium Oil for Neck Pain

Magnesium Oil Helps Relieve Neck Pain


My husband has suffered with neck pain and stiffness for many years. It was so bad it was hard to turn his head while driving. A week ago he asked about using magnesium oil. Fortunately, I had recently ordered some Asutra magnesium oil for myself and was able to provide it for him immediately.


Magnesium Oil is Easy to Apply


Before Hubby went to bed, I got read to apply the magnesium oil. I washed the back of his neck and shoulders with a washcloth to remove any sweat or traces of sunblock, and then dried the area. Then I sprayed some magnesium oil on his back and neck and rubbed it in. Since I have an arthritic thumb, I did some of the rubbing with that, hoping it might help me, too.

I had used the Asutra behind my knee earlier and had noticed a slight sting. When you begin to use magnesium oil it can sting or itch for a few minutes. I had forgotten to mention this to my husband. If your cellular magnesium levels are low, your skin sucks up the large molecules quickly, and that's what causes the sting. As your levels come back up to normal, it doesn't sting like it might at first. It doesn't sting either of us now. Even when there is a sting, it disappears quickly.

The next morning Hubby told me his the treatment had lessened his pain and it was  easier to turn his head. We now do this every night to keep his magnesium levels up in those muscles.

He decided to also see a chiropractor at his gym for a massage. That helped, too, and the chiropractor told him that using the magnesium oil was a good way to retain the results of the massage. My thumb is also doing better than it was. My husband can now turn his head much farther than he could two weeks ago.

The photo below was taken outside because the light is better. I wanted you to see how easy it is to apply the oil. Aim it where it's needed and spray. You can then rub it in or not. We choose to rub it in for best absorption. I help because he can't reach to rub in the magnesium oil where needed.

Review: My Husband Loves Using Magnesium Oil for Neck Pain
Hubby Demonstrates How to Apply Magnesium Oil, © B. Radisavljevic 


What is Magnesium Oil?


It's not an oil at all. It's really a liquid form of concentrated magnesium chloride. It's made by dissolving magnesium chloride flakes in water. It only seems a bit oily when applied.

Don't I Get Enough Magnesium from My Tablets?


We have both taken magnesium in tablets for at least twenty years. The problem is that most of what we were taking was magnesium oxide, and that is not easily absorbed. After some research I learned that oral magnesium is most easily absorbed in its malate form.

I recently switched to to a sustained release magnesium malate and niacinamide formula called Arterin. Since I started taking it I am sleeping better and experiencing less knee pain that I was.

Arterin was designed to support normal blood pressure levels and a healthy heart rhythm. Since I started taking it my problems with both of these have not recurred. I was having a real problem with heart palpitations, even though I was supposedly getting lots of magnesium in my supplements and eating lots of almonds and other magnesium food sources.

Although I still take Arterin,  I've had to adjust my levels, because I was experiencing the one side effect of too much oral magnesium -- loose and watery stools. I can now take two instead of four Arterin tablets and substitute the Asutra magnesium oil to get the rest of the magnesium I need. This reduces the inconvenient side affect.

Are You Getting Enough Magnesium?


If you are relying on your diet and supplements in tablet form, you may not be. Many cheap supplements use magnesium oxide.  The calcium / magnesium ratio needs to stay at a balanced 2:1. We were taking Kirkland Calcium Citrate (most absorbable calcium form) with Magnesium (oxide) and zinc. Ratio was 500 mg calcium to 80 mg magnesium -- not enough. To make up for it, we were taking another tablet with 400 mg magnesium oxide. We also were eating lots of nuts, seeds, bananas, avocados, and dark chocolate -- all very good food sources. In spite of this, we weren't getting enough magnesium to alleviate the symptoms of lower than optimal magnesium levels.

Men under thirty need 400 milligrams of magnesium a day. Men over thirty need 420 milligrams. Women under thirty need 310 milligram. Those women over thirty need 320. Pregnant women nineteen to thirty need 350 milligrams. Pregnant women over thirty need 360. Pregnant women are advised not to take more than 350 milligrams a day in supplement form.

Since magnesium is stored mostly in your body's bones and organs, very little is in your bloodstream at any given time. That's one reason those batteries of blood tests your doctor orders from time to time don't show if you have enough of this important mineral.

Less than optimal levels levels of magnesium can manifest themselves through insomnia, fatigue, muscle weakness, abnormal heart rhythms, muscle spasms, anxiety and depression, difficulty swallowing, forgetfulness, and poor nail growth. That's because magnesium is essential for over 300 chemical reactions in your body. It affects almost everything. It regulates the body's use of other important minerals and also some vitamins, such as vitamin D.

Optimal levels of  magnesium help keep us feeling mentally and physically healthy. They have been shown to improve memory; reduce depression caused by low serotonin levels; reduce stress and anxiety, both of which lower magnesium levels; prevent diabetes because it helps metabolize carbohydrates and glucose; thin the blood, which may reduce chances of heart attacks and strokes; build healthy bones; shorten duration of migraines; relieve some PMS symptoms; and improve flexibility by reducing the build-up of the lactic acid that cause muscle pain and tightness (like that in my husband's neck).

My Recommendations


To insure optimal magnesium levels, include rich sources of magnesium in your diet. I have mentioned some above. Avoid too much calcium in proportion to magnesium. Don't drink too much coffee soda, or alcohol. Use salt in moderation and avoid hidden salt in processed food. Use very few refined and processed foods.

Very few people get enough magnesium through diet alone. They can also deplete their supply through heavy menstrual periods, excessive sweating, and stress. Most people will need some form of supplementation for optimal levels. You can supplement with pills, magnesium oil, and soaking in salts that contain magnesium. Doctors can also give injections. Unless you love soaking in the tub, I recommend the following supplements. When you make your first order of Asutra, it includes a free e-book about the benefits of magnesium and how to get them. It also lists foods rich in magnesium.


What the Government Wants You to Know


The symptoms of low magnesium levels I have described may also have other causes. This post is intended for informational purposes only. My statements have not been evaluated by the FDA. My information and the products I have mentioned here are not intended to diagnose, cure, treat, or prevent any disease or illness. Please consult your doctor before changing your diet or using the products I have told you worked for us. Every body is different and can respond differently.

Those who have kidney failure or who are on dialysis should never take magnesium unless under medical supervision. 

Any Feedback?

Your comments are welcome below. If you think this might be helpful to someone you know, please share it. The image below was designed for Pinterest. 

Review: My Husband Loves Using Magnesium Oil for Neck Pain. Most people don't get enough magnesium. Do you?


***


Note: The author may receive a commission from purchases made using links found in this article. “As an Amazon Associate, Ebay (EPN) and/or Esty (Awin) Affiliate, I (we) earn from qualifying purchases.”


Tuesday, August 9, 2016

Reviewing Fresh n Brite For Dentures

Toothpaste For Dentures

denture
Image from: pixabay.com
In the last several weeks, I have done a series of reviews for products to use when you wear dentures. Today, we will discuss the toothpaste that I use on my new dentures. 

Dentures or false teeth are made of an acrylic material that can scratch easily. Using a standard toothpaste that you would use on real teeth is not recommended because it is too abrasive. Standard toothpaste can scratch the denture and then within those scratches stains may begin to set and will be difficult to remove. The scratches could also become a breeding ground for bacteria, too.

There are products made specifically to use with dentures for brushing. I chose to use Fresh 'n Brite when brushing my new removable denture. It is made for cleaning your false teeth with no abrasive materials in it. The paste has two layers to it. One for freshness and the other for brightness.


It is recommended that you use this toothpaste at least two times per day; once in the morning and once at night. You can also choose to use the paste after every meal. It is pretty simple to use. Just rinse your denture with warm water, apply the paste to your denture brush and clean the inside and outside thoroughly. Rinse thoroughly with warm water and you are good to go.

I use this paste in conjunction with using an effervescent cleaner  for my dental hygiene routine each day. I use the fizzing tablet at night before I go to bed to clean away any stains and the bacteria that might have started growing in the course of the day. After meals, I use the Fresh 'n Brite paste to clean my denture to remove any trapped food from my meal.

One does not have to use both products. You can opt to use just the denture paste or just the effervescent cleanser. I prefer using both products for fresh breath and shining white teeth. I waited quite a while to get my smile back and I want it to remain nice for a long time. 


Note: The author may receive a commission from purchases made using links found in this article. “As an Amazon Associate, Ebay (EPN) and/or Esty (Awin) Affiliate, I (we) earn from qualifying purchases.”


Monday, August 8, 2016

Couscous Salad for Summer

My couscous summer raspberry salad
It has been a hot and sultry summer.  A heat wave enveloped us for weeks.  I like to eat. It is safe to say that I like to eat way too much. But in this heat nothing sounded good to me.  Today I have made something that has satisfied my summer craving. I'm not very talented in the kitchen so I am not typically one to share recipes. But I have to share this couscous salad with you. If I made this recipe successfully, I am confident you will do even better. Couscous, raspberries, and feta - a delicious way to beat the heat.


Couscous


I am not even 100% sure what couscous is. But years ago I had a friend who made a good amount of recipes that included hummus, couscous, and other foods that I might never heard of otherwise. She ate far more healthy than I ever have. 


nutritional information

Lately, I've missed some of those foods. Twice recently, while trying to address my cravings, I've purchased couscous in the deli section at the store. And twice I was very disappointed. Their idea of couscous was pouring huge amounts of vinaigrette over couscous and calling it done. Their version was far too much "dressing" for me. It was almost like sipping directly from the vinaigrette bottle. Yuck.

I bought some couscous and some feta and hoped I'd find a recipe that would satisfy my hunger.


Refreshing Raspberry and Feta Couscous Salad  


I found this Raspberry and Feta Couscous Salad recipe online.  It looked easy and delicious. As soon as I saw it, I knew I wanted it. But I didn't have pine nuts or mixed salad greens.  I thought I'd wing it and make my own version which is a risky proposition in my kitchen!

Fortunately, I had fresh raspberries on hand (for smoothies) as well as some raspberry vinaigrette.  I read the directions above for guidance then made my own version.  

If you need measurements and amounts, you'll want to follow the above recipe. But my version was as follows:
  • Prepare the couscous per instructions on the box.  When finished, fluff with a fork.  Add the smallest squirt of Raspberry Vinaigrette, stir gently, cover and refrigerate.
  • Place the following ingredients in a small bowl - cubed feta, thin slices of cucumber, a few fresh raspberries, a big pinch of very finely chopped onion, a big pinch of thinly sliced yellow pepper, a bit of coarsely chopped spinach. Cover and refrigerate.
  • After the couscous is chilled, add it to the other ingredients - Fluffing and mixing together gently
  • Add another small squirt of raspberry vinaigrette
In hindsight, the only thing I should have also added was mint from my balcony garden. Perhaps I'll make that tomorrow with couscous, watermelon, mint, blueberries, and feta... my version of this recipe.

I have found that I could purchase the same brand of couscous from Amazon at a substantial savings. When I purchased the couscous from the store, I thought it was a bit pricey and thought I'd have to make it as a rare treat. But with the cost savings on the bulk amount on Amazon (same brand) I think I'll have to add this to my regular meal rotation. At least for the remainder of this summer.


Note: The author may receive a commission from purchases made using links found in this article. “As an Amazon Associate, Ebay (EPN) and/or Esty (Awin) Affiliate, I (we) earn from qualifying purchases.”


Saturday, August 6, 2016

Reviewing Monopoly Deal - A Playing Card Game

Monopoly Deal  is the Playing Card Version of the Classic Monopoly Board Game.

Package image of the Monopoly Deal card game

We are all familiar with the board game, Monopoly, which has been around in its current version since 1935.  Over the years, the classic version has grown to include nearly 1300 variations, many of them theme-based. For a list of these, check this link


Monopoly has become one of the most popular games of all time. I remember spending hours playing it as a child, then with my own children, and now my grandsons enjoy it just as much. And now it is available in a quick version card game form called Monopoly Deal


A Favorite Version of the Monopoly Board Game


monopoly game star
While visiting my 14-year-old grandson, Ryan, in Iowa in June, we played his Star Wars Monopoly game in board game form, which he absolutely loves to play. 


At the end of my visit, it was decided that Ryan would come back home with me for a visit to Coastal Georgia and the beach. He wanted to bring his Star Wars Monopoly Board Game, but there wasn't room in the car.  Instead, he discovered that there is a card game version of Monopoly, which he purchased before we left. 


Grandson Ryan playing Monopoly Deal with his G-Ma 
Grandson Ryan (c) Wednesday Elf
 Let me tell you, Ryan and I have become very expert at this Monopoly card game, playing 3 and 4 games per day most days! This Monopoly Deal card game takes only about 15 minutes to play, as opposed to 3 and 4 hours to play the board game version of Monopoly.  And since it doesn't take up any more room to pack in your suitcase than a deck of cards, it is the perfect game to take on a vacation or trip.  


Monopoly Deal Card Game


An image of Monopoly Deal game in play
(c) Wednesday Elf

Monopoly Deal comes with 110 cards consisting of the familiar Property Cards (like Boardwalk and Park Place), plus hotel and motel cards, money cards, and action cards which include rent cards and cards that let you steal property from the other players.  


Monopoly Deal Money
Monopoly Deal Money

  • The Money Cards are a tad different than what you are used to in the Monopoly board game.  The denominations begin at One Million and go up to 10 Million dollars. At first it seems strange dealing with what appears to be such a large amount of money, but one quickly adapts to playing a Rent Action Card and saying things such as "Pay me $7 Million Dollars for my property"


Monopoly Deal Pass Go card

    • Instead of 'Passing Go" and collecting $200, as in the board game, there are Pass Go cards which allow you to draw two more cards.


      Just Say No card in Monopoly Deal deck 

      • The "Just Say No" cards have become a favorite, as they prevent another player from stealing your property or having to pay a large amount of 'rent' on a property set with a house and a hotel! 


      Monopoly Deal Rules


      Each turn you draw two cards and can play up to 3 cards. Fortunes can change in a minute, depending upon what cards you draw and play.  To win you need three complete sets of Property Cards. 

      The game can be played with 2-5 players, which made it perfect for Ryan and Grandma to play a quick game or two between trips to the beach or my apartment pool those hot summer days here in southern Georgia.  It's also a quick game to play between dinner and bedtime. The more we played it, the more we enjoyed it. It's truly an addictive card game. If your looking for a fun family/friend game, Monopoly Deal is it.


      November 19

      is

      National Play Monopoly Day


      *Monopoly Deal Card Game Review written by Wednesday Elf


      Note: The author may receive a commission from purchases made using links found in this article. “As an Amazon Associate, Ebay (EPN) and/or Esty (Awin) Affiliate, I (we) earn from qualifying purchases.”


      Friday, August 5, 2016

      How to Create a Static Home Page on Blogger

      how to create a static home page on blogger
      Blogger is a great blogging platform that is perfect for beginners, as well as experienced bloggers.   However, as our blogs grow, we need to find ways to make them easier to navigate.  We want our older posts to be easier to find by our readers.

      Those of us who write on blogs already know that the newest article will be featured at the top of the blogger site.  The older articles will be shoved down the blog landing page and eventually to the "next" page.  Depending on the frequency of publishing, that can actually happen pretty fast.  Articles that are still very relevant are no longer seen on the landing page and become harder to find.  One could almost even say they are "hidden" by the newer content.  So, what can we do?  

      We take navigation very seriously on Review This!  In addition to having every article listed in our drop down tabs, we have a "Quick View Home Page".  Each week, our contributors select articles to feature on that page.  It looks & feels like a Home Page on a website.  

      We opted to have our Quick View Home Page set up as a separate page that our readers can easily visit, as opposed to setting it as our static home page.  However, you can certainly set one up just like it to be the landing page for your blog. 


      Step by Step Instructions for Creating a Blogger Static Home Page 


      Blogger has a default "Home" that takes any guests to the "line up" of published articles.  It is necessary to do a redirect in order to have a static home page on Blogger. 

      1)  Create a new page with an appropriate title and Publish it.

      create a new page

      2)  Set the Redirect on your Blogger Dashboard.  Go to Setting > Search Preferences > Custom Redirects

      Fill in the blank squares.  The site url is auto-filled:  
        They will look something like this.  Be sure to add the / at the end of your current home url

            From:  www.CurrentHomeURL.com/
            To:   http://www.YourSiteName.com/p/home-page.html 


      Redirect on your Blogger Dashboard
       
       
      3)  Check Each of the Boxes Click Save

      4)  Click Save Changes

      5)  Check the main url link to make sure it is properly redirecting to your new home page.

      6)  Go Back to the Page you created at the beginning of this tutorial and add the content you want showing on your new Home Page.


      You Now Have A Static Home Page on Blogger!


      ★ ★ ★ ★ ★

      Click the button below to see the Review This Quick View Home Page.  Each week, I use EPD, Easy Product Displays, to generate the code for the page that allows the images with captions to be set side by side.  

      I have published a step by step guide "Using EPD to Create Home Page Featured Articles" in a separate post.  Please click this link to see that companion tutorial.
       
      quick view home page


      Note: The author may receive a commission from purchases made using links found in this article. “As an Amazon Associate, Ebay (EPN) and/or Esty (Awin) Affiliate, I (we) earn from qualifying purchases.”


      Thursday, August 4, 2016

      Inspirational Calendars for Women

      It's time to start looking at calendars for 2017. Here are my top three favorite inspirational calendars for women, each with a touch of whimsy.
      I love this time of year, when summer starts winding down, school supplies fill stores' shelves, and it's time to start looking at calendars for the upcoming new year. Why start looking at next year's calendars in August? Because there are so many beautiful new designs coming out and it can take me weeks to choose a favorite!

      This year I got a head start, poring through the selection at Calendars.com. For 2017 I knew I wanted an upbeat inspirational calendar, one that would lift my spirits each time my eyes fell on it. I like lots of color, engaging artwork, and positive messages that make me smile but also make me think. And since I am one, I specifically looked for inspirational calendars for women.

      After many enjoyable hours of browsing, I've finally narrowed my choices down to three favorites. Here's what I've decided.


      Since color and engaging artwork are on my list of requirements, it's no surprise that I was immediately drawn to Suzy Toronto's calendars. Her 2017 "Don't Let Anyone Dull Your Sparkle" wall calendar is bright, beautiful, and covered in the engaging art that the artist is known for. There's a bit of a "flower power" message on the cover and a huge amount of positivity that fills the insides.


      Suzy Toronto's 2017 Don't Let Anyone Dull Your Sparkle Wall Calendar, March Page
      Suzy Toronto's Don't Let Anyone Dull Your Sparkle 2017 Calendar
      One thing that I especially like about the Suzy Toronto inspirational calendar is that her artwork isn't limited to the upper half of each monthly spread. She carries the design, and each monthly message, through to the bottom half, too, beautifully decorating not just the corners of the page but the holiday squares, too. In the sample shown, for instance, the cute shamrocks and pot of gold make St. Patrick's Day stand out on the March page. I love this calendar and know that I won't tire of looking at it.


      Blessings For Life inspirational, motivational wall calendar with a scripture verse each month.
      Blessings for Life 2017 Wall Calendar


      The "Blessings for Life" wall calendar with scripture also is filled with beautiful artwork, but the mood is a little more subtle. I adore the whimsical art collages from the Velvet Lime Girls that remind me of colorful doodles. The theme of the calendar is hope, grace, and love and an uplifting short Bible verse is included each month.

      This is a high-quality calendar with linen-embossed pages and would make not just a perfect calendar for any woman's home or office but would be a fabulous choice for a special gift. I'm thinking that this calendar will look perfect in my colorful "quilts" bedroom.


      Mary Engelbreit 2017 "Life Happens" Inspirational Desk Calendar
      Mary Engelbreit "Life Happens" 2017 Desk Calendar


      If you prefer your inspiration and encouragement in daily doses, here's a page-a-day desk calendar that's worth waking up to each morning. You've probably already identified the artist.  Yes, this is the Mary Engelbreit 2017 "Life Happens" calendar, with a page for each day of the year (Saturday and Sunday share a page). Each day when you tear off the preceding date's page, you can count on not only an adorable, whimsical piece of art but a related, short, uplifting, inspirational quote to go with it. I can't decide which I like better, the quotes or the art! I want to put this desk calendar in the kitchen where I'll see it first thing so my brain will have all day to mull over the wisdom that permeates each message. "Every flower must grow through dirt" has been popping into my head frequently since I first saw this page. I love it and bet you'll love it, too.


      So, these are my current top three favorite inspirational calendars for women, each with its own touch of whimsy and dose of wisdom. Which one is your favorite? 

      If you like all of these calendars, as I do, you might appreciate this link for free shipping.
      Calendars.com - Free Shipping On Any Order Over $35

      P.S. Calendars make great gifts!

      ~Susan
      Read more of my reviews here.

      (Note: I may receive a commission from purchases made using links found in this article.)


      Posted by Susan Deppner

      Susan Deppner

      About the Author

      Susan Deppner is a baby boomer, a cancer survivor, and a Southerner who believes in the Golden Rule. She enjoys writing about food, faith, and fitness; health, home, and holidays; people, places, pets, and patriotism, and more. Follow Susan on Twitter, Facebook, and Pinterest.


      Note: The author may receive a commission from purchases made using links found in this article. “As an Amazon Associate, Ebay (EPN) and/or Esty (Awin) Affiliate, I (we) earn from qualifying purchases.”


      Wednesday, August 3, 2016

      Review Some of Grammie Olivia's Favorite Things

      Grammieknows is what my darling little ones tell everyone, whenever I answer a question for them. 

      Sometimes the answers are true and other times they are a story that makes absolutely no sense, but has them laughing in the aisles.  My propensity for telling tales has earned me the moniker of being a know it all.....So I guess the nickname Grammieknows fits pretty good.


      white trilliums flowers
      Trilliums 2016 from  Grammie Olivia's Garden. 


      What Grammie does Know is, that gardening is a balm for the soul and works nicely to make a body tired, so that sleep can, eventually make the body rest.  Working in the garden not only makes the body tired, but it is great exercise.  As we age, we need that exercise to keep us moving one step at a time.  You know (and Grammieknows) if you don't use it, you'll lose it!  It is so true with exercise, if you don't move those muscles, arthritis and weakness will take over.  


      muscle medicine
      Muscle Medicine


      Gardening also provides a way for you to enjoy the beauty that is all around.  From the ground right up to the sky, flowers and plants make the world a more beautiful place. It doesn't stop at the ground level either.  All those flowers planted in garden beds, encourage bees, butterflies, birds and small animals to gather and enjoy the work of your hands.

      backyard wildlife book

      Finding great tools to use to make the job easier is also a lot of fun.  I have my special tools that I just can't be without!  Like any other craftsman, looking for new tools is a joy and I love sharing those great finds.  You can see some of the tools I love in another Review This Article, I love my tools.


      Being green minded, may be avante garde today, but I have been that way for a long time.  I don't encourage the use of chemicals in any way, shape, or form.  There are natural solutions to every problem and I try to search those out.  When something works particularly well, you will find me sharing that with everyone who will listen. 


      Recipe for Homemade Weed Killer

      Like my favorite weed killer, that is made up of Vinegar, Salt and Dawn (Blue) Dishwashing liquid.  I know you want the recipe now....  So, it's one gallon White Vinegar,  2 cups of Salt, and 1/2 cup of Dawn.  Always shake it up well, before applying.  Put it into your sprayer or divide it up into several different spray bottles (make sure you label them) and use early in the morning(on a dry day) for your weed issues.


      Gardening is such an incredible opportunity to stand on God's earth and work to make the world a better place to live, breathe, and be!


      You will find me on Review This, or on my website, www.grammieknowshow.com and sometimes on Facebook posting things of interest to gardeners  and those who enjoy flowers and nature at https://www.facebook.com/GrammieKnowsWeekendGardeners.
      The other places where Grammie Olivia posts things of interest include  Pinterest for fun and lots of interesting subjects that just tickle her funny bone.  You can check out some of the interesting things Grammie Olivia finds online right there.  


      I love to hear from others, so use one or all of the platforms I have shared with you to drop me a line.  I will answer, because after all, GrammieKnows.


      Note: The author may receive a commission from purchases made using links found in this article. “As an Amazon Associate, Ebay (EPN) and/or Esty (Awin) Affiliate, I (we) earn from qualifying purchases.”


      Tuesday, August 2, 2016

      Reviewing Brush Buddies Denture Brush

      Better Than A Regular Toothbrush For Dentures

      When you have a denture or partial denture you really need a denture brush to properly clean them. Sure, you could use a regular or standard toothbrush but it will not perform as well as one specifically made to brush your dentures.

      In the last few weeks, I have been discussing the products to use when you find that you are now one of the 31.5 million denture wearers in the U.S. Today, we will discuss the proper brush to use. A denture brush is made a little differently and really does work the best for cleaning. Even if you decide you are not going to use toothpaste for dentures, you still need a denture brush. After soaking your denture in an effervescent solution, you should brush your denture to make sure that you get any particles of food out of crevices and to make sure any stains are completely off.

      I chose the Brush Buddies dental brush to use for my new teeth. 

      Notice that there are two heads on the brush. The larger one is good for overall brushing and the small round head works well for the hard to reach areas that fit next to your gums. I, also, use the small round head to go around the teeth to make sure there are no left over particles of food stuck around them.

      The denture brush by Brush Buddies has a nice grip that molds to your fingers and hand to make brushing comfortable. I am pleased with the choice I made and I think you will like this brush, too.

      I use my denture brush two different ways. After I have soaked them, I go over my denture with the brush. I also use a toothpaste made for dentures a couple of times per day using the brush for dentures to make sure everything is clean. You do not have to use both but I just want to make sure my dentures are clean and that my breath is fresh. Either way, you do need a good brush to assist in your dental hygiene.


      Note: The author may receive a commission from purchases made using links found in this article. “As an Amazon Associate, Ebay (EPN) and/or Esty (Awin) Affiliate, I (we) earn from qualifying purchases.”


      Monday, August 1, 2016

      Review of CreateSpace Self Publishing Platform

      Instructions for Publishing Books at CreateSpace.com


       State Flowers of the USA Coloring Book: For Students and Teachers

      Ever since I published my 3 books on CreateSpace people have been asking me how to do that and if I recommend them. The short answer to that is yes, I do recommend them.

      The other thing people want to know is if it is hard to do. That is not so easy to answer. There is a learning curve for sure, but I do have some free tools you can use to make it easier. All in all, I think CreateSpace is a fantastic tool for first time authors to get themselves published.

      *All the books on this page are my own books I have published at CreateSpace.

      Getting Started at CreateSpace 


      So here I am going to take you step by step through the process to create your first book on CreateSpace and get it published and listed on Amazon and maybe picked up by booksellers who will also distribute it for you. My first book is on the right and got picked up by 12 other sellers besides Amazon including Barnes and Noble and several teacher websites. I am thrilled! 


      The first thing you will need to do is sign up for a free account. Just go to http://CreateSpace.com  and follow the easy registration instructions. Once you have an account you will be taken to your dashboard. It looks like the image below. The first thing you do to get started on a new book is to press that Blue button that is just about in the middle of the page which says "Add New Title." If you know the title of your new book just go ahead and add it. Don't worry you can change it before you publish, so  just put something and that way you will have access to the rest of the tools. This is the first part of the setup by the way.  After you have a title, you can just hit the button at the bottom that says "Save and Continue." 
      screenshot of members dashboard on createspace


      screenshot of createspace dashboard tool
      Menu 

      On the right is a photo of the Menu that is on the left side of the setup process once you add a title. You can see that the different parts of the process are listed and when you complete a section it gives you a Green check mark so you always know what else needs to be done. 

      The set up process is a series of pages where it will ask you to put in information about your book, so just do each step and hit save. The next thing it will want to know after the title is the ISBN. Now I am a big fan of "free" so I just use their free ones. The only reason to buy your own ISBN would be if you wanted to have books printed by them and then distribute them yourself. I have no idea why anyone would want to do that work though! Later in the process you will see that CreateSpace gives you the option to have your book distributed by Amazon (they own CreateSpace) and also by other online sellers and even by bricks and mortar stores like Barnes and Noble.  I am a big fan of "easy" too! So just use their free one, and go on to the next step, which is the Interior.

      In this step, you pick your size and type of printing. You will see a list of formats and there is a button you can click to see the approximate cost to print too. But to save you time here is a page with a list of the sizes and templates you can download to add your content. https://forums.createspace.com/en/community/docs/DOC-1323

      Now the next step is the heart of the matter so to speak; adding all your content. The templates are set up for Microsoft Word, or for OpenOffice. I don't have Word, so I use OpenOffice. (because it's free, LOL, just go to OpenOffice.org and download it! ) I find this to be the hardest part of the process, because you have to make sure your content is exactly the way you want it printed. I have done 2 coloring books and I wanted them to be printed on one side only to make a nicer product for the colorists, so I had to really pay attention to insert a blank page after every image. If you don't know how to use OpenOffice or Word, that is beyond the scope of this article, but I used Google and YouTube and was able to do find tutorials to format everything properly. Just type your question into Google. 
       Shells From the Sea: Coloring Pages and Greeting Cardsbuy button


      Once you are happy with your book, save a copy, and then also use the "export as PDF" function to save as a PDF too, because CreateSpace wants you to upload it in PDF form. But if you ever need to edit it later, you might need the original document, unless you have Adobe software and can edit PDF documents. So just to be sure, I always save the original Open Office document and also a PDF document.


      If my instructions are not clear, you can also see lots of helpful tips on the page under the Interior button. Also there is a forum with a community of writers who have compiled a list of frequently asked questions. However, many of them are experienced authors and seem to be a little impatient with first time authors, so I just use Google to ask my questions. For example I might ask "how do I  __________ on a createspace template?" You would think CreateSpace would be easier to ask, but no, Google is. 


      Designing the Cover of Your Book on CreateSpace


      Next is the cover. They have templates for that too, so just scroll through them till you see one you like. Here's a hint. Under each cover there is a scroll bar to see different versions. The typeface and the colors can often be changed so there are a lot more variations than is apparent when you first look through the cover options. Just pick one you like and upload your image if it calls for one. They often have specific requirements for the images, so if your images are not the right size you will need to edit them. Lots of people have Photoshop but I don't, so I use http://Picmonkey.com. (yes, it's free) You can upload an image there, change the file size in a few clicks and then you are good to go!

       The Swans of Kensington Garden: A Photo Book of Swansbuy button

      Speaking of images, they have to be at least 300 dpi for CreateSpace so what should you do if yours are not?  If you have Photoshop, this is fairly easy to fix but if you don't, here is a free software program you can use to change them to the correct dpi. Just go to http://www.Irfanview.com and download the free software.  

      The program can be used for many other things too, but I only use it for changing the dpi and use Picmonkey for all the other things I do with images, like change the exposure and crop, add text, straighten, etc. Picmonkey is much easier to use for those things. But you can't control the dpi with it. A hint when  you use Picmonkey: save the file as the best quality jpg. They call it Sean. Yes it is a bigger file, but it will make your finished book far more beautiful! 

      So once you have your interior and cover done, you are ready to complete your setup. This just involves setting the price, telling CreateSpace where you want it distributed and approving the proof. You will be able to check it page by page to be sure it meets your expectations. Once that is done, CreateSpace will also have to examine your proof to make sure it meets their specifications. They will either approve it, or send you a message that it needs to be changed. Don't worry, they will tell you exactly what needs to be changed. 

      Here is a photo of the project page that shows all the steps in a graphic so you can see what is done and what needs to be finished. This is a completed book so all my steps are completed and marked with a Green check mark. (I can't publish a coloring book on Kindle so that one has a red button.)

      screenshot of createspace dashboard


      Eventually you will get it approved. I say that because it usually takes a few times before they do approve it. But then, wow, you will have published your first book! Good luck! 


      Note: The author may receive a commission from purchases made using links found in this article. “As an Amazon Associate, Ebay (EPN) and/or Esty (Awin) Affiliate, I (we) earn from qualifying purchases.”


      Most Recent Reviews on Review This Reviews


      Search for Reviews by Subject, Author or Title

      The Review This Reviews Contributors


      SylvestermouseSylvestermouseDawn Rae BDawn Rae BMbgPhotoMbgPhotoBrite-IdeasBrite-IdeasWednesday ElfWednesday ElfOlivia MorrisOlivia MorrisTreasures by BrendaTreasures by BrendaThe Savvy AgeThe Savvy AgeMargaret SchindelMargaret SchindelRaintree AnnieRaintree AnnieLou16Lou16Sam MonacoSam MonacoTracey BoyerTracey BoyerRenaissance WomanRenaissance WomanBarbRadBarbRadBev OwensBev OwensBuckHawkBuckHawkDecorating for EventsDecorating for EventsHeather426Heather426Coletta TeskeColetta TeskeMissMerFaeryMissMerFaeryMickie_GMickie_G


      Review This Reviews is Dedicated to the Memory of Our Beloved Friend and Fellow Contributor

      Susan DeppnerSusan Deppner

      We may be apart, but
      You Are Not Forgotten


      “As an Amazon Associate, Ebay (EPN) and or Etsy (Awin) Affiliate, I (we) earn from purchases.” Disclosure Statement

      X