


Those of us who write on blogs already know that the newest article will be featured at the top of the blogger site. The older articles will be shoved down the blog landing page and eventually to the "next" page. Depending on the frequency of publishing, that can actually happen pretty fast. Articles that are still very relevant are no longer seen on the landing page and become harder to find. One could almost even say they are "hidden" by the newer content. So, what can we do?
We take navigation very seriously on Review This! In addition to having every article listed in our drop down tabs, we have a "Quick View Home Page". Each week, our contributors select articles to feature on that page. It looks & feels like a Home Page on a website.
We opted to have our Quick View Home Page set up as a separate page that our readers can easily visit, as opposed to setting it as our static home page. However, you can certainly set one up just like it to be the landing page for your blog.
Step by Step Instructions for Creating a Blogger Static Home Page
Blogger has a default "Home" that takes any guests to the "line up" of published articles. It is necessary to do a redirect in order to have a static home page on Blogger.
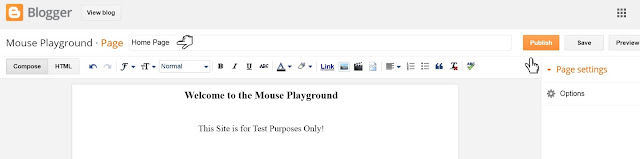
1) Create a new page with an appropriate title and Publish it.
2) Set the Redirect on your Blogger Dashboard. Go to Setting > Search Preferences > Custom Redirects
Fill in the blank squares. The site url is auto-filled:
They will look something like this. Be sure to add the / at the end of your current home url
From: www.CurrentHomeURL.com/
To: http://www.YourSiteName.com/p/home-page.html
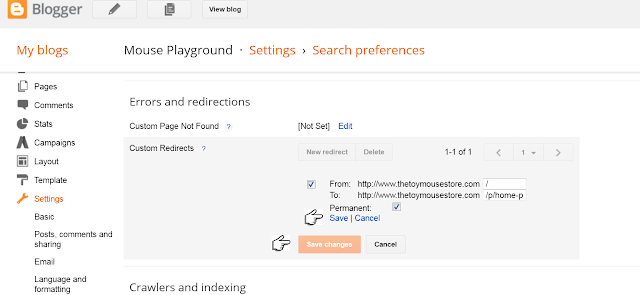
3) Check Each of the Boxes Click Save
4) Click Save Changes
5) Check the main url link to make sure it is properly redirecting to your new home page.
6) Go Back to the Page you created at the beginning of this tutorial and add the content you want showing on your new Home Page.
You Now Have A Static Home Page on Blogger!
Click the button below to see the Review This Quick View Home Page. Each week, I use EPD, Easy Product Displays, to generate the code for the page that allows the images with captions to be set side by side.
I have published a step by step guide "Using EPD to Create Home Page Featured Articles" in a separate post. Please click this link to see that companion tutorial.

★ ★ ★ ★ ★
Click the button below to see the Review This Quick View Home Page. Each week, I use EPD, Easy Product Displays, to generate the code for the page that allows the images with captions to be set side by side.
I have published a step by step guide "Using EPD to Create Home Page Featured Articles" in a separate post. Please click this link to see that companion tutorial.
Note: The author may receive a commission from purchases made using links found in this article. “As an Amazon Associate, Ebay (EPN), Esty (Awin), and/or Zazzle Affiliate, I (we) earn from qualifying purchases.”
FOLLOW US ON:


