Showing posts sorted by relevance for query clutter. Sort by date Show all posts

Wednesday, August 19, 2020

Vacuum Packing Made Easy-One Great Kitchen Tool!

Vacuum packing is not new, but it is a wonderful tool to have in your kitchen. ~ A Product Review

an assortment of vegetables


If 2020 has taught us anything, it's that nothing stays the same!  While the world is healing slowly, we
are left with finding ways to make our budgets go further.  I don't know if you have noticed, but food prices are on the rise again.  

For my family that means buying vegetables and fruits when they are in season.  You get twice the bang for your buck by doing this.  First you get the freshest of fruits and vegetables and because they are in season, the price usually reflects the abundance, by being much lower than when imported.

I prefer to go out and shop at my local farmer's markets, or when I visit my Sister's family, we make a trip out to the St. Jacob's Market, in St. Jacob's Ontario.  This is a great place to visit for a day trip or if you live close by, to shop at!  You know you are supporting local farmers and the Mennonite Community as well. (I digress!)

We try to buy our vegetables when the season is high.  They are the freshest and tastiest vegetables that you could ever want.  Picked at the perfect time and very cost effective, you just know you are getting nature's best.  But, if you don't have a way to keep them, all that goodness is missed.

vegetables


With our new Vacuum Sealer, we can purchase more of these vegetables and bring them home.  My husband and I sit and clean, divide and package the goodness either the same day or the day after.  Once they are all vacuum packed, they go into the freezer.  Summer fresh goodness is ours even in the middle of winter.

We don't stop at the fruits and vegetables though.  When we go to market, there are many farmers who make homemade sausages. Some farmers have,  cattle, chickens, pigs and lambs.  Yes we love our meats!  There is a real pleasure involved in bringing home the freshest, grain fed, and antibiotic free meats.  You know you are eating the finest quality foods available.

With our Vacuum Sealer, we separate our meats into family (for us it's two) sized portions. Some of the  Roasts and chicken get treated with spices and then packaged. 

vegetables in a basket

When it's time for dinner, out comes a package and while it is defrosting it is also marinating in the spices.  We save a lot of prep time, by having everything already put together.

Our Vacuum Sealer is getting a really good workout. We have a roll of freezer sleeves, that can be custom sized so there is no waste in the plastic.  It is entirely up to you how small or how big you make your bags.  The sealer seals both ends, one before you fill and one after you have filled the bag to your liking.  Then you have the choice of just bagging it and sealing it, or bagging and vacuum sealing.  Both are options.


This is the exact model that we have purchased and we are delighted with the ease in operation.  We spend a day or so with the prepping, but once it's done, we can relax and just enjoy. 

When we purchased our Vacuum Sealer we also purchased extra rolls of plastic because we knew that we would be making great use of this new addition to our kitchen.  This Sealer is so much better than plastic wraps and easier to use too.  We have even frozen leftovers for use at a future date.  

Now, just a word of caution, you still need to prepare your vegetables like you would normally do.  Wash them, blanch them and then pack them into the freezer.  It couldn't be easier than that.

If you are a baker, then you will love this sealer too!  Bake breads and buns, some for today and some for a later date.  Freeze them and when you are ready, it's like you just baked them that day.

an assortment of breads

I don't like clutter in my kitchen, and have found that many gadgets are "extra" stuff.  However, I would highly recommend that you think about getting one of these Sealers!  If you are interested in saving money,  buying food that is fresh and wholesome, even freezing your herbs, then you won't be disappointed.  Gardeners will love this Sealer!  When the cabbages, cauliflower, broccoli and your other vegetables are ready, there will be no waste!  Use what you can and freeze what you can't!  This really is a winner in my books.


Note: The author may receive a commission from purchases made using links found in this article. “As an Amazon Associate, Ebay (EPN) and/or Esty (Awin) Affiliate, I (we) earn from qualifying purchases.”


Sunday, September 1, 2019

Understanding the Yin Yang Theory Relating to Home Decor

A Basic Understanding of the Yin Yang Theory

Opposing forces exist in all things. In ancient Chinese, this is known as the Yin Yang Theory. The whole cannot exist without both sides pushing and pulling towards or against each other. Nothing exists without its opposite. Easy life examples are light and dark, up and down, and hot and cold.

A Review of The Yin Yang Theory in Home Decor

Home decorating choices, like all things in life, will impact the energy flow in a space. The approach to a positive home environment is known as Feng Shui. Learning a few basics about Yin and Yang can help pre-plan a room.


What is Yin?

Yin is feminine energy, sometimes referred to as passive energy. Think of Yin as the calming and relaxing aspects of a room's design. Here are some typical examples of Yin energy as it relates to home decor:
  •  Calming music
  •  Soft color tones
  •  Simple water features
  •  Cozy blankets
  •  Ambient lighting
  •  Flowers
  •  Candles
  •  Eliminate clutter
  •  Peaceful wall art

What is Yang?

Yang is masculine energy, sometimes referred to as active energy. Think of the sleek, fun, movement side of life. Here's a shortlist of suggested items to consider in a room that needs the balance of Yang:
  •  Energetic music
  •  Windchimes
  •  Tall house plants
  •  Industrial decor items
  •  Rod iron pieces
  •  Metal wall art
  •  Angular architecture
  •  Concrete floors
  •  Large windows
  •  Natural light
  •  Bright lighting
  •  Large family table in the kitchen
  •  Cheerful colors
  •  Bold wall art
  •  People gathering in a space
  •  The laughter and fun of kids playing

Yin Yang Doesn't Need to Be 50/50

In other words, some rooms will lean toward Yin energy, like a bedroom, and others toward Yang energy, such as a kitchen or place where the family gathers.  

Even though a room doesn't need a 50/50 balance, in order for it to feel right, it still requires both Yin and Yang energy. 

For example, your bedroom should be a calm relaxing retreat and feature items that enhance those feelings. This means the bedroom will be designed with mostly Yin energy in mind. However, in order for the room to have a sense of balance, you'll still need some Yang energy. You could add a rug with brighter complementary colors, or bold furnishings with a masculine edge. If that's not your thing, try a few pieces of strategically positioned bold wall art.

Kitchens tend to work best with more Yang than Yin. A kitchen is usually the 'active' gathering place. Large windows, natural light, and cheery colors all help to bring a kitchen to life. Again, you'll still want some yin energy items featured. Soften the room with a lovely soft floral centerpiece. Since the scent of coffee or even the thought of it can be calming, create a coffee station in the kitchen, with cakes and cookies nearby. 


The Quick and Easy Way to Create Balance

A simple way to tell if a room isn't balanced is to ask yourself, "does the room's overall decor feel too warm or too cold?" If you sense it leans too much one way, then add some of the opposite to create balance.


Note: The author may receive a commission from purchases made using links found in this article. “As an Amazon Associate, Ebay (EPN) and/or Esty (Awin) Affiliate, I (we) earn from qualifying purchases.”


Friday, January 28, 2022

Snowkissed - Hallmark Movie Review

Snowkissed
As autumn has turned to winter in our area, the trees and grounds have already been kissed by snow several times. When I saw the movie entitled "Snowkissed", I immediately thought it was a rather romantic way to describe a light snow.  

When it is below freezing outside, I tend to stay inside with a cup of hot cocoa, a warm blanket, and a romantic Hallmark movie.  When the title caught my attention, I decided to check it out.

Setting my first thoughts aside, I read the movie description and thought it might be a nice love story, but I watched it because the title evoked lovely mental imagery.  

Because I prefer clean and wholesome movies, I most often scan Hallmark movies first for a new film to watch when I just want to relax, not have to think too deeply, and simply be entertained by beautiful settings and likable people.

When a movie makes me smile, or even laugh, I know I have discovered a  cinematic gem.  As it turned out, the love story was sweet, I laughed several times, the scenery was fabulous and was definitely snow kissed.

This movie clearly has it all and was a wonderful escape for an hour and a half.


"Snowkissed" Movie Synopsis 


 SnowkissedCheck Price Kate (Jen Lilley) is really excited when she is offered an interview with a popular author, but her excitement is quickly diminished when she finds out she will have to travel to conduct the interview.  She hates to travel.  She likes her well organized, clutter-free life in Manhattan and she has no desire to change anything. However, with the prospect of becoming a staff member instead of a freelance writer, and a lot of encouragement from her photographer friend who will go with her, she decides to face her travel fears and take the assignment.

They arrive at the B&B in Canada to find a struggling business run by two single men who are desperate to get the endorsement of an international travel company that will send a lot of business their way.  As the only two guests for the week, the guys ask Kelly & Jane to go through their 3 day tour and give them honest critiques and suggestions.  However, constructive criticism is not always easy to take, even when it is given by request.

While the set-up of two single men and two single women may seem like the perfect situation, it isn't always a guarantee that they will end up as friends, much less anything more to each other. After all, they live in different countries, all have jobs and responsiblities, and at least one definitely does not like change.


If you enjoy a romantic movie with a touch of humor and a lot of gorgeous scenery, then you will love Snowkissed

Click Here to Watch on Amazon Prime or Buy a Hallmark DVD that includes Snowkissed.


More Great Movies Reviewed


Check Out More Movie Reviews at
ReviewThisMovies.com


Snowkissed - Hallmark Movie Review by:
House of Sylvestermouse


Note: The author may receive a commission from purchases made using links found in this article. “As an Amazon Associate, Ebay (EPN) and/or Esty (Awin) Affiliate, I (we) earn from qualifying purchases.”


Sunday, July 28, 2019

Simple DIY Hack to Help Organize Your Kitchen Drawers

DIY Hack for Organizing Kitchen Drawers
Yesterday was the day I tackled the massive kitchen drawer disaster.

It was Instagram's fault. An amazing organized drawer systems stole my attention and that was all it took. However, the Instagram post featured a stunning brand new kitchen with professional pre-installed drawer sorters.

So that got me thinking …. How can I DIY this with things I already own?

DIY organizational hacks are one of my fave things to do. For me, sorting and organizing is relaxing. Yah, I know, to some of you, that's crazy talk. It's the end result that drives me. I'll work my tail off to get to that finished look!

A Flower Vase to Hold the Important Cooking Utensils

First I had to lessen the amount of utensils in the drawers. So I put all the most useful cooking items in a vase, and placed it beside the stove. Very handy indeed. If you hate counter clutter, put it inside a cupboard or pantry.

Use a Flower Vase to Hold Cooking Utensils

Line the Drawers with a Piece of Carpet

No, not shag or thick carpeting. We used a piece of industrial hard twist with shallow grooves. They're actually extra rugs we have on hand. The most important part of this DIY hack is to ensure the carpet has a rubber non-slip backing.

Just measure the drawer and cut the carpet to fit. With a non-slip backing, even if it's not a tight fit, it won't slide around.

Carpet with Rubber Backing Keeps Utensils in Place

We open and close the above drawer multiple times a day and not one utensil slips or slides. Each item has a spot and stays put. When we need an item, it's clearly visible. No more digging!

The Carpet Prevents Slipping and Sliding

We already had an inexpensive silverware divider in the top drawer, however it kept sliding around. The constant opening and closing of the drawer would cause the items placed in front to get caught or slide completely under the sorter.

Take a look at the silverware drawer now. With the rug as a base, the plastic sorter doesn't slide and the few items we keep in the front no longer move.

With the Carpet as the Base
the Sorter and Loose Items Stay in Place

The same thing applies for the third drawer. The plastic sorter no longer slides and the items along the side and edges stay in place.

The nice thing about using a piece of carpet (with rubber backing), is that even if your plastic sorters don't exactly fit, they won't move around on the carpet. So you can put utensils in front, behind or on the sides, and they too will stay in place.

Line the Kitchen Drawer with Carpet

Since renovating our kitchen is on the agenda, I've been avoiding tackling any projects, because, well, I want the reno more! But this DIY hack was fun. Glad we did it. 

If you're planning a kitchen reno, check out these professionally design pantries! There's nothing DIY here, they're all 10s!


Note: The author may receive a commission from purchases made using links found in this article. “As an Amazon Associate, Ebay (EPN) and/or Esty (Awin) Affiliate, I (we) earn from qualifying purchases.”


Sunday, February 26, 2017

Spring Cleaning of the Soul or Soles or Both

Creative Shoe Bench! See This & More Here
When spring is springing we get the urge to neatly place, organize and tuck

Things around the home that didn't bother us over the winter months, like piles of shoes and boots in the closet and the front door, start to get under our skin.

So we spring into action.

Typical Scenes Across the Country...

With hands on our hips, crookedly we stand in the foyer evaluating our winter clutter, thinking ... 'how did I stand this for so long' !

And before we know it, the itch to organize turns into a full blown rash and we're looking around the house trying to reshuffle pieces of furniture, repurpose dressers, and re-do closets.

Freeing ourselves of the unnecessary, we start with the basics ... we bag'em and tag'em.

We only mean to clean the house, but our soul gets spit and polished too.

What?

We don't plan for this to happen, in fact we never do. But year after year, without fail, we feel lighter.

Closets Come First...

We've jammed our closets with extra sweaters, bulky coats, mitts, hats, boots, and too many pairs of shoes. It's not right.

We know it's not right. Guilty.

But, during the holiday season we really did have bigger fish to fry ... Like cozying up to a warm fire. Overflowing closets somehow made the fire feel better. It's winter ... we're not all there. There's a name for our condition: Cabin Feveritis.

But the frequent appearance of the sun along with the disappearing biting cold begins to wake us from our tolerant coma and we're ready to make tough choices ... But where do we start? ....

We figure it out.

To clean our soul, we start with soles.

The stinky invaders come first.

Ahhhh, we've lightened up just thinking about it ....

Sorted shoes; who'da'thunk that all it took was 'sorted shoes'?

All this time we thought life was complicated. Sole ... Soul? Well my gawd, life's greatest mystery has been solved.

Moral of the story - clean your closets, organize your soles, and the future is yours! ... Not really, but at least your closets will look great while your soul floats.

Don't Stop with Shoes, Here are additional Ways You Can Organize Your Life:


Note: The author may receive a commission from purchases made using links found in this article. “As an Amazon Associate, Ebay (EPN) and/or Esty (Awin) Affiliate, I (we) earn from qualifying purchases.”


Sunday, August 11, 2019

5 Creative Ways to Store or Display Books

Unique Ways to Store or Display Books


We can certainly accumulate a lot of books throughout life. Some end up in a bedroom end table, others buried in closets, and the rest make it to their home-base, a bookcase.

This review lists obscure or odd ways to store or display books in the home. When a bookcase is out of the question, try one of these options.

1. Decorative Storage Trunks

Not all storage trunks are old, dusty and stuffed in an attic or basement. Modern decorative trunks can be featured in main rooms as a functional accessory. This set of 3 accent trunks can be placed in a living room, office or bedroom with your favorite books stored inside. It's a clutter-free way to bring books into a room. They're stored away and the trunks are a piece of furniture that adds to the overall look of the room.

2. Cotton Canvas Storage Bins

This playfully printed cotton canvas bag is normally used in a child's room to store toys. The bag is light and safe, has carrying straps and is easy for kids to lift or move. Instead of using them for toys, put books inside. Complete the look of a room, by designing a reading area that features three or four of these lovely canvas storage bins surrounded by a plush comfy rug. Create an actual reading circle by placing the storage bags in the middle of a large round rug. Gather on the rug for story time.

3. Rolling Storage Cart

There is an endless number of rolling cart designs. However, this cart works for a sunroom or porch. Imagine being cozied up on your porch swing as you reach over to get one of your favorite books. Get a number of carts and position them along on a wall as a long unit filled with books. 

4. Storage Ottoman

Place books inside an ottoman. Ottomans can be positioned anywhere in a room; against a wall, in front of or beside a sofa. You'll find that Ottomans come in multiple sizes, with some being quite large. With an Ottoman, you'll get extra seating or a place to put your feet all while storing books.

5. Book Slings

Book slings are a popular choice for a child's room or reading area. However, this particular one can work in a den, office or family room. Unlike several of the above options, the books in a sling are on open display. You'll often see Slings in professional waiting rooms as a way to hold magazines or books for waiting clients.

To see elaborate ways to display books, you can check out how the other side lives here.


Note: The author may receive a commission from purchases made using links found in this article. “As an Amazon Associate, Ebay (EPN) and/or Esty (Awin) Affiliate, I (we) earn from qualifying purchases.”


Saturday, March 15, 2014

A Day in the Life of a Recycler

There's a little bit of recycling in everything we do!


green recycling arrows shaped like a heart
Hello!

Whirlwinds of activity have been happening around my home office this week. On top of everyday work and living, my family is buying a house. It's keeping us busy and keeping me distracted. But, my writing and my friends at Squidoo have been keeping me on course. Moving has provided an influx of ideas and my friends are filling my inbox with projects that will help us turn that house into a home.

I'd like to share some of the recycling inspiration that has come my way this week.

One of our biggest chores will be moving a yard full of potted plants and vegetables. While cleaning up the plants, I was reminded that even nature recycles. Some of our plants die back only to reappear magically in the spring. We've never had a failure when we Grow New Zealand Spinach in Containers and Recycle the Seeds. New Zealand spinach almost grows itself and the plants provide enough seed to share with our friends.

After packing up my mother's 1958 sewing machine and yards of fabric scraps from her past quilting projects, I told myself it was time to get serious about sewing again. But fabric is so expensive. Valerie Proctor Davis comes to the rescue with tips on How to Save Money By Sewing Your Own Clothes. She has some great ideas for turning old clothes into new clothes and how to reuse clothing patterns.

Nothing is perfect when moving into a new home and there are always unexpected expenses. When a new bill pops up, another planned purchase must be delayed. Furniture is one of those items that can be worked around when money is getting tight. Eva shares a great idea for saving a few dollars on furniture in her story of How to Decoupage an Old Desk.

Paigsr reminded me that moving creates a lot of unwanted trash. Moving is the perfect time to de-clutter and find a new home for the stuff that is no longer needed. As we pack our belongings, we'll be thinking of ways to reuse and recycle every little thing because even small recycling gestures like Returning Bottles "Can" Make a Difference!

I'm getting excited about moving into our new home and all of the recycling opportunities this new venture will bring. And, I'm looking forward to finding even more exciting and creative ways to recycle in our every day lives.

I  hope you enjoyed today's recycling stories and found some inspiration to recycle more in your own every day life. It's cool to recycle, even nature does it!

Until next time, be happy and be well!

Coletta


Posted by Coletta Teske
Coletta Teske

About This Contributor

Coletta Teske writes reviews on books, business management, writing, crafting, cooking, and gardening. She is also an avid recycler and shares her tips on recycling. She delights in upcycling an old object, recycling or transforming discarded items into a new treasure.


Note: The author may receive a commission from purchases made using links found in this article. “As an Amazon Associate, Ebay (EPN) and/or Esty (Awin) Affiliate, I (we) earn from qualifying purchases.”


Sunday, February 21, 2016

How to Change the Look and Feel of a Room Without Spending a Fortune

Changing the look and feel of a room
A Simple Facelift to our Washroom: A paint job,
new accessories, de-cluttering and cleaning
Total Cost: $150
If you live where changing seasons are a part of life, you know exactly what it means to 'feel the coming change in the air.'

It is hard to explain what it does to the senses to someone who's never experienced this artful conversion and how it unwittingly triggers many emotions within us.

How Changing Seasons Get Us Thinking About Changing Our Homes or, at the Very Least, Changing Our Decor

Since, at the time of writing this, Spring is on its way, typically, many urges hit us. Some of them include renewal, freshness, cleanliness, and, in the case of selling and buying a home, the urge for a new beginning. However, before you jump into the often exhausting process of selling a home, read this article to test your resolve.

So, How Can You Make Changes in Your Decor Without Dropping Big Bucks?

Here are Four simple, inexpensive decor ideas:

  1. Add an Area Rug to a Room: If you have a room with tile or hardwood flooring, changing your existing rug or adding one where one never existed can dramatically change the look and feel of the space. You may think that Area Rugs are just too expensive; however, be sure to check out these very popular and affordable rugs; you'll be surprised by the big bang you get for your buck!
  2. Clean and De-Clutter Your Space: This one change costs nothing but time and effort. Stand back from your room, take stock of what's in your room, and remove any furniture and knick-knacks that overwhelm the space.
  3. Re-Arrange Your Space: This makes the biggest change. Look at your space; look at the position of the window, the door(s),  and how the traffic flows, then change the space by keeping 'traffic flow' in mind. In other words, keep any area where people naturally walk as they enter with furniture. This small technique will visually increase your space's size and give your room a greater sense of openness. 
  4. Add Accessories to Warm Up the Room: Point number two talks about de-cluttering, but that doesn't mean you must remove every decorative accessory. The items that generally add to the 'feel' of a space are Throw Blankets and Pillows. Sparingly include these items without overdoing it, and you'll soften the space. 
There are many other ways to change the look and feel of a room without spending money, as well as an endless supply of DIY projects you can tackle; however, before you jump into these more complex tasks, start by using what you have - look around your house, re-use pieces from another room - creatively use the pieces you already own! 

Change doesn't have to involve spending a fortune!

by Barbara Tremblay Cipak


Note: The author may receive a commission from purchases made using links found in this article. “As an Amazon Associate, Ebay (EPN) and/or Esty (Awin) Affiliate, I (we) earn from qualifying purchases.”


Sunday, August 4, 2019

Getting Ready to Sell Your Home - 7 Simple and Necessary Improvements that Don't Require Renovations

Getting Ready to Sell Your Home Without Renovating

If you're getting ready to sell your home but can't afford any major renovations, lets review a list of updates you can do that won't cost a fortune.

1. Declutter

When getting ready to sell, the first step is to declutter your entire home. Include the basement, sheds, and garage as well. Go through all cupboards and closets and get rid of or store items you don't/won't need during the selling process. Remove unnecessary knick-knacks. Keep coffee and end tables sparingly decorated with lamps, candles and plants.

About the garage: Empty out the clutter so prospective buyers can easily determine whether their car(s) will fit inside. 

2. Paint Rooms

Painting can be time consuming, but it's an affordable first step to give your home a face lift before selling. Keeping the color scheme neutral will attract a broader range of potential buyers. Think in terms of grey, tan, beige, or white. Keep the baseboards and doors a nice crisp white. Avoid multi-colored baseboards! White baseboards provide a lovely border against the wall, rug/floor. Add pops of color with accessories only. Colorful pillows and throw blankets can bring interest to a space.

3. Create a Feature Wall(s)

A feature wall is an affordable and faster way to give your home something extra.  As an example, in the master bedroom, consider a focal wall behind the bed. Ideas for feature walls include faux brick, real brick, vinyl designs, wainscoting, and murals. Anything 'peel and stick' is the easiest.

4. Remove Personal Photos

Some sellers resist doing this. The general thought by those who aren't keen on removing their personal photos is that they feel displaying photos promote the family aspect of their home. However, that's not the way to think about this. 

When potential buyers walk into a home, they're not thinking about your family, they're thinking about how their own family will fit with the property. 

From the moment a buyer steps onto a prospective property they're analyzing the 'feel' for their own family. Emotion guides that process and a multiple combination of the smallest things move buyers closer to a decision. Looking at photos of your family is a distraction to the natural flow of this thought process. Why add a distraction? Let the buyers achieve an emotional connection to your home without disruption.

Your photos represents 'your' house, no photos allow the buyer to imagine their family in this new home. 

5. Clean, Clean and Clean

Let's go through a quick cleaning list:
  •  Declutter kitchen counters, shine kitchen sinks, wipe the cupboards and clean appliances
  •  Clean the grout on all tiles (floors, backsplash, bathtubs)
  •  Scrub bathrooms spotless!
  •  Steam clean all carpets and wash floors
  •  Vacuum your entire home
  •  Wash all the bedding, fluff pillows, and make a pretty bed (it's the focal point!)
  •  Steam clean couches and chairs
  •  Touch up any wall scuff marks with paint where applicable
  •  Ensure all light bulbs work
  •  Wash all the windows and screens
  •  Double check that all closets and cupboards are organized. Buyers will open them!
  •  Rid your house of unsavory pet and cooking odors - Try essential oils
  •  Give your pet area and/or litterbox a thorough disinfecting - Think good smells
  •  Trim overgrown trees, weed the garden and present a lovely entry way by ensuring there's a clear path to the front door.
6. Do You Have Pets?

If you have pets, and are able to, have your fur babies stay with friends or family during the selling process. If you can't arrange that, ensure your pets are secured or removed from the house before a buyer views your home. 

7.  Staging Your Home

Not everyone can afford a professional stager. However, you may reconsider staging when you read about the return on that investment! On average having your home professionally staged costs between .5 to 1 percent of a homes value. But get this: According to the National Association of Realtors for every $100 invested in staging, the potential return is $400! 

If you can't afford a professional stager, complete these fundamentals:
  •  Minimize furniture in smaller rooms
  •  Position furniture so that people can walk through a room naturally without having to walk around pieces to get to doorways
  •  Use simple window coverings, leave them open for viewings
  •  Bring energy to a room by adding plants where applicable
  •  Display baskets of fresh fruit and/or herbs in the kitchen
  •  Turn on lamps and lights before viewings
  •  Ensure the laundry is completed and your mudroom or front closet is organized
  •  Clear the entry way of coats, shoes and boots
  •  Put a lovely seasonal wreath on the front door


Note: The author may receive a commission from purchases made using links found in this article. “As an Amazon Associate, Ebay (EPN) and/or Esty (Awin) Affiliate, I (we) earn from qualifying purchases.”


Sunday, October 8, 2023

Did You Know Your Home Has Wealth Corners? Let's Review This

Your Home's Wealth Corner

Hey there, fellow seekers of good vibes and positive energy! Today, once again, we're diving headfirst into the fascinating world of Feng Shui.

For the past two Feng Shui articles, we discussed whether your bed was in the "coffin position" and whether you should have a mirror in the bedroom. Today, we'll cover the "Wealth Corner" of your home.

The Quest for Wealth Energy in Your Home

Let's start with the basics: Did you know that your home and each room have their own little money magnets called wealth corners? Yep, you heard me right. Money corners! 

The Two Ways to Find Your Wealth Corner

So, how do you locate these elusive pockets of wealth energy? There are two schools of thought here: Classical Feng Shui and Western Feng Shui. Today, we're keeping things laid-back and going Western.

The Western Bagua Map:

Bagua Map

Point 1: Locate Your Wealth Corner

  • Here's what you need to know about the Bagua Map (if you're so inclined - there's more detail at that link).
  • You can print out a copy of the Bagua Map here or use the one above as a mental guide as you find the wealth corner in a room.
  • Stand at the room's door or the front door of the whole house, and hold the map physically flat with the title at the top of the page as a guide to the direction.
  • Your wealth corner for the home is the top left area of the house, as it is for each room.
By the way, each map section represents quadrant directions for those vibes. As an example, the love and relationship corner of your home (or a room) is in the top right area.

Point 2: Embrace the Element of Wealth

Now, here's where things get colorful – literally. According to the Feng Shui Bagua Map, the element that brings the big bucks is wood, and the color choices are as vibrant as a rainbow: purple, green, gold, red, and blue.

Ready to Decorate Your Wealth Corner? Here's What You Can Do:

  • Wood Frames: Picture this - a wooden-framed photo featuring a wealth-related scene, like a tropical beach holiday or a luxurious cruise ship. Just make sure that the water feature is squeaky clean. If you're jazzing up your bedroom's wealth corner, hang that photo above a dresser and add a tabletop waterfall. Some say you shouldn't have water in the bedroom, but hey, it's your call!

  • Plants and Mirrors: For some leafy green charm, consider Bamboo, a Money Tree, or a Fern. Or, throw a mirror into the mix, just not in your bedroom. Still, some folks swear it's no biggie, so do what feels right for you.

  • Shapes and Crystals: Go rectangular with a wooden accessory housing Citrine or Pyrite Crystals. If those crystals are large and in charge, let them shine as the star of your wealth corner show.

  • Bowl of Oranges: Oranges are a symbol of good luck and wealth, so create a lovely presentation for your wealth corner that happens to be in the kitchen.

  • Position a Tortoise or a Money Frog in your Wealth Corner: Choose ones made of glass, resins, mud, metals, wood, and crystals

  • An Added Overall Tip: Paint your front door red; yep, you heard correctly. Red. Red is considered good luck and is said to bring opportunity and good luck to a home. Darn! My door is blue!.

Declutter, Declutter, Declutter!

Whether you're a Feng Shui enthusiast or just tidying up, remember to keep your space clean and clutter-free. That way, positive energy can flow like a champ throughout the room. Bright lighting, groovy tunes, pleasant scents, and a touch of candle magic can also work wonders.

Hold Up! What NOT to Include in Your Money Corner:

  • Piles of clothes, boxes, or general chaos.
  • Plants that have seen better days.
  • A stack of unpaid bills (nobody wants that energy).
  • That noisy paper shredder - let's banish it elsewhere.
  • Leave your tools out of this.
  • Garbage cans or recycling bins? Nope, keep them hidden.
  • Sad or gloomy images - we're all about the good vibes.
  • Say no to painful memories and negative vibes.
  • Old, unattractive furniture - it's time for an upgrade.
  • And remember, while a touch of fire or metal is okay, don't overdo it in your wealth corner.

There you have it, folks – the secret to unlocking wealth energy in your home. Go forth, decorate those wealth corners, and let the money vibes flow! 


Note: The author may receive a commission from purchases made using links found in this article. “As an Amazon Associate, Ebay (EPN) and/or Esty (Awin) Affiliate, I (we) earn from qualifying purchases.”


Sunday, February 7, 2016

Do I Really Want to Sell My Home? That is the Question in the Spring Air?

Do I Really Want to Sell My Home

Don't Let Spring Push You Into Selling Your Home Just Because You're Getting that 'Fresh-Air Fresh-Start Itch'

Twenty-five-plus years in real estate allowed me to see firsthand the many reasons people decide to sell their homes. Believe it or not, the boredom of the environment or needing a change was one of those reasons, especially during springtime when that 'new beginning' feeling hits!

If you've ever sold a home, you've probably received the standard good advice to 'neutralize' your color schemes. The suggestions may have also included creating a consistent flow between spaces, repainting with neutral colors, de-cluttering, removing large furniture in small spaces, and limiting patterns and prints where possible. Having your home professionally staged may have also been talked about ... good advice.

However, if the only reason you're selling your home is that you're feeling the need for change, then the first thing you should do to Fully Test that urge is to rearrange a room and, if affordable, change it up by adding MORE color and interest.

Pick colors and patterns that you and your family like. Throw out 'the house selling rule book' (to a point!), and decorate in a way that reflects your personal likes. 

If you've never attempted to work with color and pattern, here is an example of choosing a patterned couch with a patterned rug. It also features a handy short video on mixing color with pattern.

When spending a lot of money isn't an option, keep the room changes simply; try these five things first:
  1. Repaint the room
  2. Rearrange the furniture
  3. Create a new focal point
  4. Add accessories
  5. and sorry, clean and de-clutter
Focus on what you like, but start with 'the mood' you want to create: airy, fun, electric, cozy, serious ... you get the picture. Even if your existing pieces don't fit your mood choice, use what you add to do that task: paint, pillows, blankets, rugs, window coverings, or, if you're going all out, furniture.

If you think this is too much work, think about all the time, expense, and energy it will take to sell your home. When you're just trying to figure out what to do .. to stay or to go .. redo at least one room in the house before you make that larger choice to sell. 

If you re-decorate that one room with neutral tones only because you think that's practical for resale, you're subconsciously out the door already! So resist that and decorate that room in your own funky fashion. Give it your touch.

When you're finally ready to sell, then go neutral-mad. But remember to test yourself with this redo challenge, and ask yourself, do I really want to sell my home?

By Barbara Tremblay Cipak
Funkthishouse.com


Note: The author may receive a commission from purchases made using links found in this article. “As an Amazon Associate, Ebay (EPN) and/or Esty (Awin) Affiliate, I (we) earn from qualifying purchases.”


Wednesday, March 13, 2024

How to Organize Your Messy Linen Closet With Pop-up Storage Bins

A cluttered linen closet can be a source of frustration, especially when you're searching for that elusive missing pillowcase from a set of sheets or the washcloth from a particular set of towels. Fear not! In this guide, I’ll review an easy and efficient way to organize your linen closet using pop-up fabric storage bins labeled with index cards inside clear plastic pockets. Say goodbye to the linen closet chaos and hello to a well-organized and visually pleasing storage space for your sheets, towels, tablecloths, napkins, spare blankets and pillows, out-of-season comforters, and holiday table runners.

It's time for spring cleaning!

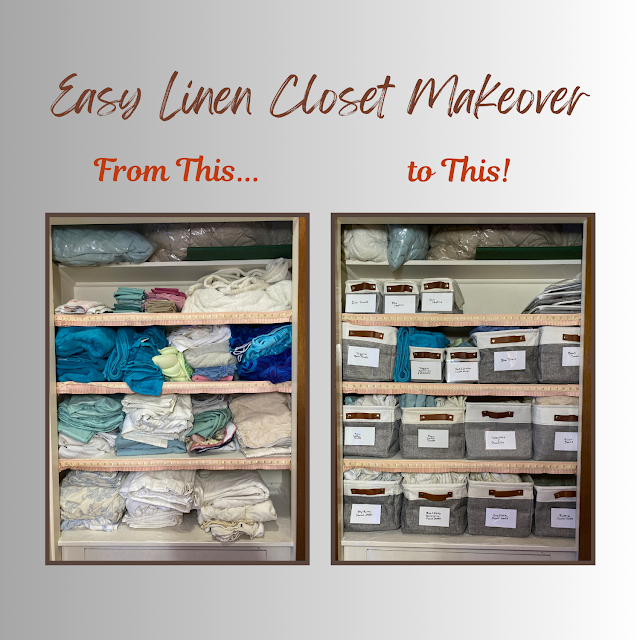
Easy linen closet makeover

I am not neat and well-organized by nature. However, I dislike living in a cluttered environment, as does my husband. So, periodically, we tackle an area of particular irritation to de-clutter and organize. Our most recent project was our overstuffed and extremely messy linen closet.

Our easy linen closet makeover was a smashing success, so I put together a step-by-step guide to decluttering and organizing a messy linen closet. (My fellow Review This Reviews contributor Barbara also wrote a linen closet organization guide several years ago that you might want to check out.)

Photograph Your Messy Linen Closet Before You Begin Organizing

I encourage you to take before-and-after photos to document the transformation. Our “before” closet was so bad that I didn’t photograph it and now I wish I had! The "before" photo you see above was taken in the middle of the process, after we had pulled everything out, sorted it into piles, discarded items we no longer need or use, and organized the linens we're keeping. It would have been far more impactful to show our real "before" linen closet next to our finished, organized "after" result, as well as a feel-good reminder of all we accomplished during this DIY home organization project.

Step 1: Assess, Sort, and Weed

Decluttering is the first step towards achieving an organized and functional space. Before diving into the organization process, take a moment to assess your linen closet's contents.

We pulled everything out of our closet, dumped them on our king-size bed, and then sorted all our sheets, pillowcases, towels, blankets, tablecloths, napkins, and other miscellaneous items into piles by category. Then came the hard part: deciding what to let go of or store elsewhere (such as the rarely used sheets for our sofa bed).

Set aside any worn-out, torn, stained, or mismatched linens, towels, or items you no longer need. Be as ruthless as you can. Decide what to discard or recycle and what to donate, then put those items into the trash, bags, or boxes, as appropriate, labeling the containers for recycling or donation.

Step 2: Group, Arrange, and Label Your Remaining Linens

Next, put everything else back in the closet, grouping related items and arranging them in whatever way you prefer to maximize shelf space and optimize organization. Be sure to leave some shelf space open to accommodate future purchases or gifts.

Tip: I suggest putting the linens you use most frequently on the most easily accessible shelves and reserving the highest and lowest shelves for the items you need to remove or put back less often ( such as comforters, extra blankets, guest linens, and holiday tablecloths).

Using scrap paper, make a temporary label for each pile on the shelves (e.g., blue towels, pink towels, striped flannel sheets). Personalize these labels in any way that makes sense to you (e.g., Mom’s Quaker lace tablecloth and napkins). Then place these temporary labels on top of each pile until you have your storage bins and labeling materials.

Messy linen closet without storage bins or labels
Our linen closet after we weeded out what we didn't need to keep.
It's organized, but still messy and the linens don't fit the space well.

Step 3: Measure, Then Select Fabric Storage Bins or Baskets

Pop-up fabric storage bins or baskets are a game-changer for maximizing space and bringing order to your closet both functionally and visually. These collapsible fabric bins make it easy to group similar items and access them effortlessly. Choose appropriate size bins to accommodate different types of linens, from large king-size sheet sets to small dish towels.

Measure your piles of linens, the width of your linen closet shelves, and the space between each shelf, then select a variety of coordinated bins in different sizes to fit. This allows you to customize your storage solution without investing in a custom closet makeover solution. The pop-up storage bins we selected are inexpensive and the workmanship is not perfect, but the price was right and they come in a wide range of sizes and shapes. It was also important to us to have bins that fold down when not in use because we wanted to keep some extras to allow for future expansion of our linen closet's contents. However, if you don't mind spending more, you can find a wide array of attractive storage bins to suit a variety of tastes and home decor styles.

If you have large, bulky items like comforters that won't fit inside even the largest pop-up storage bins, you may want to put them in airtight vacuum compression storage bags designed for this purpose, which will not only keep these items clean but also compress them to fit more easily on your closet shelves and save space.

Step 4: Unfold and Label the Bins

To make it easy to find what you need at a glance, you will want to label your pop-up storage bins. We decided to use self-adhesive clear plastic 3” x 5” pockets and index cards for labeling the fronts of our bins and ordered them from Amazon along with our bins. We chose the 3”x5” size because they matched the width of our smallest bins but were still large enough to accommodate labels with several lines of text when needed.

When your bins, plastic pockets, and index cards arrive, unfold the bins and press against the sides to prop them open. (The sides won’t stay completely straight until you fill the bins.)

Attach a clear plastic pocket to the front of each bin. We ordered self-stick plastic pockets but discovered that they didn’t adhere well to the fabric bins over time, so you will want to stitch, glue, or rivet the pockets to the bins. We've ordered a rivet tool and some rivets for attaching ours more securely. We will use the rest of the self-adhesive pockets and index cards to label storage cartons, where the adhesive will work perfectly. 

Using a permanent marker and index cards, write a new, permanent label for each pile of linens on your closet shelf to replace the temporary label.

This simple and effective labeling system allows for quick identification without having to rummage through each bin, and the clear plastic pockets protect the index card labels from becoming worn or dog-eared.

Step 5: Arrange Your Linens in the Labeled Bins

Take one pile of related linens and place it into the appropriately sized bin. Insert the index card label into the clear plastic pocket and return it to the closet shelf. Repeat with the remaining piles, bins, and labels.

This systematic approach not only keeps everything organized but also makes it easier to find what you need when you need it.

Then take a photo of your newly neat and organized linen closet and savor the contrast vs. your "before" picture.

Organized linen closet with labeled storage bins
Our formerly crammed, messy linen closet is organized and labeled,
so everything is easy to find and accessible. Now we just need to
remove the old, frilly, decorative pink shelf edging we inherited!

Step 6: Maintain Regularly

To keep your linen closet organized and efficient, commit to regular maintenance. Fortunately, this system makes it easy to maintain because, as my grandmother used to say, there’s “a place for everything and everything in its place.”

Periodically review the contents of each bin, refreshing, replacing, or rearranging items as needed. This ongoing effort will prevent the return of clutter and keep your linen closet in top-notch shape.

Messy Linen Closet Makeover Supplies

My husband chose a tailored storage bin style for this project, but the pretty baskets with the quatrefoil pattern would be a lovely, more feminine choice.

Enjoy Using Your Neat, Organized Linen Closet!

Transforming your linen closet into an organized storage space is a satisfying and easily achievable DIY project. With the help of pop-up storage bins labeled with index cards inside clear plastic pockets, you can create a system that not only streamlines your storage but also adds visual appeal. Enjoy the benefits of a tidy, accessible linen closet, where finding the perfect set of sheets or towels or your favorite tablecloth and napkins is a breeze.

Happy organizing!


How to Organize Your Messy Linen Closet With Pop-up Storage Bins by Margaret Schindel

Read More Decor Reviews by Our Review This Reviews Contributors

Read More Home Decor Reviews by Our Review This Reviews Contributors

Read More Product Reviews by Our Review This Reviews Contributors


Note: The author may receive a commission from purchases made using links found in this article. “As an Amazon Associate, Ebay (EPN) and/or Esty (Awin) Affiliate, I (we) earn from qualifying purchases.”

Most Recent Reviews on Review This Reviews


Search for Reviews by Subject, Author or Title

The Review This Reviews Contributors


SylvestermouseSylvestermouseDawn Rae BDawn Rae BMbgPhotoMbgPhotoBrite-IdeasBrite-IdeasWednesday ElfWednesday ElfOlivia MorrisOlivia MorrisTreasures by BrendaTreasures by BrendaThe Savvy AgeThe Savvy AgeMargaret SchindelMargaret SchindelRaintree AnnieRaintree AnnieLou16Lou16Sam MonacoSam MonacoTracey BoyerTracey BoyerRenaissance WomanRenaissance WomanBarbRadBarbRadBev OwensBev OwensBuckHawkBuckHawkDecorating for EventsDecorating for EventsHeather426Heather426Coletta TeskeColetta TeskeMissMerFaeryMissMerFaeryMickie_GMickie_G


Review This Reviews is Dedicated to the Memory of Our Beloved Friend and Fellow Contributor

Susan DeppnerSusan Deppner

We may be apart, but
You Are Not Forgotten


“As an Amazon Associate, Ebay (EPN) and or Etsy (Awin) Affiliate, I (we) earn from purchases.” Disclosure Statement

X