Showing posts with label Brite-Ideas. Show all posts

Sunday, June 28, 2020

Matte or Glossy Covers on a Self Published Book? Which One To Choose?


That is the question, matte or glossy?

Let me start off by admitting that I'm not a self-publishing guru! The entire self-publishing process has been self taught.

In 2019 I made a decision to tackle a bucket list item; publish my personally written life's collection of poetry. Since then, and to this date, via Amazon Self-Publishing (KDP), I've self-published a total of seven books, and am in the middle of writing my eighth and ninth book.

I've written multiple times about the learning curve to self-publishing. I have to admit it wasn't easy. However, now that I have a few books under my belt, I'm learning more about the nuanced details that make a difference in a book's appearance and presentation.

As an example, I learned how to create professional-looking book covers, and have changed my covers multiple times to what they are as of this date. I actually made another slight modification to one of them again today! I'm planning on stopping these changes soon - Nah, probably not lol - but hopefully I'll get the covers to a place where I'm completely satisfied! Building book covers from scratch is tough at first, but after you get the hang of it, it's a ton of fun and very addictive!

A Matte or Glossy Finish on the Cover of Your Self-Published Book - Which Should You Choose?

I googled the crap out of this. Watched videos - you know, the usual stuff we do when we have questions. However, I didn't get a suitable answer. So, when I published the first editions of each book, I decided to go with a matte finish for the covers.

Guess what? For my books, a glossy finish is much nicer and more practical. So, I'm in the process of changing them all to glossy. I'll do all future books in a glossy cover format from now forward.

Why a Glossy Cover Works for This Genre of Books

I write riddle books, books about sayings for cards, and of course, a poetry book. I haven't written, nor plan to write novels. Novel covers may be better in a matte finish, but honestly, I can't give you advice on that.

For Activity Books (Like My Riddle Books & Saying Books and Poetry Books), Here's Why I Believe a Glossy Cover is Best
  1. These types of books are picked up and put down often, and a glossy cover is more durable. The matte cover actually ended up with smudged fingerprints on it from too much handling. 
  2. They look way more professional with glossy covers! My husband put it this way - he said, 'the matte finish made it look like it was purchased at the dollar store, and a glossy finish gives it a bookstore feel' - Yikes!
  3. A glossy cover feels nicer to hold in your hands (a personal thing)
  4. The shiny cover helps the colors to pop more. With fun activity books, the colors are essential, so yah ... glossy all the way for that reason alone.
  5. The matte finish looks more like a school book, the glossy finish gives it an 'author feel.'
The Cellphone Photos of the Books Below Don't Really Capture the Difference Between Matte and Glossy However There is A Big Difference:


Both of These Riddle Books Have a GLOSSY COVER
 #STUMPED - A Party Game

The Book on the Left is a MATTE Finish
The Book on the Right is a GLOSSY Finish
Boredom Buster Riddles - #Stumped Volume 4

The final vote of approval came from my adult kids and my husband, they all agreed that the glossy covers were superior to the matte covers. Sorry matte.

My Non-Guru Self-Publishing Journey in Articles:
1. How to get started on that eBook you've been meaning to do for decades
2. Confessions of a Newbie Self-Publisher
3. 5 Helpful Tools from a Newbie Self-Publisher
4. 3 More Tips from a Newbie Self-Publisher


Note: The author may receive a commission from purchases made using links found in this article. “As an Amazon Associate, Ebay (EPN) and/or Esty (Awin) Affiliate, I (we) earn from qualifying purchases.”


Sunday, June 21, 2020

A Review of Practical Furniture Items for a Studio Apartment

Practical Furniture Choices for a Studio Apartment

When you're furnishing a studio apartment, every square inch matters.

Choosing items that solve multiple problems is the way to go!

On Funkthishouse, I've featured several space-saving items, and below are three of those suggestions that work for smaller spaces.

1. Chairs That Convert to a Bed

We're all familiar with couches that convert to a bed, however, when space is an absolute premium, you can add a chair that also doubles as a place to sleep.

The designs are interesting! They come in multiple colors and styles. They make a terrific addition to any small room where extra sleeping space is needed.

Use a pullout couch, but instead of a standard chair, add a chair-bed.

Check out the selection of original chair beds here

2. Space Saving Table and Chairs

A studio apartment may not have room for a table and chairs. However, if you're able to squeeze a portable table with chairs into the unit, you'll give yourself another area that can double as a place to work, play, and eat.

Space-saving tables and chairs can be quite compact. Compact sets are designed so the chairs or stools slide entirely under the table section.

Depending on the design, some can rest against the wall, and some are slightly higher in height - like a bar set would be. The taller designs add dimension to a square room. They're usually counter height as well, so they can line up with a kitchen counter so as to create a flush, continuous look.  Be sure to check those out.

Check out the various choices for a small room here

3. Lift Coffee Tables

Have you ever seen these? They're pretty cool! Lift Coffee Tables have tops or sides that lift up so that the top of the table can be used for working or eating. Under the top is storage.

A lift table makes it easier to work or have dinner from the couch. Of course, in a studio apartment, the sofa is a bed, so you'll have to ensure there's a spot for the coffee table when the couch becomes a bed.

By sliding the coffee table alongside the bed, your coffee table becomes a convenient bedside table.

Check out the full range of coffee tables to choose from

Go Vertical with Wall Storage - Floor to Ceiling When Possible

Find a wall that can house a floor-to-ceiling storage cabinet. A practical wall-unit can house the tv, books, photos, and other personal items. Choose one with drawers, then you'll have extra space for clothes.

Quick Summary of Five Basic Pieces for a Studio Apartment:
1. A sofa-bed
2. A chair bed
3. A lift coffee table
4. Compact table with chairs
5. A tall vertical wall unit with drawers
No matter what you include in your apartment, ALWAYS look for items that can double as storage. Storage space is the biggest problem in small rooms - be sure to get ahead of that problem with every piece of furniture you select.


Note: The author may receive a commission from purchases made using links found in this article. “As an Amazon Associate, Ebay (EPN) and/or Esty (Awin) Affiliate, I (we) earn from qualifying purchases.”


Sunday, June 14, 2020

An Affordable & Amazing Concealer - Check This Out

An Amazing and Affordable Concealer

My make-up routine is specific, fast, inexpensive, and extremely basic. It consists of a bit of eye shadow, mascara, blush, concealer, and lip gloss. Yep, I've mastered the five-minute face.

We all have health issues of some sort or another, however, problem skin has never been one of mine. The good skin gene has allowed me to be more liberal with my make-up choices.

I've never had to buy products for sensitive skin - and for that reason, I've had the good fortune of trying out just about every cheap make-up product out there!

After decades of trying different things, and enjoying the changes, I've discovered one product I'll no longer switch-up: I love e.l.f. Camo Concealer.

No Foundation Ever - Just a Bit of Concealer
e.l.f 16hr Camo Concealer - on Amazon


Foundation isn't something I choose to or need to wear. However, I do like a good concealer for under my eyes. Long hours, and those sleepless nights lead to tired-looking eyes - yuk - me no likey.

Also, in my opinion, tired, dark eyes make me look older. A good concealer is a great facial pick-me-up; it makes my eyes look brighter.

I've run my own not-so-double-blind-study: Without concealer, hubby will almost always say, "you look a bit tired today" - with it, hubby has been heard saying "oh, you slept well." Can't argue with wife-science?

I've tried umpteen concealers, and until e.l.f. Camo Concealer, I would switch products like underwear. I was never committed to a concealer, until this one.

Why I Like e.l.f Concealer

First, it's the price. It's not expensive. It's under $10 most of the time. Second, I can buy it at my local grocery store in the drugstore section. For any Canadians reading this, I buy mine at our local Superstore. Of course, you can find it on Amazon as well.

Skin Discoloration Cover-Up

As mentioned above, I don't have problem skin, however, a medication I take has a side-affect - skin discoloration.

Fortunately, it's only two spots on my neck. I get two reddish/brownish narrow blotches in the middle of my neck. Weird, I know. Unfortunately, they look like hickies (lol).

This concealer covers the two marks perfectly. I don't use very much, and I don't have to cake it on. By the end of the day, it's pretty much worn off.

How I Apply e.l.f. Camo Concealer

They give it that name for a reason - it's pretty thick. So you'll want to use it sparingly to determine how much you need. I use just a dab - the end of a fingertip - on each of the spots on my neck, then rub it in. I then put a dab under each eye, and on the eyelid of each eye, and gently rub it in. It's quick and easy to apply.

It Comes in Different Shades

Probably one of the hardest things to figure out with concealer is what shade/tone matches our skin. As you can see from my photo below, my skin is fair.

In the past, I always selected an Ivory shade. However, with e.l.f. Concealer I decided to try 'Light Peach' - Turns out, that's a better choice than ivory for me. The specific shade I use is "85845 Light Peach 9H02FH."

Can People With Sensitive Skin Use e.l.f Concealer?

Truth is, I have no idea. It may very well be fine, however, you'd have to do your own research on that front. My skin is normal, and this review is written with that in mind.

Make-up choices for our skin are often trial and error - e.l.f Concealer gets two thumbs up after my trial.  I've been using e.l.f. Camo Concealer for about a year, and plan to continue with it.


Note: The author may receive a commission from purchases made using links found in this article. “As an Amazon Associate, Ebay (EPN) and/or Esty (Awin) Affiliate, I (we) earn from qualifying purchases.”


Sunday, June 7, 2020

Is Dead To Me Your Cup of Tea?

An American Dark Comedy Series - Dead To Me

Dead To Me is a popular Netflix series. Have you watched it yet?

My niece mentioned it to my mom and several online friends mentioned they enjoyed it.

So, yep, I took the plunge and watched the series.

I Didn't Take My Own Advice About Binge-Watching AGAIN!

Several months ago, feeling all high-and-mighty, I thought it prudent to give out 'how to binge-watch tv' advice. Don't listen to me, because I clearly cannot practice what I preach.

I did all the don'ts again: I started the series near midnight and stayed up till 4am to finish an entire season. On the plus side, it's good!

What is Dead To Me About?

Christina Applegate plays Jen Harding, a realtor whose husband was killed by a hit and run driver. Linda Cardellini plays Judy Hale, a woman Jen meets at a grief support group. They become friends, however, the relationship is plagued with a shocking secret. I won't go any further so as not to reveal the plot. Here's the trailer for Season 1:


Enjoy Two Seasons of Dead to Me

In May 2019, the first season of Dead to Me was released. The second season was just released on May 8th, 2020.  If you've never watched this show, lucky you; you get to binge-watch two seasons!

The actors and quality acting make the series.

My eldest son and I recently discussed how an excellently written show with bad actors just doesn't cut it. However, a bad show with good actors is tolerable.

This show hits both marks: it's well written and features quality actors and quality acting. It's more like watching a well-acted movie.

Here's the trailer for the second season:


Lots of 'Language' in This Series

If you can't handle the 'F-bomb', this show is not for you. Although I usually don't enjoy movies with constant swearing, Christina Applegate's character made me laugh every time she swore - which is almost constantly! Her character has anger issues, so the writer's use of swearing works with this plot-line.

I'm not usually into crime-related shows, however, I thoroughly enjoyed this one. It's far-fetched enough to feel like entertainment and not something that could actually happen. Although these days who knows? I prefer getting lost in a true fiction, and Dead To Me offered enough fiction to make it unbelievable - in a good way.

If you're looking for another series, I recently reviewed 'Upload' - You'll escape the world's problems, yep, it's out of this world, total fiction.

Happy Sunday,
P.S. It's National Chocolate Ice Cream Day - Enjoy a bowl of ice-cream while you binge-watch TV


Note: The author may receive a commission from purchases made using links found in this article. “As an Amazon Associate, Ebay (EPN) and/or Esty (Awin) Affiliate, I (we) earn from qualifying purchases.”


Sunday, May 31, 2020

High Pressure Car Cleaning Tool Review

Reviewed, and Approved - Yes to a High Pressure
Car Detailing Tool
This item is a must for auto-detailing enthusiasts.

My husband loves to clean. You heard that right. Gifts for him normally include cleaning gadgets of some sort.

However, this particular gadget was entirely his idea. He's an avid cleaning-product-researcher and decided a high-pressure car cleaning tool would help to detail the car the way he likes it.

A High-Pressure Car Cleaning Tool Works With an Air Compressor

Take note that you'll need an air compressor to run this gadget. If you don't have an air compressor or access to one, this tool isn't for you.

This particular car cleaning tool lets you adjust the air pressure. You can clean an area using a level of pressure that's appropriate for the job.

He's pointed out it's the air pressure that pushes the cleaner into the fabric and on surfaces. That helps to provide deep, thorough cleanings.

The Car Cleaning Tool with the
air compressor hose attached

Easy to Use - Add Cleaning Product and Go

Just fill the container with any cleaning solution and water. Next, connect the air, set your ball valve to dispense the cleaner. Once you're ready to go, simply pull the cleaning trigger.

There's a water mode and air mode: To do the cleaning, use the water mode. Once the cleaning is complete clear away the excess water with the air mode. At that point, you can wipe the surface down with a microfiber cloth if needed.

Here's the High-Pressure Cleaning Tool in Action

Air Dried and Wiped with a Microfiber Cloth

Use The High-Pressure Cleaning Tool for the Car Seats and Rugs

My husband is quite detailed when he cleans. He also uses this handy gadget to clean the seats and rugs. After the winter months, it's very handy indeed for renewing those filthy rugs! They look like new when he's done. Check out the two photos below showing one of the seats and rugs.

By the way, this vehicle is fifteen years old. So it's not as though he's keeping up a new car that's in prime shape. This old SUV looks new because of his hard work and detailed mindset.

Oh, and something else he wanted me to mention: Cleaning the seats and rug below only took about ten or fifteen minutes. Of course, for extra dirty surfaces, the initial cleaning will take longer.

Here is the rug and seat after a quick cleaning

Here's a closeup of the seat after cleaning.
Remember, this vehicle is fifteen years old.


Yes, He Recommends This Product

It can also be used for other cleaning projects. You're not limited to just cars. Use it for bikes, motorcycles, outdoor furniture and rugs, and whatever else you can think of that needs a deep cleaning.

He didn't buy the high-end version of this product either. He selected an inexpensive model, similar to this one, and so far so good - it's still working.

Have fun, stay clean.


Note: The author may receive a commission from purchases made using links found in this article. “As an Amazon Associate, Ebay (EPN) and/or Esty (Awin) Affiliate, I (we) earn from qualifying purchases.”


Sunday, May 24, 2020

The Best Lawn Repair Product - Tested and Approved

We've used this product for years - works every time,
Highly Recommended!
Scotts EZ Seed Lawn Repair tested, approved, and now, reviewed.

It's a combination of mulch, seed, and fertilizer.

We've lived in our home for the past 26 years. We bought the house new and tackled our own landscaping.

In the early 1990's we put in about 52 small cedar trees around our backyard fence. The trees have since grown to about 25 feet tall.

Cedar trees require a lot of moisture and can slowly eat away your lawn - or so we discovered. We replaced our backyard lawn three times until I found EZ Seed Lawn Repair about ten years ago.

Why Scotts EZ Seed Lawn Repair?

In between our lawn replacements in those early years, we tried the usual - spread topsoil and add lawn seed. Nah, that sucked. It was still sparse in spots and didn't have the tidy finished look I personally prefer.

I also tried another lawn repair product by a popular competitor. Nope, it didn't take nearly as well as Scotts EZ Seed. I used the competitor's seed on one section, and Scotts on the other, and Scotts won the battle hands-down.

Scotts advertises that their seed consists of continuous release lawn food with super-absorbent growing material making it possible to grow grass anywhere. Yep, that's true. This stuff works.

How and Where I Use the EZ Seed Lawn Repair

I buy two large bags every year - our backyard lawn area is smaller - probably 600 square feet if I had to guess.

1. Wearing gloves, I scoop out handfuls and place the seed where it's needed  - I don't dump it from the bag - it's pricey stuff - so I place the handfuls of seed exactly where I want it.

2. I put seed along the entire perimeter of our cedar trees - the cedar trees eat away a good chunk of lawn, so I'll fill in the dead areas completely with seed.

3. I'll spread the seed about 1/8 of an inch thick, and evenly.

4. Once the perimeter of the trees is completed, I then fill in the thin areas in the center parts of the lawn.

5. Oh, and I don't do much to prep the lawn - just rake it - and sometimes sprinkle it with some water if it's bone dry dirt.

6. I've also used it in between our neighbor's driveway and ours - the grass just didn't grow well there and like I mentioned above, regular grass seed didn't take. So I used EZ Seed Lawn Repair, and yep, the lawn is now thick and lush. The stuff is amazing.

7. Water it every day! When you put this on your grass (in large sections) - don't cut the grass for four to six weeks. It needs time to grow. You have to water it. When I first put it on the lawn I'll water it by hand with the hose on a light spray setting. Once the lawn starts to grow, I'll use the sprinkler.

The clean edges of grass that come right up to the patio and trees are what I prefer - This photo is after the last sod was put in over ten years ago - Using Scotts EZ Seed keeps our lawn looking like this every year

In this photo, I've edged the lawn with Scotts EZ Seed - Turns out perfect every time
This picture is from a year or two ago

I highly recommend this product. It is pricey but in my opinion, worth every penny. We haven't had to resod our lawn. The lawn regains it's thick lush appearance with EZ Seed.

Today was the day I spruced up the lawn for spring/summer 2020. The EZ Seed project is all done for another year.

Oh, and yep, we've never had to resod the lawn since we started using Scotts EZ Seed.

Here's my other DIY gardening solution for areas of the yard where grass won't grow at all!

Scotts EZ Seed is Available on Amazon.


Note: The author may receive a commission from purchases made using links found in this article. “As an Amazon Associate, Ebay (EPN) and/or Esty (Awin) Affiliate, I (we) earn from qualifying purchases.”


Sunday, May 17, 2020

A TV Series about a Digital Afterlife - Reviewed and I Was Glued

A personal review of the Prime Series "Upload" - About a Digital Afterlife

Upload is available on Amazon Prime.

Before I tell you about the series, let me start by saying that I broke every one of my own rules about binge-watching! I started watching late at night, didn't get up for snacks (lol), watched every episode .... and the worst part, I chose a series with only 1 season!

Ok. That's off my chest.

Are You a Fan of Shows About the Afterlife - If So, You'll Enjoy Upload

My favorite types of movies are time travel, the afterlife, catastrophes, new planets, life exploration, spiritual revelations, and mankind lessons. Weird right? Lol. I know.

After reading what Upload was about I knew I'd be giving this one a try. It's a fun and interesting look at preserving a person's consciousness after death. Personally, no thanks - let me go. But hey, the creative aspect of this is futuristic, and who knows what the future holds.

The Story Line of Upload

In the year 2033 when a human passes away, they have the choice of uploading their consciousness into a virtual afterlife.

The premise of this show is that the main character, Nathan, is uploaded prematurely. The plot is about this mystery, and why.

It offers love, manipulation, humor, and some dark comedy.

Making Money on Selling an Afterlife, WHAT!

Omg. I was actually mad about this (in a disgustingly funny way), but it's critical to the story - it's part of the story!

There are expensive afterlife locations and cheap ones for those with less money. Capitalism in death, sheesh. Get this, in this story, your living loved one pays for your stay in the virtual afterlife location of your choosing, and also pays for the things you use there. LOL - like a hotel! Go easy on the afterlife minibar?

So unless you have a lot of greenbacks, your afterlife is destined to be low quality and low budget! If your bills aren't paid, your consciousness is frozen until more gigabytes are purchased or the bills are paid.

There are a Few Shocking Bloodless Scenes

I almost want to tell you what it is so you don't jump out of your body like I did! But I won't. Or should I? No. I won't. I'll give you a hint; when Nathan is being 'Uploaded', get ready for what happens, because that's one of the parts where you'll jump out of your seat.

Do I Recommend This Series?

Yes. If you're curious where a writer goes with a topic like this, you'll enjoy it's dark, fun creative aspects.

Apparently, Upload has been renewed for a second season. Yippee, I'll be watching.

The Trailer is excellent - Watch it on Prime.


Note: The author may receive a commission from purchases made using links found in this article. “As an Amazon Associate, Ebay (EPN) and/or Esty (Awin) Affiliate, I (we) earn from qualifying purchases.”


Sunday, May 10, 2020

A Review of Our New Gazebo Canopy Swing-Daybed with Netting

Yes, Recommended - A Daybed Canopy Swing!
In March of 2020, we decided to make an investment in a Patio Swing Daybed with Netting for our backyard.

With the impending restrictions due to the virus, we anticipated quarantine house-arrest could last quite some time. We knew we'd get a lot of use out of a patio swing.

Why a Gazebo Canopy Swing/Daybed with Netting?

Hubby and I had some 'intense' discussions about exactly what type of swing would be best. After a great deal of back and forth, we agreed that a swing/daybed with netting would get the most use.
  • The netting would protect us from unwanted bugs in the summer - and now we have Murder Hornets - I say good planning here!
  • The covered canopy design would be ideal for rainy days
  • A swing daybed would be amazing for warm summer nights
  • A netted swing would be a lovely place for me to write more riddle books
  • It's a lovely piece of furniture for the yard
The swing with the netting open

The netting unzips front and back. You can see in the photo below that there's a zipper on both sides. The swing came unassembled, and it took hubby about two hours to put this together. He took his time and did it right! (No extra parts at the end).

Here's the Canopy Swing fully zipped up
This canopy swing is sturdy! One of my concerns was whether it could handle severe wind. It's been tested with some substantial winds, and so far so good. It hasn't budged. It's heavy.

Here's a photo from the Box that shows Daybed
It's easy to switch from the swing to the daybed. There are two spring attachments to release, then fold the back down and it locks in place.

The only concern we have about the swing is winter storage. We have yet to face that challenge.

Where We Purchased Our Swing

The name of this product is Canvas Valencia Patio Swing Daybed With Netting.

We live in Canada and purchased our swing from Canadian Tire. The price was $499, but I noticed it's currently on sale for $100 less (May 2020) - however, in our area, they are currently out of stock. Of course pricing and availability changes throughout the year.

I've checked Overstock, Amazon, Wayfair, and Walmart and haven't been able to find a gazebo swing similar to this one for you. I would suggest just checking the sites from time to time along with your local stores (once open).

We recommend this product - the quality is excellent for the money.

Yep, I've spent a cool early spring afternoon napping on it with two sweaters, a blanket and a warm cup of tea already, love it!


Note: The author may receive a commission from purchases made using links found in this article. “As an Amazon Associate, Ebay (EPN) and/or Esty (Awin) Affiliate, I (we) earn from qualifying purchases.”


Sunday, May 3, 2020

How I Stayed Committed to the Ketogenic Way of Eating

How I stayed committed to the Keto Way of Eating
My One Year Keto Anniversary is May 4, 2020

On March 8th of this year, I wrote in detail about my progress as well as a little about Keto itself. I've lost approximately 60lbs in one year. I'm currently 59 years old, and for my 60th birthday in August, my goal is to be down another 15 pounds or so. However, if my body doesn't want to lose any more weight, then so be it.

For this review of my annual weight loss progress, I want to speak to how I've mentally been able to keep-on-keeping-on.

Down approximately 60lbs - 11 months on Keto in
this photo - Me 59 years old, and still dreaming
As I mentioned in my previous article, Keto is not for everyone. Weight loss is an incredibly personal journey and what works for one person might not work for another. However, in case your body or personality is a bit like mine, perhaps you'll find some common ground and useful tips in the points featured below.

How I Got Started

2019 was a tough year. We had a lot going on - sickness, death and other complications - it was rough. But now 2020 is like, 'hold my beer.'

I wasn't planning a diet, nope. It all happened by chance when a family member visiting was explaining how she had lost so much weight. I had been resigned to the fact that I would never lose weight again - until she started to explain Keto.

The first step for me was to learn about food. Decades ago I had lost weight after pregnancies via Weight Watchers, however, I really didn't understand Carbs - oh I thought I knew! But, nope, I sure the heck didn't. So, I'd start with learning about Carbs and the body. Here's a website with good information.

After reading about Ketosis and the Ketogenic Diet, and trying that way of eating, I discovered that it agreed with my body. In fact, just by changing my eating, I lost 20lbs in the first month. So I would suggest learning about Ketosis. I'll let you google that and do your own research. There's a ton of it!

My Personal Mind Over Body Battle And How I Stayed Committed to the Ketogenic Way of Eating
  1. I absolutely couldn't succeed without the Carb Manager App on my phone. It auto-populates your food entries regarding protein, fat, carbs, and calories. It does much more; be sure to check it out.
  2. On tough days I drink a lot - of water (lol) - actually, Sparkling Water with a bit of freshly squeezed lemon is my go-to filler.
  3. I drink tea with cinnamon and Stevia or Truvia sugar substitutes in the evening when cravings might hit.
  4. Since the weight fell off very quickly in that first month, that kept me going.
  5. Seeing my Carb-Face disappear was a real motivator to keep going!
  6. I have RA (an auto-immune disease) and after losing the first 20lbs my health started to improve. I was in a bad way a few years ago, and today I feel 20 years younger.
  7. An auto-immune disease triggers flare-ups (inflammation - bad, horrendous inflammation) and excess weight keeps us in a low constant state of inflammation. Since my weight is under control, inflammation is under control. My last flare-up was October 2019 and that was because I got cocky and reduced my RA medication - dumb move. Since I'm taking the correct amount again, no more flare-ups ... knock on wood. I feel the combination of weight loss and my meds have helped me to improve by a country mile.
  8. One of my goals was to shock my Rheumatologist with how healthy I was. My most recent visit was January 2020 and she was very impressed, yep, and shocked! When she weighed me, her mouth dropped to the floor, lol. My blood work was good as well. I told her, that I had decided to take control of my own life, since ultimately that's the only thing we have control over.
  9. Feeling better, bit by bit, kept me on track. I absolutely didn't want to go back to feeling immobile, and to struggle to get up and down from the couch.
  10. It no longer became a diet but rather a way of eating. Since I now have an extended education on food, I'm careful about everything I choose to eat.
  11. Yep, other than the odd recipe for Keto bread made with almond flour, I haven't had regular bread, rice, pasta, regular sugar, or regular desserts since the day I made the big change one year ago.
  12. Since Keto requires eating a certain amount of Protein, my body now gets protein! I didn't eat enough of it before, and instead ate too many carbs! I was never a big eater, even before Keto, I was just eating the wrong food combinations for my body.
  13. I had forgotten what it was like to feel 'small' - Now that my weight is down, I feel like I did in my 20s and 30s. By that I mean, I feel light. That feeling motivates me every single day.
  14. I have two big-girl clothes bags in my closet and every time I shrink out of something, I add it to the bag. Once I hit my goal weight I'll be giving the bag(s) to the GoodWill. Adding my big-girl clothes to the bags for a year has been the best! In fact, I added two more pieces I shrunk out of a few days ago. That's the best feeling! To date, I have two large stuffed garbage bags with clothes that are now too big. I'm motivated to add more.
  15. With Keto, my tummy shrunk, and wowza, there's a feeling that keeps me motivated.
  16. Mostly I compete with myself to keep going. And I don't want to go backward, ever again
  17. Keto has become a way of eating now, it's not a diet. Keto dictates my food choices.
  18. My go-to snacks are about 15 to 20 Almonds with a teaspoon of peanut butter.
  19. Keto foods are my fave; Chicken, eggs, cheese, fish, lettuce, pickles, olives, cauliflower, measured veggies, salad dressing, nuts, cream, dips, what's not to love.
  20. Since sugar is no longer a part of my life, I don't have cravings. 
  21. When I was first diagnosed with RA in 2016 (at 56 years old), I was in terrible health and couldn't walk a Mall, or the Grocery Store without a cart. The other day, for the first time in four years, I was able to walk around our park without holding onto anything.
  22. My go-to exercise is my stationary bike, and my outside bicycle - doing that daily keeps me motivated to keep active.
  23. Since 2019 was 'Body' and every year has been 'Mind' - I decided that 2020 would be 'Mind, Body, and Spirit.'
So there it is, one year ago at this time of writing, I weighed 60 pounds more than I do today. 

Note: I'm not a doctor (a duh, lol) - I'm not advising anyone to go on a Ketogenic diet, rather just sharing my experience. If you're planning a diet, you know what they say, talk to your doctor first.


Note: The author may receive a commission from purchases made using links found in this article. “As an Amazon Associate, Ebay (EPN) and/or Esty (Awin) Affiliate, I (we) earn from qualifying purchases.”


Sunday, April 26, 2020

How to Color and Seal Grout in One Step - Checkout the Before and After Photos

How to Color and Seal Grout in One Step

My husband likes to keep busy. Lucky me, and that's not meant to be sarcastic!

He's always finding a task to do around the house and is an avid watcher of YouTube how-to videos.

Next thing I know, he's painting/sealing the grout in the hallway. I'll quickly review the steps he followed to get the lovely finished result featured in the photos below.

1. He Used Polyblend Grout Renew

I'm always confident that hubby will select a quality product because he's very thorough when researching choices.

This product is an all-in-one colorant and sealer. You'll want to match the color of your own grout. The sealer protects the grout from traffic, dirt, and floor washings.

He purchased several bottles and color-matched them to the color of our floor. We prefer our grout to be as close to the same color as the tiles. I suspect most people prefer that.

By having the grout and tile similar in color, the floor looks more like one flowing piece. This is especially useful if your hallway isn't very large. Darker grout lines can leave an area feeling chopped up and smaller.

Here's an actual photo of the grout he
purchased - Yep, it's available
on Amazon
2. Tools Needed For The Job

All he used was a toothbrush (or 2) and some cloths for wiping. He trimmed the toothbrush to the width needed to fit the grout gap between the tiles. The gap between the tiles in our hallway is a bit wider than most, but he still had to trim the toothbrush.

Trimming the toothbrush makes applying Grout Renew easier because it fits nicely in the gap and has less chance to overlap onto the tile.

Here's a look at the toothbrush he trimmed for the job
3. How to Apply The Grout Colorant and Sealer

This job requires you to be on your hands and knees. Unfortunately, that's not easy for some of us. Thankfully hubby doesn't have any health issues in the knee department. It was hard on his back though, so be forewarned, it may take several days to complete. Take your time, don't overdo it.

He applied the grout paint sealer directly onto the grout line and painted it into the grout using the toothbrush. It was very time-consuming.

Don't worry if a bit of grout paint gets on the tiles, as you can wipe that off as you go along or do a few floor washings after it's had a chance to set for a day.

Here's the Before and After
Photo of the Grout Work
4. The Finished Look

Check out the finished look below. Hubby completed this in the fall of 2019 and it's currently spring 2020. This grout colorant/sealer has held up nicely. The floor still looks like he just finished the job. You'll notice that this grout colorant/sealer comes in many color choices, so go crazy and do the whole house.

Grout Colored/Sealed - Finished Look
Did I just add something to your honey-do-list? Sorry :)


Note: The author may receive a commission from purchases made using links found in this article. “As an Amazon Associate, Ebay (EPN) and/or Esty (Awin) Affiliate, I (we) earn from qualifying purchases.”


Sunday, April 19, 2020

55 Different Ways You Can Show Someone You Love Them

55 Ways to Show Someone You Love Them
If anything 2020 has taught us, it's that life is precious. During these crazy pandemic-times, today's review features big and small ways we can show our love to each other.

In the end, it's only love that matters. Our family lost someone yesterday (not from the pandemic), and we've been reflecting and remembering that love is the most valuable asset we take with us.

Let's not wait until it's too late to show those we love how we feel; let's start today. Here's a quick list of ways we can demonstrate we care:
  1.  Call or video your I love you message and say it
  2.  Physically mail a letter or a card
  3.  Make them dinner and clean up the mess
  4.  Clean the house for them
  5.  Give them me-time; watch the kids
  6.  Bring them a coffee, or two
  7.  Play board games and laugh
  8.  Email articles and photos to let them know you're thinking of them
  9.  Write them a poem
  10.  Dedicate a song to them via the radio
  11.  Sing them a song; if you can't sing, even better!
  12.  Create a video that lists all the reasons you love them
  13.  Thank them for all they've done for you
  14.  Accept or give forgiveness
  15.  Say "I love you" as often as you can
  16.  Bring them breakfast in bed
  17.  Send flowers or a plant
  18.  Drop off treats, gifts, personal drawings or groceries when social distancing
  19.  Have cozy gifts delivered; throw blankets, pillows
  20.  Snail mail a card every day, with a beautiful quote, for a month or a year
  21.  Let them talk; be a listener
  22.  Don't offer your opinions, just be there
  23.  Don't try to solve unsolvable problems, just be there
  24.  Accept each other's differences and just love each other for who you are
  25.  Use please and thank you with your family members
  26.  Speak with a kind voice to your loved ones
  27.  Give sarcasm a break from time to time
  28.  Remember they were once a little child, see them that way
  29.  Keep dark thoughts at bay, and send people love and light often
  30.  Remember none of us are perfect
  31.  Go 24 hours judgment-free - judge nothing, forgive everything
  32.  Read together, sing together, dance together
  33.  Set a goal to laugh with them at least 20 times in one day
  34.  Live for the moment, the specific moment you're sharing
  35.  When possible, if possible, hug each other
  36.  Start a story by email where everyone adds their portion and emails it to the next person
  37.  Pray together in person or virtually
  38.  Use your thoughtful inside voice when you have to ask for something
  39.  Give them something personal that holds special meaning to you
  40.  Ask them their opinion, so they feel they matter
  41.  When they've made a mistake, remember your own mistakes before reacting
  42.  Be a safe place for someone to land
  43.  When they speak to you in confidence, keep it confident
  44.  Don't gossip about people you love to other people you love
  45.  Serve your community in some fashion; do it together
  46.  Give each other space
  47.  Be on their team in life
  48.  When discussing testy issues, do it with grace and respect
  49.  Smile at your loved ones - this one seems silly, but try it, you'll be surprised
  50.  Laugh at their jokes
  51.  It's ok to be happy; show joy in front of your friends and family
  52.  Don't be afraid to apologize if you've made a mistake
  53.  Forgive them if they can't apologize when they've made a mistake
  54.  Be the change you want to see in a relationship
  55.  When you need love, give love
When summed up, we should consider the lessons taught in the Paradoxical Commandments, also known as The Anyway Poem. Listen to the gorgeous song interpretation by Martina McBride here in her famous song, Anyway.

The above suggestions are fairly obvious to most of us; however, sometimes we forget it's how we make each other feel that's remembered. 

I'll end with a video poem I created a few months ago called Living in Light - Stay safe and blessings to you.


Note: The author may receive a commission from purchases made using links found in this article. “As an Amazon Associate, Ebay (EPN) and/or Esty (Awin) Affiliate, I (we) earn from qualifying purchases.”


Sunday, April 12, 2020

An Original Easy Homemade Pumpkin Loaf Recipe Tweaked From A Banana Loaf Recipe

An Original Easy Homemade Pumpkin Loaf Recipe Tweaked From A Banana Loaf Recipe
Modified a Banana Loaf Recipe to Make a Pumpkin Loaf


Quarantine is bringing out the creative baker in me. Not really, but I'm trying.

The Boys Ate All The Bananas. The Hunger Games.

I wanted to make a Banana Loaf using my favorite personal recipe. However, the boys ate all the bananas. Guess what? There are no bananas at the grocery store! Really ... bananas? I've seen the flour aisle cleaned out, but missing bananas was a first.

The Boys Ate All The Apple Pie. Hunger Games the Sequel.

Apple Pie was planned for our Easter Sunday dinner, but guess what? The boys ate all the pie.

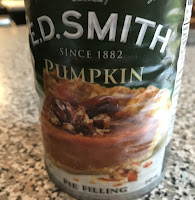
So I opened the cupboard to see how to modify my Banana Loaf recipe and found a can of Pumpkin Pie Filling - not expired, thank goodness.

My Revamped Banana Loaf Recipe Turned Into a Yummy Pumpkin Loaf Recipe

I've never made a Pumpkin Loaf, but how hard could it be right? Lol.

After searching online for a Pumpkin Loaf recipe, I decided I didn't like any of them - too complicated.

My Banana Loaf recipe is six freaking ingredients, all in one bowl! Easy peasy. Thus, I began experimenting to modify my favorite recipe to make my first Pumpkin Loaf.

The biggest challenge was determining how much Pumpkin Pie Filling to replace three medium to large bananas in a banana loaf.

After googling around, I determined that one-half plus a heaping tablespoon of a 540ml can of Pumpkin Pie Filling should work. Actually, I had no idea - it was a cross-your-fingers-and-toes guess.

The original banana loaf recipe is here.

My Pumpkin Loaf Recipe - Modified:

. 1/2 CAN plus 1 heaping Tablespoon of Pumpkin Pie Filling (Full can be 540ml, which is 2.28 Cups - so use about 1 and 1/8 Cups of Pumpkin Pie Filling)
Pumpkin Pie Filling
Here's the Pumpkin Pie Filling
I used - Any kind should do

. 1 and 1/2 Cups of Flour

. 1 Cup of White Sugar

. 1 Teaspoon of Baking Soda

. 3 Heaping Tablespoons of Softened Butter (not melted)

. 1 Teaspoon of Vanilla Extract

For flavor, in the same bowl, I added:

. 1 Teaspoon of Ground Cinnamon
. 1 Teaspoon of Ground Cloves
. 1/4 Teaspoon of Allspice
. 1/4 Teaspoon of Nutmeg

Mix everything in one bowl. Put it in a regular-sized Loaf Pan. Bake in the oven at 325 degrees for 45 to 60 minutes, depending on your oven. Check it after 30 minutes (or before that if your oven is on steroids or something).

Since this was a trial variation of one of my recipes, I didn't add anything like raisins or nuts. However, it turned out beautifully, so I'll add raisins next time. I plan to boil the raisins in water to soften them first.

This plain pumpkin loaf is delicious with butter, cream cheese, jam, or peanut butter.

Barbara's Homemade Banana Loaf
Homemade Pumpkin Loaf by Barbara


Note: The author may receive a commission from purchases made using links found in this article. “As an Amazon Associate, Ebay (EPN) and/or Esty (Awin) Affiliate, I (we) earn from qualifying purchases.”


Sunday, April 5, 2020

5 Funny and Inspiring Things to Help You Smile During Crazy 2020

The Wild Ride that is 2020
Focusing on the good, that's what I've been doing through this global pandemic. However, I understand the difficulty for those struggling with illness and loss and certainly don't mean to minimize that pain.

I want to share some of the humorous and inspirational videos I've recently come across. I hope they fill up your soul during this crazy time.

1. Humor - Pluto Living

This video series by a creative Canadian has gone viral and for good reason! It's hilarious, cute, and addictive. She's developed quite a global following in a short time. Here's her most recent video post, you're going to love it! I've watched this one about ten times already. You can follow Pluto Living on Facebook and Youtube. Check out Pluto's hilarious video on Cats - omg, that one cracked me up.


2. Inspiration - Don't Give Up on Me by Andy Grammer, Featuring the PS22 Chorus

You may have seen this video come across your Facebook timeline. If you haven't, you're in for a moving experience. Whenever I need my faith renewed, I watch the faces of these beautiful little kids singing with Andy Grammer, and I'm reminded that yes, the children will indeed save us. Take a few minutes and watch - your cup will runneth over.


3. Hilarious - Sebastian Maniscalco, The Best Comedian Evah!

Several years ago, while watching a late show, this comedian I had never heard of, did a skit that left me rolling on the floor with tears of laughter running down my face! Right then and there I googled him and watched a full show. Again, tears of uncontrollable laughter ensued! I highly recommend following him and watching his skits and full performances. We saw him live in Toronto a few years ago and no surprise, he was fantastic. The 19,000 seat stadium was filled to the rafters! If you have an Instagram account, follow him: His family posts during quarantine are entertaining. The video below is a full show from 2013. He's created much more humor since then! Enjoy.


4. Spiritual - Off The Left Eye

Each night I listen to spiritual videos from Off The Left Eye. This isn't for everyone, but for me, it brings comfort. They exam the writings of Emanuel Swedenborg (1668-1772), a Swedish Christian theologian, scientist, philosopher, and mystic. His ten thousand pages of records about his visit to the other side while alive are broken down in video chat format. If you're seeking answers, this will help. Here's one of their brief inspirational videos on humanity.


5. Funny - Memes Are Saving the Day

You've seen many comical memes about quarantine and this terrible virus by now. One of my favorites from Boo *F Hoo is, "2020 - Written by Stephen King, Directed by Quentin Tarantino" (lol!). I even find myself wanting to create them now! Read the memes, share the memes, spread the humor.

2020 is turning out to be about mind, body, and spirit. All the best to you and your family. Stay safe during these challenging times. Blessings.


Note: The author may receive a commission from purchases made using links found in this article. “As an Amazon Associate, Ebay (EPN) and/or Esty (Awin) Affiliate, I (we) earn from qualifying purchases.”


Sunday, March 29, 2020

Easy Homemade Coleslaw Dressing - A Family Fave

Easy Homemade Coleslaw Recipe
Quarantine has me thinking more about food. Fortunately, after 10 months of Keto, I still have willpower!

Keto warriors forewarned: This Coleslaw recipe is not Keto. However, if you replace the sugar with Monk Fruit Sweetener, it would be. Yet, I haven't personally tried that. If I did, I would use less Monk Fruit sweetener than 1/3 of a cup. I'd try a heaping tablespoon for my first attempt.

As mentioned in my previous recipe review posts (featured below), although I can cook, it's not my favorite thing to do. For that reason, I'm drawn to simple recipes.

While whipping through my stained recipe book, I came across this straightforward homemade recipe for Coleslaw dressing to share with you.

Homemade Coleslaw Dressing Ingredients:

. 1/2 Cup of Vinegar
. 2/3 Cup of Olive Oil
. 1/3 Cup of Sugar
. 1/2 Teaspoon of Pepper
. Miracle Whip Salad Dressing

If needed, you can double this.

Instructions:

Put all the ingredients in a small pot on the stove and bring it to a boil (EXCEPT the MIRACLE WHIP). Pour the boiled ingredients over the prepared Coleslaw while it's hot. Put it in the fridge until you're ready to serve.

Once you're ready to serve it, mix in two heaping tablespoons of Miracle Whip Salad Dressing. I've added the dressing when the Coleslaw dish is warm, and when it's been cooled in the fridge.

Preparing the Coleslaw:

You can buy the packages of ready-made Coleslaw at the store, or shred a cabbage head and
other vegetables..

The Extra Ingredients that Make Coleslaw Taste Great:

Other than a delicious Coleslaw dressing, there are two ingredients I always add:

. Chopped Apple
. Chopped Onion

Add the chopped apple just before serving. Cut the apple into small bite-sized pieces and stir it in. I usually cut up two medium-sized apples for a medium-sized bowl of Coleslaw.

Add 1/2 of a large onion, chopped or shredded.

The apple combined with the onion and the homemade dressing gives the Coleslaw a delicious taste.

Store-Bought Coleslaw Dressing Alternative:

If you don't have the time to fuss over making homemade dressing, Kraft's Coleslaw Dressing is excellent. Make the Coleslaw as described above with apple and onion, then put in nearly a full regular sized bottle of Kraft Dressing. Base the amount you want on how creamy you prefer your slaw. Pour it in quarters.

Previous Simple Recipes from My Kitchen:
If you're looking for a simple, comforting meat dish to serve with this Coleslaw, check out the Roast Pan Steak recipe featured above, it's so good!

Stay safe, happy cooking.


Note: The author may receive a commission from purchases made using links found in this article. “As an Amazon Associate, Ebay (EPN) and/or Esty (Awin) Affiliate, I (we) earn from qualifying purchases.”


Most Recent Reviews on Review This Reviews


Search for Reviews by Subject, Author or Title

The Review This Reviews Contributors


SylvestermouseSylvestermouseDawn Rae BDawn Rae BMbgPhotoMbgPhotoBrite-IdeasBrite-IdeasWednesday ElfWednesday ElfOlivia MorrisOlivia MorrisTreasures by BrendaTreasures by BrendaThe Savvy AgeThe Savvy AgeMargaret SchindelMargaret SchindelRaintree AnnieRaintree AnnieLou16Lou16Sam MonacoSam MonacoTracey BoyerTracey BoyerRenaissance WomanRenaissance WomanBarbRadBarbRadBev OwensBev OwensBuckHawkBuckHawkDecorating for EventsDecorating for EventsHeather426Heather426Coletta TeskeColetta TeskeMissMerFaeryMissMerFaeryMickie_GMickie_G


Review This Reviews is Dedicated to the Memory of Our Beloved Friend and Fellow Contributor

Susan DeppnerSusan Deppner

We may be apart, but
You Are Not Forgotten


“As an Amazon Associate, Ebay (EPN) and or Etsy (Awin) Affiliate, I (we) earn from purchases.” Disclosure Statement

X