Showing posts with label backyard gardens. Show all posts

Sunday, April 14, 2024

10 Essential Steps to Prepare Your Yard for Spring: A Guide to Yard Cleanup and Flower Preparation

10 Essential Steps to Prepare Your Yard for Spring

Spring is just around the corner, and it's time to prepare your yard for the vibrant blooms of the season. 

As the snow melts away and the days get longer, your garden awaits a rejuvenation after the winter slumber. 

To ensure your yard is ready to burst with color and life, here are 10 essential steps to focus on yard cleanup and prepare for spring and summer flowers, including perennials and annuals.

10 Steps to Prepare Your Yard for Spring

  1. Clear Away Debris: Start by giving your yard a thorough cleanup. Remove fallen branches, dead leaves, and other debris accumulated over the winter months. This step not only enhances the aesthetics of your yard but also helps prevent pests and diseases.

  2. Inspect and Prune: Look closely at your trees, shrubs, and perennial plants. Trim back any dead or damaged branches to encourage healthy growth. Pruning also stimulates flowering in many plants, so don't be afraid to trim where necessary.

  3. Prepare the Soil: Good soil is the foundation of a healthy garden. Turn over the soil in your flower beds to loosen it up and remove any weeds or old plant debris. Consider adding organic matter such as compost or aged manure to enrich the soil and provide essential nutrients for your plants.

  4. Divide Perennials: Periodic division rejuvenates perennial flowers and promotes better growth and flowering. Spring is an ideal time to divide overcrowded clumps of perennials such as irises, hostas, and daylilies. Replant the divided sections in your garden or share them with friends and neighbors.

  5. Inspect Bulbs: If you planted bulbs such as tulips, daffodils, or hyacinths in the fall, now is the time to check on them. Look for signs of growth and remove any debris covering the emerging shoots. Consider adding a layer of mulch to help retain moisture and suppress weeds around the bulb beds.

  6. Plan and Plant Annuals: Annual flowers add instant color and variety to your garden. Research which annuals thrive in your climate and soil conditions, and plan your flower beds accordingly. Consider factors such as sunlight exposure, water requirements, and bloom times to create a harmonious display throughout the season.

  7. Prep Flower Beds: Before planting annuals or transplanting seedlings, prepare your flower beds by amending the soil and adding any necessary fertilizers or soil amendments. Remove weeds and cultivate the soil to create a loose, well-draining planting environment.

  8. Start Seeds Indoors: For certain annuals and vegetables, starting seeds indoors can give you a head start on the growing season. Invest in some seed trays, potting soil, and grow lights, and begin sowing seeds for flowers such as marigolds, zinnias, and cosmos. Transplant the seedlings outdoors once the danger of frost has passed.

  9. Plan for Pollinators: Remember the pollinators as you design your flower beds! Choose various flowers that attract bees, butterflies, and other beneficial insects. Incorporate native plants and flowers with different shapes and colors to provide pollinators a diverse and inviting habitat.

  10. Mulch and Water: Finally, after all your hard work, mulch your flower beds to help conserve moisture, suppress weeds, and regulate soil temperature. Water newly planted flowers thoroughly, especially during dry spells, to help them establish strong root systems.

By following these 10 steps, you'll be well on your way to a vibrant and flourishing garden that will delight you throughout the spring and summer months. With proper yard cleanup, soil preparation, and thoughtful plant selection, your outdoor space will become a haven for colorful blooms and buzzing pollinators. So roll up your sleeves, grab your gardening tools, and let the beauty of spring unfold in your yard!

ReviewThisReviews Gardening Guru:

Check out Raintree Annie's informative articles for more tips and advice on yards and gardens. She's always very helpful - You can scroll through many of them here.


Note: The author may receive a commission from purchases made using links found in this article. “As an Amazon Associate, Ebay (EPN) and/or Esty (Awin) Affiliate, I (we) earn from qualifying purchases.”


Sunday, June 12, 2022

A Tree Stump Vase - Great for Outdoor Decor

A Tree Stump Vase


Unfortunately, we recently had to have our gorgeous English Oak tree cut down. We've had the tree since 1994, so needless to say, it was a difficult decision.

After an Arborist confirmed it was dead, we had to call a Tree Service company to safely perform the sad removal.

We were given a choice to have the tree stump ground down or left standing.

We decided to keep the tree stump and decorate it with flowers.

Why Did We Choose A Tree Stump Vase?

We wanted to feature flowers on top, and since we weren't digging a cavern directly in the stump, we needed to safely secure a weather-resistant outdoor vase to the top.

We talked about a metal vase and a plain plastic vase; however, neither seemed safely practical.
The tree stump is located between two driveways; thus, we needed something lightweight yet durable should it ever break loose after we secured it to the stump and gawd-forbid damage our cars!
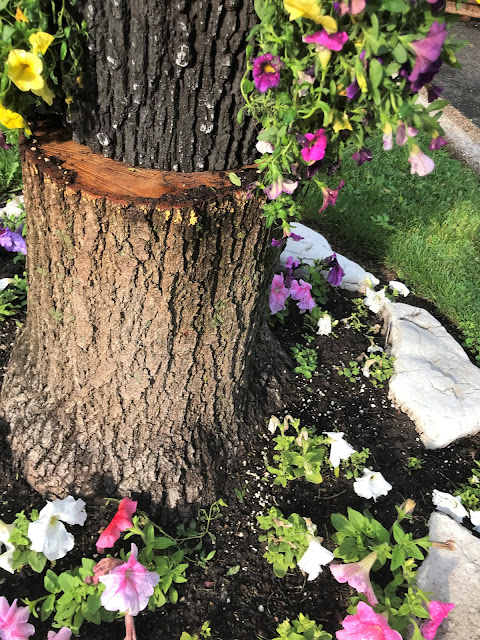
Here's a peek at the tree stump vase secured to the stump:


This tree stump vase is painted with weather-resistant UV paint to prevent fading and weathering. It's also designed to insulate plants from extreme heat or cold.

The one we purchased measures 10.5 inches in diameter and 9 inches high. They do come in other sizes. We verified the diameter of the tree stump beforehand. Also, we didn't want anything that stood too tall.


Here's another look at the tree stump with the flowers lifted.

We choose a tree stump vase primarily because it's lightweight, blends with the existing stump, and looks good without flowers. 

In the fall, we'll change the flowers, and come winter, we'll come up with something creative to fill the tree stump vase.

The finished look with the Tree Stump Vase filled with flowers

We selected flowers that trail over the stump. They still need to do some growing.


Note: The author may receive a commission from purchases made using links found in this article. “As an Amazon Associate, Ebay (EPN) and/or Esty (Awin) Affiliate, I (we) earn from qualifying purchases.”


Sunday, August 2, 2020

The Best Garden Yard Hose for Women - A Review For Women by a Woman!

The Best Garden/Yard Hose for Women!


If the marketing gurus aren't marketing this garden hose to women, they need to get on it!

For years we've known about flexible, retractable hoses for the yard, but never bothered to invest in one.

Maybe it's Covid-shopping-itis, or something like that, but this year was the year we jumped in and bought one of these lightweight, shrinkable garden hoses.

Best. Decision. Ever. 

We've purchased one for the backyard, and now I want one for the front!

I honestly don't think my husband cares one way or the other, but I care! 

Here's the female perspective on this garden/yard hose:

1. It's so light! Yes, that matters. Dragging that heavy water/garden hose around was brutal for me. This lightweight hose is nothing to maneuver! I do mean nothing. I can haul that thing all around the yard without a problem.

2. When it's time to put the thing away, gheesh, it's easy to hang up over the hose holder - why? because it's light.

3. We bought the 50-foot hose for the backyard and it takes up no space at all on the hose holder. Of course, the reason is that it shrinks up when not in use.

4. It's not bulky and ugly. 

5. The other regular hose we had never assembled nicely over the holder. I know you can put the regular type hoses on those standing wind-up hose holders (we have one in the garage for the front yard). However, we didn't want one of those sitting on our backyard patio.

6. When I get up in the morning, I like to water the flowers and grass. It used to be a chore to haul the hose out to do that. Now, I just grab the new lightweight hose and bob's-your-uncle. Job done. No sweat. No effort.

Here's the hose on the holder in our backyard:

Can you believe this is 50 Feet of Garden/Yard Hose? I love this thing!

We purchased our hose at Canadian Tire. However, you can find these just about anywhere, even Costco or Amazon. Here's a popular 100-Footer on Amazon.

In summary, if you're a yard-working-junkie, get yourself one of these!


Note: The author may receive a commission from purchases made using links found in this article. “As an Amazon Associate, Ebay (EPN) and/or Esty (Awin) Affiliate, I (we) earn from qualifying purchases.”


Sunday, May 24, 2020

The Best Lawn Repair Product - Tested and Approved

We've used this product for years - works every time,
Highly Recommended!
Scotts EZ Seed Lawn Repair tested, approved, and now, reviewed.

It's a combination of mulch, seed, and fertilizer.

We've lived in our home for the past 26 years. We bought the house new and tackled our own landscaping.

In the early 1990's we put in about 52 small cedar trees around our backyard fence. The trees have since grown to about 25 feet tall.

Cedar trees require a lot of moisture and can slowly eat away your lawn - or so we discovered. We replaced our backyard lawn three times until I found EZ Seed Lawn Repair about ten years ago.

Why Scotts EZ Seed Lawn Repair?

In between our lawn replacements in those early years, we tried the usual - spread topsoil and add lawn seed. Nah, that sucked. It was still sparse in spots and didn't have the tidy finished look I personally prefer.

I also tried another lawn repair product by a popular competitor. Nope, it didn't take nearly as well as Scotts EZ Seed. I used the competitor's seed on one section, and Scotts on the other, and Scotts won the battle hands-down.

Scotts advertises that their seed consists of continuous release lawn food with super-absorbent growing material making it possible to grow grass anywhere. Yep, that's true. This stuff works.

How and Where I Use the EZ Seed Lawn Repair

I buy two large bags every year - our backyard lawn area is smaller - probably 600 square feet if I had to guess.

1. Wearing gloves, I scoop out handfuls and place the seed where it's needed  - I don't dump it from the bag - it's pricey stuff - so I place the handfuls of seed exactly where I want it.

2. I put seed along the entire perimeter of our cedar trees - the cedar trees eat away a good chunk of lawn, so I'll fill in the dead areas completely with seed.

3. I'll spread the seed about 1/8 of an inch thick, and evenly.

4. Once the perimeter of the trees is completed, I then fill in the thin areas in the center parts of the lawn.

5. Oh, and I don't do much to prep the lawn - just rake it - and sometimes sprinkle it with some water if it's bone dry dirt.

6. I've also used it in between our neighbor's driveway and ours - the grass just didn't grow well there and like I mentioned above, regular grass seed didn't take. So I used EZ Seed Lawn Repair, and yep, the lawn is now thick and lush. The stuff is amazing.

7. Water it every day! When you put this on your grass (in large sections) - don't cut the grass for four to six weeks. It needs time to grow. You have to water it. When I first put it on the lawn I'll water it by hand with the hose on a light spray setting. Once the lawn starts to grow, I'll use the sprinkler.

The clean edges of grass that come right up to the patio and trees are what I prefer - This photo is after the last sod was put in over ten years ago - Using Scotts EZ Seed keeps our lawn looking like this every year

In this photo, I've edged the lawn with Scotts EZ Seed - Turns out perfect every time
This picture is from a year or two ago

I highly recommend this product. It is pricey but in my opinion, worth every penny. We haven't had to resod our lawn. The lawn regains it's thick lush appearance with EZ Seed.

Today was the day I spruced up the lawn for spring/summer 2020. The EZ Seed project is all done for another year.

Oh, and yep, we've never had to resod the lawn since we started using Scotts EZ Seed.

Here's my other DIY gardening solution for areas of the yard where grass won't grow at all!

Scotts EZ Seed is Available on Amazon.


Note: The author may receive a commission from purchases made using links found in this article. “As an Amazon Associate, Ebay (EPN) and/or Esty (Awin) Affiliate, I (we) earn from qualifying purchases.”


Sunday, July 22, 2018

Choosing Flowers for an East West Facing Home

A Popular Easy to Maintain Full Sun Flower Basket
featuring Bell Flowers, Petunias, and Verbena
A Review of Flowers for a House Where the Afternoon Sun is in the Front Yard and the Morning Sun is in the Backyard
Or the reverse.

Our home faces directly East-West and over twenty years ago when we purchased our home, I wasn't experienced enough with flower planting to understand how the sun floated around our home to keep the poor things alive for an extended period of time.

I'm not a gardening or flower expert by any stretch of the imagination, however I have, via trial and error, found some easy to choose flowers that will survive the daily trip around the sun.


Climbing Rose Bush in Front Island

Our Front Yard is Fully Treed - Easy Care, However Not Flower Friendly

Ha! That solves it. Little room for flower errors.

After filling our yard with greenery, it became difficult to get annual flowers to grow. So other than a few select potted plants, there are few flowers to care for in the front.

As you can see in the featured photo, we have a small front island, however, after trying and retrying a variety of flowers in it, nothing seemed to grow. So we placed easy to grow juniper as ground filler to contrast with the stepping stones, and stuck with one climbing rose bush.

However, it's not just a rose bush, it has a spiritual connection.

A friend of our family was sadly diagnosed with cancer, and before he passed away we were able to purchase this rose bush from his store, and it's thrived for about twenty years now.

More freakishly, these are the ONLY perennial flowers to have survived our front yard for over twenty years. Divine intervention? We think of him every time we look at the rose bush, so we like to think so.


Begonias on the Table - They Like the Shade
Backyard Flowers - Morning Sun that Floats Away from the House by 11:00am and Finally Leaves the Yard by 5:00pm

I've essentially stayed with three or four types of flowers.

The flowers closest to the house that only feel sun til 11:00am, are 'Sun Impatiens' also known as New Guinea Impatiens.

Unlike regular shade impatiens, New Guinea Impatiens can tolerate about a half a day of sun. Morning sun is best.

To add color to the patio table, we used Begonias. They like the shade, and since the umbrella is up most of the time, they work in that spot.

For the flower planter which gets sun all day, we selected a mixed arrangement featuring three of my favorite flowers, Verbena, Bellflowers (Campanula family), and Petunias. However, skip the Petunias for a mostly maintenance free bouquet.

Popular New Guinea Impatiens - Easy to Care For
they can handle about 3 or 4 hours of a sun a day,
morning sun is best

The Complete Story of How We Landscaped this Challenging Yard, More Here:


Note: The author may receive a commission from purchases made using links found in this article. “As an Amazon Associate, Ebay (EPN) and/or Esty (Awin) Affiliate, I (we) earn from qualifying purchases.”


Sunday, July 8, 2018

How to Bring English Ivy Back to Life - A Review of What Worked

How to Repair English Ivy
Let me start by saying, I'm not a gardening expert.

What you'll find here is something I tried from an online search on how to bring English Ivy back to life … and it sounded too simple, but it freaking worked!

I can't guarantee you'll have as much luck as I did, but considering how easy it was, perhaps you'll be able to restore your Ivy as well? It's worth a try.

I've included a couple of videos, both taken just recently in 2018: One shows the disaster that our Ivy became this year, along with patchy, blotchy lawn.

The other video shows the results of new lawn growth and Ivy growth after using the two products indicated below.

BEFORE: Take a Look at the Disaster of our Ivy this Year. You'll also see the Lawn before the Repairs. What a Mess!


What Killed the Ivy You Ask?

The Ivy that surrounds our back patio has been there, without ever dying, since we had the patio installed in the early 1990s. I've NEVER had to repair it. The Ivy has always been a reliable patio ground-cover support.

We chose Ivy because it's maintenance free and has been so until this year, 2018.

So what took the life out of our Ivy? It could have been the harsh winter we just had, but I doubt that as we've had many harsh winters over the past twenty plus years. Or it could have been dog urine. We recently had a lovely dog visitor over the winter and he enjoyed choosing the Ivy to do his business on. Quite frankly, we suspect it was the doggie urine.

What Did We Do to Repair the Ivy?

The big secret was Miracle Grow. Honestly our Ivy was so bad that I really didn't expect it to work. After searching online for what to use to revive the Ivy, the most consistent response Google kept kicking back was 'Miracle Grow'. So I gave in, and tried it.

AFTER: Take a Look at the Ivy and Lawn After the Repair was Done this Year!


There's a Few HOWEVERS Though

1. However, as mentioned above, each year I repair our lawn with Scotts EZseed Patch and Repair. Scotts EZ is a combination of Mulch, Seed and Fertilizer.
Here's the Ivy fully Repaired - The Lawn Growing Nicely

I highly recommend Scotts EZSeed!

Every year I buy several large bags and spread it along the perimeter of our cedar trees and on the dry dead patches of our lawn.

The cedar trees suck the life out of our lawn, so after replacing our lawn three times over the past several decades, I decided to consistently repair it year after year instead. Best decision.

Also, I  did try another brand of Lawn Repair and Scotts was far superior.

The reason I mention the Lawn repair is because who knows whether the fertilizer in it somehow enhanced the Miracle Grow on the Ivy. Not being a gardener, I have no idea, but thought you should know.

2. That's not the only fertilizer in our yard. Each year I also put 36 Tree Fertilizer Spikes in the ground around the cedars. You can read about how awesome that works for the trees here.

So in summary, our annual routine is normally tree fertilizer spikes and Scotts EZSeed Repair for the lawn, but this year's disaster with the Ivy called for Miracle Grow to repair it, and it worked!

Here's What the Ivy Looked Liked Last Year and Every Year Before that - Before the 'Dead Ivy' Crisis of 2018.

We've restored the Ivy again and it's Well on it's Way to Looking Like it has for over 20 Years


Note: The author may receive a commission from purchases made using links found in this article. “As an Amazon Associate, Ebay (EPN) and/or Esty (Awin) Affiliate, I (we) earn from qualifying purchases.”


Sunday, June 3, 2018

An Easy Tip to Help Keep the Trees on Your Property Healthy - A Personal Review

Our Backyard Trees - Kept Healthy with this Easy Tip
About ten years ago, while visiting a client, I had to know how in the world they were able to get the massive trees on their property to stay so healthy and look so beautiful.

He pointed to the neighbors trees across the street and said, 'when we first purchased this house, these trees looked just like those'. And 'Those' weren't very nice at all. 

I asked him, 'what did you do?'

Here's the tip he passed along to me, and we've been using it ever since for the trees in our yard.

He said, every spring and fall, we put Evergreen Fertilizer Spikes around all of our trees.

'That's it?' I asked.

He was adamant, 'yep, just put them in and forget it'.

'How long before you saw results?' 

He said it was by next year that the trees had a new life.

Our Home Has so Many Trees, I Had to Try This Product

When we purchased our home over 20 years ago we hand planted over 50 Cedar Trees in our
A Closer Look at the Health of Our Trees
from Implementing this One Tip
backyard, and in the front yard put a Blue Spruce, a Birch Tree and an English Oak Tree, along with shrubs.

As the years went on I noticed that the cedar trees in the backyard were looking a little rough, and knowing that sparse Cedar Trees aren't attractive, an immediate solution was in order.

For some reason my mind believed that caring for trees would be complicated. Wow, was I wrong!

I highly recommend using Fertilizer Spikes to care for your trees. Our experience has been fantastic.

Not being a tree expert in any way shape or form, I simply had to trust that this product would do the job.

You can find Fertilizer Spikes at just about any hardware store or The Home Depot or of course, online. 

I'm not fussy on any particular brand. The only thing I look for, for our trees, are spikes that say 'Evergreen'. There are various fertilizer spikes for different types of trees and shrubs. Just pick the ones you need based on your trees/shrubs.

This year I added another fertilizer spike to the mix, one that was for both Evergreens and Flowering Shrubs.

How Do You Put Fertilizer Spikes in the Ground?

Easy peasy lemon squeezy. That's how :)

The ones I buy come twelve in a pack, with two plastic tops to use to hammer them in the ground.

It's like making Elephant Pudding (tee hee, an old elephant joke) - simply follow the directions on the package.

I use three boxes, that's 36 spikes for the backyard, and this year I used 30 spikes for the front yard. Some of the front yard spikes were for flowering shrubs.

Also, they say to use the spikes for spring and fall and I've only ever put them in the ground in the spring. However, I think this year I'll put them in the ground again in the fall.

I've put some of the product choices below, but as mentioned above, I'm not dedicated to a particular brand. Each year I just grab whatever is on the shelf at the local hardware store. I have used both brands featured below, and both were fine. I don't have a preference.


Note: The author may receive a commission from purchases made using links found in this article. “As an Amazon Associate, Ebay (EPN) and/or Esty (Awin) Affiliate, I (we) earn from qualifying purchases.”


Saturday, May 7, 2016

Backyard Garden Birds: Springtime Review

cardinal on white gazebo bird feeder
Backyard Bird World
With the arrival of Spring, many of us see charming birds return to our backyard gardens. So, it's time to review what these birds need to encourage them. Besides Robins, which nearly everyone of us sees as heralding Spring, there are many regional birds. Like the Eastern Bluebird. OK, that's one of my personal favorites. And I found an article on Easy Backyard Gardening that highlights these delightful little birds.

Great Photo Opportunities


The author of Best Wooden Birdhouses shares photos of the Eastern Bluebirds that occupy her own backyard garden. She has a wooden birdhouse for them that blends well with her wooden fence. A nice security features for the birds themselves.

Anytime you add bird-friendly features to your own backyard gardens you get great photo opportunities. I can attest to that. I have been able to get photos of baby Swifts in the nest, brilliant Northern Cardinals on my window feeder and Yellow Finches hanging out in my Cedar trees.

The simple addition of a good wooden birdhouse will give you plenty of photo opps. Just make sure to stop and see the birds.

Hummingbirds in Backyard Gardens


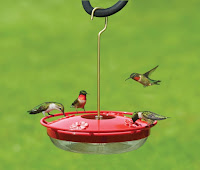
Most everyone can enjoy the return of the tiny hummingbird. With a few-well placed feeders (www.backyardbirdworld.com/bird-houses-feeders/care-of-hummingbird-feeders), these
hummingbirds at hummingbird feeder
Care of Hummingbird Feeders
birds will return to your backyard garden year after year. Hummingbird feeders take a little bit of care, but are definitely worth the time. Seeing the hovering little birds around your yard is a site worth enjoying.

So make sure to add feeders that will encourage hummingbirds to share your garden space with you. For those of you who enjoy planting flowers, add some bright red ones. That will also help hummingbirds be attracted to your backyard gardens. The beauty of the flowers will be enhanced by the presence of charming birds.

Get Your Backyard Garden Ready


Make sure to take a little time and get your own backyard garden ready to welcome back the springtime birds. Whether it's a new wooden birdhouse or a hummingbird feeder, the birds will appreciate it. And you will appreciate seeing the birds in your garden.


Posted by: BuckHawk
Buckhawk

About This Contributor

BuckHawk decribes herself as "Basically a lazy person who prefers the easy things in life." So that's what she writes about. Easy home decorating, easy recipes, easy entertaining. But, she is also a lover of animals, gardening and crafting. You'll find her writing all over the Web, but with Review This Reviews! she has the opportunity to write about all of her loves.


Note: The author may receive a commission from purchases made using links found in this article. “As an Amazon Associate, Ebay (EPN) and/or Esty (Awin) Affiliate, I (we) earn from qualifying purchases.”


Most Recent Reviews on Review This Reviews


Search for Reviews by Subject, Author or Title

The Review This Reviews Contributors


SylvestermouseSylvestermouseDawn Rae BDawn Rae BMbgPhotoMbgPhotoBrite-IdeasBrite-IdeasWednesday ElfWednesday ElfOlivia MorrisOlivia MorrisTreasures by BrendaTreasures by BrendaThe Savvy AgeThe Savvy AgeMargaret SchindelMargaret SchindelRaintree AnnieRaintree AnnieLou16Lou16Sam MonacoSam MonacoTracey BoyerTracey BoyerRenaissance WomanRenaissance WomanBarbRadBarbRadBev OwensBev OwensBuckHawkBuckHawkDecorating for EventsDecorating for EventsHeather426Heather426Coletta TeskeColetta TeskeMissMerFaeryMissMerFaeryMickie_GMickie_G


Review This Reviews is Dedicated to the Memory of Our Beloved Friend and Fellow Contributor

Susan DeppnerSusan Deppner

We may be apart, but
You Are Not Forgotten


“As an Amazon Associate, Ebay (EPN) and or Etsy (Awin) Affiliate, I (we) earn from purchases.” Disclosure Statement

X