Monday, June 7, 2021

Reviewing Farmhouse Decor Ideas: Character Wood and Metal

I have a small home that is currently under construction. The exterior is purposefully barn-like. The siding is sheet metal and the side facing the road is windowless. I plan for the interior to also suggest (suggest or scream - I'm not quite sure yet) barn interior. While shopping and planning I have found that the look I am imagining is not always easy to find examples of but my plans are slowly coming together.

on ReviewThisReviews


One problem I have had while shopping and researching decor ideas is that search words such as "rustic", "country" and "cabin" brings results of bears, moose, mountains, bentwood, and plaids. All very lovely, and very appropriate for the mountain ridge where my home is being built, but not quite the look I am going for. Many "farmhouse decor" searches yield lovely photos that include monotone white decor and flower bouquets. Again, quite gorgeous but not exactly what I'm going for. 

I am looking for barn doors, concrete floors, metals and wood combinations. While there are entire books written on other home styles; contemporary, coastal, southwestern, industrial, and more, the books on the "rustic" style comes closest to my goal. But aren't quite what I'm after.

One of our contributors is an incredibly talented DIYer. Lucky for me, Renaissance Woman shares projects that are exactly what I'd like to make for my future home. She shared how she made a DIY Pallet Book Nook. In that project she utilized character wood (from pallets) and corrugated metal to turn a small, odd space in her home into a uniquely wonderful spot to read, hangout, and relax. She shares the definition of character wood; "weathered wood that captures your imagination." This style is very much what I'm imagining.


Renaissance Woman's DIY Pallet Book Nook

If you enjoy her DIY Pallet Book Nook article, you can find more of her reviews under her tab here. She is quite talented.

This wine rack is a much smaller example of barnhouse decor. In this example, it can be purchased fully assembled. But people with DIY talent could easily make their own.


Rustic Barn Door Wine Rack


Not everyone needs or wants a wine rack. But most everyone likes to have a wall clock in plain view for convenience. And how much better if that wall clock compliments the decor.  This wood and metal clock is a wonderful example of my definition of barnhouse decor.


Vintage Farmhouse Clock

Sliding barn doors are one of the most notable farmhouse (barnhouse) features. They are so popular that not only are they functional doors but they are also a part of furniture, wall-hangings, featured in paintings, and more. I have even seen printed shower curtains that mimic wooden barn doors.

I want a barn door. I have watched video tutorials and hope to make my own sliding barn door to cover at least one window. There are versions that do not required angled cuts and I think I can manage simple straight cuts and assembly. I am hoping for both functionality (blocking sun on hot days in that south-facing window) and visual appeal (a barn door hung in my barn). 

If I decide I am unable to build my own sliding barn door there are many options for purchase. This is just one example:

sliding barn door kit; assembly required

While I've never shopped at Pottery Barn, I have noticed that some of their wood furniture fits my idea of the farmhouse style. If you don't already shop there, you may want to take a peek.

If you are looking for some barnhouse inspiration, I hope these ideas spark your imagination. 


Note: The author may receive a commission from purchases made using links found in this article. “As an Amazon Associate, Ebay (EPN) and/or Esty (Awin) Affiliate, I (we) earn from qualifying purchases.”


Sunday, June 6, 2021

The Easiest and Best Way to Clean Silver


In December 2018, I wrote another article on how to clean silver. 

In that article, I discovered a product my husband uses to clean the chrome on his tires called Mothers Mag and Aluminum Polish. The product is excellent for cleaning silver, but the way I'm about to divulge is far superior.

The Easiest Way to Clean Silver that Doesn't Involve Manual Labor

In the 1980's I purchased an Electrolytic Silver Cleaning Plate

The directions for using that cleaning plate are simple: 

Put the plate in the bottom of your kitchen sink, fill the sink with boiling hot water, then add Calgon water softener. Rest the silver piece so that it's touching the plate, and leave it for a few minutes to fifteen minutes, then wipe clean.

However, I could no longer find Calgon (except for a ridiculous price on Amazon), so I began to do a bit of Google research.

There Are Many Ways, According to Articles on Google, on How to Clean Silver

Some articles involve dish soap and vinegar. However, I found the instructions on these methods to be too cumbersome.

I figured, if a silver plate with Calgon can clean silver, there has to be an equivalent DIY alternative method. Thanks to Google research, yes, there is.

Here's the Easiest and Best Way to Clean Silver

Items Needed:

  • Your kitchen sink
  • Baking Soda (several boxes depending on how much silver you have to clean). I'd pick three boxes, so you don't run out
  • Tinfoil
  • Boiling Hot Water

Directions:

1. Put the drain plug in your sink.

2. Line your entire sink with tin foil, shiny side up. Don't leave any sink exposed. Instead, bring the tin foil right up the sides of your sink all the way around. However, if you're only cleaning silverware and small pieces, you could try just lining the bottom of the sink.

3. Pour boiling water into the sink. I used mostly boiling water from the kettle, but I ran super hot tap water when the water needed more heat. However, just keep boiling water coming. I re-filled the kettle and boiled more water every time I emptied the kettle.

4. I filled the sink to the highest level because I had many silver pieces to clean, with some pieces being quite large.

5. Place a piece or pieces of silver in the sink touching the tin foil. For larger pieces, just rotate them so that all the sides get covered with water at some point. If the piece isn't in the water, it won't clean.

6. Pour baking soda into the sink. I poured it on top of the silver in the water, but I don't think that matters. Since I had a lot of silver to clean, I used several boxes of baking soda. On the first silver items, I probably dumped half a box in the water. I wanted to make sure it worked. Next, I cleaned a silver tea service, silver platters, silver candles, and a silver serving dish to clean. Judge for yourself how much baking soda you need. If you feel it's not cleaning fast enough, simply get the water up to boiling again, and add more baking soda.

7. The cleaning process takes care of itself. You don't have to scrub anything (just wipe it off when you take it out of the sink). In fact, it's interesting to watch the silver clean itself right before your eyes.

8. Dry, wipe and shine up your silver with a cloth. That's it, you're done.

9. I cleaned all these pieces in less than an hour. 

I prefer the above method because it uses everything I have in the house; a sink, hot water, tin foil, and baking soda - boom, that's it. Oh, and it's unbelievable how clean the silver turns out.


Here are the pieces I cleaned (and they were completely tarnished before):


This tea set was so tarnished it looked brassy-black. The tray was tricky to clean in the kitchen sink, but I managed to clean it simply by turning it around and around until all the areas were submerged.


The piece on the top left was also severely tarnished with dark black, as were the two serving dishes in the bottom middle.


Note: The author may receive a commission from purchases made using links found in this article. “As an Amazon Associate, Ebay (EPN) and/or Esty (Awin) Affiliate, I (we) earn from qualifying purchases.”


Saturday, June 5, 2021

Reviewing Yo-Yo Day

Cartoon boy with Yo-Yo


National Yo-Yo Day is celebrated each year on June 6.


History of the Yo-Yo


Yo-Yo
Image Source: PIxabay
The yo-yo came to the United States with Pedro Flores, a young immigrant from the Philippines. Pedro remembered playing with a toy called a bandalore and it inspired him to create the toy he called the Flores Yo-yo. “Yo-yo" means “come-come” in the Philippine language. 


Flores manufactured his Yo-yo between 1928 and 1932 in Santa Barbara, California. He realized that people had to be shown how to use the yo-yo before they would buy it. He hired a team of yo-yo masters to demonstrate all the tricks you can do with it. 


When Donald F. Duncan, Sr., a Chicago businessman, inventor and toy manufacturer, spotted this toy while on a business trip to California, he realized its potential as a popular new toy. Duncan eventually purchased Flores' company and the 'Yo-Yo trademark. Subsequently, this wooden toy became known as the Duncan Yo-Yo


Wooden and plastic Yo-Yos
Original Wooden Yo-Yo to Today's Plastic Yo-Yo
Both Styles Still Available here on Amazon

Duncan was the country's leading yo-yo producer until after the trademark expired in 1965, when competing plastic yo-yos began outselling the old-fashioned wooden Duncan Yo-Yo. 

Today you can still get the wooden style yo-yo, along with a wide variety of plastic Yo-yos in many colors and styles. 


National Yo-Yo Day


This fun holiday began in 1990 when it was founded by Daniel Volk. June 6th is the date of Donald F. Duncan's birth in 1892. 


Daniel Volk once worked for the Duncan Toy Company as a yo-yo demonstrator. He toured the country from 1976 to 1978. At one point he met two brothers (The Smothers Brothers) who had a music and comedy act and taught them how to Yo-Yo. This led to the creation by Tommy Smothers of the Yo-Yo Man, a mostly non-speaking character who was a comedic performer of tricks using a  yo-yo. The term "Yo-Yo Man" is registered in his name. 


Later, the Smothers Brothers produced the Yo-Yo Man Instructional Video featuring the two comedians along with Mr. Volk. In conjunction with National Yo-Yo Day, the Hummingbird Toy Company produced the first of several Smothers Brothers brand yo-yos. 


Summary


As you can see, from it's humble beginnings as a simple toy from the Philippines, the Yo-Yo became a very popular American toy. So, on June 6th, it is only fitting to celebrate the Yo-yo's history by picking up a new yo-yo and testing your yo-yoing skills by trying as many tricks as possible. Do you know how to do the pinwheel or walk the dog? 


National Yo-Yo Day is reviewed by

~Wednesday Elf


Note: The author may receive a commission from purchases made using links found in this article. “As an Amazon Associate, Ebay (EPN) and/or Esty (Awin) Affiliate, I (we) earn from qualifying purchases.”


Friday, June 4, 2021

Durable Insulated Lunch Box Tote - Reusable Cooler Bag Reviewed

insulated lunch box tote cooler bag
Several year ago, I purchased this insulated lunch tote for our son. Even after much use, it still looks new and keeps his water cold!

As we approach the hot days of summer, I am reminded of why I selected this particular lunch tote for our son.  He needed an insulated bag for his bottled water which sustains him throughout his work day.  

Because several bottles of water can be heavy, I wanted a durable tote with a sturdy zipper.  This lunch box tote certainly meets, and exceeds, those basic standards. 

Since it easy holds 3 large (24 oz) bottles of Propel water, I am certain it would hold almost any regular lunch someone wished to carry.  Most importantly, with the thin reusable ice packs I purchased separately, his water stays cold all day.

I selected the black lunch bag for him, but the lunch tote comes in several colors. I especially like the midnight blue, which looks a lot like denim.


Features of The Upper Order Durable Insulated Lunch Box 

As I mentioned above, the zipper is very sturdy and the tote is insulated, but there are several other features to love about this lunch tote bag.  

 Upper Order Durable Insulated Lunch Box Tote
Reusable Cooler Bag
Check Price
  • Insulated
  • Strong, Durable Fabric
  • Strong, Durable Zipper
  • Sturdy, but Fabric is Flexible to Accommodate Bulky Containers
  • Inside Wipes Clean 
  • Outside Wipes Clean of Dust & light dirt/debris
  • Inside Pocket
  • Outside Pocket
  • Carry Handle
  • Detachable Shoulder Strap 
  • Slim Design - 11" x 10" x 3.6"
  • Professional Appearance
  • Inexpensive  

This lunch box tote can easily slip behind his drivers seat (which is pushed back for longer legs) to sit on the floor board for easy access getting in or out of the car.   


Would I buy this insulated lunch box tote again? Absolutely!


 GrayCheck Price UPPER ORDER Reusable Insulated Lunch Box for Men and Women (Black)Check Price BlueCheck Price


Recommended Ice Packs

I purchased a pack of thin ice packs.  Only one is required at a time, therefore 3 are left in the freezer for future use.  We simply alternate them each day.

 Healthy Packers Ice Pack for Lunch Box - Freezer Packs - Original Cool Pack | Slim & Long-Lasting ReusableCheck Price


Read More Product Reviews On
ReviewThisProducts.com


House of Sylvestermouse


Note: The author may receive a commission from purchases made using links found in this article. “As an Amazon Associate, Ebay (EPN) and/or Esty (Awin) Affiliate, I (we) earn from qualifying purchases.”


Wednesday, June 2, 2021

The Best Advice to Maintain Your Keto Diet Weight Loss

Losing weight is a piece of cake (so to speak) compared to keeping those pounds from coming back. If you are following a mostly clean ketogenic weight loss diet for an extended period, figuring out how to maintain your successes after you reach your target weight can be even more challenging.

This time last year, after celebrating the one-year anniversary of the start of my successful keto diet weight loss journey, I shared my best advice for preparing to succeed on a keto diet

Last week marked my second keto-versary, In honor of this important milestone in my transformational journey toward better health and wellbeing, I am sharing what I’ve learned during the past year about how to maintain the significant weight loss I achieved on a ketogenic diet.

image collage of woman at different weights between 2017 and 2020

The Best Tips to Maintain Your Keto Diet Weight Loss Success

In part one of my post about preparing to succeed on a keto diet, I shared my belief that there is no “one-size-fits-all” ketogenic weight loss diet that is optimal for everyone, that dirty, lazy and strict keto are not your only options, and that designing a personalized approach to this way of eating that best fits your unique needs, lifestyle, and priorities can improve your chances of success. Based on my own experience so far, I think it’s just as important to design a personalized plan to maintain your keto diet journey wins after you reach your target weight.

For the past 12 months or so, I have been working on and refining my long-term strategy to maintain not only my new, healthy weight but also the other profoundly positive changes that resulted from my switch to a mostly clean ketogenic diet. Although I will likely continue to experiment, evaluate and make further tweaks over time, I have gradually figured out a viable “new normal” that is meeting my needs, for now. 

The best advice I can share is to learn as much as you can from people who have transitioned from a keto weight loss diet to a healthy, sustainable maintenance diet and kept those pounds from coming back. Use whatever aspects resonate with you to help you design your own personalized plan, tailored to your needs, priorities, and preferences.

To help you get started, here are the seven strategies that have helped me maintain my nearly 60-pound weight loss so far. 

3 side-by-side photos of same woman before and after losing weight and keeping it off with a ketogenic diet

Make Small, Incremental Changes to Your Diet at a Time

Increase your carbs and calories very slowly, then wait at least a week or two to see how your body responds before deciding whether, what, and how much to change next. You also may want to try gradually decreasing your fat intake somewhat and evaluating the effects. I increased my carbs by 5 grams and added 50 calories every three weeks,  very small changes to my calories and macros roughly every 3 weeks so my metabolism would adapt to each minor change without overreacting to a perceived food surplus or famine. 

Use Most of Those Extra Carbs and Calories to Add Nutrients and Fiber

It’s okay to reserve some of your extra maintenance carbs and calories for a keto-friendly cheddar cheese and chive biscuit or a square or two from a healthy, sugar-free The Good Chocolate bar, but try to invest most of your carb and calorie “raise” into a broader range or slightly larger portions of nutrient-dense, fiber-rich foods, such as berries and root vegetables, especially if you plan to continue with a modified keto or low carb diet as part of a healthy lifestyle. You can also try introducing small amounts of high-fiber beans and legumes and see how they affect your blood sugar, insulin, energy level, mood, and mental clarity. 

Pay Attention to How Your Body Responds 

If you have (or had) a lot of weight to lose, start experimenting with very small, gradual increases to your calories and carbs when you are within three pounds of your target weight, even though it means waiting a bit longer to reach your “magic number” on the scale. Finding your personal nutritional “sweet spot” to maintain your new, healthier weight will require navigating uncharted territory. Switching your focus from losing those last few pounds to figuring out how to keep them off for good will give you a good head-start on testing the effects of those dietary changes and fine-tuning them by the time you  reach your weight loss goal. 

Don’t Revert to Your Former Bad Habits

To paraphrase Henry Ford, if you keep doing what you’ve always done, you’ll keep getting what you’ve always gotten. So, if you go back to eating the things that caused you to put on weight and made it hard to lose—especially sugars, refined starches and highly processed foods—you will soon put back any pounds you dropped on keto, and probably a few more, too boot. 

Keto cookbooks and baking books

Build On Your New, Healthy Lifestyle Habits

If you have been following a "dirty keto" approach, consider eating fewer highly processed foods and buying healthier, fresh, whole, or minimally processed foods, such as organic fresh berries and vegetables and grass-fed (and, ideally, grass-finished) beef and dairy products.

If you your meals have relied heavily on fast food restaurant chains or packaged foods, try cooking more of your meals and eating out less to help you control the quality and quantity and enhance the flavor and nutrition of the foods you consume. (You will probably also save some money in the process.) To expand your repertoire of quick and easy, delicious and nutritious breakfasts, lunches, dinners, and snacks, I highly recommend Carolyn Ketchum's cookbook The Everyday Ketogenic Kitchen: With More than 150 Inspirational Low-Carb, High-Fat Recipes to Maximize Your HealthMaya Krampf's The Wholesome Yum Easy Keto Cookbook: 100 Simple Low Carb Recipes. 10 Ingredients or Less, Kyndra Holley's Craveable Keto: Your Low-Carb, High-Fat Roadmap to Weight Loss and Wellness, Natasha Newton's Southern Keto: 100+ Traditional Food Favorites for a Low-Carb Lifestyle, and Maria Emmerich's Keto Restaurant Favorites: More Than 175 Tasty Classic Recipes Made Fast, Fresh, and Healthy

If you miss traditional baked goods and have been disappointed by the keto recipes or packaged versions you've tried, invest in a couple of cookbooks with reliable recipes from a keto baking expert, such as Ketchum's The Ultimate Guide to Keto Baking: Master All the Best Tricks for Low-Carb Baking Success or Hilda Solares' Essential Keto Bread: Sweet and Savory Baked Goods to Satisfy Any Craving.

If you haven't been getting much exercise, look for ways to build a more active lifestyle.

Bagged piles of women's clothing to donate or sell

Get Rid of Clothes That No Longer Fit You 

Don’t sabotage yourself by holding onto this safety net in case you gain back the weight you worked so hard to lose. Try on every piece of clothing you own and sort it into the appropriate pile: throw away, give away, donate, sell, or bring to a tailor to be altered to fit your new size, depending on the style and how much would need to be taken in. If you’re having trouble letting go of some favorite pieces that would require too much alteration, think about how much good you will do by donating them to someone in need.

Digital body weight scale and tape measure

Keep Paying Attention (for the Rest of Your Life)

Body weight can fluctuate frequently for many different reasons, so stepping on the scale too often when you’re on a reducing diet can be frustrating, demotivating and even misleading. However, once you are close to your goal, more frequent weigh-ins can provide important feedback as you experiment with and fine-tune changes to your diet to develop a successful eating plan to maintain your target weight. 

Even after you have developed a maintenance diet framework that appears to work for you, it’s important to weigh yourself consistently, at the same time of day, at least twice a month. This is even more important if you stop tracking your calories and macros with nutrition tracker app such as Carb Manager after you reach your desired weight. 

The longer it has been since you reached your weight loss goal, the more likely it is that you will start taking your ability to maintain that weight for granted. I learned this the hard way after Carb Manager’s initial poorly implemented redesign of this popular keto and low carb diet tracking app early this year forced me to stop using it for several months. Recording and tracking everything I ate or drank against my daily calorie limit and macros in the Carb Manager app had been one of the keys to achieving my target weight and maintaining it for the next eight or nine months. So, when the initial launch of the redesigned app made it too time consuming and frustrating to keep using, I was nervous about losing the main tool I had come to rely on to help me keep my weight and my healthy eating on track. But it didn’t take long to become confident in my ability to maintain my weight without tracking every bit and sip. Then, a few weeks ago, I noticed that my tummy wasn’t as flat as it had been a year ago, and the scale informed me that I had gained back four pounds. I realized it was time to start learning to use the new version of Carb Manager and get back to tracking my calories and macros. I have already shed two of those four pounds and returned to weighing myself every two weeks, so that if my weight creeps up a pound or two, I can nip that trend in the bud and return to my ideal weight quickly and easily, simply by cutting back on the carbs for a week or two.


The Best Advice to Maintain Your Keto Diet Weight Loss by Margaret Schindel

Posts About My Keto Diet Journey

My First Year on The Keto Diet

Preparing to Succeed on the Keto Diet, Part One

Preparing to Succeed on the Keto Diet, Part Two

Low Carb Muffins & Cupcakes: Treats to Enjoy on a Keto Diet

Low Carb Keto Chocolate Yogurt Granola Chip Pudding Recipe

Good Dee’s Keto Cookie Low Carb Baking Mix Review

Hamama Microgreens Growing Kit Review & Success Tips

My Favorite Hamama Microgreens Seed Quilt Accessories

Keto Cheddar Cheese Biscuits With Chives Recipe

The Ultimate Keto Hot Chocolate Recipe

The Best Low Carb Keto Gift Ideas: Keto Gift Guide

The Best Low Carb Keto Cinnamon Muffins

Wholesome Yum Keto Bread Mix and Yeast Bread Recipe

The Good Chocolate 100% Organic No Sugar Dark Chocolate Review

The Best Advice to Maintain Your Keto Diet Weight Loss

My New Irresistibly Delicious Keto Cheese Crackers Recipe

Luscious Low Carb Keto Triple Peppermint Cheesecake Brownies Recipe

Quick & Easy Livlo Blueberry Scones Keto Baking Mix Review

Snack Better With The Best Healthy Keto Cookie Dough Bites

The Best Quick and Easy Low Carb Keto Pizza Recipe

The Best Quick and Easy Low Carb Keto Shortcake Cupcakes Recipe

Comparing the Best Keto-Friendly Chocolate Hazelnut Spreads - No Added Sugars

The Best Low Carb Keto Sandwich and Burger Buns Mix

Blueberry Biscuit Scones — New, Easy, Low Carb Keto Recipe

The Best Keto Pizza Crust Mix With 0 Net Carbs

An Unusual, Delicious Strawberry Chocolate Tea With 0 Calories

Delicious Sugar-Free Keto Cookies That OREO Fans Will Love

Healthy Pistachio Cherry Chocolate Chip Marshmallow Cereal Treats Recipe

Easy, Decadent, High Protein, Sugar-Free Rocky Road Cottage Cheese Ice Cream

The Best Quick & Easy Low Carb Sausage and Ricotta Calzones

How to Make Refreshing Vanilla Italian Soda (With or Without Cream)


Reviews of the Keto Diet by Barbara C. (aka Brite-Ideas)

My Personal Keto Testimonial

How I Stayed Committed to the Ketogenic Way of Eating

Read More Reviews About Health and Wellness by Our Review This Reviews Contributors


Note: The author may receive a commission from purchases made using links found in this article. “As an Amazon Associate, Ebay (EPN) and/or Esty (Awin) Affiliate, I (we) earn from qualifying purchases.”


Tuesday, June 1, 2021

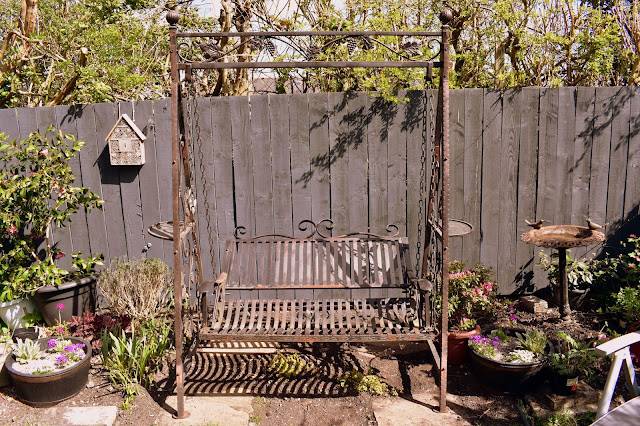
Reviewing Restoring A Metal Garden Swing Seat


restored metal garden swing

We bought a metal garden swing seat recently for a good price as it needed some work and the shop needed the space. 

The swing is all metal and would have originally been painted black. It is very sturdy and quite heavy. It took two strong guys to carry it into our garden. 

My husband and I love this garden seat and like a bit of a challenge, so we embarked on revamping it. 

I always think if the bones are good then most things can be restored to look beautiful and useful again. 


weather garden swing that needs restoration
Original State Of the Garden Swing Seat


From the minute it arrived in our garden albeit quite rusty and certainly neglected and in need of serious tender loving care,  we loved it and it felt like it had been there forever. I love the details of the leaves and flowers and the general shape of the seat.

It is super comfortable as well. The swing has a lovely action and it feels so relaxing to sit on it and gently rock back and forth. It belonged in our garden and we love it! 


Preparation Work For Restoring The Garden Swing. Using Wire Wool Brushes. 

They say that preparation is the most important part of any project and it is important to take your time doing this part. 

While I love to get to the exciting part of making it beautiful, I am happy to accept that this preparation element needs to be given care. 

First, we used wire wool brushes to get rid of any flaking rusty parts. Quite a lot of old rust and flaking damaged parts fell off at this stage! 

We chose quite slim brushes as there were many nooks and crannies to get into that a larger brush would not have been able to reach.

This part of the work was quite hard slow going as it is important to get rid of all the loose sections and make sure it was as clean as possible. 

I am very glad we chose to use brushes with long handles instead of steel wool bundles to hold by hand, as it would have been hard on our hands. Using the brushes our hands were protected and the brushes did a great job.  


Then we wiped down the whole seat with an antibacterial spray to clean it all up and remove any dust particles. We repeated this again before painting.

We initially thought we might have to get in a welder to mend some of the worst parts, especially on this armrest section, but wanted to try out epoxy resin first to see if that would work. 


damaged metal garden swing that needs repair
Damage On The Garden Swing Seat


Repairing The Damaged Metal Sections

The next step was to use epoxy resin sticks to repair some of the damaged areas. Using this is quite easy. Do wear gloves as your skin may react to the epoxy resin. 

You simply cut the wrapping and the tube and I took a small piece and rolled it up in my gloved hands until the two parts were mixed evenly then simply applied it to the metal gap I needed covering.

It reminded me of using plasticine as a child. However, it is advisable to wear gloves when handling epoxy resin and of course, keep away from children and pets. 


repairing a damaged metal swing
Epoxy Resin Use On The Garden Swing Seat


I found you do need to work fairly quickly as it does dry in about 10 minutes. So best to only take what you need from the tube. I would keep any unused in a sealed container to help prevent it from drying out.  

I then smoothed it down and allowed it to dry. It took only about an hour before it was cured but we left it overnight before painting.

I thought I would need to sand it down but actually, on this type of item, it looked just fine as it was. I had taken care to smooth it out as much as possible when applying through. On some projects, you would need to sand down first. 

This type of epoxy resin can be drilled and sanded. It can even be used underwater and is waterproof rather than just water-resistant. We wanted this level of protection as this garden swing seat is too heavy to move around a lot so will be out in all weather. 

We were very pleased with the result. Even on the worst damaged sections of the armrest, the resin had set well and firm and the damaged sections were stable again.


Painting The Garden Swing Seat With Hammerite Paint. 

Once the epoxy resin was set hard we decided to paint the whole swing seat black with Hammerite Direct To Rust Paint.

This paint says it gives up to 8 years of rust protection and can be painted directly onto rust, though I still think sanding down and filling any damaged sections is advisable. I do think that with an outdoor seat like this we will repaint every couple of years to keep it looking good.

It is a great paint for a quick job as it is a primer, undercoat and topcoat all in one. This is very useful for outdoor painting when you are trying to paint when it is not raining for a while! 

You must keep it away from any aquatic life as it could be very harmful to them. Please wear gloves when handling and painting as it can provoke an allergic reaction and it is flammable so be careful where you leave it. 

It is important to keep Hammerite Paint away from children and pets. We even stayed out in the garden to make sure none of the local wildlife went near it until dry! 

Hammerite do many different colours, including gold, copper, white and green but as I eventually want to grow plants and climbers all around this seat we decided on a simple black so that the flowers and greenery will show up against it. I also think that this white would also have looked very stylish.


We have not used Hammerite paint before but we were very happy with the way it went on. It was about the right consistency. It did drip a little if we had too much paint on the brush so we learned to carefully wipe off the excess on the tin then paint.

We found it worked well on the larger sections of the A-frame and the broader metal lengths. It was also quite easy to use on the quite intricate leaves, stems and flowers as long as we did not load the brush up too much.


flower and leaf design on the frame of a metal swing
Beautiful Painted Leaves And Flowers


The Hammerite paint dried to a smooth sheen. It is a slightly glossy look which is what we wanted, rather than the rougher hammered finish of the original Hammerite paint. The finish is of course completely down to personal preference. 

Here is the garden swing seat when we had just painted the main A-frame but not yet painted the seat. 

You can see the difference once painted it looks significantly smarter, the rust is no longer visible and the metal is more protected from the elements. 


painted garden swing
A-Frame Hammerite Painted Garden Swing Seat


I would advise using an old paintbrush that you are happy to throw away afterward as getting Hammerite out of a brush is a difficult task! 

Normally I am not an advocate of throwing things away but in this case, weighing it up, I feel that using the necessary non-environmentally friendly cleaner is probably worse than throwing away the brush. 

The brushes were certainly a mess after use and I think it would have taken a lot of work and product to get them clean enough to use on any other project. 

So we got off the worst of the paint then wrapped the brush in newspaper and took it to the skip for safe disposal. 


The Finished Restoration Of The Garden Swing Seat!

So was it worth all the work? Well, I would say yes absolutely!

We do not mind the work and got quite a lot of satisfaction from restoring a decaying piece of garden furniture into a once again beautiful and useful garden swing.

 After one coat of Hammerite paint we have achieved a good finish. We will do another coat of paint at some point but it has rained part of every day since so it can wait a while. 

Here is the finished product! 


restored metal garden swing
Finished Renovation Of Garden Swing Seat 


It may well have been easier to simply buy a brand new garden swing seat. However, that would have cost us hundreds more. 

This way we have learned new skills, saved a lovely garden seat and now we have a beautiful piece we love sitting on with a nice cup of coffee and are very proud to have in our garden. 

The next stage is to choose suitable plants to position around the garden swing and to beautify it further with plants. 

Then I need to make some cushions for the seat. Now I am not all that handy with sewing. However, once we replace our mattress and memory foam topper, I feel I can cut the old one to size and use it as a garden seat cushion with a simple removable cushion cover. 


Read More Craft and DIY Projects On Review This Reviews Here: Crafts & DIY 


Read More Gardening Reviews On Review This Reviews Here Gardening


Note: The author may receive a commission from purchases made using links found in this article. “As an Amazon Associate, Ebay (EPN) and/or Esty (Awin) Affiliate, I (we) earn from qualifying purchases.”


Most Recent Reviews on Review This Reviews


Search for Reviews by Subject, Author or Title

The Review This Reviews Contributors


SylvestermouseSylvestermouseDawn Rae BDawn Rae BMbgPhotoMbgPhotoBrite-IdeasBrite-IdeasWednesday ElfWednesday ElfOlivia MorrisOlivia MorrisTreasures by BrendaTreasures by BrendaThe Savvy AgeThe Savvy AgeMargaret SchindelMargaret SchindelRaintree AnnieRaintree AnnieLou16Lou16Sam MonacoSam MonacoTracey BoyerTracey BoyerCheryl Paton Cheryl PatonRenaissance WomanRenaissance WomanBarbRadBarbRadBev OwensBev OwensBuckHawkBuckHawkDecorating for EventsDecorating for EventsHeather426Heather426Coletta TeskeColetta TeskeMissMerFaeryMissMerFaeryMickie_GMickie_G


Review This Reviews is Dedicated to the Memory of Our Beloved Friend and Fellow Contributor

Susan DeppnerSusan Deppner

We may be apart, but
You Are Not Forgotten


“As an Amazon Associate, Ebay (EPN) and or Etsy (Awin) Affiliate, I (we) earn from purchases.” Disclosure Statement

X