Showing posts with label decorating. Show all posts

Sunday, February 7, 2016

Do I Really Want to Sell My Home? That is the Question in the Spring Air?

Do I Really Want to Sell My Home

Don't Let Spring Push You Into Selling Your Home Just Because You're Getting that 'Fresh-Air Fresh-Start Itch'

Twenty-five-plus years in real estate allowed me to see firsthand the many reasons people decide to sell their homes. Believe it or not, the boredom of the environment or needing a change was one of those reasons, especially during springtime when that 'new beginning' feeling hits!

If you've ever sold a home, you've probably received the standard good advice to 'neutralize' your color schemes. The suggestions may have also included creating a consistent flow between spaces, repainting with neutral colors, de-cluttering, removing large furniture in small spaces, and limiting patterns and prints where possible. Having your home professionally staged may have also been talked about ... good advice.

However, if the only reason you're selling your home is that you're feeling the need for change, then the first thing you should do to Fully Test that urge is to rearrange a room and, if affordable, change it up by adding MORE color and interest.

Pick colors and patterns that you and your family like. Throw out 'the house selling rule book' (to a point!), and decorate in a way that reflects your personal likes. 

If you've never attempted to work with color and pattern, here is an example of choosing a patterned couch with a patterned rug. It also features a handy short video on mixing color with pattern.

When spending a lot of money isn't an option, keep the room changes simply; try these five things first:
  1. Repaint the room
  2. Rearrange the furniture
  3. Create a new focal point
  4. Add accessories
  5. and sorry, clean and de-clutter
Focus on what you like, but start with 'the mood' you want to create: airy, fun, electric, cozy, serious ... you get the picture. Even if your existing pieces don't fit your mood choice, use what you add to do that task: paint, pillows, blankets, rugs, window coverings, or, if you're going all out, furniture.

If you think this is too much work, think about all the time, expense, and energy it will take to sell your home. When you're just trying to figure out what to do .. to stay or to go .. redo at least one room in the house before you make that larger choice to sell. 

If you re-decorate that one room with neutral tones only because you think that's practical for resale, you're subconsciously out the door already! So resist that and decorate that room in your own funky fashion. Give it your touch.

When you're finally ready to sell, then go neutral-mad. But remember to test yourself with this redo challenge, and ask yourself, do I really want to sell my home?

By Barbara Tremblay Cipak
Funkthishouse.com


Note: The author may receive a commission from purchases made using links found in this article. “As an Amazon Associate, Ebay (EPN) and/or Esty (Awin) Affiliate, I (we) earn from qualifying purchases.”


Sunday, January 24, 2016

Three Affordable Ways to Visually Increase the Size of a Room

3 Affordable Ways to Visually Increase the Size of a Rom


With real estate at a premium in many locations and rent equally expensive, numerous apartments and homes have smaller rooms or at least one room that could be a better size. 

Don't despair; here are three affordable ways to visually increase the size of a room:

Use a Faux Window Decal

Three-dimensional wall decals come in various funky design choices, including faux windows with scenery.

Put up a fake window without the hassle of having to use wood by using vinyl wall decals instead. There is an endless choice of 'views'; choose from snow, mountains, beaches, and Halloween horror scenery! The 3D effect creates automatic depth.

Use Draperies with 3D Designs

Drapes with scenery are another option. Again, much like 3D Faux Windows, these drapes come in many landscape choices. 

Go ahead and use them in a room with no windows. Just put the drapes up and keep them closed, and they'll serve a double purpose; they create the illusion that a window is behind them, and by keeping them constantly closed, they also provide faux depth with their three-dimensional designs.

Use Mirrors

This isn't a new trick, but it's always effective. Feature a large mirror on the wall above a piece of furniture. In fact, you could also install a wall-to-wall mirror. 

If you're not interested in a large mirror, try mirrored accessories, such as a wall clock. Anything on the wall with a mirror built into it will help create depth.

Choose from these three simple suggestions, and your room will seem more significant to anyone who enters. You've tricked the eye by creating depth.

by Funkthishouse.com


Note: The author may receive a commission from purchases made using links found in this article. “As an Amazon Associate, Ebay (EPN) and/or Esty (Awin) Affiliate, I (we) earn from qualifying purchases.”


Sunday, October 25, 2015

Bunk Beds With Stairs and Storage

For those who have a large family, bunk beds with stairs and storage are ideal for combining practical space saving with creative and unique designs


Most of us are learning to go vertical to save space, especially when we have kids who share a room. 

Well there's no need to settle for just a standard bunk bed or twin bed system any longer; you can combine beds with dressers and desks and save space all at the same time.

If you're living in an apartment you'll love the idea of bunk beds with stairs and storage! Even a very small room can benefit from vertical decor.

Here are Several Styles of Bunk Beds to Consider when trying to Save Space:

  1. Twin over Twin with stairs/desks/
  2. Twin over Double with stairs/desk
  3. 3 in 1 Beds - Twin over Twin/Double with a Trundle
There's no need to look at an 8ft by 10ft space and think
Loft Beds for Adults
horizontally! Here are some visual tips to help you along the vertical decorating process:
  1. Measure the room or gain a sense of it's size before you start anything
  2. Determine which wall would best suit a Bunk Bed system
  3. Assess whether a bunk bed system with stairs would interfere with the flow of the room
  4. If the staircase is positioned out of the path of the door, and wouldn't block the closet or window, that should be the place you decide to work with
  5. Get the measurements of the bunk bed units you like best
  6. Cut a piece of string the length of each side of the bunk bed system - that string will be used on the floor to create a visual aid of the area it will take up
  7. Don't forget to mark the height of the unit on the wall (in chalk or a piece of masking tape) 
  8. Be sure that the bunk will be positioned away from any ceiling fans or light fixtures
  9. Now stand back and look at the area the string on the floor and the marker on the wall take up, and decide whether the bed system you're choosing will work
  10. If you've decided upon a 3 in 1 bed system (a Trundle too), don't forget to allow for floor clearance so the trundle bed can be pulled out
In Regards to Dressers:

If the unit you're selecting has built-in dressers, be sure to allow for clearance for when the drawers are pulled out. 

Here's a Useful Tip (One I've implemented in every bedroom of my own home)

How to Get Use from Your Old Dressers!
If you find that the built-in dressers of a bunk bed system aren't enough, and you don't want to buy additional dressers, but have old ones - put the old dressers in the closet. 
By using your own old dressers in your closets, you'll get a closet organizer without having to spend big bucks having one custom designed! 
This is easy to do! Measure the dresser and the closet first to be sure the depth of the dresser will fit inside the closet. Position the dresser inside the closet so that when the closet doors are opened, there's clearance to open the dresser drawers. You may have to be creative to get everything to fit neatly, but that's the fun part!
If you're fortunate enough to have a walk-in closet, they're a perfect place to use old dressers.

You Can Find a Wide Selection of Bunk Beds with Stairs, Loft Beds, and Space Saving Beds Here 


Note: The author may receive a commission from purchases made using links found in this article. “As an Amazon Associate, Ebay (EPN) and/or Esty (Awin) Affiliate, I (we) earn from qualifying purchases.”


Thursday, October 1, 2015

Top 7 Halloween Ornaments for Your Halloween Tree

This 4-foot black Halloween tree would make a great home for your Halloween ornaments.
I just had to share this awesome Halloween tree. Isn't it cool? Problem is, it's empty. Maybe you could use it. I mean, you have to put your Halloween ornaments somewhere, right? Wait a minute. You do collect Halloween ornaments, don't you? Whether you have a collection already or if you've been waiting to get started, then you're in the right place. Read on to learn more.

Collecting Halloween ornaments is becoming so popular, it's almost scary!  More and more people are decorating their home or their office with Halloween trees - and the more ornaments, the better.  To decorate your Halloween tree, choose ornaments with a theme or mix and match using all the ornaments that you love.

If you haven't already, why not start a Halloween ornament collection for your family?  For younger children, Disney or Peanuts ornaments are fun.  Once they're older, add black cats, ghosts, or other favorite Halloween figures.  Chances are you'll be able to find their (or your own) favorite character in the form of a Halloween ornament that they can reuse every year on their very own Halloween tree. Or add them all to a big Halloween tree that the whole family can enjoy.

Cute or Creepy?


The choice of cute Halloween ornaments only, creepy ghoulish ones, or a mixture of both is entirely up to you. In fact, some people prefer to avoid the scariest themes of Halloween and focus more on a family-friendly theme with a harvest tree that can carry them right into Thanksgiving. You'll find plenty of ornaments designed to celebrate fall and the harvest season. And no worries about nightmares!

Here are some of the most popular collectible Halloween ornaments and themes.

skull ornament charlie brown ornament mouse ornament


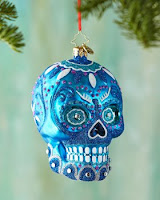
1.  Radko Halloween Ornaments. You may be familiar with Christopher Radko blown glass ornaments with a Christmas theme. You might not have known it, but Radko makes Halloween ornaments, too. They're top quality, always with beautiful designs. For 2015, here's the blue skull ornament, La Calavara. Though actually designed for Dia de los Muertos (Day of the Dead) celebrations, nothing says creepy Halloween like a skull. Actually, with its glittery design and hand-painted cool colors of blue, purple, and silver, this one is really pretty and hardly scary at all. Well, maybe a little bit. In any case it's a great addition to a Radko ornament collection.

2.  Peanuts Halloween Ornaments. Everyone loves Charlie Brown, Snoopy, Linus, Lucy, and the rest of the gang and there are plenty of Halloween ornaments that celebrate the Peanuts comics series. I love this Charlie Brown O'Lantern ornament. You'll probably find the most choices from the Peanuts Halloween collection on eBay, especially if you're looking for something specific, perhaps a keepsake ornament from a particular year that you're missing from your collection. Just click the link then customize the search if you don't see exactly what you have in mind.

3.  Hallmark Halloween Ornaments. Don't you just love this cookie cutter mouse ornament? It's actually from 2015, from Hallmark. If you didn't make it to the store to get yours, or if there's another that you've missed through the years, once again I recommend eBay for Hallmark Halloween ornaments. You'll find Peanuts ornaments here, too, so there's an overlap in the results, but Hallmark also features the Hauntington Collection, a zombie series, and much, much more. There's something for everyone with an emphasis on "cute."

witch ornamentblack cat ornament 


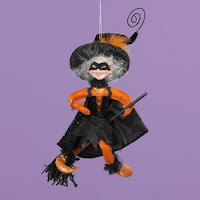
4.  Witch Ornaments. Ah, the ever popular witch. I was drawn to this Kurt Adler Pixiepies witch ornament from 2012. You'll find plenty more witches to choose from at this link. Note that this is a big ornament at 13 inches, so she might not fit on your Halloween tree, but she'd look great hanging from a doorway or perhaps a chandelier. (Always check the description so you'll know what size ornament you're getting, especially if you have a tiny tree.)

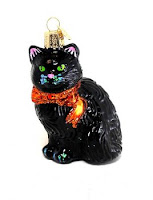
5.  Black Cat Ornaments. I'm a cat lover, so black cat ornaments really appeal to me. I like glass ornaments, too, so that's why I chose this Halloween kitty to feature. Prefer something that's not breakable? Or maybe a cat that's part of a set? Then check these black cat ornaments at Amazon.

ghost in pumpkin ornament ghost ornaments

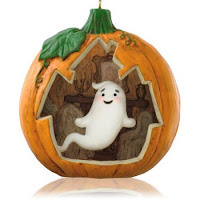
6.  Ghost Ornaments. When I think of ghosts, I think of friendly ghosts like this one, with smiles on their faces. We have some overlap from above again here, as this is a ghost ornament from Hallmark's 2014 collection. I think it's adorable. And again, I found the best selection of Halloween ghost ornaments on eBay. Check out the link and see which one you like best.

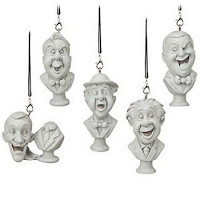
7.  Disney Halloween Ornaments. You might recognize these Disney Haunted Mansion Singing Ghosts from your last visit to a Disney theme park. These are from 2013 and would make a wonderful addition to your Halloween tree if you're a Disney family (I know there are plenty of you out there!). You'll find lots more familiar characters when you check out more Disney Halloween ornaments right here.

Those are the top seven Halloween Ornament themes for your consideration. Did you choose a favorite? If you're still looking or haven't found just the right theme yet, then give this link a try. Then let me know what you chose in a comment below. I'm dying to find out!

--Susan Deppner

Meet the Reviewer


Posted by Susan Deppner

Susan Deppner

About the Author

Susan Deppner is a baby boomer, a cancer survivor, and a Southerner who believes in the Golden Rule. She enjoys writing about food, faith, and fitness; health, home, and holidays; people, places, pets, and patriotism, and more. Follow Susan on Twitter, Facebook, and Pinterest.


Note: The author may receive a commission from purchases made using links found in this article. “As an Amazon Associate, Ebay (EPN) and/or Esty (Awin) Affiliate, I (we) earn from qualifying purchases.”


Sunday, July 12, 2015

Unique Wall Decorating Idea for Washrooms!

Quotes for the Bathroom Wall
The Washroom Quote We Featured

The Twitter Principle - I call these 'Mom's Visual Tweets'

A few years ago, we updated our main washroom, and one of the accessory items I wanted to place on the wall was a quotation that didn't relate to the room itself.
Typical washroom quotes normally involve something about brushing your teeth or maybe soaking in the tub. However, you don't have to limit your choices. You can easily select words usually reserved for a bedroom, kitchen, living room, or office.
I elected to go this route mainly because it's the one room I know I'll have the kids' undivided attention in! I'm using what I call 'The Twitter Principle' - I call these Mom's Visual Tweets. Especially since some of my boys are men now, reading a short, profound message is much more effective than mom (a.k.a ME) blurting out one-liners! Not to mention that short quotes qualify as NOT too much information!

I've also placed quotes on the fridge for the family to read, but since our washroom was recently updated, I used a small space on the wall to feature this lovely message:

Washroom with Wall Quote
Our Washroom with Wall Quote - Wall Quotes
However, don't feel you have to be limited to being profound and deep with your word choices; you can also choose fun quotes, especially if the washroom is deemed a 'kid space,' or you can have a quote personalized and simply select your own words. 
The above photo shows the canvas quote I put on our own washroom wall, as well as a photo that shows you how I used a small section of the wall to feature it. You can see that you only need a little wall area to find a space for a quote.

Reading and gathering quotes and sayings is one of my favorite hobbies, so much so that I've created quite an extensive Pinterest board about quotes: 

Follow Barbara Tremblay Cipak's board Favorite Quotes on Pinterest.
Have fun decorating!


Note: The author may receive a commission from purchases made using links found in this article. “As an Amazon Associate, Ebay (EPN) and/or Esty (Awin) Affiliate, I (we) earn from qualifying purchases.”


Thursday, May 21, 2015

Decorating with Zazzle Posters

blue butterfly photo by mbgphoto

Places to Decorate with Posters

Posters can be a great way to decorate a room or add a bit of color to a dull space.  They are a more casual form of decorating but can really brighten up an area.  Consider posters for decorating in the following spots.

  • College Dorm Rooms
  • Laundry Rooms
  • Basement Rec Rooms
  • Downstairs Baths
  • Finished Garage Walls
  • Hallways

Using a Theme in your Poster Decorating

If you have an area where you want to put several posters, then picking a theme is a good idea.  You might want to use movie posters, hobby themes, nature themes, or perhaps photos from a favorite vacation.  The posters below are selections from lighthouses that I have visited and photographed.  These posters would make a great theme for the lighthouse enthusiast.  I can see a basement recreation room decorated with different lighthouse posters.
Lighthouse Posters
This next collection of posters is from flowers that I have photographed. Flower posters can add a bright spot to many dark or forgotten spots. How about adding one of these to your laundry room.
by mbgphoto
Tropical butterflies are always a welcome sight.  This collection of tropical butterflies comes from my photographs taken at The Butterfly House in Chesterfield, Missouri.  Put a few of these posters on a finished garage wall and it will delight you each time you enter your garage.

Zazzle Posters make Decorating Easy

Zazzle has a great collection of posters that you can order online.  You can also customize their posters with your own photographs or designs. 

If you are looking for a particular size Zazzle is the place to come.  They have a wide variety of sizes starting at 4"by 6" and going up to an extra large 40"x40".  You can also create your own custom size.

At Zazzle you can pick from five different types of materials for your posters.
  1. Value Cardstock Paper (Matte)
  2. Value Poster Paper (Matte)
  3. Poster Paper (Semi-Gloss)
  4. Archival Heavyweight paper (Matte)
  5. Premium Canvas (Gloss)
If you would like to add a frame to your poster their are custom frames available to an extra charge.


Note: The author may receive a commission from purchases made using links found in this article. “As an Amazon Associate, Ebay (EPN) and/or Esty (Awin) Affiliate, I (we) earn from qualifying purchases.”


Sunday, April 19, 2015

Review of a Twin Bed King Connector

Turning Twin Beds into a King Size Bed is Easy and Affordable

This is a practical solution for a teen whose outgrown twin beds, or for a guest room where it's necessary to alternate between twin beds and a large single bed.

If you've ever pushed two twin beds together, you know exactly what the problem is; the gap in the middle.

Without a twin bed king converter, we've gotten around this problem by putting several toppers on the mattresses.

However, if you move around a lot when you sleep, the gap is still an issue. Movement slowly splits the twin beds apart.

So being the creative sort, I placed non-skid padding under the mattresses to prevent the mattresses from splitting apart. Although that was an affordable way to address the movement of the mattresses, it didn't solve the dip in the middle.

This is Where a Twin Bed Connector Comes In

The one featured below has straps that wrap around the twin beds. It keeps the beds together.

You may still feel a dip or gap, however, if you place a mattress cover and other toppers on before the sheet, it should be barely noticeable.

Overall this is an affordable solution to transitioning a kids room to a teens room. You can keep the twin beds and convert them into a king for the growing youngster.

Most teens want a bigger bed, and if their room is already furnished with twin beds, this is a viable solution. Best of all, you don't have to buy a king sized bed!

How to Make it Look Nice:

If the room you're making over isn't going to be switched back and forth between twin and king, then it's easy to dress up the bed so it looks like it's always been a king bed.

  • If you have two headboards and you're able to remove them, then you could either go with an improvised headboard attached to the wall that's the width of both mattresses, or elect to skip a headboard altogether and simply deck the bed out with many pillows.

  • If you opt for pillows as the backdrop, without a headboard, you can use a bolster at the head of the bed so the pillows don't appear to be resting directly on the wall. I've done this myself, and it looks really nice.

  • Use a king sized bed skirt. With one skirt going around both beds. Without the appearance of two headboards, nobody will notice the beds were once twin beds.

  • I can't stress enough how padding the mattress with various covers makes a difference; I've used a mattress cover as well as a thick foam mattress pad and it really gives the bed that one piece feel.

The Bed Sheets and the Bedding

Two twin beds, especially with extra padding on top, is a little bigger than a standard king size bed; not much bigger, but enough of an issue that you'll need over sized or deep pocket king sized bed sheets. We love Jersey Knit Bed Sheets because they're stretchable, and they'll work nicely to solve this problem. However, if you're not a fan of Jersey Knit Sheets, then be sure to get king sized bed sheets with deep pockets.


The Non-Slip Padding Mentioned Above 
Ultra Stop Non-Slip Indoor Rug Pad, Size: 4' x 6'Ultra Stop Non-Slip Indoor Rug Pad, Size: 4' x 6'
Above I talk about the non-slip padding I put between the box spring and mattress, well I actually used ones designed to hold area rugs in place.

For us they worked perfectly. This one measures 4 feet by 6 feet, so I just bought a couple for each twin bed, and positioned them on the box spring so as to cover a good portion. I would position them to go over the gap in the bed as well. The Grand Fitted Quilted Mattress Pad Cover Hypoallergenic (Stretches to 18The Grand Fitted Quilted Mattress Pad Cover Hypoallergenic (Stretches to 18

Mattress Pad Cover

Here's an example of a king sized mattress pad cover that you can put over the twin bed king connector and mattress.

This one has 20 inch deep pockets as well, so if you want to put a layer of foam underneath (for added comfort) you should have a enough room. I would say, if you had to choose between the non-slip pads above and this, choose this. It's the best way to pull the mattresses together after you've used the twin connector.


Note: The author may receive a commission from purchases made using links found in this article. “As an Amazon Associate, Ebay (EPN) and/or Esty (Awin) Affiliate, I (we) earn from qualifying purchases.”


Monday, March 23, 2015

Sharpies - a Great Way to Personalize Easter Eggs

Eggs by A Pumpkin & a Princess
There is an easy way to make beautiful and personalized Easter eggs. In this review, you will see that using egg coloring and Sharpie brand markers is an inexpensive way to make your eggs unique.Whether you decorate Easter eggs as a great way to spend time with children or because you are an adult who loves to relive that childhood magic of coloring eggs, using a Sharpie marker is a great way to make your eggs your own.

I have always loved Easter eggs


I am not a very creative person. Nor do I do much decorating on the holidays. But I have always loved Easter egg decorating and hunting. Easter eggs bring back memories of the hunts at Grandma's house so many years ago.  Even the hunt that I remember few details of except looking down at my pretty new shoes in the snow, leading up to Grandma's house. We had the hunt in that house that year.  I must have been around kindegarten age but I sure do remember those black patent leather shoes and the excitement of trying to add eggs to my little basket. 

Coloring the eggs


Over the years I have tried different products to color eggs. But I always return to the familiar way with PAAS. I have the best luck with PAAS and it is inexpensive.  I find PAAS is reliable and the directions are simple to follow. 


PAAS Egg Decorating Kit

Some folks color their eggs with Kool-Aid.  I may try that this year. I like the colors and they say that it slightly scents your eggs. The directions for using Kool-Aid packs are as follows:

  • Pour 1 pack of Kool-Aid into a container suitable for coloring eggs
  • Add 2/3 cup water to container; stir until completely dissolved.
  • Place the egg into the container (with a spoon preferably)
  • Keep the egg, or section of egg, submerged until the desired color is achieved
  • Set egg aside and allow to dry completely

Cherry Kool Aid


Taking the decorating one step further


My friend's personal Easter Bunny
I have to say that I LOVE Sharpie brand markers. Always have and I always will.  I use them at work, at home, and every chance I get.  Sharpie makes a marker size and color for every project you could think of.  They are bright and permanent. There are a variety of tips and mediums. 

My friend likes Sharpie markers even more than I do. A few years ago he introduced me to the idea of decorating Easter Eggs with Sharpie markers. We colored our eggs as we normally do. After they cooled and dried, we drew on them with these simple, black, permanent markers.  I regret not having taken more photos of his artwork but I think you can get the idea. You can see that the marker ink is dark and bold.  I am not as artistic. Rather than drawing things such as bunny faces, I drew simple smiley faces on mine, and wrote words or messages. 

I never imagined that Minion eggs would be an easy and adorable Easter egg design. Crystal on A Pumpkin & a Princess shows us how to color the eggs with PAAS, then add googley eyes, a bit of string, and a hand-drawn face to make these holiday Minions (shown above).  There too, you can see how nice the Sharpie marker ink looks on the eggs. 


On Redefine Creativity Alisa Burke shows us how she creates gorgeous "doodle" Easter eggs by using a black Sharpie over a white egg.  She uses the empty egg shell after blowing out the contents.  There are a variety of designs in her article but they all remind me somewhat of beautiful henna tattoos. I'd like to try these with a hard-boiled egg and a base of pastel color. Thank you Alisa for this wonderful idea. 


Eggs by Obviously Sweet
The "doodle" eggs displayed on Obviously Sweet are also white eggs with black sharpie patterns. These have a slightly different look than the patterns mentioned earlier. To me they look more modern and geometric. They can be as easy or difficult as you care to make them.

I don't know how I didn't know, but there is a neon sharpie marker set that is fluorescent under black lights.  I can imagine using the neon colors for these patterned "doodle" eggs.  I think they would look great. 

Happy Easter to you. Whether you are helping a child discover the wonder of making beautiful things or whether you are an adult that still enjoys the fun of decorating eggs, I hope that you create some wonderful memories as you make your eggs this year. 


Note: The author may receive a commission from purchases made using links found in this article. “As an Amazon Associate, Ebay (EPN) and/or Esty (Awin) Affiliate, I (we) earn from qualifying purchases.”


Most Recent Reviews on Review This Reviews


Search for Reviews by Subject, Author or Title

The Review This Reviews Contributors


SylvestermouseSylvestermouseDawn Rae BDawn Rae BMbgPhotoMbgPhotoBrite-IdeasBrite-IdeasWednesday ElfWednesday ElfOlivia MorrisOlivia MorrisTreasures by BrendaTreasures by BrendaThe Savvy AgeThe Savvy AgeMargaret SchindelMargaret SchindelRaintree AnnieRaintree AnnieLou16Lou16Sam MonacoSam MonacoTracey BoyerTracey BoyerRenaissance WomanRenaissance WomanBarbRadBarbRadBev OwensBev OwensBuckHawkBuckHawkDecorating for EventsDecorating for EventsHeather426Heather426Coletta TeskeColetta TeskeMissMerFaeryMissMerFaeryMickie_GMickie_G


Review This Reviews is Dedicated to the Memory of Our Beloved Friend and Fellow Contributor

Susan DeppnerSusan Deppner

We may be apart, but
You Are Not Forgotten


“As an Amazon Associate, Ebay (EPN) and or Etsy (Awin) Affiliate, I (we) earn from purchases.” Disclosure Statement

X