Instructions to Add a Navigation Menu to Your Blogger Blog
 Blogger offers a great way to start a free blog, but there are a few things you may want to do to improve the navigation of your blog. One of those things is adding category tabs to the top of your Blogger Blog to make it easier for guests to find subjects of interest by category. This horizontal line of tabs is often referred to as a Navigation Menu or Bar because quite simply, it helps visitors navigate your site and find exactly what they are seeking.
 As you add new posts to your blog, you will discover that it becomes really difficult for visitors to find your older articles. Therefore, labeling your posts by category and than creating tabs at the top of your blog becomes essential.
Be sure to bookmark these easy to follow instructions for adding tabs to your blog. As your blog content grows, you may wish to revisit and change your tabs. This article will then serve as a great refresher on how they were initially set up, therefore you can easily see how to change or add to them.
Easy Instructions on How to Add Tabs to Blogger
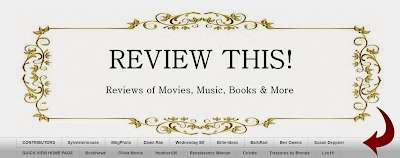
I am going to take you to the layout of Review This to show you step by step how to create your navigation menu. This is the method used to create our top navigation menu that is a simple list of our Contributors names. If you click on either name, you will see that it redirects you to posts that have been published by that one author. You decide what category labels best suit your blog. For instance, a recipe blog might have labels for Appetizers, Main Course, Desserts, Snacks, and More.
The secondary navigation menu of our categories is a drop-down menu. A separate tutorial on creating a drop-down menu will be published at a later date.
- Add a Category Label to Each Post. Labels are on the right side of each post draft under Post Settings.
- Go to the Layout Tab on Your Blog Dashboard
- Click "Add a Gadget" in the Cross Column Section under the Header Section
- Select either the Labels Gadget or the Page Gadget. We used the Page Gadget on Review This because we had Page Links we also wanted to add to our Nav Bar in addition to the labels. (Contributors & Quick View Home Page Links)
- If you Use the Label Gadget, simple select the labels you wish to have as tabs, and save.
- If you Use the Page Gadget, select the pages you want to use, plus add other labels as external links, save link, and save gadget.
- You can change the order of the tabs by simply dropping & dragging them within the gadget.
- View Your Blog in "Preview" to See Your Arrangement
- Save Arrangement (button in upper right corner of layout page)
Use the Arrows at the Base of the Slideshow to Move Through the Images
and the stop button to pause the playing slideshow on a specific image


Terrific tutorial, Sylvestermouse. I have been wanting to know how to do this for some time. Thanks so much for another great Blogger tip.
ReplyDeleteThe difference between the "Label" and "Page" gadgets is where I've gotten stuck. Thanks for these simple but excellent instructions!
ReplyDeleteIt worked well. Thanks to the directions and the screenshots. You might want to add something to (See Tutorial Images in Slideshow Below Written Directions) that would help me. Push the > arrow to view each screen shot rather than the solid |> as the screenshots scroll past automatically too fast to read. I would also add view your blog in Preview mode to see if you like it. You can always go back and change it. Other than that it is very clear directions. I had already been playing with the layout and Pages for years. I had not noticed how to do the Label tabs. So I thank you very much for that tutorial! <3
ReplyDeleteFabulous Sherry! I am so glad you found the tutorial helpful. Your suggestions are great! I always appreciate helpful critiques and recommendations for my tutorials. It really does help me to improve the instructions for others. btw, you blog is beautiful! I very much enjoyed visiting it to see the tabs at work for you.
DeleteNote to our other contributors and guests: You can visit Sherry's blog at http://butterflyof4.blogspot.com/
What helpful information! I'm going to try this at the first opportunity. I'd love to feature some of my labels on the top.
ReplyDeletethat's a very handy and easy to understand tutorial on how to add tabs to the top of blogger! People who use Blogger will find this very useful.
ReplyDeleteThis is something I have wanted to do for some time so I do appreciate this great tutorial. Now to find time to get er done!
ReplyDeleteAlways great and helpful information Cynthia. As you know I created my tabs using EPD with another tutorial that you wrote. I'm saving this one so I can check out all of your other tutorials.
ReplyDelete