Why I Love PicMonkey.com, Plus Tips For Using It
Until I discovered PicMonkey, I was stuck with using the free photo editing program that came on my HP laptop, and using Paint, the standard accessory in the Windows platform for computers. But now I am hooked on PicMonkey! It is my favorite free photo editing software!
I never got around to buying Photoshop, and though I tried to use Gimp, it just was too hard for me to decipher. (Gimp is touted as a free version of Photoshop and many of my friends swear by it, but maybe I am software challenged.) So I thought I would show you some of the ways I use PicMonkey to edit and embellish my photos for articles on the internet and how you can too.
First of all, if you don't have an account, just go to PicMonkey.com and sign up for an account. Once there you will see a page that varies as far as the image, but at the very top you will always see this:
You can see that I am signed in, but if you are not, just click on "Log In" on the right, and then you can begin editing.
You can also see the 4 buttons in the center that show where to start your photo editing project. For basic and advanced editing of your own photos, click "Edit." I will cover "Design," and "Touch Up" and "Collage" further down this page.
Once you do, it will show a screen asking you where to get the photo you want to edit. You can choose your computer, Facebook, One Drive, or their own new platform, Hub. Most people are probably going to choose a photo from their own computer so I will explain using that option.
Once you click on "Computer" it will open a window to your own files. Just scroll to your photo folders and click on the photo you wish to edit. That will place it on the screen in PicMonkey. You will notice that on the left is a row of buttons. At the very top is a symbol of lines and dots and if you hover over that, it says "Basic Edits." If you click it you see a list of edits you can do. Here is an example of a photo I uploaded to the editor with the sidebar showing the menu:
The first thing I like to do is open the "Rotate" button. (3rd button down on the left) You can rotate your photo in all directions, to change the orientation from horizontal to vertical and also to change the top to the bottom, just by clicking the arrows. But what I like to do is play with the "Straighten" slider. I guess I don't hold my camera steady as I often have photos that are crooked. But that is an easy fix in PicMonkey. Just slide the arrow till you have a straight photo and click "Apply." It even has guidelines to make it easy for you.
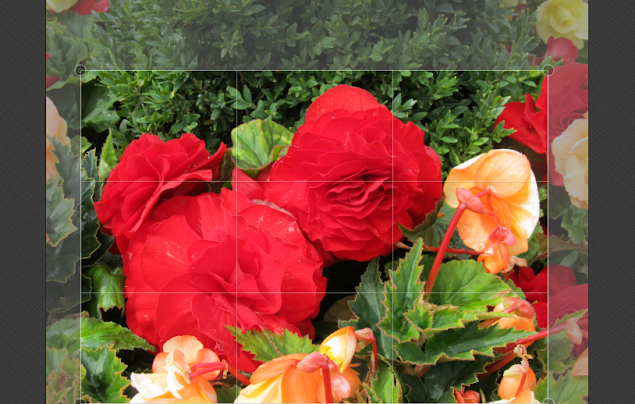
Then I like to open the "Crop" button. The reason I straighten before I crop is that straightening sometimes takes part of the photo off, so I want the whole thing straightened before cropping. Here you can see the crop lines I am going to use. You can drag the lines around till you are happy with your photo.
Here it is after I clicked on "Crop." You can move the crop lines wherever you want them. When you are satisfied, just click "Apply" and then your photo will be magically cropped like this one.
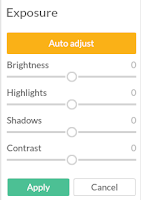
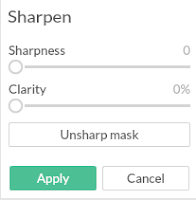
Then I like to do some basic editing so I click on "Exposure." The first thing I do is click on "Auto Adjust." This is often all that I do, as it seems to make my photos pop and look great. But you can also play with all the sliders and if you like the way a photo looks you can click "Apply" and those changes will be done. When you are satisfied, just close that little window by clicking "Cancel" or "Apply," whichever is the case. Here are how the other sections look when they are open. On this rose photo I have not done any other edits. I just cropped it and auto adjusted the exposure.
If you make a mistake, there is an "Undo" button. At the very bottom of the screen is a backwards arrow. Just click that anytime you are not happy with your design and undo the last step! You can actually keep hitting "Undo" until you get back to a place where you are happy and then continue your design from there.
.
More Tricks for Using PicMonkey
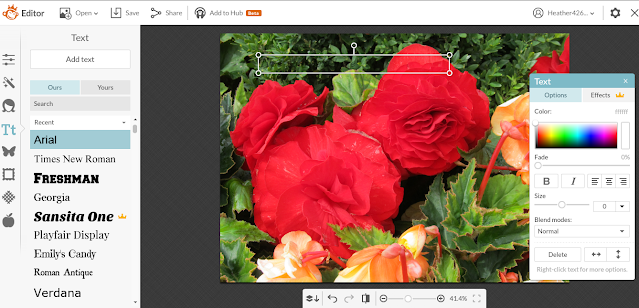
Now besides the "Basic Edits" you can do a lot of different effects. One I use a lot is the "Text" function to add text to photos. This is great for making photos for Pinterest and other media like Twitter. So just click on "Text" and you will see this: (photo on the right)
Notice the slider on the right. Use it to scroll through all the choices of Font you can use.
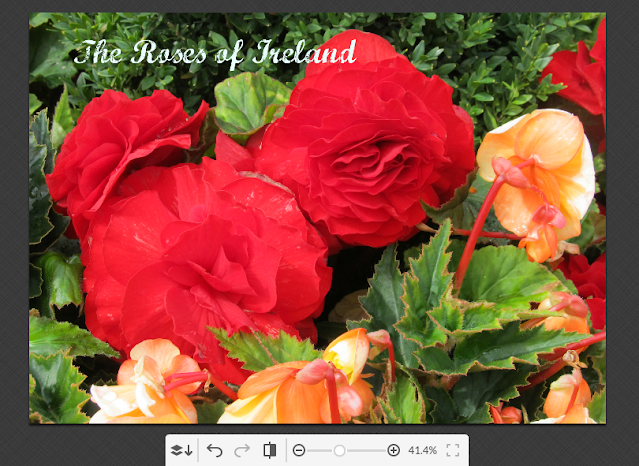
I am going to use Marcelle Script so I just click on it and change the color of the script in the little box that pops up. I will use a very pale shade of blue but you can pick whatever you want. Move the box wherever you want and drag the edges to make it bigger or smaller. Then start adding text in the box. Example is below.
And below is a picture of it after adding the text. Just click on the photo somewhere else besides the text box when you are finished and the text box disappears and your text is there.
Now let's say I want a background under the text. You can add any number of special effects by clicking the buttons on the left and scrolling till you find a design you like and clicking on the photo to place it. You can also move it around on the photo. Just click on it once and drag it wherever you want it. Here I have added a ribbon. Once I clicked on it and placed it I changed the color to White. Then I added text over that.
There are plenty of other effects you can use on the left too. The "Touch Up" ones are great for faces! And if you want a set of photos in a theme, there are lots of themed effects. They have a Zombie theme, Victorian theme, and lots more! Just click on any of them to see all the things you can do. It would take me hours and hours to go over all the wonderful effects you can create, but the easier and more fun way to learn it is to add a photo and play with all the buttons to see what you can do! PicMonkey also has tutorials explaining how to use all the functions. Just scroll down on the Home page and you will see them.
Here are a few things I did to the image after I got the text and the ribbon trim on it. First are different edges. One is a simple box edge and next is a craft scissors edge.
Then I added an effect called "Frost" which adds the color of the frame as a brushed effect all around the edges, and on the lower one I added a "Bokeh" overlay to make it sparkly. These are just a few of the effects you can get!
 |
| State Flowers of the USA Coloring Blog |
Using PicMonkey for Graphic Design
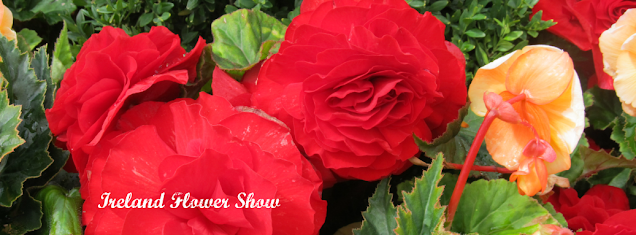
You can also use PicMonkey to design graphics and my favorite, Facebook covers. Up above where it says "Edit, Touch Up, Design, Collage," click on "Design." Then you will see a square, a Facebook cover, different sizes, and a custom option. To do a Facebook cover, just click that option and it opens up a screen with the exact size you need. Next click on "Overlay" on the left. You have your choice of many there, so you can scroll through and have fun designing your own cover by adding a combination of effects on the screen. Or you can add your own, just click on "Your Own" at the top. Here I have used the same photo of roses by clicking on the file in my computer and then dragging the edges out till the whole template is covered. Then I have added some text on top of that. It's now ready to upload to a Facebook page.One more thing that I think is pretty cool is that when you are designing, you can choose your background or even make a transparent background for designs you might be doing for Zazzle or other design platforms. For that you go to "Basic Edits," and click on "Canvas Color." If I wanted to make a round logo for example, I would choose a transparent background and then overlay a circle from the "Geometric Shapes" overlay section. Then I would put whatever design I wanted inside the circle, like text, colors, and/or textures. Once I have saved the design I have a round logo. Here is the one I designed for my Aurora Art Supplies products and website.

Aurora-ArtSupplies
And here are some Photos I edited in PicMonkey and added banners and text to use on my Amazon ads for my Aurora Art Supplies Colored Pencils and Water Color Pencils.
&
Using PicMonkey for Website Design
Okay let's say I want to design a background for a website. And maybe I want a Blue sparkly one. First I would add Blue as my background color. Next I would go to the textures in the "Overlay" section and start adding them till I have an effect I want and then save it. Then I would go to the editor in my Wordpress theme and where it says to add a background, I would upload that file. Voila, a custom background. Here is one I made so you can see. I used a Blue solid color, then "Space" overlay, then a "Bokeh" overlay. I played with the saturation till I liked it and saved it.
There are so many effects you could really play for hours and design any number of cool things. And I didn't go into the "Collage" function, but all you do for that one is click on the "Collage" button above, pick a style from the left side menu and add photos to the cells by dragging them to the one you like. You can even design text boxes and add them as one of the photos of the collage. My friend Kim is a master of PicMonkey collages. Here is one she made for her educational site for kids to learn State facts.

A very useful function that I use all the time is the "Resize" function at the bottom of the "Basic Edits." Just click on it and you can make your photo whatever size you need! Very useful for websites!
So I guess you could say I am a PicMonkey addict now! Try it and I bet you will be too! But a few of the fonts and effects are premium so you have to pay extra for those. Well I wanted them for a project so I signed up for one month only ($5) so I could make some cool designs. Then I reverted back. A few days later PicMonkey sent me an email asking me why I cancelled the premium version and one of the answers you could pick was "It costs too much." That's what I picked and then they offered it to me for $33 a year, or less than $3 a month. So if you want the premium version, that's how you can get it for less. Try it for a month at $5 and then cancel. I love bargains, don't you? Thank you PicMonkey!
*Of course, this may have been a one time offer, I can't promise that the offer will always be there. But it doesn't hurt to try, does it?
Note: The author may receive a commission from purchases made using links found in this article. “As an Amazon Associate, Ebay (EPN), Esty (Awin), and/or Zazzle Affiliate, I (we) earn from qualifying purchases.”











I use PicMonkey, too, and I'm slowly venturing out and using some of the features for the first time. I learned a thing or two from your review, so thank you very much! Excellent demo of the features with beautiful examples!
ReplyDeleteSo glad to be of help! Thank you!
DeleteHeather, this is a fabulous review. Very helpful. I've used picmonkey, and yep, very addictive. I've also picked up a few very good tips here from your article as well! Great job on this, thanks so much, I'll reference this several times as I try a new creation.
ReplyDeleteI'm glad it helped you! Thanks for stopping by!
DeleteI've been using PicMonkey for quite some time, especially to resize my own photos downloaded from my camera. I couldn't get along without it. I've not tried some of the 'fancier' options, but have looked at a few and I think they'd be fun to 'play around' with. Thanks for reviewing this very useful program, Heather.
ReplyDeleteYou are so welcome!
DeleteThanks for the compliment, Heather. I do love the PicMonkey collage feature! They're always adding new fonts, themes, and graphics too. I have Photoshop and used that when I was designing TV graphics, but PicMonkey is so much more fun to use. There's always something new to discover. Your Aurora graphics look beautiful. I love the heart layout of pencils (which are also awesome, by the way.) Can't wait to try your new water color pencils.
ReplyDeleteThank you Kim! Don't buy the pencils yet. I plan to have a coupon giveaway soon so you can get them for way less. :)
DeleteWow, thanks! They're on Warren's birthday wish list.
DeleteI do use PicMonkey and like it a lot. Mostly just resize my pictures and edit some things. You point out some nice features that I haven't tried yet. Thanks for this excellent review!!
ReplyDeleteYou are very welcome!
DeleteI've never used PIcMonkey but this article has got my interest!
ReplyDeleteIt would be perfect for you!
DeleteThis is a great tutorial Heather! I love Picmonkey!!! It really is the perfect photo editing tool for online writers and is definitely easy enough to understand. I have also used Gimp and find it to be more advanced too. They are both great for photos, but I do think Picmonkey is easier and faster.
ReplyDeleteThanks! Welcome back too! Glad you like the tutorial as I know you already know how to use PicMonkey.
DeleteI've never used Picmonkey, but it sounds like something I'd love. I do love my Photoshop, but I could never get my head around Gimp either.
ReplyDeleteThanks for stopping by!
DeleteWhat a great review of a great photo-editing site! I stumbled across PicMonkey while looking for a low-cost (okay…FREE) editing site. Like you, I was totally overwhelmed with Gimp, and didn't want to pay the high price for Photoshop. My determination to find another option was realized with PicMonkey; and what a fantastic find it was! I still can't believe something of this quality is free. I've been tempted to upgrade to the Premium version, and LOVE your suggestion to try it for a month, then cancel. Perhaps I'll receive the same lower-cost offer! LOL Thanks again for sharing such a great website with others who may not be familiar with PicMonkey!
ReplyDeleteGlad you liked my review! Hope you got the low cost premium version too!
DeleteI absolutely love PicMonkey. It's my favorite photo editor so far.
ReplyDelete