Showing posts with label site review. Show all posts

Thursday, December 29, 2016

Site Review of Teabag Folding|Paper Facets

Review of Teabag Folding Site


Teabag Folding rosette from Teabag Folding website
Rosette from Teabag Folding Site
If  you are a fan of hand made cards you will love the site: http://paperfacets.com. 

It has many beautiful cards for you to purchase and they are very reasonable for such unique designs that are made entirely by hand. Even the shipping is much less than it is on other sites. 

Teabag folding is sort of an obscure paper craft but the results are gorgeous and your card recipients are going to be stunned by the beauty of the cards you give them. I was blown away by all the beautiful cards available on this site.

Learn the Art of Teabag Folding


And if you would like to learn about the craft of paper folding you are in for a treat as the owner has many many tutorials with clear and precise directions to help you from start to finish. (Tea bag folding is also known as flat fold origami.) She also lists and reviews many sources of the supplies you will need to get started making your own beautiful cards and the craft of teabag folding. 
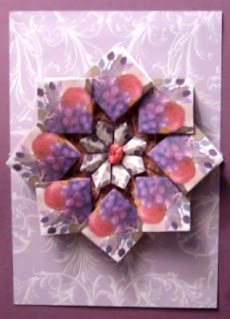

Hand Made card
Hand Made Card from Paper Facets
From the beginning of learning the craft, to learning some of the techniques and patterns, to sourcing some of the materials, and her reviews of some of the suppliers and supplies, you will find everything you need to get started and to become an expert on this very unique paper craft. You will also find hints on how to run an arts and crafts business if you want to take it that far. 

As an aside, I met the owner, Sherry, at an event in 2010 and she was very lovely and funny.  I am not surprised that her art is so wonderful. And that's what it is, art. Each and every card is a little work of art. She told a hilarious story of making her designs while on break when she worked at the phone company for many years so she could rush to craft fairs with her beautiful cards and sell them.

Buy Hand Made Cards at the Teabag Folding Website
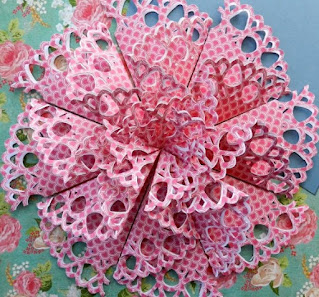


Rosette teabag
Cut Out Rosette from Teabag Folding Site
I am so glad she now has them online so you don't have to find her at a crafts fair. You can just go to her site: Tea Bag Folding or http://paperfacets.com and look at some of her beautiful cards or you can order custom work too by contacting her on the site. There is lots of information for everyone. from the customer to the beginner to the expert paper craft artisan.

I totally recommend Teabag Folding, both the craft, and the site. Prepare to be enthralled. 

Photos on this page are courtesy of  paperfacets.com.


Two books about the paper craft of Origami to get you started:


Note: The author may receive a commission from purchases made using links found in this article. “As an Amazon Associate, Ebay (EPN) and/or Esty (Awin) Affiliate, I (we) earn from qualifying purchases.”


Monday, August 22, 2016

Review of Picmonkey Photo Editing Site

Why I Love PicMonkey.com, Plus Tips For Using It

Picmonkey review

Until I discovered PicMonkey, I was stuck with using the free photo editing program that came on my HP laptop, and using Paint, the standard accessory in the Windows platform for computers. But now I am hooked on PicMonkey! It is my favorite free photo editing software! 

I never got around to buying Photoshop, and though I tried to use Gimp, it just was too hard for me to decipher. (Gimp is touted as a free version of Photoshop and many of my friends swear by it, but maybe I am software challenged.) So I thought I would show you some of the ways I use PicMonkey to edit and embellish my photos for articles on the internet and how you can too.

First of all, if you don't have an account,  just go to PicMonkey.com and sign up for an account. Once there you will see a page that varies as far as the image, but at the very top you will always see this:

Picmonkey header photo


You can see that I am signed in, but if you are not, just click on "Log In" on the right, and then you can begin editing.

You can also see the 4 buttons in the center that show where to start your photo editing project. For basic and advanced editing of your own photos, click "Edit." I will cover "Design," and "Touch Up" and "Collage" further down this page.

Once you do, it will show a screen asking you where to get the photo you want to edit. You can choose your computer, Facebook, One Drive, or their own new platform, Hub. Most people are probably going to choose a photo from their own computer so I will explain using that option.

Once you click on "Computer" it will open a window to your own files. Just scroll to your photo folders and click on the photo you wish to edit. That will place it on the screen in PicMonkey.  You will notice that on the left is a row of buttons. At the very top is a symbol of lines and dots and if you hover over that, it says "Basic Edits."  If you click it you see a list of edits you can do.  Here is an example of a photo I uploaded to the editor with the sidebar showing the menu:

PicMonkey tutorial image


The first thing I like to do is open the "Rotate" button. (3rd button down on the left) You can rotate your photo in all directions, to change the orientation from horizontal to vertical and also to change the top to the bottom, just by clicking the arrows. But what I like to do is play with the "Straighten" slider. I guess I don't hold my camera steady as I often have photos that are crooked. But that is an easy fix in PicMonkey. Just slide the arrow till you have a straight photo and click "Apply." It even has guidelines to make it easy for you.
PicMonkey tool


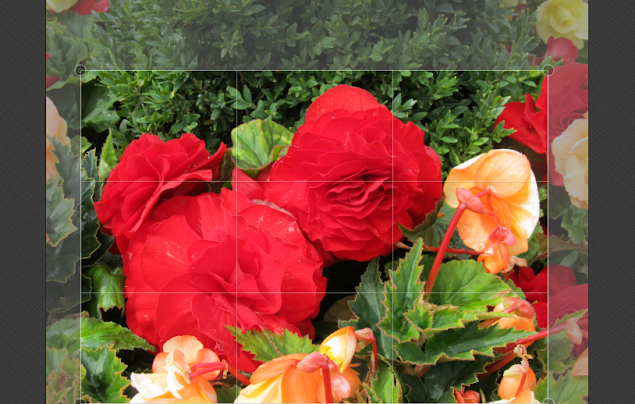
Then I like to open the "Crop" button. The reason I straighten before I crop is that straightening sometimes takes part of the photo off, so I want the whole thing straightened before cropping.  Here you can see the crop lines I am going to use. You can drag the lines around till you are happy with your photo.

roses editing image

Here it is after I clicked on "Crop." You can move the crop lines wherever you want them. When you are satisfied, just click "Apply" and then your photo will be magically cropped like this one.

roses


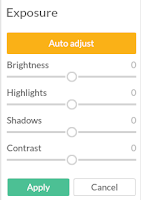
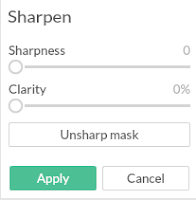
Then I like to do some basic editing so I click on "Exposure." The first thing I do is click on "Auto Adjust." This is often all that I do, as it seems to make my photos pop and look great. But you can also play with all the sliders and if you like the way a photo looks you can click "Apply" and those changes will be done.  When you are satisfied, just close that little window by clicking "Cancel" or "Apply," whichever is the case. Here  are how the other sections look when they are open. On this rose photo I have not done any other edits. I just cropped it and auto adjusted the exposure.

PicMonkey exposurePicMonkey sharpeningPicMonkey colors

If you make a mistake, there is an "Undo" button. At the very bottom of the screen is a backwards arrow. Just click that anytime you are not happy with your design and undo the last step! You can actually keep hitting "Undo" until you get back to a place where you are happy and then continue your design from there.
.
PicMonkey undo

More Tricks for Using PicMonkey


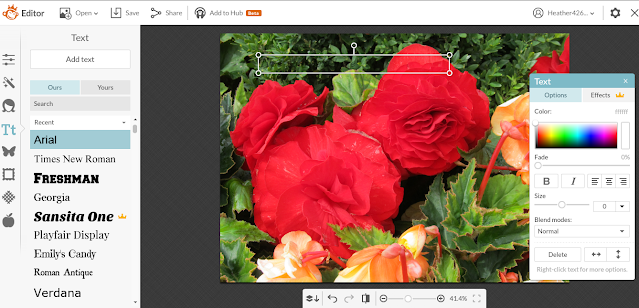
Now besides the  "Basic Edits" you can do a lot of different effects. One I use a lot is the "Text" function to add text to photos. This is great for making photos for Pinterest and other media like Twitter. So just click on "Text" and you will see this: (photo on the right)


font tool


Notice the slider on the right. Use it to scroll through all the choices of Font you can use.


I am going to use Marcelle Script so I just click on it and change the color of the script in the little box that pops up. I will use a very pale shade of blue but you can pick whatever you want. Move the box wherever you want and drag the edges to make it bigger or smaller. Then start adding text in the box. Example is below.

PicMonkey add text tool


And below is a picture of it after adding the text. Just click on the photo somewhere else besides the text box when you are finished and the text box disappears and your text is there.

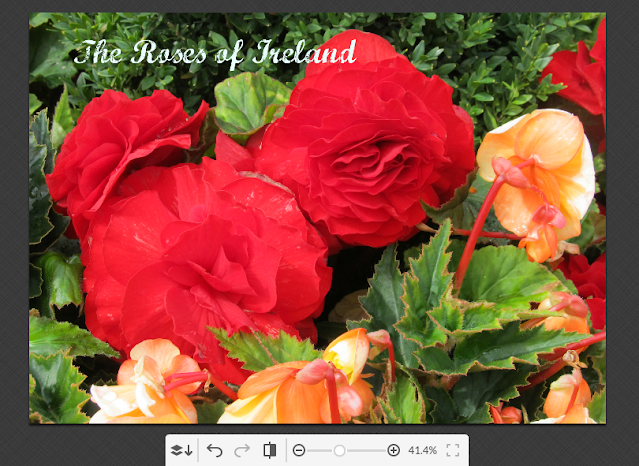
roses of ireland


Now let's say I want a background under the text. You can add any number of special effects by clicking the buttons on the left and scrolling till you find a design you like and clicking on the photo to place it. You can also move it around on the photo. Just click on it once and drag it wherever you want it. Here  I have added a ribbon. Once I clicked on it and placed it I changed the color to White. Then I added text over that.

roses image


There are plenty of other effects you can use on the left too. The "Touch Up" ones are great for faces! And if you want a set of photos in a theme, there are lots of themed effects. They have a Zombie theme, Victorian theme, and lots more!  Just click on any of them to see all the things you can do. It would take me hours and hours to go over all the wonderful effects you can create, but the easier and more fun way to learn it is to add a photo and play with all the buttons to see what you can do! PicMonkey also has tutorials explaining how to use all the functions. Just scroll down on the Home page and you will see them.

Here are a few things I did to the image after I got the text and the ribbon trim on it. First are different edges. One is a simple box edge and next is a craft scissors edge.

spring flowers roses

roses post card

Then I added an effect called "Frost" which adds the color of the frame as a brushed effect all around the edges, and on the lower one I added a "Bokeh" overlay to make it sparkly. These are just a few of the effects you can get!

roses - spring flowers banner
State Flowers of the USA Coloring Blog


roses with sparkles


Using PicMonkey for Graphic Design

You can also use PicMonkey to design graphics and my favorite, Facebook covers. Up above where it says "Edit, Touch Up, Design, Collage," click on "Design." Then you will see a square, a Facebook cover, different sizes, and a custom option. To do a Facebook cover, just click that option and it opens up a screen with the exact size you need. Next click on "Overlay" on the left. You have your choice of many there, so you can scroll through and have fun designing your own cover by adding a combination of effects on the screen. Or you can add your own, just click on "Your Own" at the top. Here I have used the same photo of roses by clicking on the file in my computer and then dragging the edges out till the whole template is covered. Then I have added some text on top of that. It's now ready to upload to a Facebook page.

roses banner


One more thing that I think is pretty cool is that when you are designing, you can choose your background or even make a transparent background for designs you might be doing for Zazzle or other design platforms. For that you go to "Basic Edits," and click on "Canvas Color." If I wanted to make a round logo for example, I would choose a transparent background and then overlay a circle from the "Geometric Shapes" overlay section. Then I would put whatever design I wanted inside the circle, like text, colors, and/or textures. Once I have saved the design I have a round logo. Here is the one I designed for my Aurora Art Supplies products and website.
aurora art logo
Aurora-ArtSupplies


And here are some Photos I edited in PicMonkey and added banners and text to use on my Amazon ads for my Aurora Art Supplies Colored Pencils and Water Color Pencils.


Using PicMonkey for Website Design 


Okay let's say I want to design a background for a website. And maybe I want a Blue sparkly one. First I would add Blue as my background color. Next I would go to the textures in the "Overlay" section and start adding them till I have an effect I want and then save it. Then I would go to the editor in my Wordpress theme and where it says to add a background, I would upload that file. Voila, a custom background. Here is one I made so you can see. I used a Blue solid color, then "Space" overlay,  then a "Bokeh" overlay. I played with the saturation till I liked it and saved it.

blue star


There are so many effects you could really play for hours and design any number of cool things. And I didn't go into the "Collage" function, but all you do for that one is click on the "Collage" button above, pick a style from the left side menu and add photos to the cells by dragging them to the one you like. You can even design text boxes and add them as one of the photos of the collage. My friend Kim is a master of PicMonkey collages. Here is one she made for her educational site for kids to learn State facts.

coloring banner

A very useful function that I use all the time is the "Resize" function at the bottom of the "Basic Edits."  Just click on it and you can make your photo whatever size you need! Very useful for websites!

So I guess you could say I am a PicMonkey addict now! Try it and I bet you will be too!  But a few of the fonts and effects are premium so you have to pay extra for those. Well I wanted them for a project so I signed up for one month only ($5) so I could make some cool designs. Then I reverted back.  A few days later PicMonkey sent me an email asking me why I cancelled the premium version and one of the answers you could pick was "It costs too much." That's what I picked and then they offered it to me for $33 a year, or less than $3 a month.  So if you want the premium version, that's how you can get it for less. Try it for a month at $5 and then cancel. I love  bargains, don't you? Thank you PicMonkey! 

*Of course, this may have been a one time offer, I can't promise that the offer will always be there. But it doesn't hurt to try, does it? 

Picmonkey banner


Note: The author may receive a commission from purchases made using links found in this article. “As an Amazon Associate, Ebay (EPN) and/or Esty (Awin) Affiliate, I (we) earn from qualifying purchases.”


Wednesday, August 19, 2015

Site Review: Heart of the Home Kitchen

Looking for Kitchen Ideas?

In most homes the kitchen is apt to be the one room in the house that family and friends gather to share both food and time together. The website Heart of the Home Kitchen honors this long standing tradition with ideas for items to use in our kitchens, ways to decorate our kitchens and even gifts for the kitchen.

kitchen
Old fashioned kitchen
If we look up the word kitchen in the dictionary we find that it simply means a room or area where food is prepared and cooked. Kitchens in a home are so much more than that simplistic definition, though. At least that is the case for me in my life's journey and I would imagine it is more than just the room where food is prepared for most people. It truly is the "heart of the home", the one room where most activity takes place during any given day.

We could most probably trace this tradition all the way back to prehistoric peoples. The community fire would have been where the women were cooking the food for the clan, the children would have been close by to play and be looked after, the men would have been gathered around to stay warm and to discuss the next hunt or the new peoples who had entered their territory. It was the gathering place, the heart of the community.

What can you find at Heart of the Home Kitchen?

I love this website dedicated to the concept of the kitchen being the heart of the home for all sorts of reasons. You can find categories like: 
My kitchen has always been the hub of activity in our home as it was in my Grandmother's and my Mother's kitchens. As I was working on a meal, my children gathered around the table to do their homework and tell me about their day. It is where my friends have always gathered to share their joys, divide their grief and laugh together. Because I spend so much time in my own kitchen, I love to find sites like Heart of the Home Kitchen that have ideas for products that I can use or decorate with.

pan
I love to bake so when I found this idea for heart shaped bakeware, I was delighted! There are ideas for cake pans, pie pans, muffin tins and even casserole dishes all shaped like hearts. Now, those would come in handy for holidays like Valentines Day but I will use them for other occasions , too. When I know the grandchildren are coming, I'll bake up some goodies and it is fun to have them shaped like a heart. The kids love it and it is just another way for me to show my love for them. 

There is even a video in the article that shows how to make cream cheese filled cupcakes that of course would be fun if they were baked in a heart shape! Yummy and fun!

My kitchen is the first room I go to in the morning and the last one to have the lights turned out before I go to bed. It is the soul of our home, the place where I feel that I can nurture family and friends with my food and my company. That is why I appreciate sites like Heart of the Home Kitchen where I can find new ideas for my kitchen and gift ideas for others who feel the same way about their special area where not just food is prepared but where family gathers. I think you will love this site, too.


Note: The author may receive a commission from purchases made using links found in this article. “As an Amazon Associate, Ebay (EPN) and/or Esty (Awin) Affiliate, I (we) earn from qualifying purchases.”


Wednesday, June 10, 2015

Country Porch Site Review

Looking For Porch Ideas?

porch
I've been working on decorating my front porch and during that journey I discovered a wonderful resource of ideas and products at Country Porch World.

Many of my first memories are from my Grandmother's front porch where the family gathered every evening after supper and the chores were all finished. That was back in the days before homes had air conditioning, the porch was cooler and just the obvious place for the family to gather. Sometimes neighbors would stop by for a chat to share news (gossip) about the small town we lived in. It was the social meeting place for the family but mostly it was just a comfortable place to be. That is the feeling I want for my front porch. A comfortable gathering space for my family and neighbors.

For Me It Starts With Seating

rocking chair
Grandma always had a couple of rocking chairs on one end of the porch, a swing on the other end and several chairs dispersed in between. I don't have a good space for a swing but I do want at least two rocking chairs on my own porch.  Country Porch World gave me some great ideas on how to place my rockers and a few products to consider in their article: Add a Rocking Chair Vignette. I like the way they explain about using cushions and throws which adds to the comfort in both eye appeal and the physical comfort of the people who will be sitting in the chairs. I, also, absolutely love the Jack Post Knollwood Classic rocker shown in the article. I believe that is where I will begin my decorating venture on my own porch, with two of those rocking chairs. I will probably crochet a couple of throws in colors that coordinate with the cushions that I choose. That will add to the warmth of the country look that I will be going for. 

Suggestions For Design Elements

Country Porch World goes beyond suggesting products for a country style porch with design element ideas, ideas for color schemes and so much more. I found their ideas quite helpful and inspiring. What I am going for on my own porch is an inviting place for people to gather and that can be accomplished with the ideas presented on the website. Adding little things like fabrics to tables, small accent pieces and other interesting things, just makes people want to go out to the porch and sit a spell. Even though Grandma had her porch set up out of necessity she nailed that comfortable and relaxing atmosphere for us all to enjoy and relax after a hard day.

The Sound of Wind Chimes

windchime
Example of DIY wind chimes found at pgeveryday.com
I don't know what it is about hearing wind chimes when there is a slight breeze in the air. I find it so appealing and calming. So, I do want at least one set of chimes on the porch. 

There are times when I would rather not hear the chimes, though. When the birds are singing in the trees or when I'm trying to concentrate on reading something; the chimes can be a little distracting. 

Country Porch World has a wonderful suggestion in their article about wind chimes! I would have never thought to do this but it makes so much sense. They suggest that you take an old elastic bracelet to wrap around the chimes when you want them silent. Now, how clever is that? Don't have a bracelet on hand? I think a large rubber band would work or even some twine. Choose something that is easily placed and removed when you want to silence your chimes. 

I have found so many wonderful ideas for decorating my porch at Country Porch World and I think you will enjoy it, too. Not only is it a place to find interesting products to decorate your porch, patio or deck in a country look but the articles about how to accomplish the feel of comfort and relaxation are very helpful. 


Note: The author may receive a commission from purchases made using links found in this article. “As an Amazon Associate, Ebay (EPN) and/or Esty (Awin) Affiliate, I (we) earn from qualifying purchases.”


Saturday, May 30, 2015

Koffee Kingdom Site Review

coffee maker
What can be more fun for a coffee lover like me than a site devoted entirely to coffee? Frankly, it's coffee everything. From bean roasts to cute-shaded sugar cubes, Koffee Kingdom has it all.

Yes, I will admit that I'm addicted to coffee. But for me, it has to be a good cup of coffee. Some things I knew about what makes a good cup for me, but I wasn't sure why. So I read a great article on this site: Coffee Bean Roasts and How They Effect Flavor. Now I know to choose the right roast to get the best cup of coffee for my tastes.

Coffee Makers: Keurig is King


coffee makerWhat I also discovered is why I want to have a fresh cup of coffee every time. Sure I knew about Keurig Coffee Makers, but didn't know why I would want to get one of those until I read a review about these machines.

In the article Keurig Single Serve Coffee Maker, there is a list of all the benefits. Frankly, that sold me more than anything else. The idea of getting a fresh cup of coffee every time is just part of the appeal. No waiting for a pot to finish dripping, no wasting the extra coffee in a pot, and no handling filters and coffee beans all the time.

Coffee Home Decor As Well


tin sign
Drinking good coffee is one thing, but enjoying a little coffee atmosphere in my home decor is also a treat. And don't you know the site Koffee Kingdom has some of that, too. My little breakfast nook has coffee-themed wall decals, but I was looking for just a bit more to carry the theme. Tin coffee signs looked like a good addition. I found some cute ways to add to my decor.

There are plenty of other options as well, including wall clocks with a coffee theme, serving trays that add a little coffee humor, even fun mugs. Well, honestly, do we ever have enough mugs to enjoy our favorite brew? I don't so I love to find new ones.

Koffee Kingdom for Enjoyment


So my analysis of the site Koffee Kingdom is that it's got it all. The kind of information I need to make a perfect cup of coffee, great additions to my coffee world, and some fun ideas for gift giving as well.

Is the site worth checking out? My answer is yes. If you enjoy coffee like me, you will enjoy Koffee Kingdom. Then let me know what you think, too. 


Posted by: BuckHawk
Buckhawk

About This Contributor

BuckHawk decribes herself as "Basically a lazy person who prefers the easy things in life." So that's what she writes about. Easy home decorating, easy recipes, easy entertaining. But, she is also a lover of animals, gardening and crafting. You'll find her writing all over the Web, but with Review This Reviews! she has the opportunity to write about all of her loves.


Note: The author may receive a commission from purchases made using links found in this article. “As an Amazon Associate, Ebay (EPN) and/or Esty (Awin) Affiliate, I (we) earn from qualifying purchases.”


Most Recent Reviews on Review This Reviews


Search for Reviews by Subject, Author or Title

The Review This Reviews Contributors


SylvestermouseSylvestermouseDawn Rae BDawn Rae BMbgPhotoMbgPhotoBrite-IdeasBrite-IdeasWednesday ElfWednesday ElfOlivia MorrisOlivia MorrisTreasures by BrendaTreasures by BrendaThe Savvy AgeThe Savvy AgeMargaret SchindelMargaret SchindelRaintree AnnieRaintree AnnieLou16Lou16Sam MonacoSam MonacoTracey BoyerTracey BoyerRenaissance WomanRenaissance WomanBarbRadBarbRadBev OwensBev OwensBuckHawkBuckHawkDecorating for EventsDecorating for EventsHeather426Heather426Coletta TeskeColetta TeskeMissMerFaeryMissMerFaeryMickie_GMickie_G


Review This Reviews is Dedicated to the Memory of Our Beloved Friend and Fellow Contributor

Susan DeppnerSusan Deppner

We may be apart, but
You Are Not Forgotten


“As an Amazon Associate, Ebay (EPN) and or Etsy (Awin) Affiliate, I (we) earn from purchases.” Disclosure Statement

X