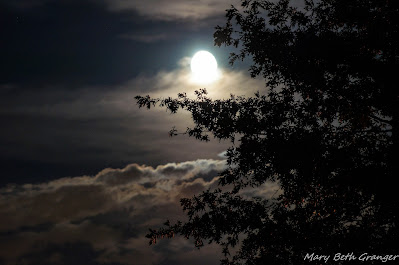
Photographing the Moon on a Cloudy Evening
On a partly cloudy summer's evening in August, I walked out into my front yard about 11:00 pm and was greeted with the beautiful sight seen above. The full moon was peaking out above the clouds and was framed by my neighbors tree. I went back into the house and grabbed my camera to shoot a few photos. I wanted to get the moon, trees, and clouds into focus so I played around with several settings. My first shots came out rather blurry and that leads me to tip #1
- Use a Tripod when shooting at night
I know I should use a tripod more often but I always seem to first try without one. Sometimes if you have something to steady the camera on you can get away with out a tripod, but I have found that the shots come out much clearer when you use a tripod. In the photo above I used a tripod and shot the photo using the following settings Aperture-5.6, Speed 2.5 seconds, ISO 320, lens length 150mm. I used an SLR camera, but I do believe the above shot could also be taken on a good point and shoot camera.
Learning from my Peers-a Moon full of Details
Although I was happy with the first photo, I really wanted to take a photo showing more of the details on the face of the moon. I wasn't sure how to accomplish this, so I went online and did a bit of research. I gained the knowledge that helped me the most from a Facebook photography group called Digital Photography School. The people on the site were wonderful. I posted my first photo and then told them what I wanted to accomplish with my photo. Here are some tips they gave me that I then used the next evening when taking the detailed photo of the moon above.
- In addition to a tripod use a remote shutter
- Set the ISO to 100
- Use a faster shutter speed (the slower speed tended to make the light from the moon blowout the photo)
- Expect to take many photos to get one good one
- It is nearly impossible to get both detail in the moon and foreground in the same shot. (I found there are ways to get around this but that is a bit more complex).
With these tips in mind the next evening I waited for the moon-rise and then got out my tripod, my shutter release and my new 150-600mm lens. I set my camera with the following settings ISO 100, speed 1/125 sec, aperture 6.3, and lens length 600mm. The moon was a bit less than a full moon on the next night, but I had also read that the waxing or waning moon can give you better details. I was very pleased with my resulting photo that you see above. You can even see some craters on the surface of the moon.
If I were to get foreground in the same photo I could possibly use Photoshop to combine two photos or there are some techniques using filters which I haven't tried yet. Just leaves me with more to learn another day.
Fun in Lightroom- Adding a bit of drama to my photo
I like to have my photos look as close to real life as possible, but sometimes it is fun to add a little drama from a photo processing software like Lightroom. In the photo above I slid over the slider for tint in Lightroom giving a blue cast to the photo.
Zazzle Products from my Photos
I enjoy taking my photographs and making them into cards, magnets, posters and other products on Zazzle. These are available for sale. The first product below was taken of the Super Moon in March of 2011.
The poster below shows the full moon peaking out from under the clouds and shining on the ocean in Jupiter Florida.
Note: The author may receive a commission from purchases made using links found in this article. “As an Amazon Associate, Ebay (EPN), Esty (Awin), and/or Zazzle Affiliate, I (we) earn from qualifying purchases.”


I've always admired your wonderful photography, Mary Beth and am especially impressed with your 'moon shots'. Thanks for the tips on how to create them.
ReplyDeleteInteresting that the slower shutter speed works better for the moon when all the other details are just right. Your moon shots are gorgeous! I especially like the effect with the blue tint. Always enjoy your tips and photos!
ReplyDeleteawesome tips! Hopefully, I'll be able to get some good photos of my own in the future. Love your moon photos.
ReplyDeleteMary Beth, if I follow your advice maybe, just maybe I will become a good photographer. These pictures are wonderful. Thanks for all the settings, so I can try it! Now I just have to grab the camera out of my other half's hands.
ReplyDeleteWow! Your moon photo on Aug 21st is amazing! I love trying to capture neat shots of the moon. I have never tried photographing it while using a tripod. I know you have often recommended using a tripod, but I am the worlds worst at wanting to grab my camera and capture a shot. I need to learn to plan in advance to get those great shots. I have also never used a remote shutter. You always give the best photography tips and certainly great inspiration!
ReplyDeleteSome gorgeous photographs, I'll have to use your tips as I don't have many moon shots that have worked!
ReplyDelete