Saturday, August 5, 2017

Salt Life Review

Salt Life Signature Decal
What is Salt Life, you may be asking?

Salt Life, as defined by the Urban Dictionary, is:

“Salt Life ~ Originally a sticker on the back of cars used to denote a surfer, bodyboarder, or general beach bum whose  life centered around the ocean or related beach going activities.”


Recently I reviewed apparel by Southern Fried Cotton, carried in the clothing department of the store I work for.  Since our store is located in a coastal community, we cater to ocean and beach related clothing, popular in our area.  Salt Life is another Southern and Coastal Company which manufactures the type of clothing we carry.


Origin of Salt Life


The Salt Life brand has come to represent the ocean and the many activities centered around it. It appeals to those who enjoy an active lifestyle surrounding surfing, fishing, diving and days spent on the beach.

Salt Life was begun in 2003 by four men who, besides being friends, were also passionate about the ocean and all it has to offer.  These four 'watermen' are from Jacksonville Beach, Florida and thus that is where their company is located. Salt Life is more than just a Logo ~ it represents a style of life that is ocean and beach related.


Explore the Salt Life in TeeShirts, Hats, Decals and Lots More...


Salt Life Marlin Tee Shirt
Cut Salt Marlin Life T-Shirt
Popular with fans of ocean fishing is the Salt Life Marlin Tee Shirts. They come in a variety of colors, and are found in different designs such as the Sun Tee (marlin leaping with sun behind it), Palm Tee (showing a palm tree on the beach and the marlin leaping in the ocean), and Marlin Waves (colorful design of a marlin leaping out of a large ocean wave). 

The Ocean Life tee shirt line represents all there is to love about the ocean ~ the surfing, swimming, fishing and fun beach life.

There are fishing theme T-shirts with the “Life in the Cast Lane” sayings and designs such as hook, line & sinker that fishermen love.  There are skull themes and anchor images, turtles and many others.


Salt Life Salt Life Marlin Tee Shirt
Sea La Vie Ladies T-Shirt @ Salt Life

Especially for the ladies, there are scoop neck Tees with clever sayings that remind one of the  ocean and coast, such as “Sea La Vie”, “Seahorse Daze”, and “Living Salty Turtle”.


Salt Life also has a wide variety of hats for these seaside activities.  Live the Salt Life is one of their favorite mottos.  This 'Anchor' hat is a favorite for your beach-going activities.


Salty Crab Decal @ Salt Life

And, of course, there are stickers and decals, such as the one seen in the Introduction image and this Salty Crab decal.  Check out all the Salt Life images of fishing poles and fish, sea turtles, palm trees, Salty crab and more. 


Salt Life also carries clothing for kids, a line of shorts for men & women, and other beach gear such as beach towels, flags and coolers.

Everything that is a reminder of your favorite oceanside sport or beach activity.  Check them all out on the Salt Life website.


Salt Life Food Shack


In addition to their clothing and gear designs, Salt Life also has restaurants called 'Food Shacks'. Currently, these restaurants are located in Jacksonville Beach, Florida, St. Augustine Beach, Florida and Fernandina Beach, Florida, with plans to open more. They are known for their eclectic seafood menu and are lively hangouts for the beach-going crowd.

Enjoy Local Fried Shrimp and Beer Can Chicken, salads and tacos and Fresh Rolled Sushi, fresh fish and salt water favorites.  Check the Jacksonville Beach menu here
for these and many other selections, all available in their casual yet trendy open-air space located near the beach. Their motto is “Pull up a stool. Eat. Drink. And be Salty.” 


Roatan Marine Park


The Salt Life Company 'gives back' in an effort to protect the oceans they love and preserve the seas and coral reefs for future generations. They have teamed with Roatan Marine Park to protect the waters and reefs in Roatan, Honduras. Check out the Roatan Marine Park website
to see how they are working to provide a sustainable marine environment that can provide fisheries and tourism without harming the ecosystem.


Summary


Salt Life turtle decal
Salt Life Signature Turtle Decal

Everyone enjoys the Salt Life, whether it's participating in water sports or simply having a 'beach day'. The Salt Life clothing and gear is perfect for anyone, seaman or land lovers,  wanting a trip to the beach. The Salt Life Food Shacks specialize in tasty seafood.


Live the Salt Life!


Quick Links:
 

Salt Life Website
Salt Life Food Shack
Salt Life Tees, Gear & More on Amazon


*Salt Life Review by Wednesday Elf


Note: The author may receive a commission from purchases made using links found in this article. “As an Amazon Associate, Ebay (EPN) and/or Esty (Awin) Affiliate, I (we) earn from qualifying purchases.”


Friday, August 4, 2017

How to Create An Image Slideshow & Add Image Slideshow in Blogger Post Reviewed

How to Create An Image Slideshow & Add Image Slideshow in Blogger Post

Easy Instructions for Creating a Slideshow for Blogger Posts


Blogger is a fabulous free blogging site, but it does have it limits.  While you can easily add single images to a blogger post, there is no slideshow option available.  Therefore, we must improvise by creating and adding our own slideshows to our Blogger articles. 

Last week, I featured a slideshow in my How to Grill the Perfect Steaks article.   While the images were not especially "pretty", the pictorial tutorial would be extremely helpful to a grilling beginner.

This week, I will show you how to create and add your slideshows to your own Blogger posts.  If you follow these few simple instructions, you will find out for yourself just how easy it is to generate beautiful image slideshows to feature on a Blogger post.


How to Create An Image Slideshow for Blogger

You do need a Google account since we will be using the Google Slides.   Follow these very easy steps to create your own slideshow.

  1.   Click here to open Google Slides
  2.   Select "Blank" under Start a Presentation
  3.   Select "Insert" then "Image" from the Drop Down Menu
  4.   Upload Your Image 
  5.   Add Additional Images by Clicking the + sign on the top left
      and repeat Step 3 until all of your images are added.

Slideshow Showing Images of Steps


How to Add an Image Slideshow in a Blogger Post

Once you have finished adding all of the photos to your slideshow, it is time to publish and embed the slideshow in your Blogger post.


  1. Select File and scroll to "publish to web"

  2. How to Add a Slideshow to Your Blogger Post


  3. Copy the Code
  4. Add Image Slideshow in Blogger Post

  5. Paste the code in the html of your Blogger post
How to Create An Image Slideshow for a Blogger Post


This is How It Looks on Compose in Your Blogger Post

How to Create An Image Slideshow for a Blogger Post


Additional Options In Google Slides for Creating Slideshows

  • You can change the background color under the Layout Tab
  • Change the layout to accommodate 2 images instead of one
  • Images can be Cropped
  • Change the layout to Combine Text and Photos
  • Text can be Added on Photos 
  • Add Links to Photos
  • Rearrange the Images by Simply Dragging Image
  • Add or Change Photos after the Slideshow is published
  • Built-in Spell Checker
  • Undo & Redo Buttons


Example Slideshow


More Tips & Tutorials for Blogger


Note: The author may receive a commission from purchases made using links found in this article. “As an Amazon Associate, Ebay (EPN) and/or Esty (Awin) Affiliate, I (we) earn from qualifying purchases.”


Thursday, August 3, 2017

Mr. Church Movie Review

Inspired by a True Friendship


Recently I went in search of a good movie. What I found was a character who touched my heart. His name and that of the movie? Mr. Church. Here's my review.

It's been hot out, good movie watching weather, so recently I went in search of a new movie to enjoy. What I found was a character who touched my heart. His name? Mr. Church.

I was attracted to the movie at first by the number of excellent reviews, over 18,000 on Amazon, averaging 4.7 out of 5, with zero 1-star ratings (which may put the accuracy of the old saying, "You can't please all the people, all of the time" in question).

The movie description came next, something about a little girl, her dying mother, their cook, and a family bond that lasts forever. I watched the trailer, though I actually suggest that you might want to skip that. I like to go into a movie knowing little about the twists and turns of the plot and this trailer, typically, does give a few things away. But, on the other hand, you might want to watch it just to get a taste of the beautiful mood of the movie. And it is a beautiful movie. I'll leave the trailer decision up to you.

The movie stars Eddie Murphy and Britt Robertson. Yes, the same Eddie Murphy that you might know from Saturday Night Live or The Nutty Professor. But this movie is no comedy. It's a touching drama that will capture your curiosity just like Mr. Church captured Charlie's (Britt Robertson's character) when she first saw him and reported to her mother that, "There's a black man in our kitchen, cooking eggs."

Every character in the movie is well written, well cast, and well acted. Even the minor characters, those with less time on screen, are important as is every line of dialogue they speak. In fact, this movie reminds me of a wonderful book, one with not a single word that isn't important to the whole of the story. The setting, too, beginning in 1971 Los Angeles, was perfect.

I want to tell you more, but I don't like spoilers and I hope you'll trust that I'm steering you in a direction you'll be glad you followed once you watch the movie and get to know Mr. Church for yourself.

This movie is rated PG-13. It contains some rough language, but only in what I would call "appropriate places," and the subject matter is not intended for young children.

Mr. Church is available at the link to rent, stream, or purchase on DVD and may be included with your subscription of Amazon Prime.


~Susan Deppner
Read more of my reviews.

Check Out More Movie Reviews At


Posted by Susan Deppner

Susan Deppner

About the Author

Susan Deppner is a baby boomer, a cancer survivor, and a Southerner who believes in the Golden Rule. She enjoys writing about food, faith, and fitness; health, home, and holidays; people, places, pets, and patriotism, and more. Follow Susan on Twitter, Facebook, and Pinterest.


Note: The author may receive a commission from purchases made using links found in this article. “As an Amazon Associate, Ebay (EPN) and/or Esty (Awin) Affiliate, I (we) earn from qualifying purchases.”


Wednesday, August 2, 2017

How To Trap Those Flies That Drive You Crazy: A Window Fly Trap Review

Flies in Your House Can Drive You Crazy

I'm usually pretty sane, but if I'm preparing a meal or trying to eat, seeing flies buzzing around me drives me nuts. Flies are dirty and carry diseases. I don't want them in my kitchen when I'm preparing, serving, or trying to eat food. 

How To Trap Those Flies That Drive You Crazy: A Window Fly Trap Review
Photo Courtesy of Pixabay, edited on FotoJet


Imagine my distress when my husband left the door open two weeks ago while he went outside to get something and about a dozen flies flew in! Once the flies were in, they didn't want to go back out.

 For at least ten days I fought them with folded newspapers and a fly swatter to no avail. Those pesky flies knew how to settle just where they would land on a clean dish or plate of food were I to swat them. I did get a couple who lit where I could hit them, but most escaped from my attacks. It seemed for every one I killed, two more would appear in its place. It seemed everywhere I went in the kitchen or family room, at least five flies were circling in the air. My stress level was high. 

My Electronic Fly Trap

After a few days of watching helplessly as the flies treated my table and walls as their personal airport, I remembered I once had an electronic trap for mosquitoes and other flying insects. I hadn't used it for years and was, in fact, storing it in the kitchen at our other house. I decided to retrieve it. In the past, it had caught a few flying insects. The one I own is obsolete now, but it was similar to this one and worked the same way. 


It uses light to attract the insects. Then it sucks them into a lower compartment with a powerful fan and traps them there. Eventually, they dehydrate. These traps work pretty well for mosquitoes, as I remember. Reviewers on eBay seem to agree with me. It may work for you if you have a problem with mosquitoes.

However, it did not work very well on my flies. I had it on the kitchen table and turned it on at night before I went to bed after other house lights were off. At my first morning bladder call, I'd shut the trap before the sun was up.  Unfortunately, my husband got up after me and thought he should turn it on again, which opened the trap. I'm not sure it ever caught a fly for long. Their numbers did not seem to decrease.

I brought my vintage Stinger NOsquito Ma06 Indoor Insect Mosquito Bug UV Light Quiet Electronic Trap | eBay decades ago. I don't remember where. I did find one like mine on eBay, which you can see if you follow the link above. 

Shopping for a Solution to My Fly Problem

Finally, I couldn't stand it anymore. I had to find a solution! I went to Walmart in search of fly paper, but they didn't have anything but sprays. I don't like poisons, especially spray poisons, anywhere I prepare or eat food. Rather than drive all over town, I checked Amazon. I found a description for Catchmaster Window Fly Traps.

These simple window traps got four to five-star reviews, depending on package size and seller. They were really cheap in comparison to the electronic zappers and light traps, some of which got much lower reviews. I figured I didn't have much to lose by trying the Catchmaster traps. They are very simple to use. They catch the flies that land on them with a very sticky surface that holds them in place. I keep my traps beneath the blinds that cover the windows.

How to Set the Catchmaster Window Fly Trap


How To Trap Those Flies That Drive You Crazy: A Window Fly Trap Review
Image created on FotoJet, © B. Radisavljevic

Here's how to prepare your traps:

  1. Open the package
  2. Pull out the trap
  3. Tear the narrow release strip off the trap
  4. Stick the trap in the corner of a window
  5. Be careful to put it where you won't need to touch it to open and shut the window
  6. Peel off the large release liner that faces toward you. 
  7. Wait patiently for the flies to land

My Results

How To Trap Those Flies That Drive You Crazy: A Window Fly Trap Review
Victims Trapped in My Kitchen Window. © B. Radisavljevic


I tend to be impatient, and catching flies this way isn't instant. I had put six traps in windows the day I got them. The next day only four flies were stupid enough to land on them. (I hate that flies seem to be smarter than I am.) As I write this, I've had my traps up for about ten days. I have trapped thirteen flies, a few gnats, and a couple of baby spiders that must have just hatched. I still have one very smart fly who continues to stay away from the traps. My east windows seem to catch the most flies.

Two days after I'd placed my first traps, Hubby went to shopping and found some Pic Window Fly Traps and brought them home. He didn't realize I still hadn't used all my Catchmaster traps. I finally decided to try a couple of the Pic traps to see if they would do any better at catching the flies still in the air. I picked one window and a bathroom mirror where I'd not yet caught any flies and put a Pic trap in another position in each of those places. They haven't caught any flies, either. Not yet.

Perhaps I just put the Pic traps in bad places, but a fly had circled that bathroom about every time I'd walked in. The Pic traps got better reviews a couple of years ago, but more recent users say they aren't as sticky as they used to be and aren't catching flies as well anymore.


How To Trap Those Flies That Drive You Crazy: A Window Fly Trap Review
God Designed the Very Best Fly Trap, © B. Radisavljevic
Of course, there is the messiness factor, and one can't be too squeamish.

My Recommendation

If flies are your primary problem, electronic zappers and light traps with fans probably won't work for you. I've read the reviews for just about all of them. I was leaning toward the light-fan combinations that plug in like night lights, but they got bad reviews. The electronic gadgets seem to work better on smaller flying insects with lighter bodies. They may be effective with gnats and mosquitoes, but the house flies that drive me crazy are much heavier. 

The Catchmaster Window Traps I tried worked pretty well. I'd much rather deal with one stubborn fly than fourteen. Getting the gnats and baby spiders, along with anything else that wants to land on my windows, is a bonus. 

I believe these traps are a great value for the money. My life has been much calmer since I put them in my windows. There is a bit of a yuck factor in having to look at trapped flies, but you can decide where to place your traps. If you put them in top window corners instead of the lower ones you won't have to look at them so often. You also need to be careful not to touch the sticky part of the traps. My mini blinds hide the traps, including the one next to the table, most of the time.

If flies in your kitchen drive you as crazy as they do me, I believe these window traps will help you as more or more than the other fly catching gadgets I've tried or looked at. Why not pick up an inexpensive package now so you'll be ready immediately to fight any flies who invade your home. Any mosquitoes, gnats, fruit flies, moths, and spiders you catch will just be a bonus. 


 Window Fly Traps by Catchmaster - 12 CountCheck Price Pic-Corp Window Fly Traps (12 Pack of 4)Check Price RESCUE! Outdoor Disposable Hanging Fly Trap - 12 TrapsCheck Price


See more product reviews from our contributors.


Note: The author may receive a commission from purchases made using links found in this article. “As an Amazon Associate, Ebay (EPN) and/or Esty (Awin) Affiliate, I (we) earn from qualifying purchases.”


Tuesday, August 1, 2017

Fancy Feast Wet Cat Food Reviewed

Convenient Way To Purchase Food For Your Cat

tabby cat
Cat image courtesy of Pixabay.com
Let's talk about an option to feed our cats today by reviewing Fancy Feast wet cat food. My older kitty is kind of persnickety about what she will eat and what she will not. Why is it that cats seem more finicky about their food than dogs do? Every cat that has ever owned me, has had a definite opinion about what they want to eat. 

For many years, I fed my cat dry cat food and it was just fine. As she has aged, she started having problems with constipation and it was suggested that I switch her to wet food. That switch has helped tremendously! 

In the wild, cats love to dine on mice, bless their souls! It turns out that they instinctively know that a mouse provides a pretty balanced diet when it comes to a cat's health. As disgusting as it might sound to us humans, the mouse provides the right amount of meat, liquid and calcium for the feline digestive system. House cats (our pets) don't usually get to control their diets with mouse morsels like their feral cousins do. Our giving them only dry food may not meet their moisture requirements in their diets.

In my attempt to ease my own kitty's digestive troubles, I tried a few different kinds of wet cat food. She seemed to like the Fancy Feast meals the best. Once I had determined that, I started ordering it online because it is so darned convenient!


I love that there is a nice variety to choose from and that I can offer her something different each day. Typically, I will order a box like the one above and then the next time choose maybe the seafood collection or a different collection. My kitty seems to prefer the classic pate meals but there are options of grilled and ones with gravy, too.

The ability of having the cat food delivered to my door is wonderful! I find that I shop more and more that way for all sorts of products, not just my cat food. It is convenient, economical and I don't have to worry about having run out of food for my cat or the humans in the house. Don't you just love it?


Note: The author may receive a commission from purchases made using links found in this article. “As an Amazon Associate, Ebay (EPN) and/or Esty (Awin) Affiliate, I (we) earn from qualifying purchases.”


Monday, July 31, 2017

Review of a Great DIY Back Pain Relief Tool

Body Back Buddy on Amazon
A co-worker has brought a pain-relief tool to the office and has offered to share. I have since used this Body Back Buddy self-massage tool multiple times to find relief for chronic pain and to help relax my shoulders and back. If you experience chronic pain in your back or shoulders, this little gadget may also be helpful to you. I know that it has been so helpful to me at work that I'm ordering one of my own to keep at home.


Migraines and the Search for Pain Relief


My co-worker and I suffer from chronic migraines.  She and I are constantly discussing ways we find relief and things that are not as helpful. When she brought this massage tool to work my initial thought was that it was a gimmick. But I gave it a try anyway. With chronic migraines,  you become willing to give most anything a try.

As soon as I picked up this plastic hook with knobs, I found relief. It was intuitive to use. I just hooked it up over my shoulder and started "rubbing" the knots near my shoulder blades and spine.  

I had thought the hard plastic knobs would be uncomfortable. But the hardness of the knobs was, in part, what makes it so effective. And the curve of the item helped me to apply hard pressure to my tender spots. I was able to both press against and rub the stubborn knots as well as run the plastic knobs up and down my spine. 


Tender Points or Muscle Knots?


My sibling is officially diagnosed with Fibromyalgia and talks about her tender points and pain. We compare notes. I have similar painful points that I call my "traveling bumps". There never seems to be an explanation for the location of these tender areas.  I have not been officially diagnosed with Fibro and while my pains may be caused by whatever causes my migraines, the pain is similar to my sibling's Fibro. I am planning on suggesting that my sister give the Body Back Buddy a try.

This massage tool has been wonderful at reaching and releasing my painful "traveling bumps" no matter their origin.


Three of my four favorite moves with the Body Back Buddy (photos courtesy of Amazon)


The Pros and Cons of the Body Back Massage Tool


There are many pros and only a couple of cons that I have found with this wonderful pain relief tool. I am sure that you'll have your own opinion of the Body Back Buddy massage tool, but this is my list:


Body Back Buddy Pros:


  • immediate relief where you are - without the time commitment and expense of massage appointments
  • heavy duty and sturdy plastic - it does not feel as though it will break while in use
  • the curve and placement of the knobs are intuitive - I picked it up and used it effectively without looking at any instructions
  • compared to other pain relief tools and mechanical massagers - it is very affordable
  • I can easily massage my neck, spine, shoulders, and back with this tool (it also massages your feet, but I have kept my feet off of it, since it is borrowed)
  • the Body Back Company has made this, in the US, since 1995 and has a good track record and good reviews

Body Back Buddy Cons:

  • beware of copies and knock-offs that seem to be more cheaply made and less sturdy
  • it is large and can't be hidden in a small bag or purse for transport
  • I am overweight and cannot do the technique that involves placing the Back Buddy around my middle (seen below) 
the only technique I cannot do (photo courtesy of Amazon)

Related Pain Relief Articles:


Barbara's husband suffers from neck pain and finds relief by using magnesium oil spray. For more information, take a peek at her article My Husband Loves Using Magnesium Oil for Neck Pain

Over time, I have found that peppermint essential oil often eases migraine pain. I use Dr. Bronner's organic castile soap and hot steamy baths to find pain relief. Dr. Bronner's soap has many uses and if you aren't familiar with this fantastic soap, let me introduce you with my review of Dr. Bronner's Peppermint Castile Soap


Note: The author may receive a commission from purchases made using links found in this article. “As an Amazon Associate, Ebay (EPN) and/or Esty (Awin) Affiliate, I (we) earn from qualifying purchases.”


Sunday, July 30, 2017

How to Decorate a Room with Purple

Photo Via Pixabay
Last week we covered how to include the color Orange in home décor, so let's talk Purple this week

While orange in home décor is the most misunderstood, purple may be the most feared.

However, there's no need to be shaking in those boots.

Since there's various shades of purple ranging from very soft to royal bold, you can choose what works best for you. Also, don't think purple is just for bedrooms either, you'll be surprised just what you can do with a living room decked out in purple.

Still have doubts? Then, scroll to the bottom of this page to see the collection of rooms decorated in different shades of purple.

Before Decorating with Purple Make One of These Three Decisions:

1. You only want to add a little purple to your space
2. You want a more sophisticated look in your purple room
3. You want the room to have a deep rich look of purple

Let's Discuss How to Use Purple Based Upon Points 1,2, and 3

Just a Little Purple in Your Living Room:

Start by adding a touch of soft yellow. Why soft yellow? Because yellow is a complimentary color to purple and will help the small amounts of purple you add, to pop.

Add the yellow to a feature wall. Then add a lightly pattern neutral drape that contains both the yellow and purple. Keep your couch a neutral color, like white, then add two accent chairs in a medium toned purple (slightly darker).

Finish the space off by adding multiple pillows in a combination of the purples and yellow featured in the space. Mix the pillows up with solids and patterns.

A More Sophisticated Look Using Purple:
Photo Via Pixabay


Start by painting a feature wall in a lighter purple-grey shade.

You can paint more than one wall. If you're color-brave go ahead and paint the whole room in that color.

Next choose a couch in a solid charcoal grey color, and choose accent chairs that are closer to the lighter grey-purple you've painted the walls.

For your drapes, bring in a third neutral color like a light tan or beige.

Finally, end the look with pillow accessories but use darker shades of purple on a few solid color cushions and then choose patterns for the others that have both a mix of light purple-grey and tans.

A Deep Rich Braver Attack of Purple in Your Living Room:

So you're gutsy and ready to go all out purple. First choose a deep rich violet purple for a large feature wall. Or better yet, on a fireplace wall.

Next go with the same or similar rich purple that you chose for the wall for the couch. For the drapes continue with the bold theme by using a deep pink-purple.

For the accent chairs, you'll need a neutral tone, and believe it or not, a lovely burnt orange will work. Lastly, bring all the shades you've included in the room into various plain and patterned pillows.

Check Out This Collection of Rooms Decorated in Purple as Well as Purple Accessories


Note: The author may receive a commission from purchases made using links found in this article. “As an Amazon Associate, Ebay (EPN) and/or Esty (Awin) Affiliate, I (we) earn from qualifying purchases.”


Saturday, July 29, 2017

Book Review of Will's Red Coat by Tom Ryan

will's red coat book cover
Will's Red Coat by Tom Ryan
What would happen today if we gave ourselves over, wholeheartedly, to a hurting soul?  What if we could let go of all expectations and simply concentrate on pure giving?  Tom Ryan, author of Will's Red Coat, lived the transformational answer to these questions when he responded to a Facebook post about a soul in desperate need.  Little did Ryan know at the time how that seemingly straightforward act of kindness would dramatically change him and forever alter the course of his life.

On the surface, this book would appear to be yet another memoir of a man and his dog.  Oh, but this is so much more than that.  There is a man, yes -- Ryan, the New York Times bestselling author of Following Atticus.  And there is a dog -- a deaf, mostly blind, senior dog that is raging against the dying light.  But this is not your typical rescue story of human saves animal, or animal saves his person.

This is a story of finding the life you have always wanted, and needed, by submitting to that which you would never have knowingly chosen.  Up front, Ryan thought he was providing a temporary last home for a dog that was expected to live only a very short time.  In essence, it was a hospice situation.  Ryan was offering Will a place, and space, to die with dignity.

Things are never this simple, though, are they?  This weak, angry dog wasn't ready to die without a fight, without experiencing the underlying beauty that is so easy to miss in life.  The heart of this book is how two souls, Tom and Will, became the beauty they were each seeking.

As an animal welfare volunteer who deals with abandoned, forgotten souls on a daily basis, I found myself deeply moved by the profound truths of this poignant story.  The truths you will discover when you read this book are these:
"It's never too late to trust again, to love or be loved again; and it's never too late to live again."  ~ Will's Wisdom
 Yes, this book will make you cry, but the tears will be joyous and healing.  They will be a celebration of the triumph of a life lived in full.  I found this book to be an incredibly beautiful tribute to what happens when you become who you were always meant to be.


Note: The author may receive a commission from purchases made using links found in this article. “As an Amazon Associate, Ebay (EPN) and/or Esty (Awin) Affiliate, I (we) earn from qualifying purchases.”


Friday, July 28, 2017

How to Grill the Perfect Steaks - Beginner Tips Reviewed

Learning to Grill the Perfect Steaks

Easy Instructions:  How to Grill the Perfect Steak
I decided to learn how to grill steaks myself after reading so many great recipes and ideas for the grill written by my fellow online writers. 

In our family, it has always been the man's job to cook out.  Previously, I just accepted the gift gratefully and I was content to defer to my dad, one of my brothers, or to my husband's expertise on the grill.  However, with visions of kebabs and grilled pound cake, I was inspired to learn how to use the grill. 

I photographed all of my husband's steps to preparing the grill and preparing the food.  Now I will be ready to grill our next steaks.   I am willing to share my new knowledge.  Perhaps, this article will help you get started too.  

So, let's have some fun!


Choose your Steaks Carefully

Although they were expensive, we chose to cook 4 USDA Choice Rib Eye Steaks.  They weighted 3.82 lbs total weight.  They were purchased the same day we cooked them and they were never frozen.  In this photo, they have already been seasoned and are ready to grill, but I have included our steak preparation instructions below


Selecting the Right Steaks to Grill


What You Need to Cook the Best Steaks You will Ever Eat!

In our family, grilling steaks was always man's work. 
After decades of relying on my father, brothers and husband,
I decided to learn how to grill steaks to perfection myself. 
Let me show you how!

    Grilling Supplies for Great Steaks
  • A Grill
  • Charcoal
  • Chimney Grill Starter
  • A Sheet of Newspaper
  • A Match or Lighter
  • Food ~ We chose 4 Rib Eye Steaks ~ Total weight: 3.82 lbs.
  • Seasonings ~ We only use salt, pepper and olive oil lightly rubbed on steaks 

Setting up the Grill

Slide Through the Photos using the Arrows at the Bottom of thia Google Slides Frame


  • Start with a clean grill
  • Stuff a sheet of newspaper in the bottom
    of your chimney grill starter
  • Turn over starter and fill the chimney grill starter with Charcoal
  • Light the paper at the base of the chimney grill starter with a match or long lighter
  • Wait for charcoal to get ready. It will be mostly gray. This takes approx.
    35 - 45 min.
  • When the charcoal is ready, use a pot holder on the handle of your chimney grill starter and dump the charcoal into the grill.
  • Carefully place the grill rack in place over the hot charcoal on the lowest level closest to the charcoal.
The grill we used is named Maude.  She is my dad's grill and she is over 30 years old - Her handles are gone and her paint is worn, but she still cooks! 

Using a Chimney Grill Starter

  The Chimney Grill Starter is a lot safer than flicking a lit match at lighter fluid doused charcoal.
Food tastes better without the use of lighter fluid too!


Preparing Your Steaks to Grill


If you do it our way, it is really easy and absolutely delicious!  Do not poke or pierce the steak with a fork, knife or any utensil at any point in the preparation or cooking process.  This will allow the meat to retain all of it's flavor and juices.
    How to Grill the Perfect Steak
  • Rub Olive Oil lightly on both sides of each steak
  • Salt and Pepper both sides of each steak
  • Place seasoned steaks on the grill rack
  • Cover grill and steaks for 9 minutes
  • Turn steaks ~ ONLY ONCE
  • Cover grill again and cook an additional 7 minutes for medium or 12 minutes for medium well.
  • Remove steaks from the grill and wrap in aluminum foil.  Allow to rest in the aluminum foil for 5 minutes before you eat.

Step by Step Photos of the Grilling Process

grilling steaks process
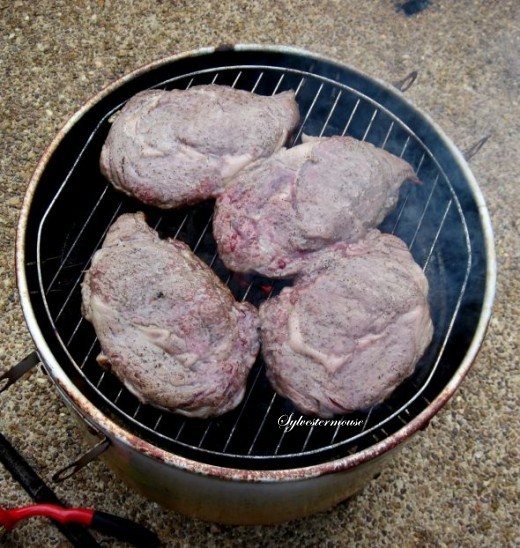
Turn Steaks Only ONCE
cooking steaks on the grill Cover grill again and cook an additional 9 minutes for medium rare or 12 minutes for medium well.
grilled steaks 
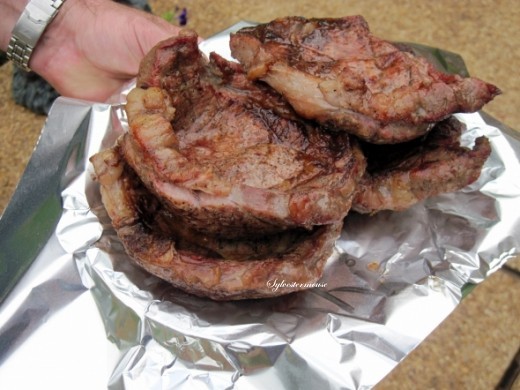
Remove steaks from the grill and wrap in aluminum foil. Allow to set for 5 minutes before you eat.

How to Grill the Perfect Steak - Step by Step Instructions for Beginners
This is my cut steak. I like mine cooked medium well.
I thought you might like to see the inside color of one of
our finished steaks.
This one grilled for a total of 21 minutes.


Now, Isn't that easy!  These steaks are quite delicious too.  They are best you will ever taste anywhere.


More Cooking & Grilling Fun

Join me at Cooking for the Holidays for More Cooking Tips & Recipes


You may also wish to try Grilling Shrimp on the Grill with this Easy Recipe from Sam's Place
For a Recommended Grill, check out this review of the Char-Griller Duo 5050 written by Dawn Rae


Check Out More Recipe & Food Reviews at
ReviewThisRecipes.com


How to Grill the Perfect Steaks - Beginner Tips Reviewed Written by:
House of Sylvestermouse


Note: The author may receive a commission from purchases made using links found in this article. “As an Amazon Associate, Ebay (EPN) and/or Esty (Awin) Affiliate, I (we) earn from qualifying purchases.”


Thursday, July 27, 2017

Review of Owls Head Maine

Owls Head Lighthouse in Maine photo by mbgphoto
Owls Head Lighthouse

Owls Head Lighthouse

Owls Head lighthouse is located in Owls Head Light State Park.  It is at the eastern point of Rockland Harbor and it sits high on a cliff overlooking the harbor.  When I had visited Rockland Breakwater light, I could get a glimpse of it on the hill at the far end of the harbor.

The lighthouse is a very short, stubby looking lighthouse.  When we visited the lighthouse we parked in a lot just before the trail.  I then walked the trail up a hill and around a bend which ended at the Coast Guard station.  From there I climbed a short ramp and then the stairs up to the lighthouse.

It was a foggy day near the lighthouse so it was hard to get good views away from the cliff.  The fog horn was blaring and several people on the trail told me it was too loud to stay their long, however by the time I got to the lighthouse the fog horn had stopped blaring and I was able to photograph in peace.

There was a hill full of wild flowers in front of the lighthouse, mainly daisies which were very pretty.
Owls Head Lighthouse in Maine photo by mbgphoto
Owls Head


Owls Head Harbor

I had read in my guidebook that there was a wonderful small harbor in Owls Head. It is very small harbor but a great place to capture photos of the lobster boats and the gear that is used in the lobster industry.  I enjoyed seeing all of the traps stacked on the dock and the colorful ropes all piled high.  On an old shed across the drive were colorful lobster buoys hung on the outside wall.
colorful lobster buoys photo by mbgphoto

Lobster Boats in  Owls Head Maine photo by mbgphoto
Lobster Boats in Owls Head Harbor

ropes photo by mbgphoto
Ropes
Fishing Boats in Owls Head Maine photo by mbgphoto


lobster traps photo by mbgphoto
Lobster Traps


Owls Head on Zazzle

I  enjoy making my photographs into Zazzle products like magnets, cards, buttons, mugs and much more.  You can see what I have to offer by clicking the link below.


Photographers Guide to Maine

This is the guidebook I use when traveling in Maine.  It gives me lots of great ideas of places to photograph, directions and many helpful hints.  


Note: The author may receive a commission from purchases made using links found in this article. “As an Amazon Associate, Ebay (EPN) and/or Esty (Awin) Affiliate, I (we) earn from qualifying purchases.”


Most Recent Reviews on Review This Reviews


Search for Reviews by Subject, Author or Title

The Review This Reviews Contributors


SylvestermouseSylvestermouseDawn Rae BDawn Rae BMbgPhotoMbgPhotoBrite-IdeasBrite-IdeasWednesday ElfWednesday ElfOlivia MorrisOlivia MorrisTreasures by BrendaTreasures by BrendaThe Savvy AgeThe Savvy AgeMargaret SchindelMargaret SchindelRaintree AnnieRaintree AnnieLou16Lou16Sam MonacoSam MonacoTracey BoyerTracey BoyerRenaissance WomanRenaissance WomanBarbRadBarbRadBev OwensBev OwensBuckHawkBuckHawkDecorating for EventsDecorating for EventsHeather426Heather426Coletta TeskeColetta TeskeMissMerFaeryMissMerFaeryMickie_GMickie_G


Review This Reviews is Dedicated to the Memory of Our Beloved Friend and Fellow Contributor

Susan DeppnerSusan Deppner

We may be apart, but
You Are Not Forgotten


“As an Amazon Associate, Ebay (EPN) and or Etsy (Awin) Affiliate, I (we) earn from purchases.” Disclosure Statement

X