Friday, May 28, 2021

Kandio Non Contact Infrared Sensor Thermometer Reviewed

No Touch Thermometer
At the beginning of the pandemic, I realized I didn't have a very good thermometer in my home.  All of our existing thermometers were decades old and took temperature in the ear or mouth.  Because we were warned about how easy it was for the virus to spread, I decided we needed a no touch thermometer.

I promptly went to Amazon and bought a no contact infrared thermometer.  After waiting weeks for it to be delivered, it didn't work at all upon arrival.  I returned that one and ordered another one that was available.  

Again, I had to wait weeks.  Upon arrival, the second thermometer would turn on, but it definitely did not show correct temperatures.  Not only were the readings way too low, but they were inconsistent.  I returned that thermometer too.  What seemed apparent to me was that there was a lot of trash being sold on the market and the sellers were price gouging.  

Both of those thermometers exceeded $100 price tag, but I really wanted, actually felt we needed, a no touch thermometer.  I was quite frustrated and had no idea how I could get a working non contact sensor thermometer.  Frankly, I was wary of ordering another one so I ordered from a different site.  Same results!

After 3 unsatisfactory orders, I gave up on buying the thermometer online.  I had expressed my frustration to my husband and clearly he was listening because one day he came home with the Kandio No Contact Infrared Sensor Thermometer and it works!!!  

He purchased ours at our local independent pharmacy.  It was in the window when he drove by.  He spotted it and promptly bought one for our household.  Pretty awesome and greatly appreciated!

Before writing this review, I checked the major online sites and couldn't find anyone carrying the Kandio thermometer, but I do see there are sellers on Ebay carrying them.

My recommendation, don't waste your money and time on others!  Seek out the Kandio Non Contact Infrared Sensor Thermometer.


The Kandio Non Contact Infrared Sensor Thermometer

Below is the information on the thermometer that my husband bought for us. Along with the model number, I am sharing what we paid for ours so you know if you are getting a fair price or not.

No Touch Thermometer
Model: GDTWQ36 

Our Kandio thermometer cost: $59.99

Temperature is taken by aiming the thermometer at the forehead (1 - 2 inches away) and squeezing the trigger button on the handle.  Therefore, the thermometer never touches the "patient" and you can easily stand an arms length away.

  • Fast, accurate reading in 1 second
  • Large, easy to read display screen
  • Back-lit display (you don't have to disturb patients rest)
  • Beeps when temperate is taken
  • Auto Shut-off after 1 minute
  • 2 AAA batteries required
 
This has been the only reliable no contact thermometer that I have found available.  How about you?  Have you found a reliable no touch/non contact thermometer?  If so, please share the thermometer product information in the comments below.  We want everyone to be able to check and monitor their own temperature accurately.

Stay Safe & Healthy!
 

No Contact Thermometer on Ebay


Read More Health Related Reviews
Here On Review This Reviews!


House of Sylvestermouse


Note: The author may receive a commission from purchases made using links found in this article. “As an Amazon Associate, Ebay (EPN) and/or Esty (Awin) Affiliate, I (we) earn from qualifying purchases.”


Thursday, May 27, 2021

Review of Shark VacMop


Shark VacMop photo & review by mbgphoto
Shark A1 Robot  VACMOP
After a month with our new dog, Dixie, I knew I needed another solution for keeping our floors free of dog hair and paw prints.  We have had a robot vaccum for several years and I really liked how it worked, however it was getting older and even though we had replaced the battery, it just couldn't handle the whole house without several recharging sessions.  Also, after two very rainy days, I saw that paw prints were also going to be a problem and the vacuum just didn't solve that problem.  I had seen the new robots that had both vacuum and mop features and I was intrigued.

Checking out the Features of the new Vacuum/Mops

There are many new vacuum and mop robots on the market and I found I had to read everything carefully to find one with the features that would work best for our house.  I didn't know much about them when I started out , but I did know I wanted one that both mopped and vacuumed at the same time. That feature alone eliminated several of the models who did one or the other, or that you had to change trays to switch from vacuuming to mopping.  I didn't want that.

I also found that several of the new models were wifi connected and would do a lot using my smart phone.  I even found a few that would work with Alexa or the Google Assistant.

I also wanted one that would really pick up the pet hair and one that would be easy to clean.

Features of the Shark AI Robot VACMOP(TM)

After my research and then checking out the sales, I decided on a Shark Robot. The ads said it was perfect for pet hair, had advanced navigation and a self cleaning brush roll.   Here are the features that helped me make my decision.
   1.  VacMop mode vacuums and mops at the
         same time.
   2.   Vac Mode has several speeds of suction, 
          allowing it to efficiently pick up  debris
         and pet hair.                  
   3.   Row by Row cleaning that has a laser vision 
         to detect and avoid objects.
   4.   It has WiFi and works with both Alexa and 
         Google Assistant.


How I Like my New Robot

I love my new Shark Robot.  When I first got it, I had it do a run to map out our house.  That was really cool how it navigated the house and then I was able to pull up a little map on my Smart Phone.  I then was able to mark carpets or any other area I did not want the robot to mop.  

I have found that it does an excellent job keeping my floors clean and free of pet hair.  I could choose to have it go at a scheduled time, but since we are always home I just tell Alexa when I want it to run.

I have found it easy to clean after using.  I just empty the dust pan and shake out the filter.  I will want to wash the filter once a month.

I am very pleased with my purchase and would definitely recommend this brand and model.


Note: The author may receive a commission from purchases made using links found in this article. “As an Amazon Associate, Ebay (EPN) and/or Esty (Awin) Affiliate, I (we) earn from qualifying purchases.”


Wednesday, May 26, 2021

Wonderful Tools to Help You Age Gracefully-A Product Review

Aging is not for the Faint of Heart, but it's better than the alternative! 

old age quote


This is a quote that many older folks often say and as I'm getting older I would have to agree with them.  There are so many things to be thankful for when we reach that "Golden Age"!   But (and now comes the truth), there are also many things that start to go wrong! Things that we never noticed in our youth.  Like the effects of arthritis on our joints especially hips and knees, fingers and such.

My other half and I look after two more elderly than us, relatives.  My uncle turns 91 today and my mother turns 90 in August!  While we "look after" them, they are still both in good health (relatively speaking) and only require help with shopping, doctors appointments and such.  So we are blessed that they both still have their wits about them.

three women talking


One thing that they both complain about is getting up and down.  Stairs and getting up off of the couch or chair causes them both some measure of discomfort.  They are both showing signs of age related arthritis that can be very painful at times.  That seems to be their most difficult and constant complaint.  They can't get up as easily as they used to!

So we started to look for things that would raise their chairs and couches up a little bit more so that they didn't have to work so hard to get up.  What we found were several options that were affordable, easy to install and provided that extra lift!

Buying new furniture was not an option for either of them or we might have suggested that!

Now my uncle is tall (over 6 ft.) and my mother isn't a shorty either, so we decided to go with something that would give them enough of a lift so that when sitting their knees were at 90 degrees to their hips. Right now, without these risers, their "bottoms" are lower than their knees, making it hard to rise up out of the chair or couch. 

Medical equipment specialists, have chairs that will electronically almost stand a person out of the chair when activated, but that was over doing it where my family was concerned and they are very pricey ($400+).  

Furniture risers seemed to be a great answer and we decided to try it ourselves first because I have very bad arthritis in my knees and was having the same problems that they were having.  We ordered and installed the "iPrimio Furniture Risers" and it could not have been easier.  Simply lift each leg and slide the riser under the foot of the couch and place it back down again.  No holes to drill, no marking up the floors, no slipping either as they have a rubber foot that doesn't slide.  Within minutes our couch was 3 inches higher than it was before.  

risers used under a couch to raise the couch height These are the risers that we have installed on our couch.

Added bonus is that now it is even easier to vacuum under the couch.  With that extra bit of space underneath, the vacuum head easily reaches under the couch!  

You can see in the ad, that there are also risers for bed frames too.  No need to buy a whole new bed assembly, just lift and install the risers and I know you will hear words of thanks coming from your loved ones.  

Bathrooms are also problematic.  Just recently toilets are being  made to what is called a "comfort height".  If they live in their own homes you could hire a plumber to install one of these but again be prepared for a cost that is not average.  A regular standard height toilet will cost  about $150. dollars without installation.  You can get regular height toilets that can cost much more for "decorator styles".  Comfort height toilets will start at $270. plus!  Again that is just for the toilet, installation will cost extra. 

But, when getting up and down is a real effort or causes pain, then you have options that can help your loved ones live life easier with just a few modifications. Safety and comfort for our aging population are important as we try to keep them as independent as possible.

I hope that my experiences with these really easy additions might help you with whatever joint related issues you or one of your loved ones might be having.  

The risers are wonderful and you would never guess that they were added after the fact!  Everyone who comes to our house enjoys sitting on the chairs and couch, not realizing that the extra height makes it so much more comfortable.  Rising from them is no longer a pain in the knees or anywhere else.


reaction quote banner


Note: The author may receive a commission from purchases made using links found in this article. “As an Amazon Associate, Ebay (EPN) and/or Esty (Awin) Affiliate, I (we) earn from qualifying purchases.”


Tuesday, May 25, 2021

The Joanna Brady Mystery Series – Book Reviews.

The Joanna Brady Mystery Series book cover

The Brady Novel of Suspense series is written by J.A. Jance, the New York Times bestselling author of the J.P. Beaumont series and the Ali Reynolds series, plus five interrelated thrillers about the Walker Family.


The Joanna Brady series are filled with beloved characters, small-town charm, vivid history, intriguing mystery, all with the scenic Arizona desert as a backdrop.

~ Quote from the book jacket of Book #18 'Field of Bones'


Joanna Brady (main character) 


Desert Heat book cover
Desert Heat - Book 1 in the Joanna Brady Series

When the series begins in “Desert Heat”, Joanna is a young widow with a 9-year-old daughter (Jenny). Her husband Andy, a police detective in Bisbee, Arizona, was running for sheriff when he was killed by a hit man sent by the Mexican Drug Cartel he had been investigating. Encouraged to run for the office in his place, Joanna, who is also the daughter of a former Bisbee Sheriff, may have originally been elected on a sympathy vote, but she goes on to prove herself as a boots-on-the ground law enforcement officer. 


Cochise County in SE Arizona is 80 x 80 miles square with the southernmost county line the international border with Mexico and the eastern country line the state line with New Mexico. The stories in this series of books take place in and around the town of Bisbee, AZ and throughout the 6400 square miles of the sheriff's office domain.  As you can imagine, this large of a territory to police produces a wide variety of crimes which often have to be investigated under extreme conditions of difficult 4-wheel drive locations and desert weather.


Each book begins with a Prologue which sets the scene for the storyline and introduces you to one or more of the characters. Sometimes the character is a victim; sometimes it's the protagonist whose identity we learn as the story progresses.


Another interesting thing about this continuing series is quite often when a new character is introduced in one book, we find that character appearing in subsequent books. We meet the character in one book and when they appear in later books, the author gives a brief summary of who they are as a reminder to the reader. It is a great way to keep track of who they are and what parts they played. From book to book, the characters all become very familiar to the reader. It also becomes a good way to know what happened to that character we first met, and what they are doing now. 


*Note: It's rather like your new neighbors who just moved to town. They are strangers at first, but after awhile they become familiar friends. 


The storylines in the Joanna Brady series may have murder and mayhem, but they are also filled with family life, interactions with friends and neighbors, introductions to new babies and the latest dog or cat or horse. After all, the sheriff, the deputies and detectives and support staff of the Cochise County Sheriff's Department are also people with family lives that exist outside of work. The stories also give fascinating descriptions to the countryside of southeastern Arizona filled with both desert and mountain areas complete with the sizzling heat of desert summers and the cold of mountain winters. 


Summary


If you enjoy novels of suspense with a good story-line which also gives you the back-story of the interesting characters, you will enjoy this Joanna Brady book series. 


Missing and Endangered book cover
Book #19 in the Joanna Brady Novels of Suspense


List of Joanna Brady Books:


Joanna Brady, a deputy sheriff's widow, daughter of a former town sheriff, and now elected sheriff in Cochise County, Arizona.


  1. Desert Heat(1993)
  2. Tombstone Courage (1994)
  3. Shoot, Don't Shoot (1995)
  4. Dead to Rights (1996)
  5. Skeleton Canyon (1997)
  6. Rattlesnake Crossing (1998)
  7. Outlaw Mountain (1999)
  8. Devil's Claw (2000)
  9. Paradise Lost (2001)
  10. Partner in Crime (2002)
  11. Exit Wounds (2003)
  12. Dead Wrong (2006)
  13. Damage Control (2008)
  14. Fire and Ice (2009)
  15. Judgment Call (2012)
  16. Remains of Innocence (2014)
  17. Downfall (2016)
  18. Field of Bones (2018)
  19. Missing and Endangered (2021)


*Reviewer's Note:  Author J.A. (Judith) Jance grew up in Bisbee, Arizona, a small copper mining town in SE Arizona. I find it interesting that she bases her stories in a real town. one she is so familiar with, and includes real location descriptions. It makes the fiction stories appear very real as if they are happening right now, along with giving you a bit of history of the town and the area. It's a history lesson, a murder mystery, and a suspenseful story, all with interesting characters  who, although fictional, seem like people you have always known. 


I highly recommend the 'Brady Novels of Suspense' series by J.A. Jance.


Related Links:

Book Review of the Ali Reynolds Series by J. A. Jance


(c) The Joanna Brady Mystery Series book review written by Wednesday Elf


Note: The author may receive a commission from purchases made using links found in this article. “As an Amazon Associate, Ebay (EPN) and/or Esty (Awin) Affiliate, I (we) earn from qualifying purchases.”


Monday, May 24, 2021

ReadeREST Magnetic Eyeglass Holder Review


I was going to title this review the "Where Did I Put  My Glasses Review?" Those pesky and elusive reader glasses that one seems to own many, but can never find one? Help is on the way with this simple and so practical solution to keeping those reader glasses handy and safe.
ReadeREST Magnetic Eyeglass Holder


I came upon this handy gadget from the beloved handyman which keeps old houses alive. His work and eyesight required him to be constantly taking his glasses on and off. What a great! idea - no more searching for reader glasses which are never where they need to be - or so many pairs of reader glasses around the house they are becoming apart of the decor.

Kidding aside, if the readers are prescription reader glasses then the cost of replacement cannot be overlooked ...

Easy As 1-2-3


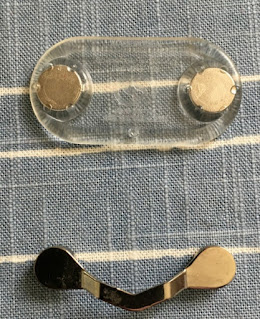
I love a gadget that is easy! And 'installing' this gadget could not be easier. Two pieces plus a few seconds and you are good to go (assuming you can actually find the glasses to add to the gadget.)

both sides of theReadeREST Magnetic Eyeglass Holder


  1. Position the clear base to the location desired on the inside of the shirt/top/coat.
  2. The top base with the eyeglass holder is positioned on the outside of the shirt/top/coat on top of the clear base.
  3. The magnet will attach the two pieces making an eyeglass sandwich.
  4. Voila! The eyeglass sandwich is complete and just add the glasses.

Practical and Convenient


These eyeglass holders are one of the most practical gadgets in my collection. A top purchase! The holders can be easily stored whether on a piece of clothing, purse, wallet, briefcase, the kitchen window. Small, unobtrusive, portable and lightweight and of course extremely practical.

A great stocking stuffer for the holidays!

Shark Tank


What I did not realize until this year was the ReadeREST holders were a product from Shark Tank. I happened across an update article from Shark Tank about the evolution of the glasses from the presentation to present day sales.

The ReadeREST eyeglass holders are available at major retail stores across the country and of course online. I always love an entrepreneur who begins making a product in the garage and succeeds to bring the vision to the marketplace.


Note: The author may receive a commission from purchases made using links found in this article. “As an Amazon Associate, Ebay (EPN) and/or Esty (Awin) Affiliate, I (we) earn from qualifying purchases.”


Sunday, May 23, 2021

What I've Learned on My Self-Publishing Journey So Far


What I Learned on My Self-Publishing Journey

I'm not a self-publishing guru, just someone who decided to jump in with both feet and give it a try.

In October of 2019, I self-published my first book on Amazon. The book features a collection of 50 years of my personal poetry.

After that, I went on a tear and self-published seven more books in approximately twelve months; two are sayings for cards, and the other six are personally written riddle books. I'm currently writing my seventh riddle book. Looking back, I still can't believe I accomplished all that in such a short time. I get tired thinking about it!

My self-publishing journey involved teaching myself every step along the way. It was challenging. 

A Quick Summary Review of What I've Learned About Self-Publishing Non-Fiction Books So Far:


1. Pick a Niche

After writing a poetry book and two books about "What to Write in Cards," I decided that I needed a niche topic. Since I have this crazy ability to write riddles, I decided riddle books would be my niche. However, you can write a series or individual books if you're a fiction author. 

2. Why I Wanted a Niche Topic for my Books

Of course, you can write on any topic and self-publish on multiple issues. That's perfectly fine. However, I wanted to select one area to build a website and social media platform to tie into that topic. For fiction writers, an author website is all you need, no matter the variety of topics you write about.

3. Pick a Name for Your Niche Topic That Can Tie Into Your Social Sites, Books, and Website

I chose #Stumped Riddles, which I use in some form or another on all social media sites. I found it best to tie everything together.

Check out the links:

StumpedRiddles.com

Facebook.com/stumpedriddles

Twitter - @stumpedriddles

Instagram.com/riddlechallenge

4. Set Up Your Amazon Author Page

Here's the link where you can set up your Amazon Author page. You can take a look at my completed Amazon Author page here.

5. Market and Advertise Your Books

Unless you already have a huge fan base or following, you'll need to advertise. I use KDP Advertising and Facebook Advertising at the moment.

6. Set Advertising Goals

Do you want to build traffic to your website or simply sell books? I send my advertising links to my website; from there, customers can link to the associated Amazon page. I choose not to link directly to Amazon as I aim to build authority and traffic to my site.

7. Converse With People On Your Social Media Posts

I post individual riddles on my website and all my social media links. The riddle answers link back to my site. When people take a guess at the answer, I always respond to each person who posts. I plan to get a helping hand in that area when the volume becomes too much. 

8. Check the Negative Reviews on Other Books Similar to Yours

I read multiple negative reviews on books like mine. Those comments give me ideas on what to avoid and add to my books to improve them. 

9. Don't Be Afraid to Change the Design of Your Book

Based on input from others or sales volume, avoid getting stuck with an ineffective design. I redesigned my books thrice before settling on the final layout and content structure. I'm currently revamping all of the riddle eBooks. 

10. Your Book's Cover Design is Key

All the gurus repeatedly stress one particular point... 'Hire a professional to design your book cover." Of course, I didn't listen, lol. However, I did re-do my covers multiple times and have a knack for creating graphics. If cover design is not your thing, consider paying a professional.

11. Watch Self-Publishing Tutorials on YouTube

Many self-publishing gurus (actual gurus) create helpful, instructive videos. I've probably watched 35 videos or more. You'll pick up little tidbits here and there from each one of them. 

Additional Self-Publishing Articles:

Basic Tips for the Newbie Self-Publisher

Matte or Glossy Book Covers

Confessions of a Newbie Self-Publisher

5 Helpful Self-Publishing Tools

3 Tips for a Newbie Self-Publisher

How to Get Started on Your First eBook


Note: The author may receive a commission from purchases made using links found in this article. “As an Amazon Associate, Ebay (EPN) and/or Esty (Awin) Affiliate, I (we) earn from qualifying purchases.”


Saturday, May 22, 2021

Reviewing World Turtle Day

Two turtles sunning on rocks

History and Origin of World Turtle Day:


World Turtle Day was created in 2000. It was founded by Susan Tellem and Marshall Thompson. Today it is an annual event sponsored by the American Tortoise Rescue organization.


Date When Celebrated:  This holiday event is always celebrated on May 23


World Turtle Day was created for two reasons:

  1.  To celebrate and enjoy both turtles and tortoises.
  2.  Bring awareness to the disappearing habitat of turtles and to educate people on how to protect them.


Facts about Turtles and Tortoises.


  • Turtles and tortoises have a long life span. Many species live 35 to 50 years and some have been known to live a lot longer.
  • Some species are carnivores, while others are herbivores. 
  • According to the International Union for Conservation of Nature, 129 of 300 species of turtles and tortoises are on the endangered  species list.      


What's the Difference Between a Turtle and a Tortoise?


turtle on a log by a stream
Source: Pixabay


Both turtles and tortoises are reptiles, dating back over 200 million years. 


The major difference stems from the fact that a tortoise lives on land and a turtle lives in the water for most of the time. Now  I'm sure you realize that "Turtle" you bought at the pet store and the one you saw in the park or even your back yard, was actually a Tortoise.  But even knowing the difference, it's okay if you want to refer to all species as simply “Turtles”. 


Crafty Turtles


TMNT

Handmade plush TMNT dolls
TMNT - Donatello-Raphael-Leonardo-Michelangelo


Favorite cartoon turtles in Amigurumi Crochet inspired by the Teenage Mutant Ninja Turtles.


These crocheted turtle dolls are hand-crocheted in a sage green acrylic yarn. Each turtle has a different color headband - Red for Raphael, Orange for Michelangelo, Purple for Donatello and Blue for Leonardo. The turtle's belly is in yellow yarn. The turtle shell on the back is done in dark forest green. There is a brown belt around each turtle. The eyes are black craft safety eyes.


The turtles are stuffed with a new soft polyester fiberfill. They each measure 6 inches tall and 4 inches across the arms and body. 


Tiny Turtles Plush Animals


Tiny toy plush turtles
Tiny Toy Turtles

These tiny turtles measures 5 inches from head to tail and about 3 inches from the tip of the head to the little turtle feet. Tiny turtles are handmade in the Amigurumi style of crochet using acrylic yarn and filled with soft polyfil.


Tiny Turtles make a darling baby gift or a fun plush toy for any age child. 


Terrance the Tortoise


Plush toy turtle in crochet
Terrance the Tortoise

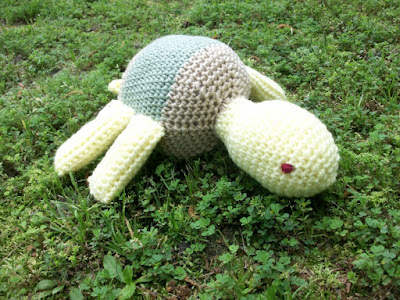
Meet Terrance, a plush stuffed toy tortoise. Terrance is an Amigurumi toy turtle handmade in crochet. You can call him by his nickname, Terry.


Terrance the tortoise is crocheted in yellow, tan and sage green acrylic yarn and filled with soft new polyfil. He measures approximately 10 inches long and 11 inches wide including his legs (about 5 inches across his body with 3 inch legs each side).


Toy tortoise has a tan body with a sage green shell. His head, legs and tail are done in yellow. His eyes are embroidered. He's soft and cuddly and fun for any age child.


All the crafty turtles above are available now or will be back soon in the Etsy shop of Coastal Crochet Crafts. If you want a turtle sooner, just drop a note in the Etsy Shop and Pat will create a custom order for you. :)


Famous Turtles


The most famous turtles are:

  • The four Teenage Mutant Ninja Turtles - Michelangelo, Raphael, Leonardo and Donatello
  • Squirt and Crush from Finding Nemo


Related Links:


Plush Turtles and a Tortoise – Plush Toy Animals Story

World Sea Turtle Day – June 16


Turtle on a log


World Turtle Day review written by (c) Wednesday Elf


Note: The author may receive a commission from purchases made using links found in this article. “As an Amazon Associate, Ebay (EPN) and/or Esty (Awin) Affiliate, I (we) earn from qualifying purchases.”


Friday, May 21, 2021

The Widow and the Highlander Book Review

Widow and the Highlander
The Widow and the Highlander by Martha Keyes is the first book in the Tales from the Highlands series.  After I finished the first book, I immediately wished to move to the second book in the series. It isn't that Keyes didn't wrap up the first novel.  She did. It was simply that I wasn't ready to move on from the story. 

You know you have found a wonderful series of books when you hate the idea of starting a different book by another author. Unfortunately for me, the second book in Tales from the Highlands has not yet been released. 

It is doubtful the I will forget the MacKinnon clan and I have added the The Enemy and Miss Innes (Tales from the Highlands Book 2) to my wishlist so I will know as soon as it is released. I am certain, no matter what else I have started reading, I will move back to this series to continue reading about Catherine and her sister, Elizabeth.

I highly recommend this historical fiction and I am certain I will enjoy the entire series once it is published. 


The Widow and the Highlander Synopsis
Historical Fiction - Scotland 1762

 The Widow and the Highlander
(Tales from the Highlands Book 1)
Check Price
Christina isn't certain what to do next!  She is actually relieved, perhaps even happy, to be a new widow.  After her abusive husband, Gordon, dies due to illness, she finds she can breathe again. That is, until his cousin, Angus MacKinnon, "suggests" she marry him.  Angus and several of his family members had taken up residence at Dunverlockie after the funeral, and don't plan to leave.

Because Christina's father invested deeply in Dunverlockie, he made MacKinnon sign a will that would legally transfer ownership of the estate to Christina if Gordon died before a child was born, Christina now solely owns Dunverlockie.  That does not bode well with the MacKinnon clan and they are determined to regain control of the estate one way or another.

The MacKinnons had originally established ownership of Dunverlockie after Gordons' father betrayed a friend, then set back and watched him executed for treason.  MacKinnon's reward for turning him in as a traitor to the crown, was Dunverlockie.

Christina was not married to Gordon at the time of the execution.  In fact, she would have been a child.  Therefore, she did not know the family that had been removed from the home.  What she did know, was that the MacKinnons were a vicious clan and she didn't wish to remain a part of their family.  However, she had her own siblings to consider and she needed the income Dunverlocke provided.  When she suspected she was being poisoned, she knew she had to do something whether she wanted to or not. After all, aside from her own sister, she didn't know who was an ally and who was an enemy inside or outside of the castle.

 The Widow and the Highlander (Tales from the Highlands Book 1)Check Price


Read More Book Reviews at
ReviewThisBooks.com


House of Sylvestermouse


Note: The author may receive a commission from purchases made using links found in this article. “As an Amazon Associate, Ebay (EPN) and/or Esty (Awin) Affiliate, I (we) earn from qualifying purchases.”


Thursday, May 20, 2021

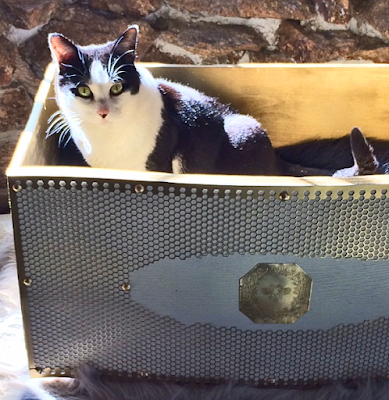
DIY Cat Bed Fit for a Queen


cat in her drawer bed

The ruler of my household happens to be a cat of a certain age known as Miz Grizz.  She is The Queen, and as such, deserves royal treatment.  I noticed that Her Royal Highness is quite fond of the reimagined drawer beds I made for Gracie and Minnie (two Kingdom of Grizz subjects).  The time has come to honor Her Majesty with a cat bed fit for a queen.

open drawer

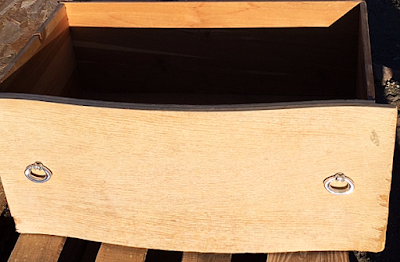
I still had a drawer left over from my first foray into creating upcycled pet beds, so I claimed it for this project.  As I looked around the house for additional inspiration, and potential supplies, a theme quickly presented itself.  One of the first items I found was a metal honeycomb that I decided to use as a stencil for the sides and back of the bed.  Now that I knew I was going with a queen bee motif, it was time to get started.  First, I removed the drawer's hardware.  Then, I sanded all of the surfaces to prep for painting (and filled holes).  

close up of drawer wood

Next, I primed everything with spray paint.  On the outside of the drawer, I used Rust-Oleum Chiffon Cream Chalked Paint.  The drawer's inside surfaces were painted with Rust-Oleum Metallic Gold.  Choosing to go with a metallic finish provided an unexpected, and very appealing, outcome.  How I love the way the underlying wood grain is highlighted by the shimmery play of light.

painted drawer exterior


metal honeycomb sheet

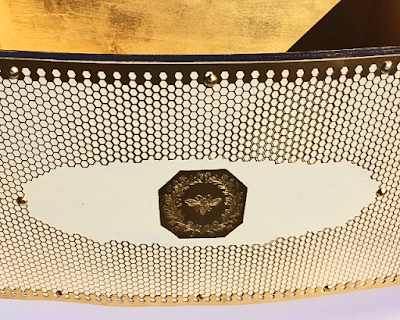
Following the application of the first coats of paint, I used the metal honeycomb sheet to overlay the creamy background with metallic hints of ongoing hive activity.  While working to evoke this effect, an additional idea came to mind.  If I modified the metal sheet for use on the front of the Queen's new bed, it could frame a name plate.

honeycomb sheet attached to wood as decor


That is when I began to envision another feature: an acid-etched brass bee emblem.  Though I had recently experimented with etching copper, I wasn't sure if the same method would work with other metals.  I discovered that the technique worked perfectly with brass.  My new etching became the centerpiece of The Queen's nameplate.

painted jars used as feet

In keeping with the bee theme, I used decorative jelly jars (think royal jelly) for the legs of the bed.  It was just a matter of painting the jars and then attaching the lids to the bottom of the drawer.

DIY Cat Bed Fit with cat inside

Finally, I added a luxurious faux fur mattress fit for a queen.  Miz Grizz works hard keeping everyone in line and has more than earned an extra measure of comfort.  I hope Her Majesty is pleased with my humble offering.  Though it is a small gift, it was made with great love.  She is the Queen of My Heart.

New Demo: Four-Poster Upcycled End Table Pet Bed


Note: The author may receive a commission from purchases made using links found in this article. “As an Amazon Associate, Ebay (EPN) and/or Esty (Awin) Affiliate, I (we) earn from qualifying purchases.”


Wednesday, May 19, 2021

14 Secrets to Growing Strong, Healthy, Beautiful Nails

Weak, fragile, ridged, peeling, flaking or splitting nails are unsightly, embarrassing and sometimes painful. The same is true of cracked, ragged, torn, chewed, or puffy cuticles. I know this because I spent much of my adult life feeling self-conscious about my visibly damaged nails and dry cuticles, and searching for effective ways to improve their length, strength, and appearance. I described the extent of that damage, as well as the remarkable results I have been able to achieve so far, in my recent review and recommendations for choosing the best manicure (and pedicure) tools

In today’s post, I am sharing the things I have done to dramatically improve the strength, flexibility, and appearance of my damaged fingernails and toenails.

How to Grow Healthy, Beautiful Nails

Before I reveal these 14 secrets to growing strong, healthy, beautiful nails, I will offer three important considerations to provide context for these proven strategies.

  • The nail plate—the visible, hard surface to which nail polish is applied—is hardened, flattened, compressed layers of dead keratin protein cells. (That's why it doesn't hurt or bleed when you clip or cut the free edge, unless you accidentally trim too close to the quick.) 
  • The only living tissue is the deeper layer (dermis) of the skin beneath the nail plate (aka the nail bed) and the fold of skin cells at the base of the natural nail plate (aka the nail fold) that produce the cuticle.
  • So, the best way to achieve lasting improvements to the strength, flexibility and appearance of damaged nails is to focus on nourishing and protecting the nail bed and nail fold, keeping the cuticle and surrounding skin moisturized, and protecting the nail plate as much as possible from absorbing excess water. 

Tip: The Nail (anatomy) Wikipedia page provides a helpful, high-level overview of the nails' structure and parts, function and clinical significance. 

1. Protect and heal your cuticles, so they can protect you.

Picking at, biting or cutting your cuticles can open the door to bacteria or fungi, causing an infection that not only will make your cuticles look worse, but also can lead to permanent nail bed damage. Dana Stern, MD, a board-certified dermatologist in New York City who specializes in nail health, explained in a Q&A for Nails magazine, “Cuticles serve as the nail’s natural protective seal. They are next to the most important part of the nail—the nail matrix—and protect the matrix from bacteria and infection. Any trauma to the cuticle area (cutting, biting, picking) can affect the matrix and ultimately lead to irregularities in the nail. Instead, push cuticles back gently and use a cuticle oil or cuticle cream to keep them hydrated and healthy.”

If you have a hangnail, don't pull, tear or bite the off. Remove it right after showering or shampooing, when the dead skin has been softened. If it is next to the side of the nail, file it off with a glass file. If it is at the bottom or corner, use a sterilized cuticle nipper to carefully nip off just the base of the loose, dead skin. Avoid nipping any live tissue. Then use a glass nail file to smooth the clipped root so it doesn't catch or snag on fabrics, etc., and you aren't tempted to pick at or pull on it. I recently discovered that using a Germanikure glass cuticle pusher, which I can hold in a “pencil grip,” gives me much better control when I am smoothing hangnails or calluses.

2. Moisturize your cuticles and nail bed.

The nail bed is the living tissue directly under the nail plate, which extends beyond the cuticle. A well moisturized nail bed is one of the keys to improving the nails’ health, strength and appearance. It not only makes the cuticles smoother and less prone to cracking (which can let damaging bacteria and fungi in), but also makes the nails stronger, more flexible and less prone to chipping, cracking or splitting. 

To keep these areas moisturized, apply cuticle oil, serum and/or cream, then slowly and thoroughly massage the oil into your cuticles and the surrounding skin. Do this every morning and just before bed, at a minimum, and preferably after showering, bathing, shampooing, or washing your hands in hot, soapy water, or using hand sanitizer. It’s a good idea to moisturize your cuticles and the surrounding skin again after washing dishes, cleaning the kitchen, bathrooms, windows, etc., or doing other “wet work” without wearing rubber gloves, and especially if you use household cleaners containing harsh chemicals. If you don’t want to keep multiple bottles, applicators or jars of cuticle oil or cuticle cream in different parts of your house, you can keep one in your bedside stand or table and keep hand cream or lotion near the sinks to massage into your hands and cuticles after getting them wet.

Tip: If your cuticles are very dry and in rough shape, I highly recommend splurging on Deborah Lippmann's The Cure cuticle cream intensive cuticle treatment therapy, which won Allure’s Best of Beauty Award for four consecutive years. I have been using it for many years, and even though I have tried several other highly rated cuticle creams during that time, this rich formula consistently gives me noticeably softer, smoother cuticles and must faster results that, for me, are worth the premium price. 

3. Keep your fingernails dry.

When fingernails and toenails absorb water, they soften and swell. As a result, the thin, translucent keratin layers on the surface can separate, which leads to peeling and flaking. Avoid keeping your hands in warm or hot water—especially hot, soapy water—except when you wash your hands, bathe or shower and shampoo your hair. 

Also, paradoxically, keeping your hands or feet submerged in hot, soapy water dehydrates the living tissue, including the dermis layer of the nail bed and the nail fold. That’s why it’s important to massage in a cuticle oil, serum or cream (or at least a moisturizing hand cream or lotion) right after washing your hands or emerging from the tub or shower. 

Protect your nails and keep them dry by wearing cotton-lined latex or rubber dishwashing gloves for washing dishes, cleaning the kitchen and bathrooms, and other "wet work," and wear gardening gloves while working or playing in the dirt.

4. Clean your nails gently.

Don't use a cuticle stick or other pointed tool that can dig into the quick and open it to bacterial or fungal infections. Instead, scrub the fronts and backs of your nails gently with a wet nail brush and gentle hand soap.

5. Avoid or limit contact with harsh chemicals when cleaning.

When doing housework (including washing dishes) or laundry, minimize contact with harsh chemicals, by wearing rubber gloves whenever possible and, ideally, swapping traditional household cleaning products and laundry detergents for cleaners that don't contain harsh or potentially harmful chemicals. I highly recommend Puracy's natural cleaning products, which have perform as well as, and often even better than, the popular, big-name cleaners I had used in the past. 

6. Use nail hardeners sparingly, if at all.

These products can make nails more brittle and, therefore, more prone to breaking. Nail hardeners can give the illusion of strong nails, but with continued use most can do more damage than good. They should only be considered for nails that are exceptionally weak or fragile, and not for long-term use. 

One exception that I can recommend is Color Street Nail Strengthener, a 3-in-1 base coat, top coat and strengthener that strengthens nails without making them brittle. You can purchase Color Street products, including their nail strengthener, through a Color Street stylist, such as my friend and fellow Review This Reviews contributor Olivia Morris.

7. Use nail polish to repel water and prevent peeling and splitting nails.

Wearing polish not only creates the appearance of more beautiful nails, it can also protect them. In the May 2020 Bustle post “5 Affordable Nail Polishes That Are Actually GOOD For Your Nails,” Dr. Stern explained that, but also can protect nails by helping to prevent the absorption of water, and because polish “binds the nail cells together, so nails are less likely to fray and split.” 

Dr. Stern recommended “10-free” polishes, which don’t contain any of the 10 potentially harmful chemicals most often used in polish formulas. I have tried several 10-free nail polish brands and formulas, and Zoya nail polish is one of my favorites in this category.

It’s also worth noting that the authors of the November 2019 Harvard Health blog post “A look at the effects of nail polish on nail health and safety” wrote, “There is no strong research data regarding whether the chemicals excluded from non-toxic polishes have harmful health effects at the concentrations present in traditional nail polish.”

For the past few years I have been wearing Color Street nail polish strips almost exclusively, rather than liquid nail polish. Read more about these wonderful nail polish strips in Olivia's Color Street nail polish strips product review

8. Never try to flake, peel or scrape off your nail polish.

Although applying basecoat, polish and topcoat can provide some protection and aid with maintaining or growing strong nails, wearing that lacquer will do much more harm than good if it isn’t removed gently by rubbing (not scrubbing) with a cotton ball or pad soaked in acetone-free nail polish remover.

Removers whose primary ingredient is acetone are essentially slightly diluted versions of paint stripper, and while those powerful solvents are effective and efficient, they are exactly the type of harsh, drying, potentially harmful chemicals that you want to avoid. Peeling or (even worse) scraping is even worse. Because lacquer is bonded to the surface of the nail plate, the top layers of keratin are removed along with the polish, leaving them even thinner, weaker and more fragile than before the protective coating was applied.  

So, if you want to achieve or maintain healthy nails, but you either can’t resist the urge to pick at or peel off your polish or don’t have the patience to remove it slowly and gently with acetone-free nail polish remover and cotton, you're probably better off leaving your nails bare.

Experts also advise removing polish no more than once a week (especially if you are using an acetone-based remover.)

Tips for Using Acetone-Free Nail Polish Remover:

I have found that Mineral Fusion and the new acetone-free Color Street Nail Polish Remover work better job than other acetone-free formulas I have tried. However, even the best acetone-free nail polish removers are less aggressive and need more time to soften and dissolve layers of dried lacquer. Try to be patient and resist the temptation to speed up the process by rubbing harder or scrubbing.

If you applied a topcoat, start by scuffing the surface slightly with a few gentle strokes of a coarse salon board, just enough to start dulling the shine a bit. Lightly saturate a cotton ball or pad with acetone-free nail polish remover (so it’s evenly wet, but not dripping) and hold it against the nail for at least 60 seconds before you try to wipe off the polish. Repeat, if necessary, to remove any remaining polish.

I also recommend keeping a few HandsDown Ultra nail and cosmetic pads on hand for removing polish from just one or two nails without putting the rest of them at risk, thanks to the poly film backing and tab “handle.” that keeps the other nails away from the pad and remover. 

Polishes containing chunky glitter are much harder to get off (even with an acetone-based formula. The easiest and gentlest way to remove it is saturate small or mini size cotton balls (or large cotton balls cut or torn in half) with the acetone-free remover and use acrylic nail and polish remover clips to hold a mini cotton ball firmly against each nail. In my experience, it usually takes between three and eight minutes to remove glitter polish this way (and significantly less with an acetone-based formula), depending on how many layers of base coat, glitter polish, and topcoat I’m wearing. 

9. Keep your nails trimmed and the edges smooth. 

Use a glass nail file to smooth out and help seal the edges of the keratin layers to avoid snagging and reduce the chances of breakage. A fine glass nail file is the only type that can be used safely on both the “push” and “pull” stroke, without the risk causing flaking, peeling or splitting nails. (Any other type of nail file or salon board must be used only on the “push” stroke, going from the outer corner toward the center in only one direction, and lifting and repositioning the file to begin each new stroke, to minimize potential loosening of the keratin layers.) 

I recently ordered a few more glass nail files so I could keep one in every room of the house (as well as in my purse and our cars), to help me smooth any rough edges, snags or hangnails as soon as I notice them (and avoid the nervous habit of picking at or pulling on them and making things worse). I decided to try a set of Germanikure Czech glass nail files that come with sturdy, protective, suede leather soft cases. (The company also offers velvet soft cases as a vegan alternative.) The set includes a large file, a smaller, travel-size file, a glass callus remover/heel smoother, and the glass cuticle pusher I prefer to the nail file for smoothing hangnails, rough skin or calluses on my fingers. All the tools in this set are made from a thicker tempered glass than most others I’ve tried, and everything from the tools themselves to the suede leather cases to the packaging demonstrates an attention to detail and a commitment to high quality. I also got a pair of Germanikure Professional Stainless Steel Nail Scissors made in Solingen, Germany, which are also of superior quality. I can highly recommend this company’s products.

10. Eat a nutritious “rainbow” diet that includes foods high in vitamin C, biotin and folic acid (folate).

People who eat a healthy diet with plenty of vitamin C may have smoother, softer skin. One possible reason: Because vitamin C is an antioxidant, it can help protect your skin from free radicals. These break down oils, proteins, and even DNA. Vitamin C is found naturally in vegetables and fruits, especially oranges and other citrus fruits.

Some research studies have found that biotin can strengthen fingernails and make them grow faster. Clinical trials have shown that taking biotin orally can make brittle nails firmer, harder, and thicker, and there is also some evidence that oral biotin may improve vertically ridged nails (a condition known as trachyonychia). You can find biotin in a variety of foods, such as eggs, fish, meat, seeds, nuts, and vegetables. 

A folate (vitamin B9) deficiency can contribute to ridged, weak, brittle or peeling nails. The term folate can mean not only the folate that is found naturally in food but also folic acid, the form of the vitamin used in dietary supplements and enriched foods. To increase your consumption of folate-rich foods, you can eat more leafy greens and cruciferous vegetables (e.g., kale, spinach, arugula, broccoli, Brussels sprouts), asparagus, beets, citrus fruits, avocado, bananas, papaya, melons, eggs, legumes including beans, peas, and lentils, walnuts, almonds, flax seeds, wheat germ, beef liver, and vitamin-fortified and enriched products, including some breads, pasta, cereals, and juices.

Sources: 

Lipner, Shari & Scher, Richard. (2017). Biotin for the Treatment of Nail Disease: What is the Evidence?. Journal of Dermatological Treatment. 29. 1-17. [10.1080/09546634.2017.1395799].

Health Benefits of Biotin, WebMD.

15 Healthy Foods That Are High in Folate (Folic Acid)," Healthline.

11. Consider biotin supplements and folic acid supplements. 

Research studies have found that oral biotin supplements can increase nail thickness and prevent splitting and breaking. If your nails are especially thin and week, you might want to ask your doctor about prescribing a stronger, therapeutic dose of biotin, which has resulted in significant improvements in people with severe nail problems. 

Source: WebMD. (2006, December 16). A Dozen Tips for More Beautiful Nails. [https://www.webmd.com/beauty/features/more-beautiful-nails-a-dozen-tips

You also might also want to consider trying a folic acid supplement. WebMD’s supplement guide to folate (folic acid) [https://www.webmd.com/diet/supplement-guide-folic-acid] provides guidance on the USDA’s Recommended Dietary Allowance (RDA), as well as the maximum amount that most people can take safely on their own, although a doctor might prescribe a higher dose for treating a folate deficiency. Source: WebMD. (2020, July 26). Folate (Folic Acid). [https://www.webmd.com/diet/supplement-guide-folic-acid]

Note: I recommend asking your doctor before taking any supplement.

12. Don't use your nails as tools. 

This is one of the most important secrets to growing strong, healthy, more beautiful nails. It’s also the one I have the hardest time keeping in mind during my day-to-day activities! 

13. Don’t forget your toenails. 

All these secrets for growing strong, healthy nails apply equally to fingernails and toenails. It’s especially important to disinfect pedicure tools after each use, since fungus can grow more easily on toenails that are enclosed in the dark, moist environment of shoes or slippers for many hours each day. Also, to reduce the risk of ingrown toenails, cutting toenails straight across—not at an angle—is a must.

14. Save salon manicures and pedicures for special occasions and bring your own tools.

There is no doubt that a professional salon mani or pedi can quickly give you the appearance of more beautiful nails, at least in the short term. However, while a salon visit might be an affordable indulgence, you also need to consider the hidden cost of the cumulative damage to the strength and health of your nails.

“Water content and other aspects of brittle versus normal fingernails” a study by Dr. Stern and colleagues at Mount Sinai published in 2007 in the Journal of the American Academy of Dermatology, found that the odds of having brittle nails was more than three times greater among participants who received a professional manicure, and that the likelihood of having brittle nails was linked to the frequency of having professional manicures. Possible reasons include exposure to more chemicals and harsher ingredients than you would choose for your own nail polish remover, disinfectant and other at-home manicure or pedicure supplies, and salon owners or technicians who fail to follow their state's disinfection protocols or comply with other health and safety regulations or industry standards.

Experts recommend bringing your own manicure and pedicure tools with you to the nail salon, maintaining separate sets of nail care tools for your hands and feet to avoid cross-contamination, and disinfecting them thoroughly every time you use them, especially after you bring them back from a professional salon manicure or pedicure appointment, to minimize your risk for developing a bacterial, viral or fungal infection.

Bottom line: If you want healthy, strong nails that look pretty with or without polish, save those salon visits for special occasions, and bring your own tools to your manicure or pedicure appointments.

What are your best tips for growing strong, healthy beautiful nails?

We can all benefit from sharing what has (or hasn't) worked well for us or our friends or family members. Thank you!


14 Secrets to Growing Strong, Healthy, Beautiful Nails product review by Margaret Schindel

Read the Other Posts in This Nail Care Tips Series
The Best Manicure Tools For Strong, Healthy Nails

Read More Beauty Reviews From Our Contributors

Read More of My Product Reviews

Read More Product Reviews by Our Review This Reviews Contributors


Note: The author may receive a commission from purchases made using links found in this article. “As an Amazon Associate, Ebay (EPN) and/or Esty (Awin) Affiliate, I (we) earn from qualifying purchases.”


Most Recent Reviews on Review This Reviews


Search for Reviews by Subject, Author or Title

The Review This Reviews Contributors


SylvestermouseSylvestermouseDawn Rae BDawn Rae BMbgPhotoMbgPhotoBrite-IdeasBrite-IdeasWednesday ElfWednesday ElfOlivia MorrisOlivia MorrisTreasures by BrendaTreasures by BrendaThe Savvy AgeThe Savvy AgeMargaret SchindelMargaret SchindelRaintree AnnieRaintree AnnieLou16Lou16Sam MonacoSam MonacoTracey BoyerTracey BoyerRenaissance WomanRenaissance WomanBarbRadBarbRadBev OwensBev OwensBuckHawkBuckHawkDecorating for EventsDecorating for EventsHeather426Heather426Coletta TeskeColetta TeskeMissMerFaeryMissMerFaeryMickie_GMickie_G


Review This Reviews is Dedicated to the Memory of Our Beloved Friend and Fellow Contributor

Susan DeppnerSusan Deppner

We may be apart, but
You Are Not Forgotten


“As an Amazon Associate, Ebay (EPN) and or Etsy (Awin) Affiliate, I (we) earn from purchases.” Disclosure Statement

X