Showing posts with label Product Reviews. Show all posts

Wednesday, October 6, 2021

My New Irresistibly Delicious Keto Cheese Crackers Recipe

Cheddar cheese crackers are one of the few things I've really missed since I embarked on a healthy ketogenic diet in 2019 (and lost nearly 60 pounds). The only acceptable replacement I've found for those famous, small, square cheese crackers in the bright red box with the cutesy name were Defy Foods' yummy keto cheddar crackers, which were sold only online, cost significantly more than their unhealthy, conventional cheese crackers counterparts and, sadly, are no longer made.

Recently, I began experimenting with my own homemade keto cheese crackers recipe, inspired by recipes from two of my favorite low carb recipe developers. I combined elements of both their recipes and added some powdered, dehydrated, real cheddar cheese for an extra flavor boost. This past weekend, I finally perfected my version. Both my husband and I couldn't be more thrilled with the results!

I am delighted to share my delicious new keto cheese crackers.
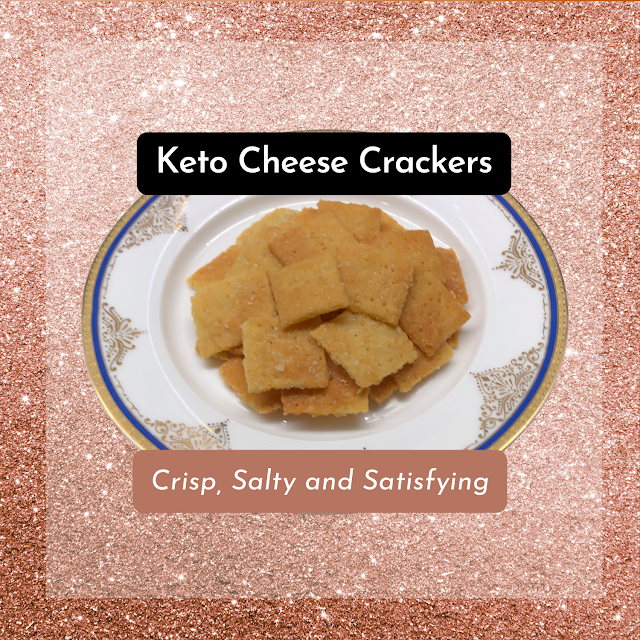
Crisp, Salty and Satisfying Keto Cheese Crackers
My healthy, homemade low carb crackers are bursting with real cheddar cheese flavor

My Inspiration for This Recipe

When I decided to try my hand at making homemade cheddar cheese crackers, I started by searching for recipes on my two favorite low carb keto recipe developers' blogs, Carolyn Ketchum's All Day I Dream About Food</ > and Maya Krampf's Wholesome Yum. Carolyn and Maya are two of my go-to gurus for reliable, delicious recipes that support my low carb lifestyle. 

Carolyn's Keto Cheese Crackers with Pepper Jack looked great, but I'm not a big fan of pepper jack cheese or red pepper flakes. I also wasn't sure that adding garlic powder to the dough would give me the classic flavor I was looking for. The recipe also called for brushing the thinly rolled out dough with melted butter and then sprinkling it with coarse salt before baking. While it sounded delicious, I preferred to start with fewer ingredients and fewer steps for my first attempt.

Maya's Low Carb Keto Cheese Crackers Recipe had fewer ingredients and steps. However, the optional nutritional yeast "for cheesier flavor" wasn't something I had on hand, since I didn't care for the taste the few times I had tried using it as a substitute for grated cheese.

Recipe Experiment #1: Tasty, But Not Quite There Yet

Since I wanted my crackers to have a strong cheddar cheese flavor, I replaced the optional nutritional yeast in Maya's recipe with Vermont sharp cheddar cheese powder. 

The resulting crackers were quite tasty. However, I wanted them to have a stronger cheddar flavor and be a bit more buttery and salty. In addition, the small, fragile squares of thinly rolled dough were quite prone to tearing as I transferred them to the parchment-lined baking sheet.

Recipe Experiment #2: We Have a Winner! 

For my second batch, I changed a few things when I was making Maya's cheddar dough:

  • I substituted twice as much Vermont sharp cheddar cheese powder for the optional nutritional yeast.
  • I increased the amount of salt from 1/4 teaspoon to 3/8 teaspoon. 
  • After stirring together the dry ingredients, instead of combining them with the egg first, I stirred them into the melted cheese along with the egg.

I also made several other changes based on Carolyn's pepper jack cheese crackers recipe:

  • The dough was rolled out on a silicone baking mat sprinkled with almond flour (using parchment paper on top to prevent the dough from sticking to the rolling pin). After pricking and cutting the  dough, it was much easier to just slide the mat onto the baking pan instead of lifting and transferring the fragile squares of raw dough.
  • I used a pizza cutter to slice the sheet of dough into approximately 1-inch squares. (I also didn't worry about trying to cut perfectly parallel and perpendicular lines, since I wouldn't succeed in any event!).
  • Before putting the crackers in the preheated oven, I brushed them with melted butter and sprinkled them with coarse salt.
  • This time, I baked the crackers at 300 ℉ instead of 350 ℉, left them in longer, turned off the oven when they were barely golden brown and left them inside to finish developing their color, cool slowly and crisp up.

Maya and Carolyn are extremely talented, very experienced low carb recipe developers. Combining elements from both their recipes and adding the Vermont sharp cheddar cheese powder turned out to be a winning strategy. This new version produced dozens of perfectly crisp, deliciously salty, buttery cheddar cheese crackers that tasted absolutely amazing! 

My husband adored them, too. (In fact, he might easily have devoured the entire batch on the spot if I hadn't set aside a small plate of these crackers to photograph for this recipe!)

Plate of prepared keto cheese crackers

Wholesome, Homemade Low Carb Cheddar Cheese Crackers That Everyone Will Love

I'm really excited to share my new keto cheese crackers recipe! 

For the many people who follow a low carb or ketogenic diet and have been searching in vain for buttery, salty, flavor-packed low carb crackers that don't cost an arm and a leg, these scrumptious bite-sized savory snacks will satisfy those cravings. Unlike the conventional grocery store kind, these are made with minimally processed, "real food" ingredients. 

These crisp, delicious, high protein cheese crackers are tasty enough for everyone can enjoy, whether or not they are trying to cut back on highly processed foods with empty calories.

They're wonderful to bring to holiday parties or get-togethers with family and friends any time of year. You can indulge without "cheating" on your low carb diet and no one who tastes them will guess that your homemade cheddar crackers are made with almond flour instead of wheat flour.

Who says you can't enjoy holidays treats without gaining weight?

How to Make Keto Cheese Crackers

These irresistible keto cheese crackers are quite easy to make. However, low carb baking is quite different from conventional baking methods. Here are a few important tips to keep in mind, especially if this is your first experience baking with almond flour.

Plate of keto cheese crackers surrounded by recipe ingredients

Choose High Quality Ingredients for the Best Taste and Texture

This recipe calls for only a few ingredients, so the quality of each one will have a major impact on the taste and texture of your homemade crackers. 

For the best flavor, buy a block of good, sharp (or very sharp) Vermont cheddar cheese and grate or shred it yourself just before making this recipe. Cabot Creamery cheddar, which Carolyn Ketchum recommends, is one of my favorite brands, too. 

I used King Arthur Better Cheddar Cheese Powder for these keto cheese crackers, which I had purchased for another recipe and like very much. King Arthur Baking Company (formerly King Arthur Flour) has a a well deserved reputation for excellence and baking expertise. I have relied on their products and recipes for decades. 

It's important to use fresh, finely ground and blanched almond flour for most low carb keto baking recipes. My favorite is Maya Krampf's Wholesome Yum premium almond flour.

You will need two kinds of salt: fine sea salt (or table salt, if you prefer) and coarse or flaked salt. For the dough, I used Redmond Real Salt Ancient Fine Sea Salt, an unrefined, unprocessed sea salt with trace minerals and no additives. It's comparable to pink Himalayan sea salt, but has been "mined in Utah since 1958 from an ancient seabed protected from modern pollution."

After pricking, cutting and brushing the thinly rolled out dough with melted butter, I sprinkled the tops of the crackers with a combination of coarse sea salt and crushed Maldon sea salt flakes before baking. The Maldon sea salt flakes were too coarse to use straight from the package, but crushing them with my fingers and mixing them with the regular coarse sea salt turned out to be the perfect topping.

Use a Silicone Baking Mat and Unbleached Baking Parchment to Roll Out the Dough

Rolling out and cutting the dough on a silicone baking mat and then sliding it onto your baking sheet is much easier than rolling the dough between sheets of baking parchment and cutting and transferring the small, fragile squares to the pan. The best known brand, Silpat, commands a premium price. Fortunately, I've also had good luck with much less expensive silicone baking mats.

It's essential to cover the raw dough with a large sheet of baking parchment paper when you're rolling it out, so that it doesn't stick to the rolling pin. These days, I only use unbleached baking parchment. (Who wants to risk leaching chlorine bleach into their homemade baked goods?) I find the flat, 12" x 16" pre-cut sheets of unbleached baking parchment much easier to use than wrestling with a piece torn from a roll whose curl stubbornly refuses to flatten out. 

Use a Large, Microwave-Safe Bowl and a Sturdy Silicone Mixing Spatula for Making the Keto Cheese Crackers Dough

I often use my 2-quart Pyrex measuring cup as a large mixing bowl, especially for recipes that require melting ingredients such as butter, chocolate or cheese in the microwave. The handle provides a good grip on the microwave-safe glass bowl as you incorporate the dry ingredients and the egg into the melted cheddar cheese.

The best tool for the job is a sturdy, stiff rubber spatula. I prefer the DI ORO Seamless Series Large Silicone Spatula for this purpose, which was named "Winner: Best All-Purpose Spatula" in Cook's Illustrated's March 2017 Silicone Spatulas Equipment Review (paid subscription required)

Roll Out the Dough as Thinly and Evenly as Possible 

The thinner you roll the dough, the crisper your crackers will be. Try to roll out the sheet of dough to as uniform a thickness as possible, which will help the crackers bake at the same rate. (You may want to make the dough near the edges slightly thicker to prevent the outermost row of crackers from browning too quickly.)

Use a Pizza Wheel With a Plastic Blade to Cut the Dough Into Strips and Then Squares

The plastic blade cuts through the dough cleanly without slicing into your silicon baking mat. It's also faster, easier and safer than cutting the small squares with a knife. The OXO 1065872 Good Grips 4-inch Pizza Wheel and Cutter for Non-Stick Pans is very similar to the one I own (which is no longer made) and gets excellent customer product reviews.

If You Are Using a Countertop Oven, Divide the Dough Into Quarters and Bake It in Four Batches

The built-in double wall ovens that came with our 1950s ranch-style house died several years ago. Since then, we have been making do with a countertop oven. (If you are considering one, I encourage you to read Sylvestermouse Cynthia's recent Calphalon Performance Cool Touch Countertop Toaster Oven product review.) 

Unbaked keto cheese crackers on silicone mat in small baking pan

Obviously, having to use a much smaller silicone baking mat and pan (approximately 8.5" x 12.5") that could fit inside my large toaster oven took much longer than using a large silicone mat and baking sheet and baking in a full-size oven. However, as you can see from my photos, it is certainly doable. 

Keto Cheddar Cheese Crackers Recipe

Plate of keto cheese crackers
These buttery, low carb crackers will satisfy your cravings without kicking you out of ketosis. They're yummy enough to share with carb-loving friends and family of all ages, so they're perfect for holidays, football games, parties, kids' lunchboxes and everyday snacks. 

Prep Time   20 minutes

Cook Time  30–60 minutes

Total Time   50–80 minutes

Servings       8–10

Ingredients

  • 6 ounces sharp cheddar cheese
  • 1 ½ cups finely ground and blanched almond flour (plus extra for dusting)
  • 2 Tbsp good quality sharp cheddar cheese powder
  • 3/8 tsp fine sea salt
  • 1 large egg, lightly beaten, at room temperature
  • 1 Tbsp butter, melted
  • Coarse salt for sprinkling

Instructions

  1. Preheat the oven to 300 ℉. Place a large silicone baking mat on your counter, table or other work surface and sprinkle it with almond flour.
  2. Grate or shred the sharp cheddar cheese into a large microwave-safe bowl or a 2-quart (8-cup) Pyrex measuring cup. 
  3. Stir together 1 ½ cups of the almond flour with the cheddar cheese powder and salt.
  4. Microwave the cheese on High at 30-second intervals, stirring with a large, sturdy rubber or silicone spatula until the cheddar is completely melted and has a smooth consistency. 
  5. Stir in the almond flour mixture and the egg and use the spatula to "knead" the dough against the the sides of the bowl. Then, turn out the dough onto a lightly greased sheet of parchment or waxed paper and use your hands to squeeze and finish kneading the dough into a compact ball. The dough should be soft and pliable and feel a bit oily. If it's too sticky to work with easily, you can either chill it for 15 minutes or so or work in another tablespoon or two of almond flour.
  6. Flatten the ball of dough and shape it into a square patty, then place it in the center of the prepared silicone baking mat. Cover it with a large sheet of baking parchment (or wax paper) and roll it out as thinly and evenly as possible (no more than 1/8-inch thick).
  7. Use a pizza wheel with a plastic cutting disc to slice the sheet of dough into small squares or rectangles approximately 1-inch wide (although you can make them wider, if you prefer). You should end up with between 5 dozen and 8 dozen (60–100) crackers, depending on how thinly you roll the dough and what size you make your squares or rectangles.
  8. Prick the tops of the crackers with a fork or toothpick, brush them with the melted butter and sprinkle them with the coarse salt. Then transfer the silicone mat carefully onto a large baking sheet and place it in the preheated oven. 
  9. Bake until the crackers turn a light golden brown and the edges begin to crisp up (approximately 15–30 minutes, depending on the size and thickness), then turn off the oven and allow them to remain inside until they are firm to the touch. Keep a close eye on the color of the pieces around the edges. If they are browning faster than the ones in the center, remove the darker pieces and let them cool at room temperature while the rest of the crackers cool down more slowly inside the warm oven. 

I like to store these keto cheese crackers in single layers, separated by paper towel, inside an airtight tin or large Stasher silicone food storage bags, which are extremely easy to seal and unseal. Layering them with paper towels helps absorb ambient moisture and keep them crisp. However, if they last more than a day or two, you can just pop them back into a 300 ℉ oven for a few minutes. Just be sure to keep an eye on them so they don't get too brown.

My New Irresistibly Delicious Keto Cheese Crackers Recipe by Margaret Schindel

Posts About My Keto Diet Journey

My First Year on The Keto Diet

Preparing to Succeed on the Keto Diet, Part One

Preparing to Succeed on the Keto Diet, Part Two

Low Carb Muffins & Cupcakes: Treats to Enjoy on a Keto Diet

Low Carb Keto Chocolate Yogurt Granola Chip Pudding Recipe

Good Dee’s Keto Cookie Low Carb Baking Mix Review

Hamama Microgreens Growing Kit Review & Success Tips

My Favorite Hamama Microgreens Seed Quilt Accessories

Keto Cheddar Cheese Biscuits With Chives Recipe

The Ultimate Keto Hot Chocolate Recipe

The Best Low Carb Keto Gift Ideas: Keto Gift Guide

The Best Low Carb Keto Cinnamon Muffins

Wholesome Yum Keto Bread Mix and Yeast Bread Recipe

The Good Chocolate 100% Organic No Sugar Dark Chocolate Review

The Best Advice to Maintain Your Keto Diet Weight Loss

My New Irresistibly Delicious Keto Cheese Crackers Recipe

Luscious Low Carb Keto Triple Peppermint Cheesecake Brownies Recipe

Quick & Easy Livlo Blueberry Scones Keto Baking Mix Review

Snack Better With The Best Healthy Keto Cookie Dough Bites

The Best Quick and Easy Low Carb Keto Pizza Recipe

The Best Quick and Easy Low Carb Keto Shortcake Cupcakes Recipe

Comparing the Best Keto-Friendly Chocolate Hazelnut Spreads - No Added Sugars

The Best Low Carb Keto Sandwich and Burger Buns Mix

Blueberry Biscuit Scones — New, Easy, Low Carb Keto Recipe

The Best Keto Pizza Crust Mix With 0 Net Carbs

An Unusual, Delicious Strawberry Chocolate Tea With 0 Calories

Delicious Sugar-Free Keto Cookies That OREO Fans Will Love

Healthy Pistachio Cherry Chocolate Chip Marshmallow Cereal Treats Recipe

Easy, Decadent, High Protein, Sugar-Free Rocky Road Cottage Cheese Ice Cream

The Best Quick & Easy Low Carb Sausage and Ricotta Calzones

How to Make Refreshing Vanilla Italian Soda (With or Without Cream)


Reviews of the Keto Diet by Barbara C. (aka Brite-Ideas)

My Personal Keto Testimonial

How I Stayed Committed to the Ketogenic Way of Eating

Read More Recipe Reviews by Our Review This Reviews Contributors

Read More Product Reviews by Our Review This Reviews Contributors

Read More Reviews About Health and Wellness by Our Review This Reviews Contributors


Note: The author may receive a commission from purchases made using links found in this article. “As an Amazon Associate, Ebay (EPN) and/or Esty (Awin) Affiliate, I (we) earn from qualifying purchases.”


Tuesday, October 5, 2021

WHAT SOLD ON EBAY? FIRST EDITION

Visit this post and discover a few of the interesting items that sold from my eBay store one fine fall weekend in September.

Frequently, friends and acquaintances often ask me what’s sold on eBay lately and I often receive interesting comments when I do share some of my latest sold items on social media. Therefore, I thought that I would do a review of exactly that – what has sold on eBay recently from my own eBay store. Please come along with me and we will check out a few of the interesting things that I sold one fall weekend in September of 2021.

The items that sold are as varied as the stock is in my eBay store, Treasures By Brenda. However, this weekend the sales included just a few gently used and vintage items and none of my new stock although I do have many new items in store. I have actually heard it said that about 80 percent of the items on eBay are new though I think the platform is best when it helps unite buyers with items that are no longer produced and therefore hard-to-find. I have had the pleasure of reuniting many buyers with beloved items that they had as children or even as adults.

I would like to start by sharing my favorite item but I find myself hard pressed to pick just one so here then are the four fun items that sold arranged in no particular order:

HANDMADE BABY OR LAP QUILT


What Sold on eBay? Discover what sold in the first edition of WSOEB. Items included this beautiful baby quilt!

The colors, the stitching lines and the wavy edges of this handmade lap quilt were absolutely darling and I think made it quite special. If I needed a throw blanket, I might have added it to my collection even though it really featured fabrics that are meant for babies. Someone somewhere put a lot of work into making this lovely piece and now it has gone to a new home where someone new will treasure it. You can see the other quilts that I have in my eBay store by clicking right here.

VINTAGE ORIENTAL DIPPING BOWLS


Beautiful little oriental dipping bowls are but one of the things that sold that are discussed in the first edition of WSOEB.

I am not actually sure what these tiny bowls are for. If you know, I’d love to hear. At two inches, they are too small, I think, to be used for dipping though I have called them dipping bowls. Have you any thoughts on what their original purpose might have been? If you are interested, you can discover some similar oriental dipping bowls on eBay by clicking right here.

MOUSETRAP CHEESE BOARD


This is a novelty gift idea, for sure and one that is sure to surprise guests at your next cocktail party. It is a very realistic Acme mouse trap that is oversized so that you can use it as a cheese or small charcuterie board and we know those boards are very trendy right now. I thought of gifting this item to a family member who once had quite a struggle at home with mice. I’m sure she would have responded with a roll of her eyes and exclaimed, “Oh, Brenda!” You can find your own Acme cheese board here on eBay.

TREMAR CORNISH CHIMNEY SWEEP FIGURINE

Curious about what sells on eBay or maybe what to sell? Check out my WSOEB posts and discover items like this Tremar Chimney Sweep Figurine.

Finally, I sold was a little vintage Cornish art pottery chimney sweep or cleaner by Tremar. The company Tremar was located in and named after a village in eastern Cornwall that started producing pottery in the early 1960s. They made pieces that were popular with tourists and that included items like animals, people, vehicles and buildings. Some 'sets' were created to encourage buyers to collect multiple pieces, a technique we know today but was used less often in the middle of the century. The Tremar pottery company closed its doors in the 1980s. You can see all of the Tremar Pottery pieces on eBay by clicking here.

While these items are no longer available in my store, I do have a large stock of interesting and unusual items in my shop. Do drop in!  You can visit my store, Treasures By Brenda, on eBay by clicking here!  

You never know
what I might have
in store for you!
Brenda


Note: The author may receive a commission from purchases made using links found in this article. “As an Amazon Associate, Ebay (EPN) and/or Esty (Awin) Affiliate, I (we) earn from qualifying purchases.”


Monday, October 4, 2021

Gift Baskets for every Occasion - Reviewed


Gift Baskets
Photo By Pixabay

The idea of giving gifts in baskets is centuries old, gifts delivered in baskets have been around ever since someone figured out how to weave a basket.


The Holiday season is without a doubt the most popular time of the year to give a gift basket. In the Holiday season, many corporations send gift baskets to their valued customers as a way of saying thank you for your business.

 Many companies give their employees gift baskets during the season, or all year long as a way of saying, “great job”.


The Holiday season is a time to bring family and friends together, but sometimes that’s not always possible, as family members or friends move away. Sending a gift basket to a faraway family member or friend is a perfect solution for gift giving.


Gift baskets are a practical gift, as the basket or container can be used after the gifts are consumed. Many Holiday basket containers can be used after there’re empty, by filling them with some sort of festive Holiday décor and placing it as a centerpiece on a table.


The Holidays are not the only time of the year to give someone a gift basket. The gift basket industry has grown into a multibillion-dollar business a year. Today you can find or make a gift basket for any theme or occasion.


Here are some other popular times to give a gift basket, Valentine’s Day, Mother’s Day, Father’s Day, Easter, Halloween, New Home, New Baby, Birthday’s. I guess that I could go on and on, but I think you get the idea. As they say, Gift Baskets are for all occasions.


Making your own Gift Baskets:


Making your own gift baskets is fun and easy. For one thing, you can choose the items in the basket to be specific to the person you are giving them to. For example, a coffee or tea basket, a chocolate lovers’ basket, how about a fruit of a cheese basket. Here is a neat idea, A Bakers Basket for someone who loves to bake.


Here is something that many of you may not know. Some years ago, when I was out of work for a while, I started making and selling gift baskets.


No, I didn’t get rich or turn it into a thriving business, but I sure did have fun making and selling gift baskets. I finally had to give it up when I got a new job but I still enjoy making my own gift baskets.


Here is an article that I wrote on my review site. Make a Halloween Gift Basket. It is a gift basket for kids, look and see just how creative you can get with the different ideas for items. The instructions in this article would apply to any gift basket that you want to make.

As I said, making your own gift basket is fun, easy, and creative. So, you can make your own or buy one. Either way gift baskets are a great gift giving idea.


More Gift Ideas from ReviewThis here: ReviewThisGifts.com

Wine Country Gift Baskets Gourmet FeastWine Country Gift Baskets Gourmet FeastCheck the PriceSpa Baskets for Women, Spa Luxetique Spa Gifts for Women, 8pcs Rose Bath Gift Set Includes Bath Bombs, Bath Salts, Bubble Bath, Best Gift Set for WomenSpa Baskets for Women, Spa Luxetique Spa Gifts for Women, 8pcs Rose Bath Gift Set Includes Bath Bombs, Bath Salts, Bubble Bath, Best Gift Set for WomenCheck the Price


Note: The author may receive a commission from purchases made using links found in this article. “As an Amazon Associate, Ebay (EPN) and/or Esty (Awin) Affiliate, I (we) earn from qualifying purchases.”


Friday, October 1, 2021

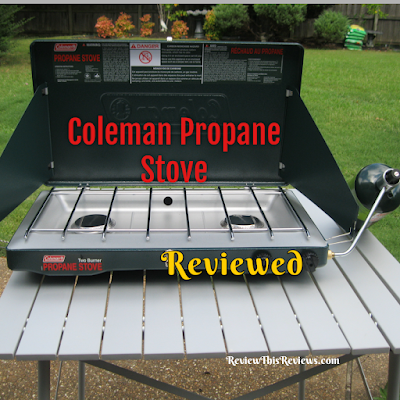
Coleman Classic 2-Burner Propane Stove Reviewed

coleman camping stove
The Coleman Stove is essential for camping and emergencies!

We are all accustomed to everything in our homes working with the flip of a switch or the turn of a dial.  However, when a recent hurricane hit Louisiana, I was reminded of how quickly everything powered with electricity can go out like a light for days, perhaps even weeks.

We have a lot of family in Louisiana and all have been hit hard by the extreme weather in the last 2 years.  Multiple hurricanes, tropical storms and flooding have taken their toll.  Anyone who lives on or near the coast knows they must be prepared for a disruption of utilities, often for extended periods of time.  Because they are so well prepared, we are rarely called on for help.  However, after the last hurricane, our cousin's 1960's Coleman stove stopped working.  They depend on that stove to cook, brew coffee, and even boil water as needed.  It truly is an essential appliance for a home during post hurricane recovery.

He called us and my husband went into immediate action, searching for a new Coleman stove for him.  Here in Tennessee, there were plenty available at the normal low price. He ran down to the local store and purchased the replacement stove for his cousin.

This experience reminded me of how something as simple and common as a camping stove can become life saving in emergency situations.  We need water to survive.  Being able to boil water for purification is an absolute necessity.  

There are several things that become essential for survival in extreme situations.  I would probably rate a generator as number one to keep a refrigerator running, but the Coleman stove would follow close behind. 


The Coleman Classic Propane Stove

There are several styles of Coleman stoves available. We opt for the two burner that will accommodate a griddle, two pans, or one pan alongside a water boiling kettle.  It is small enough to be easy to store, but large enough to really be serviceable.  

coleman camping stove with propane bottle

The Coleman stove does require a bottle of propane (shown in my photo on right), which is also easy to store, inexpensive, and readily available in many of the stores around established camp sites or parks.

Features of the Coleman Classic Propane Stove

  • 2 Adjustable Burners
  • Side Panels to Protect & Block Burners from Wind
  • Uses Attachable/Detachable Propane Cylinder Bottle
  • Easy to Light Flame Burners
  • PerfectFlow Mechanism (regulated, consistent performance)
  • Removable Chrome-plated Grate
  • Easy to Wipe Clean 
  • 3 year limited warranty
  • Portable
closed for travel coleman camping stove


The Stove, Propane, Kettle & Table shown below are the Products Shown in My Photos  


Note: The author may receive a commission from purchases made using links found in this article. “As an Amazon Associate, Ebay (EPN) and/or Esty (Awin) Affiliate, I (we) earn from qualifying purchases.”


Wednesday, September 29, 2021

Nice Fingernails Don't Have To Be Difficult to Achieve! A Product Review

Have you ever just finished polishing your nails and then got an itch somewhere?  What happens?  You scratch and ruin all the hard work you just did trying to get your nails looking pretty!  There is a certain amount of "drying time" needed to keep that polish you just applied, looking as good as it should. 

painting fingernails


Then to add to your misery, you have to remove all that polish that you just mucked up without messing the other hand that you didn't scratch with!  Unless you have three arms, you know that this is just about impossible to do! 

No wonder so many women  have given up on having nice looking nails, or they pay the price to go to a nail salon and have someone do their nails for them.

Now personally I have done that too!  Paying someone to do your nails for you is pricey!  You have to be careful that the nail salon you go to is clean, sanitized and not spreading diseases (fungus especially).  I have had more than one friend end up with an infection in their fingernails because of less than perfect sanitary conditions in a salon they used.  That is truly adding insult to injury!  

Color Street Nail Strips to the rescue!

When you are the master of your own manicures, you don't have to worry about the conditions of the salon!  If you follow ReviewThisReviews.com, I know you have seen Margaret Schindel's write ups on good nail health and the best tools to keep your nails looking good (https://www.reviewthisreviews.com/2021/05/14-secrets-grow-strong-healthy-beautiful-nails.html) (https://www.reviewthisreviews.com/2021/05/best-manicure-tools-strong-healthy-nails.html).  These are very important and if you have daughters, it's a great way to teach them how to take care of their hands and nails.  Good health involves taking care of all your body parts!  It's also a great way to have some fun and spend some quality time with your girls!  Make it a Saturday or Sunday night date to have those hands and nails looking lovely for the whole week to come!

Color Street Nail Strips are relatively new on the market.  They are NOT artificial nails that you paste on your own fingers, but rather they are fully cured nail polish strips that you place right on your own fingernails.  What makes these nail polish strips so nice is that they are dry immediately after application.  No time is needed to dry the polish before you can scratch your nose or ears or any other parts that could itch.  So no way to muck up the freshly applied color.

I have put these nail strips on my own fingers and after a few minutes, washed and dried dishes and then  gone for a swim!   Amazingly these nail strips stayed put, and lasted on my fingers for over two weeks without peeling, cracking or chipping.  They are incredibly strong and beautiful!

Margaret also does some amazing manicures using Color Street Nail Strips either in one set or sometimes mixing different sets to make something truly unique and lovely.  Just take a look at this manicure she did:

nice fingernails

I love the combination of these three different sets of  nail strips.  

Let me explain a little more about these strips:

  • each set contains 16 real nail polish strips  (sized for the average nail beds)
  • each set comes with an alcohol pad to make sure your nails are oil free pre application
  • a small emery board to help with removing the excess nail strip
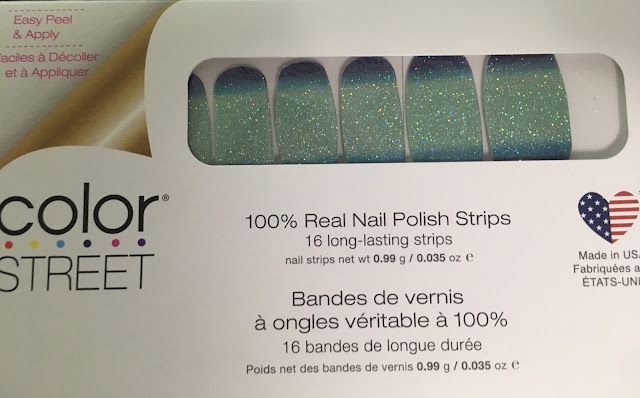
This is what they look like when you receive them:

color street nails
And this is what is inside each package:
color street nail strips

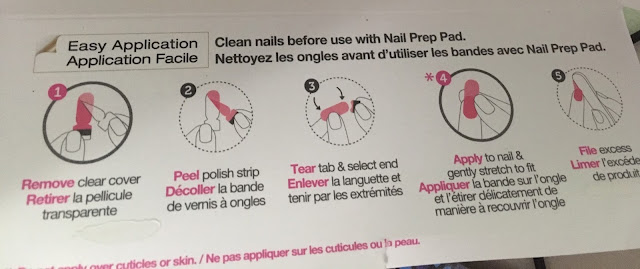
When you open the package right up, you will find easy to follow instructions on how to apply these strips to your own nails.
instructions for applying color street nail strips

You can see for yourself that there are only 5 easy steps to applying these nail strips to your fingernails.  Once they are on, you don't have to wait for anything to dry.  You literally can get up and go!  

I know that this is one of the things my other half likes the best, no waiting 10 to 15 minutes for nail polish to dry before you can do anything else.  Those critical minutes when all of your efforts can go up in smoke!  It just doesn't happen with Color Street!

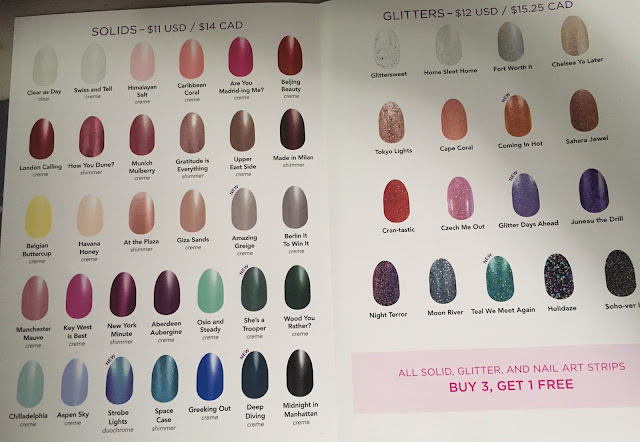
The other part I love is that there are so many choices.  I happen to love glitter and Color Street offers 17 different glitter strips and 4 Prism FX strips (holographic glitter).  There is even a "Glitter Dipped" overlay that makes your nails look like they are dripping with shiny sparks of color.  

But for my more tame days, I can choose from 30 different solid colors too!  Or two different French Manicures.  

Special occasions, no problem, there are 14 different nail art designs (it makes your nails look like someone did some fantastic paintings right there on your fingers).

That is a lot of choices!  Can you just imagine how many bottles of polish you would need to have in order to have all these choices?  

A friend of mine loves mermaids, so there is even an overlay for her and 5 other overlays that change up a plain color to something amazing. The combinations are endless.  Use your imagination and creativity to create something special that is yours and yours alone.

color street colors

color street nail strips

If you want to know more about Color Street, please feel free to leave me a message in the comments!  You can also see the whole catalogue of colors and styles available on my website www.colorstreet.com/olivia72!  I'd be pleased to be of any assistance to you!  Color Street is available through the website in the USA and Canada without any problems!

Here's to lovely hands and even prettier nails!  Believe it or not, little things like nice hands can make a difference in how you feel about yourself and how others perceive you!  It's a little thing, but, it is important to give that totally polished (no pun intended)  and put together look.

friends banner


Thank you Margaret Schindel for your permission to use your lovely manicure picture!


Note: The author may receive a commission from purchases made using links found in this article. “As an Amazon Associate, Ebay (EPN) and/or Esty (Awin) Affiliate, I (we) earn from qualifying purchases.”


Monday, September 27, 2021

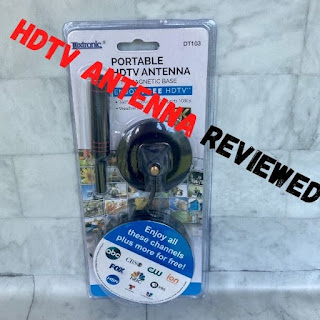
Luxtronic HDTV Antenna Reviewed

If you have cut the cord for cable than you have already discovered an antennae is a prime component of successful cable cutting. Old school rabbit ears is another name. The function is the same, but the styles and choices have greatly increased these past years.


portable HDTV antenna

My old antenna

old antenna


Anyone else remember a rabbit ear antenna with foil! Ah the memories. Recently my hdtv antenna stopped working which really emphasized how necessary an antennae is for any viewing. When I scanned the over air channels without the antennae I had 5 channels. Five channels which looked to be all the same programming resembling informercials.

I quickly started surfing for a replacement and was happy to discover the design of antennae's have vastly improved. A few years ago when I cut the cable cord I had an antenna which was not only  large, but had to be hung in the air for maximum reception. Not pretty, not practical, but still better than a cable bill.

I chose the HDTV Digital Antenna with a very small footprint and am very pleased. So pleased I have purchased a few more to upgrade from the hang from the window antenna version!

portable HDTV antenna

The Antenna by Luxtronic is very small and unobtrusive. It can be used indoor or outdoor with a 50 mile range. 

A simple install by connecting to the TV antenna input and then auto scan the over the air signals and the antenna works wonderfully. If you are looking to aesthetically upgrade your set of rabbit ears, I highly recommend this antenna to access all your over the air channels without the cost of cable.

portable HDTV antenna


Free Streaming Options For Cable Cord Cutters

Kanopy Review

Use your library card to access a huge library for free streaming. Focus on Indie films. No contracts, no subsrciptions!

Hoopla  Review

Hoopla offers free books, movies and television shows through your local library.

Freegal Review

Giant Movie Library featuring Sony's catalog. Another free service offered in combination with your library card. Weekly limit of downloads.

Amazon Prime 

 Amazon Prime is not free, but if you'd like to give the service a spin a 30 day trial subscription can be accessed. More movies, music, tv shows and Amazon Prime content than one imagine!


Note: The author may receive a commission from purchases made using links found in this article. “As an Amazon Associate, Ebay (EPN) and/or Esty (Awin) Affiliate, I (we) earn from qualifying purchases.”


Wednesday, September 22, 2021

The Best Loud, Easy to Read Multi-Event Digital Timers

The ThermoPro TM02 Digital Dual Kitchen Timer is the best, most intuitive, easiest to read and loudest multi-event digital kitchen timer I have owned in many years. In this product review, I will share the features my husband and I love most about this recent addition to our kitchen, as well as a few others considerations to help you decide whether the ThermoPro TM02 might also be the best multi-event digital timer for your needs. 

If you want to be able to time three dishes, activities or other events concurrently, the OXO Good Grips Triple Kitchen Timer is another excellent option, as long as you don't mind having more (and smaller) buttons and a more compressed display for the three countdown timers.

The Best Multi-Event Digital Kitchen Timers - Easy to Read Display, Loud Adjustable Volume Alarms

I often need to set timers for concurrent tasks and activities, especially during holiday cooking and baking marathons and when entertaining. A multi-event digital timer is less expensive, more convenient and more space-saving than two or three single-event models. I prefer ones with intuitive, easy-to-read controls that I can pause and restart with a touch, unlike mechanical dial units.

Digital Kitchen Timers Have Gone Down in Price, Quality, Longevity and Ease of Use 

The best timer I've ever owned was an OXO Good Grips triple digital kitchen timer that I bought roughly 20 years ago. Setting and switching between the three timers was simple and intuitive. The numbers on the backlit digital LCD screen display and the labels on the buttons were easy to read. The alarms had distinct beep patterns (single beeps, double beeps, and triple beeps for events one, two and three) that made it easy to identify which timer was going off, even when I was in a different room. This model was a workhorse that performed reliably in my kitchen for many years before the LCD display eventually started to fail (as these types of digital display screens inevitably do). 

When I went to order another one (about 10–12 years ago), I learned that the manufacturer had discontinued that model. The newer version had more bells and whistles, which I neither wanted nor needed. As a result, navigating, setting and clearing the multi-event digital timers (the unit's core functions) was less straightforward and intuitive on the redesigned OXO Good Grips triple kitchen timer versus its predecessor. Based on the many negative product reviews, I wasn't the only customer who was upset by the design and functionality changes in the newer model. 

Finding a worthy replacement has been a surprisingly challenging, time-consuming and lengthy undertaking. Unfortunately, like many other products, digital kitchen timers have declined substantially in quality. Over the past 10 years or so, every model I have purchased, regardless of price, has had to be replaced 12–18 months later, when one or two segments of the digital numbers no longer show on the LCD display. 

After the display on my second replacement multi-event timer developed a "dead spot," I decided to replace it with a pair of single-event digital kitchen timers. I had hoped that a simpler display screen might not fail as soon, which turned out to be wishful thinking. However, switching from a multi-event model to two bare-bones ones did have one benefit: Whenever the display started to fail on one of them, there was another that still worked and could tide me over until a replacement arrived.

Resuming the Search for a New Multi-Event Digital Timer, Using Updated Requirements

When the LCD display on one of our most recent basic timers developed a "dead spot" a few weeks ago, I decided to see whether any new multi-event kitchen timers had been introduced since the last time I had looked several years earlier and, if so, whether one of them might be a good fit for my husband's and my current needs, which had changed somewhat since my previous searches. 

My first step was to reevaluate, update, and reprioritize our multi-event digital timer requirements list. For example, we no longer entertain as frequently or elaborately as we used to do when we were in our thirties and forties, and our vision and hearing aren't as sharp as they were back then. These days, we would much rather have a dual event kitchen timer with larger, easy-to-read numbers than a three-event timer with a more cramped digital display and smaller numbers that are harder to read. A bright, backlit screen, loud alarms with adjustable volume, large, well spaced buttons with easy to read labels, and an intuitive interface that is simple enough to figure out (and remember) without referring back to the instruction guide or manual. 

My Favorite Easy to Read, Loud Alarm, Multi-Event Digital Timer (Two Event Countdown Timers)

ThermoPro TM02 Dual Event Digital Kitchen Timer

When I was evaluating and comparing products against our new "wish list," I was excited to find the ThermoPro TM02 Digital Kitchen Timer, which seemed to tick all our most important boxes. To my surprise, my husband became just as excited as I was when I took him through the photos, description, specifications and product reviews on Amazon. 

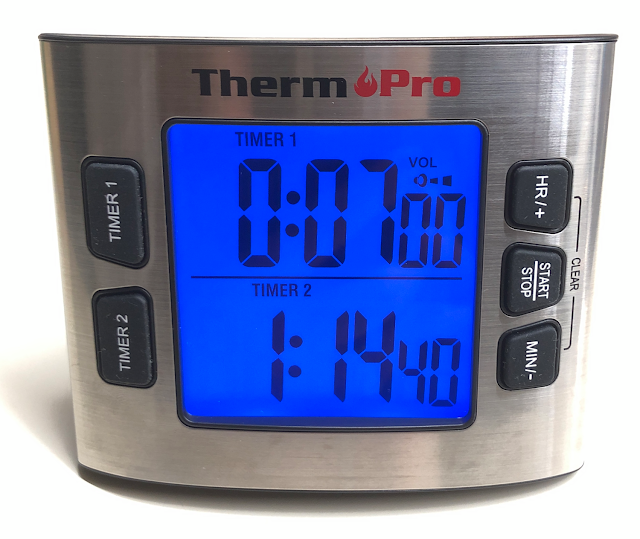
ThermoPro TM02 Dual Event Digital Kitchen Timer - blue backlight turned on
The ThermoPro TM02 Dual Event Digital Timer has a large, easy to read LCD display. The bright blue backlight comes on for 10 seconds when a countdown timer starts or stops and when the alarm goes off.

We have been using our new ThermoPro TM02 multi-event timer several times a day since it arrived a few weeks ago and we're both delighted with our purchase.  

Of course, only time will tell how long the LCD display will last, but we're really impressed with the thoughtfulness and attention to detail that went into this timer, so we're cautiously optimistic. 

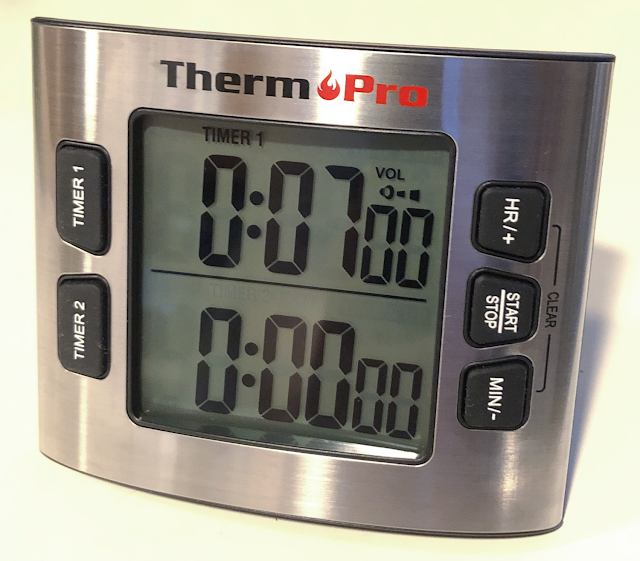
ThermoPro TM02 Dual Event Digital Kitchen Timer with backlight turrned off
Even when the backlight is off, the large numbers of both countdown timers are very easy to read. The front has five large buttons with high-contrast, intuitive labels. 

Why We Love It:

  • Accurate. Unfortunately, not all digital timers are!
  • Easy to read, tilted display with large digits. Unlike many of the smaller, cheaper kitchen timers we have used, the ThermoPro TM02 Dual Event Digital Timer's large, sturdy kickstand stays put and keeps the display at a good angle on the countertop for hands-free viewing. 
  • Large, bright, backlit display. The oversized* LCD display takes up most of the real estate on the front of this timer, which provides enough room for both countdown timers to have large, numbers that are easily legible even when viewed from an angle versus head-on, and even when the bright blue backlight is off.
    * The manufacturer describes it as a 2.6-inch LCD screen. Mine measures 2.375" tall by 2.125" wide and 2.875" on the diagonal. 
  • Simple, intuitive, clearly labeled controls. There are just five large, clearly labeled buttons on the front, plus one mode selector switch and the volume adjustment button on the back. 
  • Ten-second backlight conserves batteries. The blue backlight comes on any time a button is pressed, e.g., to set, start, pause, restart, or stop the timer. Since it's very bright (which is wonderful), it only stays on for 10 seconds each time, so it doesn't chew through batteries like some others we've owned.
    • Some customers have complained that the backlight doesn't stay on long enough. We haven't found that to be an issue, especially since pressing any button turns the light back on for another 10 seconds.
  • Loud alarms with adjustable volume and silent alarm/mute mode. Pressing the small volume button on the back allows you to cycle through four alarm volume settings. The low, medium and high volume levels range from 70-105 dB. We find the medium volume setting loud enough to hear from one or two rooms away. There is also a volume Off setting that mutes the alarm so you can see when the timer goes off without disturbing anyone else. 
  • Convenient memory function. After the countdown finishes, the timer automatically returns to the previous setting. For example, I make a large mug of herbal tea almost every day, and the kind I make most often steeps for seven minutes. After Timer 1 goes off and I press the Stop button, it automatically reverts to seven minutes unless I actively clear the memory, so that all I have to do is press the Start button the next day when I want to make tea. 
  • Set each countdown timer for up to 23 hours 59 minutes. Some digital timers have a maximum time limit of only 60 to 90 minutes! 
  • Choice of 12/24 hour clock format with date function. Although this feature isn't important to us, many people love it. 

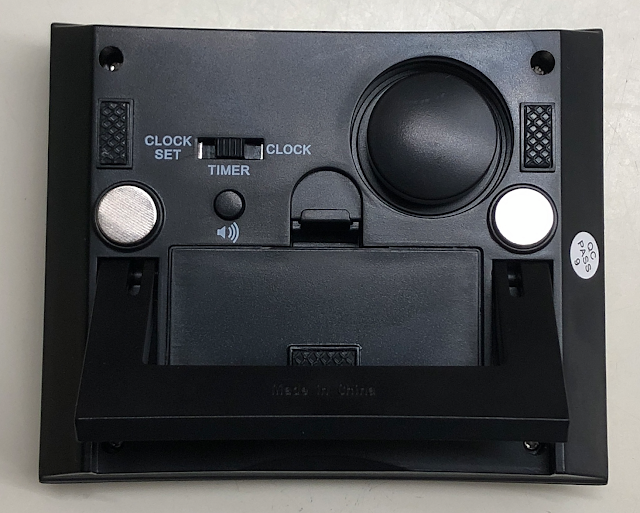
Back view of ThermoPro TM02 Dual Event Digital Timer
A sturdy pull-out kickstand keeps the ThermoPro TM02 dual channel multi-event timer stable on your countertop, or use the two strong magnets to attach it to your refrigerator or another metal surface. A simple, three-position switch toggles between the timer, clock and clock set modes, while the small button underneath controls the adjustable volume alarm loudness settings.

Other Considerations:

  • You can't program seconds. We don't anticipate this being an issue for us. However, there are certain recipes (and other uses) for which the ability to time in 15- or 30-second increments is essential. So, if you work in a commercial or restaurant kitchen, this could be a deal-breaker. Otherwise, if you need this capability only infrequently, you can set the timer to the next full minute and monitor the digital display until there are 15 or 30 seconds remaining in the countdown (or use a countdown timer app on your mobile phone for those situations).
  • Some people find even the low volume (70dB) setting too loud. My husband and I have not found this to be the case. Your mileage may vary.
  • No dedicated "Clear" button. It's quite common for digital timers to be reset by pressing the hour and minute buttons simultaneously, rather than having a dedicated "Clear" button, and it's a practice the America's Test Kitchen reviewers said they didn't mind as long as the buttons were clearly labeled and intuitive. However, some customers still object to it. 
  • This model doesn't switch to clock mode automatically when the countdown timers are not in use. Since the clock on our microwave oven displays the time whenever we aren't microwaving something, we prefer having the display remain in countdown timer mode unless we actively switch it to clock (or clock set) mode. However, some customers have complained about having to switch from timer to clock mode manually.
  • The neodymium ("rare earth") magnets on the back are very strong, but the foam adhesive discs holding them in place are not. My husband and I prefer to keep our kitchen timers on the counter, so this isn't an issue for us. However, if you plan to keep your digital timer on your refrigerator door, one Amazon reviewer recommends prying out the magnets with a thin screwdriver or awl, completely removing the foam adhesive pads and any glue residue, and then using a strong epoxy adhesive to glue the magnets directly into the round, recessed areas in the housing. Be sure to follow the epoxy manufacturer's instructions for preparing the surfaces and applying and curing the glue.
    • Note: Customers who complain that the magnets are not strong enough are mistaken. The problem is not the neodymium magnets, which are extremely strong. It's the cheap foam adhesive discs that are too weak, and there's an easy fix for that. 

The Best Easy to Read, Loud Alarm, Multi-Event Digital Timer (Three Event Countdown Timers)

OXO Good Grips Triple Kitchen Timer

Although I still haven't found a three-event digital timer that I like as well as my old OXO Good Grips Triple Kitchen Timer, if I still needed one I would definitely go with the current version, which has gone through multiple revisions and iterations since the one I owned and loved. 

The current generation OXO Good Grips Triple Kitchen Timer was rated Highly Recommended as the best multi-event digital timer in the June 2021 Cook's Illustrated Kitchen Timers Equipment Review (subscription required). 
OXO Good Grips Triple Kitchen Timer
The OXO Good Grips Triple Kitchen Timer has a full numeric keypad and three dedicated event timer buttons.

Why You'll Love It:

  • Accurate. For us, that's a baseline requirement.
  • Upward angle and sturdy base. Designed for one-handed setting and countertop stability. 
  • Large screen with inverse backlit digital display. Easy to read at a glance, even in low light.
  • Adjustable volume. Three different loudness levels to suit your preference. 
  • Each event timer can be set for up to 99 hours, 59 minutes and 59 seconds. I'm not sure why someone would need a 100-hour maximum time limit unless they were an NBC producer timing one of Al Roker's multi-day Rokerthons, but it's nice to have the option available.  
  • Easily identifiable event alarms. Just like my old OXO Good Grips Triple Kitchen Timer, the current model also has three distinct beeping patterns, so you can tell which event alarm is going off just by the sound, even if you are in a different room. 
  • Numeric keypad lets you set the clock and event timers faster. It also uses a numeric keypad instead of the more common -/+ buttons to set the countdown timers and clock. According to the June 2021 Cook's Illustrated Kitchen Timers Equipment Review, it took the America's Test Kitchen product testers, on average, less than half the time to set the timers on models that had full keypads than on models that did not.
  • Convenient memory function. All three event timer remember their last settings until you clear them from memory.

Other Considerations:

  • More buttons to press. The numeric keypad means you need to press more buttons to set the timers or clock (versus just two -/+ buttons to increase or decrease the time).
  • Smaller digits. Fitting three event timer displays on a smaller LCD screen than that of the ThermoPro TM02 Dual Event Kitchen Timer means "the digits on the screen are slightly smaller than ideal," as the America's Test Kitchen reviewers wrote.
  • Backlit screen display goes blank (“standby mode”) after 60 seconds. A frustrated Amazon reviewer who loved nearly everything else about this OXO Good Grips Triple Kitchen Timer called this issue a deal-breaker.

The Best Loud, Easy to Read Multi-Event Digital Timers product review by Margaret Schindel

Read More of My Product Reviews

Read More Product Reviews by Our Review This Reviews Contributors


Note: The author may receive a commission from purchases made using links found in this article. “As an Amazon Associate, Ebay (EPN) and/or Esty (Awin) Affiliate, I (we) earn from qualifying purchases.”


Most Recent Reviews on Review This Reviews


Search for Reviews by Subject, Author or Title

The Review This Reviews Contributors


SylvestermouseSylvestermouseDawn Rae BDawn Rae BMbgPhotoMbgPhotoBrite-IdeasBrite-IdeasWednesday ElfWednesday ElfOlivia MorrisOlivia MorrisTreasures by BrendaTreasures by BrendaThe Savvy AgeThe Savvy AgeMargaret SchindelMargaret SchindelRaintree AnnieRaintree AnnieLou16Lou16Sam MonacoSam MonacoTracey BoyerTracey BoyerRenaissance WomanRenaissance WomanBarbRadBarbRadBev OwensBev OwensBuckHawkBuckHawkDecorating for EventsDecorating for EventsHeather426Heather426Coletta TeskeColetta TeskeMissMerFaeryMissMerFaeryMickie_GMickie_G


Review This Reviews is Dedicated to the Memory of Our Beloved Friend and Fellow Contributor

Susan DeppnerSusan Deppner

We may be apart, but
You Are Not Forgotten


“As an Amazon Associate, Ebay (EPN) and or Etsy (Awin) Affiliate, I (we) earn from purchases.” Disclosure Statement

X