Showing posts with label kitchen gadgets. Show all posts

Saturday, July 24, 2021

Is the Lemon Pod the Best Lemon Keeper?

Let's review why I love my Lemon Pod and why I think it most definitely IS the best type of lemon keeper or lemon saver around.   You could always try and convince me otherwise of course!

The Lemon Pod Review
The Lemon Pod (photos Lou16, design Canva)


I do love lemons and have over the past year discovered lemon and blueberry proats which have become my absolute favourite breakfast.   When making these proats I only use half a lemon.   What I would do before I had the Lemon Pod was - I placed the remaining half of the lemon in a plastic sandwich bag and stored it in the fridge until the next day.

Obviously, this is not very environmentally sound so I decided to look for a lemon keeper or lemon saver.   During my hunt I discovered the Lemon Pod and I thought it was the best one available so I brought it.   I absolutely love it and use it along with my lemon squeezer several times a week.

What attracted me to the Lemon Pod?  It's not a rigid container that you just pop your lemon half in, it has a top that actually stretches to fit the lemon.   The different sizes of lemons that I get throughout the year can all be catered for with the Lemon Pod.

The Lemon Pod is actually made up of two pieces.    A bottom solid piece of heavy plastic is where you put the half lemon, cut side down.   The top piece has a heavy plastic ring around the outside which twists into the bottom locking it in place.   The middle of this top piece has a stretchy material that stretches over the lemon.   When you take the lemon out the stretchy material goes back to its 'normal' size.

I believe that as this stretches to 'fit' the lemon it helps it to stay fresh longer because less air can be trapped in there.  To be honest, I couldn't tell you exactly how long the lemons will stay fresh because the longest I've kept half a lemon is two days, but I won't part with my Lemon Pod and I won't swap it for another Lemon Keeper.

If you don't fancy trying proats and you don't add lemon juice to your hot drinks you might be interested in trying a couple of sweet lemon recipes a couple of our contributors make.   First Sam makes fresh Lemon Hand Pies which sound absolutely delicious and then Mary Beth makes some amazing Lemon Cookies.


Note: The author may receive a commission from purchases made using links found in this article. “As an Amazon Associate, Ebay (EPN) and/or Esty (Awin) Affiliate, I (we) earn from qualifying purchases.”


Wednesday, February 10, 2021

Open Jars Easily With Jar Heads Rubber Jar Opener Gripper Pads

I have always found opening jars with very tight lids to be a challenge, since I have fairly small hands and limited grip strength. Now that I'm over 65 and my hands are weaker, that task evolved from a challenge into a struggle, until I discovered Jar Heads rubber jar opener gripper pads. They make opening jars significantly easier for anyone, and are especially helpful for someone with small, weak, or arthritic hands. They're also thoughtful, practical gifts for seniors. 

Here is my product review of these terrific Jar Heads jar opener rubber grips, which have become kitchen essentials at our house.

Jar Heads non-slip textured rubber grip Jar Openers - Made in the USA from 100% post-consumer recycled tires

Finding the Best Jar Opener For People With Limited Grip Strength or Arthritis Can Be Hard

There are many types of jar opening tools and gadgets on the market. Many, if not most, claim to be good for seniors and people with weak hands or arthritis. Nearly all of them have mostly 5-star ratings and glowing reviews on Amazon. (It's really unfortunate that Amazon's customer ratings and reviews system seems to be easily "gamed," and isn't nearly as helpful in making purchasing decisions as it used to be.) So, despite having more experience than most with online product research and comparison shopping, I found that picking out a jar opener that had a high probability of living up to those claims was a bit like playing roulette. 

So, if you are looking for an extremely effective jar opener that not only would be a welcome addition to any kitchen, but could also be a blessing for someone with small or weak hands, arthritis, or limited grip strength, I hope to spare you considerable time and effort by summarizing the most popular types of jar openers available and sharing some of the products I purchased, or seriously considered, before I discovered the awesome Jar Heads rubber jar gripper pads that I have been using, and loving!

The Most Popular Types of Jar Openers and Rubber Jar Grips

Traditional Handheld Jar Openers

In my experience, most traditional jar openers and screw-top bottle openers are only moderately effective, and often quite frustrating. 

  • None of the ones without teeth that I've tried over the years, especially the strap wrench (AKA grip wrench or loop wrench) types, have worked well on very tightly sealed screw-top bottles or glass jars with metal lids.
  • I've found that, for the most part, jar openers with sharp, serrated teeth (like the older version of this OXO Good Grips Jar Opener I've owned for many years) can be more effective than the "toothless" models at breaking the vacuum seals on new, unopened glass food jars. Unfortunately, they often end up skidding around the rim of those stubborn, firmly stuck, tightly sealed metal lids, rather than biting into and gripping the metal securely as you twist the lid counterclockwise. Consequently, the teeth can score a deep, sharp-edged gash around the perimeter of the pugnacious jar lid, whether or not the jaws successfully break the seal and loosen the lid. Sometimes I have had to wrap the sides of those lids with flexible, nonwoven, self-adhesive bandage strips to protect our hands from the sharp, jagged-edged score lines around the rim when we subsequently open or close the jar.
  • All these types of handheld jar openers require not only grip strength in both hands (the one that holds the jar and the one that turns the lid), but also sufficient leverage to twist the jar and lid in opposite directions. 

Mounted, Under-Cabinet Jar Openers

Two of the issues with traditional handheld jar lid and screw-top bottle openers are weak grip strength and lack of leverage. A jar opener that is mounted securely to the underside of a cabinet above the kitchen counter(s) and has a V-shaped area with large, serrated metal teeth on one side of the "V," such as the popular and highly rated EZ Off Jar Opener, can help with both these issues, and also accommodate a wide range of bottle cap and jar lid diameters. It enables you to grip the jar more securely with both hands as you turn it counterclockwise, and holds the lid firmly in place as you twist the container.

When trying to open very tightly sealed jars, however, the large, serrated teeth could bite into the sides of the metal lids deeply enough to cut grooves or gouges with sharp, jagged metal edges.

Automatic Electric Jar Openers

Many women (especially those who have limited grip strength), seniors, and people who suffer from arthritis are fans of automatic electric jar openers, and find that these (theoretically) hands-free electric openers give them a greater sense of independence in their daily lives. They can be quite effective at opening straight-sided glass jars (ideally without rounded "shoulders" at the top) that have tightly sealed, hard-to-open, metal screw-top lids.

However, these kitchen gadgets are more expensive than most manual bottle or jar openers, and have some limitations that manual openers don't. 

  • These automated openers should not be used with plastic jars or on plastic lids. 
  • While it is possible to use this type of automatic opener with tapered glass jars, doing so requires placing a hand on top of the gadget and maintaining firm downward pressure to prevent the plastic arms from slipping. Obviously, that isn't optimal, particularly for someone with arthritic or weak hands.
  • If one of these electric jar openers malfunctions, or just slips off a glass jar with "sloping shoulders" (potentially knocking it over, and perhaps causing it to break), they don't turn themselves off automatically, which I consider a safety risk. 
  • This type of opener operates fairly slowly, and it is important to wait until the entire automated cycle is complete before removing both the gadget and the newly-loosened bottle or jar lid. For someone who either lacks patience or needs to prepare a meal in a hurry may find this wait frustrating, or even be tempted to try to stop or remove their automatic electric jar opener prematurely. If they remove it during the cycle, the opener will continue to operate until the cycle completes, and stopping it mid-cycle would require removing the batteries while it was still running, which would be dangerous. 
  • They are wider and bulkier than most other types of jar openers, and may not fit in a crowded kitchen tools drawer.  
  • Most run on two AA batteries, which will need to be replaced for as long as the product remains in use. 
Despite those limitations, these electric jar openers are a wonderful option for anyone who is physically unable to grip both a jar and its lid securely and twist it open with the aid of a handheld or under-cabinet jar opener or rubber gripper pads. As long as they can press the enormous button on the top of this tool to initiate the cycle, the process of opening a jar is fully automated and hands-free, except for jars that are tapered or have rounded "shoulders." (As I mentioned, opening those types of jars requires placing a hand on top of the device and holding it firmly in place throughout the entire automated cycle, to prevent it from slipping off the lid, which makes that a hands-on vs. a hands-free operation.)

Rubber Jar Openers AKA Rubber Jar Grips, Jar Opener Rubber Grips

I would never had considered buying a rubber jar opener, or even looked at the terrific Jar Heads rubber jar opener gripper pads, if my husband and I hadn't received one as a promotional gift from our favorite local barbecue restaurant many years ago, when we lived in Boston's Back Bay neighborhood. It was a large, pig-shaped cutout made from a thin, pink, textured rubber sheet, emblazoned on one side with the restaurant's whimsical logo and its address, phone number, and website in bold, black permanent ink. At the time, we thought it was a cute idea, but nearly threw it out. How could this flimsy piece of rubber sheet work better than a traditional jar opener with sharp, serrated, stainless steel jaws? 

Fortunately, we never got around to tossing it. One day, on a whim, I decided to give it a try. I was astonished at how much faster and easier I could open a brand new jam jar with an extremely tight lid by using this silly, pig-shaped, subtly textured rubber "rag" than with any of the traditional handheld jar openers I had owned over the years. When my husband came home from an errand, I was excited to show him how much more securely I was able to maintain a grip on a stubborn lid and twist it open successfully with Porky's help, compared to my usual struggles with hard-to-open jars. Seeing how well it worked for me piqued his curiosity, and he wanted to experience the difference  between using this thin, rubber jar opener pad and using our traditional model, with stainless steel jaws with large, sharp teeth on one of the sides. Even though my husband is very strong, has a powerful grip, and doesn't need the help of a jar opener most of the time, he also was impressed by Porky's performance. He also liked the idea of using this simple rubber jar gripper pad to help him subdue the occasional extra-defiant lid and break the vacuum seal without having to rely solely on brute force. 

It's ironic that this mildly amusing, but seemingly worthless piece of thin, floppy, lightly textured rubber sheet, which we had nearly thrown in the trash bin, turned out to be by far the most useful, memorable, and appreciated promotional item either of us has ever received from any business. In addition, my husband and I soon figured out that if we could get two of these rubber jar openers, using one in each hand would strengthen my grip on the jars as well as the lids and increase my leverage, so that I wouldn't need as much strength or have to use as much force to open even stubborn jars with tightly sealed lids. 

At the time, our crazy work schedules and pressing family health issues left us with neither the time or energy to pursue the possibility of acquiring a second Porky. Then, after several years of loyal service, poor Porky met his demise in the line of duty, when the thin rubber sheet tore as grappled with one recalcitrant jar lid too many. Since we were no longer living in the city, I decided to call the barbecue restaurant and ask whether they still had any of their old promotional jar opener rubber grips and, if so, whether they would let me purchase half a dozen (two for immediate use and four more as spares). That's how I learned, to my dismay, that the restaurant had closed the previous year.

It was it was time to begin the search for a worthy successor to our beloved porcine rubber jar opener. 

I looked high and low for something similar, but there wasn't much to choose from at the time. I purchased a pair of white, flower-shaped, jar opener rubber grip pads, currently sold as NORPRO 597 Non-Slip Rubber Jar Openers, so I could use one in each hand to help me hold the glass jar securely while I twisted the lid open. I also liked the wider, 5.5-inch diameter of this style, and the rubber was thicker and, presumably, more durable. Unfortunately, that thickness made the rubber much stiffer and less pliable, so it couldn't conform to the lid, and the surface was smooth and almost slick, all of which made it harder to get a good grip with these, despite the "non-slip" marketing claim, 

A few years later, I found two more possible contenders. One was a set of natural rubber jar openers with an open waffle pattern similar to foam shelf liner, which also had a wider, 6-inch diameter. And, since they came in a set of four, I would have one to hold the jar, one to grip the lid, and two extras for backup. However, I worried whether the soft foam material and open weave might make them less grippy or less durable than I needed (or both), and in reading through the customer reviews, I found several that mentioned those issues. 

The other contender, the Prepworks by Progressive Jar Grips Multi-Purpose Lid Openers, looked very promising. This set of three rubber jar openers includes one teal blue, square grip pad approximately 5" wide, made from thin, flexible, lightly textured rubber sheet that looks to be very similar in weight, thickness, and flexibility to that the jar opener we had; a somewhat smaller green round sheet made of a slightly thinner material, and a red, 2" wide, rubber grip shaped like a truncated cone for gripping bottle lids, and made thicker and, presumably, somewhat sturdier material. Unfortunately, as I read through the numerous reviews, many of the customers who gave this set 5-star ratings did so primarily because of the bottle opener. People seems much less enthusiastic about the two rubber jar openers, which some considered too flimsy and likely to tear.

Jar Heads Rubber Jar Opener Gripper Pads for the Win!

When I felt that my search for Porky's replacement had reached the point of diminishing return, I decided to stop looking for additional candidates and go with options I might have missed, order a set of Jar Heads rubber jar openers, and cross my fingers that they would actually live up to their claims. 

Lady Luck must have been smiling on me, since the first time I used my new Jar Heads rubber jar opener grippers, I knew at once that I had hit the product roulette jackpot with these well made, easy to use kitchen gadgets!
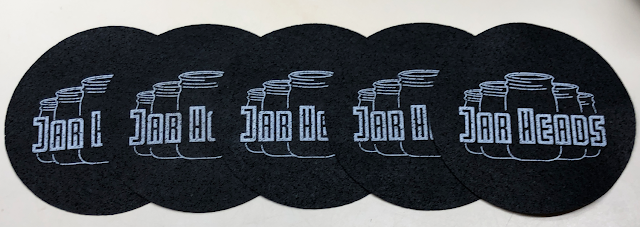
Row of five Jar Heads rubber jar opener gripper pads

Here are the main attributes, features, and benefits that led me to choose Jar Heads Rubber Jar Opener Grippers over the other rubber jar openers on my "short list" of contenders. 

Thin and Flexible Enough to Conform to Jars, Bottles, and Lids, Yet Tough Enough to Hold Up Under Pressure, and Over Time

  • Even though these jar opener pads are only about 1/16" thick, they're also sturdy and substantial.
  • Made from recycled rubber tires, which are designed to withstand much more abuse than twisting open bottle and jar lids! 
  • After 10 months of frequent use, and being squeezed into a drawer crammed with kitchen tools and kitchen gadgets in between uses, all five of our Jar Heads still look, feel and perform the same as they did when I first opened the package. 

Made From 100% Post-Consumer Recycled Tires

  • Uses sustainable, eco-friendly, recycled material and manufacturing practices.

Superior Grip Strength Lives up to "Non-Slip" and "Works Great for Weak Hands,...Seniors With Arthritis and Children" Claims 

  • While nearly every rubber jar opener product’s marketing makes these claims, few live up to them.
  • By contrast, Jar Heads take advantage of the powerful grip strength that has been engineered into the rubber tires from which these jar opener gripper pads are made, which also gives them exceptional durability

Jar Heads rubber jar opener gripper pads next to jar and bottle
Wide Enough to Grip Large Jars, Flexible Enough to Grip Small Bottles

  • The 5" diameter make these rubber discs are wide enough to grab onto even oversized pickle jars or  party-sizes pretzels sold in bulk at warehouse stores like Costco or Sam's Club.
  • They are also thin and flexible enough to grip a small, slender hot sauce bottle and its extremely small screw-on lid. 

Made in the USA

  • Buying products made in the USA supports American companies, workers, and their families.  

Sold in Sets of Five

  • That's enough to share, or use in pairs, and still have spares!

Strong, High-Quality Jar Openers for $2.50 Apiece

  • At the time this post was published, a 5-pack of Jar Heads was selling on Amazon for $12.50, with free shipping for Amazon Prime members. That works out to just $2.50 each for these excellent jar opener rubber grips! 
  • At that low price, you could give these out as stocking stuffers to everyone on your holiday gift list, or as small "just because I'm thinking of you" gifts any time of year.

30-Day, 100% Money-Back Satisfaction Guarantee

  • I respect and prefer to buy from companies that have enough confidence in the quality and performance of what they make or sell, and have a strong enough commitment to their customers to stand behind their products with a risk-free, 100% money-back satisfaction guarantee. 

    Jar Heads are sold by First Class Products of NY, which describes itself as a "Small Family Run Business founded in New York" on its Amazon Seller Profile Page, where you can contact them directly with a question or concern, and also read the overwhelmingly positive seller feedback from their Amazon customers. 
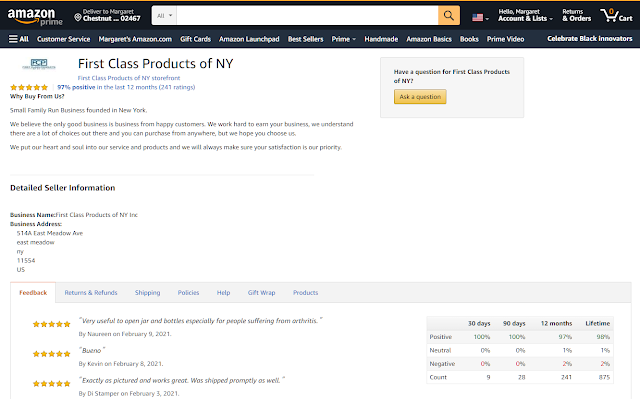
Screenshot of Amazon seller profile for Jar Heads
A screenshot of the seller's Amazon Seller Profile page 

Jar Heads Make Great Gifts for Seniors

Or Anyone With Small or Weak Hands or Limited Grip Strength

  • Gives them more confidence to open jars and bottles by reducing the legitimate fear of losing their grip on glass containers and knocking over or dropping them, potentially causing them to break into dangerous, sharp glass pieces and shards.
  • Reduces the frustration and embarrassment of needing to rely on someone else to take care of this routine task for them, and waiting for someone to be available to help.

A Helpful, Inexpensive Aid That Makes Anyone, Regardless of Their Grip Strength

  • Even people who have strong enough hands to loosen tight lids or break the vacuum seals on new, unopened bottles and jars will appreciate how much less effort it takes to open them with the help of these Jar Heads rubber grip pads.


Jar Heads Rubber Jar Opener Gripper Pads product review by Margaret Schindel

Read More of My Product Reviews

Read More Product Reviews by Our Review This Reviews Contributors


Note: The author may receive a commission from purchases made using links found in this article. “As an Amazon Associate, Ebay (EPN) and/or Esty (Awin) Affiliate, I (we) earn from qualifying purchases.”


Monday, May 18, 2020

Reviewing the Dexter Russell 8-Inch Bread Knife

All knives are equal in the kitchen, right? Wrong! I immediately put my original bread knife in the trash after using the Dexter Russell scalloped bread knife for the first time. 


Over the past couple of years I have focused on learning to bake homemade bread and biscuits. I typically need very easy recipes. As I bake successful loaves of bread, I tend to share with friends and family. Recently, I baked a wonderful Artisan-like loaf of crusty bread. The bread itself was amazing. But as usual, I struggled cutting even slices.

My friend laughed at me, as he watched me saw and hack away at the bread. Sometimes squishing the softer loaves more than cutting them. He said I needed a bread knife. I told him that I had a bread knife.

It was only a few days later that a bread knife arrived in the mail. After my very first slice of bread I immediately realized why my friend laughed at me and my original bread knife. With the Dexter Russell knife I could cut even slices of bread, thick or thin, with great ease.  There was no "sawing" involved.

I am so incredibly thankful for this knife!


Dexter Russell 8" Scalloped Bread Knife with Polypropylene Handle


This knife is SHARP, cuts through bread like cutting through warm butter, and seems very durable. The handle is very comfortable and large enough that I can firmly grip it.

You may already know that Dexter Russell is advertised as the "largest manufacturer of professional cutlery in the United States." So although this is my first experience with a Dexter Russell knife, it is clearly a company that has a history and a good reputation.

Some facts about this bread knife:

  • made in the US
  • superior blade shape
  • 400 series stain-free, high carbon steel
  • formed handle with finger guard
  • slip-free polypropylene handle

My knife was ordered and shipped via Amazon. However, knives ordered on the Dexter Russell website can be engraved at extra cost. 


An engraved bread knife would make a special and memorable gift for a housewarming, wedding, or culinary arts graduation. I know this gift is a much appreciated addition in my kitchen.


My Favorite Bread Recipes


In 2016 I had my first bread baking success with this Peasant Bread recipe. The round loaves are incredibly easy to make and end with a buttery flavor and crunchy crust.


In 2017 I began having success with making delicious loaves using Patara's bread recipe and a Pullman Loaf pan. Making my sandwiches using my own bread is wonderful. And having a good knife to cut those bread slices will be even more wonderful!


Only recently I became successful at baking crusty, round loaves of bread. I think this bread's appearance is as wonderful as the taste. If you'd like to know more about this bread, you can read about it here


Note: The author may receive a commission from purchases made using links found in this article. “As an Amazon Associate, Ebay (EPN) and/or Esty (Awin) Affiliate, I (we) earn from qualifying purchases.”


Friday, March 9, 2018

KitchenAid Smooth Glide Ice Cream Scoop Reviewed

KitchenAid Smooth Glide Ice Cream Scoop Reviewed
For decades I have fought the battle with scooping ice cream.  Recently, I purchased the KitchenAid Smooth Glide Scoop and I am here to tell you, it actually works!  Scooping ice cream or sherbet just got a whole lot easier for me.

I can't even begin to guess how many spoons I have bent trying to scoop ice cream without letting it thaw on the kitchen counter first.  I hate leaving the ice cream out on the counter to thaw for several reasons.  For one thing, if I want ice cream, I'm not very patient.  I want it right then.  Second, I hate having to wipe off the condensation ring the container leaves on my kitchen counter before I can enjoy my dessert.  Plus, I hate the "frost" coating on the top of my ice cream that is created when it has to refreeze.

I have tried several ice cream scoops over the years.  While they won't bend like a spoon, they have been laborious to use.  Sometimes even painful.  I simply don't have the gorilla strength required to scoop hardened ice cream with a half moon bowl shaped scooper.  However, the KitchenAid Smooth Glide Scoop makes me feel a lot stronger because I can immediately dish up a bowl of ice cream without doing any permanent damage to my silverware, my hand, my wrist, my arm or my shoulder.

KitchenAid Smooth Glide Scoop

 KitchenAid Smooth Glide Scoop, BlackCheck PriceIt is all in the design!  The handle is thick enough for me to grip without being too wide for me to hold.  In the picture, it looks like that is a flat handle, but it is only flat on the top.  It is curved underneath and fits perfectly in my hand, allowing me to firmly grip the scoop.

The scoop itself is slightly curved and easily glides through frozen ice cream.  I admit, I don't really care if the ice cream has a pretty shape.  It doesn't have to be a perfectly shaped ball for me to enjoy devouring it.  Obviously, if you plan to serve ice cream on a cone, you would need the old-fashioned half-moon bowl shaped ice cream scoop.  Me?  I would rather never eat ice cream on a cone again now that I can scoop my ice cream without hurting myself, or someone else.

Oh, and another great feature:  It is dishwasher safe and I do, indeed, wash mine in the dishwasher. 

I will keep my old bowl shaped ice cream scoop to use with batter for cupcakes, cookies, etc., but for ice cream, I choose the KitchenAid Smooth Glide Ice Cream Scoop!

Read More Product Reviews On
ReviewThisProducts.com


House of Sylvestermouse


Note: The author may receive a commission from purchases made using links found in this article. “As an Amazon Associate, Ebay (EPN) and/or Esty (Awin) Affiliate, I (we) earn from qualifying purchases.”


Wednesday, February 15, 2017

Personal Review of My Favorite Vegetable Peeler: The Zyliss Potato Peeler

It Took Me 45 Years to Discover the Best Vegetable Peeler

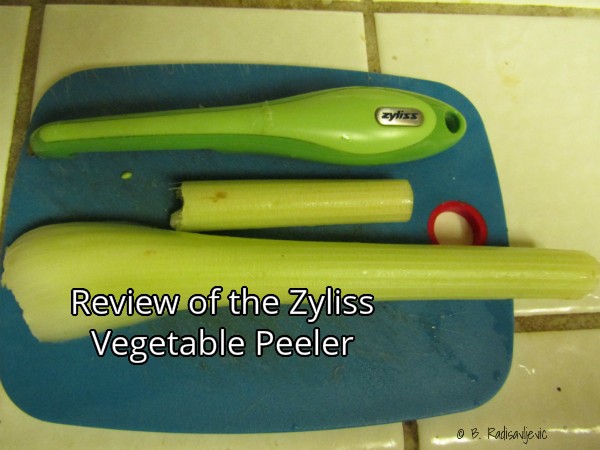
In my opinion, it's the Zyliss Potato Peeler. It's the best solution I've found for peeling celery -- the ultimate test of a peeler for me. I've pictured it next to some celery to be peeled for a soup I was making. I peeled it after I took this picture.

Personal Review of  My Favorite Vegetable Peeler: The Zyliss Potato Peeler

Here's what led to my decision to buy it. If you need an excellent peeler right now and don't need the review, take the shortcut below. 


Go straight to the Zyliss Potato Peeler on Amazon and skip the rest of this review. 


My Early Experience with Vegetable Peelers


Some of my most frustrating kitchen experiences have been while peeling vegetables -- especially celery. When I still lived with my parents, Mom often assigned the job of peeling the vegetables to me. I was the one who peeled the potatoes for the holiday mashed potatoes. I also got to peel the rutabagas to cook, and the carrots and celery for the hors d'oeuvres tray before dinner. It was a job I hated. Mom's peeler was the best to be found for the job in the 1950's. It looked a lot like this Miracle Peeler. I think it was a Miracle Peeler. It was much better than others I had used. Even so, peeling wasn't my favorite kitchen chore. 


The Miracle Peeler's handle was fairly easy to control, and I could cut bad spots out with the sharp curved attachment at the end. When I got married and bought my own peeler, I bought the Miracle Peeler. It was the best I could find 53 years ago.

My mother-in-law was using an old stainless steel paring knife she brought with her from Europe. I could not find one like it online, though I did check eBay. This is what it looked like. It's upside down. There is a peeling blade on the other side of the depression in the blade. When Paula handed this to me to peel something, I didn't know what to do with it. I'd never seen anything like it. I didn't do a very good job. When we next visited my husband's parents, I brought Paula a Miracle Peeler like mine so I could at least function if she asked me to peel something.

A Vintage Paring Knife My Mother-in-Law Used to Peel Vegetables


Why I Wanted to Replace My Miracle Peeler


Over the years my original Miracle Peeler stopped working as well. I decided to get a new one. The replacement I bought looked like the old one but didn't seem to be made as well. I picked it up at a grocery store and didn't pay too much attention to the brand name. Perhaps it was a cheaper knock-off. In any case, it didn't work very well -- especially on celery. If the celery was the least bit limp, it was almost impossible to peel. Not only that, the new one did not seem to fit my hand as well, and it hurt to use it. I decided to try to find a better one.

I Bought a Zyliss Potato Peeler

The Zyliss peeler works very well on celery and on the other veggies I peel with it. I have been using it now for about five years and it's the best I've ever used.

Personal Review of  My Favorite Vegetable Peeler: The Zyliss Potato Peeler

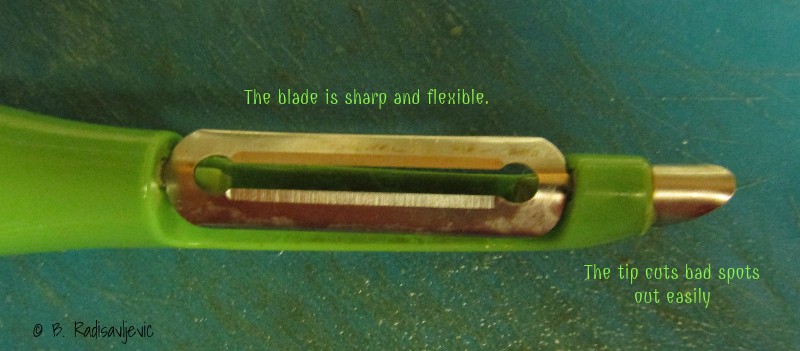
I've even used it to strip brown spots off the back of romaine lettuce ribs to make them look nicer. The blade is very flexible and the celery strings don't catch in it as much as in other peelers I have used. If strings do linger long enough to interfere with peeling, I rinse the strings off the blade easily under the faucet. On other peelers, I've often had to use a brush.  If I find a bad spot in the vegetable I'm peeling, I use the sharp cutting end of the Zyliss peeler to get it out easily.

The Zyliss peeler handle is more comfortable in my hand than other peelers have been. It's easy to grip and unlike the Miracle Peeler, my fingers don't have to bend to fit around a small thin metal handle that sometimes presses against my skin in a painful way. I also tried using the Zyliss to peel a stalk of celery with my left hand.  I proved to myself that left-handed people can also use the Zyliss Peeler, since the blade flips both ways.

If you need to replace your vegetable peeler, I highly recommend the Zyliss Potato Peeler. I believe you will be very happy with it, as I have been.


Personal Review of  My Favorite Vegetable Peeler: The Zyliss Potato Peeler


You may also want to check out my review of another small but essential kitchen tool: Rescued by a Brix Jar Key: A Review

***


Note: The author may receive a commission from purchases made using links found in this article. “As an Amazon Associate, Ebay (EPN) and/or Esty (Awin) Affiliate, I (we) earn from qualifying purchases.”

Wednesday, October 5, 2016

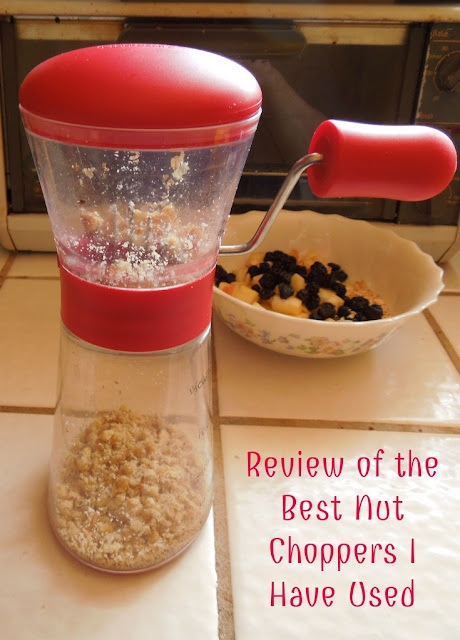
Review of the Best Nut Choppers I Have Used

Nut Choppers Are Essential Tools in My Kitchen

I use my nut grinder almost every day. I use it most mornings when I chop the walnuts for Barb's Power Breakfast Cereal. I also put chopped walnuts in my Buckwheat Blueberry Breakfast Pudding for cold mornings. Most of my baked goods contain nuts. All of those nuts need to be chopped into smaller pieces.

Review of the Best Nut Grinders I Have Used in my Kitchen
My Progressive Nut Chopper, Divided into its Parts

Here's Why I Needed to Buy the Progressive Nut Chopper


 Norpro Hand Crank Nut Walnut Almond Peanut Chopper Cutter Grinder Time Saver


For most of my over fifty years in the kitchen, I used this manual nut grinder and loved it.

Then one morning I accidentally broke the glass base. I tried the top on every empty jar I had in my cupboard, but not one fit. They were too large or too small or had different size screwing threads to fit a vacuum lid. I tried using one those jars with the same diameter opening, trying to hold the top on while I turned the crank, but it was just too awkward.

I was otherwise perfectly happy with this nut grinder . I would screw the grinder / chopper element onto the glass jar base, put in the nuts I wanted to grind, and crank the handle. I never had a problem. When I finished grinding the nuts I removed the grinder part and dumped any loose nut pieces into the bowl which was ready to receive them. Then I also emptied the jar into the bowl. After the jar was empty, I'd put it in the dishwasher and hand wash the plastic grinder top and lid.

My Review of the Progressive Nut Chopper

Even though I had been very happy with my Norpro Nut Chopper / Grinder, I bought the Progressive Nut Chopper to replace it because it was completely made of plastic.  I would not have to worry about the bottom breaking. I also liked the fact that I could put all the parts in the dishwasher. 

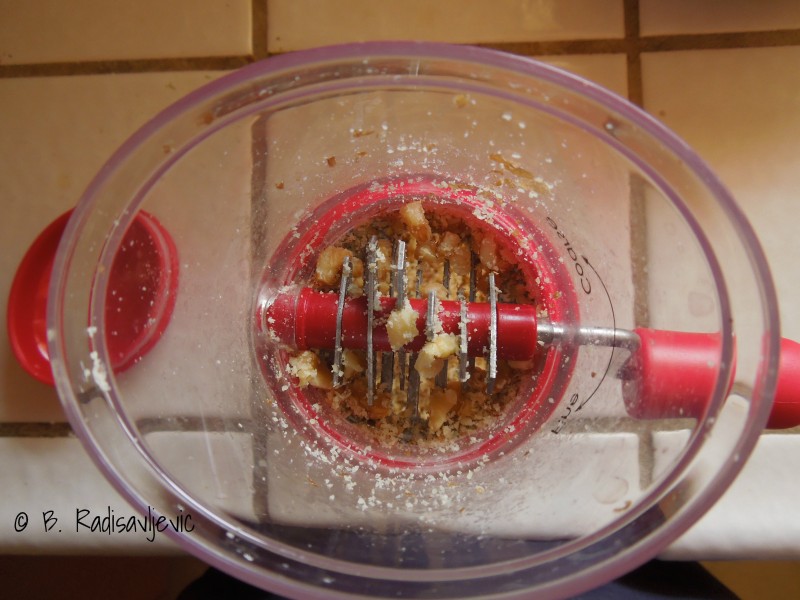
The Progressive Nut Chopper works the same way as the Norpro Nut Chopper. I turn the handle clockwise for nuts chopped coarsely. For a finer grind I turn the handle counterclockwise. The only difference is that there is more distance between the cutting blades on the Progressive model. More nut pieces seem to get stuck on the blades that have to be removed by scraping off the blades when I'm finished chopping than there are when I use the Norpro  model. There is no difference in quality of the chopped nuts. 

Review of the Best Nut Grinder / Choppers I Have Used
A Close Look at the  Progressive Nut Chopper Blades in Action


More Features of the Progressive Nut Chopper

Other things I appreciate about the Progressive Chopper that were lacking in the Norpro are the large non-slip base and the measuring lines on the container. With the Norpro I was always guessing how many nuts I'd chopped until I emptied them into a measuring cup. The Progressive Chopper holds one and one-half cups of nuts in the base and I can see exactly how many I have finished chopping.

Review of the Best Nut Choppers I Have Used: The Progressive Nut chopper and the Norpro Nut Chopper


Which Nut Chopper is Right for You?

Both nut choppers work the same way, so which you buy will depend on how important these unique features of the Progressive Nut Chopper are to you.
  • More durable plastic base that is hard to break
  • All parts may go into top rack of dishwasher
  • Convenient measuring lines on base
  • Non-slip base
You will pay a bit more to get those features, but you will also not have to worry very much about having to replace a broken base. If that doesn't matter to you, you can probably do just as well with the Norpro Chopper. Either nut chopper will give you great value and last a long time -- unless you accidentally drop the Norpro or knock it against a hard surface.

Which Nut Chopper Will You Choose?


Note: The author may receive a commission from purchases made using links found in this article. “As an Amazon Associate, Ebay (EPN) and/or Esty (Awin) Affiliate, I (we) earn from qualifying purchases.”


Monday, September 19, 2016

Spoonula Review

Le Creuset Spatula Spoon
Sometimes it is the smallest and most overlooked thing that makes our lives easier. In this case, I have discovered that my spoonula is one of the things that makes life in the kitchen much better. Cooking is not typically something that is enjoyable for me. My cooking is about survival more than fun. But my silicone, wooden-handled hybrid of a spatula and a spoon is the first tool I grab now when at the stove. This is my spoonula review.


My Wonderful Williams-Sonoma Spoonula


A friend of mine re-gifted some small spatulas and strange-looking utensils to me. The larger utensils of the bunch were strange-looking; a wedge of concave silicone on a wooden handle.  It was fairly large and chunky.  I tossed it into a drawer thinking that I'd throw it away after my friend left.

One day, after having neglected kitchen chores in such a long time that my spatulas and spoons were dirty, I grabbed this strange utensil. I don't recall what I was cooking - probably scrambled eggs.  I do recall how I immediately loved this spoon-spatula.  Despite it's relatively hefty weight, it was comfortable and easy to handle.  It scraped and flipped my food like a dream.  

Since then, I've looked it up on the internet and identified it as a Williams-Sonoma Spoonula with a wooden handle. I want to purchase another one or two because I like it so much.  I've owned this one for approximately a year now.  I have not melted the silicone end - as I often do my spatulas.


My Williams-Sonoma Spoonula


I recommend a silicone spoonula for the following reasons:

  • in the fry pan - scrambled eggs and sauteed veggies
  • stirring sauces - gravy and alfredo sauce
  • mixing batters - perfect for scraping every drop of pancake or cake batter from the bowl
  • scraping that last bit of the peanut butter from the inside of the large jar
  • It does not scratch my non-stick pans
  • It has not melted
  • Is extremely durable - I JUST noted that it is to be hand-washed.  I've run mine through the dishwasher after every frequent use.  Which explains the slight wear of the wooden handle. Oops.

If you are talented in the kitchen, I am quite sure you can find more uses for this durable and handy kitchen tool.  
KitchenAid Silicone Spoon Spatula


Whether you prefer the Williams-Sonoma brand, or other brands such as Rachel Ray's, I think you will find a sturdy silicone spoonula as helpful in the kitchen as I do.


Rachel Ray's 3-piece Spoonula Set


A Few Considerations from the Experts When Purchasing Silicone Spatulas


I completely lucked into ownership of a silicone spoonula suited to my needs.  I have experienced kitchen utensils that melt and utensils that are so flimsy they are worthless.  I had not considered further potential kitchen utensil problems and annoyances. Here is a wonderful silicone spatula review from American's Test Kitchen to guide your purchase or your silicone spatula or spoonula.


Note: The author may receive a commission from purchases made using links found in this article. “As an Amazon Associate, Ebay (EPN) and/or Esty (Awin) Affiliate, I (we) earn from qualifying purchases.”


Sunday, May 15, 2016

The Oster Griddle and Why I Love It - A Review

Oster Griddle via Amazon
The biggest reason we have a Griddle in the house is to make pancakes.

For decades home-made pancakes have been a staple in our home and when we're in-between grills, pancake breakfasts usually hit the skids.

Well, we've been in the 'in-between' stage for about a year or more, so just recently I decided a new Griddle was in order.

What's nice about a Griddle is the convenience for breakfast! My fourth son is now 16, still in high-school, and I make it a habit to prepare him a decent breakfast before school. That breakfast usually ranges between:
  • Free-Range Eggs, Spinach & Kale fried in Coconut Oil and Sliced Oranges, or
  • A Grilled Cheese Sandwich with Sliced Oranges or Bananas
What Do I Love about The Oster Griddle?

We've had a Griddle in our home for decades, and I do have a good amount of experience determing whether a grill passes the 'pancake' making test.

When I tried the Oster Griddle for the first time, I knew instantly, by how the pancakes browned, whether I had a winner ... and yes, according to my pancake making judgement, this grill is a winner.

Here are the points about the Oster Griddle that I appreciate:
  • It's ceramic non-stick coating is fantastic for non-stick performance. For the first batch of pancakes, I always put a bit of butter on the grill (even with a non-stick griddle) just to be safe. But with this grill, although I haven't tried it, I believe the butter was unnecessary. However, for the other three batches of pancakes, I did not add any butter whatsoever and the pancakes didn't stick at all!
  • The size of the grill is nice - I was able to make six good sized pancakes at a time.
  • The surface is scratch resistant and less likely to peel or flake. I haven't had ours long enough to give it the scratch test, but based on the durability of the surface, I can believe it.
  • The ceramic coating is free of PTFE & PFOA chemicals.
  • Food cooks evenly
  • It does cook faster and thus I imagine that will save energy over time
  • It looks nice on my counter and it's a snap to clean
I plan to use it frequently for breakfasts and it's situated conveniently beside the Vitamax and Coffee Machine (the two other appliances that get the most use).

Using our Oster Griddle for Grilled Cheese
Photo by Funkthishouse.com
Enjoy My Pancake Recipe:

Well, it's not really mine, it was my Mom's and before Mom, Grandmothers :)
  • 1 Cup of Flour
  • 3 Teaspoons of Baking Powder
  • 2 Tablespoons of Sugar (Optional)
  • 3/4 Teaspoon of Salt (Optional)
  • 1 Egg
  • 1 Cup of Milk
  • 2 Tablespoons of Melted Butter or Oil
  • 1 Teaspoon of Vanilla Extract
Mix all of the ingredients together (manually). Don't over mix it of course. Let the Mixed Batter sit for five or ten minutes or even longer if needed. Then, using a ladle, scoop onto your grill ... greased with a little bit of butter if you like.

On the Oster Grill, the temperature between 265 and 300 degrees seemed to work fine for me.

The secret to good, fluffy pancakes is to only flip them once.

You'll know the first side is cooked when there are 'bubble-holes' peeking through the uncooked side. However, you can usually tell by the smell, or just take a little peek to be sure they're the color of golden brown that you like.

Flip them over, let the other side cook for a few minutes or less, and they're done.

Because we are so many in our family, and everyone has there own preference for the fixings they like inside their pancakes, I'll add the items to each pancake on the uncooked side one at a time, while the one side is cooking. Tip: When you add the food item to the uncooked side, gently spread some of the batter from that uncooked side over the food item - that way when you flip it over, you'll have batter cooking on the grill instead of the chocolate chips, blueberries or whatever you added hitting the grill directly (which could burn).

Popular flavor additions in our home are chocolate chips, fresh raspberries, strawberries or blueberries. This morning it was chocolate chip pancakes and blueberry pancakes.

So yes, I recommend this grill, we love it!


Note: The author may receive a commission from purchases made using links found in this article. “As an Amazon Associate, Ebay (EPN) and/or Esty (Awin) Affiliate, I (we) earn from qualifying purchases.”


Thursday, March 31, 2016

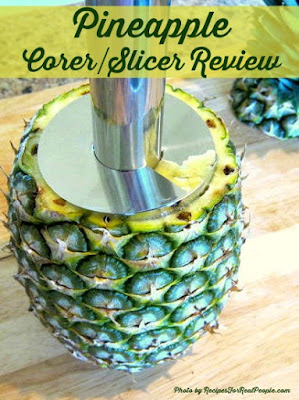
Pineapple Corer and Slicer Review

Pineapple Corer and Slicer Review
This pineapple corer-slicer is a relatively new addition to my kitchen gadget collection, one I use often and always enjoy. This week when I prepared and served a fresh pineapple I documented the event with my camera, so I figured this was a good time to share a brief review. (Photos below are all mine.)

Who needs a pineapple corer/slicer? Anyone who loves to eat fresh pineapple but hates the cutting-it-up process!

Here's what I used to do. I'd see a display of pretty pineapples in the store that looked so tasty and reminded me of our long-ago trip to Hawaii, so I'd lovingly select one, gently put it in my grocery cart, take it home, and set it on the counter where I'd let it stay for days, until the leaves started drying up. Eventually, I'd pull out the cutting board and two or three knives to tackle the cutting and slicing, then grab the poor pineapple. After 10 or 15 minutes of slicing, dicing, changing knives, trimming, and chopping, I'd have my pineapple chunks, but I'd also have a big mess to clean up.

No more!

Now, I simply grab the pineapple then pull out my stainless steel pineapple corer-slicer, one sharp knife (for cutting off the top), and the cutting board. It takes just seconds to cut a few inches off the top of the pineapple then no more than a minute or two to line up the cutter with the pineapple core, twist the handle to work the cutter to the bottom of the luscious fruit, and pull out the gorgeous pineapple slices.

Let me show you how it works:

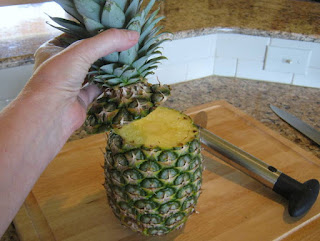
Using the sharp knife, lay the pineapple on the cutting board and cut a couple of inches off the top.
Using the sharp knife, lay the pineapple on the cutting board and cut a couple of inches off the top. 


Holding the pineapple with one hand, line up the cutter with the core of the pineapple then start turning. You'll need to apply just a bit of pressure.  Continue turning and slicing until you reach almost to the bottom of the pineapple.
Holding the pineapple with one hand, line up the cutter with the core of the pineapple then start turning. You'll need to apply just a bit of pressure. Continue turning and slicing until you reach almost to the bottom of the pineapple. 

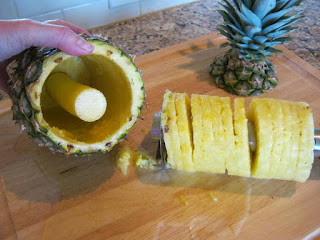
Use the handle to firmly pull the pineapple slices out of the pineapple.
Use the handle to firmly pull the pineapple slices out of the pineapple. Hold everything upright so the juice doesn't run out like it did here.
(I had to lay it down to take the picture.)

Remove the handle to easily slide the pineapple slices off the cutter.
Once you've pulled the slices out of the pineapple, push the two black buttons below the handle to remove the handle, then slide the pineapple slices off the cutter. Use a knife to cut the slices into chunks if you prefer. Use the empty pineapple "shell" to serve fruit salad or a fancy drink. Replace the "lid" for an elegant presentation.

Which Pineapple Corer Slicer Works Best?


There are basically three types of pineapple corers. I'm very satisfied with the simple stainless steel model, the style that is most widely available and comes with mostly excellent reviews. There's also a plastic model that works the same way but, based on reviews that I've read, may not cut the pineapple as smoothly and will eventually break. Or you might want to consider the ratcheting model that costs about twice as much (still less than $20), but the ratchet mechanism makes it easier to turn the handle without continuously re-positioning your hand. Some plastic models come with a convenient wedge cutter; most do not and judging by the videos I've watched, you won't miss it.

Compare the three types at this Bed, Bath and Beyond link and watch a video of each, showing exactly how they work. Or check out the huge selection and low prices of pineapple corers on eBay.

Should you buy a pineapple corer and slicer to add to your kitchen gadget collection? If you enjoy eating or serving fresh pineapple, it's a no-brainer. You'll spend from about 6 to 20 dollars and never again have to let another beautiful, fresh, delicious, good-for-you pineapple go bad as it wastes away on your kitchen counter. I say go for it!  

~ Susan
Read More of My Reviews


Posted by Susan Deppner

Susan Deppner

About the Author

Susan Deppner is a baby boomer, a cancer survivor, and a Southerner who believes in the Golden Rule. She enjoys writing about food, faith, and fitness; health, home, and holidays; people, places, pets, and patriotism, and more. Follow Susan on Twitter, Facebook, and Pinterest.


Note: The author may receive a commission from purchases made using links found in this article. “As an Amazon Associate, Ebay (EPN) and/or Esty (Awin) Affiliate, I (we) earn from qualifying purchases.”


Thursday, February 18, 2016

Presto Pizzazz Plus Rotating Oven Review

Presto Pizzazz Plus Rotating Pizza Oven Review

A Multi-Use Rotating Pizza Oven (and more) 


I first had my eye on the Presto Pizzazz a couple of years ago, thinking that it might be a fun kitchen gadget, something I'd use now and then to bake or re-heat pizza. I didn't buy it then because I decided that a one-purpose gadget wasn't a good investment of money or space in my kitchen.

But wait, there's more.

Recently, I came across this clever pizza cooker again, with a new, updated name. Now it's called the Presto Pizzazz Plus Rotating Pizza Oven. This time I read the outstanding reviews and realized that there was much more to the Presto Pizzazz than pizza. People love this thing and use it for lots of different convenience foods, and prepare food that you wouldn't even think of as being able to bake outside a conventional oven. Indeed, it's not just a one-purpose kitchen gadget, not at all!

So I bought the Pizzazz Plus and determined to test it out for myself.

First We Baked Pizza


First, we tried pizza (makes sense). I bought our favorite freshly-prepared pizza from the deli (actually they're previously frozen, thawed when you buy them, but they look fresh, taste amazing, and we like them a lot). I ended up adding a little bit of time to the recommended cooking time in the Presto Pizzaz Plus instruction booklet and we really loved the result. The crust was perfectly done on the bottom, the toppings hot, and the cheese bubbly. The frozen pizza that I tried later turned out very well, too.

I should mention that there are two heating elements on the oven, one above and one underneath the tray. It's up to you to choose upper, dual, or lower. So if the crust is done the way you like it but your piled-on pizza toppings need a bit more heat, simply choose "upper," add some time, and watch the pizza until it looks exactly as hot and bubbly as you want it to be.

Chocolate Chip Cookies Baked on the Presto Pizzazz Plus
Chocolate chip cookies
baking on the Presto Pizzazz Plus.
Then we moved on to cookies for dessert. Brilliant! I love being able to bake up just four to six cookies from a refrigerated package for the two of us as a quick dessert. Delicious result!

Tater tots make for a quick lunch or snack when baked on the Presto Pizzazz Plus Rotating Oven
Tater tots make for a quick lunch
or snack when baked on the
Presto Pizzazz Plus Rotating Oven.
The next day I chose tater tots to fix for a quick lunch. Again, the pizza oven, now a tater tots oven, performed as advertised using the settings and cooking time for "potato patties" in the convenience food cooking chart included with the instructions.

The breaded, cheese-stuffed jalapeno peppers that we tried next turned out great, too.

That night we tried frozen egg rolls to go with our stir-fry vegetables (honestly, we do eat "fresh" most of the time, but everybody's entitled to a little convenience food now and then). Again, score! And no preheating the conventional oven, which sped up dinner prep time considerably.

All the frozen convenience foods that we tried, even the cookies, turned out great. Saturday morning came the big test: cinnamon rolls, the "pop and fresh" kind. I almost didn't try them on the Pizzazz Plus because it seemed so unlikely that they'd turn out, but my husband encouraged me to be brave, to try and see what happens. Once again I was not only surprised but impressed. Eight cinnamon rolls with the recommended settings from the instruction book were a perfect fit and turned out beautifully, as you can see from the pictures below. And yes, they tasted great, too.

Presto Pizzazz Plus Cinnamon Rolls - before.
Presto Pizzazz Plus Cinnamon Rolls - after.

Presto Pizzazz Plus Tips


Here are seven things about the Pizzazz that are important to remember:

Presto Pizzazz Plus Rotating Oven with Instruction Book. Utensils not included.
Presto Pizzazz Plus Rotating Oven with Instruction Book.
Utensils are not included.
1. Place the Pizzazz Plus away from the edge of the counter. It's attractive to both kids and dogs, neither of which should be allowed to operate or even touch it without the permission (and supervision) of a responsible adult. Safety first!

2. Don't walk away from the Pizzazz Plus when it's in use. First reason, you might not hear the "ding" when it's done and, even though the heating coils turn off at the end of the timed cycle, the residual heat may will burn the food (I should have taken a picture). Second reason, see number one above.

3. Using potholders, lift and remove the tray from the Pizzazz when you're satisfied that the food is done and set it on a cooling rack or cutting board to let the food, and the tray, cool.

4. To avoid damaging the surface of the tray, don't use a pizza wheel or knife until you've moved the pizza to a cutting board. See number 5.

5. Treat the tray carefully to make it last. Store it in a safe place where it won't get scratched. Use only utensils that are designed to be used on non-stick surfaces to keep from damaging the surface. Consider investing in a silicone or plastic spatula and tongs (useful for turning tater-tots, egg rolls, etc.) to use with the Presto Pizzazz.

6. Read the instruction booklet that comes with the appliance. Test it using the times and methods on the cooking charts then adjust accordingly based on your own preferences.

7. Don't overload the cooking tray with food; leave space between individual tater tots, chicken nuggets, etc. For instance, six cookies, spaced evenly, bake much better than nine or 10 cookies that are too close together.

But Wait, There's More!


(Did I say that already?) There are many other foods you can bake on the Pizzazz Plus, I just haven't gotten to them all. Besides typical frozen snack foods, cookies, and cinnamon rolls, the instruction booklet suggests grilled sandwiches and quesadillas, and even includes instructions for making s'mores. What's not to like about that?!

When I first looked, I was amazed at how many 5-star reviews this convenient countertop pizza oven had received. Now I know why. The very handy Presto Pizzazz Plus Rotating Pizza Oven gets 5 stars from me and has earned my "Sassy Susan" Seal of Approval.

Did you enjoy the review? Does this appliance appeal to you? How would you use it? Please share your thoughts in the comment section below.

QUICK LINKS:
Buy the Presto Pizzazz Plus at Home Depot (Best price as I type this - subject to change)
Buy it at Walmart
Buy it at Amazon.com

~Susan
Meet the Reviewer

P.S. If you enjoyed this review, please pin it:

The Presto Pizzazz Pizza Oven does more than bake pizza. Use it to prepare convenience foods and snacks, even cookies and cinnamon rolls!


~Susan Deppner
Read more of my reviews.


Posted by Susan Deppner

Susan Deppner

About the Author

Susan Deppner is a baby boomer, a cancer survivor, and a Southerner who believes in the Golden Rule. She enjoys writing about food, faith, and fitness; health, home, and holidays; people, places, pets, and patriotism, and more. Follow Susan on Twitter, Facebook, and Pinterest.


Note: The author may receive a commission from purchases made using links found in this article. “As an Amazon Associate, Ebay (EPN) and/or Esty (Awin) Affiliate, I (we) earn from qualifying purchases.”


Most Recent Reviews on Review This Reviews


Search for Reviews by Subject, Author or Title

The Review This Reviews Contributors


SylvestermouseSylvestermouseDawn Rae BDawn Rae BMbgPhotoMbgPhotoBrite-IdeasBrite-IdeasWednesday ElfWednesday ElfOlivia MorrisOlivia MorrisTreasures by BrendaTreasures by BrendaThe Savvy AgeThe Savvy AgeMargaret SchindelMargaret SchindelRaintree AnnieRaintree AnnieLou16Lou16Sam MonacoSam MonacoTracey BoyerTracey BoyerRenaissance WomanRenaissance WomanBarbRadBarbRadBev OwensBev OwensBuckHawkBuckHawkDecorating for EventsDecorating for EventsHeather426Heather426Coletta TeskeColetta TeskeMissMerFaeryMissMerFaeryMickie_GMickie_G


Review This Reviews is Dedicated to the Memory of Our Beloved Friend and Fellow Contributor

Susan DeppnerSusan Deppner

We may be apart, but
You Are Not Forgotten


“As an Amazon Associate, Ebay (EPN) and or Etsy (Awin) Affiliate, I (we) earn from purchases.” Disclosure Statement

X