Showing posts with label Gifts. Show all posts

Sunday, December 19, 2021

The Best Baby Booties - A Personal Recommendation


The arrival of our Granddaughter has given me an education on what's popular and what's not with baby products. 

Having raised four sons, I know a thing or two about constantly losing baby socks. 

About a month ago, I noticed our super-cute Granddaughter had these very warm, comfy, and secure booties on her feet. I asked my daughter-in-law what kind they were, and she informed me they were called "Hudson Baby Booties."

Hudson Baby Booties Come in a Variety of Sizes, Designs, and Colors - They're Awesome!

Here's One Pair Our Granddaughter Wears

I've since purchased two additional pairs for our Granddaughter, and I highly recommend them for gifts. If I were a new mom starting out, I'd want many pairs of these to go with a wide variety of outfits.

What's So Great About These Booties?

  • They're soft and comfortable
  • They're cozy and warm
  • They're easy to put on and remove
  • They have never fallen off of our Granddaughter's feet!
  • They come in multiple designs, sizes, and colors
  • They make a lovely gift
  • No more losing sockies
  • They open up wide for baby's feet to go in
  • They velcro-wrap for closing
  • Great for cold winter nights or cooler days
  • A good choice when taking baby for a walk or in the car
Notice How Much They Open So You Can Easily Put Them On

The Tongue is Soft - Pulls Forward so Foot can Easily Go Inside


Here's a Look At the Velcro Close

The Two Velcro Sides wrap around Baby's Ankle - They Stay On!

I highly recommend these booties for the baby in your life. Several pairs of these, in multiple sizes, make an excellent gift. In fact, these are now my go-to baby gift. They're usable, cute, and practical. Our Granddaughter, especially now during the winter months, wears hers daily.

You can find Hudson Baby Booties here on Amazon


Note: The author may receive a commission from purchases made using links found in this article. “As an Amazon Associate, Ebay (EPN) and/or Esty (Awin) Affiliate, I (we) earn from qualifying purchases.”


Monday, December 6, 2021

Reviewing Handmade Kirigami Greeting Cards by Paper Love Cards

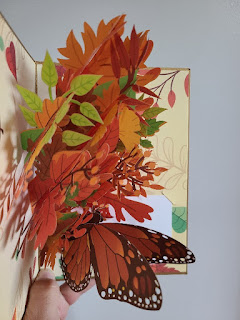
I recently received a card with a note in the mail at my new address. I was touched by the personal letter included in the card and mesmerized by the card. I opened and closed the card repeatedly, looking at the details. Throughout the day I moved the card from one shelf to another looking for the best place to display my new miniature piece of art. This card lay flat in the envelope but when I opened it I was surprised by an exquisite butterfly on a bouquet of foliage expanding into a three-dimensional paper sculpture. I was so intrigued by the card that I immediately looked up the company information.


This card was created by Paper Love Cards. Paper Love cards are exquisite pop-up cards handcrafted by origami and kirigami artists. I am familiar with origami. Origami is the art of paperfolding and making shapes (often birds, with the crane being one of the most popular. Origami utilizes folding only, no cutting or gluing.

I first learned the term kirigami when researching these cards. Kirigami is a form of origami that includes the folding and the cutting of paper that results in three-dimensional forms. I am unclear as to whether Kirigami originated in Japan or China, but all sources report that it has a very long history. By the 17th century, it was recognized as a true art form in Asian culture and became popular in America in the 1960s and 1970s. 

Paper Love Cards

The Paper Love Cards design office is based in New York, United States while the cards are made in by origami and kirigami artists in Vietnam. They advertise "A pop of art for every occasion" and they aren't lying. The offer cards for holidays, birthdays, changes of seasons, 

These cards are suitable for recipients of all ages. The Dabbing Santa Christmas card would tickle many younger people.

Paper Love can be ordered online via their website or Amazon store and are currently sold at Walmart and Walgreens.

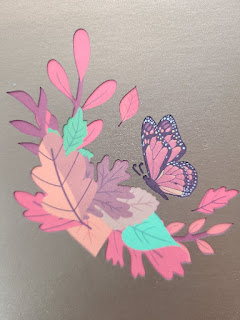
The card sent to me was of a butterfly design. As I opened the card, it eclosed and fully displayed itself to me. The colors are vibrant and the foliage is in many shapes. My photos do not do the dimensions and details of this card justice but perhaps they will help show some of the details better than I am able to describe. 


The Lost Art of Tangible Communication

In this day and age of a constant barrage of text messages, video chats and constant conversations in our ears via earbuds, handwritten messages are becoming a lost art. How wonderful to recieve a heartfelt message from someone who takes the time to put a card into the mail. While I am not at all good at doing this on a regular basis, I had already sent out a few handwritten messages. 

Digital communication is very important. It is instant and frequent. It helps us to remain in close and quick contact. However, tangible communication, that can be held and saved, is a special thing. Especially when that communication includes a bit of handmade art.

Special Cards for Christmas, Thank You, Birthday, and More

The wide variety of cards available is wonderful. There is literally probably something for everyone and there are so many designs to choose from. There is a brief video on the Paper Love Cards Amazon store that currently shows the opening of a Christmas card.  It also shows the small insert of paper were a brief message can be written. It is about the size of a business card. 

I would like to encourage you to take a peek in order to see how these 3D designs pop open. And to take a peek at the selection of cards so you are prepared when you shopping for an extra special card for a special someone. 


Note: The author may receive a commission from purchases made using links found in this article. “As an Amazon Associate, Ebay (EPN) and/or Esty (Awin) Affiliate, I (we) earn from qualifying purchases.”


Monday, November 29, 2021

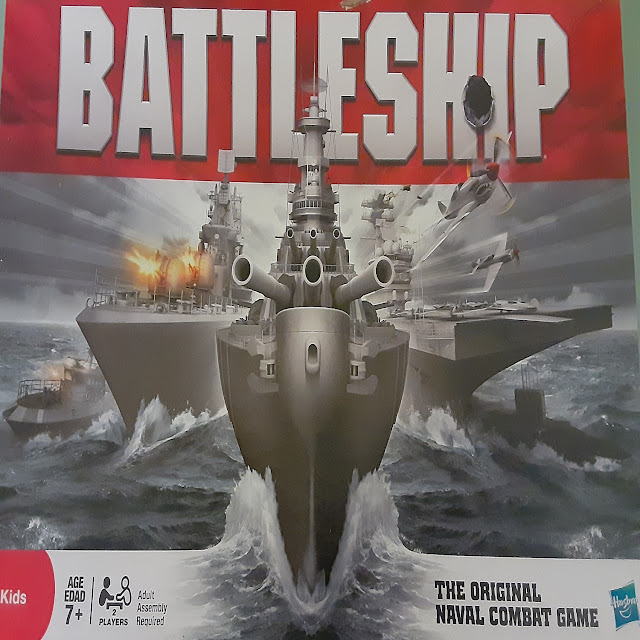
Battleship Classic Board Game Reviewed


Battleship Classic Board Game Reviewed

Battleship is a classic naval combat board game of strategy and excitement. In this board game, you will search the ocean floor to destroy your opponent’s fleet of ships.

The board game was first introduced by Milton-Bradley in 1967 as a plastic board and peg game. The game battleship comes from earlier versions of a pencil and paper game from the 1930s.

Battleship has also evolved into many electronic versions of the game today. The game I had growing up was the original plastic board and peg game. I have spent many hours playing this game with my brothers and friends.

The game we have today is the same, but it was made by Hasbro. I have never tried one of the electronic versions but thought about it many times. Today I play the same battleship game with my grandchildren that I played growing up.

How to Play Battleship:

Each player has a fleet of five ships consisting of the following:

Class of Ship                       #of Hits to Sink the Ship

Aircraft Carrier                                  5

Battleship                                          4

Destroyer                                          3

Submarine                                        3

Patrol Boat                                        2

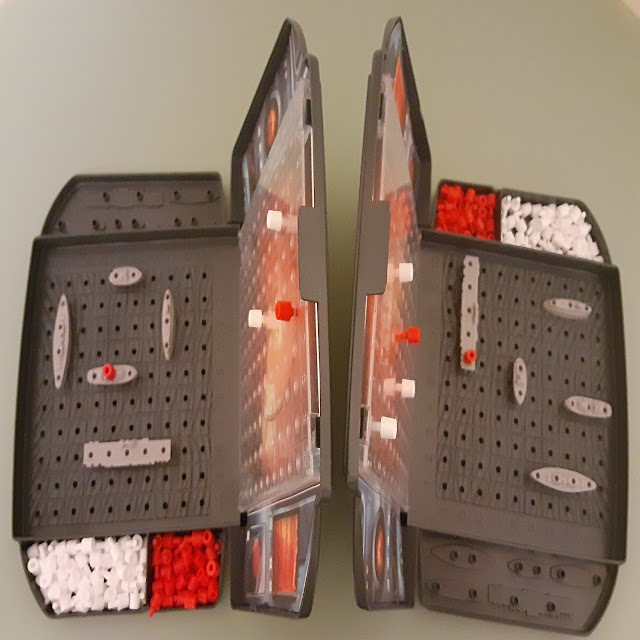
Battleship classic board game

Each player has a plastic case with two grids, white pegs, and red pegs. One grid is the ocean floor, this is where you place your fleet of ships either horizontal or vertical. The upper grid is to record your misses with white pegs and your hits with red pegs.

 You can also use your ocean floor to track your opponent's misses with white pegs. This is an option and I never use it.

A player calls out a location on the grid and the opposing player says either hit or miss. If it is a miss the first player marks the location with a white peg, so he doesn’t call that location again. If it is a hit, then he places a red peg in that location and the opposing player places a red peg in the ship that was hit.

Now, the first player must figure out if the ship is placed horizontal or vertical on the opposing player’s grid. Once a player has sunk the other player's entire fleet, he wins the game.

Battleship is just another classic game that has been around for many years and will provide hours of fun.

For more classic toys and games visit me at

 Cherished Toy Finds


Find more toys on Review This Here

ReviewThisToyReviews.com

 Battleship Board Game for ages 7 and up makes a perfect gift for hours of fun.

Hasbro Gaming Battleship GameHasbro Gaming Battleship GameCheck the Price


Note: The author may receive a commission from purchases made using links found in this article. “As an Amazon Associate, Ebay (EPN) and/or Esty (Awin) Affiliate, I (we) earn from qualifying purchases.”


Friday, November 19, 2021

Lazy One Fuzzy Feet House Slippers Reviewed

Lazy One Fussy Feet House Slippers
It seems I am cold all of the time, even in the summer.  That is in large part due to the fact that my husband prefers cooler temperatures. Because I can always layer clothing, we keep our home cold.  At least "cold" by my definition.  Therefore, warm fleece lined house slippers are the perfect gift for me!

When my parents visited Yellowstone National Park, they discovered the Lazy One Fuzzy Feet house slippers and decided they were exactly what I needed.  When my mother spied the slippers with the brown bear fabric, she knew those slippers were made for me.  There was only one pair available and fortunately, they were in my size.

To say I was thrilled with this gift would be an understatement.  I have worn them every day since I received them.  The first thing I do in the morning is slip them on before I leave the warmth of our bedroom carpeting.  The last thing I do at night is slip my Lazy One slippers off and leave them at the side of the bed for when I awake.

Our bathroom has tile flooring and can give quite a jolt to bare feet, but not to my feet when they are protected by my beautiful camping bear slippers.  The slippers also have a nonslip sole which keeps one foot firmly in front of the other when walking across smooth tile or hardwood floors.

I was recently discussing how much I love the slippers with my mom.  After I left that day, she decided to try to find me a second pair so I would have them if and when I wear out my original pair.  She even tried calling the Yellowstone gift shop, but was unsuccessful in obtaining a replacement pair.  Being my mother and relentless in a search for something for one of her children, she started searching online, which is a tremendous challenge for my mom.  She doesn't really like computers, therefore she would never be called computer savvy, but she is tenacious.  

Would you believe she found my beloved slippers on Amazon?  Of course, she ordered them immediately. I now have a back-up pair of my Camping Bear Lazy One Fuzzy Feet house slippers hidden away in my closet for the time when the originals need to be replaced. 


Lazy One Fuzzy Feet House Slippers

 Lazy One Fuzzy Feet SlippersCheck PriceAfter Mom discovered the house slippers on Amazon, I had to check out the other designs available.  The collection is so vast, it would seem there is a design for everyone.  I love my brown bear and do not desire to replace him, but I must say there are some really cute slippers that would be quite the temptation.  Plus, there are a few holiday designs.

Because the slippers can be washed on cold and tumble dried, they stay clean in spite of the fact that I might follow Merlin, our Labrador Retriever, out onto the patio on a chilly morning without changing from my slippers to shoes. 

The price is also right! Finding a gift that is less than $20 is difficult these days.  I know I will be looking closely at the Lazy One collection when buying Christmas gifts.  Perhaps, I should pick out a pair or two for my mom.  She tends to stay cold too!


 Check Price Check Price Check Price Check Price


Read More Gift Reviews On
ReviewThisGifts.com


House of Sylvestermouse


Note: The author may receive a commission from purchases made using links found in this article. “As an Amazon Associate, Ebay (EPN) and/or Esty (Awin) Affiliate, I (we) earn from qualifying purchases.”


Friday, November 12, 2021

Give a Kindle Unlimited Gift Subscription Reviewed

Kindle Unlimited Gift Subscription
Kindle Unlimited is the perfect gift for people who like to read!

We frequently hear the term "the gift that keeps on giving".  That phrase is especially true about a subscription to Amazon's Kindle Unlimited.  You can give a 6 month, 12 month or 24 month subscription depending on your gift giving budget.  Plus, it makes the perfect annual gift for someone who has everything.

Personally, I like to give a Kindle Unlimited subscription for birthdays, especially to family members who live in other states.  Because you choose the date of delivery at the time of purchase, you can even buy it on the very day and have it delivered immediately.  I'm not as likely to forget the date of Christmas, but birthdays do tend to slip up on me. However, if I get to Christmas Eve and realize I need to send a gift, Amazon has me covered with a Kindle Unlimited subscription.

Whether you are buying a Christmas gift, a birthday gift, an anniversary gift, or simply a "thinking of you" gift, Kindle Unlimited always comes in the right size with free shipping.  All you need is the recipient's email address! 


How to Gift a Kindle Unlimited Subscription

It is as easy as clicking this link, making the subscription length choice, filling in the email address, date of delivery, and adding a gift note (if desired), then checking out.  

Kindle Unlimited Gift Subscription
Prices May Change - Subscription Cost Shown is Price at Published Time of Article

Kindle Unlimited Gift Subscription


It takes on a few minutes to give a gift that keeps on giving and will be used all year long! 


You may also wish to give a Kindle Fire (color illustrations) or a Paperwhite Kindle (smaller & lighter than the Fire) along with the KindleUnlimited subscription.  This would truly be the ultimate gift for someone who loves to read.


Kindle Unlimited Gift

 Kindle PaperwhiteCheck Price Amazon Fire HD 10 tabletCheck Price


Read More Product Reviews On
ReviewThisGifts.com


House of Sylvestermouse


Note: The author may receive a commission from purchases made using links found in this article. “As an Amazon Associate, Ebay (EPN) and/or Esty (Awin) Affiliate, I (we) earn from qualifying purchases.”


Wednesday, November 10, 2021

Mirror Mirror on the Wall - A Gift Suggestion

How many times have you stood in front of the mirror first thing in the morning and thought, "What words of wisdom do you have for me today?"

There are many times in my life where I have been overwhelmed, upset, depressed, down in the dumps or excited about something that will be happening.  All of these feelings sometimes just grab hold of me and I stare at my reflection hoping that some wisdom will come me and help me over whatever hurdle seems to be in my path.

Now I've been thinking a lot about my grandchildren who have just gone through two years of hardship and stress.  I know that they have missed out on so much with all the restrictions put in their path.  I also know that kids are resilient little beings and that they will bounce back.  In the meantime, I have been thinking about ways to help them cross those barriers and climb over their disappointments so that they can look at themselves through my eyes and smile.
cartoon of man looking in a mirror
Little words of encouragement are always needed by everyone and our children and grandchildren are no exception to the rule.  So because we aren't physically close to them, we can still be an encouragement for them from afar.

How?  Well, this year, I'm making sure that my Grandchildren know what they mean to me daily! And this is how I'm going to do it. 

We are buying each one of the Grandchildren  a mirror to be hung on their wall in their rooms.  Hung at a height that will make it possible for them to check out how they look and at the same time have a message that will either make them smile, or pause and think, or just laugh!  

So how are we going to get a message on their mirror?  Easy peasey when you have a set of  Liquid Chalk Markers!  

These markers write on glass easily and are erasable too.  So when you need a new message on your mirror just clean off the old with a damp cloth and add the new.

Everyday you can change up the message, or leave one there as a reminder of your Grandparent's thoughts for you! 

Everyone loves a little encouragement and there are lots of ways to add that spark to your mirror with Words to Live By !  Checking out Pinterest is another great source for Quotes for all kinds.  


My Grandson's are going to love that their mirror will say "You make me smile!" and "You are the kindest boy I know!"

My Granddaughters are going to love theirs too!  One will say, "You are poetry in motion!"  While the other one will say, "Your imagination just makes me happy!"  
be happy banner


Can you just imagine what seeing these words on their mirrors everyday will do to their spirits?  I imagine and hope that it will give them a positive outlook that will carry them over any hurdles they happen to be facing.  

When they need a little pick me up, grab the Liquid Chalk and write a note to them or let them write a note to themselves.  

I'm looking forward to seeing their reactions and when they are finished with needing some positive reinforcement, they will always have a nice mirror to see themselves in!

I know they will see a wonderful person who has empathy and joy in their lives, that is for sure!


Note: The author may receive a commission from purchases made using links found in this article. “As an Amazon Associate, Ebay (EPN) and/or Esty (Awin) Affiliate, I (we) earn from qualifying purchases.”


Wednesday, November 3, 2021

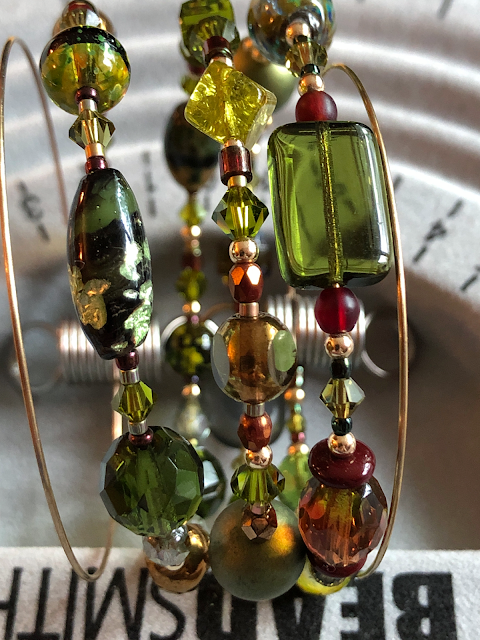
How to Make a Stylish Beaded Coil Wrap Bracelet

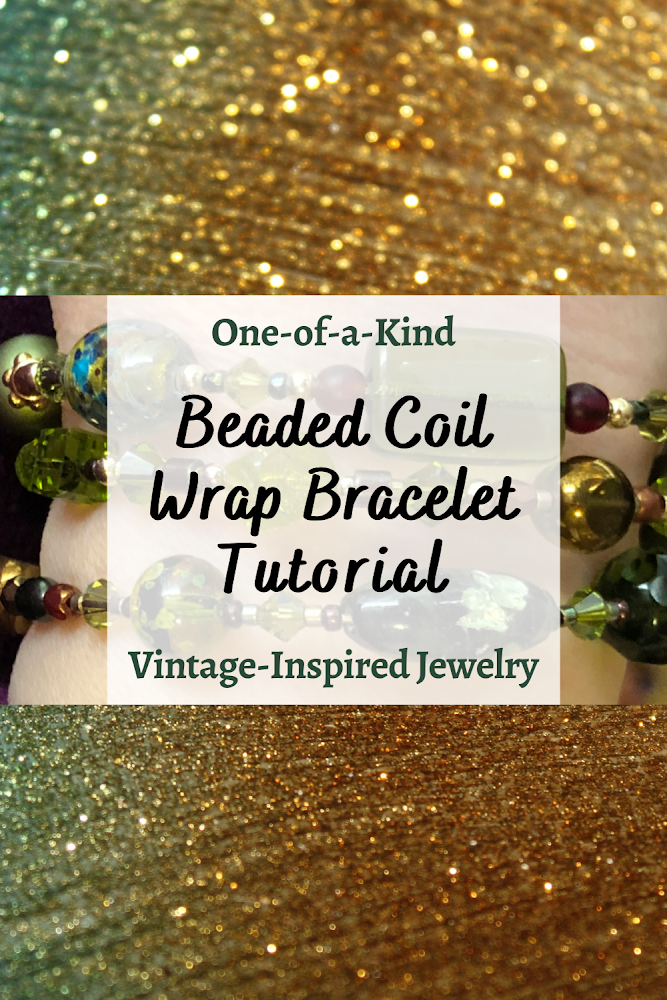
Main image: Beaded Coil Wrap Bracelet Tutorial

Beaded bracelets are wonderful accessories that can add a pop of color to any outfit. Unlike necklaces and earrings, bracelets allow you to enjoy looking at them throughout the day while you’re wearing them. Vintage beaded coil wrap bracelets from the 1940s and 1950s designed by top jewelry icons of that era, such as Miriam Haskell and Robert DeMario, are coveted by vintage jewelry collectors. They have also come back into fashion repeatedly, for good reason.

While bracelets with clasps can be quite challenging to fasten and unfasten, even with a bracelet helper tool, beaded coil wrap bracelets made with memory wire are a cinch to put on and take off your wrist. During my three decades of designing, making and, periodically, selling one-of-a-kind beaded jewelry, my coil wrap bracelets featuring vintage beads have remained among my most popular jewelry designs, regardless of fashion trends.

In this jewelry tutorial, I’ll review how I made my most recent memory wire coil wrap bracelet with a mix of contemporary and vintage beads, which is a birthday gift for a very dear friend. The friend for whom I made this one owns several beaded coil wrap bracelets I’ve designed for her in different colors. She loves wearing them so much that when I asked her what type of jewelry she would like me to make as her birthday gift this year, she requested another coil wrap bracelet, this time in shades of olive green.

These beautiful, classy, distinctive bracelets make wonderful gifts for any jewelry lover (including yourself), and especially for someone who has difficulty putting on or taking off her favorite bracelets with clasps. 

Beaded Memory Wire Wrap Bracelet Tutorial

Materials, Tools and Supplies You Will Need

  • Assorted beads in a range of sizes, shapes, materials and surface finishes.
    • I used a combination of rare vintage glass beads, vintage Swarovski crystals, contemporary glass beads, including Japanese and Czech seed beads and glass pearls, and small (2mm and 3mm) 14k gold-filled beads. 
    •  I've written an article on The Best Sources for Vintage Beads, Findings and Jewelry Components, if you are interested in using vintage beads in your memory wire beaded coil wrap bracelet designs. Buying beaded jewelry at thrift stores, auctions and estate sales and taking them apart can be a great way to buy more unusual and vintage beads less expensively. 
    • You can also make beautiful bracelets with inexpensive beads from the crafts store, if you prefer. 
  • A bead board.
    • While not strictly required, a bead board will make it much easier to plan out, play "what if" and rework parts of your design. 
    • The BeadSmith bead board I use has three channels for designing multi-strand bracelets and necklaces, a flocked surface to help keep beads from rolling around too much as you are laying out your jewelry designs, six recessed compartments of different sizes to hold and organize beads, findings and other jewelry components, and a plastic cover to protect your work-in-progress from dust and keep your laid-out design in place in between work sessions. 
  • Steel bracelet memory wire. 
  • Memory wire cutters.
    • Memory wire is extremely hard steel wire that will ruin the cutting jaws regular jewelry wire cutters intended for softer metal wire, such as silver, gold or copper. I highly recommend using either memory wire cutters made specifically for this purpose or a heavy-duty wire cutter from the hardware store.
      • An old, heavy-duty toenail clipper with straight or slanted (but not curved) jaws that you don't mind ruining is another option.
  • Bead stoppers.
    • These are steel coil spring clamps that prevent beads from slipping off stringing wire. I find they are also useful when stringing beads on memory wire bracelets.
    • I have both the basic Beadalon wire bead stoppers, which I am showing in this project because they are less expensive, and the cushioned Soft-Flex wire bead stoppers, which I prefer because they are more comfortable to use and less likely to escape from your fingertips.
    • As an alternative, you can try using ribbed clear silicone ear wire clutches, if the holes fit your memory wire.
  • Memory wire end caps.
    • Memory wire end caps are half-drilled metal beads that are glued onto the trimmed ends of the memory wire to keep the rest of the beads in place on the finished memory wire wrap bracelet and leave a smooth, rounded end that won't scratch or snag on clothing.
    • Choose silver-plated or gold-plated end caps to match your wire or spacer/accent beads.
    • Alternatively, you can use heavy-duty memory wire looping pliers to turn a small loop at each end of the wire. Finishing the ends with small loops also gives you the option of making and attaching beaded dangles to them.
  • Strong, two-part epoxy glue that dries clear. 
  • Wooden toothpicks and scrap cardboard.
    • Toothpicks and pieces of cardboard cut from shipping cartons or cereal boxes are the perfect disposable mixing tools and palettes for preparing and applying small amounts of clear two-part epoxy to the ends of the wire.
  • Close-fitting latex or nitrile exam gloves.
    • You'll wear these to protect your fingers while sliding small spacer beads and memory wire end caps onto the epoxy-coated wire ends. Choose gloves that are aren't too large, too loose or too thick to maintain the dexterity required to hold the small memory wire end cap beads securely and quickly maneuver the wire into the small holes before the epoxy sets.
    • I find that unpowdered nitrile exam gloves work great for this purpose. 
  • Ultra-fine point permanent marker.
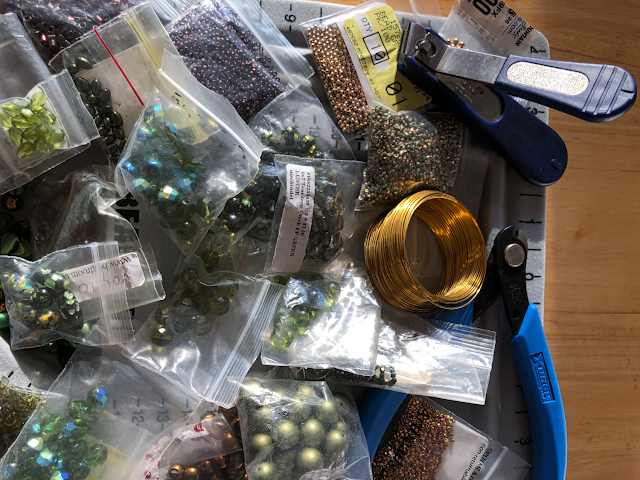
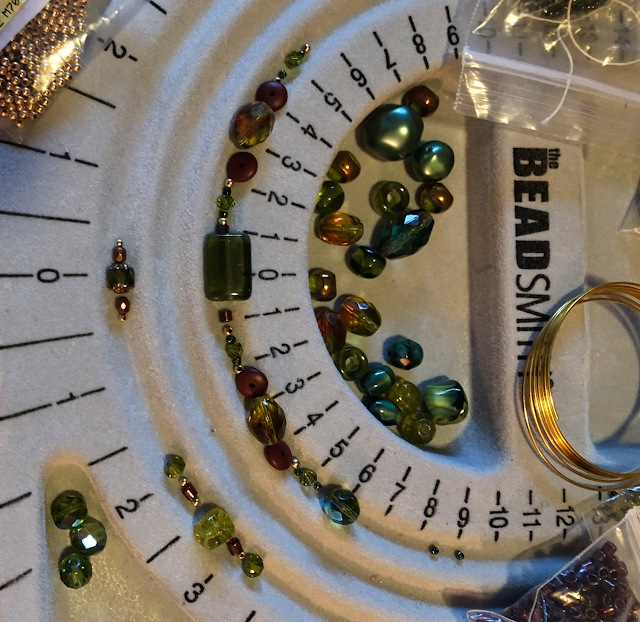
Bead board with assorted beads and jewelry making tools

Step 1: Choose Your Color Scheme and Assemble a Varied Selection of Beads to Design With

First, decide what your main color will be. Choose a wide variety of beads in different shades of that color, sizes, shapes and finishes. Then, decide on a couple of complementary accent colors. Start with a broader selection than you think you will need. I find that I can never predict exactly which beads will end up in my final design, and the more choices you have to play with, the more creative you can be.

My friend wanted the dominant color of her bracelet to be olive green. This photo shows just some of the light to dark olive-toned vintage and contemporary beads I selected from my very large collection for this design, along with some small accent beads in gold, bronze and deep red shades, from garnet to cinnabar.

Bead board with coil of bracelet memory wire and memory wire cutters

Step 2: Cut Your Memory Wire to the Desired Finished Number of Coils, Plus Some Extra 

A memory wire wrap bracelet can have as few as two coils or as many as you can fit on your arm! I usually prefer to make by beaded coil wrap bracelets either three or five coils wide.

Although it's possible to leave the entire memory wire coil uncut until you have finished stringing all your beads from one end, I find it much easier to cut the purchased memory wire coil to a more manageable length and add beads from both ends, since I always make multiple design adjustments as I go along.

It's important to cut the wire longer than you want your finished bracelet to be, for a few reasons. You need enough extra wire at both ends to hold onto as you get closer to stringing the last of your beads and to allow space to clamp the wire ends with the bead stoppers so the beads won't slide off one end while you are adding beads to the other end. Also, the width of the beads will increase the diameter of the coils, so if you start with just three coils of wire you might end up with only two coils once the beads have been added. Wider or longer beads also prevent the memory wire from curving as much, which also enlarges the beaded coils and takes up more of the wire. 

So, if I'm planning to make a three-wrap beaded coil bracelet, especially if I will be including 8mm and larger focal beads in the center of my groupings, I will usually cut five or  six coils memory wire and then trim the excess after all my beads have been strung and I am happy with the design.

Remember to use either a memory wire cutter or another heavy-duty wire cutter whose cutting jaws won't be ruined by this very hard wire!

Bead board with beads laid out in beginning of design

Step 3: Begin Playing With Design Ideas

You can string your beads in a random pattern, if you wish. The most important thing is to have a harmonious mix of bead colors, shapes, sizes and finishes. 

I prefer creating memory wire wrap bracelet designs that combine apparent randomness with symmetry. I do this by creating "bead stations," small groupings of odd numbers of beads in symmetrical patterns, usually featuring a larger bead in the center flanked by smaller and medium-size beads interspersed with tiny spacer beads. I find that this creates a pleasing "rhythm" and "flow" to the design.

Occasionally, I will include a larger grouping of symmetrically arranged beads, such as the one I experimented with in the upper channel of the three-strand bead design board shown in the photo above.

Beads strung on memory wire held in place with a bead stopper clamp

Step 4: Start Stringing Your Beads Onto the Memory Wire

Once you feel comfortable with the initial direction of your beaded coil wrap bracelet design, it's time to start stringing your beads onto the memory wire. Clamp a bead stopper about half a coil away from one end, then start stringing the beads in your desired order or pattern.

I usually repeat some of the smaller and medium-size spacer beads from one "bead station" grouping when designing the adjacent grouping, making slight changes and using a different center focal bead for each successive pattern. 

Beads strung onto bracelet memory wire

Step 5: Adjust as Needed So the Bead Stations Complement Their Neighbors, Both to the Sides and On the Other Coils

I've found that it's nearly impossible to create a final multi-strand beaded coil wrap bracelet design before stringing the beads on the memory wire. 

While the mechanics of cutting memory wire, stringing beads and finishing the ends are fairly simple, designing the bracelet so that the colors, sizes, shapes and patterns of each bead grouping complement not only the ones to either side on the same coil but also their counterparts on the adjacent coils is definitely a challenge (a bit like playing the three-dimensional chess game from Star Trek, lol). 

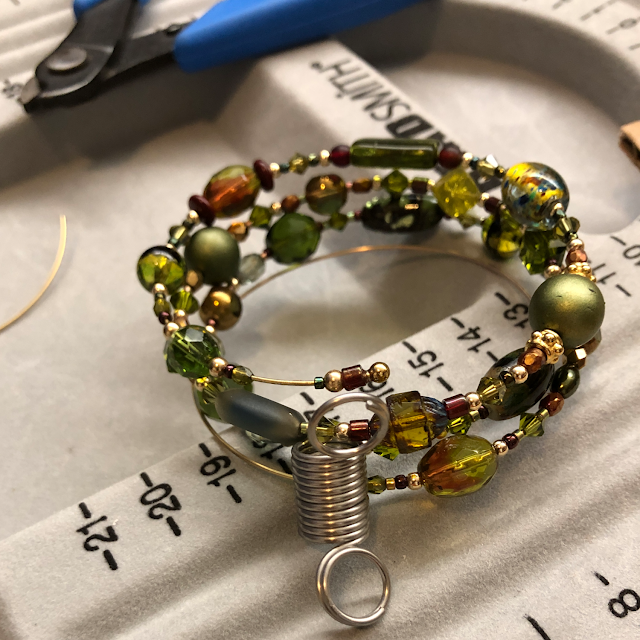
As you can see from the photos, my final design turned out to be significantly different from the initial pattern groupings I was experimenting with at the beginning in order to get all three parallel beaded coils to fit together nicely.


Extreme close-up of final beaded coil wrap bracelet design before trimming and finishing the wire ends

Step 6: Do a Final Alignment Check

Snug the beads down firmly, gently stretching the coils apart and adjusting the bead stopper clamps, if necessary, to ensure there are no gaps where the wire shows between the beads.

Then, do a final check to make sure you're happy with the way the beads on each coil align with those on the other coils. Even though I am careful to keep re-snugging the beads as I go, I usually have to make a few minor adjustments after snugging the beads one last time.

Gluing the last few beads to one end of the memory wire

Step 7: Glue The Last Several Beads to One End of the Bracelet, Then Trim the Memory Wire and Glue on the End Cap

Place one end of the memory wire into the jaws of the memory wire cutter. Using just enough force on the handles to compress the wire without cutting through it, make adjacent, parallel grooves along the first 1/2-inch of one end of the memory wire. This will create some "tooth" on the smooth metal surface to help the epoxy adhere better. Use an ultra fine point permanent marker to place a small mark about 3–4 mm from the tip of the wire.

Next, prepare a very small amount of the J-B Weld clear two-part epoxy. Put on your exam gloves, then squeeze equal amounts from both sides of the syringe dispenser onto a scrap of cardboard and mix them together thoroughly and quickly with a clean toothpick.. 

Clean off the tip of the toothpick, then use it to pick up a drop of the prepared epoxy mixture and apply it to the small section of wire where you made the grooves, starting at the mark you made about 3–4 mm from the tip and spreading it inward along the remainder of the grooved section. Quickly remove the bead stopper clamp and slide the last several beads down onto the glued section of wire, taking care not to get any of the epoxy on the last 3–4 mm of the grooved end of the wire. Slide one more bead down next to the glued beads, replace the bead stopper next to it to keep the glued beads in place while the epoxy sets, then prop the bracelet with the exposed tip of the wire facing upward.

When the epoxy has not only set but also cured, tug firmly on the glued beads to make sure they are securely attached. Then, slide a memory wire bead cap onto the clean end of the memory wire to gauge how much of the wire to trim. Remove the end cap and use the memory wire cutters to remove the excess length. 

Helpful Tip

Trim a little less wire from the end than you think you need to. Removing a bit more, if necessary. However, if you trim off too much, there won't be enough wire to allow the epoxy to bond it securely to the end cap. It's better to leave the wire a smidge too long and have a tiny gap between the last bead and the end cap than to trim it too short.
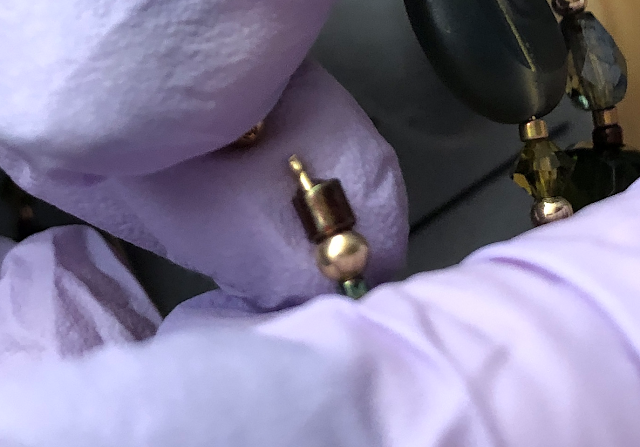
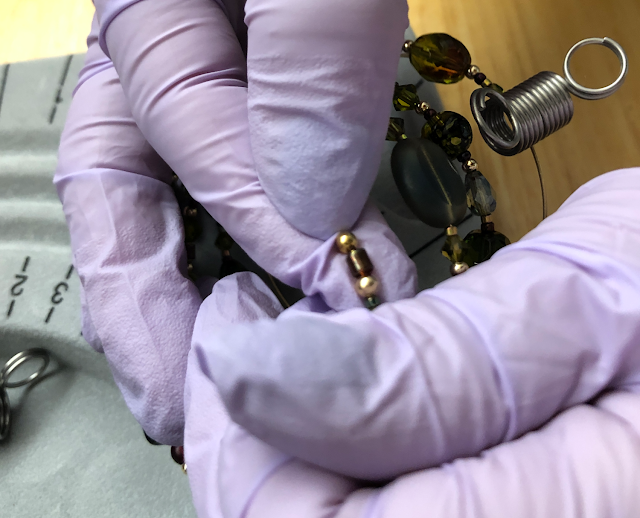
Close-up of gloved fingers aligning the hole of the memory wire end cap to the glued, trimmed wire end
Coat the tip of the trimmed and ridged wire end with a dab of epoxy and align the end cap hole.

Close-up of pressing the end cap onto the glue-coated wire end
Then, quickly and carefully, push the end cap firmly onto the glued tip of the memory wire.

Using a fresh piece of cardboard and a fresh toothpick, prepare another small amount of two-part epoxy. Quickly apply a dab to the exposed end of the trimmed wire, align the hole of the memory wire end cap and guide it onto the wire tip. Hold the end cap securely in place for at least 60 seconds, applying pressure from the end with a clean, gloved fingertip. Slowly and carefully remove the pressure, then prop the bracelet with the freshly glued end pointing upward, so that gravity continues to pull it down onto the clipped wire tip. 

Allow the epoxy to cure fully, then give the end cap a tug to make sure it is firmly secured to the end of the wire before moving on to Step 8.

Step 8: Trim and Glue the Other End of the Bracelet

Finishing the second end is a bit trickier than the first. Slide the loose beads down the bracelet wire, snugging them firmly against the glued beads at the other end. Use the ultra fine point permanent marker to mark the wire at the last loose bead. Then, carefully slide several beads off that end of the wire and place them in order in a channel of the flocked bead board, making note of which end of the row of beads was at the end of the wire.

Use the memory wire cutters to indent parallel lines into the section of memory wire adjacent to the remaining strung beads, as before. Put on the exam gloves, prepare a small amount of epoxy, re-snug the beads and apply the glue to the section of exposed wire between the end of the strung beads and the mark you made. Quickly slide the beads you removed back onto the wire in the correct order and snug them down onto the glued section. Wipe off any visible epoxy that might have squeezed out onto the adjacent exposed wire. Replace the bead stopper and allow the epoxy to cure fully.

When the glue has cured, carefully remove the bead stopper and tug firmly on the glued beads to ensure that they remain firmly attached to the wire. Examine the adjacent wire carefully, scraping off any tiny areas of cured epoxy residue with a utility blade. 

Trim the excess wire, testing the length of the remaining exposed wire at the tip with the memory wire end cap and leaving just slightly more than the depth of the end cap bead hole. If necessary, use the memory wire cutter to impress additional closely-spaced parallel indents into the exposed wire end.

Prepare a small amount of epoxy and glue on the bead cap, applying pressure with a gloved fingertip for at least 60 seconds as before, then prop the bracelet with the freshly glued tip facing up and allow it to cure fully.

Tug on the end cap bead to ensure it is well secured to the end of the wire.
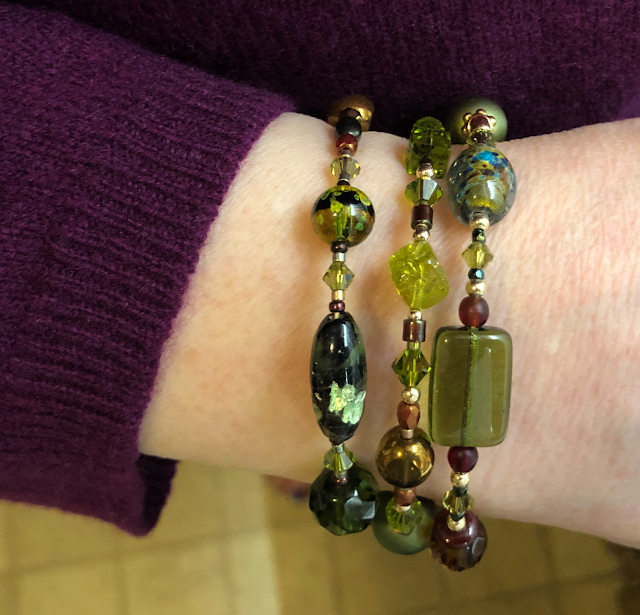
Finished beaded coil wrap bracelet being worn on woman's wrist
I'm modeling the finished, one-of-a-kind, vintage beaded memory wire wrap bracelet I designed and made as a birthday gift for my dear friend Sally.

Wear or Give Your Beaded Coil Wrap Bracelet With Pride! 

Although I collect rare vintage glass beads and Swarovski crystal beads and love to use them in my jewelry designs, making beautiful beaded memory wire coil wrap bracelets can be as easy or challenging and as inexpensive or costly a project as you decide to make it. 

Wouldn't it be fun to get some inexpensive beads from craft stores and find and disassemble beaded jewelry at bargain prices from yard sales and thrift shops, then pick up some memory wire, a heavy duty wire cutter and some epoxy and invite your favorite teens or college students over for a jewelry making "play date?"

I hope you decide to give this beaded coil wrap bracelet project a try. If you do, I would love to see what you make!


How to Make a Stylish Beaded Coil Wrap Bracelet by Margaret Schindel

Read More Crafts & DIY Reviews by Our Review This Reviews Contributors

Read More Gifts Reviews by Our Review This Reviews Contributors


Note: The author may receive a commission from purchases made using links found in this article. “As an Amazon Associate, Ebay (EPN) and/or Esty (Awin) Affiliate, I (we) earn from qualifying purchases.”


Tuesday, November 2, 2021

WHAT SOLD ON EBAY? SECOND EDITION

This is the second edition of WHAT SOLD ON EBAY. If you've ever been curious, discover some of my new, used and vintage sales!

Curious? People often are, whether purely out of simple curiosity or because they have considered or actually do sell on eBay. Let’s review What Sold on eBay since my last post. Once again, these are five items that sold from my eBay store, Treasures By Brenda. This time, they’re from a weekend in October.
Yes! This Hudson's Bay waist pouch (or fanny pack as you may call it) sold from my eBay store. Discover more interesting SOLD items here!

On this particular weekend, with one exception, the sales were used and vintage items. And once again, that demonstrates what I believe, that eBay is one of the best places to turn to for items that are out of production.

So here are the five items that sold from my store starting with the only item that was new:


WAIST POUCH / FANNY PACK


Did you ever use a fanny pack? Or maybe you wear a waist pouch today? Whatever you call them, there has been a resurgence in interest in fanny packs. Fanny pack, by the way, is what we called them when they were first popular in late 1980s and early 1990s when, according to The Globe and Mail, Adweek Magazine declared them “the hottest product of the year.” Well, they’re back. We have so many types of bags available today that I don’t imagine that fanny packs will ever be the hottest product of the year again but they are popular. This one had the advantage of also bearing the iconic stripes from Canada’s Hudson Bay Company and it is SOLD. I do have one HBC fanny pack left and you can find it here with my collection of  Hudson’s Bay Company merchandise

WHAT SOLD ON EBAY? One cute-as-can-be wind-up pecking chick toy!
VINTAGE WIND-UP TOY


Are you intrigued by wind-up toys, vintage or not? The smallest item I sold was surely this fun little metal toy. In this case it was a tiny chick with the original box. Wind-up toys are tricky, they have certainly been reproduced and this one was vintage though not extremely old or very valuable. Still, it was a fun item, an addition to someone’s collection or maybe a fun stocking stuffer. It is SOLD but if you want one, you will find more of this vintage wind-up pecking chick here on eBay

KNIFE BLOCK


Do you use a knife block to store your knives? Whether you do or not, you might be surprised that some knife blocks have considerable monetary value. In this case, mine was a small Cutco brand block that was not particularly valuable but that definitely did have value to the person who purchased it and who wanted a smaller knife block. However, the large Cutco blocks, like the one shown in this picture that hold 32 pieces, can sell for over $300. Mine is SOLD but if you are interested, you will find more than 1,500 Cutco knife blocks on eBay here.
What sold on eBay? How about a handsome Cutco knife block?

BEER STEIN


Do you drink your beer in a stein? I don’t have a whole lot of luck selling beer steins and I had a vintage Lord Nelson HMS Victory beer mug in my store for a long time. Let’s just say for years during which it was listed at various price points until eventually it was clearance priced. It had some crazing and so, when I found another one like it that was in better condition in my pile of items to list, I removed the crazed one and listed the second one, which sold in a week proving that condition is very important to buyers. A lesson to all would-be eBay sellers! Mine is SOLD but if you’re after a Lord Nelson stein, look here

WOOL WINTER SCARF

WHAT SOLD ON EBAY? How about a handsome pure virgin wool scarf. Discover more great sales here!

Do you wear a wool scarf in the winter? I have read that wool scarves are good sellers and I have sold a few but I would caution that they, too, need to be in very good condition and they have to be listed at the right price. In this case, my sale was of a handsome pure virgin wool men’s scarf in a tartan pattern. I have other scarves in my eBay store but none like this traditional one. Mine is SOLD but if you are looking for a pure virgin wool scarf, click here

BOWLING PINS


What would you do with an incomplete vintage set of 3.5 inch table top bowling pins? Whether or not they appeal to you, you might agree with me that they were the most unusual item I sold this weekend.  They have been used and loved whether as part of a game, as a toy or as a decoration, I do not know. In any case, these go against the idea of condition being very important to buyers and I believe that in this case the much beloved condition may have actually added to their appeal for the buyer. Mine are SOLD and when I looked today, I could not find anything exactly like them but you can follow this link to see the assortment of miniature vintage bowling pins that I did find on eBay. 

WHAT SOLD ON EBAY? Vintage tabletop bowling pins. What would you do with them?

While none of these items are available anymore in my eBay shop, I do have many other unique and interesting items. Do drop in to my shop, Treasures By Brenda, by clicking here

You never know
what I might have
in store for you!
Brenda

MORE READING:

Learn more about this vintage item that is enjoying a current resurgence in popularity.  

What Sold on eBay? First Edition
Discover what items sold the first time I wrote a post like this one.
Disney's television series, Tale Spin, continues to be popular as do these vintage toys.


Note: The author may receive a commission from purchases made using links found in this article. “As an Amazon Associate, Ebay (EPN) and/or Esty (Awin) Affiliate, I (we) earn from qualifying purchases.”


Wednesday, October 20, 2021

The Best Acrylic Fabric Paints for Painting Clothes and Accessories

Acrylic fabric paints, iron-on appliques and other embellishments are a fun and easy way to transform ordinary t-shirts, sweatshirts, denim jackets and jeans into special, one-of-a-kind clothing designs. 

Even if you don’t feel especially artistic, it’s extremely easy to add striking hand painted designs to basic wardrobe items by applying acrylic fabric paint through a stencil with a foam pouncer. 

Embellishing clothing with fabric paints is also a wonderful project to do with kids. Both my fashionista niece and her younger brother used to love taking solid color T-shirts and creating their own hand painted and stenciled designer tees, which they wore with pride.

Some fabric paints also work well on other materials, including leather and vinyl, so they’re great for painting shoes, sandals, handbags, belts and other accessories to give them a whole new look with fresh colors, color blocking, patterns or painted accents.

I have researched and used different types, brands and formulas of fabric paints in different price ranges. In this review I will share my favorite acrylic fabric paints for decorating clothing and accessories. 

The Best, Most Versatile Acrylic Fabric Paints for Embellishing Clothing & Accessories

Why Use Acrylic Fabric Paints?

Acrylic fabric paints, also called acrylic textile paints, are formulated specifically for use on fabric clothing and other textiles. Unlike fabric dyes and alcohol-based textile paints or inks, they do not spread and saturate the fibers. Most work best on untreated or pre-washed, natural fabrics and synthetic fabrics whose fiber content contains at least 50% natural fibers. 

Acrylic textile paints are usually thinner, penetrate fibers better and dry more flexible than standard acrylic paints formulated for art or craft uses. Fabric paints also contain a binder that helps them adhere much better to natural fibers after the paint dries and is heat-set (usually with an iron). This binder makes the painted designs more durable, so they can better withstand repeated washing and resist cracking, peeling or flaking when the fabric is gently stretched or folded, such as when you put on, move around in, take off or put away your painted clothing.   

More transparent colors usually have a thinner consistency and are softer to the touch when dry compared to more opaque fabric paints. They are great for lighter color fabrics, since the color of the clothing will show through them. For the same reason, opaque fabric paints will show up much better on darker clothing, although they are slightly thicker and will dry a bit stiffer than more transparent formulas.

Good Quality Fabric Paints Give the Best Results

Jacquard makes moderately priced, high-quality, highly pigmented paints, dyes, mica powders and other art and craft supplies. Jacquard's Textile, Neopaque and Lumiere lines are my go-to acrylic paints for painting fabrics.

Jacquard Textile acrylic paints "Exciter Pack" assortment

Jacquard Textile 

Jacquard Textile paints have a medium- to light-bodied consistency and come in 39 semi-transparent colors. Mixing any of the other colors with 123 White will create a pastel shade. You can make any color more transparent without affecting the quality or consistency by mixing it with Jacquard Textile 100 Colorless Extender. (Another option, which I don’t recommend, is diluting the paints with up to 25% water, since it will reduce their viscosity and negatively affect the quality.)  Mixing any other Jacquard Textile color with #220 Super Opaque White will make it more opaque. 

The Jacquard Textile Color Exciter Pack is an economical assortment that includes small bottles of nine of the most useful colors in the line. It's a great way to try these paints without investing a lot of money.

Jacquard Textile colors can also be mixed with Jacquard Lumiere, Neopaque or Dye-Na-Flow paints or with Jacquard Pearl Ex Powdered Pigments to create custom colors and effects.

Jacquard Neopaque and Lumiere

Neopaque is Jacquard’s line of light-bodied, opaque acrylic paints. They come in 21 colors plus a Flowable Extender medium that can be used to make the colors more transparent without altering the paint’s texture, consistency, adherence and other key properties. Lumiere is a companion line of 33 beautiful metallic and pearlescent paint colors designed to complement the Neopaque solid colors and have similar characteristics. My favorite Lumiere paints are the color-shifting duo-chrome colors!

Even though the Jacquard Neopaque and Jacquard Lumiere lines have not been optimized specifically for painting on fabrics, like the Jacquard Textile line, they have many of the same characteristics and are also considered fabric paints. After they have dried and been heat-set, both Neopaque and Lumiere paints adhere to textiles very well, remain flexible and resist cracking, peeling and chipping. I have used them to paint fleece sweatshirts, both freehand and with stencils, and they have withstood many washings well.

Both formulas are opaque, highly pigmented and provide good coverage, even on dark fabrics. You can mix any Neopaque or Lumiere shade with Neopaque Flowable Extender to make it more transparent without changing its consistency, thickness, flexibility, adherence or other important characteristics. 

Similarly to the Jacquard Textile line, you can mix pastel shades by blending a small amount of Neopaque White into any of the other Neopaque colors.

Jacquard Neopaque and Lumiere acrylic paints
I've been using my first Jacquard Neopaque and Lumiere acrylic paint Exciter Packs for many years. 

There are also a Lumiere Exciter Pack with 9 pearlescent and metallic colors and a Lumiere & Neopaque Exciter Pack with 7 metallic Lumiere shades plus black and white Neopaque. As with the Textile line, these two Exciter Packs are a great way to get a nice variety of colors in smaller quantities for a very affordable price. I have purchased both of these Exciter Packs as well as full-size bottles of the Neopaque black and white and Lumiere duo-chrome colors I use most. I recently bought another of the Lumiere assortments because some older colors have been discontinued and newer ones added.

Another advantage of Jacquard Lumiere and Neopaque acrylic paints is that they adhere well to a wide range of surfaces including paper, wood, rubber, vinyl, leather and rubber, in addition to fabric, and can be used for many different types of projects. I have gotten more than my money’s worth out of mine. 

For example, I completely transformed an old pair of boring, frumpy, beige comfort sandals by painting the leather with Lumiere for the uppers and black Neopaque to edge the sole, and then sewing on some faux jeweled trim. 

Beige sandals before and after being painted with aqua and blue Jacquare Lumiere acrylic paints

Heat-Set Fabric Painting Medium 

You also can achieve successful results by mixing permanent, highly pigmented art or craft acrylic paints 50/50 with a good quality fabric medium, such as Golden GAC 900 Heat-Set Fabric Painting Medium or Martha Stewart Tintable Fabric Medium. 

Pébéo Setacolor

If you are painting a very special piece of clothing or textile, you may want to consider the Pébéo Setacolor line. These superb fabric paints come in an extensive range of beautiful colors and finishes. Although they are more expensive than the Jacquard fabric paints, superior quality, performance and product selection make Pébéo Setacolor products a favorite among many professional painted clothing artists and enthusiasts. 

Pébéo Setacolor Light Fabrics are transparent and include 44 matte, metallic, glitter, and fluorescent shades. Pébéo Setacolor Opaque comes in 77 matte and “shimmer opaque” shades with glitter, pearlescent, metallic and iridescent finishes that dry softer, smoother and more flexible than most other opaque textile paints. There are also Pébéo Setacolor 3D fabric paints that come in tubes with small nozzles that are great for adding raised outlines or dimensional accents to your painted clothing designs. 

The most affordable way to try these terrific paints is with one of the 10-color introductory sets, the Pébéo Setacolor Light Fabrics Discovery Kit or the Pébéo Setacolor Opaque Discovery Kit

Use Fabric Paints and Stencils for Beautiful, Affordable, One-of-a-Kind Handmade Gifts 

Stencils are made in just about any pattern or theme you could want and require no artistic talent to use.

I have used inexpensive fabric stencils of flowers, gardening tools and bees to decorate a sweatshirt for my mother-in-law who loves to garden. 

One of my husband’s favorite gifts from me is a forest green sweatshirt I purchased for him many years ago and stenciled with a cascade of metallic and pearlescent autumn leaves. It has been worn and washed so many times that the fleece is pilling, and the color has faded. By now, the paint isn’t quite as bright or shiny as it once was, either, but it’s still hasn’t cracked, flaked or worn off, and he still wears it proudly.

Man wearing dark green sweatshirt with a stenciled metallic autumn leaves design
My husband still loves and wears this sweatshirt I stenciled for him many years ago. 

You can use alphabet stencils to personalize a T-shirt, hoodie or other garment with the gift recipient’s name or add a meaningful word or message. 

Older children will also love using fabric paints and stencils to turn simple, inexpensive pieces of clothing into personalized gifts for special friends and family members.

Stenciled or hand painted tablecloths, napkins, placemats and table runners also make wonderful gifts. Painting them with snowflakes, pointsettias and other seasonal designs makes any holiday a bit more festive. 

I hope I have inspired you to give fabric paints a try!

The Best Acrylic Fabric Paints for Painting Clothes and Accessories


The Best Acrylic Fabric Paints for Painting Clothes and Accessories by Margaret Schindel


Read More Crafts Reviews by Our Review This Reviews Contributors

Read More DIY Reviews by Our Review This Reviews Contributors


Note: The author may receive a commission from purchases made using links found in this article. “As an Amazon Associate, Ebay (EPN) and/or Esty (Awin) Affiliate, I (we) earn from qualifying purchases.”


Most Recent Reviews on Review This Reviews


Search for Reviews by Subject, Author or Title

The Review This Reviews Contributors


SylvestermouseSylvestermouseDawn Rae BDawn Rae BMbgPhotoMbgPhotoBrite-IdeasBrite-IdeasWednesday ElfWednesday ElfOlivia MorrisOlivia MorrisTreasures by BrendaTreasures by BrendaThe Savvy AgeThe Savvy AgeMargaret SchindelMargaret SchindelRaintree AnnieRaintree AnnieLou16Lou16Sam MonacoSam MonacoTracey BoyerTracey BoyerRenaissance WomanRenaissance WomanBarbRadBarbRadBev OwensBev OwensBuckHawkBuckHawkDecorating for EventsDecorating for EventsHeather426Heather426Coletta TeskeColetta TeskeMissMerFaeryMissMerFaeryMickie_GMickie_G


Review This Reviews is Dedicated to the Memory of Our Beloved Friend and Fellow Contributor

Susan DeppnerSusan Deppner

We may be apart, but
You Are Not Forgotten


“As an Amazon Associate, Ebay (EPN) and or Etsy (Awin) Affiliate, I (we) earn from purchases.” Disclosure Statement

X