Sunday, August 28, 2016

Before You Decorate, Learn the Top Color Choices for Fall 2016

Top 10 Fall/Winter 2016 Pantone Colors
in Headband Hair Ties 
It seems ridiculous to decorate for a trend or season doesn't it? Not necessarily.

It can be done without spending a fortune in time or money. As an example, here's how to temporarily make a bedroom change for Halloween.

To be all-up-in-what's-current in your decor with Pantone's fall and winter colors, add pieces that include some of their ten choices into various accessories.

That way you're not doing a complete overhaul but can still show your friends and guests what the current seasonal colors are ... and for Fall 2016, they're calm, appealing, and gorgeous!

A REVIEW of PANTONE'S TOP COLOR CHOICES for FALL 2016

You can see the specific color choices here on Pantone's website.

They're beautifully presented and you'll get a real sense of their true color tones. The headband hair ties featured here are the colors listed below, however they're not in order.

When you visit the Pantone website or watch the video featured below you'll see exactly the color name as it relates to the actual color.
1. Riverside Blue
2. Airy Blue
3. Sharkskin (grey family)
4. Aurora Red
5. Warm Taupe
6. Dusty Cedar
7. Lush Meadow
8. Spicy Mustard
9. Potters Clay
10. Bodacious
The Zeitgeist and Color

Upon reviewing Pantone's top color choices for fall 2016, their main theme of consistency, confidence and strength certainly fits the emotional and even uncertain times we currently find ourselves living in.

The emotions exuded by Pantone's color choices reflect the times, however they do so in a way that encourages a sense of calm in a world where division and hardening of positions have taken root. The certainty of Riverside Blue is meant as an example of something you can count on.

Of course that's not by coincidence, as Pantone connects it's color selections to the Zeitgeist, which in simple english means it reflects the mood, emotions and beliefs of society for the current time.

Pantone's Color of the Year for 2016

Pantone announces a color of the year every year and puts out the top 10 color choices for both spring and fall. This year was the first time two colors were selected as color of the year; Rose Quartz and Serenity. Of course, the need for calm and steadiness in a divided world is reflected in this choice.

Seven Ways You Can Incorporate any of the Above 10 Fall Colors for 2106 into Your Current Decor:
1. Use slip covers over pillows
2. Add a throw blanket to a room
3. Have your child/children create a piece of art with any one or all of the ten colors then frame and feature it
4. Create a fall center-piece using the lovely fall shades of spicy mustard, aurora red, lush meadow, and warm taupe
5. Put lush green plants throughout your home or add several to one room
6. Incorporate Aurora Red and Lush Green into your holiday home decor
7. Set your Thanksgiving Table with each of these colors in mind; glasses, mugs, plates, napkins, the tablecloth and center-piece
Of course you'll find most of these colors reflected in fashion, however, they also extend to our working and living environments. After all, color selection is based upon society's current 'mood' and that mood makes itself visible in every aspect of our life, from where we live, to where we work, to what we wear.

Here's a video that shows you the fall color choices reflected in clothing. Go ahead and use these as your guideline should you decide on home decor accessories in these shades:


Color is a very personal choice, and in the end, our room and our clothes have to reflect who we are inside. With the mood of society ever changing the one constant we can confidently call upon are the things and colors that make us happy.


Note: The author may receive a commission from purchases made using links found in this article. “As an Amazon Associate, Ebay (EPN) and/or Esty (Awin) Affiliate, I (we) earn from qualifying purchases.”


Saturday, August 27, 2016

How to Remove Blemishes From Photos Using Photoshop

How to restore old family photos using photoshop
©Louanne Cox
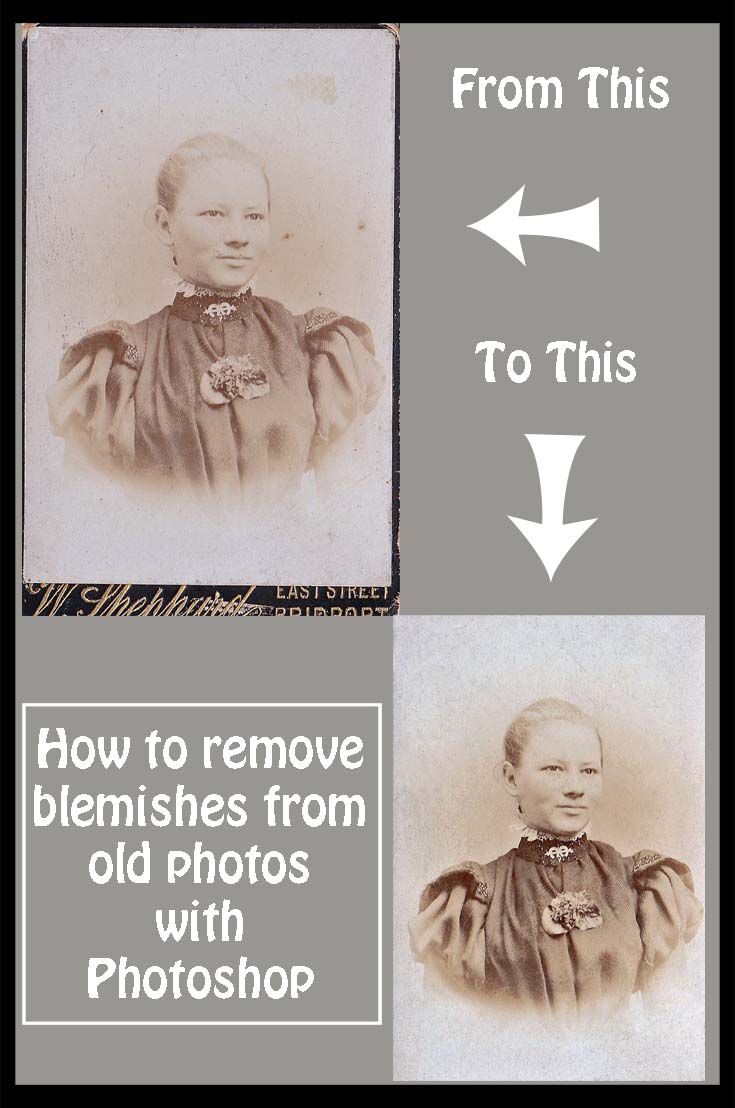
Let's review how easy it is to use Photoshop to remove blemishes from photos, trust me it's really simple and well worth the time spent to restore old family photos.

As one of the genealogists in our family I have been given a number of photographs over the years that have been in shocking condition from one that was ripped in half to countless that have age spots and blemishes on them and then there's the creased photos!   The positives is that today's photographs will all be preserved in a digital format so that future generations can see what their ancestors looked like.

I digress, this is supposed to be about removing blemishes (by which I mean the age spots that older photographs sometimes get, NOT grandma's birthmark or grandpa's big ears!) with Photoshop.

To begin I'm going to show you two versions of a  photograph of my great grandmother -

How to remove blemishes from old photos using photoshop

The original photograph was on a piece of card with the photographers name on it - this had actually been cut or broken off so you couldn't easily read it.   The first thing I did after I had scanned the photo was to crop it so that we were left with just the photo and no evidence of the 'card'.

remove blemishes using photoshop

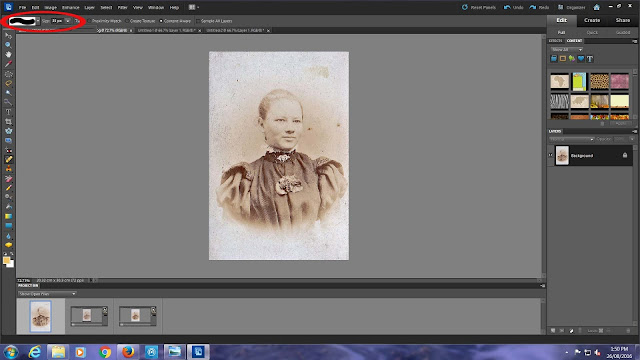
Using the picture above you can see the Image drop down menu button is circled with the number 1 next to it.   If you click on here it will show you the option to crop your photograph, if you want to.

The number 2 circle is around the Enhance drop down menu and I went to this and clicked on the auto smart fix button.   Now why did I do this?   A number of older photos that I have which are in the sepia tones tend to be really light when I scan them in and the auto smart fix just seems to darken them slightly without over correcting.   If you don't like the result just click the undo button and miss out this step.

On the left hand side of the image you'll see the number 3 circle that is around an icon that looks like a band aid, this is the spot healing tool aka our best friend!

Now if you're into 'airbrushing' your photos this is the button that can get rid of wrinkles etc, but for our purposes we're just using it on age spots, spillages and creases that were on the photograph.

Once you've clicked on the icon and you move your mouse back to the picture you'll see a circle appear.   Move the circle around a 'spot' and click it, the 'spot' will disappear just like magic.

Restoring old family photographs with photoshop - a how to guide

When you've clicked on the 'band aid' you'll find that a sub menu appears at the top - see the red circle in the above picture.   This is where you can adjust the size of the circle that appears.

So now you know how to remove blemishes in Photoshop, let me give you a few more tips that I've found helpful.

Zoom in on the photo - just use Ctrl + to make the photograph a few sizes bigger and then remove the blemishes.   It can make it easier to see them, especially creases in photographs which can really show up once you get rid of the brown age spots.

When working on the face make the circle as small as you can so that it just covers the blemish you want to remove.   I had a photograph of my grandmother as a teenager and something that looked like coffee had been dripped onto it at some stage of it's life (before it came into my possession).   One of the splashes was over her eye and when I clicked on it her face just looked strange - I have no other words!   I zoomed in on her face, made the circle smaller than the stain and clicked on it from the outside of the stain in - that worked out really well and it's one of my favorite photos now.

Don't work on too many photos in one sitting.   When you're zooming in and doing a good job you don't realize what a strain on your eyes it is.   If you sit there and do half a dozen photographs once you walk away from the computer you'll realize that your eyes have been strained and they can really ache, so can your head!   It is quite addictive though, just make sure you only do a few photos at a time.

Now that I've shown you how easy it is, you might just be thinking - I need Photoshop!   Trust me you'll use it for far more than removing blemishes from old photographs, so I've added the link to purchase it just below.  

Adobe Photoshop Elements 2021Adobe Photoshop Elements 2021
I have Photoshop Elements, although not the 2021 version yet, I hope to get it upgraded for Christmas this year.

Having Photoshop is fun and addictive as there's so many different effects you can create with your images. I do have to share a funny story about my daughter a few years ago. It wasn't long after I first got Photoshop and she was looking at some photos I'd taken of her and didn't like any of them because she had a pimple and she was showing too much gum in some of them ........ personally I thought they looked great, but I'm just mum!

Anyway I asked her if she'd like me to Photoshop them, her eyes opened wide and she said, "can you do that mum?", I replied of course I can or words to that effect and she left me alone to work on it. She wasn't impressed with my results - I gave her elf ears and a wavy nose - her dad thought it was hilarious, but my pre-teen (at the time) did not appreciate my idea of photoshopping! I'm not suggesting other parents do this, but it was funny and even she tells the story of mum photoshopping her nowadays.

I hope that I've helped you to remove blemishes from your old photographs as they are precious. Looking at photos is a great way of triggering memories, I love pulling out our photo albums with my mum and reminiscing. It's funny how everyone remembers things differently and you can go off on a number of different tangents just from a single photo.


Note: The author may receive a commission from purchases made using links found in this article. “As an Amazon Associate, Ebay (EPN) and/or Esty (Awin) Affiliate, I (we) earn from qualifying purchases.”


Friday, August 26, 2016

Windigo Fire Book Review

Windigo Fire book cover
Murder. Mayhem. Fire. When I proposed Windigo Fire by M.H. Callway to my book club a year ago, they were instantly taken by the action-packed storyline, which goes as follows:

Native Canadian Danny Bluestone, takes a job for some easy money at a kid's retreat in Red Dog Lake in Northern Ontario. A local offers him the chance to be a scout for wealthy tourists and hunters.  Danny realizes that this business is a cover-up for a grow-op but he takes the job anyway and it turns out that he has been recruited for a bear hunt that is illegal. However, he awakens and finds all of the tourists except one dead. The two survivors have to join together to escape even though the other might be the murderer. He uses his shaman knowledge to survive in the bush and from the Windigo, an evil spirit.

Little did I know that when I read this book I would be vacationing on a remote and isolated lake in Northern Ontario not far from Timmins where this story is set.  I was lucky though that I did not experience any murder, mayhem or fire. I did, however, encounter the beautiful wilderness outdoors that is part of Canada's north.  There were other cottages on the lake but we could not see a single one of them from my sister's cottage. We spent many hours swimming, canoeing and yes, reading Windigo Fire.

It is rare to have a consensus at my book club, especially one that is positive. This time everyone, bar none, enjoyed the book. It is an action packed book that was hard to put down. Perfect for an entertaining summertime read and for time spent in the wilderness.

Do not get me wrong though. This book was not perfect. Members of my group found a few inconsistencies or missing points in the book, and decided that it seemed almost like little bits had been removed, perhaps to make this story "book size."

In terms of what to be aware of, know that this book has drugs, alcohol, sex, a strip club, language, fighting, murder and fire. However, I have certainly read many books that are worse. It definitely has an interesting variety of characters that range from vulnerable to flawed to incorrigible and leaves you with a few puzzles to decipher at the end.

Is Windigo Fire recommended? Yes, it is by me and by the other members of my book club.  I will be passing it around to all of my family members some of who live in the north, others who love camping in the wilderness or at least the campgrounds of northern Ontario.

Happy Reading!
Brenda

Quick Link:

Buy your copy of Windigo Fire from Amazon.


Note: The author may receive a commission from purchases made using links found in this article. “As an Amazon Associate, Ebay (EPN) and/or Esty (Awin) Affiliate, I (we) earn from qualifying purchases.”

Thursday, August 25, 2016

Reviewing Tips Learned on Photographing the Moon

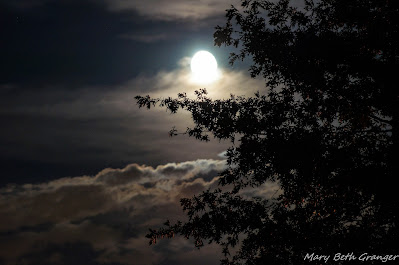
Moon framed by clouds and tree photo by mbgphoto

 Photographing the Moon on a Cloudy Evening

On a partly cloudy summer's evening in August, I walked out into my front yard about 11:00 pm and was greeted with the beautiful sight seen above.  The full moon was peaking out above the clouds and was framed by my neighbors tree.  I went back into the house and grabbed my camera to shoot a few photos.  I wanted to get the moon, trees, and clouds into focus so I played around with several settings.  My first shots came out rather blurry and that leads me to tip #1

  • Use a Tripod when shooting at night
I know I should use a tripod more often but I always seem to first try without one.  Sometimes if you have something to steady the camera on you can get away with out a tripod, but I have found that the shots come out much clearer when you use a tripod.  In the photo above I used a tripod and shot the photo using the following settings Aperture-5.6, Speed 2.5 seconds, ISO 320, lens length 150mm.  I used an SLR camera, but I do believe the above shot could also be taken on a good point and shoot camera.
The Moon photo by mbgphoto
Moon August 21, 2016

Learning  from my Peers-a Moon full of Details

Although I was happy with the first photo, I really wanted to take a photo showing more of the details on the face of the moon.  I wasn't sure how to accomplish this, so I went online and did a bit of research.  I gained the knowledge that helped me the most from a Facebook photography group called Digital Photography School.  The people on the site were wonderful.  I posted my first photo and then told them what I wanted to accomplish with my photo.  Here are some tips they gave me that I then used the next evening when taking the detailed photo of the moon above.
  • In addition to a tripod use a remote shutter
  • Set the ISO to 100
  • Use a faster shutter speed (the slower speed tended to make the light from the moon blowout the photo)
  • Expect to take many photos to get one good one
  • It is nearly impossible to get both detail in the moon and foreground in the same shot. (I found there are ways to get around this but that is a bit more complex).
With these tips in mind the next evening I waited for the moon-rise and then got out my tripod, my shutter release and my new 150-600mm lens.  I set my camera with the following settings ISO 100, speed 1/125 sec, aperture 6.3, and lens length 600mm.  The moon was a bit less than a full moon on the next night, but I had also read that the waxing or waning moon can give you better details.  I was very pleased with my resulting photo that you see above.  You can even see some craters on the surface of the moon.

If I were to get foreground in the same photo I could possibly use Photoshop to combine two photos or there are some techniques using filters which I haven't tried yet.  Just leaves me with more to learn another day.
Moon photo by mbgphoto

Fun in Lightroom- Adding a bit of drama to my photo

I like to have my photos look as close to real life as possible, but sometimes it is fun to add a little drama from a photo processing software like Lightroom.  In the photo above I slid over the slider for tint in Lightroom giving a blue cast to the photo.

Zazzle Products from my Photos

I enjoy taking my photographs and making them into cards, magnets, posters and other products on Zazzle.  These are available for sale.  The first product below was taken of the  Super Moon in March of 2011.

Super Moon over Ocean Card
Super Moon over Ocean Card by mbgphoto
Add your photos and text to blank greeting cards at Zazzle
The poster below shows the full moon peaking out from under the clouds and shining on the ocean in Jupiter Florida.


Note: The author may receive a commission from purchases made using links found in this article. “As an Amazon Associate, Ebay (EPN) and/or Esty (Awin) Affiliate, I (we) earn from qualifying purchases.”

Wednesday, August 24, 2016

Book Review of Tabitha (Girls from the Mountain Book 1)


Tabitha's Story is One of God's Grace


In this Christian novel by Vikki Kestell, young Tabitha had to deal with situations so horrible that it hurt to read about them. Yes, Tabitha did bring it on herself by running away from home with Cray for a more exciting life than she had with her parents in their home near a Texas creek. She was fourteen and bored with her monotonous life. Cray promised riches and adventure.

Book Review of Tabitha (Girls from the Mountain Book 1)
Book Review of Tabitha: Girls from the Mountain Book 1
Image from Pixabay,  and Modified


Tabitha knew her parents did not approve of Cray. They had warned her that he had no sense and that he was a wild dreamer. Still, he was able to persuade Tabitha to run away with him to the Arizona gold fields. Even though Tabitha knew running away wasn't right, Cray's flattery about her beautiful red hair and milky complexion, as well as his promise to marry her in a church wedding as soon as they made their fortune, convinced her to ignore her conscience.

She had learned the difference between right and wrong from her parents. She knew she was rebelling when she left with Cray. What she never dreamed was that he would so completely betray her that only the grace of a God she hadn't met could save her.


Palmer House


Palmer House, a Denver ministry to young women and girls such as Tabitha, rescues them. When we meet Rose Thoresen, the administrator and counselor of Palmer House in 1911, she is 63. Tabatha, who is the oldest of Rose's “girls,” is now thirty. She has nine weeks to go before her new nursing school term begins in Boulder and she wants some project to keep her busy. Rose convinces her to tell her story of her journey to faith in Christ, including the mistakes she made before her rescue and arrival at Palmer House.

Book Review of Tabitha (Girls from the Mountain Book 1)


Rose said she would help by writing down notes as Tabitha told her story. It would then be edited and Tabatha could read it and suggest any changes before it was made into a small book to keep at Palmer House and for the use of other residents who had not yet entered a relationship with Christ. Much of what follows is part of her story. (Image above from Open ClipArt-Vectors on Pixabay, text added on PicMonkey)


Arizona and Beyond


We first see Tabitha in Arizona as she waits in the heat of the desert beside Cray's tent for him to come home for the dinner she has prepared. But he doesn't come. The claim he had paid for in this uninhabitable land had no gold left to find, so Cray had spent all he had in the nearest mining town of Fullman on supplies. They had only a two-week supply of food and water. They had found a patch of land near the only stream and camped there. When we meet Tabitha there, she has been there for two weeks. There are no other humans around. She is in the desert alone.


By this time Tabitha had been with Cray for a few months. He had kept saying he'd find the gold and then go back to Texas and buy land and cattle. Tabitha was the only one who continued to speak of marriage. They often quarreled. Cray was finding no gold, though he went to look for it every morning and returned sullen and distant. On the morning of the fifteenth day on the campsite, Cray seemed happier as he left. He packed his gear on the mule, along with extra water for her. He ate the breakfast Tabitha had prepared, and took the lunch she had packed for him. He even said goodbye to her, which he'd not bothered to do for a while. As he left, he'd told her “Goodbye, Tabitha. You wish me well now.'


Book Review of Tabitha (Girls from the Mountain Book 1)
Book Review of Tabitha
Photo from Morgue File, Modified


Cray did not come home that night. The next morning Tabitha walked to his dig to find his tools and the mule gone. She knew then he would not come back. He had left her alone in the desert. She crouched in her tent for the rest of the day, alternately sobbing and ranting in anger over his desertion. She tried to figure out how to survive. She knew her only hope was to walk back to Fullman, a day's journey. It was not a reputable town. Tabitha thought that maybe she would find Cray there and he would take her back.

Instead, when she thought she had been rescued by another woman, she learned that Cray had sold her into prostitution as payment for new supplies. She also learned that escape only brought beatings and threats of worse punishments. She died inside and at one point was tempted to take her own life.

Rescued by the Grace of God


Although Tabitha had not yet met the Lord, she heard a street preacher while she was being transferred from one brothel to another. She did not know the meaning of what she heard, but the preacher had looked right at her and said that Jesus could save even her. She held onto those words and cried out to this Jesus she did not know for help. One night that help came, and she arrived at Palmer House. While there, as Rose and the other staff loved her and taught her, she finally trusted herself to Jesus and decided to spend the rest of her life following him.


After Palmer House


I don't want to reveal more of the plot here because I don't want to spoil it. Much of the action occurs during World War I. We watch as Tabitha faces enemies during her nursing school education, and as she decides what to do about a very persistent suitor – a rich man who is a benefactor of Palmer House, the nursing school, and an orphanage. Even knowing her background doesn't discourage him. Later they both go overseas separately to serve in the war in different locations.

How Reading Tabitha Affected Me


The book's theme – how the grace of God can overcome evil – was well executed. I found myself thanking God again for the blessing of a normal childhood with parents who loved me and the opportunity to learn about Jesus while still young.

I was outraged to see how young women, still in their early teens, were enslaved as prostitutes with no hope of escape. I'm even more outraged that this still happens today, outside of novels, in our large cities, as pimps befriend runaways and then bully and enslave them. I just read today that in a county where we once lived and still own property detectives just broke up a ring of suspected human traffickers. In this case the victims were Chinese and here on visas.

Daniel Walker, who worked undercover for many nonprofit organizations to rescue today's enslaved prostitutes, has written God in a Brothel to describe his experiences freeing women and children from the sex trade in the United States. You can read it for a nonfiction perspective on how Christians still rescue those who cannot help themselves.

I often found myself in tears as I watched Tabitha's struggle with the consequences of her wrong choice so early in life and as I later watched her grieve the loss of the one she loved.

My Review


Although some may find the style sentimental and Tabitha almost too good to be true in her later life, she does model servant leadership. She is serious about making up for the lost years with her obedience in her later life as a Christian. Toward the end of the book she faces the ultimate test of her faith, but I won't be a spoiler.

The biggest weakness I saw in the book was that many characters seemed unrealistically good or evil. Yet I know that very godly and very wicked people do exist. Tabitha was the most well-developed character, and I found myself wanting her to be successful and eventually marry Carpenter. We don't see enough of Mason Carpenter, her benefactor and love interest, to get to know him very well, since most of the time the two are away from each other. We do see that he's the perfect gentleman, always helping everyone and doing good. I couldn't help but like him, but it was  hard to believe he was so perfect.

The author was very good at tying all the loose ends of the plot together in a satisfying way. I was able to predict some plot elements I was sure would be there, and I was happy that the author agreed with me.

This historical Christian romance reminds Christians of how God reaches out to all of us.  Those who may be searching for meaning in life, who have no hope left because of their past mistakes, may find hope as they read this book. Tabitha illustrates the power of God to cause a person be reborn to a new and living hope.

Vikki Kestell also wrote the A Prairie Heritage Series. It explains some of what occurs before and after the events in Tabatha. You will see some of the same characters' stories unfolding in A Prairie Heritage Series. Tabitha fits between Stolen and Lost Are Found. You might want to pick up the entire series and read Tabitha where it fits best chronologically.


Note: The author may receive a commission from purchases made using links found in this article. “As an Amazon Associate, Ebay (EPN) and/or Esty (Awin) Affiliate, I (we) earn from qualifying purchases.”


Tuesday, August 23, 2016

Reviewing Soft Foods: Corn Spoonbread

Soft Foods For Denture Work

whole kernel corn
Corn image from Pixabay.com
Today I will review another of the soft foods that I fixed while awaiting my dentures. Corn Spoonbread has been a favorite of mine since I was knee-high to a grasshopper! At any large family gathering we could count on someone bringing spoonbread along for everyone to enjoy.

So, when I needed to eat nothing but soft foods; corn spoonbread was something that I knew I would enjoy eating and I knew it was not a difficult recipe to make. Not only did it meet the criteria of being a soft food but it is also scrumptiously delicious!

The recipe that I am about to share with you is the one that has been passed down from my Grandmother and Mother. We always make ours in a cast iron skillet but if you do not have one, you can always use a baking dish or casserole dish instead.


Ingredients:

1 pkg Jiffy Corn Bread Mix
1 15 oz. can cream corn
1 cup frozen corn kernels
1 cup sour cream
1/4 cup melted butter
2 large eggs
2 Tablespoons sugar
1/4 teaspoon salt

Directions:

Pre-heat your oven to 375 degrees.

Lightly oil your cast iron skillet.

In a large bowl combine the Jiffy mix, sugar and salt. Add both corns, sour cream, butter and eggs. Mix well. (Make sure your butter has cooled before adding or you will cook your eggs!).

Spread the mixture into your cast iron skillet and bake for 20 to 25 minutes.

This is so very good and as you can see very easy to make! What was great for my husband and I was that it made enough that we could have it for a couple of days before we ate it all. It is soft enough that it does not hurt those tender gums, tasty and filling enough that my tummy was sated. The bonus for me was that it had a feeling of nostalgia, too. Remembering watching and helping my Grandma make it in her kitchen, helping Mom make it in hers and enjoying it at all of those family gatherings.

My husband likes this recipe so much that he wants me to make it as a side dish more often. It goes great with any meat: beef, pork or turkey. It looks pretty and cheerful on the plate and it seriously makes your tummy happy! It is one of those wonderful comfort foods that I know your family will enjoy whether soft foods are a necessity or not.


Note: The author may receive a commission from purchases made using links found in this article. “As an Amazon Associate, Ebay (EPN) and/or Esty (Awin) Affiliate, I (we) earn from qualifying purchases.”

Monday, August 22, 2016

Review of Picmonkey Photo Editing Site

Why I Love PicMonkey.com, Plus Tips For Using It

Picmonkey review

Until I discovered PicMonkey, I was stuck with using the free photo editing program that came on my HP laptop, and using Paint, the standard accessory in the Windows platform for computers. But now I am hooked on PicMonkey! It is my favorite free photo editing software! 

I never got around to buying Photoshop, and though I tried to use Gimp, it just was too hard for me to decipher. (Gimp is touted as a free version of Photoshop and many of my friends swear by it, but maybe I am software challenged.) So I thought I would show you some of the ways I use PicMonkey to edit and embellish my photos for articles on the internet and how you can too.

First of all, if you don't have an account,  just go to PicMonkey.com and sign up for an account. Once there you will see a page that varies as far as the image, but at the very top you will always see this:

Picmonkey header photo


You can see that I am signed in, but if you are not, just click on "Log In" on the right, and then you can begin editing.

You can also see the 4 buttons in the center that show where to start your photo editing project. For basic and advanced editing of your own photos, click "Edit." I will cover "Design," and "Touch Up" and "Collage" further down this page.

Once you do, it will show a screen asking you where to get the photo you want to edit. You can choose your computer, Facebook, One Drive, or their own new platform, Hub. Most people are probably going to choose a photo from their own computer so I will explain using that option.

Once you click on "Computer" it will open a window to your own files. Just scroll to your photo folders and click on the photo you wish to edit. That will place it on the screen in PicMonkey.  You will notice that on the left is a row of buttons. At the very top is a symbol of lines and dots and if you hover over that, it says "Basic Edits."  If you click it you see a list of edits you can do.  Here is an example of a photo I uploaded to the editor with the sidebar showing the menu:

PicMonkey tutorial image


The first thing I like to do is open the "Rotate" button. (3rd button down on the left) You can rotate your photo in all directions, to change the orientation from horizontal to vertical and also to change the top to the bottom, just by clicking the arrows. But what I like to do is play with the "Straighten" slider. I guess I don't hold my camera steady as I often have photos that are crooked. But that is an easy fix in PicMonkey. Just slide the arrow till you have a straight photo and click "Apply." It even has guidelines to make it easy for you.
PicMonkey tool


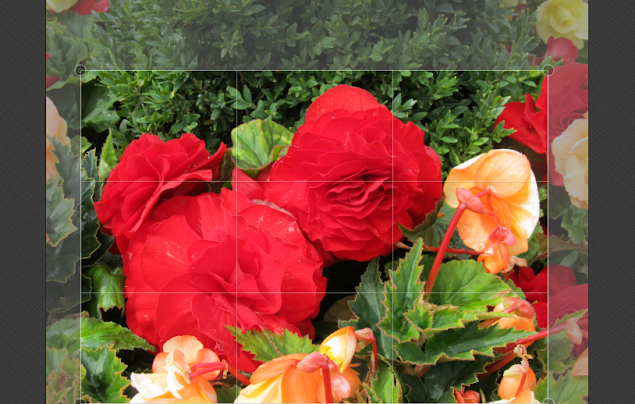
Then I like to open the "Crop" button. The reason I straighten before I crop is that straightening sometimes takes part of the photo off, so I want the whole thing straightened before cropping.  Here you can see the crop lines I am going to use. You can drag the lines around till you are happy with your photo.

roses editing image

Here it is after I clicked on "Crop." You can move the crop lines wherever you want them. When you are satisfied, just click "Apply" and then your photo will be magically cropped like this one.

roses


Then I like to do some basic editing so I click on "Exposure." The first thing I do is click on "Auto Adjust." This is often all that I do, as it seems to make my photos pop and look great. But you can also play with all the sliders and if you like the way a photo looks you can click "Apply" and those changes will be done.  When you are satisfied, just close that little window by clicking "Cancel" or "Apply," whichever is the case. Here  are how the other sections look when they are open. On this rose photo I have not done any other edits. I just cropped it and auto adjusted the exposure.

PicMonkey exposurePicMonkey sharpeningPicMonkey colors

If you make a mistake, there is an "Undo" button. At the very bottom of the screen is a backwards arrow. Just click that anytime you are not happy with your design and undo the last step! You can actually keep hitting "Undo" until you get back to a place where you are happy and then continue your design from there.
.
PicMonkey undo

More Tricks for Using PicMonkey


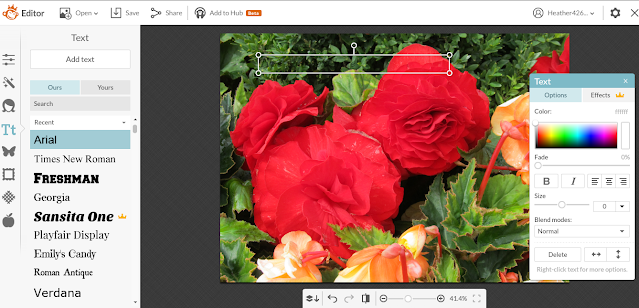
Now besides the  "Basic Edits" you can do a lot of different effects. One I use a lot is the "Text" function to add text to photos. This is great for making photos for Pinterest and other media like Twitter. So just click on "Text" and you will see this: (photo on the right)


font tool


Notice the slider on the right. Use it to scroll through all the choices of Font you can use.


I am going to use Marcelle Script so I just click on it and change the color of the script in the little box that pops up. I will use a very pale shade of blue but you can pick whatever you want. Move the box wherever you want and drag the edges to make it bigger or smaller. Then start adding text in the box. Example is below.

PicMonkey add text tool


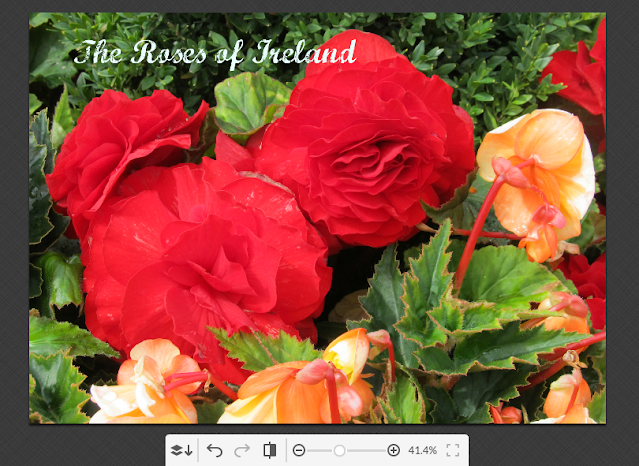
And below is a picture of it after adding the text. Just click on the photo somewhere else besides the text box when you are finished and the text box disappears and your text is there.

roses of ireland


Now let's say I want a background under the text. You can add any number of special effects by clicking the buttons on the left and scrolling till you find a design you like and clicking on the photo to place it. You can also move it around on the photo. Just click on it once and drag it wherever you want it. Here  I have added a ribbon. Once I clicked on it and placed it I changed the color to White. Then I added text over that.

roses image


There are plenty of other effects you can use on the left too. The "Touch Up" ones are great for faces! And if you want a set of photos in a theme, there are lots of themed effects. They have a Zombie theme, Victorian theme, and lots more!  Just click on any of them to see all the things you can do. It would take me hours and hours to go over all the wonderful effects you can create, but the easier and more fun way to learn it is to add a photo and play with all the buttons to see what you can do! PicMonkey also has tutorials explaining how to use all the functions. Just scroll down on the Home page and you will see them.

Here are a few things I did to the image after I got the text and the ribbon trim on it. First are different edges. One is a simple box edge and next is a craft scissors edge.

spring flowers roses

roses post card

Then I added an effect called "Frost" which adds the color of the frame as a brushed effect all around the edges, and on the lower one I added a "Bokeh" overlay to make it sparkly. These are just a few of the effects you can get!

roses - spring flowers banner
State Flowers of the USA Coloring Blog


roses with sparkles


Using PicMonkey for Graphic Design

You can also use PicMonkey to design graphics and my favorite, Facebook covers. Up above where it says "Edit, Touch Up, Design, Collage," click on "Design." Then you will see a square, a Facebook cover, different sizes, and a custom option. To do a Facebook cover, just click that option and it opens up a screen with the exact size you need. Next click on "Overlay" on the left. You have your choice of many there, so you can scroll through and have fun designing your own cover by adding a combination of effects on the screen. Or you can add your own, just click on "Your Own" at the top. Here I have used the same photo of roses by clicking on the file in my computer and then dragging the edges out till the whole template is covered. Then I have added some text on top of that. It's now ready to upload to a Facebook page.

roses banner


One more thing that I think is pretty cool is that when you are designing, you can choose your background or even make a transparent background for designs you might be doing for Zazzle or other design platforms. For that you go to "Basic Edits," and click on "Canvas Color." If I wanted to make a round logo for example, I would choose a transparent background and then overlay a circle from the "Geometric Shapes" overlay section. Then I would put whatever design I wanted inside the circle, like text, colors, and/or textures. Once I have saved the design I have a round logo. Here is the one I designed for my Aurora Art Supplies products and website.
aurora art logo
Aurora-ArtSupplies


And here are some Photos I edited in PicMonkey and added banners and text to use on my Amazon ads for my Aurora Art Supplies Colored Pencils and Water Color Pencils.


Using PicMonkey for Website Design 


Okay let's say I want to design a background for a website. And maybe I want a Blue sparkly one. First I would add Blue as my background color. Next I would go to the textures in the "Overlay" section and start adding them till I have an effect I want and then save it. Then I would go to the editor in my Wordpress theme and where it says to add a background, I would upload that file. Voila, a custom background. Here is one I made so you can see. I used a Blue solid color, then "Space" overlay,  then a "Bokeh" overlay. I played with the saturation till I liked it and saved it.

blue star


There are so many effects you could really play for hours and design any number of cool things. And I didn't go into the "Collage" function, but all you do for that one is click on the "Collage" button above, pick a style from the left side menu and add photos to the cells by dragging them to the one you like. You can even design text boxes and add them as one of the photos of the collage. My friend Kim is a master of PicMonkey collages. Here is one she made for her educational site for kids to learn State facts.

coloring banner

A very useful function that I use all the time is the "Resize" function at the bottom of the "Basic Edits."  Just click on it and you can make your photo whatever size you need! Very useful for websites!

So I guess you could say I am a PicMonkey addict now! Try it and I bet you will be too!  But a few of the fonts and effects are premium so you have to pay extra for those. Well I wanted them for a project so I signed up for one month only ($5) so I could make some cool designs. Then I reverted back.  A few days later PicMonkey sent me an email asking me why I cancelled the premium version and one of the answers you could pick was "It costs too much." That's what I picked and then they offered it to me for $33 a year, or less than $3 a month.  So if you want the premium version, that's how you can get it for less. Try it for a month at $5 and then cancel. I love  bargains, don't you? Thank you PicMonkey! 

*Of course, this may have been a one time offer, I can't promise that the offer will always be there. But it doesn't hurt to try, does it? 

Picmonkey banner


Note: The author may receive a commission from purchases made using links found in this article. “As an Amazon Associate, Ebay (EPN) and/or Esty (Awin) Affiliate, I (we) earn from qualifying purchases.”


Sunday, August 21, 2016

I Have Loved You for a Thousand Years - Love is Endless

Angels on Duty
Angels on Duty - Fridge Magnet

Most of us have heard 'I Have Loved You for a Thousand Years' by Christina Perri. If the song sounds familiar, it's the final song in the Twilight Series.

Today's Review isn't about Music; it's about love

What do I know about love? Well, I know what you know and what we've all heard; it's what makes the world go round, all there is, and of course, all we need.
In an increasingly cynical world where people gather in their corners defending positions, ideas, beliefs, what's right and what's not, love patiently waits for us to call it 'one step closer'.
You and I know that this life is fleeting, and whether we believe it's our one and only existence or that our consciousness/soul returns to master its lessons is irrelevant to this particular life we're living as us - In the end, our end, one question requires an answer, 'did we love.'

It's the love we give that travels with us and nourishes the earth. That love imprints itself on those left behind, and they pass it along. Like the tiniest seed buried deep in the earth, love grows.


Questions we might ask about our own love
After the storm, did we find our way back to love? 
When hope slipped through our fingers, did we find our way back to love? 
When the ones we love died, and a piece of us was taken with them, did we find our way back to love? 
When we suffered an illness that scared us to our core and thought, why me, did we find our way back to love? 
When our TV told us why to hate, and who to hate, did we find our way back to love? 
When people took positions that opposed everything we stood for, did we find our way back to love? 
When dark thoughts tried to infect us, did we find our way back to love? 
When we hated ourselves for our own mistakes and choices, did we find our way back to love? 
When we were hurt, did we find our way back to love? 
When someone we love was hurt, did we find our way back to love?
Most of all, when we caused someone pain, did we find our way back to love? 
Did we do this all unconditionally? Did we find our way back to love without expecting anything in return? Did we just decide to love our neighbor?

Here we are, the size of a piece of sand, all together, living on a giant ball that hangs in the middle of the universe, questioning ourselves and perhaps even questioning what it means to have faith. Our mere existence on this spinning ball is a testament to faith.

Yet, we are born with the greatest gift, the capacity to love ... and after centuries, we still have yet to harness its power.

This unseen power can't physically be measured; it only exists if we declare it, and the more of it we give, the more of it we have. It's the most extraordinary energy yet to be weaponized for good.

How Do We Get There

Our love for each other is the road home. That's it. There is only one road that takes us there.

We can spin our wheels until the cows come home; it won't make a spit of difference ... it's the gift of love, even when it's the toughest to give, that takes us there. Test yourself - Think of the most complex person there is to love, try to love them, pray for them, and genuinely wish them well.

Planting love in places that need planting is one of the best uses of love.

For my Dad, Happy Birthday - I have loved you for a thousand years and will love you for a thousand more.


Through it all, love remains.


Note: The author may receive a commission from purchases made using links found in this article. “As an Amazon Associate, Ebay (EPN) and/or Esty (Awin) Affiliate, I (we) earn from qualifying purchases.”


Saturday, August 20, 2016

A Review of the AOC Computer Monitor

AOC Computer Monitor
AOC 24-Inch Computer Monitor

Well, there I was working on my computer when suddenly, with no warning, my computer monitor dimmed and the picture slowly faded away.  Knowing very little about the inner workings of computers, I had no idea what just happened.

I tried rebooting the computer, but to no avail. I then called my local computer repair shop and described the problem. Their advice was to bring in the tower to my desktop computer for them to run a diagnostics.  Since this service is FREE, I was happy to do so.  Turned out the computer is just fine (thank goodness), so the problem was the monitor. 


Blog post author's old computer monitor
Old Computer Monitor (c) Wednesday Elf

My old monitor was part of a desktop computer setup I purchased about eight years ago, so it isn't all that surprising that it finally wore out.  The solution ~ buy a new monitor.

Since most computer monitors are interchangeable with any computer setup, it didn't really matter which brand of monitor I bought. Therefore,  I went searching for the best buy.  I didn't need anything really fancy. I'm not a gamer, so didn't need a special gaming monitor.  So it really came down to getting the most for the money.  


AOC 24-Inch Computer Monitor


Image of my new computer monitor
My NEW Computer Monitor (c) Wednesday Elf
The monitor I purchased is the AOC 24-inch slim design LED flat screen.  My old monitor was also a flat screen, but was just 19 inches. I'm still getting used to the bigger screen! 


On the subject of the 'bigger screen', I noticed quite a difference in the appearance of icons and fonts on this 24-inch monitor. With a larger 'space', everything appeared smaller. After awhile, I discovered there was a way to get back to viewing things on my new monitor the way I was used to. My cousin stopped by for a visit and was telling me a story about how he changed the DISPLAY on his 92-year-old dad's computer monitor to a larger font so he could 'see' the words with his Macular Degeneration limiting his eyesight.   So, following my cousin's instructions, I did a similar change to the size of my fonts.  


Changing the Monitor Display


In case you are wondering, simply go to the Start Menu, click on Control Panel, then Appearance, then Display.  


Computer image of how to change the monitor display

Under the Display tab you will see something that says something similar to "change the size of text and other items on your screen". There are some preset options (small, medium, large) and one option that states 'set custom text'. The 'medium' choice is preset at 125% larger than normal and that works well for my Uncle, but is too much larger than I need.  So I chose my own percentage and found that about 108% larger makes everything on my screen look the way it did when I had just a 19-inch monitor.  Nice to know that you can have something new that is 'bigger and better', and still have it display the way you want.


Key Features of the AOC Monitor


  •  eSaver software to set low-power configuration
  •  23.6" viewable image with 16:9 aspect ratio
  •  Narrow bezel and slim design
  •  Multimedia connectivity with VGA and DVI ports
  •  VESA 100mm wall-mount compliant

This AOC monitor can be found in a variety of places, including Walmart, but I decided to buy mine at Staples because it was on sale this week. 


AOC began as Admiral in Chicago in 1934.  In 1967 the company became the Admiral Overseas Corporation (AOC).  Established in Taiwan, it became the first manufacturer of color televisions for export. Today AOC is known as the Worldwide Leader in Display Manufacturing.

Back Online!


Illustration of a computer monitor with a happy smile
Image courtesy of Pixabay

I picked up my computer tower from the repair shop after they checked it out and found it in fine shape.  On the same  trip, I brought home my new monitor.  I unpacked and set up the monitor,  plugged all the cords back into the tower, and turned it on.  My new monitor immediately lit up nice and bright and I was once again 'back in business'. I was without a computer for less than 24 hours, but missed it terribly! It's amazing how dependent we have become on our computers!

Quick Links for a Computer Monitor by AOC:


Review by Wednesday Elf. 

Click here to read more of my Reviews


Note: The author may receive a commission from purchases made using links found in this article. “As an Amazon Associate, Ebay (EPN) and/or Esty (Awin) Affiliate, I (we) earn from qualifying purchases.”

Most Recent Reviews on Review This Reviews


Search for Reviews by Subject, Author or Title

The Review This Reviews Contributors


SylvestermouseSylvestermouseDawn Rae BDawn Rae BMbgPhotoMbgPhotoBrite-IdeasBrite-IdeasWednesday ElfWednesday ElfOlivia MorrisOlivia MorrisTreasures by BrendaTreasures by BrendaThe Savvy AgeThe Savvy AgeMargaret SchindelMargaret SchindelRaintree AnnieRaintree AnnieLou16Lou16Sam MonacoSam MonacoTracey BoyerTracey BoyerRenaissance WomanRenaissance WomanBarbRadBarbRadBev OwensBev OwensBuckHawkBuckHawkDecorating for EventsDecorating for EventsHeather426Heather426Coletta TeskeColetta TeskeMissMerFaeryMissMerFaeryMickie_GMickie_G


Review This Reviews is Dedicated to the Memory of Our Beloved Friend and Fellow Contributor

Susan DeppnerSusan Deppner

We may be apart, but
You Are Not Forgotten


“As an Amazon Associate, Ebay (EPN) and or Etsy (Awin) Affiliate, I (we) earn from purchases.” Disclosure Statement

X