Showing posts with label photo tips. Show all posts

Thursday, October 12, 2017

Review of Worldwide Photo Walk

ears of corn in husks photo by mbgphoto

Worldwide Photo Walk

 Saturday, October 7 was the Scott Kelby World Wide Photo Walk.  This walk sponsored by Kelby One had over 21 thousand participants on 985 walks throughout the world.  As I looked at the map I noted that just over half of the participants were in North America and the rest of the walks were scattered throughout the world.  The stated purpose of the walk is for photographers to go out on a walk, shoot photographs and have fun with other photographers.

The walk will have a contest at the end where everyone is asked to submit one photo from the walk.  The photo at the top of the page is my submission.

Supporting Charity

The participants of the walk are encouraged to donate to The Springs of Hope, a Kenya orphanage.  The organization feeds, houses, educates and empowers young orphans.

barge going down missouri river photo by mbgphoto
View of Barge going down Missouri River

Walk in St. Charles Missouri

The walk that I participated in took place in the historic downtown and the riverfront area of St. Charles.  A group of us (about 15) met at 8:45 Saturday morning at the old train depot on the riverfront.  We were given a bit of guidance from the leader of the walk and then we all gathered for a group photo.
After the group photo we broke into smaller groups and began our walk. The group I was in walked down the riverfront for about a half a mile, talking, laughing and stopping to photograph interesting sites.  
missouri bridge photo by mbgphoto

After a while we turned up from the river for a stop at a farmer's market.
reaching for a gourd photo by mbgphoto

pumpkins photo by mbgphoto


Next we followed the itinerary for the walk and walked a block up from the river to historic Main street in St. Charles.
Historic Downtown St. Charles lamppost photo by mbgphoto


Main Street is a delightful area with cobblestones streets and lots of wonderful old buildings that are turned in to shops and restaurants.  It can get quite busy on a weekend afternoon, but since we were there in the morning the crowds were slim and we were able to get some good shots.  The next photos are the sidewalks and shops along Main Street.
St Charles shops on main street photo by mbgphoto

brick walk photo by mbgphoto

St Charles Missouri photo by mbgphoto

bench photo by mbgphoto

Changing Decor for the Seasons

It is early fall when we are taking our walk and the shop owners have decorated for the season.
harvest scarecrow photo by mbgphoto

fall pumpkin & gourd decor photo by mbgphoto

pumpkin and mums photo by mbgphoto

Taking a Rest

Our walk lasted just over 2 hours.  Here are a few of the group stopping for a rest on some bundles of hay.  After the walk several of the participants stopped at a local restaurant to enjoy some good food and discuss photography.  It was a fun morning that I enjoyed thoroughly.
photo by mbgphoto


Photography Books

I enjoy reading photography books to get ideas from other photographers and to hone my photography skills.  I have found Scott Kelby's digital photography books to be very helpful.  Here is a book he now has with the best of the other books.


Note: The author may receive a commission from purchases made using links found in this article. “As an Amazon Associate, Ebay (EPN) and/or Esty (Awin) Affiliate, I (we) earn from qualifying purchases.”


Saturday, August 27, 2016

How to Remove Blemishes From Photos Using Photoshop

How to restore old family photos using photoshop
©Louanne Cox
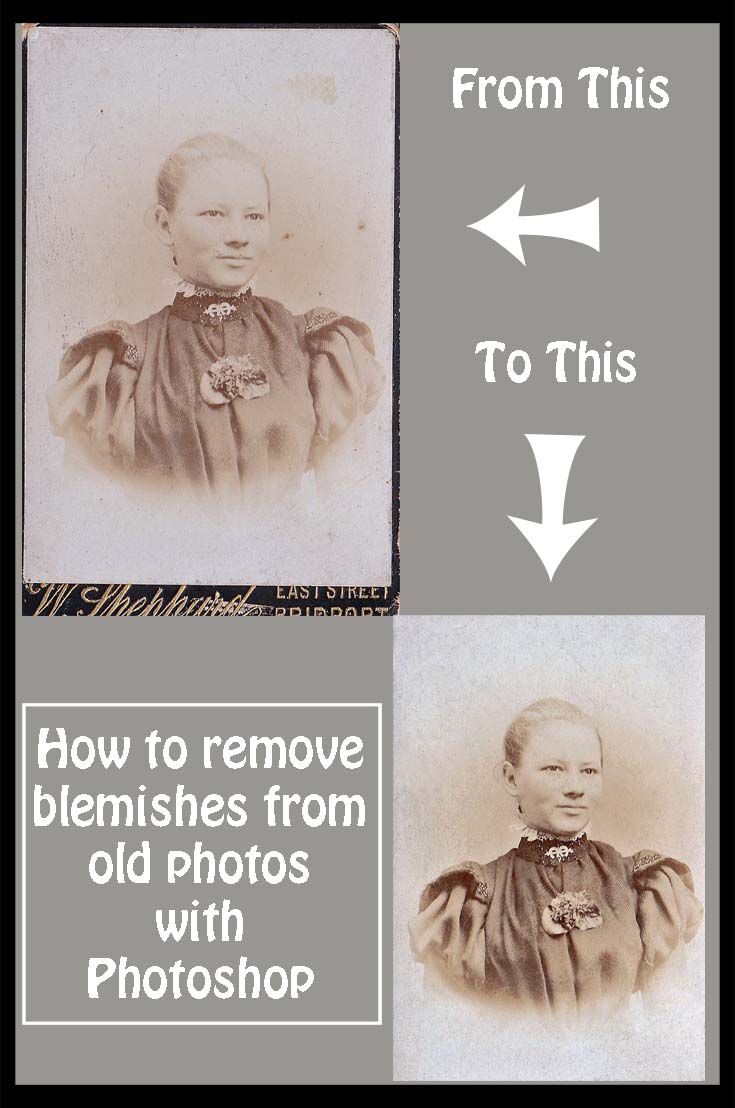
Let's review how easy it is to use Photoshop to remove blemishes from photos, trust me it's really simple and well worth the time spent to restore old family photos.

As one of the genealogists in our family I have been given a number of photographs over the years that have been in shocking condition from one that was ripped in half to countless that have age spots and blemishes on them and then there's the creased photos!   The positives is that today's photographs will all be preserved in a digital format so that future generations can see what their ancestors looked like.

I digress, this is supposed to be about removing blemishes (by which I mean the age spots that older photographs sometimes get, NOT grandma's birthmark or grandpa's big ears!) with Photoshop.

To begin I'm going to show you two versions of a  photograph of my great grandmother -

How to remove blemishes from old photos using photoshop

The original photograph was on a piece of card with the photographers name on it - this had actually been cut or broken off so you couldn't easily read it.   The first thing I did after I had scanned the photo was to crop it so that we were left with just the photo and no evidence of the 'card'.

remove blemishes using photoshop

Using the picture above you can see the Image drop down menu button is circled with the number 1 next to it.   If you click on here it will show you the option to crop your photograph, if you want to.

The number 2 circle is around the Enhance drop down menu and I went to this and clicked on the auto smart fix button.   Now why did I do this?   A number of older photos that I have which are in the sepia tones tend to be really light when I scan them in and the auto smart fix just seems to darken them slightly without over correcting.   If you don't like the result just click the undo button and miss out this step.

On the left hand side of the image you'll see the number 3 circle that is around an icon that looks like a band aid, this is the spot healing tool aka our best friend!

Now if you're into 'airbrushing' your photos this is the button that can get rid of wrinkles etc, but for our purposes we're just using it on age spots, spillages and creases that were on the photograph.

Once you've clicked on the icon and you move your mouse back to the picture you'll see a circle appear.   Move the circle around a 'spot' and click it, the 'spot' will disappear just like magic.

Restoring old family photographs with photoshop - a how to guide

When you've clicked on the 'band aid' you'll find that a sub menu appears at the top - see the red circle in the above picture.   This is where you can adjust the size of the circle that appears.

So now you know how to remove blemishes in Photoshop, let me give you a few more tips that I've found helpful.

Zoom in on the photo - just use Ctrl + to make the photograph a few sizes bigger and then remove the blemishes.   It can make it easier to see them, especially creases in photographs which can really show up once you get rid of the brown age spots.

When working on the face make the circle as small as you can so that it just covers the blemish you want to remove.   I had a photograph of my grandmother as a teenager and something that looked like coffee had been dripped onto it at some stage of it's life (before it came into my possession).   One of the splashes was over her eye and when I clicked on it her face just looked strange - I have no other words!   I zoomed in on her face, made the circle smaller than the stain and clicked on it from the outside of the stain in - that worked out really well and it's one of my favorite photos now.

Don't work on too many photos in one sitting.   When you're zooming in and doing a good job you don't realize what a strain on your eyes it is.   If you sit there and do half a dozen photographs once you walk away from the computer you'll realize that your eyes have been strained and they can really ache, so can your head!   It is quite addictive though, just make sure you only do a few photos at a time.

Now that I've shown you how easy it is, you might just be thinking - I need Photoshop!   Trust me you'll use it for far more than removing blemishes from old photographs, so I've added the link to purchase it just below.  

Adobe Photoshop Elements 2021Adobe Photoshop Elements 2021
I have Photoshop Elements, although not the 2021 version yet, I hope to get it upgraded for Christmas this year.

Having Photoshop is fun and addictive as there's so many different effects you can create with your images. I do have to share a funny story about my daughter a few years ago. It wasn't long after I first got Photoshop and she was looking at some photos I'd taken of her and didn't like any of them because she had a pimple and she was showing too much gum in some of them ........ personally I thought they looked great, but I'm just mum!

Anyway I asked her if she'd like me to Photoshop them, her eyes opened wide and she said, "can you do that mum?", I replied of course I can or words to that effect and she left me alone to work on it. She wasn't impressed with my results - I gave her elf ears and a wavy nose - her dad thought it was hilarious, but my pre-teen (at the time) did not appreciate my idea of photoshopping! I'm not suggesting other parents do this, but it was funny and even she tells the story of mum photoshopping her nowadays.

I hope that I've helped you to remove blemishes from your old photographs as they are precious. Looking at photos is a great way of triggering memories, I love pulling out our photo albums with my mum and reminiscing. It's funny how everyone remembers things differently and you can go off on a number of different tangents just from a single photo.


Note: The author may receive a commission from purchases made using links found in this article. “As an Amazon Associate, Ebay (EPN) and/or Esty (Awin) Affiliate, I (we) earn from qualifying purchases.”


Thursday, May 26, 2016

Reviewing Tips for Photographing Beautiful Sunsets

Sunset at August Busch Conservation Area photo by mbgphoto
Sunset at August Busch Conservation Area

Most photographers agree that the minutes before and after sunset provide some of the best lighting for taking photographs. Although I have read and heard that theory many times, I often, either for convenience or desire, try to photograph at different times. When I compare my photos that I have taken over the years, I find that the best ones almost always were taken during the pre and post sunset time periods.
On this page, I will share with you some of the photos that I have taken and some of the techniques I use to capture these images.
all photos are by the authorT-mbgphoto


Preparing for Your Photo Shoot

On a recent spring evening my friend, Teresa and I set out to capture some sunset photographs.  We wanted to catch the reflection of the sinking sun and the colors of the post sunset sky on water, so we went to a nearby area where there are several different lakes.  August A Busch Conservation Area is just a few miles away from us so we decided drive out and check out the lakes in the area. We made sure we arrived about an hour before sunset so we could check out which lake would be best to capture the types of photos we wanted to take.  After driving around several lakes we decided lake #6 would best fit our needs.  We could park on the east side of the lake and get some nice shots of the sun fading into the western sky and horizon.  The other feature we liked about this lakes were a couple of small boats tied up on the eastern shore that would make a nice foreground feature for our photos.

Tips for Preparation

  • Make sure you have batteries charged and room on your memory card
  • Search out the best place to get the photo you want
  • Set up your tripod and camera ahead of time ( a tripod will result in the clearest photos, especially after sunset)
  • Using an off camera remote is helpful (helps to alleviate camera shake)


Take a few shots before sunset

Taking a few shots early will help you to determine the best places to set up your camera.  The light just before sunset can be really nice for capturing flowers and other objects.  The soft light will bring out the details of an object. The first photo shows our set up photo.  The next two show the effects of the soft lighting during the time just before sunset.  Notice the beautiful details in the rose photo.
sunset photo by mbgphoto

flowers at sunset photo by mbgphoto

rose photo by mbgphoto

Camera, Lights, Action

We had our cameras set on tripods, the light came from the setting sun and now we were ready for action.  We took several shots as the sun was setting.  I always like to capture the various stages of a sunset.  For these shots I had moved my tripod away from the boats and to an area where I could capture the sunrise framed by the tree and grasses in the foreground.
sunset photo by mbgphoto

sunset over a lake photo by mbgphoto

sunset behind the trees photo by mbgphoto

The Sun has Set but we are not done Yet

The time right after sunset can produce some wonderful colors in the sky.  It is different each time so you just have to be patient, wait and be surprised.  On this day some beautiful pink colors came out of the clouds after sunset.  The first photo was taken a short time after sunset.  A lot of times new photographers are then ready to pack up and leave thinking they have gotten all the good photos.  But look at the second two photos and note how about 30 minutes after sunset the sky takes on a deep blue color.
sunset photo by mbgphotosunset photo by mbgphoto

sunset photo by mbgphoto

 Patience Required

These next two photos show the difference in waiting those extra minutes just after sunset to get the perfect photo.  I was shooting at Missouri Botanical Garden in St. Louis for a photography workshop. The instructor had told us to set up and wait for the sky to turn a deep blue.  I waited, and waited and took the first photo.  It was ok but I didn't think anything that great.  Then I waited a bit more and the sky turned an even deeper blue and as a bonus a sliver of the moon was in my photo.  I think you will agree the deep blue really made the photo.  Patience paid off.
Missouri Botanical Garden in St. Louis photo by mbgphoto

Missouri Botanical Garden in St. Louis after sunset photo by mbgphoto

Products from my Photos

Here are some Zazzle Gifts I have made from photographs that I took in the "golden hour" after sunset.

Fountain at Sunset Poster
Fountain at Sunset Poster by mbgphoto
See other Sunset reflections Posters at zazzle
He is Risen! Easter Message Card
He is Risen! Easter Message Card by mbgphoto
Shop for Easter message Cards online at Zazzle.com


Note: The author may receive a commission from purchases made using links found in this article. “As an Amazon Associate, Ebay (EPN) and/or Esty (Awin) Affiliate, I (we) earn from qualifying purchases.”


Thursday, March 13, 2014

Editing Your Photos

I strive to compose  my photos so that very little editing is needed.  I like my photo to represent what I saw through the lens of my camera.  There are times, however where a bit of editing is required.  The two photos below are an example.  You will  note that in the photo before the editing the lighthouse is a bit crooked and the horizon is not quite straight.  The other thing that bothered m e about the photo was the lone tourist standing by the lighthouse.  Sometimes it is great to have people in the photos, but when I am taking a photo to be framed or to be used on Zazzle I really like to have the scenery without people.

Before Editing 
lighthouse

 In the photo below you will see the results of the photo editing.  I use Adobe Lightroom for my photo editing.  For this photo, I first went into the crop tool and moved the angle slightly to the right to straighten the lighthouse and the horizon.  Next I used the clone tool to click on the person and then clicked on the cloud to fill the area where the person was standing in with clouds.

Before I finished I slid the clarity and the vibrance slides up just a bit.  The photo below is the finished product.  Although I think the before photo was good, I do think the after editing photo is better.  What do you think?
After Editing
lighthouse photo by mbgphoto


Note: The author may receive a commission from purchases made using links found in this article. “As an Amazon Associate, Ebay (EPN) and/or Esty (Awin) Affiliate, I (we) earn from qualifying purchases.”


Most Recent Reviews on Review This Reviews


Search for Reviews by Subject, Author or Title

The Review This Reviews Contributors


SylvestermouseSylvestermouseDawn Rae BDawn Rae BMbgPhotoMbgPhotoBrite-IdeasBrite-IdeasWednesday ElfWednesday ElfOlivia MorrisOlivia MorrisTreasures by BrendaTreasures by BrendaThe Savvy AgeThe Savvy AgeMargaret SchindelMargaret SchindelRaintree AnnieRaintree AnnieLou16Lou16Sam MonacoSam MonacoTracey BoyerTracey BoyerRenaissance WomanRenaissance WomanBarbRadBarbRadBev OwensBev OwensBuckHawkBuckHawkDecorating for EventsDecorating for EventsHeather426Heather426Coletta TeskeColetta TeskeMissMerFaeryMissMerFaeryMickie_GMickie_G


Review This Reviews is Dedicated to the Memory of Our Beloved Friend and Fellow Contributor

Susan DeppnerSusan Deppner

We may be apart, but
You Are Not Forgotten


“As an Amazon Associate, Ebay (EPN) and or Etsy (Awin) Affiliate, I (we) earn from purchases.” Disclosure Statement

X