

 |
| Forest Park Bandstand |
I thought I was pretty good at keeping up with the changes in Adobe's Photoshop and Lightroom, but it seems like there is always something I missed. At our last photo club meeting the speaker introduced me to some features that have been there for months, and I was unaware of all the advantages they had.
Presets
The subject was on making your own presets in lightroom and while that was a great topic, while I was listening to the speaker, he mentioned a few features that I had overlooked. Lightroom, through the powers of AI, now gives you the ability to edit one section of a photo at a time with a single click. In the masking feature you can select sky, background or subject and then edit just that portion of the photo. In addition to this when you find a look that you like you can turn it into a preset and use the same editing for future photos.
One of the things that I had overlooked was the Lightroom in their latest update had added three groups of presets for you to use. They are for portraits, sky, and subject. This is a real time saver when one of the presets works for the photo you are editing.
Adaptive Presets-Sky
Here are the presets that are available for your use in Lightroom.
- Blue Drama
- Dark Drama
- Neon Tropics
- Storm Clouds
- Sunrise
- Sunset
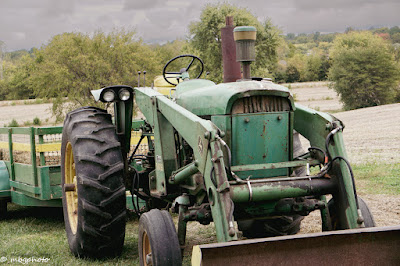
The photo at the beginning of the review is one that I took while on a visit to Forest Park in St. Louis. It is of a historic bandstand, that has been a favorite of people visiting the park since the 1920's. In this photo I used the 'Blue Drama' preset to add a bit of drama to a rather dreary sky.
Another tip I learned from the speaker at photo club, is that there is a slider above all the presets and when you use this slider you can alter the amount of the preset that can be used on the photo, anywhere from 0 percent to 200 percent. Here are two examples using the same photo and using the 'Neon Tropics' preset. This first example uses the preset at 200 %.

This version is interesting, but I think it is a bit too dramatic, so here it is using only 50% 'Neon Tropics' preset.
I do think I like the 50% use a bit better.
Adaptive Presets-Subject
For subjects Lightroom has six different presets added in and in addition you can always make and safe your own presets.
- Pop
- Warm Pop
- Soft
- Cool Soft
- Vibrant
- Glow
To demonstrate the subject presets built into Lightroom I will give you a few examples below. You will first need to select your subject in the photo using the masking feature and then select your preset and add the percentage of preset that work for your photo. In my examples I will again use the Forest Park Bandstand photo.
The first one is using the Glow setting. It is very subtle, but I like the look it portrays.

The preset used int the photo below is the Pop setting at 200%

Like I learned at my last photo club session, there is always something new to be learned in Lightroom, even for those of us who are seasoned users. Here is a book that is sure to teach you a few tricks. Lightroom for Beginners and Seniors It can be purchased on Amazon.
Note: The author may receive a commission from purchases made using links found in this article. “As an Amazon Associate, Ebay (EPN), Esty (Awin), and/or Zazzle Affiliate, I (we) earn from qualifying purchases.”
FOLLOW US ON:


