Showing posts with label air fryer. Show all posts

Thursday, January 4, 2024

Crispy Air Fryer Tater Tots

 Air fryer tater tots are quick and easy snacks or the perfect side to any meal. These tater tots come out of the air fryer so crispy on the outside and soft and tender on the inside.

Crispy Air Fryer Tater Tots
Crispy Air Fryer Tater Tots - Reviewed

Tater tots are just one of those foods that are loved by kids and adults alike. Our grandson Tyler loves his tater tots made in the air fryer. It is so easy to make tater tots in the air fryer from frozen to the table in about 10 to 15 minutes.

How to make tater tots in the air fryer:

The air fryer is the quickest way to make the crispiest tater tots right from the freezer.

  1. First, set your air fryer to air crisp and the temperature to 400 degrees. The high temperature is important for crispy tater tots. Set the timer for 12 minutes.
  2. I place the frozen tater tots in a one-gallon plastic storage bag. Add one tablespoon of olive oil and toss them around. You can also use a cooking spray if you like.
  3. Place the frozen tater tots in the air fryer basket and lightly season with salt. Cook for 6 minutes then open and toss them around in the basket. This is important so they don't stick together. Cook for the remaining 6 minutes. 
  4. Place them in a bowl and serve plain or with your favorite dipping sauce.
We like to have some different dipping sauces, such as ketchup, ranch, or barbecue sauce. My favorite is the barbecue sauce but when our granddaughters are visiting, the ranch is their favorite.

More seasoning suggestions for tater tots:

  • Smoked Paprika
  • Italian Seasoning
  • Taco Seasoning
  • Montreal Steak Seasoning
  • Old Bay Seasoning
These are just some ideas for different seasonings. You can season your tater tots with whatever you like. The amounts depend on your taste but usually, one tablespoon per basket in the air fryer is enough.

We use our Ninja Foodi Grill to air fry. The Ninja is a combination indoor grill and air fryer. We have had our Ninja for several years and just love it. Any air fryer will work just as well.

For more recipe ideas on ReviewThis Click Below:

ReviewThisRecipes.com


Note: The author may receive a commission from purchases made using links found in this article. “As an Amazon Associate, Ebay (EPN) and/or Esty (Awin) Affiliate, I (we) earn from qualifying purchases.”


Thursday, August 3, 2023

Easy Air Fryer Corn on the Cob

 Air fryers are a wonderful tool to have in your kitchen. If you don't have an air fryer consider making room on your kitchen counter for one. From main dishes, and side dishes to desserts, there isn't anything you can't do with an air fryer.

Easy Air Fryer Corn on the Cob
Air Fryer Corn on the Cob - Reviewed
Photo credit Sam Monaco

Our daughter got us a Ninja Foodi Grill for Christmas a few years ago. It is a combination grill and air fryer, and we use it all of the time to make so many easy meals.

Summertime is corn season and grilled corn is a favorite of ours. If you don't feel like firing up the grill just for corn or boiling water to heat up the kitchen try the air fryer.

It's so easy to make in the air fryer, in just 15 minutes you will enjoy that delicious toasted corn flavor with your favorite garnish for added flavor.

How to Make Air Fryer Corn on the Cob:

Air fryer corn on the cob
Air Fryer Corn on the Cob
Photo Credit Sam Monaco

I started with five fresh ears of corn and brushed them with olive oil on all sides, or you could use melted butter. 

Then, I coated them all around with Hidden Valley Ranch Seasoning. I preheated the air fryer to 375 degrees and set the time for 15 minutes. We added melted butter and salt for a delicious side dish. My air fryer basket easily fits five ears of corn.

This works well for fresh or frozen corn, but I prefer fresh corn on the cob. If you have an air fryer give this a try, your family is going to love it.

Other Topping Ideas for Corn on the Cob:
  • Sour cream
  • Parmesan cheese
  • Cheddar cheese
  • Crumbled bacon
  • Chili powder
  • Paprika 
  • Old Bay seasoning
  • Cajun seasoning
These are just a few more ideas for garnishing corn on the cob. I'm sure everybody has their favorite.

You may also like some of my other Air Fryer Recipes:


Ninja Foodi 5-in-1 Indoor Grill with Integrated Smart Probe, 3.9 L (4 qt.) Air FryerNinja Foodi 5-in-1 Indoor Grill with Integrated Smart Probe, 3.9 L (4 qt.) Air FryerNinja Foodi 5-in-1 Indoor Grill with Integrated Smart Probe, 3.9 L (4 qt.) Air Fryer


Find more recipes on Review This Here:


Note: The author may receive a commission from purchases made using links found in this article. “As an Amazon Associate, Ebay (EPN) and/or Esty (Awin) Affiliate, I (we) earn from qualifying purchases.”


Thursday, March 2, 2023

Easy Air Fryer Baked Potatoes

There are so many ways to make potatoes and a nice baked potato is one of my favorites. Now, there are several ways to bake potatoes. In the oven or microwave, some people use their instant pot to make baked potatoes, although I've never tried the instant pot.

Easy air fryer baked potatoes

Well, I've found another method to make baked potatoes, and it is now my go-to favorite. Try baked potatoes in your air fryer.

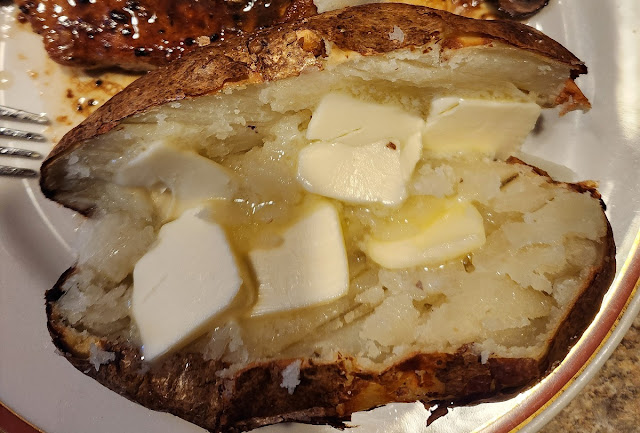
These air fryer baked potatoes are soft and tender on the inside with a wonderful crispy skin on the outside. The crispy outside is what sold me on using the air fryer. Baking them in the oven or microwave just doesn't turn the skin crispy.

Benefits of using the Air Fryer:

  • Air fryers use less energy than your oven does.
  • Your oven can heat up the whole house. If you live in a warmer climate then using the air fryer is a plus.
  • The oven will not give you that crispy skin.
I recently made some delicious pork chops and severed them with these air fryer baked potatoes. You can find the recipe for the pork chops here: Cast Iron Skillet Garlic Butter Pork Chops.


How to make Air Fryer Baked Potatoes:

  • Wash the potatoes and pat them dry.
  • Brush them with olive oil and add salt all around.
  • Poke holes around the potatoes with a fork
  • Preheat your air fryer to 400 degrees.
  • Air Fry for 40 to 50 minutes until the inside is tender.
  • Turn the potatoes over halfway through.
It may take a little longer depending on the air fryer and the size of the potatoes. I only did two potatoes but my air fryer basket would have fit four nice size potatoes easily.

Cut them open and add your favorite toppings such as butter, sour cream, chives, or whatever you like on your baked potato. The air fryer that we have is the Ninja Foodi Grill and Air Fryer. We use it often to grill and air fry, it's perfect for the two of us.


More Air Fryer Recipes:

Italian Roasted Potatoes

Apple Hand Pies

Crispy Chicken Wings

Sugar Cinnamon Biscuit Bites

Homemade French Fries


Find more recipes on ReviewThisReviews Here:

ReviewThisRecipes.com


Note: The author may receive a commission from purchases made using links found in this article. “As an Amazon Associate, Ebay (EPN) and/or Esty (Awin) Affiliate, I (we) earn from qualifying purchases.”


Tuesday, September 27, 2022

Air Fryer Apple Hand Pies

 Air Fryer Apple Hand Pies are so easy to make, and make the perfect after-school or anytime snack for your family. My review will show you just how easy these are to make.

Air Fryer Apple Hand Pies
Air Fryer Apple Hand Pies - Reviewed

The weather is starting to cool off, and that always puts me in the mood for apple pie. Instead of making a whole apple pie, I decided on making these easy hand pies in my air fryer.

I bought the 9-inch pie crust ready-made and a can of apple pie filling. If you would like to make your own pie crust and apple pie filling See my recipe here: Sam's Apple Pie.

Apple Hand Pie Ingredients:

  • 2 pie crusts (9-inch)
  • 1 can apple pie filling (I used a 21oz. can of Duncan Hines Comstock Apple Pie Filling) 
  • 1 egg beaten
  • Water to wet the edges
  • White sugar to sprinkle over top

Apple Hand Pies Air Fryer

I cut out 5-inch circles from the pie crust. I didn't have a 5-inch cookie cutter so I used a small bowl that measured 5-inches across.

I got three circles out of each pie crust, and after rolling out the remaining dough I got three more for a total of 9 hand pies.

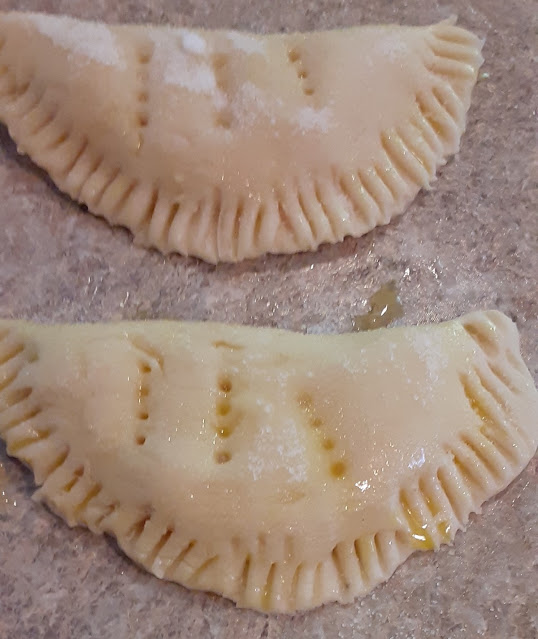
Place one tablespoon of pie filling in the middle of each cutout, wet the edge with water, fold over and crimp with a fork.

Hand Pies

I brushed each hand pie with the beaten egg mixture and poked a fork through in three places to help release the steam. Then I sprinkled the tops of each with white sugar.

Air Fry Apple Pies

I started my Ninja Air Fryer and set it to Air Crisp. Set the temperature to 350 degrees and the time to 8 minutes. I could only fit four at a time in the basket of my air fryer, you don't want them to touch. Times and Temperatures may vary with different air fryers.

Cooling Apple Hand Pies

I set them on a rack to cool for at least 10 minutes. Serve with ice cream, or as you see in the intro photo I served some with caramel sauce. 

My grandsons were visiting so needless to say that these didn't last very long. The best thing about these is that they are so easy to make with an air fryer.

Don't have an air fryer? No problem preheat your oven to 350 degrees and bake for 20 to 25 minutes until they are golden brown.

The Ninja Foodi Grill is so much more than just an air fryer, read my review here:


Note: The author may receive a commission from purchases made using links found in this article. “As an Amazon Associate, Ebay (EPN) and/or Esty (Awin) Affiliate, I (we) earn from qualifying purchases.”


Tuesday, April 19, 2022

Air Fryer Crispy Chicken Wing Recipe

 My air fryer crispy chicken wing recipe and method reviewed

Air Fryer Crispy Chicken Wing Recipe

Everybody in our family likes crispy chicken wings. I have never quite mastered crispy wings until I made them in our Ninja Foodi Grill and Air Fryer. So, if you like your chicken wings crispy this is the way to do it.

We had a crowd the day we made these so I used a 5-pound bag of chicken wings. Normally I would do about 2-pounds.

How I prepared the chicken wings:

one gallon zip lock bags
2 tablespoons olive oil per bag
3 to 4 tablespoons baking powder per bag


Seasoning:

1 teaspoon smoked paprika
1 teaspoon garlic powder
1/2 teaspoon cayenne pepper
1 teaspoon onion powder
1 teaspoon brown sugar

All of the above ingredients are per one bag of 15 or 20 wings. The first thing I did was, rinse the wings with cold water and pat them dry with a paper towel.

You can really use any already made chicken seasoning, just add a generous amount to each bag. Place the wings in a zip lock bag, add all the ingredients and mix well. Set the bags in the refrigerator for about 30 minutes.

I sprayed the air fry pan with non-stick cooking spray. Then, I set the air fry temperature to 390 degrees and the timer for 22 minutes. When the air fryer was preheated I added the wings, fitting about 12 to 15 wings in the pan. After 11 minutes I turned the wings over for the remaining 11 minutes.

Preparing the hot sauce:

1 stick of butter (melted)

Mix this together well in a large bowl. If you really like your wings hot add a dash of cayenne pepper. For me, the hot wing sauce is hot enough. Toss the crispy wings in the sauce and enjoy.

Air Fryer Crispy Chicken Wings

These crispy wings are perfect anytime for a snack or party. Your family and friends will love these air fryer wings.


Find more recipes on Review This here:


Note: The author may receive a commission from purchases made using links found in this article. “As an Amazon Associate, Ebay (EPN) and/or Esty (Awin) Affiliate, I (we) earn from qualifying purchases.”


Saturday, March 5, 2022

Air Fryer Sugar Cinnamon Biscuit Bites


Air Fryer Sugar Cinnamon Biscuit Bites
Air Fryer Sugar Cinnamon Biscuit Bites - Reviewed

These air fry sugar-cinnamon biscuits are so easy to make, and what a wonderful little sweet treat and snack. Your family will think that you spent all day making these.

These little beauties are perfect for breakfast or an after-school snack for the kids. I made these last week and they did not last very long at all in our house.

Sweet Biscuit Bites Ingredients:

1 package Pillsbury Grand Biscuits (8 counts)

1 stick (1/2 cup) melted butter

3/4 cup white sugar

2 tablespoons cinnamon

Instructions:

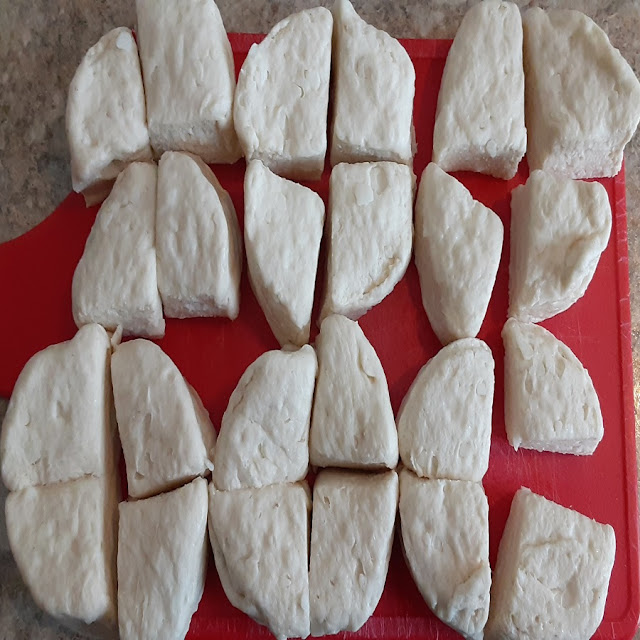
  1. Cut each biscuit into fours
  2. In a bowl add the sugar and cinnamon and mix together
  3. Melt the butter, I used a measuring cup for the melted butter
  4. Spray your air fry pan with non-stick cooking spray
  5. Place them in the air fryer, and space them so they don't touch each other.
  6. Set to air fry at 360 degrees
  7. Set the timer for 3 or 4 minutes. Times could vary with different air fryers. I used our Ninja Foodi Grill and Air Fryer
  8. Remove them with tounges to a plate and let them rest for a couple of minutes.
  9. Dip each one in butter then roll them in the sugar and cinnamon.
Cutting the Biscuits

Cutting the biscuits into fours. You can roll these into little balls if you like to be like donut holes. The yield is 32 little sugar-cinnamon biscuit bites.

Air Fry donut bites

The first batch is done, in the air fryer for 3 minutes at 360 degrees or until they are golden brown. On the 2nd batch, they were done after 2 minutes because the air fryer was already heated. That is something you will have to keep an eye on.

sugar cinnamon biscuit bites

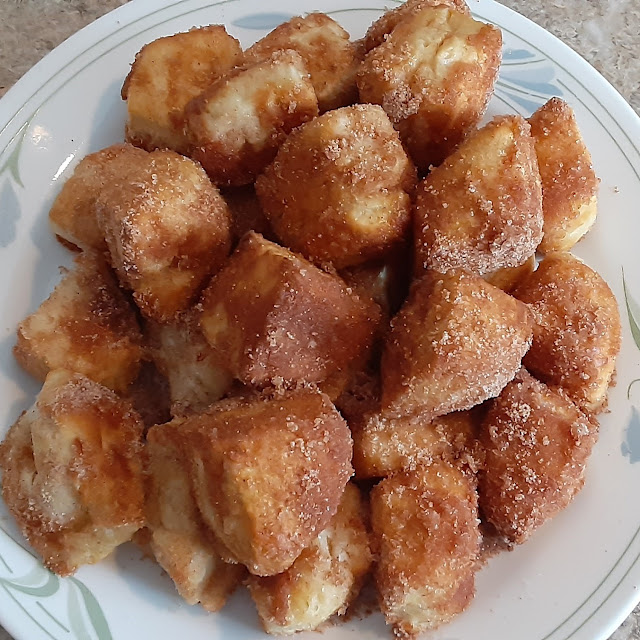
After about 2 minutes I dipped each one in the butter and then rolled in the sugar-cinnamon mixture.

I must say that these are so easy to make, and what a perfect little treat to have on hand for the kids or friends.

Times may vary with different air fryers. I used our Ninja Foodi Grill and Air Fryer. Click here to read my review of the Ninja Foodi.

My friend, Mary Beth also reviewed her new Power XL Air Fryer. Click here to see her review.

Find more recipes on Review This Here: ReviewThisRecipes.com


Note: The author may receive a commission from purchases made using links found in this article. “As an Amazon Associate, Ebay (EPN) and/or Esty (Awin) Affiliate, I (we) earn from qualifying purchases.”


Thursday, July 8, 2021

Review of My New Air Fryer


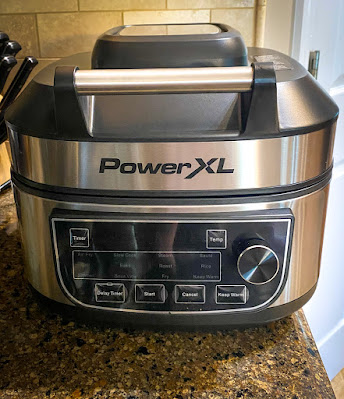
new air fryer photo by mbgphoto

My brother and my neighbor have both been telling me about the wonders of their air fryers, so when I found a great sale on Amazon I decided it was time for me to buy one and give it a try.  I had been getting in a real rut with my cooking and in fact I dreaded to have to cook meals each day.  Well, I will tell you with my new combination air fryer griller I am looking forward to each mealtime and deciding what I can make next.  The possibilities seem endless.  So far I have made shrimp, chicken wings, waffle fries, grilled sandwiches, donuts, apple chips, and reheated toasted ravoli.  All were very easy and what was really great was how easy it was to cleanup the fryer.

Features of my Power XL Grill Air Fryer Combo

The air fryer that I choose has 12 different cooking modes.  Although I don't anticipate using all of them, I can see where several will come in very handy.  There is a separate lid that I can use when I want to slow cook, steam, saute, rice, simmer, sous vide, fry or keep warm.  When I want to use the following modes: air fry, grill, bake, or roast I use the air frying lid.


I really like that it has a slow cooker option too.  I was worried about space for the air fryer but now I can put away several of my other appliances and just use the Power XL for everything.

I have not made fried food for years, but with the option of using little or no oil for the air fryer I can have crispy food and they can still be healthy without compromising any of the taste.


Recipes I Have Tried

My Power XL  came with a recipe book so it gave me some good ideas to start. I also found that if I wanted to cook something I could just ask Alexa and she would give me a recipe.  For instance I asked our  Alexa to give me a recipe for shrimp and she provided me with several options.  I could also ask what time and temperature to use for cooking chicken wings and she gave me the answer.  There are also tons of recipes online to try for air fryers.  

The first recipe I tried was one for shrimp.  It was so very easy. I brushed the raw shrimp with a mixture of olive oil and seasonings and then put them in the basket of the air fryer.  I cooked them at 400 degrees for 8 minutes and they came out perfectly cooked and a little crispy on the outside.  They were wonderful and this is a recipe I am sure I will use often.

For a breakfast treat I made some donuts in the air fryer.  They were also so simple and delicious.  I took a package of Pillsbury Grands biscuits and cut out a hole in the center.  I then cooked them for 6 minutes in the air fryer.  When they were finished I took them out and brushed them with some melted butter and sprinkled on a cinnamon/sugar mixture.  They were delicious.  Here is a photo I took.

cinnamon sugar biscuits made & photographed by mbgphoto

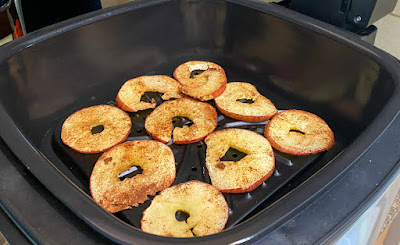
I also made some apple chips by slicing an apple thin and adding a mixture of cinnamon and nutmeg.  They were a wonderful snack.  Here you see them laid out in the air fryer.

apple chips air fried


What I am Looking Forward to Trying

I have a lot of different recipes marked to try in the future.  In the cookbook that came with the PowerXL was a recipe for a cherry dump cake that I will be trying this weekend.  My brother made it and said it turned out great.  A nice feature is that you can bake a cake without having to turn on the oven and heating up the house in the hot weather we are having.

Some other recipes I have found that I will try in the near future include: chicken parmesan, chicken drumsticks, french toast, egg-bacon-cheese biscuits, air fried vegetables, and fried zuccini.


Note: The author may receive a commission from purchases made using links found in this article. “As an Amazon Associate, Ebay (EPN) and/or Esty (Awin) Affiliate, I (we) earn from qualifying purchases.”


Monday, July 15, 2019

Reviewing the NuWave Gourmet Accessory Kit

NuWave Air Fryer Accessories
With my recent purchase of the NuWave Brio air fryer I also purchased the NuWave Gourmet Accessory Kit. At first I thought the little pan and cooking rack were over-priced and I felt silly for spending that extra money. But after using them for nearly every healthy meal - multiple times a day - I consider them invaluable.

If you aren't at all familiar with the NuWave Brio air fryer, you can read my review here. The Gourmet Accessory Kit is sold separately here


NuWave Gourmet Accessory Kit


Because I am typically cooking only for myself I purchased the Gourmet Accessory Kit.  It sounds much more fancy than it is. It is really just a 6" x 6" square pan (2 Qt) with a handle and a 6" x 6" cooking rack.  Rather than cook my foods in the pan included with the machine or on it's existing rack, I use the little pan the most often. 

Easy Clean Up: The pan has been keeping mess to a minimum. The juices and splatter stay in the accessory pan. It is non-stick so it is easy to lift out and wash off. 

Portion Control: The Gourmet Accessory Kit also helps with portion control - without leaving me feeling deprived. The pan holds just a small amount. I cook that small amount and after a bit, if I'm still hungry, I can quickly cook a bit more in the Brio air fryer. However, I haven't felt like I needed that second portion very often.

Cooking Items Separately: I can also cook two different items at the same time. I place one item in the pan - sitting on the original rack in the machine - and cook veggies on the original rack next to it. I have not yet cooked a meal large enough to have to use the Accessory rack in addition to the original rack. But it's good to know that I will have that extra space if I need it.  

Weight Loss: After loosely following the eating habits recommended by the Embry family in Living Proof and using the NuWave Brio air fryer, I have lost 4 lbs in approximately 2 weeks. That doesn't sound like much, but I am thrilled with that much loss after just changing what I eat. 


Note: The author may receive a commission from purchases made using links found in this article. “As an Amazon Associate, Ebay (EPN) and/or Esty (Awin) Affiliate, I (we) earn from qualifying purchases.”


Monday, July 1, 2019

Reviewing the NuWave Brio 10 Qt Air Fryer

Reviewing the NuWave Brio on Review This! 
Just this week I purchased the NuWave Brio 10 qt air fryer. And I am immediately in love with this way of cooking. I had to immediately review my new kitchen appliance.  If I find that over time I become disenchanted with this air fryer, I'll update this review. But right now I cannot imagine changing my mind about this machine.


NuWave Brio 


I bought an air fryer due to a recommendation from a co-worker. My co-worker had a cardiac event at a very young age. Thankfully, he recovered fully and returned to work. Not only did he return to work he clearly was losing weight and living a healthier lifestyle.  I asked him what his secret was. He said that he was using an air fryer. And if I was interested in losing weight and/or becoming healthier, I should definitely get one.

After looking at video reviews and comparison shopping in the stores, I chose the NuWave Brio 10 Qt machine. I made this choice for three main reasons.

  • similar pricing to the other machines
  • 1500w (double the power of some of the other machines)
  • a larger cooking space than some of the other machines

The NuWave advertising lists the highlights of this appliance as:

  • digital controls
  • evenly distributed heat
  • dishwasher safe parts (the parts - not the machine)
  • program functions - program your favorite recipes
  • stage functions - create up to 10 stages of time/temp adjustments
  • rotisserie - adjustable forks and rotates 360 degrees
  • sear function 
  • reversible wire rack (to adjust the height of your food and/or make room for up to an 8 lb chicken)
  • built-in "safe start" sensor
  • precise temperature control from 100F - 400F degrees. 

My Skepticism and Hesitation


That initial air fryer recommendation came to me close to two years ago. When my co-worker suggested an air fryer, one of the reasons I was very skeptical is that I didn't believe that I'd use one regularly. After all, I never deep-fry foods and I already often bake my meats/french fries rather than fry. 

Since then, a second co-worker has had a cardiac event (she is fully recovered also - thank God!). With my friends having major health scares, my own increasingly health problems, and after watching a movie of a young man who controls his Multiple Sclerosis (MS) symptoms via diet and exercise, I decided to take the plunge and purchase an air fryer. 

(No, I do not have MS, but his story about healthy diet was so motivating I decided to focus on cutting out even more carbs, sugars, and junk foods. If you would like to see my review of Living Proof by Matt Embry, click here).


The Past Week with the Brio Air Fryer


Since I have bought this machine, I have had a wide variety of cooked vegetables (broccoli, asparagus, green beans) that I normally would not have unless I was eating out. For some reason, I have never been able to stir-fry or saute vegetables and have them turn out appealing in any way. The one vegetable I cook well is summer squash, but I was frying them in a small amount of oil. Now I'm air frying them with only a dusting of cooking spray.

I've made chicken livers in this machine and they turned out GREAT.  I did not expect them too. The light flour coating browned and crisped. I was amazed. Another perk was that cooking the chicken livers in the machine greatly decreased that cooking liver smell that permeates the apartment when I cook them in the frying pan!  

I've also made a beef and broccoli Chinese food recipe that turned out GREAT. This is something I've never been able to cook successfully previously. 

I have made both lightly floured chicken nuggets and BBQ chicken chunks that looked and tasted as though they were grilled.

But the best thing about this appliance has been cooking great foods, foods that I often would pop into the oven for 30 - 45 minutes. But this apartment is hot and we've been having a heatwave. Without the Brio, I would either be on the verge of heatstroke while making dinner or I would forgo a real meal. With the NuWave Brio, I have been making great meals during this heatwave and adding very little, if any, extra heat in the kitchen. 

I am really pleased with this purchase and I'm very glad I finally acted on my co-worker's recommendation.


Note: The author may receive a commission from purchases made using links found in this article. “As an Amazon Associate, Ebay (EPN) and/or Esty (Awin) Affiliate, I (we) earn from qualifying purchases.”


Most Recent Reviews on Review This Reviews


Search for Reviews by Subject, Author or Title

The Review This Reviews Contributors


SylvestermouseSylvestermouseDawn Rae BDawn Rae BMbgPhotoMbgPhotoBrite-IdeasBrite-IdeasWednesday ElfWednesday ElfOlivia MorrisOlivia MorrisTreasures by BrendaTreasures by BrendaThe Savvy AgeThe Savvy AgeMargaret SchindelMargaret SchindelRaintree AnnieRaintree AnnieLou16Lou16Sam MonacoSam MonacoTracey BoyerTracey BoyerCheryl Paton Cheryl PatonRenaissance WomanRenaissance WomanBarbRadBarbRadBev OwensBev OwensBuckHawkBuckHawkDecorating for EventsDecorating for EventsHeather426Heather426Coletta TeskeColetta TeskeMissMerFaeryMissMerFaeryMickie_GMickie_G


Review This Reviews is Dedicated to the Memory of Our Beloved Friend and Fellow Contributor

Susan DeppnerSusan Deppner

We may be apart, but
You Are Not Forgotten


“As an Amazon Associate, Ebay (EPN) and or Etsy (Awin) Affiliate, I (we) earn from purchases.” Disclosure Statement

X