Showing posts with label Blogger Tips & Tutorials. Show all posts

Friday, August 5, 2016

How to Create a Static Home Page on Blogger

how to create a static home page on blogger
Blogger is a great blogging platform that is perfect for beginners, as well as experienced bloggers.   However, as our blogs grow, we need to find ways to make them easier to navigate.  We want our older posts to be easier to find by our readers.

Those of us who write on blogs already know that the newest article will be featured at the top of the blogger site.  The older articles will be shoved down the blog landing page and eventually to the "next" page.  Depending on the frequency of publishing, that can actually happen pretty fast.  Articles that are still very relevant are no longer seen on the landing page and become harder to find.  One could almost even say they are "hidden" by the newer content.  So, what can we do?  

We take navigation very seriously on Review This!  In addition to having every article listed in our drop down tabs, we have a "Quick View Home Page".  Each week, our contributors select articles to feature on that page.  It looks & feels like a Home Page on a website.  

We opted to have our Quick View Home Page set up as a separate page that our readers can easily visit, as opposed to setting it as our static home page.  However, you can certainly set one up just like it to be the landing page for your blog. 


Step by Step Instructions for Creating a Blogger Static Home Page 


Blogger has a default "Home" that takes any guests to the "line up" of published articles.  It is necessary to do a redirect in order to have a static home page on Blogger. 

1)  Create a new page with an appropriate title and Publish it.

create a new page

2)  Set the Redirect on your Blogger Dashboard.  Go to Setting > Search Preferences > Custom Redirects

Fill in the blank squares.  The site url is auto-filled:  
  They will look something like this.  Be sure to add the / at the end of your current home url

      From:  www.CurrentHomeURL.com/
      To:   http://www.YourSiteName.com/p/home-page.html 


Redirect on your Blogger Dashboard
 
 
3)  Check Each of the Boxes Click Save

4)  Click Save Changes

5)  Check the main url link to make sure it is properly redirecting to your new home page.

6)  Go Back to the Page you created at the beginning of this tutorial and add the content you want showing on your new Home Page.


You Now Have A Static Home Page on Blogger!


★ ★ ★ ★ ★

Click the button below to see the Review This Quick View Home Page.  Each week, I use EPD, Easy Product Displays, to generate the code for the page that allows the images with captions to be set side by side.  

I have published a step by step guide "Using EPD to Create Home Page Featured Articles" in a separate post.  Please click this link to see that companion tutorial.
 
quick view home page


Note: The author may receive a commission from purchases made using links found in this article. “As an Amazon Associate, Ebay (EPN) and/or Esty (Awin) Affiliate, I (we) earn from qualifying purchases.”


Friday, June 17, 2016

How to Change a Blogger URL to a Custom Domain URL

Custom Domain URL on Blogger - Easy Instructions

Easy Instructions for Changing a Blogger URL with Photos

There are several reasons why you might want to redirect a blogger url to a custom domain url.  In my case, I didn't want to transfer all of the articles on blogger to a new site just to have the custom domain url.  Custom domains are easier to remember since they most often match the site name.  They also don't require readers to remember the "blogspot" part of the url.  It is so much easier to tell friends, family, and readers to visit ReviewThisReviews.com than it is to tell them ReviewThisPersonalReviews.blogspot.com.  Now that our site has been redirected, either the old url or the new custom domain url will land you here.

Even though we have owned the custom domain name for years, I was hesitant to make the redirect.  I feared all kinds of evils would befall us.  I worried that we might even be offline for hours or days.  All of those concerns were unfounded.  Nothing bad happened and within 30 minutes, our custom domain was completely set and our site was redirected.

Now, let me share our extremely easy directions for redirecting a blogger site to a custom domain.  These instructions are written with bloggers in mind, not computer web designers.  The instructions are written in plain, easy to understand English and I have included lots of screenshots so you can see exactly what I am talking about in each step. 

Instructions for Redirecting a Site URL


If you follow these instructions, they will work.  Some steps may require waiting time for the DNS settings to activate, but that does not mean you have made a mistake.  Simply be patient and allow the internet to process your commands. 

1) Purchase Custom Domain - I use Namecheap, so these instructions will show their dashboard 

2) On the Blogger Dashboard, click Settings > Basic 

3) Click the link "+ Setup a 3rd party URL for your blog" 

Easy Instructions with Photos for Changing a Blogger URL to Custom Domain


4)  Go to the Namecheap Dashboard and click "Manage" by the url you wish to use, then select "Advanced DNS" from the top tabs.
 
Easy Instructions for How to Change a Blogger URL to a Custom Domain URL

Easy Instructions for How to Change a Blogger URL to a Custom Domain URL


5)  Copy the domain url, go back to the blogger dashboard, and paste the domain url in the box.   
BE SURE TO START THE DOMAIN URL WITH www.      
example:  www.thetoymousestore.com      
(If there is a / at the end, remove it)
 
Easy Instructions for How to Change a Blogger URL to a Custom Domain URL

6)  Click Save - This will auto-populate the information you need for the next step.
 
Easy Instructions for How to Change a Blogger URL to a Custom Domain URL

7)  Copy the destination (ghs.google.com) and Go Back to the Namecheap Dashboard.  Paste ghs.google.com in the CNAME record value box replacing "free.park-your-domain.com."  Make sure the www is in the Host section  

8)  Click "add a new record" and select to add another CNAME Record (See Screenshot Below)  

9)  Paste the second line of letters and numbers in the appropriate CNAME boxes  

Easy Instructions for How to Change a Blogger URL to a Custom Domain URL

10)  Click all of the check marks - they will disappear and little trash cans will appear 

11)  Go back to the Blogspot dashboard and click Save.   (If it doesn't save right away, wait 15 - 20 min and try again.   One of my blogs took about  15 min for the DNS settings to activate so I could save it.) 

12)  Once saved, confirm the new domain url is working by viewing your actual blogLook at the address to confirm url change.
 
Easy Instructions for How to Change a Blogger URL to a Custom Domain URL


13)  One last VERY IMPORTANT STEP!   

On the Blogger dashboard, under Settings > Basic, click the "edit" link beside the new url and check the box beside "Redirect 'YourSiteName'.com to www.'YourSiteName'.com.    This ensures that the www.  is not required in the url to find your site.   (This may also take a few minutes before it will allow you to save it)  

Easy Instructions with photos for changing a blogger url to a custom domain url


Congratulations!   
You are done, so go Celebrate!!!


You may also enjoy seeing our new Quick View Home Page here on Review This!  This page features articles you may have previously missed, while also providing excellent examples of the types of reviews published on our site.  

I will be sharing instructions on how to create your own Quick View Home Page for your blog soon.


Quick View Home Page on Blogger


How to Change a Blogger URL to a Custom Domain URL written by:
House of Sylvestermouse


Note: The author may receive a commission from purchases made using links found in this article. “As an Amazon Associate, Ebay (EPN) and/or Esty (Awin) Affiliate, I (we) earn from qualifying purchases.”


Friday, May 15, 2015

How to Create Collections on Zazzle and Add Them to Your Sites

Creating a Collection on Zazzle is really easy!   Plus, adding your curated Zazzle collection is even easier, but you may wonder why you would want to feature the collection link instead of featuring the items themselves in a post.  There are actually several reasons why the collection would be a better option than individual links, but first let's cover how to create the Zazzle collection.


create a zazzle collectionHow to Create a Zazzle Collection

  1. Select Your Subject ~ Example:  Postcards from Rome
  2. Hover you mouse over the item you will be adding to the board.  You will see the "add to collection" button in the upper right hand corner.
  3. Click the down arrow to see the list of your collections.  
  4. Since we are adding a new collection, type the title of your new collection in the bottom square and click create.  
  5. Add a description of your new collection by editing the board.
  6. Add 5 tags
  7. Check the "visible in stores" square if you wish the collection to show on your store's home page.   It must also be marked "public" do show to anyone other than you.
add a title, tags and description to a zazzle collection
How to Edit, Title, Add Tags and Add a Description to Your Zazzle Collection


Alternate Way to Create a Collection on Zazzle


You can also start a new collection by simply clicking the "+ New Collection" on your Collections page and continue with steps 4-7 above.

create a collection on zazzle
How to Create a Collection on Zazzle


How to Find Your Collections on Zazzle


In order to edit, change the cover photo, or rearrange the items in the collection, you can simply go to your collections page and select the collection you wish to edit.  You will find that option in the drop down tabs under your profile image at the top.

find your collections on zazzle
How to Find Your Collections on Zazzle


How to Add a Photo to the Top of Your Zazzle Collection Page


At the top of each collection page, you have the option to add a photo or banner image.  This gives the collection page a really nice overall finished look, while also giving an instant example of what can be found in that collection.

Add a photo to the top of your Zazzle collection by simply clicking the "camera" in the big, blue square and selecting the image from your own uploaded photos or images. 

add a top photo to your collection
How to Add a Top Photo to a Zazzle Collection


How to Reorganize Your Items in a Zazzle Collection


Reorganizing the items in your collection is very easy.  Simply click the "organize" button at the top of the collection, then drag and drop your items where you wish.

organize a zazzle collection
How to Reorganize Your Items in a Zazzle Collection


How to Add a Zazzle Collection to Your Wordpress or Blogger Site


Adding a Zazzle collection to Wordpress or Blogger is very easy.

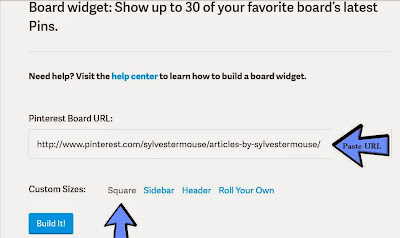
  1. Simply click the "share" button at the top of the collection page on Zazzle. 
  2. Select the "link" option
  3. Select Your Display Preference
  4. Copy the html code
  5. Paste the html code in your article under the html (blogger) or text (wordpress) option ~  not under compose or visual

 
share your zazzle collection on social media


How the Collection Appears


Note:  To get a larger display on your site like I have above, go to the "html" of your article and change the 325.jpg standard size to 525.jpg.  That size should not distort your image and will give you a larger display of your collection photo.


Why Use a Zazzle Collection in Your Website Article 


There are actually a couple of very important reasons to us the Collection link provided by Zazzle in your site article.


  1. It is only one affiliate link on your article.  
  2. Links to the entire Collection page which could easily feature dozens of additional related items.
  3. From your Collection page, the reader may well be tempted to explore more of your Zazzle store items.
  4. The Collection image makes a great sidebar ad or a fast addition to a related article for an easy update of the article.

What do you think?  Can you add to that list of why we should use a Zazzle collection in our website articles?

Please leave your thoughts, suggestions and comments below.


Zazzle Collections Can Include Items from Other Zazzle Stores


You are not limited to featuring only your store items in one of your collections.  You can add items for other Zazzle stores to your collections.  This is especially helpful if you don't have enough of a particular item to make a nice size collection presentation.  You will earn 15% in affiliate income when a buyer clicks through your created collection link in your published article!

However, if they access your collection via Zazzle instead of your published article, your referral code is not included in each individual link in the collection.  Therefore, I would not recommend checking the "visible in stores" option when creating collections that include a lot of items from other stores, unless you don't mind not receiving the commission for items sold.   Hopefully, that will be corrected in the future.


Note: I changed the size of these collection displays from 425.jpg to 625.jpg. I also added the words "Collection Curated" to the blanket collection since all of the throw blankets featured in this collection are not items in my store.


See the Collection Images in Action on a Wordpress Article


Here is an example of an article I recently published that uses the collection image links instead of individual product links.  I have featured 3 different Zazzle Collections in this article.

Mugs by Sylvestermouse

I would love to add your articles here too.  If you have used a Zazzle Collection in one of your published articles, please leave the link in the comments section below.


From Our Readers


This Mug Collection was created by Jasmine who, within an hour of reading this article, had used the instructions here to create her first collection and I wanted to share it with everyone. Review This is, and always has been, dedicated to promoting others as well as our own work. Thank you for being one of our loyal followers Jasmine!

Our own Contributor, Bev, also created a collection by using the instructions in this article. Likewise, we are featuring her new Zazzle collection.

mugs by raintree annie on zazzleFlower Mugs by Annie (Raintree Designs)

throw blankets on zazzleThrow Blankets Curated Collection by Sylvestermouse

mugs by bevClematis Mugs by GramsBe


If you use these instructions to create your first Zazzle collection, simply leave me a note in the comments section below. I would love to feature your collection too. (The throws would be happy to move out of the way for your collection to be included here.)


Note: The author may receive a commission from purchases made using links found in this article. “As an Amazon Associate, Ebay (EPN) and/or Esty (Awin) Affiliate, I (we) earn from qualifying purchases.”


Friday, April 10, 2015

How to Embed Your Pinterest Board in Your Blog Post

how to embed a pinterest board
I am always looking for new ways to improve and increase the ways I can easily create displays for my websites and blog posts. I recently discovered how to embed a Pinterest Board in a blog post here on Blogger, as well as on websites.

I love using Pinterest! It is not only a great way for me to share my photos, articles and favorite craft tutorials, but it is also an excellent way for me to find new ideas and products.

Being able to create a specific niche board on Pinterest is really awesome. Being able to share that board with others via a blog post, is most excellent!


How to Create and Embed the Pinterest Board HTML Code


You are going to laugh at how easy it is to create and embed your individual Pinterest board. It takes only a moment to do either of these displays!


To Create This Pinterest Board, Simply


make a pinterest board to embed
  • Click Here
  • Then, copy the Pinterest Board URL that you wish to display and paste it in the box. 
  • Select the size of your display from the Custom Sizes ~ Square is Shown Above
  • Click "Build It"
  • Copy and Paste the Generated Code into the html section of Your Blog Post
  •  


To Create This Pinterest Board, Simply


create a pinterest board display to embed
  • Click Here
  • Then, copy the Pinterest Board URL that you wish to display and paste it in the box. 
  • Select "Roll Your Own" in the Custom Sizes options
  • Select Image Width 80, Board Height 400, Board Width 800
  • Click "Build It"
  • Copy and Paste the Generated Code into the html section of Your Blog Post
  •  
There are several size options available or you can play with the display size by simply changing the numbers in the "roll your own" section.   The size I used here was the board size that I thought looked best on this particular site.

These boards are generated feeds and the looks will change each time you add a new pin to your board.


Using an Embedded Pinterest Board   


There are many ways and places that online writers might wish to use an embedded Pinterest board.  One example that immediately comes to me is if you are publishing a recipe article, you could embed your recipe Pinterest board at the bottom of  your article to show additional recipes.

If a reader clicks on one of the pictures on the embedded board, it will allow them to immediately repin the original pin, which means they could easily repin every image link showing on the board without ever leaving your article.

If a reader clicks on the "See on Pinterest" button at the bottom of the embedded board, the link will take them to the actual board on Pinterest and they can explore all of your recipes / articles on that board.

Personally, I think this is a fabulous tool for online writers and I would highly recommend trying it out.  You may well see a huge increase in not only your Pinterest traffic and repins, but also in the traffic to your other articles showing on a displayed board.


Now, just for fun, 

Here is a Gifts for Mothers Shopping Board just in time for you to make your selections for 

Mother's Day!


Pinterest Board is hosted by Sylvestermouse, but Includes
GIFT SUGGESTIONS FROM MULTIPLE CONTRIBUTORS

(Image Weight: 100, Board Height: 350, Board Width: 600)


Note: The author may receive a commission from purchases made using links found in this article. “As an Amazon Associate, Ebay (EPN) and/or Esty (Awin) Affiliate, I (we) earn from qualifying purchases.”


Friday, March 27, 2015

Easy Product Displays Reviewed

Easy Product Displays for Amazon and Zazzle Affiliates A few years ago, I started using Easy Product Displays (EPD) to create my product displays on my websites.  I am still using them today!

I would like to take a moment to review the website "Easy Product Displays" and show you exactly why I would recommend them to anyone who desires to sell products online.


Amazon or Zazzle Product Displays in Minutes

If you own a website or blog, you already know product display codes to use on your websites and blogs can be difficult and cumbersome to write.

But, what if you had a tool that did it all for you?  If you could just pick what products you want and have them displayed for you, would you go for it?

That was my hope when I discovered Easy Product Display 2 years ago.  All my wishes came true! Literally!  Well, ok, I didn't win the lottery, but I can now make beautiful product displays with only a few mouse clicks.  Stay with me, while I show you how easy this really is to use.


How EPD Works

It Truly Does the Work for You!

Simply input the item you wish to search into the search box on Easy Product Displays and it will automatically populate the results of your search. You select the items you wish to have displayed, select your border & button choices and EPD will instantly give you the html to insert on your page.


Examples of Displays Using EPD

Easy Multi Product Display

For this example, I put in the Search Term "Doll", selected the layout and in a matter of seconds had the entire code, borders, titles, buttons and all ready to copy and paste into my website page.

Easy Product Display showing 5 items
Note: In order to remain in compliance with the word/product ratio of Review This, this section is a photo of how the features would look, but are not linked to products. 


With a Simple Click, I Changed the Format to Look Like This:


Easy Product Display showing 2 items

Easy Product Display showing 3 items
Note: In order to remain in compliance with the word/product ratio of Review This, this section is a photo of how the features would look, but are not linked to products. 

Another Simple Click and I Have This Format


A Few More Clicks and You Can Change the Borders, Buttons, Text Style, etc

For a Totally Different Look


You Could Even Go Borderless on any Size!


Easy Options & Features on EPD

  • Amazon & Zazzle Search Tool
  • Single or Multiple Item Product Display
  • Change Image Display Size
  • Add a Border and/or Button
  • Select Color of Text, Border, Font and Button
  • Create Your Own Buttons 
  • Amazon & Zazzle Buttons Available to Select
  • Set the Image on the Left or Right Side (my examples are all centered
  • Manually Change the Item Title for Product Display Uniformity
  • Save Format Settings & Colors for Website Consistency 
  • Save Multiple Amazon Tracking ID's to Auto Load
  • Make Custom Display for Other Affiliations by Simply Entering the Product Link URL, Image URL and Title
  • Use the "import code" section to make changes to previous features easy
  • No Software Download
  • Can Use Tool from Any Device or Location 

Website & Blog Owners

If you own or write on a website or blog that allows html code for products, Easy Products Displays website was created just for you!

You can join today and start your free trial of EPD by simply clicking here.


Testimonials from Current EPD Subscribers


"I don't know how I managed without it before!  It's extremely handy!  I use it everyday when I'm building pages.   The speed and convenience of EPD is worth it!


"Easy Product Displays is an affiliate marketers best friend! There is nothing out there that even comes close in ease of use and versatility when it comes to making attractive displays for items you want to feature or sell. In addition, it also has great customer service if you have a problem, the staff usually gets back to you the same day and there is a wonderful community of users that frequent their Facebook page that also offer advice and ideas on how to better use this great tool. Last but certainly not least, the makers of EPD are always updating it and improving its functionality and adding features. You really could not ask for a better product than this, I highly recommend it."
Tracey Jade Boyer


"If you want a professional-looking web site for selling items directly or for marketing items as an affiliate, this is it! Easy Product Displays allows you to add items manually or to interface with sites such as Amazon.com to select the items that you want to add. This economical display solution is packed with features and gives you several choices of layout, and also allows you to easily change the code should you choose to add or delete items, even at a later time."
Rhonda Reid


One More Exciting Announcement!
EPD recently announced that they will soon be including ShareASale in addition to Amazon and Zazzle. This is a really exciting change for all of us and we look forward to being able to easily create our SAS product displays on EPD!

If you join today, you will already be familiar with the EPD website when they introduce ShareASale to the line-up. (This might be considered insider information, so if you are reading this today, be sure to share this article with your friends too.)


Update!  ShareASale Has NOW Been Added to EPD!  Join Today Easy Product Displays for Amazon and Zazzle Affiliates


Note: The author may receive a commission from purchases made using links found in this article. “As an Amazon Associate, Ebay (EPN) and/or Esty (Awin) Affiliate, I (we) earn from qualifying purchases.”


Most Recent Reviews on Review This Reviews


Search for Reviews by Subject, Author or Title

The Review This Reviews Contributors


SylvestermouseSylvestermouseDawn Rae BDawn Rae BMbgPhotoMbgPhotoBrite-IdeasBrite-IdeasWednesday ElfWednesday ElfOlivia MorrisOlivia MorrisTreasures by BrendaTreasures by BrendaThe Savvy AgeThe Savvy AgeMargaret SchindelMargaret SchindelRaintree AnnieRaintree AnnieLou16Lou16Sam MonacoSam MonacoTracey BoyerTracey BoyerRenaissance WomanRenaissance WomanBarbRadBarbRadBev OwensBev OwensBuckHawkBuckHawkDecorating for EventsDecorating for EventsHeather426Heather426Coletta TeskeColetta TeskeMissMerFaeryMissMerFaeryMickie_GMickie_G


Review This Reviews is Dedicated to the Memory of Our Beloved Friend and Fellow Contributor

Susan DeppnerSusan Deppner

We may be apart, but
You Are Not Forgotten


“As an Amazon Associate, Ebay (EPN) and or Etsy (Awin) Affiliate, I (we) earn from purchases.” Disclosure Statement

X