For those who see beauty in imperfection, wood stitching is an appealing art form. When I recently found a cracked tabletop, my first inclination was to replace it with something less damaged. However, as I further considered the nature of this wood piece, I realized it was the crack that gave the table its real character.
As Leonard Cohen expressed in his song "Anthem," forget your perfect offering, there is a crack, a crack in everything. So, I thought, why not highlight rather than hide the flaw? The flaw is the offering... is the song.
I had never attempted to stitch wood with copper wire before today, but I've been wanting to try this technique. I am learning through trial and error what works. I'll share my process here and a few tips.
First, I didn't care for the glossy wood finish, or the cheap look of the table itself. Sanding alone did not fix that. Torching everything took care of it. It's a method known as Shou Sugi Ban. Fire is a sure way of taking something lacking a wow factor and making it instantly memorable.
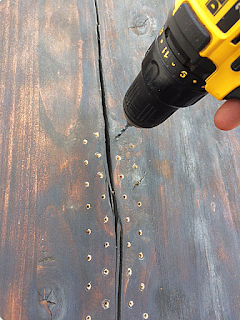
After charring the tabletop, I drilled holes in preparation for the wire stitching. Using my butane torch, I burned the wood inside and around the holes (so the raw wood wouldn't show).
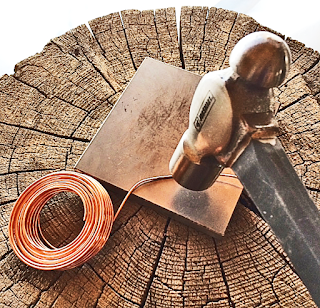
Using a steel block and hammer, I flattened the copper wire. The copper looks better when it lies flush with the wood surface.
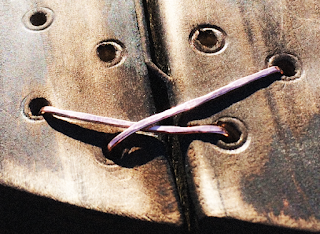
Now, I am experimenting with lacing patterns. The trick, it seems, is to double back and bring two stitches up through a single hole. I have discovered that the wire has to be carefully handled after being pounded flat. A few pieces of wire have snapped in half when I started stitching the wood. Lesson learned. (And I have gone back and sanded down the indentations left by the drill around the holes pictured above.)
I am intrigued, so far, with my project. The uniqueness of what is being created from something others might consider broken is what draws me to this work in progress. This table is reminding me that there is beauty to be found in brokenness. The crack is where the light gets in.
These kinds of projects tend to take on a life of their own. I never know ahead of time just where the wood and other elements will lead me. It's the adventure of it all that keeps me coming back for more.


Diana, your "stitching wood with copper wire" sounds like the words to a song itself and a restoration tool as interesting as it is lyrical. I've never heard of this technique before, so your descriptions are fascinating. I can hardly wait until you get to Part Two.
ReplyDeleteThank you, Elf. We share a curiosity for the lyrical. I do hope this tabletop will be singing when the restoration is finished (if our work is ever truly finished).
DeleteThis is so cool Diana. I love what you are doing with that old tabletop and I am looking forward to seeing the finished project.
ReplyDeleteThanks, Mary Beth. I find it so satisfying to renew things that just need a little TLC and a second chance at fulfilling their purpose. This tabletop deserved a new look and a new lease in life.
DeleteWow Diana! That is so impressive so far. I'm looking forward to seeing the finished project. I love that you have taken something broken and made it beautiful again. We should do that to ourselves too! Yes there is beauty in brokenness, we just need the eyes to see it and I know you do indeed have those eyes. What a wonderful project this is!
ReplyDeleteYes... may we see the beauty that exists in brokenness. It just takes seeing with our hearts. And you are so very right about how we all need to do this for ourselves, as well.
DeleteFabulous! I always love your ingenuity and how your bring beauty to things that others might just toss. The idea of stitching a wood crack definitely appeals to me. I never would of thought of this DIY project myself. When finished, I have no doubt this will definitely be a functional piece of artwork!
ReplyDeleteThank you, Mouse. There are wood masters who must make thousands on their stitched tables. I have seen some of their work and it is beyond exquisite. I'm thinking I may need to try piano wire for my creations, as surely piano strings are super strong and less brittle than the wire I am now using. I think my table, when finished, will be an excellent conversation starter about things that matter. I would be very pleased with that outcome.
DeleteAfter hammering the wire flat heat it with your torch
DeleteReally hot then cool it with water and the wire will be much softer and easier to work with and it shouldn't break
Wow! You have done a beautiful job here stitching the wood crack with copper wire. I really love this!! I think it is fantastic to bring an old or damaged piece back to life with added beauty. You are very talented Diana.
ReplyDeleteThank you. I appreciate your belief in me and what I am hoping to accomplish here. Much appreciated!
DeleteDiana dear, you have a special knack for seeing beauty that isn’t immediately apparent to a casual observer. It’s one of the many things I love about you, my friend. I admire that you not only recognized this broken table’s intrinsic value and potential, you also were able conceive an artistic vision for bringing out/enhancing its unique beauty, and to bring that vision to life for you and others to enjoy and appreciate.
ReplyDeleteI love the combination of the rustic and minimalist aesthetic. The Shou Sugi Ban Japanese wood torching technique is new to me, and it seems fitting that your design also appears to embrace the “seeing beauty in imperfection” aspect of the Japanese wabi-sabi philosophy and aesthetic. Using the copper wire stitching also reminds me of kintsugi - the art of repairing cracked pottery with an adhesive mixed with karat gold, celebrating the imperfections by using precious metal to make the cracks and the repairs more visible, instead of trying to hide them with an invisible repair.
I can’t wait to read part two of this post and see the final results of your realized vision!
P.S. Flattening the wire before you did the lacing would have work hardened the copper, making it more brittle as well as less malleable/harder to bend and manipulate. It might be worth experimenting with a bit of scrap wood and wire to see whether the copper lacing repair becomes easier if you don’t flatten the wire until after the lacing has been completed, and if you also anneal the round wire with the torch and pickle it (in a strong, hot citric acid solution, perhaps) to remove the oxidation before you begin lacing with it. If you do decide to experiment with this idea on scrap material, I would love to hear your thoughts on the pros and cons of both approaches!
You know, I was wondering if perhaps I should try annealing the wire. I wouldn't have known about the potential of a pickle solution. Thank you for that tip. And I think I will try flattening everything after the lacing is complete (if I can do so with a table that is not entirely even on the two sides of the crack). Like you, I thought about the pottery, but did not know the name for that lovely technique. I have gained so much from your thoughtful response. Thank you for always making time to offer the gift of robust comments and affirmations. It is such a super power.
DeleteAbsolutely amazing work Diana. Burning the wood seems to give it some character. I once watched a guy hook up battery cables to nails to burn a table top that he was making. I can't wait to see the finished project. Thanks.
ReplyDeleteThanks, Sam. Now that is something I've not tried... burning wood with charged nails. Interesting. Who comes up with these things?
DeleteWow, that's so beautiful - the lacing is gorgeous. I remember as a little girl I had a wood burning kit - I burnt myself so much! I never really had the knack for it - but I love the look of this - can't wait to see the finished product.
ReplyDeleteThank you. It's good that we try things for which we may have no knack. I often feel like a jack of all trades, master of none (because I would rather do tons of exploration than limit myself to one expertise). I actually did a little wood burning today on another project. I remember wanting a wood burning kit when I was young. It's never too late to pursue those creative inclinations.
DeleteWhere can I find part two? Can’t find anyone else sharing this technique and wanting to try it on a new table.
ReplyDeleteAs in silversmithing you should anneal the wire to soften it by heating and quenching. The more you work the wire the harder it will get and may need to be annealed again. This is probably why it broke as it got to brittle
ReplyDeleteWhen you hammer the copper wire it work hardens. So you need to anneal it by using a torch to turn it orange then quench it in cold water it will then be soft enough to bend without breaking it.
ReplyDelete