Thursday, April 14, 2022

Visit Missouri - First Capitol


Missouri's first capitol
Missouri's First Capitol

The first Missouri capitol was in St. Charles.  Although we have lived very near for nearly 20 years, I had never been on a tour of this first capitol until recently. I was on an outing with a group that I serve as a photography mentor and our outing included a tour of the first capitol.  The outside of the building does  not look very exciting so I wasn't sure what to expect and I was very pleasantly surprised.

History of First Capitol


Missouri was granted statehood on August 10, 1821.  Before that time various locations in St. Louis had served as the place where decisions were made for the territory.  Once it looked like statehood would become a reality a search went on to find a permanent seat of government.  A location was picked in the center of the state overlooking the Missouri river.  This new location was called "The City of Jefferson" and today we call it Jefferson City.

While construction of the new capitol was taking place the first legislator needed a place to meet.  Nine different cities were competing for the honor.  One of these cities, St. Charles, pledged free meeting space for the temporary capitol.  St. Charles was located on the Missouri river and had great access to areas throughout the state by either the river or the Boonslick Road.  The first Govenor Alexander McNair signed a bill making St. Charles the first capitol of Missouri.  The legislator met in St. Charles for the first time in June of 1821.   At that time the heated discussions of the legislature centered around slavery and state's rights.

House of Representatives in Missouri's first capitol
House of Representatives

Senate in Missouri's first capitol
Senate

Tour of First Capitol


The first legislator met on the second floor of the two newly constructed adjoining buildings.  The first floor was occupied by a general store and a carpentry shop. In the photos above you can see what the senate and the house of representatives looked like.

Our tour guide gave us some fascinating insight into what the meetings would have been like back in the early 1800's.   In the photos above you see what each of the meeting rooms looked like. The senators each had tables they could use but the representatives sat on benches.  Our tour guide showed us the "Laptops" like what they would have used to in order to take their notes.  Here is a photo I took of the laptop.

style of laptop in Missouri's first capitol


It would have been like a mini desk, with compartments to hold the writing instrument, the ink and other essentials.  They could hold it on their laps to use instead of a desk.

After seeing the legislators we went to the next room upstairs which was the govenors office.
Here is a photo of that office.

Governor's office in Missouri's first capitol
Governor's Office


Four Missouri governors were in office during the time the capitol was in St. Charles.  The new capitol was ready in 1826.

Downstairs Stores and Home


The tour also included a look at a reconstructed Dry Goods store.  It included items that would have been in that type of store during the early 1800's.  Here is a photo I took in the store.

replica of a store in the 1800's


Sources for this Review


My sources for this review are the information provided for us by our docent, Mike.  He was an excellent tour guide and provided some very interesting information on what life was like during the early years of Missouri statehood.

I also used information I read on a pamphlet I picked up during the tour.  The information was published by Missouri Department of Natural Resources.  Their website is www.mostateparks.com.


Note: The author may receive a commission from purchases made using links found in this article. “As an Amazon Associate, Ebay (EPN), Esty (Awin), and/or Zazzle Affiliate, I (we) earn from qualifying purchases.”


Wednesday, April 13, 2022

The Best Large, Sturdy, Adjustable, Over-the-Sink Dish Drying Rack

If you hand wash a lot of dishes, nonstick cookware, etc. or have a small kitchen with limited counter space, a large, over-the-sink dish drying rack with two or three tiers can be a great solution.

I recently purchased a large, sturdy, adjustable over-the-sink dish drying rack that easily spans our nearly 33-inch wide double sink. The over sink dish rack we chose easily accommodates our nonstick pots, pans and bakeware, measuring cups and spoons, dishes, mixing bowls, cups, glasses, cutlery, kitchen utensils, and even our large salad spinner and cake carrier. It also gets our bottle and dish brushes, sponges and dish soap off the counter, freeing up valuable kitchen counter space and helping to keep those items neatly organized and easily accessible.

We couldn’t be more thrilled with our new Boosiny stainless steel, 3-tier over sink dish drying rack. Here’s my in-depth product review.

Free Up Valuable Kitchen Counter Space! Over-the-Sink Dish Drying Rack - Adjustable & Customizable

Since my husband and I are the only ones in our household, we only run the dishwasher every few days, when we have a full load, to save energy and water. So, in addition to our handwashing our nonstick cookware and baking pans, cast iron skillet, carbon steel knives, Thermos Stainless King Vacuum-Insulated Travel Tumblers, etc. we also hand wash quite a few dishwasher-safe items that we use every day, such as our tall Vitamix blender (for our smoothies), extra-long Vitamix curved silicone scraper spatula, an extra-large cutting board, chef's knife and 5-quart salad spinner for our nightly dinner salads, two tall shaker bottles for our daily electrolyte supplement drinks, 12-inch pizza pans for our countertop oven, and measuring cups and spoons.

With the exception of our cast iron cookware and carbon steel knives, which need to be towel-dried immediately after washing to prevent rust, we prefer to let our hand washed kitchenware items air dry on a rack. Until recently, however, we haven't had a proper dish drying rack. (In fact, I'm embarrassed to admit that for a long time we were using one of our large stainless steel wire cooling racks as a makeshift countertop dish drying rack until we could figure out a better solution.)

Our old, very small kitchen has extremely limited counter space. The usable surface of those small counters is even smaller, because our Ninja CE251 programmable coffee maker, microwave, food processor, Vitamix blender, KitchenAid mixer and Instant Pot pressure cooker are lined up along the far edge. (We use most of these every day and the built-in kitchen cabinets are too full to store them when they aren't actively in use.) Finding a dish rack with the capacity to handle all our hand washed kitchen items that wouldn't take up any more of our limited counter space than necessary proved challenging.

Types of Dish Drying Racks to Consider

When I started researching dish drying racks, I found four types worth considering for our kitchen.

Traditional Countertop Dish Drainers with Drainboards

Traditional dish drying racks sit on the counter right next to the sink. They are placed over a rimmed rubber drainboard with a lip, where the water collects and drains into the sink. These are very popular and work well for many households. Unfortunately, this type was neither spacious or sturdy enough for our needs, and we didn't have space in the kitchen to store it when not in use to free up that counter space.

Roll-Up Dish Drying Racks

Roll-up over-the-sink dish drying racks can be a great choice if counter space is at a premium or if you like your kitchen counters to look clean and uncluttered. The biggest advantage of this type of drying rack is that it can be rolled up compactly (similar to a bamboo sushi rolling mat) and stored in a kitchen drawer or under the sink when not in use.

One that I considered is the Ahyuan roll up dish drying rack, which is made from high quality 304 stainless steel rods held together on either end with food-grade silicone strips. It comes in several sizes, including one large enough to span the front and back lip of our kitchen sink surround. However, since the base of our kitchen faucet fixture is very close to the edge of the sink, only half of the dish rack could rest on the lip of the surround, while the other half would have to lay on the counter. Also, even the largest size (20.5" x 19.6") would not have enough room to dry all our hand washed dishes, pots, pans, cooking and eating utensils, blender jar, food processor bowl and accessories, etc.

2-Tier or 3-Tier Countertop Dish Drying Racks

Tiered countertop dish drying racks have become increasingly popular in recent years. The very attractive 3-tiered X-cosrack black stainless steel dish drying rack would be fantastic for someone who has enough space for a rack that lives on the countertop. This well designed, adjustable dish rack is large and sturdy enough to accommodate plenty of hand washed dishes, cookware, etc., yet has a fairly compact footprint (15.7" long x 11.2" wide x 22.8" tall). I love that it comes with a utensil holder basket and removable plastic drainboards for each of the three wire shelf baskets. Each shelf basket can be removed and put back quickly easily to adjust them to your preferred height or for cleaning.

This excellent, well made dish rack has nearly 1,000 rave reviews on Amazon. I was sorely tempted to order one, but since we don't have enough counter space to leave it out all the time and it would prevent access to the blender and food processor that would live behind it, I knew it wasn't the right solution for our needs.

2-Tier or 3-Tier Over-the-Sink Dish Drying Racks

These are very similar to the tiered countertop dish drying racks, but they have the advantage of taking up only about an inch of counter space on either side of the kitchen sink and draining directly into it. Unlike roll-up dish racks, they also do not interfere with access to or use of the sink or faucet while your dishes, glasses, pots, pans, etc. are drying.

During my research I read numerous product reviews of highly rated tiered over-the-sink dish drying racks on Amazon. It quickly became apparent that there are significant differences in design, materials and manufacturing quality as well as adjustability, dimensions and capacity between brands and models.

Many models could not be adjusted to span our nearly 33-inch wide double sink. Some did not seem deep or sturdy enough to accommodate a large, heavy casserole dish or Dutch oven, for example. Some were harder to assemble and adjust, and some were more prone to rusting.

Fortunately, I found one that ticked all the boxes for us.

Boosiny 3-tier stainless steel adjustable over sink dish drying rack
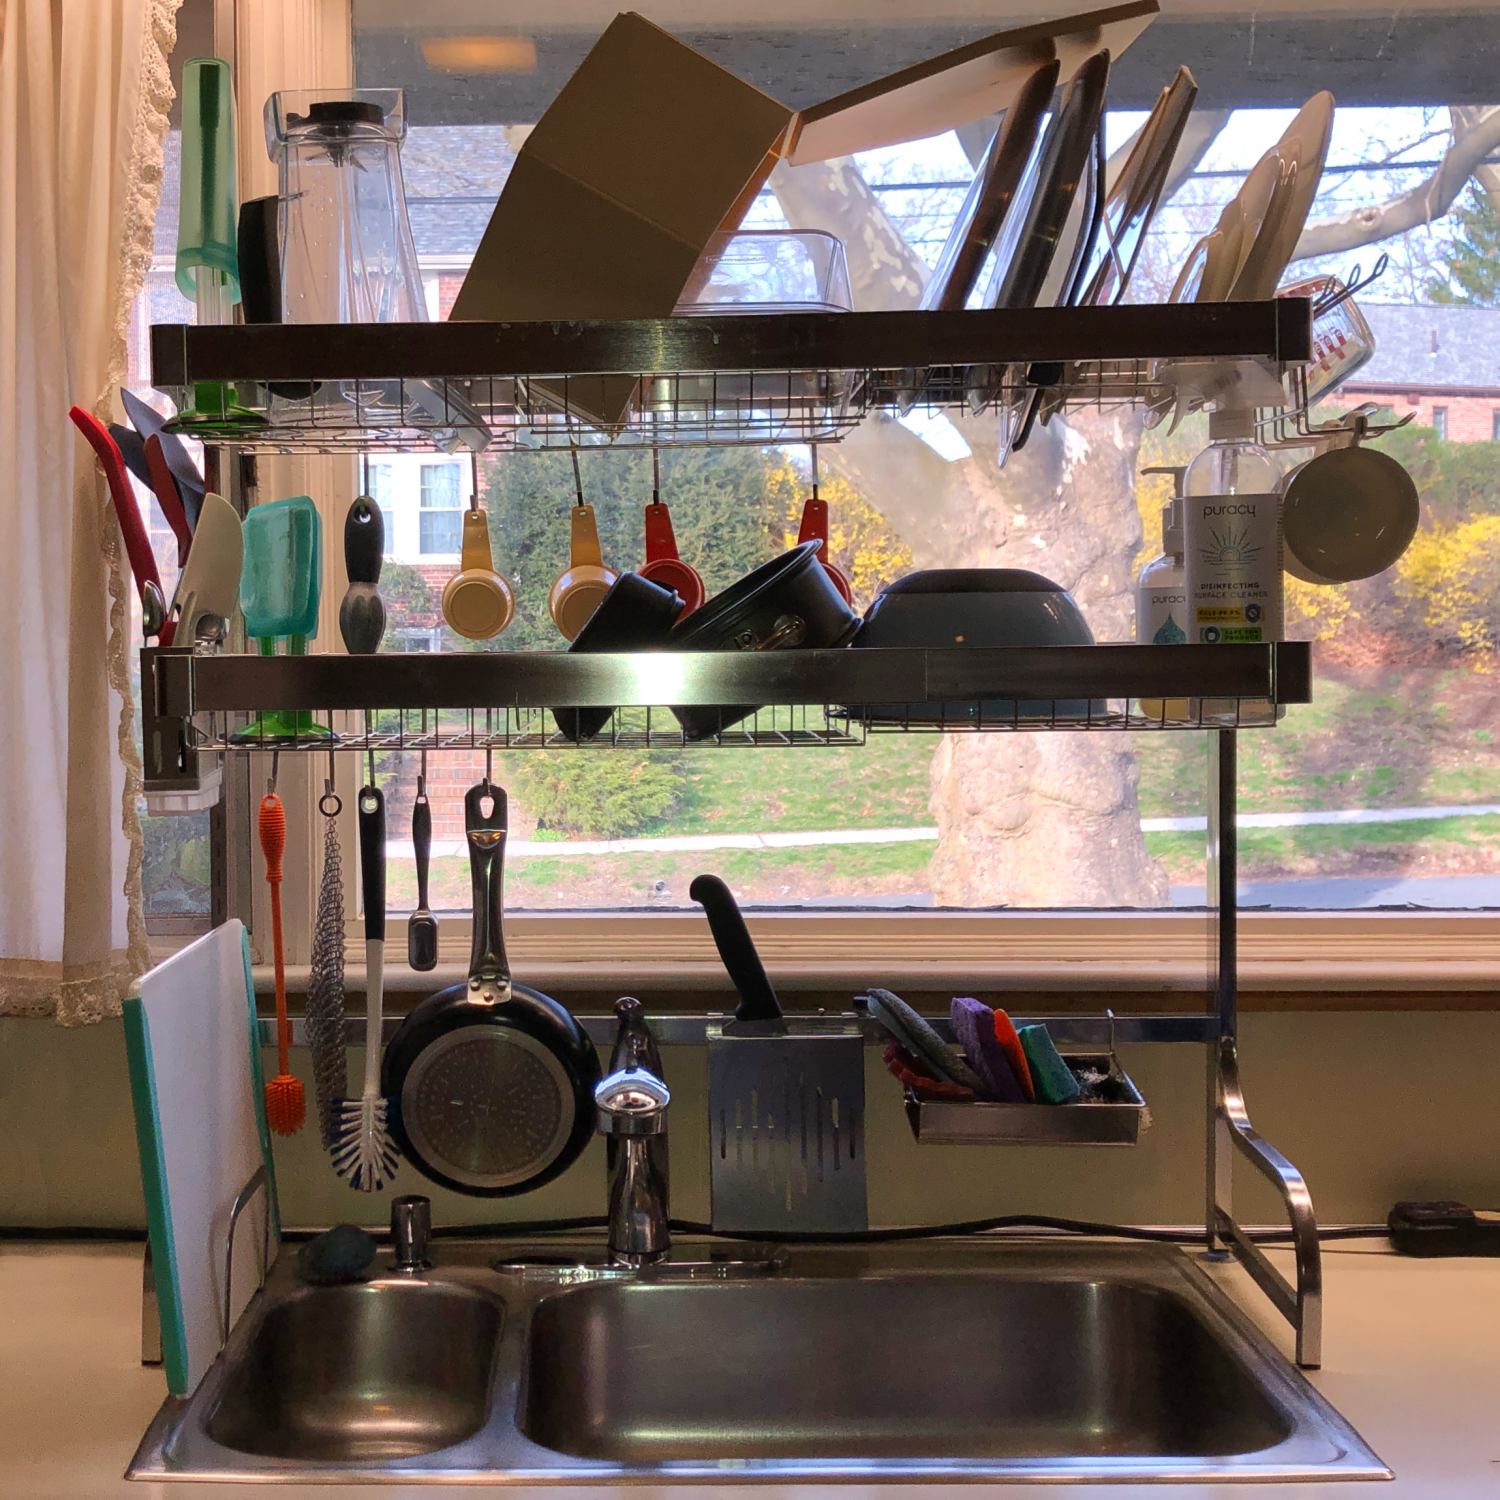
Our stainless steel 3-tier over-the-sink dish drying rack doesn't block the view out our kitchen window, even when we pile it high with hand washed dishes, mixing bowls, storage containers, etc.

Reclaim Valuable Kitchen Counter Space With an Over-The-Sink Dish Drying Rack

Given both our limited storage and counter space and the eclectic nature and varying sizes, shapes and weights of the dishes, glasses, pots, pans, cooking and eating utensils, etc., we typically wash by hand, we decided to go with one of the tiered over sink dish racks.

The one we ultimately chose is the Boosiny stainless steel, 3-tier over sink dish drying rack, which I recommend highly.;

Here's why we love it.

Note: We purchased the regular stainless steel version. There is also a less expensive stainless steel model with a gray coating that is slightly different in size, design, and number and style of accessories (for example, it has only six hooks instead of 10).

Sturdy, Stable and Roomy

  • This well made Boosiny stainless steel rack is roomy, stable and solidly built. In fact, it can hold up to 180 lbs. of dishes, pots, pans and other kitchenware and dishwashing supplies!
    • Even when our hand washing load is large and includes one of my heavy vintage ceramic Corningware French White casserole dishes or my enameled cast iron Le Creuset stockpot, this heavy-duty 3-tier dish drying rack can handle it with ease.
  • Some days, my husband and I end up using only part of its generous capacity. Other days, especially if I am baking or cooking something that involves a lot of prep (or measuring cups and spoons), we fill up every inch.

Useful Accessories

The Boosiny 3-tier over-the-sink dish drying rack comes with several accessories that clip onto or hook into the frame:

  • A utensil holder basket with a removable plastic bottom for easy cleaning.
  • A slotted knife holder, also with a removable plastic bottom.
  • A clip-on cutting board holder (we love this thoughtful feature!)
  • A handy small basket compartment for sponges, dish rags, steel wool pads, etc. (which the manufacturer refers to as a "detergent holder")
  • A cup rack that clips onto the side of one of the main shelf baskets
  • A set of 10 long clip-on hooks
    • We use some of ours to hold dish and bottle brushes, and use the rest to hang measuring cups, measuring spoons, cooking utensils with loops or holes, and our stainless steel mesh scrubbing "cloth" for cleaning cast iron pans.

Note: We are planning to bend the arms on the cup rack at a more acute angle, since some of our drinking glasses won't stay on them as is.

Adjustable and Customizable

  • The width of the frame is adjustable from a minimum of 25.6" to a maximum of 33.5" to fit most sinks.
  • The two main racks baskets also slide telescope-fashion to match the desired frame width.
  • Hooks, baskets and other attachments are also completely configurable as desired and can be changed quickly and easily without tools.

Extremely Easy to Assemble and Adjust to Your Liking

  • Minimal assembly required. You can fully assemble and customize the rack to your preferences in about 10 minutes!
  • Start by using the included hex key to connect the horizontal bars to the upright posts and use the small wrench to attach the feet. There are also suction cups for the two back feet for added stability.
  • Next, adjust width of the frame by sliding the horizontal bars and turning the knobs to tighten and stabilize the frame at the desired width.
  • Extend or collapse the two main wire shelves (baskets) to match the width of the frame and hook the tabs into the slotted frame posts at your desired height.
  • Attach the accessories wherever you wish by clipping the utensil holder, slotted knife holder, cutting board holder, sponge/soap holder, cup rack and hooks to the frame or the main wire shelf baskets.
  • You can also rearrange them quickly and easily to find the perfect configuration for your needs.

Easy-to-Clean, Rust-Resistant and Scratch-Resistant Stainless Steel

  • This heavy-duty dish rack is made from high-quality grade 304 stainless steel and is rust- and corrosion-resistant. According to the many glowing product reviews on Amazon, it holds up well over time without rusting issues.
    • Per the manufacturer, this unit passed a 24-hour salt test, an excellent predictor of its resistance to rust and corrosion.
  • Since the wire shelves and accessories attach with tabs or hooks, they are easy to remove and replace, as needed, for periodic cleaning, if desired.

Doesn't Obstruct the View

We are lucky enough to live on a pretty, tree-lined street. One of our concerns when we purchased this 3-tier over-the-sink dish drying rack was that it would be an eyesore and block or partially obstruct the view out our large, counter-to-ceiling kitchen windows. As you can see from my photo, even when the rack is loaded up with dishes, bowls, cookware and even a huge, opaque plastic cake storage box, we can still enjoy the view.

Need a Smaller Dish Rack?

If you like the features of the Boosiny stainless steel, 3-tier over sink dish drying rack but prefer something smaller and more affordable that sits on your counter, this manufacturer also makes several excellent 2-tier dish drying racks, including the Boosiny 304 Stainless Steel 2 Tier Large Dish Rack and Drainboard Set with Utensil Holder, Cup Holder and Dish Drainer.

The Best Large, Sturdy, Adjustable, Over-the-Sink Dish Drying Rack Cards by Margaret Schindel


Read More Product Reviews by Our Review This Reviews Contributors

Read More Kitchen Reviews by Our Review This Reviews Contributors


Note: The author may receive a commission from purchases made using links found in this article. “As an Amazon Associate, Ebay (EPN), Esty (Awin), and/or Zazzle Affiliate, I (we) earn from qualifying purchases.”


Tuesday, April 12, 2022

Adorable Amigurumi – Craft Book Review

 A crochet pattern book for Cute and Quirky Crocheted Critters


Adorable Amigurumi Book Cover

Adorable Amigurumi Craft Pattern Book


Serious cuteness in Japanese Amigurumi crochet – the yarn-filled world of “small, crocheted stuffed toys”. This book contains patterns for new characters that are adorable and cuddly.  


Marcel the Monkey, a pattern in the book Adorable Amigurumi
Marcel the Monkey
Craft a Koala Bear or a not-so-fearsome Yeti. Try out a darling dragon or a Dachshund Dog.  Pick a zoo or jungle animal with these patterns for a cute giraffe, a lovable lion or Marcel the Monkey.


Then there are funny characters to crochet, such as a Dust Bunny or Sy Clops.


Dragonfly, a crochet pattern
Dragonfly


A Dragonfly, a Butterfly and a Bug-eyed Ladybug will flit around your child's toy room. 


For fans of sea creatures, Adorable Amigurumi has patterns for Tubs the Whale, Olive Octopus and Cal I.Mari. 


Toucan, a crochet pattern
Toucan


Don't forget Bella la Batty – a fun toy bat, or a colorful Toucan bird.


Author of Adorable Amigurumi


Erin Clark, a crochet crafter since age six, calls herself Voodoo Maggie online. She admits that her crochet crafting at such a young age first only consisted of the chain stitch. In fact, she once chained a whole skein of yarn! (Fellow crochet crafters will understand what this would look like – LOL). 


Eventually she mastered scarves and afghans. These turned out fine for gifts, but soon it became boring to crochet only flat things.  After looking around for something more challenging, Erin discovered the magical world of Amigurumi. The reason she gives for loving Amigurumi so much is because, to her, it's like 'sculpting' with yarn.


After mastering this craft, Erin began to create her own patterns in the style of Amigurumi crochet.  The end result is Adorable Amigurumi ~ filled with patterns of delightful and unique crocheted critters from the imagination of Voodoo Maggie.


Summary


Adorable Amigurumi Crochet Craft Book cover

Adorable Amigurumi Craft Book crochet contains patterns for 18 animals done in the Amigurumi style of crochet. The instructions in the book will walk you through step-by-step directions to make your own creations of these delightfully playful Japanese amigurumi animals. The book is also full of over 300 colorful photos to help guide you.


So, get out your favorite yarns and crochet hooks and pick a pattern to begin your collection of these cute toybox toy stuffies.


*Adorable Amigurumi Crochet Pattern Book reviewed by Wednesday Elf


Note: The author may receive a commission from purchases made using links found in this article. “As an Amazon Associate, Ebay (EPN), Esty (Awin), and/or Zazzle Affiliate, I (we) earn from qualifying purchases.”


Monday, April 11, 2022

Orbit B-hyve Smart Hose Wifi Review

No sprinkler system? Sprinkler system envy this year? If you have to water a large area of land or just regularly water a garden bed then a wifi controlled hose timer may be for you. Newly planted landscaping definitely need attentive watering and a hose timer can be a great time saver to expedite watering.

wifi hose timer

After a large revamp of the garden beds this year it was clear the area needed frequent watering and it was also clear the location of the outdoor water faucets did not correspond with the area needing watering. Many hoses and hose extensions would be required along with constant monitoring and moving of the sprinklers.

I researched quite a few remote controlled or Wifi controlled hose timers in order to expedite the watering of the garden beds. Of course remote controlled hoses do not spare the gardener from moving the hoses! Pro Tip: End the watering by leaving the hose/hose timer in the area that needs the most water, then you can remotely start watering that area the next day.

Orbit B-hyve Smart Hose Wifi

Pros Of The B-Hyve

  • Easy to setup
  • Wifi "hub" is a plug in unit
  • Phone App
  • Easy to water manually via app
  • Available in one, two or four zones
  • Alexa compatible


Cons of The B-Hyve

  • This is not necessarily a con, but the app contains alot of bells and whistles to customize a watering schedule.
  • Wifi "hub" is a plug in unit so if you lose electricity and/Wifi the timer will not work
  • When the remaining battery life is 30% the timer cannot be engaged via app

Recommendation
The B-Hyve Smart Hose Timer has worked flawlessly for this home. The unit has 4.5/5.0  stars with over 4,000 reviews on Amazon and the reviewers were accurate. I chose the one zone unit and never had any issues with its' performance. 
This would be a great gift for the gardener! One of those I always wanted, but have never bought... purchases!


Note: The author may receive a commission from purchases made using links found in this article. “As an Amazon Associate, Ebay (EPN), Esty (Awin), and/or Zazzle Affiliate, I (we) earn from qualifying purchases.”


Sunday, April 10, 2022

How to Fix a Gap at the Bottom of a Door - A Review


Our laundry room door opens to the garage. We recently noticed that time created a gap at the bottom that allowed light, and gawd knows what else to come through!

I did a lot of reading and research to decide which product my husband should use to repair this problem.

Things We Had to Consider:
  • It's a metal door and being a door to the garage, it's a fire door.
  • Products we could DIY
  • However, feel free to double-check and get a professional opinion on the best products to use with a fire door. We're happy with the product we selected.
  • Affordability
  • Easy to install

Information We Needed Before We Decided on the Best Product:

  • The depth and width of the door
  • A close measurement of how big the open gap is at the bottom of the door (between the floor and the door)
  • To choose a fire-rated product
  • Something that was affordable and that we could do ourselves

Allow Me To Save You Some Time:

I researched for hours to find what we thought would be the best product to solve our problem. 

The biggest problem was the endless number of products to choose from!

We chose two products for our exterior door:
  1. U-Shaped Door Bottom with Drip Cap (To fit a 1(3/4)" door width)
  2. Door Draft Stopper for Exterior/Interior Doors - Weather Stripping Door Sweep. Here's the one we purchased from Amazon Canada. Here's a similar product on Amazon USA - It's not the exact same, but very close.

1. The U-Shaped Door Bottom:

This product also comes with a door sweep on it. The benefit for us is that it helped fill in the gap at the bottom of the door. 


It also has a "drip cap." We really didn't need a drip cap since our door is in the garage and not exposed to the elements; however, I preferred the extra coverage the drip cap provided. Plus, it looks nice.

This product slides onto the bottom of the door but needs to be secured with the enclosed screws. You'll need a drill for that.

Our door depth measured 1(3/4)," and the u-shaped door bottom slid on perfectly. 

Our door is 30" wide, and the product comes as one whole piece measuring 36" wide. 

My husband cut the metal piece to fit our door using a Dremel Tool with a cutting disk. Hubby said you could also use a hacksaw. 

His tip is to be sure to measure the width correctly (double-check it) before you begin cutting.

Here's what a Dremel tool looks like:


Here's a close-up of the cutting disks:


2. Door Draft Stopper for Exterior/Interior Doors

This product is pretty easy to put on the door. My hubby's tip is to ensure the door is clean before putting it on. The product sticks on, so it only makes sense that you'll want to have a good clean surface. 

You'll have to cut it to fit your door. 

Here are the easy instructions indicated on the box that came with our product:


Here are a few photos of our actual door - which badly needs painting!


This is the Metal Slide On Door Sweep - View from the Outside of the Door


This is the weather guard on the inside of the door


Note: The author may receive a commission from purchases made using links found in this article. “As an Amazon Associate, Ebay (EPN), Esty (Awin), and/or Zazzle Affiliate, I (we) earn from qualifying purchases.”


Saturday, April 9, 2022

National Unicorn Day – A Holiday Review

 April 9th is National Unicorn Day!


Unicorn standing against a night sky image
On April 9 we celebrate a popular mythical creature loved by children (and many adults, even if they don't admit it).  Why?  Because it's a beautiful creature, and because it is a symbol of happiness, fantasy and wonder.


This icon of color is magical and often makes its appearance on birthday cakes and children's clothing, in books and music and even as plush animals.


Unicorns are horse-like and pictured as white with a single horn. The Rainbow Unicorn is white with a rainbow-colored mane and tail. 


The origin of National Unicorn Day is unknown, but it is enchanting to celebrate these majestic creatures and remember how much more fun life can be when we let a little magic in sometimes.


A Collection of Unicorns


Coloring Book


Unicorn coloring book cover
Unicorns and Rainbows

What could be a more perfect example of the colorful critter called a Unicorn than this coloring book filled with 50 designs for kids ages 4-8.  If you  have a child who loves unicorns, stars and rainbows, this Unicorn Coloring Book is a fun treat.


Unicorn Pajamas


Pajama sleep set with unicorn design
Unicorn Pajamas - a Sweet Sleep Set

Little girls would enjoy taking a unicorn to bed by wearing this sweet sleep set with unicorns prancing all over. This two-piece pajama set will send your little one off to dreamland in style. Available on Amazon.


Plush Toy Unicorn


Toy unicorn in handmade crochet
Plush Toy Unicorn on Etsy


For a baby shower or a new baby gift, this hand-crocheted plush unicorn makes a lovely gift.  A fairy-tale unicorn is excellent décor for the nursery. Soft and cuddly for baby's first toy.  

Toy Plush Unicorn is hand-crocheted with acrylic yarn in white. Lavender yarn is used for the horn, the eyes and as accents on the arms and legs. The mane is done in crocheted spirals in lavender, metallic pink and metallic Royal blue. The tail has these same 3 colors.  Unicorn measures 16 inches tall and 8 inches wide and weighs 14 ounces.

A cuddly & cute stuffed unicorn plushie.

Plush unicorn can be found in the Etsy Shop Coastal Crochet Crafts.


Summary


Image of a colorful unicorn

So gather together a few unicorns, or unicorn lovers, and celebrate National Unicorn Day on April 9.


For more Holiday Reviews on ReviewThisReviews

click on Holidays


*National Unicorn Day Review written by Wednesday Elf


Note: The author may receive a commission from purchases made using links found in this article. “As an Amazon Associate, Ebay (EPN), Esty (Awin), and/or Zazzle Affiliate, I (we) earn from qualifying purchases.”


Friday, April 8, 2022

Cobbler Aprons with Pockets & Snap Front Closure Reviewed

cobbler apron
Anyone who cooks knows the value of a great apron, but you may not be familiar with the snap front cobbler apron.

For as long as I can remember, my mother has preferred the cobbler apron style which resembles a lightweight vest with pockets. Because she has several, all of my siblings and relatives (men included) have been seen sporting one of her fabulous aprons. 

I must confess, I like to wear them to cover my clothing when I am eating spaghetti or soup. Certain meals tend to "find" their way to my blouses regardless of how careful I am.  My mom's cobbler aprons have saved a lot of beautiful blouses and shirts over the years.

Cobbler aprons are easy to slip on and snap closed, plus they have pockets for cell phones, jewelry you may need to slip off while cooking, or recipe cards.  Because they are lightweight, they don't make you hot while cooking and there are no ties that come untied or hinder you when moving around the kitchen.

In the past, the lightweight cobbler aprons my mom prefers, were very hard to find. However, thanks to online shopping, they have become much easier to acquire.

Even though my mom is small, we buy the aprons in the large size which truly allows anyone in our family to wear them when needed. Mom and I have found them to be fabulous when crafting too!


Cobbler Aprons with Pockets & Snap Front Closure

AmeriMark Easy-Care Snap Front Cobbler Aprons Vest with Two Patch PocketsAmeriMark Easy-Care Snap Front Cobbler Aprons Vest with Two Patch PocketsCheck PriceCobbler aprons are available in a variety of fabric patterns that include flowers, animals, birds, butterflies, nautical, holiday, and even abstract art designs are options.

If you have trouble tying apron ties, or keeping them tied, you will love the cobbler apron which simply snaps in the front.

Because they are made of a cotton-blend material, they can be machine washed and dried often.  

Like my mom, the cobbler apron could easily become your favorite apron to grab when working in the kitchen, for light gardening, or crafting. The pockets really do make them more universal in appeal and practical use.


 AmeriMark Easy-Care Snap Front Cobbler Aprons Vest with Two Patch Pockets Black Patchwork LargeCheck Price AmeriMark Easy-Care Snap Front Cobbler Aprons Vest with Two Patch Pockets Hibiscus LargeCheck Price AmeriMark Easy-Care Snap Front Cobbler Aprons Vest with Two Patch Pockets Lilac Fruit LargeCheck Price AmeriMark Easy-Care Snap Front Cobbler Aprons Vest with Two Patch Pockets Teal Cats LargeCheck Price AmeriMark Easy-Care Snap Front Cobbler Aprons Vest with Two Patch Pockets Purple Dogs LargeCheck Price


Read More Product Reviews On
ReviewThisProducts.com


House of Sylvestermouse


Note: The author may receive a commission from purchases made using links found in this article. “As an Amazon Associate, Ebay (EPN), Esty (Awin), and/or Zazzle Affiliate, I (we) earn from qualifying purchases.”


Thursday, April 7, 2022

The Broken Way - Book Review

Hands cupped together and holding seeds
Read an Excerpt

So much of life is paradox.  Like, for instance, how the having is in the giving.  Or, how abundance flows through generosity.  And, as Ann Voskamp models in The Broken Way, how healing emerges from the shattering pain of brokenness.  

Truth be told, we are all broken, yet few of us want our broken laid bare for all the world to see.  Voskamp, with astonishing vulnerability, makes it safe for us by being the one to expose her cut lines, her cracks, and those moments when bad brokenness made way for good brokenness.  

As is especially apparent right now, we live in a broken world.  Yet, it is those things that break our hearts that provide us with the openings needed for a healing that can only come through union with other broken hearts.

In the introduction, Ann asks us this: How do we live with our one broken heart?  This is a book that challenges us to take our time with that question.  What else is time for if not for that?  

Voskamp shares:

Maybe what matters isn't what we want from the time we have to live... but what time wants from us.  There is a time to be broken and given into all the world's brokenness.  

With Easter fast approaching, I cannot think of a better time to reflect on what that means.  

This book came to me when I needed it most and I know there is someone reading this who will feel the same way.  A sure sign of an impactful reading experience, for me, is how much I write while absorbing a book.  I filled an entire journal with notes, insights, reflections, and quotes.  

Ann Voskamp's broken heart met up with mine through her exquisite way with words, her raw honesty, and her immense capacity for communion.

How do we live with our one broken heart?  We live by giving it away.  We live by connecting our broken to another's broken.  

Brokenness is our unity... our common ground... our gift to one another.  


Note: The author may receive a commission from purchases made using links found in this article. “As an Amazon Associate, Ebay (EPN), Esty (Awin), and/or Zazzle Affiliate, I (we) earn from qualifying purchases.”


Wednesday, April 6, 2022

2022 In the Garden ~ A Review

2022 In the Garden will be a time of renewal, rebirth and refreshment of the earth and you! If you ask any gardener they will certainly tell you that time spent in the garden is Time Well Spent.

garden with pink flowers

Whether you choose to garden for beauty or for bounty, one thing is sure, you should start with the best seeds that are available.  I like ordering my seeds from West Coast Seeds.  They supply seeds that are NOT TREATED!  This means that there are no chemicals added to your seed supply,  making it a much healthier choice. They have a wonderful website (https://www.westcoastseeds.comthat is full of fantastic articles to help you become a great ambassador of your part of the earth.  
vegetables

I have been gardening with my family since the early 1960's and that is a long time ago now.  What I learned from my parents was that the earth needs us to be responsible for what happens in the ground around us.  We were composting and tilling the earth with organic matter long before it became chic to do so.  

In the years since then, much has changed in the gardening industry.  Many companies are selling you products that have been Genetically Modified (GMO). These plants are just now coming under scrutiny and producers are being forced to let you know if what you are purchasing is chemically modifiedWith West Cost Seeds you don't have this problem at all.  Everything they sell is grown right and seeds are organic and Non-GMO!  This makes me very happy!  I don't want to grow anything that isn't natural or has been modified genetically.

West Coast Seeds is not only dedicated to helping people become better gardeners, they also want to educate them on what are best practices for sustainability and renewal of the ground.  Their website offers so many learning opportunities.  Articles on sunflowers, growing a garden that is bee and butterfly friendly, to squash pollination and more is all available to you.  You will even find recipes to use for all the produce you get from your gardening efforts.  This website and the company are tops in my books! 


Learn to Grow


I do hope that if you have some questions about gardening that you will take the time to check out West Coast Seeds website.  You will be amazed at the amount of information available to you!  West Coast Seeds will ship all across Canada and the USA!  

The season for gardening and growing has just begun, now is the time to order your seeds and get them started so that your bounty will be overflowing when it comes to harvest time.  

Happy Gardening to all of you!


Note: The author may receive a commission from purchases made using links found in this article. “As an Amazon Associate, Ebay (EPN), Esty (Awin), and/or Zazzle Affiliate, I (we) earn from qualifying purchases.”


Monday, April 4, 2022

Reviewing Two Gardening Planner Visual Aids That Helped Me Get Started

Not counting tomatoes and squash, I have not been a successful gardener. And I would dearly love to have a productive vegetable garden. However, I am especially bad at starting my own seeds. I am also really bad at putting plants out too late in the season. Until this year!  This year I have had the help of two seed-starting guides. Today I am reviewing the Clyde's Garden Planner and my local Extension Service Garden Calendar. I haven't yet transplanted my seedlings outside but already am seeing much better results!


I have never had much success at starting vegetable seeds for gardens. I also have never had much success outside of growing tomatoes and squash. It always caused me to wonder - why could I grow enough tomatoes and squash to feed a small army but nothing else. Over the past couple of seasons I have learned that successful seed starting has to do with two main things; timing related to last frost and growing conditions. Here I am reviewing two things I am depending on this year with seed starting that relates to timing related to frost dates.

My Past Garden Failures - Not Understanding Frost Dates and Growing Seasons

My gardening style had historically been to buy all of the different vegetable plants I wanted, when they are available in the store, and stick them in the ground (or containers when I lived in the apartment) at the same time. Most - if not all - of those plants died.

Because I am a procrastinator, I often planted late in the spring. I now realize that it was warm enough then for the tomatoes and squash to be happy. But the cool weather plants withered away. And the plants that needed a longer growing season never had the length of time they needed to produce their vegetable.

When I did start seeds, I would start tomatoes indoors and they sprouted despite my ineptitude. If I was lucky enough (rather than skilled enough) to place them in a south-facing window, I ended up with excellent tomato plants. Otherwise, I ended up with super tall, super thin plants that died (I know now that this is called "leggy" and it's from lack of adequate light). I found that I could start squash plants outside by putting seeds in the ground by the time I got around to it (very late spring/early summer). But plants such as watermelon, cantaloupe, and pumpkin would grow vines but no vegetable. They didn't have enough time.

I have since learned that vegetable seeds need to be started in related to frost dates. Which means the "last frost date" which is the projected last day in the spring that your area could receive frost and the "first frost date" which is the projected first day in the fall when the temperatures are lowering and frost could appear. 

Last Frost Date and Counting Backward

Somewhere along the way, I learned that seed packets give directions about starting seeds. For example, my Amish Paste Tomato seed packets read "Start indoors 6-10 weeks before last frost."  That's very helpful. 

It is easy to do an internet search for your expected last frost date for that year. This year, mine is May 5th. But then it was a matter of using a calendar and counting back however many weeks for each thing I wanted to plant. I am not an organized type of person and this making lists from calendars and counting back was sheer madness for me.

Then I discovered Clyde's Garden Planner. Absolute relief. 

Clyde's Garden Planter was the best $7 I have ever spent. It is a simple sleeve of super thick card stock folder over, holding another piece of card stock that slides back and forth. You locate your average last frost date in the spring, slide the red line indicating the last frost to that date, and voila! You can easily and quickly see the recommended planting dates (and whether it is to "seed indoors" or "outdoor planting") of 21 different plants!


Easy as that!

I cannot adequately describe how helpful this one little visual tool has been.

More advanced gardeners will appreciate that at each end of the slide there is a wealth of information such as 

  • how many ounces of seeds for a 10' row
  • planting depth
  • distance between rows
  • distance between plants
  • approximate produce yields per 10' row
  • natural plant companions
Finally, turn the card over and you have the chart for summer and fall planting related to the first frost date expected in the fall. 

2022 Garden Calendar - WV Extension Service


The other visual aid that I was thrilled to find just a couple of weeks ago was this wonderful calendar. I received my free copy from a local family-owned nursery.

In this calendar, the pages are full of information about when to plant or harvest plants, reminders for gardening schedules (such as fertilizing, propagating, and watching for garden pests). 

As each area is very different, I will not go into more detail about this calendar. And while I knew that in the United States, we have the Extension Offices that we can contact if we have questions about things such as invasive insects. But I did not know that there was information such as this calendar available. At least at my local Extension Office.

If you are not aware of what your local Extension Office offers, it would be worth giving them a call or checking out their website. 

Related Links:

If you'd like to see a video of my Tomato and Pepper seedlings, click here. I am not an official "YouTuber". I started posting videos to show family and friends my progress on my land. Now that I've moved into my new home I have had a bit more to share and a bit more people interested in looking. 

I previously reviewed The First-Time Gardener Growing Vegetables by Jessica Sowards which has been an extremely helpful and encouraging book about gardening. 


Note: The author may receive a commission from purchases made using links found in this article. “As an Amazon Associate, Ebay (EPN), Esty (Awin), and/or Zazzle Affiliate, I (we) earn from qualifying purchases.”


The Review This Reviews Contributors


SylvestermouseSylvestermouseDawn Rae BDawn Rae BMbgPhotoMbgPhotoBrite-IdeasBrite-IdeasWednesday ElfWednesday ElfOlivia MorrisOlivia MorrisTreasures by BrendaTreasures by BrendaThe Savvy AgeThe Savvy AgeMargaret SchindelMargaret SchindelRaintree AnnieRaintree AnnieLou16Lou16Sam MonacoSam MonacoTracey BoyerTracey BoyerCheryl Paton Cheryl PatonRenaissance WomanRenaissance WomanBarbRadBarbRadBev OwensBev OwensBuckHawkBuckHawkDecorating for EventsDecorating for EventsHeather426Heather426Coletta TeskeColetta TeskeMissMerFaeryMissMerFaeryMickie_GMickie_G


Review This Reviews is Dedicated to the Memory of Our Beloved Friend and Fellow Contributor

Susan DeppnerSusan Deppner

We may be apart, but
You Are Not Forgotten


“As an Amazon Associate, Ebay (EPN) and or Etsy (Awin) Affiliate, I (we) earn from purchases.” Disclosure Statement

X