Showing posts with label Food Review. Show all posts

Tuesday, November 17, 2020

Keto Cheddar Cheese Biscuits Recipe With Chives

Today, I'm pleased to share my review of my quick and easy low carb cheddar cheese and chive biscuits recipe, whose not-so-secret ingredient is HighKey Keto Buttermilk Biscuit Mix.

I've enjoyed putting my own spin on my baked goods ever since I was a kid, whether I'm making them from scratch or using a high quality packaged mix as a shortcut. So, when HighKey Snacks, one of my favorite keto food brands, came out with a delicious keto-friendly buttermilk biscuit baking mix, I couldn’t wait to start playing around with my own ingredient add-ins. One of my favorite variations so far is this quick and easy, 5-ingredient recipe for keto cheddar cheese buttermilk biscuits with chives. They're so buttery and delicious, everyone in your family will ask for more, and they'll never guess these treats are keto-friendly. This is now one of my go-to low carb recipes, and I usually bake a dozen every two or three weeks, depending on whether my omnivorous husband is in the mood for some.

Keto & Low Carb Cheddar-Chive Buttermilk Biscuits
Tender, flavorful, cheddar cheese keto biscuits with chives, ready in 30 minutes or less

Enjoy Big, Buttery Drop Biscuits, Even on a Keto or Low Carb Diet

I have tried—and loved—every baking mix in HighKey’s keto-friendly, low carb product line. So, I was really excited when the company announced it was coming out with a new keto buttermilk biscuit mix. I was confident that it, too, would be a winner, and I wasn’t disappointed! 

Since making a traditional flaky biscuit requires using wheat flour or other another grain, the texture of those made with HighKey’s buttermilk biscuit baking mix makes them more similar to traditional drop biscuits. Just add eggs, They’re extremely versatile and taste great, whether you eat them plain, toasted and buttered, or in sweet or savory dishes, from keto strawberry shortcake (with fresh berries and whipped cream) to sweet or savory low carb sandwiches.

Even though this biscuit mix has great buttermilk flavor, I was surprised to learn that it contains no buttermilk. In fact, it’s dairy free and soy free, and has no added sugar or artificial ingredients, so it’s a great option for people with those dietary restrictions, regardless of whether they’re following a ketogenic or low carb diet.

Two baking pans of freshly baked keto cheddar-chive biscuits
Tender, low carb, keto-friendly cheddar cheese biscuits with chives, just out of the oven

My Quick and Easy Keto Cheddar Cheese and Chive Biscuits Variation

Using HighKey Buttermilk Biscuit Baking Mix

Variety is the spice of life, especially when your food choices aren’t free of limitations. Both my husband and I are huge fans of cheddar cheese bread. These days, however, the yummy, carbohydrate-laden cheese bread we used to buy from our local bakery is now off-limits (for me, at least). My husband also loves chives. So, one of the first ideas I had for varying the original HighKey buttermilk biscuit mix recipe was to add sharp cheddar cheese and chives. 

I had to experiment with the proportions bit to get the prominent cheddar flavor I was looking for. Increasing the amount of cheese also made the biscuits somewhat less crumbly, which means I can also use them as hamburger buns. And, while I love having a slice of hot, gooey, melted cheese on my burgers, using these cheddar-chive keto biscuits as a bun gives me that great cheeseburger flavor even if I don’t add any additional cheese. 

I usually prefer to use fresh chives in my dishes. For this recipe, however, I decided to go with freeze-dried chives, since I would need only a small quantity, and I no longer eat mashed potatoes (which I always make with plenty of fresh chives) now that I follow a ketogenic diet. Fortunately, freeze-dried chives work fine for these cheddar cheese biscuits.

One of My Favorite Keto Bread Options

With or without chives, these cheddar cheese biscuits are not only delicious but also versatile. Even though they are moist, rich, and yummy just as is, I also I love using them to add extra flavor to a sandwich or burger, as a filling side dish to turn a soup or salad into a satisfying, high-protein, low carb meal, or just sliced, toasted, and buttered for breakfast (or a hearty snack).  

Just be aware that you may want your burger with a knife and fork if you serve it in one of these tender biscuits.
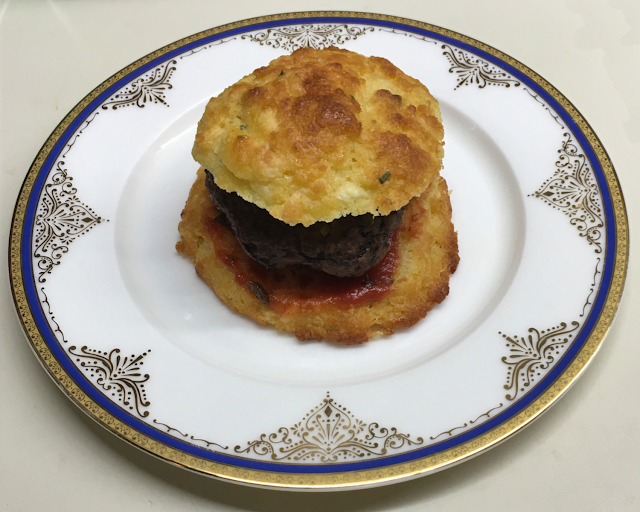
Hamburger on a keto cheddar cheese biscuit
Last night's dinner: this juicy burger on a keto cheddar-chive biscuit,
served with a big, colorful, pretty and nutritious salad

Low Carb Keto Cheddar Cheese and Chive Buttermilk Biscuits Recipe 

These quick and easy keto biscuits are sure to become one of your favorite low carb recipes.

Keto cheddar-chive biscuit
Prep Time:

15 minutes

Cook Time:

15 minutes

Total Time:

30 minutes

Recipe Yield:

12 large biscuits

Calories:

257 kcal


Ingredients

  • 1 10-ounce package HighKey Buttermilk Biscuit Mix
  • 1 ounce sharp or extra-sharp cheddar cheese, shredded 
  • 1 to 2 tablespoons freeze-dried chives, or to taste
  • ½ cup butter, very well chilled and cut into ¼-inch cubes
  • 4 large eggs, lightly beaten

Instructions

  1. Preheat the oven to 375 ℉. Line one or two baking sheets with parchment paper. 
  2. In a large mixing bowl, stir together the baking mix, shredded cheese, and chives.
  3. Stir in the chilled butter cubes, then cut in the butter with a pastry blender until it resembles coarse crumbs. 
  4. Stir in the eggs to form a soft, sticky dough.
  5. Scoop the dough onto the parchment-lined baking sheet(s) in 12 equal mounds, spacing them well apart to allow for spreading.
  6. Bake for 14–15 minutes, until the tops and edges of the biscuits are a light golden brown.
  7. Let them cool for a minute or two, then remove them to a cooling rack to cool completely.

Screenshot of recipe nutrition information in Carb Manager app on iPhone screen
Nutrition Facts

If you're on a keto diet and counting your macros, here's what the Carb Manager app calculated. Although it's based on the specific brand of extra-sharp aged cheddar cheese (and eggs and butter) I used, the calories and macros should be very similar, regardless of the brands of ingredients you use.

These big, delicious cheese biscuits are extremely filling. Each contains 2.6 net carbs, 257 calories, and just over 23 grams of fat, 9 grams of protein, and 6 grams of dietary fiber. 


Helpful Baking Tips for Making Keto Cheddar and Chive Buttermilk Biscuits


Make the Entire Package of HighKey Buttermilk Biscuit Mix at a Time (and Freeze Any Extra Biscuits)

The first time I prepared a bag of HighKey Buttermilk Biscuit Mix, I measured out 1-1/3 cups of the dry mix and combined it with 1/4 cup of butter and two eggs to make 6 biscuits as directed on the package. Unfortunately, when I started making my next batch, I discovered that there was only about a cup of leftover dry mix in the package! Subsequently, I have seen comments on Facebook and Amazon from people who had the same experience after following the package directions. Now, I always make a dozen buttermilk biscuits at a time, using the entire bag of mix. Fortunately, like most baked goods, these biscuits freeze beautifully, and thaw quickly at room temperature.

Use a Pastry Blender to Cut in the Butter

When I was a girl, my grandmother taught me to cut fat into dry ingredients by scissoring it into the flour mixture with two sharp knives. That experience definitely has made me appreciate the ease and efficiency of using a pastry blender instead. In addition, this handy tool, also called a pastry cutter or dough blender, creates more uniform bits of butter for more even distribution throughout the dough. It's also possible to use a fork, but that tends to mash the butter into the flour, rather than chopping it into nice little individual flour-coated bits. So, although the HighKey Buttermilk Biscuit Mix package directions give you the choice of using a pastry cutter or a fork, I strongly recommend using the former.
Spring Chef Dough Blender
Spring Chef Dough Blender on Amazon

I recently replaced my dull, 40-year-old pastry blender with a Spring Chef Dough Blender, and it turned out to be a major upgrade! It has sturdier and much sharper stainless steel blades, as well as a wide, comfortable, soft-grip handle. Both these features make it a pleasure to use, especially since this high quality, heavy-duty cutter doesn't feel heavy in my hand. In addition to cutting butter or other fat into dry ingredients, I also love using it for other cooking and baking tasks that my previous pastry blender would not have been up to, such as chopping nuts and making salsa and guacamole.

Use a #14 Scoop to Portion the Dough Evenly

Dividing any dough or batter evenly into equal-size portions is always desirable, since it enables all the biscuits, cookies, etc., to finish baking at the same time with the same degree of doneness. If you are baking for yourself or others who are monitoring their food intake, whether tracking macros on a low carb or keto diet or counting calories, protein, fat, carbohydrates, fiber, cholesterol, sodium, potassium, or other nutrients for a medical, health, or weight loss reason, portioning equal servings of a recipe becomes even more important. Over time, I have assembled a collection of high quality Norpro stainless steel scoops in several different sizes, the largest of which is the 4-tablespoon (#16) Norpro scoop with a comfortable, soft-grip handle, none had the right capacity to measure out 1/12 portions of this keto buttermilk biscuit dough, with or without added cheese. Guesstimating how much to overfill  the #16 size always left me with too much or two little dough for the last few portions, and I was spending more time weighing each mound and shuffling around bits of dough to equalize the portion sizes than I did preparing it in the first place.

Eventually, I managed to find a #14 stainless steel scoop with a capacity of 4-3/4 tablespoons, which turned out to be the perfect size for portioning this keto biscuit dough into twelfths. It's a huge time-saver, makes nice, rounded mounds, and has a sturdy spring-action mechanism for the scraper blade.

Don't Skip the Baking Parchment Paper

These drop biscuits will likely stick, and stick badly, to the baking pan if you try to grease it instead of using baking parchment. I prefer using unbleached, precut sheets of parchment paper, which are less toxic than bleached baking parchment and don't curl like paper sold in rolls. If you are trying to cut down on single-use disposable products, a reusable silicone nonstick baking mat is a great alternative.

Consider Making Them With Extra-Sharp Cheddar 

The first time I made these, I used regular sharp cheddar, and only half an ounce. (I also left out the chives.) They tasted good, but weren't as cheesy or tangy as I had hoped. So, for the next batch, I not only doubled the amount of cheese, and used aged, extra-sharp cheddar. It made a huge difference! So, if you enjoy the taste of extra-sharp cheddar, I encourage you to try using it in these biscuits.

My Favorite Brands of High Quality, Low Carb and Keto Baking Mix Products

One of the keys to my successful keto diet journey, which helped me lose nearly 60 pounds and, more importantly, has enabled me to maintain that weight loss, has been finding keto-friendly versions of my favorite baked goods. 

Although I’ve always loved to bake (and still do), I also wanted to spend less time thinking about food, which meant spending less time cooking and baking, especially during the first six months of my new, healthy eating lifestyle after switching to a ketogenic diet. So, while I absolutely love using the recipes in Carolyn Ketchum’s The Ultimate Guide to Keto Baking (my keto baking bible) and my go-to low carb and keto blogs and websites, more often than not I’ve been using the excellent baking mixes from HighKey Snacks, Good Dee’s, and Keto and Co, which not only taste great but are also made with wholesome (and, for the most part, minimally processed) ingredients. You can learn more about these brands’ high-quality baking mixes in my review of homemade low carb keto cupcakes and muffins.


Keto Cheddar Cheese Buttermilk Biscuits Recipe With Chives by Margaret Schindel

Posts About My Keto Diet Journey

My First Year on The Keto Diet

Preparing to Succeed on the Keto Diet, Part One

Preparing to Succeed on the Keto Diet, Part Two

Low Carb Muffins & Cupcakes: Treats to Enjoy on a Keto Diet

Low Carb Keto Chocolate Yogurt Granola Chip Pudding Recipe

Good Dee’s Keto Cookie Low Carb Baking Mix Review

Hamama Microgreens Growing Kit Review & Success Tips

My Favorite Hamama Microgreens Seed Quilt Accessories

Keto Cheddar Cheese Biscuits With Chives Recipe

The Ultimate Keto Hot Chocolate Recipe

The Best Low Carb Keto Gift Ideas: Keto Gift Guide

The Best Low Carb Keto Cinnamon Muffins

Wholesome Yum Keto Bread Mix and Yeast Bread Recipe

The Good Chocolate 100% Organic No Sugar Dark Chocolate Review

The Best Advice to Maintain Your Keto Diet Weight Loss

My New Irresistibly Delicious Keto Cheese Crackers Recipe

Luscious Low Carb Keto Triple Peppermint Cheesecake Brownies Recipe

Quick & Easy Livlo Blueberry Scones Keto Baking Mix Review

Snack Better With The Best Healthy Keto Cookie Dough Bites

The Best Quick and Easy Low Carb Keto Pizza Recipe

The Best Quick and Easy Low Carb Keto Shortcake Cupcakes Recipe

Comparing the Best Keto-Friendly Chocolate Hazelnut Spreads - No Added Sugars

The Best Low Carb Keto Sandwich and Burger Buns Mix

Blueberry Biscuit Scones — New, Easy, Low Carb Keto Recipe

The Best Keto Pizza Crust Mix With 0 Net Carbs

An Unusual, Delicious Strawberry Chocolate Tea With 0 Calories

Delicious Sugar-Free Keto Cookies That OREO Fans Will Love

Healthy Pistachio Cherry Chocolate Chip Marshmallow Cereal Treats Recipe

Easy, Decadent, High Protein, Sugar-Free Rocky Road Cottage Cheese Ice Cream

The Best Quick & Easy Low Carb Sausage and Ricotta Calzones

How to Make Refreshing Vanilla Italian Soda (With or Without Cream)


Reviews of the Keto Diet by Barbara C. (aka Brite-Ideas)

My Personal Keto Testimonial

How I Stayed Committed to the Ketogenic Way of Eating

Read More Recipe Reviews by Our Review This Reviews Contributors

Read More Product Reviews by Our Review This Reviews Contributors

Read More Reviews About Health and Wellness by Our Review This Reviews Contributors


Note: The author may receive a commission from purchases made using links found in this article. “As an Amazon Associate, Ebay (EPN) and/or Esty (Awin) Affiliate, I (we) earn from qualifying purchases.”


Monday, February 24, 2020

Celebrate Paczki Day!

Fat Tuesday is also known as Paczki Day in Detroit! You may be wondering what a paczki is and the second most popular question is, "How do you pronounce paczki?" Both questions will be answered as we learn and review the traditional and delicious packzi!

Paczki Day


Hamtramck And Paczki

In Southeast Michigan and probably throughout Michigan, Hamtramck and Paczki are synonymous.
When preparing for Fat Tuesday people drive many miles to Hamtramck for the traditional Polish Paczki! Fans stand in line at the bakeries early Tuesday morning to pick up their order of this delicious pastry.

Hamtramck Michigan is known as "The World In Two Square Miles" and the city "within the city " of Detroit. Hamtramck became a destination for  Polish immigrants when an auto plant was opened by the Dodge Brothers in 1914.

The city boundaries are literally within the city of Detroit. In 1970 ninety percent of the population was Polish. Through the years the demographics of the city have changed and Hamtramck is a multi cultural city which continues to celebrate the traditions of Poland. And Paczkis of course!

What Is a Paczki?

Paczki are filled pastries that resemble a  traditional American filled doughnut, but that is where the similarities end for true aficionados. I am not one to turn down any type of doughnut, but paczki are deliciously unique and different.

Supermarket versions of paczki are usually like door stoppers = not a paczek! The inside should be  light and fluffy and the outside is crispy and topped with sugar.  Traditional flavors of paczki are: PowidÅ‚a (plum jam) and wild rose petal jam; but the more popular fillings are custard, lemon, strawberry, blueberry, raspberry, and apple. My personal favorite is Bavarian cream!

How Do You Say Paczki?

Poonch-kee !

What Is the Difference Between Paczki and Paczek?

A single pastry is a Paczek - Poon-check!
Many pastries are Paczki - Poonch-kee!

Paczki festivities in Hamtramck celebrate all week long including what has become a pre Fat Tuesday event the Paczki Run.
Paczki in a box


The Paczki Run


Prior to Fat Tuesday, Tour de Troit holds its' annual Paczki Run which is a 5k race highlighting the sights of Hamtramck. Traditional post race refreshments are a little different for the Paczki Run. Let's keep in mind this is a winter run in Michigan so Paczki participants are hardy braving snow, ice and wildly varying weather conditions.

Post race includes Polish music, dancers and  "paczek from New Martha Washington Bakery & New Palace Bakery and a beer from Motor City Brewing Works are served to each finisher! Na Zdrowie! "


If you are a fan of pastries and doughnuts I highly recommend the Paczki (because noone can eat just one!)

More Michigan Travel


It's not St. Patrick's Day without the traditional Wigley's Corned Beef.  Head over to Eastern Market to ensure you have the best! corned beef for St. Paddy's. 


Note: The author may receive a commission from purchases made using links found in this article. “As an Amazon Associate, Ebay (EPN) and/or Esty (Awin) Affiliate, I (we) earn from qualifying purchases.”


Saturday, January 11, 2020

Did You Know That January is Hot Tea Month?

I thought I'd review our love of tea here on Review This Reviews and also share with you the teas I enjoy during my day.

Enjoying a cup of hot tea as January is hot tea month
The tea pictured is Arbonne's Detox Tea, click this link to purchase.

The authors on this site do seem to enjoy their hot tea and you can check out Cynthia's hot tea article to learn more about the different types of tea available.

I used to enjoy several mugs of black tea a day and an occasional green tea, but these days I enjoy herbal teas - which tea lovers will (correctly) say aren't actually teas, but herbal infusions.

Which teas do you prefer to drink?   I would love to know in the comments.

My Daily Teas - Whatever Month of the Year it is!


I start every day with a mug of Arbonne detox tea which I absolutely love.

If I'm meeting a friend during the day I will choose peppermint tea as my drink of choice as it's available at most cafes these days.

I used to have peppermint tea every afternoon, but these days I only drink it occasionally as January in Queensland, Australia (where I live) is pretty hot so I tend to drink a fizz stick instead.  Sometimes I do feel like a hot drink and I will switch between my usual peppermint or a Twining's Spearmint and Peppermint tea..

Other teas I may have are from Arbonne's holiday tea range (I'll probably enjoy them more in our winter months though).

At night I enjoy Twining's Chamomile, Honey & Vanilla tea.   You may have noticed that I am partial to Twining's teas, my husband even brought me a couple of their cold infuse teas to try, but this is hot tea month so we'll talk about them on another article.

More Tea Please!


Let's have a look at what some of the teas our other Review This contributors enjoy:

Cynthia reviews Aveda Comforting Tea which sounds absolutely delicious.
Barb enjoys Lifestyle Awareness teas and reviews a couple of them for us - Immunity Now & Serene Slumber.

Of course you also need to be able to make tea which brings us to Barb's Tea Kettle review.

I have written a review on gift ideas for tea lovers which enjoys some gorgeous tea pots and fun tea infusers, check that out here - Best Gifts for Tea Lovers.

So if you're not a tea drinker already, why not try a few different ones this January in honour of Hot Tea Month?   If you do (and I hope you do) then be sure to come back and let us know what ones you've enjoyed.

Of course there's one thing any cup of tea is good with and that's a great book!


Note: The author may receive a commission from purchases made using links found in this article. “As an Amazon Associate, Ebay (EPN) and/or Esty (Awin) Affiliate, I (we) earn from qualifying purchases.”


Wednesday, December 18, 2019

How to Prep and Store Organic Raspberries to Keep Them Fresh Longer

For the past year or more, I've been on a quest to find a way to prolong the time I can refrigerate fresh raspberries before they go bad. A few weeks ago, after extensive research and numerous failed experiments, I finally succeeded! In this review, I’ll share the preparation and storage method I developed that allows me to store fresh berries in the refrigerator successfully for days longer than any other method I tried.
The Secrets to Keeping Organic Raspberries Fresh Up to 2X Longer
The method I developed for prolonging the storage of ultra-perishable organic raspberries
was a labor of love that took more than a year of research and experimenting!

Organic Raspberries Are Extremely Perishable

Fresh berries are one of nature’s most delicious treats. Unfortunately, they don’t keep long in the refrigerator, especially the ones that you buy in a store rather than from a local farm stand. I try to buy mostly organic produce these days, and organic berries have even shorter lifespans than their conventionally grown counterparts. In fact, during the winter, many of the organic raspberries we get here in Boston are imported from Mexico, and after such a long journey, they rarely last more than a day, if that! That’s a waste of both food and money.

I adore organic raspberries and started eating them every week when I switched to a very low carb / keto lifestyle. That's when my search to find a way to prolong their edible life became a much higher priority.

My extensive online research produced lots of information and advice from reliable sources. Unfortunately, much of it was conflicting. Most sources advised not rinsing fresh raspberries until just before eating them. Some suggested soaking the berries in a vinegar and water solution immediately after buying them, then rinsing, drying and storing them. I remembered and looked up a 2015 article by my friend Grace who, after doing her own online research, developed a similar method for prepping and storing most types of produce that includes a 10-minute soak in a saltwater solution, followed by a 10-minute soak in a vinegar-water bath.

I tried them all. Many, many berries were sacrificed on the alter of my research! Unfortunately, none of the methods I tried succeeded in extending the storage life of my beloved organic raspberries. Nonetheless, I was determined to find a solution that would keep them going bad within a day or two of bringing them home.

Through Trial and Error, I Eventually Worked Out My Own Method for Storing Organic Raspberries Successfully for Several Extra Days

Undaunted (well, sort of), I started combining various aspects of some of the prior experiments. After each new experiment, I analyzed the results and tweaked the process for the next attempt. After a few more months, my stubbornness persistence finally paid off!

The prep work needs to start the minute the raspberries are brought home. After discarding any mushy ones, any remaining berries that have softened a bit are set aside to be eaten the same day. The rest get a brief saltwater bath, followed by a brief vinegar and water bath. The berries stay in each solutions for only 2-3 minutes, a much briefer soak than in any of the other methods I tested.

Next, they are rinsed, drained, and sorted further based on their firmness. Then they are set on a paper towel-covered cooling rack(s) for several hours to dry out thoroughly. As far as I know, mine is the first method to use this multi-hour drying time - an idea that turned out to be a game-changer in my experiments!

The storage method turned out to be as important as the prep process. Lining my storage container with two to three layers of paper towel was a step in the right direction, but not enough to slow down the berries' deterioration significantly.

The last piece of the puzzle fell into place when I stopped layering the berries between paper towels in a sealed storage container before refrigerating them. After another series of experiments and tweaks, eventually I was able to prolong the storage time by another 1-2 days by switching to a large, shallow storage container and storing the berries face down in a single layer, spaced apart so they didn't touch, and letting the lid rest on top of the container instead of sealing it.

Now My Organic Raspberries Remain Good for 5 or 6 Days!

Since I don't drive and I need to ask my husband to replenish my supply each week, my goal was to be able to have him buy me two 6-ounce containers of organic raspberries and keep them fresh for three to four days in the refrigerator. But once I started to make significant progress with my experiments, I raised my sights on a more ambitious goal.

Once I started experimenting with significantly longer drying times, my results improved dramatically! Obviously, how long fresh berries will keep depends on their condition when they are purchased. (Don't you hate not being able to see the berries at the bottom of the container, which are the most likely to be damaged or moldy, because they're hidden by the absorbent pad?)

After another month or two of trial-and-error, I finally achieved my new "stretch" goal: figuring out a way to prep and store three 6-oz. containers (18 ounces) of organic fresh raspberries so they stay fresh for 5 days. In fact, when I've been able to get a container of berries that are very fresh, firm, and unbruised, I've been able to prep them, store them in the refrigerator, and enjoy them for as long as 6 days!

A discovery like this is too good not to share. So, if you want to try my method for yourself, read on.

How to Prep and Store Organic Raspberries So They Stay Fresh Longer: Step-by-Step Instructions

Step 1: Gather your tools and supplies.

Supplies for prepping fresh raspberries for storage
Some of the supplies for prepping organic raspberries
to help them last up to 5 days (or even longer) in the refrigerator

Here's what you'll need:
  • Fresh organic raspberries (or any other type of berry, organic or conventionally grown)
  • A small bowl
  • A medium-to-large mixing bowl
  • A large slotted spoon
  • Water
  • Table salt or sea salt
  • A timer (after trying out many different brands and models, this accurate, easy-to-use, dual kitchen timer is definitely my favorite, thanks to the intuitive buttons, a large, easy-to-read display, and a ring loud enough to be heard from another room!)
  • Easy access to the kitchen sink (preferably with a sprayer-type faucet)
  • A roll of paper towels, preferably with closer perforation lines (like these Bounty Quick-Size Paper Towels) that let you tear off only the length you need
  • Shallow food storage containers with lids - one large and one medium sized
  • Optional: Paper clips
  • Optional: FreshPaper Food Saver Sheets
*Heinz All-Natural Distilled White Vinegar is one of the few white vinegars that aren't made with petroleum (yuck!). It's made from grain, which could be GMO, of course, but since it's a choice of that or a petroleum-based product, I'll stick with the former. Since I use a significant amount of it for prepping my raspberries, making my sugar-free pickling brine for my refrigerator pickles, and diluting it 50/50 with water to make a non-toxic kitchen surface cleaner/degreaser spray, I sometimes buy it in the large, 1.32-gallon economy size jug.

Step 2: Pick through the berries.

Carefully transfer them from their containers and spread them out in a single layer.

Pick through the berries, throwing out any that were damaged and setting aside any that need to be eaten that day rather than stored.

Then gently place the remaining berries in the small bowl.

Step 3: Soak them briefly in heavily salted water and rinse.

Fill the mixing bowl partway with enough water to just cover the berries. (You'll quickly learn eyeball the amount of water based on the volume of berries you're prepping.) Add about 3 tablespoons of table salt or sea salt and stir to dissolve.
Mixing the saltwater bath for the berries
Preparing the saltwater bath for the berries

Set the timer for 2 minutes, but don't start it yet. Adjust the "arms" of the colander so it rests on the edges of the sink. (Alternatively, place a traditional, small-holed colander over another mixing bowl, resting it on the lip of the bowl to elevate it for better drainage.)

Hold the bowl of raspberries just above the surface of the liquid in the mixing bowl, then tip them into the salty water. Start the timer.

Give them a brief, gentle stir so all sides of every berry come into contact with the saltwater solution, then stir them gently again after a minute.

As soon as the timer alarm goes off, use the large slotted spoon to lift the berries out of the water and place them into the over-the-sink colander so they are spread out over the entire surface of the colander. (Try to avoid piling the berries on top of each other, which can bruise the ones underneath.)

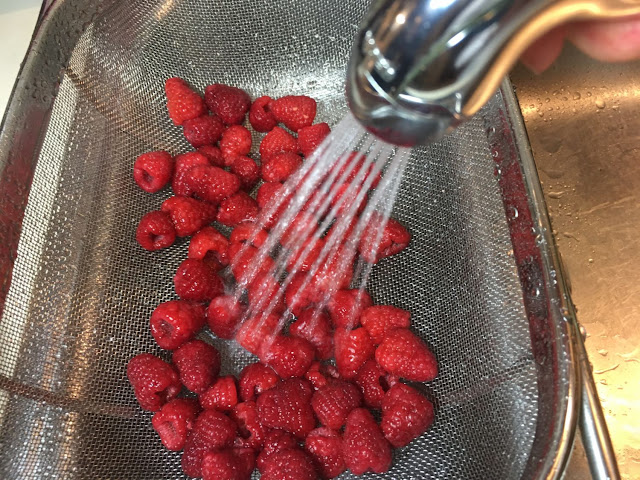
Run the cold water faucet and use the sprayer to quickly and gently rinse the berries in the colander. Leave them to drain while you empty and rinse the mixing bowl.

Gently rinsing the berries after the saltwater bath
Keep the water pressure gentle to avoid bruising the berries!

Tip: The less you handle the berries and the more gently you treat them, the longer they'll keep!

Step 4: Repeat, using a vinegar and water solution this time.

Refill the mixing bowl to the same level as before, this time substituting a mixture of roughly 3 parts cold water to 1 part all-natural white vinegar. (As an example, to make 2 cups of the vinegar solution, you would mix 1-1/2 cups of water with 1/2 cup of all-natural white vinegar.)

Gently tip the rinsed and drained raspberries from the colander into the vinegar solution in the bowl, then give them a gentle swish, soak, rinse and drain as you did in Step 3.

Gently spread them out on a double thickness of paper towels to absorb more of the water, turning them so the holes face down so any remaining water inside the berries can drain.

Step 5: Sort the raspberries according to firmness and let them dry for at least 3-4 hours (even overnight, if necessary).

Line the gridded baking rack(s) with three layers of paper toweling. Transfer the berries to the racks, one at a time, keeping them face-down and spacing them slightly apart so they don't touch their neighbors. Sort the berries into two groups as you do this, placing the firmest berries to one side of the rack (or on a different rack) and the softer berries to the other side.

Spreading out the berries in a single layer without touching on several sheets of paper towel
Leave the raspberries on the rack until they are firm and the surface is very dry

Set the racks on the counter and set the timer for 1 hour. When it rings, use the lightest touch and the least amount of pressure possible to slowly and gently roll each berry onto its side and separate it from the paper towel, then return it to the rack. (If you don't do this, or if you wait too long, the berries can stick to the paper towel as they dry, making it difficult to remove them without rupturing the surface at the sticking point. Voice of experience here, lol!) After you roll and lift off each berry, check for any leaked juice stains and, if necessary, move it to another spot where the paper towel is clean and dry.

Leave the racks out on the counter for at least 3 to 4 hours, preferably longer, until the surface of the berries has dried out a bit and they feel firmer than they were prior to their brief saltwater and vinegar solution baths.

Letting the surface of the berries dry out enough before refrigerating them is key to extending their storage time. I've even left them out overnight a couple of times, when they hadn't firmed up sufficiently after 4 hours on the paper towel-topped racks.

Step 6: Prep the storage containers and refrigerate the berries.

Rasbperries in paper towel lined storage containers, in a single layer without touching each other
The raspberries in the measuring cup were set aside to eat that night.
The ones in the containers are prepped and ready to be stored in the fridge.

Line both food storage containers with a double or triple thickness of paper towel, folding it neatly at the corners so the bottom to create a paper "tray" that fits perfectly flush against the sides and bottom of the container's interior. Holding four corner folds in place with paperclips helps keep the bottom of this liner flat and the sides at a 90-degree angle, which prevents that berries placed along the edges from tipping over and rolling toward the center.

When the berries have dried out sufficiently on the surface and are firmer to the touch than when you brought them home, place the less firm berries into the medium-size container, face down and spaced slightly apart. Then repeat with the remaining berries and the larger container.

Place the filled containers in the refrigerator, then lay the lids lightly on top of them and slightly askew, keeping the berries exposed to a small amount of air during their cold storage to help maintain their firmness. For the same reason, don't place anything on top of the lids.

Raspberries in storage containers with lids askew
Prepped raspberries in food storage containers with their lids askew
so the air can continue to circulate throughout the cold storage period 

Note: Moisture is raspberries' sworn enemy. So, before I made my multi-hour surface drying and unsealed lid breakthrough discoveries, I used to place a FreshPaper Food Saver Sheet inside each storage container before sealing the lids. Although the packaging says they can be reused for up to 2 weeks before tossing them, I found that the FreshPaper sheets absorbed so much moisture inside the sealed containers that I had to take them out and let them dry every other day. Now, I use them only when I get a container of out-of-season berries that are too soft to firm up even after leaving them out to dry overnight (although in that situation, being able to store them successfully for more than a day or two is unlikely). If you'd like too try a package, I got mine as part of a Whole Foods Market grocery delivery via Prime Now, a local shopping service that's free for Amazon Prime members.

Step 7: Enjoy the Raspberries

When you're ready for some fresh berries, simply remove as many as you want from the container and dig in. No need to rinse them again - they're ready-to-eat!

Bowl of fresh organic raspberries after 6 days of refrigerator storage
Store-bought, organic raspberries - still tasty (and not mushy)
even after they were stored in the refrigerator for 6 days!

Before you return the uneaten berries to the fridge, check that they are still standing up and spaced apart inside the storage container, then place the lid lightly on top.

Remember to eat the berries in the medium-sized storage container first, before starting in on the large container last.

Future Experiments

Over time, I've been swapping more and more single-use, disposable paper and plastic products for more eco-friendly, reusable alternatives. So, while this method works remarkably well for me, I'm troubled by how many paper towels it requires.

I could (and eventually might) substitute a dedicated set of cloth dish towels for draining and drying out the berries and cutting some to size for lining the storage containers. But since our bathroom towel racks are filled with towels and we have nowhere else to hang hand-laundered items to dry, hand-washing a bunch of berry-stained towels once or twice a week isn't in the cards. I'd be concerned about throwing the berry-stained towels into the washing machine with a regular laundry load because the dried berry juice might tint the water pink and ruin everything else in the washer. Running the machine with just the towels would be a waste of water and electricity.

I tried drying the berries directly on cooling racks with a grid design, but the openings were too large and many of the berries fell through.

I'm still hoping to come up with a way to reduce or eliminate paper towels from my process. At some point, I want to buy a couple of largish sheets of food-grade, stainless steel mesh and fold the edges down to make a drying tray. If I can figure out the right mesh to let the raspberries dry out over a period of hours without sticking to the metal, that might be a good solution.


How to Prep and Store Organic Raspberries to Keep Them Fresh Longer reviewed by
Margaret Schindel


Note: The author may receive a commission from purchases made using links found in this article. “As an Amazon Associate, Ebay (EPN) and/or Esty (Awin) Affiliate, I (we) earn from qualifying purchases.”


Saturday, October 26, 2019

Restaurant Review of Go Fish Marina Bar and Grill

A collage of views from the Go Fish marina Bar and Grill in Iowa

On the banks of the Mississippi River in Princeton, Iowa sits a delightful and delicious restaurant called Go Fish Marina Restaurant and Bar. Or simply “Go Fish” as the locals call it. 


The Go Fish restaurant in Princeton, Iowa

Go Fish is built up on stilts like a lot of coastal property due to flooding. It has a good size indoor seating area, a bar, and a lovely outdoor deck.  The deck has tables with umbrellas and a covered Cabana. The restaurant bar also opens to the outside deck. 


The outside deck overlooking the Mississippi River at Go Fish restaurant in Princeton,  Iowa

On warm days, the outside deck is an especially delightful place to eat ~ the food is very good and the scenery is charming.  Last week my son & I had a birthday lunch there. The sun was shining, the sky nearly cloudless, the temperature a warm Fall day, and the river mesmerizing to watch. A very pleasant and peaceful place to eat. 


Go Fish Menu


The Menu at Go Fish Restaurant
The menu has a wide variety of options with many items made from scratch with fresh and local ingredients. The dishes range from chicken to steak to seafood, and from pork chops to burgers.  

The Go Fish Cowboy Burger is a filling treat. It's a half-pound of flame-grilled Black Angus Iowa Beef topped with pepperjack cheese, crispy bacon, sauteed mushrooms and onions. 

The pork chops are wonderful. They are the Iowa Pork Chops our area is known for. I've never had better pork anywhere – not just that served in restaurants, but any you buy at the grocery stores. Iowa pork is terrific!  

On this particular day, I had the batter fried fish & chips and they were delicious. Their 'chips' (french fries) are listed as Crispy Battered Fries and they were outstanding! The fish consisted of two good sized Haddock filets and the batter was fantastic. Served with cole slaw, the fish & chips was a very tasty dish for sure. 

Oh, did I mention the desserts? Homemade ice cream and Key Lime Pie.

Check out the Go Fish Website here for more culinary delights. 


Go Fish Location


The Go Fish Marina Bar & Grill is located at 411 River Drive in Princeton, Iowa. They also state that they are located in Pool 14 of the Mississippi River at Mile Marker 502. That terminology is new to me (being a new Iowa resident), but I looked it up. The term Pool (or Navigation Pool) is used to describe the area between navigation dams on the Mississippi River. For instance, Pool 1 begins in the Upper Mississippi River at St. Paul, Minnesota. 


Boat docks at Go Fish Restaurant Marina Bar and Grill

Most probably the reason Go Fish specifies the river location on their website is because you can approach by river, dock your boat and walk up to the restaurant. 

Their operating hours are seven days a week year round. 


  • Mon-Thu : 11am-10pm
  • Fri-Sat: 11am-11pm
  • Sun: 11am-9pm 


Summary


Dockside dining at the Go Fish Marina Bar and Grill
So if you find yourself traveling through Iowa or taking a boat ride up or down the Mississippi River, consider stopping at Go Fish Marina Bar & Grill for lunch or dinner. The restaurant is only a few miles north of the Quad Cities almost straight over from Chicago. Dining on the banks of the Mississippi is a charming experience. 

If  you do not live near rivers, lakes or oceans where you can enjoy delightful 'dockside dining', create your own at home with the delicious recipes in these cookbooks on Dockside Dining.


For more food and restaurant reviews, check out 


Quick Links:

Go Fish Marina Bar & Grill website


More Places to visit in Iowa:


(c) Wednesday Elf 10/26/2019

*Photos & Photo Collages Created by Wednesday Elf 


Note: The author may receive a commission from purchases made using links found in this article. “As an Amazon Associate, Ebay (EPN) and/or Esty (Awin) Affiliate, I (we) earn from qualifying purchases.”


Monday, August 12, 2019

Nonni's Biscotti Reviewed

Nonni's Biscotti Reviewed
Looking for a light and airy snack? Perfect to accompany a nice cup of tea or coffee? Nonni's biscotti is a yummy alternative to the after meal cookies and sweets or a mid afternoon snack.

Biscotti The Alternative Snack

The biscotti are made with real butter, eggs and sugar. No preservatives or artificial flavors are used in Nonni's recipe.

Each biscotti is individually wrapped which is very user friendly and keeps the biscotti fresh. The biscotti are light and airy yet crispy. These are perfect for those who like to dunk a crispy treat in their coffee, tea or milk.

These are a very nice alternative to sweets and cookies, but remember that biscotti does translate to a crisp cookie or biscuit. Biscotti is the plural of biscotto and biscotti are traditionally twice baked to obtain the light and dry consistency.

Who Is Nonni?


Nonni is the grandmother of the founder of Nonni's Bakery. The lore of the biscotti recipe began with Nonni in Lucca, Italy an area of Tuscan. The family recipe was then brought to America over a century ago.

Flavors Of Nonni's Biscotti


There are quite a few flavors for the Biscotti!


  • The Originali
  • Cioccolati
  • Dark Almond Chocolate
  • Limone
  • Salted Caramel
  • Toffee Almond
  • Turtle Pecan
  • Triple Chocolate


Where To Buy Nonni's Biscotti


The Biscotti are not inexpensive at our local independent grocer or brand name grocery store. I have found the selection and prices are much better on Amazon. If you'd like to look for Nonni's in your area, check the retail store locator here.

Amazon has a very nice variety pack of Nonni's Biscotti which has four flavors of the Biscotti: Originali, Limone, Turtle Pecan and Cioccolati. The biscotti are much lower priced online than I found locally.


Biscotti are a nice change of pace for those who like sweets and snacks. The flavors are subtle so no need to be worried about being over powered by the flavors. 

As they used to say, "Try it - you may like it!" The tagline of Nonni's is Nobody treats you like Nonni's!


nonnis biscotti


Note: The author may receive a commission from purchases made using links found in this article. “As an Amazon Associate, Ebay (EPN) and/or Esty (Awin) Affiliate, I (we) earn from qualifying purchases.”


Most Recent Reviews on Review This Reviews


Search for Reviews by Subject, Author or Title

The Review This Reviews Contributors


SylvestermouseSylvestermouseDawn Rae BDawn Rae BMbgPhotoMbgPhotoBrite-IdeasBrite-IdeasWednesday ElfWednesday ElfOlivia MorrisOlivia MorrisTreasures by BrendaTreasures by BrendaThe Savvy AgeThe Savvy AgeMargaret SchindelMargaret SchindelRaintree AnnieRaintree AnnieLou16Lou16Sam MonacoSam MonacoTracey BoyerTracey BoyerRenaissance WomanRenaissance WomanBarbRadBarbRadBev OwensBev OwensBuckHawkBuckHawkDecorating for EventsDecorating for EventsHeather426Heather426Coletta TeskeColetta TeskeMissMerFaeryMissMerFaeryMickie_GMickie_G


Review This Reviews is Dedicated to the Memory of Our Beloved Friend and Fellow Contributor

Susan DeppnerSusan Deppner

We may be apart, but
You Are Not Forgotten


“As an Amazon Associate, Ebay (EPN) and or Etsy (Awin) Affiliate, I (we) earn from purchases.” Disclosure Statement

X