 |
| The method I developed for prolonging the storage of ultra-perishable organic raspberries was a labor of love that took more than a year of research and experimenting! |
Organic Raspberries Are Extremely Perishable
Fresh berries are one of nature’s most delicious treats. Unfortunately, they don’t keep long in the refrigerator, especially the ones that you buy in a store rather than from a local farm stand. I try to buy mostly organic produce these days, and organic berries have even shorter lifespans than their conventionally grown counterparts. In fact, during the winter, many of the organic raspberries we get here in Boston are imported from Mexico, and after such a long journey, they rarely last more than a day, if that! That’s a waste of both food and money.I adore organic raspberries and started eating them every week when I switched to a very low carb / keto lifestyle. That's when my search to find a way to prolong their edible life became a much higher priority.
My extensive online research produced lots of information and advice from reliable sources. Unfortunately, much of it was conflicting. Most sources advised not rinsing fresh raspberries until just before eating them. Some suggested soaking the berries in a vinegar and water solution immediately after buying them, then rinsing, drying and storing them. I remembered and looked up a 2015 article by my friend Grace who, after doing her own online research, developed a similar method for prepping and storing most types of produce that includes a 10-minute soak in a saltwater solution, followed by a 10-minute soak in a vinegar-water bath.
I tried them all. Many, many berries were sacrificed on the alter of my research! Unfortunately, none of the methods I tried succeeded in extending the storage life of my beloved organic raspberries. Nonetheless, I was determined to find a solution that would keep them going bad within a day or two of bringing them home.
Through Trial and Error, I Eventually Worked Out My Own Method for Storing Organic Raspberries Successfully for Several Extra Days
Undaunted (well, sort of), I started combining various aspects of some of the prior experiments. After each new experiment, I analyzed the results and tweaked the process for the next attempt. After a few more months, myThe prep work needs to start the minute the raspberries are brought home. After discarding any mushy ones, any remaining berries that have softened a bit are set aside to be eaten the same day. The rest get a brief saltwater bath, followed by a brief vinegar and water bath. The berries stay in each solutions for only 2-3 minutes, a much briefer soak than in any of the other methods I tested.
Next, they are rinsed, drained, and sorted further based on their firmness. Then they are set on a paper towel-covered cooling rack(s) for several hours to dry out thoroughly. As far as I know, mine is the first method to use this multi-hour drying time - an idea that turned out to be a game-changer in my experiments!
The storage method turned out to be as important as the prep process. Lining my storage container with two to three layers of paper towel was a step in the right direction, but not enough to slow down the berries' deterioration significantly.
The last piece of the puzzle fell into place when I stopped layering the berries between paper towels in a sealed storage container before refrigerating them. After another series of experiments and tweaks, eventually I was able to prolong the storage time by another 1-2 days by switching to a large, shallow storage container and storing the berries face down in a single layer, spaced apart so they didn't touch, and letting the lid rest on top of the container instead of sealing it.
Now My Organic Raspberries Remain Good for 5 or 6 Days!
Since I don't drive and I need to ask my husband to replenish my supply each week, my goal was to be able to have him buy me two 6-ounce containers of organic raspberries and keep them fresh for three to four days in the refrigerator. But once I started to make significant progress with my experiments, I raised my sights on a more ambitious goal.Once I started experimenting with significantly longer drying times, my results improved dramatically! Obviously, how long fresh berries will keep depends on their condition when they are purchased. (Don't you hate not being able to see the berries at the bottom of the container, which are the most likely to be damaged or moldy, because they're hidden by the absorbent pad?)
A discovery like this is too good not to share. So, if you want to try my method for yourself, read on.
How to Prep and Store Organic Raspberries So They Stay Fresh Longer: Step-by-Step Instructions
Step 1: Gather your tools and supplies.
 |
| Some of the supplies for prepping organic raspberries to help them last up to 5 days (or even longer) in the refrigerator |
- Fresh organic raspberries (or any other type of berry, organic or conventionally grown)
- A small bowl
- A medium-to-large mixing bowl
- A large slotted spoon
- Water
- Table salt or sea salt
- A large, adjustable, stainless steel mesh over-the-sink colander (or a large colander with small holes and another mixing bowl)
- A timer (after trying out many different brands and models, this accurate, easy-to-use, dual kitchen timer is definitely my favorite, thanks to the intuitive buttons, a large, easy-to-read display, and a ring loud enough to be heard from another room!)
- Easy access to the kitchen sink (preferably with a sprayer-type faucet)
- A roll of paper towels, preferably with closer perforation lines (like these Bounty Quick-Size Paper Towels) that let you tear off only the length you need
- 1-2 large cooling racks with a wire grid (I recommend this KITCHENATICS 11.8" x 16.9" heavy-duty stainless steel wire cooling and roasting rack - in fact, I just ordered a second one!)
- Shallow food storage containers with lids - one large and one medium sized
- Optional: Paper clips
- Optional: FreshPaper Food Saver Sheets
Step 2: Pick through the berries.
Carefully transfer them from their containers and spread them out in a single layer.Pick through the berries, throwing out any that were damaged and setting aside any that need to be eaten that day rather than stored.
Then gently place the remaining berries in the small bowl.
Step 3: Soak them briefly in heavily salted water and rinse.
Fill the mixing bowl partway with enough water to just cover the berries. (You'll quickly learn eyeball the amount of water based on the volume of berries you're prepping.) Add about 3 tablespoons of table salt or sea salt and stir to dissolve. |
| Preparing the saltwater bath for the berries |
Hold the bowl of raspberries just above the surface of the liquid in the mixing bowl, then tip them into the salty water. Start the timer.
Give them a brief, gentle stir so all sides of every berry come into contact with the saltwater solution, then stir them gently again after a minute.
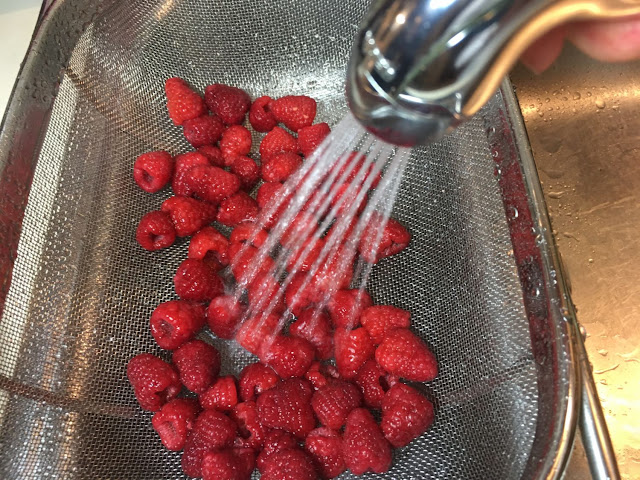
As soon as the timer alarm goes off, use the large slotted spoon to lift the berries out of the water and place them into the over-the-sink colander so they are spread out over the entire surface of the colander. (Try to avoid piling the berries on top of each other, which can bruise the ones underneath.)
Run the cold water faucet and use the sprayer to quickly and gently rinse the berries in the colander. Leave them to drain while you empty and rinse the mixing bowl.
Step 4: Repeat, using a vinegar and water solution this time.
Refill the mixing bowl to the same level as before, this time substituting a mixture of roughly 3 parts cold water to 1 part all-natural white vinegar. (As an example, to make 2 cups of the vinegar solution, you would mix 1-1/2 cups of water with 1/2 cup of all-natural white vinegar.)Gently tip the rinsed and drained raspberries from the colander into the vinegar solution in the bowl, then give them a gentle swish, soak, rinse and drain as you did in Step 3.
Gently spread them out on a double thickness of paper towels to absorb more of the water, turning them so the holes face down so any remaining water inside the berries can drain.
Step 5: Sort the raspberries according to firmness and let them dry for at least 3-4 hours (even overnight, if necessary).
Line the gridded baking rack(s) with three layers of paper toweling. Transfer the berries to the racks, one at a time, keeping them face-down and spacing them slightly apart so they don't touch their neighbors. Sort the berries into two groups as you do this, placing the firmest berries to one side of the rack (or on a different rack) and the softer berries to the other side. |
| Leave the raspberries on the rack until they are firm and the surface is very dry |
Set the racks on the counter and set the timer for 1 hour. When it rings, use the lightest touch and the least amount of pressure possible to slowly and gently roll each berry onto its side and separate it from the paper towel, then return it to the rack. (If you don't do this, or if you wait too long, the berries can stick to the paper towel as they dry, making it difficult to remove them without rupturing the surface at the sticking point. Voice of experience here, lol!) After you roll and lift off each berry, check for any leaked juice stains and, if necessary, move it to another spot where the paper towel is clean and dry.
Leave the racks out on the counter for at least 3 to 4 hours, preferably longer, until the surface of the berries has dried out a bit and they feel firmer than they were prior to their brief saltwater and vinegar solution baths.
Letting the surface of the berries dry out enough before refrigerating them is key to extending their storage time. I've even left them out overnight a couple of times, when they hadn't firmed up sufficiently after 4 hours on the paper towel-topped racks.
Step 6: Prep the storage containers and refrigerate the berries.
 |
| The raspberries in the measuring cup were set aside to eat that night. The ones in the containers are prepped and ready to be stored in the fridge. |
When the berries have dried out sufficiently on the surface and are firmer to the touch than when you brought them home, place the less firm berries into the medium-size container, face down and spaced slightly apart. Then repeat with the remaining berries and the larger container.
Place the filled containers in the refrigerator, then lay the lids lightly on top of them and slightly askew, keeping the berries exposed to a small amount of air during their cold storage to help maintain their firmness. For the same reason, don't place anything on top of the lids.
 |
| Prepped raspberries in food storage containers with their lids askew so the air can continue to circulate throughout the cold storage period |
Step 7: Enjoy the Raspberries
 |
| Store-bought, organic raspberries - still tasty (and not mushy) even after they were stored in the refrigerator for 6 days! |
Future Experiments
Over time, I've been swapping more and more single-use, disposable paper and plastic products for more eco-friendly, reusable alternatives. So, while this method works remarkably well for me, I'm troubled by how many paper towels it requires.I could (and eventually might) substitute a dedicated set of cloth dish towels for draining and drying out the berries and cutting some to size for lining the storage containers. But since our bathroom towel racks are filled with towels and we have nowhere else to hang hand-laundered items to dry, hand-washing a bunch of berry-stained towels once or twice a week isn't in the cards. I'd be concerned about throwing the berry-stained towels into the washing machine with a regular laundry load because the dried berry juice might tint the water pink and ruin everything else in the washer. Running the machine with just the towels would be a waste of water and electricity.
I tried drying the berries directly on cooling racks with a grid design, but the openings were too large and many of the berries fell through.
I'm still hoping to come up with a way to reduce or eliminate paper towels from my process. At some point, I want to buy a couple of largish sheets of food-grade, stainless steel mesh and fold the edges down to make a drying tray. If I can figure out the right mesh to let the raspberries dry out over a period of hours without sticking to the metal, that might be a good solution.
How to Prep and Store Organic Raspberries to Keep Them Fresh Longer reviewed by
Margaret Schindel


![Freshware Food Storage Containers [36 Set] 16 oz Plastic Deli Containers with Lids, Slime, Soup, Meal Prep Containers | BPA Free | Stackable | Leakproof | Microwave/Dishwasher/Freezer Safe](https://m.media-amazon.com/images/I/51eOGIEdZYL._SL500_.jpg)


![Freshware Meal Prep Containers [15 Pack] 3 Compartment with Lids, Food Containers, Lunch Box | BPA Free | Stackable | Bento Box, Microwave/Dishwasher/Freezer Safe, Portion Control, 21 day fix (32 oz)](https://images-na.ssl-images-amazon.com/images/I/51xiAFQmk9L.jpg)


