Showing posts with label home organization. Show all posts

Wednesday, March 13, 2024

How to Organize Your Messy Linen Closet With Pop-up Storage Bins

A cluttered linen closet can be a source of frustration, especially when you're searching for that elusive missing pillowcase from a set of sheets or the washcloth from a particular set of towels. Fear not! In this guide, I’ll review an easy and efficient way to organize your linen closet using pop-up fabric storage bins labeled with index cards inside clear plastic pockets. Say goodbye to the linen closet chaos and hello to a well-organized and visually pleasing storage space for your sheets, towels, tablecloths, napkins, spare blankets and pillows, out-of-season comforters, and holiday table runners.

It's time for spring cleaning!

Easy linen closet makeover

I am not neat and well-organized by nature. However, I dislike living in a cluttered environment, as does my husband. So, periodically, we tackle an area of particular irritation to de-clutter and organize. Our most recent project was our overstuffed and extremely messy linen closet.

Our easy linen closet makeover was a smashing success, so I put together a step-by-step guide to decluttering and organizing a messy linen closet. (My fellow Review This Reviews contributor Barbara also wrote a linen closet organization guide several years ago that you might want to check out.)

Photograph Your Messy Linen Closet Before You Begin Organizing

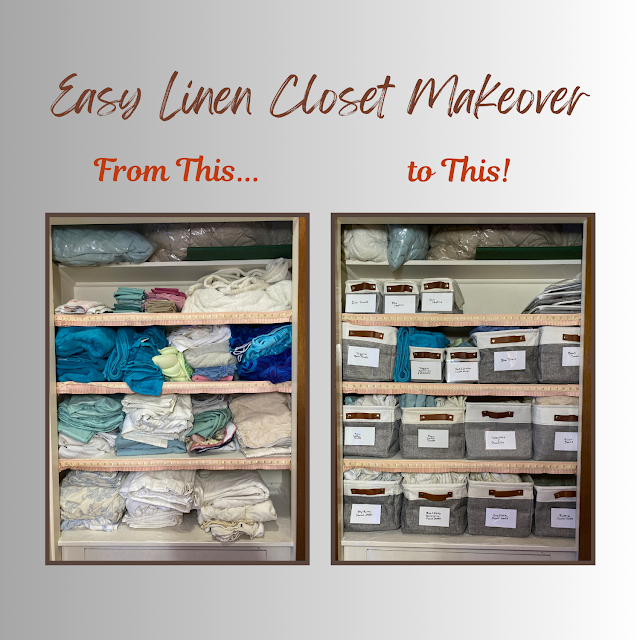
I encourage you to take before-and-after photos to document the transformation. Our “before” closet was so bad that I didn’t photograph it and now I wish I had! The "before" photo you see above was taken in the middle of the process, after we had pulled everything out, sorted it into piles, discarded items we no longer need or use, and organized the linens we're keeping. It would have been far more impactful to show our real "before" linen closet next to our finished, organized "after" result, as well as a feel-good reminder of all we accomplished during this DIY home organization project.

Step 1: Assess, Sort, and Weed

Decluttering is the first step towards achieving an organized and functional space. Before diving into the organization process, take a moment to assess your linen closet's contents.

We pulled everything out of our closet, dumped them on our king-size bed, and then sorted all our sheets, pillowcases, towels, blankets, tablecloths, napkins, and other miscellaneous items into piles by category. Then came the hard part: deciding what to let go of or store elsewhere (such as the rarely used sheets for our sofa bed).

Set aside any worn-out, torn, stained, or mismatched linens, towels, or items you no longer need. Be as ruthless as you can. Decide what to discard or recycle and what to donate, then put those items into the trash, bags, or boxes, as appropriate, labeling the containers for recycling or donation.

Step 2: Group, Arrange, and Label Your Remaining Linens

Next, put everything else back in the closet, grouping related items and arranging them in whatever way you prefer to maximize shelf space and optimize organization. Be sure to leave some shelf space open to accommodate future purchases or gifts.

Tip: I suggest putting the linens you use most frequently on the most easily accessible shelves and reserving the highest and lowest shelves for the items you need to remove or put back less often ( such as comforters, extra blankets, guest linens, and holiday tablecloths).

Using scrap paper, make a temporary label for each pile on the shelves (e.g., blue towels, pink towels, striped flannel sheets). Personalize these labels in any way that makes sense to you (e.g., Mom’s Quaker lace tablecloth and napkins). Then place these temporary labels on top of each pile until you have your storage bins and labeling materials.

Messy linen closet without storage bins or labels
Our linen closet after we weeded out what we didn't need to keep.
It's organized, but still messy and the linens don't fit the space well.

Step 3: Measure, Then Select Fabric Storage Bins or Baskets

Pop-up fabric storage bins or baskets are a game-changer for maximizing space and bringing order to your closet both functionally and visually. These collapsible fabric bins make it easy to group similar items and access them effortlessly. Choose appropriate size bins to accommodate different types of linens, from large king-size sheet sets to small dish towels.

Measure your piles of linens, the width of your linen closet shelves, and the space between each shelf, then select a variety of coordinated bins in different sizes to fit. This allows you to customize your storage solution without investing in a custom closet makeover solution. The pop-up storage bins we selected are inexpensive and the workmanship is not perfect, but the price was right and they come in a wide range of sizes and shapes. It was also important to us to have bins that fold down when not in use because we wanted to keep some extras to allow for future expansion of our linen closet's contents. However, if you don't mind spending more, you can find a wide array of attractive storage bins to suit a variety of tastes and home decor styles.

If you have large, bulky items like comforters that won't fit inside even the largest pop-up storage bins, you may want to put them in airtight vacuum compression storage bags designed for this purpose, which will not only keep these items clean but also compress them to fit more easily on your closet shelves and save space.

Step 4: Unfold and Label the Bins

To make it easy to find what you need at a glance, you will want to label your pop-up storage bins. We decided to use self-adhesive clear plastic 3” x 5” pockets and index cards for labeling the fronts of our bins and ordered them from Amazon along with our bins. We chose the 3”x5” size because they matched the width of our smallest bins but were still large enough to accommodate labels with several lines of text when needed.

When your bins, plastic pockets, and index cards arrive, unfold the bins and press against the sides to prop them open. (The sides won’t stay completely straight until you fill the bins.)

Attach a clear plastic pocket to the front of each bin. We ordered self-stick plastic pockets but discovered that they didn’t adhere well to the fabric bins over time, so you will want to stitch, glue, or rivet the pockets to the bins. We've ordered a rivet tool and some rivets for attaching ours more securely. We will use the rest of the self-adhesive pockets and index cards to label storage cartons, where the adhesive will work perfectly. 

Using a permanent marker and index cards, write a new, permanent label for each pile of linens on your closet shelf to replace the temporary label.

This simple and effective labeling system allows for quick identification without having to rummage through each bin, and the clear plastic pockets protect the index card labels from becoming worn or dog-eared.

Step 5: Arrange Your Linens in the Labeled Bins

Take one pile of related linens and place it into the appropriately sized bin. Insert the index card label into the clear plastic pocket and return it to the closet shelf. Repeat with the remaining piles, bins, and labels.

This systematic approach not only keeps everything organized but also makes it easier to find what you need when you need it.

Then take a photo of your newly neat and organized linen closet and savor the contrast vs. your "before" picture.

Organized linen closet with labeled storage bins
Our formerly crammed, messy linen closet is organized and labeled,
so everything is easy to find and accessible. Now we just need to
remove the old, frilly, decorative pink shelf edging we inherited!

Step 6: Maintain Regularly

To keep your linen closet organized and efficient, commit to regular maintenance. Fortunately, this system makes it easy to maintain because, as my grandmother used to say, there’s “a place for everything and everything in its place.”

Periodically review the contents of each bin, refreshing, replacing, or rearranging items as needed. This ongoing effort will prevent the return of clutter and keep your linen closet in top-notch shape.

Messy Linen Closet Makeover Supplies

My husband chose a tailored storage bin style for this project, but the pretty baskets with the quatrefoil pattern would be a lovely, more feminine choice.

Enjoy Using Your Neat, Organized Linen Closet!

Transforming your linen closet into an organized storage space is a satisfying and easily achievable DIY project. With the help of pop-up storage bins labeled with index cards inside clear plastic pockets, you can create a system that not only streamlines your storage but also adds visual appeal. Enjoy the benefits of a tidy, accessible linen closet, where finding the perfect set of sheets or towels or your favorite tablecloth and napkins is a breeze.

Happy organizing!


How to Organize Your Messy Linen Closet With Pop-up Storage Bins by Margaret Schindel

Read More Decor Reviews by Our Review This Reviews Contributors

Read More Home Decor Reviews by Our Review This Reviews Contributors

Read More Product Reviews by Our Review This Reviews Contributors


Note: The author may receive a commission from purchases made using links found in this article. “As an Amazon Associate, Ebay (EPN) and/or Esty (Awin) Affiliate, I (we) earn from qualifying purchases.”


Sunday, April 2, 2023

Step Up Your Entryway Game: Tips for a Tidy Front Hall Closet

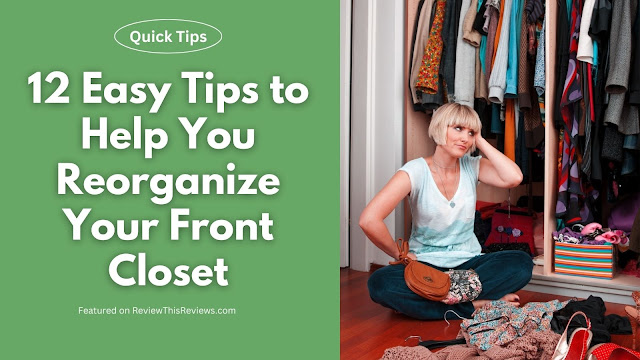
Tips to help you organize your front closet

Organizing a front hallway closet can be daunting, especially if you're unsure where to start. 

Here are some tips on how to organize your front hallway closet effectively:

  • Start by decluttering: Take everything out of the closet and sort items into four piles: keep, move it to another closet, donate, and toss. Only keep items that you use regularly and are in good condition.

  • Use hanging space wisely: Invest in good-quality hangers that hold multiple items or heavier coats. For lighter items, consider tiered hangers. Hang coats and jackets in order of season and frequency of use, with the most frequently used items at the front. Or, of course, you can store your winter items in another location for spring, summer, and fall.

  • Use bins or shelves for storage (whichever works best for your sized closet): Stacking bins or drawer bins are an excellent solution to store hats, gloves, scarves, and other small items. Clear bins are an excellent choice to see what's inside before opening.

  • Maximize floor space: Use the floor space of the closet for storing shoes and boots. You can use shoe racks or a hanging shoe organizer to keep shoes off the floor.

  • Utilize door space: Over-the-door organizers are perfect for storing items such as umbrellas, purses, and even some pairs of shoes. 

  • Invest in hooks: Hooks are a great way to keep bags, hats, and other items off the floor and organized.

  • Label Bins: Use labels on baskets, bins, and shelves to help keep everything organized and easy to find. This will only work if the people in the house make an effort to put things back in the appropriately labeled bin.

  • Keep seasonal items separate: Store seasonal items, such as winter coats and boots, in a separate closet or in the back of the closet. This will free up space for items that you use more regularly.

  • Maintain the organization: Once you have organized your front hallway closet, it's essential to maintain it. Make sure to put items back in their designated spots and regularly declutter to prevent the closet from becoming cluttered again.

  • Use vertical space: If you have high ceilings in your closet, consider using vertical space by installing additional shelves or hanging rods. This will allow you to store more items without taking up extra floor space.

  • Use slim hangers: Slim hangers are a great way to save space in your closet, as they take up less room than traditional hangers. They also help prevent clothes from slipping off the hanger.

  • Store accessories together: Keep all your accessories in one designated closet area. Stacking storage bins can keep these items organized and easy to find.

By following these tips and utilizing storage items such as hangers, shelving, baskets, bins, and hooks, you can effectively organize your front hallway closet and make room for coats, hats, seasonal outerwear, boots, and shoes.

Some Suggested Product Ideas For You:


Note: The author may receive a commission from purchases made using links found in this article. “As an Amazon Associate, Ebay (EPN) and/or Esty (Awin) Affiliate, I (we) earn from qualifying purchases.”


Tuesday, March 7, 2023

Review Of Slim Non Slip Space Saving Clothes Hangers


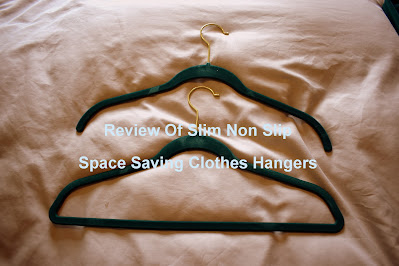
Slim Non Slip Clothes Hangers


I have used these slim, non-slip space saving clothes hangers for years in our wardrobes and find them a joy! I am not the best at organising clothes and these hangers really do help me to maintain a more organised and neater, more useable, pleasing space in the wardrobes. 

I used to have quite a mix of hangers in our wardrobes, anything from bulky yellow plastic and lovely thick wooden hangers which did the job but took up space themselves. I even used those that came with clothes bought from shops which were often black shiny plastic.

I disliked the clattering noise the black plastic hangers make and the way they all got caught up with each other often snapping in the process. All the hangers were different colours, clothes were difficult to find and get out of the wardrobe and the wardrobes themselves just looked messy.

 Also, my silkier clothes were always falling off the hangers onto the floor to my regular annoyance. They became creased and needed washing again, so could not be worn when I needed them. 

It may sound silly, but going into the wardrobes each day and facing that disorganization became a source of a sort of mild stress in my life I did not need! 

These slim, non slip, space saving clothes hangers have made a huge difference to the organisation of our wardrobes and made it a pleasure to pick out clothes to wear in the morning. 


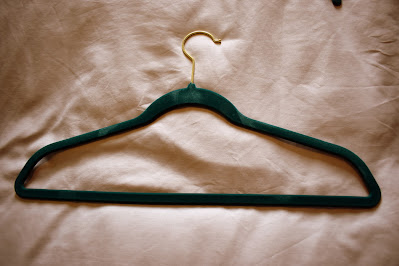
Slim Non Slip Clothes Hangers
Slim non slip hanger for shirts, dresses and tops  Photo By Raintree Annie


Advantages And What I Love About The Slim Non-Slip Hangers

  • Being so slim they make a huge difference in the number of clothes you can hang in a wardrobe space. The profile is so slim, really just a few millimeters, the only real width it takes up is the type of clothes you hang on it. 
  • As they are covered with velvet or velvet like material, it crucially prevents clothes from slipping off onto the floor. It also keeps clothes looking nice without ugly hanging marks. 
  • If you buy enough of one colour to hang all your clothes on it can make your wardrobe look quite beautifully designer colour coordinated and extremely organised without much effort. 
  • Or you can colour coordinate your clothes for example shirts on one colour hanger, dresses on another colour and so on. 
  • What we do is to have all my clothes on one colour hanger and my husband's clothes on a different colour.
  • If you have children you can choose a different colour for each child or let them choose. 
  • Even very silky or lightweight floaty clothes do not slip off these hangers which is a wonderful plus as I used to find my silky tops at the bottom of the wardrobe all the time, but now they remain firmly on the hanger. 
  • All clothes are now hanging at the same level which looks pleasing to the eye and makes finding clothes much quicker.
  • Clothes do not get crushed so easily and I find stay looking good for much longer even if you don't regularly wear them. 
  • These slim hangers with velvet or velvet like material coverings are quiet, they do not clatter like the plastic ones and so are much calmer to use. 
  • I find the hangers reasonably sturdy especially if you buy the heavy duty ones. Depending on what quality you buy they may not always last as long as good quality wooden ones but they are at a price point where it is not too much to replace any that do break after a few years. 
  • You can hang shirts, dresses, cardigans, trousers, leggings, jeans, skirts and jackets to name a few on these hangers. You will need the hangers with a bar across to hang trousers and jeans. 


Slim Non Slip Clothes Hangers
Slim Non Slip Hanger with bar for trousers and jeans Photo By Raintree Annie


  • These hangers come in a wide range of lovely colours to suit different members of the family or different uses. A single colour of the Slim Hangers looks very chic and efficient in a wardrobe. You can buy them in white, black, grey, pastel colours and bold colours to suit everyone in the family and your wardrobe! 
  • If you do not have a wardrobe and rely on a hanging space or freestanding hanger then having all the hangers in one colour and one type just makes the clothes hanging space look so organised and neat in a room. 
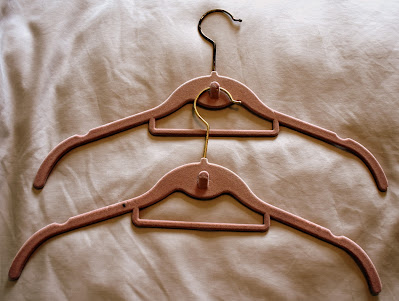
  • Some of the hangers come with a small hook as in the photograph below. With these types of hangers, you can hang your clothes on them, then use the hooks to stack the hangers using the hook to make them even more space saving. I usually hang no more than two or three hangers together to achieve this as clearly it will make clothes hang lower in the wardrobe and puts more pressure on the top hook. However, especially for light shirts and tops, it is a wonderful space saving tip.


Slim Non Slip Clothes Hangers
Slim Non Slip Hangers with hooks Photo By Raintree Annie


Disadvantages Of The Hangers

  • The weak point I have found on pretty much all these hangers is where the metal hook meets the hanger. You do need to watch for signs of wear in that area. However, I have found ours do last many years and many have not shown any wear. 
  • Never try to jam them into an overfilled wardrobe. If you do they may break. Rather make sure there is a clear space, which there now should be as these are so space saving!  
  • I have found it is not good to pile many clothes on one hanger, for these hangers one normal clothing item or two light items is enough. Personally, I do not hang really heavy clothes like coats and heavy jackets on these types of hangers, I use thicker and broader hangers for these items. 
  • I do not feel they are really suitable for hanging damp or wet clothes after washing. So we keep plastic or wooden hangers for laundry purposes and these slim non-slip ones for dry clothes.


The Joy Of An Organised Wardrobe Of Clothes!

Our wooden hangers and my special pretty padded hangers are still used for some heavier clothes or those that require a wide hanger or if they are on display, but they are reserved for these few items and do not form the majority of our wardrobe hangers.

Now the majority of our clothes are hung using slim, non slip, space saving hangers. We feel more organised and can find the clothes we are looking for so much more easily. 

There is certainly more space in our wardrobes, our clothes look better, and it all just feels so much clearer and neater. It is an altogether quieter, calmer and happier experience choosing clothes to wear in the morning!

We always try to clear out our clothes and wardrobes in late Winter or early Spring and it feels so good to have it all lovely and tidy with our clothes hung on these slim, non slip, space saving hangers.

The wardrobe looks organised, calm and tidy and in a sometimes chaotic and stressful world, this small change makes one aspect of daily life a bit easier. 


Read More Product Reviews Here 


Find More Product Reviews On Review This Reviews Here At

 ReviewThisProductReviews.com


Note: The author may receive a commission from purchases made using links found in this article. “As an Amazon Associate, Ebay (EPN) and/or Esty (Awin) Affiliate, I (we) earn from qualifying purchases.”


Sunday, August 18, 2019

How to Display Artwork Without Hanging it on the Wall

A Review of 5 Ways to Display Artwork Without Hanging it on the Wall


When levels, hooks, hammers, and nails frustrate you, or you're not keen on marking up the walls, below are designer approved alternative methods to feature art:

1. An Art Easel

Art easels provide mobility. Place your favorite piece of art on an easel and move from room to room when you need a change. Easels come in numerous styles. Finding one to match your decor should be a cinch.

2. Frame TV

Frame TV transforms into art. Samsung's Frame TV turns into a beautiful piece of art when you're not watching it. This particular Frame TV should be wall-mounted. However, if you're planning to wall mount your TV anyway, an art tv provides two-for-one use. Display spectacular artwork from a list of established or up-and-coming artists. Oh, and one more thing, put a Frame TV on an easel for a display of rotating or static art.

3. Lean Art Against the Wall

There are two ways to consider doing this:

Leaning a larger piece on the floor

The trick to this is placing the art in a room without it appearing as a shortcut or after-thought. A very large piece of art should be positioned so that it's part of the design of the room. Avoid placing it away from the focus of the space. The decor and furniture in the room should tie into the piece.

Leaning and layering pieces on a cabinet, bench, fireplace or other furniture surfaces

Layering is exactly what it sounds like. You layer a variety of photos so they're slightly touching each other. As an example, on a cabinet,  layer multiple family photos in a collection of matching or non-matching frames against the wall.

4. Place Art in a Decorative or Non-Operational Fireplace

An unused fireplace insert area is ideal to display art. Choose at least one or more pieces to cover the entire back wall, then layer a few smaller pieces in front. The art completes the fireplace by giving it a distinctive purpose.

5. Use a Bookcase or Large Cabinet

If you have a large bookcase or cabinet, lean your art inside one or more of the shelves. It's especially lovely to use larger art pieces on a few shelves. Don't stop at one or two pieces, add several in varying sizes.

If You Decide to Hang Photos on the Wall, what are the Best Hooks?

If ultimately you decide to hang your photos, I HIGHLY recommend these hooks. They're the only ones I use. It's one of those 'As you see on TV' products and they're fantastic. They only leave a pinhole in the wall and you don't need tools (hammers etc) to hang your pictures. I can hang photos on my own now, no need to ask for help.


Note: The author may receive a commission from purchases made using links found in this article. “As an Amazon Associate, Ebay (EPN) and/or Esty (Awin) Affiliate, I (we) earn from qualifying purchases.”


Sunday, August 11, 2019

5 Creative Ways to Store or Display Books

Unique Ways to Store or Display Books


We can certainly accumulate a lot of books throughout life. Some end up in a bedroom end table, others buried in closets, and the rest make it to their home-base, a bookcase.

This review lists obscure or odd ways to store or display books in the home. When a bookcase is out of the question, try one of these options.

1. Decorative Storage Trunks

Not all storage trunks are old, dusty and stuffed in an attic or basement. Modern decorative trunks can be featured in main rooms as a functional accessory. This set of 3 accent trunks can be placed in a living room, office or bedroom with your favorite books stored inside. It's a clutter-free way to bring books into a room. They're stored away and the trunks are a piece of furniture that adds to the overall look of the room.

2. Cotton Canvas Storage Bins

This playfully printed cotton canvas bag is normally used in a child's room to store toys. The bag is light and safe, has carrying straps and is easy for kids to lift or move. Instead of using them for toys, put books inside. Complete the look of a room, by designing a reading area that features three or four of these lovely canvas storage bins surrounded by a plush comfy rug. Create an actual reading circle by placing the storage bags in the middle of a large round rug. Gather on the rug for story time.

3. Rolling Storage Cart

There is an endless number of rolling cart designs. However, this cart works for a sunroom or porch. Imagine being cozied up on your porch swing as you reach over to get one of your favorite books. Get a number of carts and position them along on a wall as a long unit filled with books. 

4. Storage Ottoman

Place books inside an ottoman. Ottomans can be positioned anywhere in a room; against a wall, in front of or beside a sofa. You'll find that Ottomans come in multiple sizes, with some being quite large. With an Ottoman, you'll get extra seating or a place to put your feet all while storing books.

5. Book Slings

Book slings are a popular choice for a child's room or reading area. However, this particular one can work in a den, office or family room. Unlike several of the above options, the books in a sling are on open display. You'll often see Slings in professional waiting rooms as a way to hold magazines or books for waiting clients.

To see elaborate ways to display books, you can check out how the other side lives here.


Note: The author may receive a commission from purchases made using links found in this article. “As an Amazon Associate, Ebay (EPN) and/or Esty (Awin) Affiliate, I (we) earn from qualifying purchases.”


Saturday, December 16, 2017

Organizing Your Kitchen Cupboards - Where to Start?

organizing kitchen cabinets
Organizing your kitchen cabinets!
I don't know about you, but my kitchen cupboards get messy (and we won't even talk about the odds 'n ends drawer!).  I think in my mind I believe I should have a walk in pantry, but in reality I don't which means that it's not big enough!  Back in the real world I'm sure that my pantry is big enough for my household, I just need to review how to organize it better!

I did buy an expandable metal shelf for the cupboard that houses my mugs and teas and this was fantastic, but I didn't think it would work the best for my pantry.

Problem number one is herbs and spices.  Now the old spice racks that I used to have would be great except I have no where to put them and also I have a couple of herbs and spices that I buy in larger containers as I use more of them.

Problem number two is cans.  I buy quite a few canned goods especially when they're on special, but I have to stack them on top of each other to see what I have and if I want to use something it can no longer be stacked so it sits behind something else and get's doubled up.

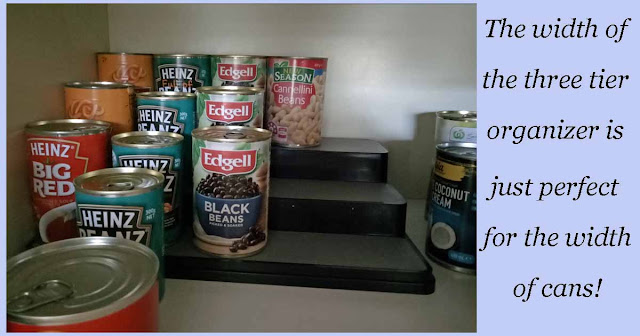
A solution?  I came across a three tier cabinet organizer and thought yes, this could be it!  I tested it out with my herbs and spices and then with my cans and went back to get a second one.

Now I know you can get can organizers that you can fit lots of cans in and they just roll out, but I just didn't think that would work very well in my home.  With this three tier organizer I can pop on my cans and see at a glance what I have.  Now you might look at the image and think well I can't read what the label says, but I pretty much know what the cans I buy look like so I can see enough to know exactly what's there.

three tier organizer for kitchen cabinets
Click image to go to Amazon and check the price of this awesome organizer (and buy it if you want to!)

As far as my herbs and spices go I find it works well, but it may not be the best organization solution for you as you don't really see the names on the spices.

three tier organizer for spices
Photo by Lou16
Check out my image to see what I mean.  Now this is fine by me because I keep my herbs and spices in alphabetical order except for the the larger containers which aren't showing (they're to the right if I had a better photo to show you).

If that sounds a little OCD - it's not, I just worked retail for a decade and in my mind alphabetical for herbs is the way to go!

I also know exactly what herbs and spices I have - someone coming into my kitchen may have problems using my organizer, but you know what?  I don't care, I just want to have it organized for me (and my husband as he's a great cook)!

I have a few other problem areas that need to be organized and I'm working on them.   I need to organize my cake decorating stuff - I have an idea on how to do that so stay tuned!

Another problem area is all of the bulk foods that I have especially since my daughter turned vegan.  I also think I have a solution for this problem too so there will definitely be a follow up post on organizing your kitchen cupboards.

Do you use anything special to organize your pantry?

One thing that my entire home lacks is enough storage so I've tried lots of different ways to keeping things organized, I hope to share more with you in the future.


Note: The author may receive a commission from purchases made using links found in this article. “As an Amazon Associate, Ebay (EPN) and/or Esty (Awin) Affiliate, I (we) earn from qualifying purchases.”


Most Recent Reviews on Review This Reviews


Search for Reviews by Subject, Author or Title

The Review This Reviews Contributors


SylvestermouseSylvestermouseDawn Rae BDawn Rae BMbgPhotoMbgPhotoBrite-IdeasBrite-IdeasWednesday ElfWednesday ElfOlivia MorrisOlivia MorrisTreasures by BrendaTreasures by BrendaThe Savvy AgeThe Savvy AgeMargaret SchindelMargaret SchindelRaintree AnnieRaintree AnnieLou16Lou16Sam MonacoSam MonacoTracey BoyerTracey BoyerRenaissance WomanRenaissance WomanBarbRadBarbRadBev OwensBev OwensBuckHawkBuckHawkDecorating for EventsDecorating for EventsHeather426Heather426Coletta TeskeColetta TeskeMissMerFaeryMissMerFaeryMickie_GMickie_G


Review This Reviews is Dedicated to the Memory of Our Beloved Friend and Fellow Contributor

Susan DeppnerSusan Deppner

We may be apart, but
You Are Not Forgotten


“As an Amazon Associate, Ebay (EPN) and or Etsy (Awin) Affiliate, I (we) earn from purchases.” Disclosure Statement

X