Thursday, June 9, 2022

Nature Photography Day

pink flowers photo by mbgphoto

 
June 15th is Nature Photography Day.  This holiday was first started in 2006 in North America but has since spread to people throughout the world.  It is a day to study, reflect, enjoy and photograph nature.

While reading about Nature Photography Day online, I discovered numerous suggestions on how to celebrate the day.  Here are a few that sounded interesting.
  • Grab your camera and go for a walk in your neighborhood.  Experience all the beauty in nature that you can observe every day.
  • Share your photos with families and friends and spread the word that it is Nature Photography Day.
  •  Enjoy a local park or a nearby creek or river.  Photograph the beauty of nature.
  • Participate in efforts to preserve nature.
  • Start a photo competition of nature photograph.
  • While you are doing any of the above take the time to breath in all the peace and serenity that nature provides.

Favorite Flowers from my Nature Photography Files


single pink rose photo by mbgphoto


I love to photograph roses.  There is something quite striking about a single rose bud.  In the photo above I tried to isolate the rose bud by using a 6.3 aperture and focusing on the rose bud so that the background becomes a bit blurry.  It is important to keep the background simple so that the focus is on the flower.  The photo was taken in the early evening when the light was soft.  Early morning or evening are great times to take floral photos.  Cloudy days also enhance the colors in the flowers, so they are a good time to photograph.

flower photo by mbgphoto


Here is another photo taken in the early evening and with an aperture that gives the blurry background that enhances the flowers.


purple iris photo by mbgphoto

Another good technique for photographing flowers is to find an interesting background to set off the blossom.  In this photo I found some purple irises in front of a brick wall.  I kept my aperture so that the background would be a bit blurry, and I zoomed in on the flower.  I love the effect of the bright purple against the brick.

fuscia plant photo by mbgphoto

Another time I love to photograph flowers is right after it rains.  It seems to really bring out the colors and the raindrops look refreshing.  The above photo is of a fuscia plant hanging on our deck.

Combining Birds and Plants in Photos


male red cardinal by lilac bush photo by mbgphoto

I particularly enjoy capturing flowers and a bird in the same photograph.  In this photo I saw a Cardinal sitting on our fence and the lilacs were just starting to bud out in the foreground.  I focused on the Cardinal, so you will note that the lilacs are slightly out of focus.

Photographing Backyard Birds


One of my favorite pastimes is photographing the birds in our backyard.  Here is a Hawk that was sitting high up in the tree at the edge of our property.  He sat still for a long time, and I was able to capture several shots.  I zoomed in for the long shot and was quite pleased with the result.  I was able to get him framed in the surrounding branches.

cooper's hawk photo by mbgphoto


A great way to enhance your skills in nature photography is to first study the works of other photographers and then practice, practice, practice.

Happy Nature Photography Day on
June 15th!  Grab your camera and get out and enjoy nature.


Note: The author may receive a commission from purchases made using links found in this article. “As an Amazon Associate, Ebay (EPN) and/or Esty (Awin) Affiliate, I (we) earn from qualifying purchases.”


Wednesday, June 8, 2022

The Best Powerful Lightweight Stick Blender With Versatile Attachments

A stick blender, also called an immersion blender, is great for puréeing soups and sauces. Using a lightweight stick blender with a whisk attachment can be a lot more comfortable to use than a traditional hand mixer for mixing batters or whipping heavy cream. Several months ago, after the plastic housing and whip attachment on my 1980s-era Braun MR72 MultiPractic deluxe hand held blender with variable speed control eventually cracked, I did a lot of online research before choosing a new stick blender.

Müeller Ultra-Stick 3-in-1 Hand Blender
The Müeller Multi-Purpose Ultra-Stick Hand Blender (model MU-HB-02) is one of my most used kitchen tools. It is also one of the best kitchen gifts and can replace several small appliances!
Ultimately, I purchased a Müeller Multi-Purpose Ultra-Stick Hand Blender (model MU-HB-02) with three versatile attachments: an immersion blender, a wire whisk and frother. Today I'll share my review of this excellent, powerful, lightweight stick blender.

The Müeller Multi-Purpose Ultra-Stick Hand Blender Is Surprisingly Powerful

Having used the Braun MR72 MultiPractic stick blender and whisk attachment for several decades gave me a much better idea of which features were important to me when choosing my next model of one of these small appliances. After narrowing down my top contenders for a new immersion blender, the powerful 500W motor on the Müeller Multi-Purpose Ultra-Stick Hand Blender (model MU-HB-02) weighed heavily in its favor, since the 150W motor on my old Braun made it underpowered for my needs.

When using any immersion blender, it's important to hold the blades above the bottom of the pot, pan or other container and control the tool as the suction created by the blade and its housing try to force the shaft downward. The first time I used the blending shaft attachment on my new Müeller hand blender, I could feel how much more power it has compared to my old Braun model!
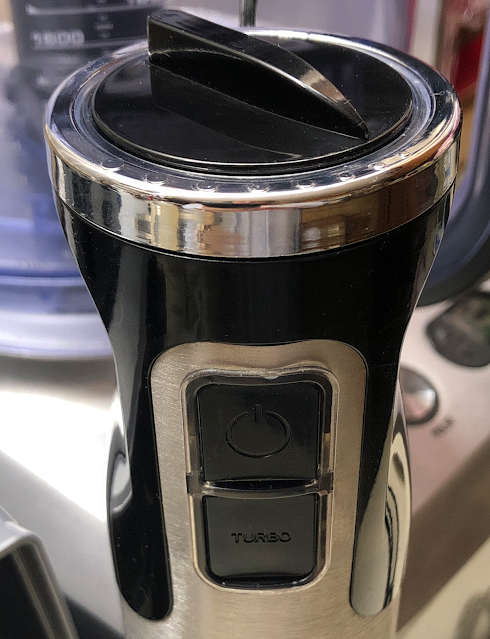
Müeller Multi-Purpose Ultra-Stick Hand Blender speed control dial, power button and turbo button
The slim, contoured, ergonomic shape is easy for even a small hand like mine to hold comfortably. The speed control knob turns continuously, and the power and turbo buttons require just a thumb press.

Variable Speed Control Knob, One-Touch On/Off Button and Turbo Button Let You Control That Power Easily

My old model had a variable-speed control dial, but it had only 6 speeds. That, in combination with the 150W motor, provided a very limited range of speeds. By contrast, the Müeller Multi-Purpose Ultra-Stick Hand Blender (model MU-HB-02) offers a choice of 9 speeds, thanks to multiple power and speed controls that give you more control over its powerful 500W motor.

The top of the motor body housing is the speed control knob. On the side near the top are two stacked buttons: The power button and the turbo button.

Speed Control Knob: After inserting the desired attachment—immersion blender, whisk or frother—into the motor body housing, plug the hand blender into the wall outlet. Then, the speed control dial clockwise to increase the speed or counter-clockwise to decrease the speed.

Power Button: Press your thumb on the one-touch on/off power button to turn on the motor and continue to depress it as you blend, whisk or froth your food or beverage. Release the button to turn off the hand blender. The company advises not to hold the Power button down for longer than 50 seconds at a time. However, I have not found that to be a limitation, since the 500W motor provides enough power to complete most tasks I have tried in less than 50 seconds!

Turbo Button: The Turbo button lets you kick things up a gear when you need to, whether you are puréeing cooked vegetables or whipping egg whites or heavy cream. Just slide your thumb down from the Power button to the Turbo button (directly underneath it) and press it for a quick burst of increased power.

Müeller Multi-Purpose Ultra-Stick Hand Blender (model MU-HB-02) with attachments and instruction manual
The Müeller Multi-Purpose Ultra-Stick Hand Blender (model MU-HB-02) with the immersion blending shaft attached, along with the gear box, whisk and frother attachments and simple instruction manual

Immersion Blending Shaft, Whisk and Frother Attachments Are All Extremely Useful

Blending Shaft: Attach this to the motor to use the Müeller Multi-Purpose Ultra-Stick Hand Blender as an immersion blender. Its extremely sharp, stainless steel S-shaped blade lets you blend shakes or smoothies and purée soups, sauces or baby food.

Whisk Attachment: I use this lightweight stick blender with the whisk attachment several nights a week to make fresh whipped cream to serve with berries, ice cream, or another dessert. The difference in taste between store-bought whipped cream in a pressurized can and freshly whipped, lightly sweetened heavy cream with a splash of vanilla is significant. And with my new Müeller stick blender and wire whisk attachment, I can whip up a small batch of whipped cream, just enough for my husband and me, in just seconds!

I just pour a few tablespoons of heavy whipping cream into a 2-cup Pyrex glass liquid measuring cup, add my sweetener of choice and some pure vanilla extract, then insert my hand blender with the whisk attachment and move the whisk in circles, holding it slightly above the bottom of the measuring cup. I start on the slowest speed for 5 or 10 seconds to avoid splattering, then dial the speed up and finish whipping the cream to the desired consistency. After spooning the topping over our dessert, I just pull out the which attachment and wash it and the measuring cup. Easy peasy!

The powerful motor of this hand blender also means I can use it to beat egg whites or mix cake, cupcake or other thin to medium batters, rather than pulling out my large, heavy KitchenAid stand mixer (which I now reserve for mixing thicker, heavier batters and doughs).

Frother Attachment: My husband and I drink Bulletproof coffee (hot coffee whipped with clarified butter and MCT oil to a creamy, foam-topped consistency) in the morning. It has several valuable benefits, as I've discussed in my product review of The Best Affordable Programmable Large- and Small-Batch Coffee Maker. We had already purchased a cordless milk frother for this purpose, but it devours batteries and is underpowered, which is even more noticeable as the two AA batteries run down.

The frother attachment to our new Müeller Multi-Purpose Ultra-Stick Hand Blender is a significant improvement in terms of power (110V vs. 3V), and we no longer are chewing through AA batteries.

Close-up of extremely sharp stainless steel blending shaft blade
The stainless steel blending shaft has an extremely sharp blade. Fortunately, it's also dishwasher safe!

Easy to Assemble and Disassemble

The plastic whip attachment for my old Braun hand blender was a pain in the neck to attach and detach from the motor housing. Fortunately, assembling and disassembling my new Müeller Multi-Purpose Ultra-Stick Hand Blender (model MU-HB-02) with different attachments is a breeze!

Make sure the motor body is unplugged before attaching or detaching anything to or from it.

To attach the immersion blending shaft, insert it into the motor body and turn it counterclockwise so it snaps into the housing (you will hear a click).

To connect the whisk attachment or milk frother, first insert the shaft of the attachment into the gearbox. Then, insert the gearbox into the motor body and turn it counterclockwise so it snaps into the housing (you will hear a click).

To remove the immersion blending shaft, whisk or frother after using, simply reverse the process: Turn the blending shaft or gearbox clockwise and pull gently to detach it from the motor body housing, then gently pull out the whisk or frother attachment from the gearbox, if applicable.

Quick and Easy Clean-Up With Dishwasher-Safe Attachments

The motor body housing and gearbox should never be immersed in water, but can be cleaned easily just by wiping with a sponge or damp cloth.

The blending shaft, whisk and frother attachments can be hand washed in warm soapy water or put in the dishwasher for easy clean-up.
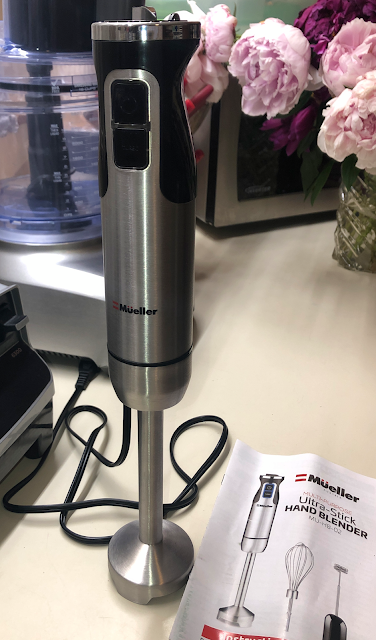
Müeller Multi-Purpose Ultra-Stick Hand Blender assembled with blending shaft as an immersion blender
Connect the stainless steel blending shaft to the motor housing for a powerful immersion blender

Lightweight, Slim and Comfortable to Use

The Müeller Multi-Purpose Ultra-Stick Hand Blender model MU-HB-02 weighs only approximately 1.9 pounds. It is lightweight, slim and has an ergonomic grip that is comfortable even for small hands like mine.

It is also 12.6 inches tall, so if I'm puréeing hot soup in a stockpot or Dutch oven, for example, my hand stays comfortably elevated above the heat.

Surprisingly Affordable and an Excellent Value

I could have spent more money on an immersion blender with whisk and other attachments that had features this one lacks, such as a speed dial that be operated with the dominant hand while the power is on. However, the quality/price/performance ratio on this Müeller Multi-Purpose Ultra-Stick Hand Blender is quite impressive and it does everything I need it to at an extremely affordable price—less than $35 at the time of publication.

Since this stick blender with the whisk attachment is made mostly of stainless steel (unlike many others), takes the place of frother and a hand mixer (and is much more comfortable to use), can stand in for a regular blender or food processor in many cases and does a better job than either of those for blending small amounts of ingredients, it's really a terrific value. The America's Test Kitchen expert testers also recommended this immersion blender on the Cook's Illustrated website.

Don’t Use the Immersion Blending Shaft in Nonstick Cookware

The only other feature I could wish for would be a removable pan guard for the immersion blending shaft's blade housing, like the one on the KitchenAid KHBV53BM Variable Speed Corded Hand Blender, that wouldn't scratch nonstick cookware. However, the pan guard appears to be plastic, and I wouldn't feel comfortable using a plastic attachment inside a hot pan or pot of food that's directly on the heat anyway. In addition, that KitchenAid model has only 180W of power, doesn't come with a whisk or frother attachment, and the removable immersion blending arm isn't dishwasher-safe.

If I need to purée a soup or sauce, it's easy enough to use a stainless steel pot or to transfer the contents of a nonstick pot to a stainless steel bowl for immersion blending and then return the puréed mixture to the pot. This minor inconvenience is well worth it to have all the advantages and versatility of the Müeller Multi-Purpose Ultra-Stick Hand Blender, especially given its affordable price.

An Affordable and Versatile Small Kitchen Appliance Any Home Cook Would Love

Müeller Multi-Purpose Ultra-Stick Hand Blender (model MU-HB-02)
Click image to order the
Müeller Multi-Purpose Ultra-Stick Hand Blender
(model MU-HB-02) 
on Amazon

This is one of those kitchen tools that you don't realize you needed until you have one. In fact, since I don't do a lot of immersion blending, when my old Braun stick blender with plastic parts cracked, I thought about not replacing it. But I really loved being able to whip up a small batch of fresh whipped cream or whip just one or two egg whites without having to drag out my heavy KitchenAid stand mixer, which is what prompted me to take a look at getting another hand blender with a whisk attachment. Finding a lightweight, stainless steel model with a much more powerful motor at an affordable price made the decision very easy.

The fact that this stick blender also has a milk frother attachment was a nice bonus that many gift recipients would appreciate, since lattes, cappucinos and other frothy drinks have become so popular. And, of course, anyone who drinks Bulletproof coffee would definitely love such a powerful frother.

I find myself using this versatile stick blender nearly every day, sometimes multiple times a day, for frothing coffee, making fresh whipped cream, or puréeing a sauce or gravy to get the lumps out quickly and easily. I'll bet someone you know would get a lot of use out of this Müeller Multi-Purpose Ultra-Stick Hand Blender, too.


The Best Powerful, Lightweight Stick Blender With Versatile Attachments by Margaret Schindel


Read More Product Reviews by Our Review This Reviews Contributors

Read More Kitchen Reviews by Our Review This Reviews Contributors

Read More Gifts Reviews by Our Review This Reviews Contributors


Note: The author may receive a commission from purchases made using links found in this article. “As an Amazon Associate, Ebay (EPN) and/or Esty (Awin) Affiliate, I (we) earn from qualifying purchases.”


Tuesday, June 7, 2022

Flex Seal Liquid Rubber - Reviewed

 Flex Seal liquid rubber in a can is a liquid rubber sealant coating. Flex Seal can be brushed on, rolled on, poured, or dip something to create a rubber coating.

Flex Seal Liquid Rubber - Reviewed

Flex Seal is an easy-to-use liquid coating that dries to form a watertight rubberized seal. Once Flex Seal is cured it will seal out water and moisture on a variety of surfaces.

Projects that I have used Flex Seal For:

Closet Corner

My basement closet corner was the very first project where I used Flex Seal. The wall and baseboard were wet and turning black from mold.

I was walking around the hardware store trying to figure out how to fix this and that is when I found Flex Seal. I had seen it advertised on television so I thought why not give this a try.

After we cleaned all of the mold from the wall and baseboard, I painted the area with a primer. Then, I brushed the Flex Seal onto the wall, baseboard, and even part of the floor.

As you can see in the photo, after two years there is no moisture or mold. 


Outdoor table
This is our outdoor dining table. I told Fran last year that this would be it for this table, next year we will have to get a new one.

It is a glass top table with a metal edge. The problem is that over the years the edge rusted. I have restored this table a couple of times and really thought it was time to get rid of it.

The edge rusted to the point where it had some holes. I filled the holes with a product called JB Weld SteelStick, sanded it down, brushed Flex Seal over the edge, and then spray painted to match the color. 

We just may get one more year out of this table.


My third project for Flex Seal was to seal some leaking gutters. The end caps and seams on the house gutter were leaking when it rained. 

I brushed on Flex Seal to all of the seams and end caps on the gutters and the problem was solved. This I don't have a photo of because there was no way that I was going back up the ladder to take pictures.

I'm very pleased with the performance of Flex Seal on the projects that I have used it on. I am sure there are many more uses for Flex Seal. It comes in a liquid, spray, and caulking I believe you can buy it in white or black.

Flex Seal Liquid, 16 oz, Clear, Liquid Rubber Coating Sealant, Waterproof, Flexible, Breathable, and UV Resistant, Roof Repair, Basements, RV, Campers, Trailers, Marine, EPDM, MasonryFlex Seal Liquid, 16 oz, Clear, Liquid Rubber Coating Sealant, Waterproof, Flexible, Breathable, and UV Resistant, Roof Repair, Basements, RV, Campers, Trailers, Marine, EPDM, MasonryFlex Seal Liquid, 16 oz, Clear, Liquid Rubber Coating Sealant, Waterproof, Flexible, Breathable, and UV Resistant, Roof Repair, Basements, RV, Campers, Trailers, Marine, EPDM, Masonry


Note: The author may receive a commission from purchases made using links found in this article. “As an Amazon Associate, Ebay (EPN) and/or Esty (Awin) Affiliate, I (we) earn from qualifying purchases.”


Monday, June 6, 2022

Reviewing Vacuum Sealing Jars with a FoodSaver Machine

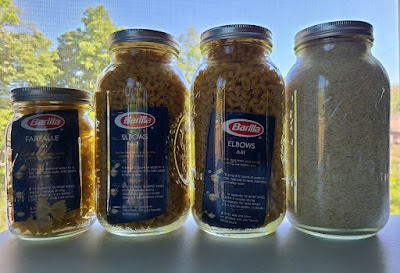
Bad news. All dry foods such as beans, rice, flour, corn meal, and pasta may have been exposed to moths or weevils during processing and packaging at food plants or during shipping. This is how these bugs are able to hitchhike into your home - even if your kitchen is pristine. If you suddenly have tiny beetles in your flour or moths in your bag of beans, it is because the eggs have had time to hatch before you've cooked the item. Yuck! One solution to avoid this is vacuum sealing your dry goods in jars. And the FoodSaver does this.


The FoodSaver machine is fairly well-known. Many people know that it is a machine that vacuum seals food into special plastic bags. When air is removed from food products that food stays fresher longer. And many are aware that vacuum sealed frozen food is at less risk for freezer burn. But not as many people know that Mason jars can be used with the FoodSaver machine to vacuum seal food in jars. 

Important Note: Not all FoodSaver machines have the Accessory Port that is needed to vacuum seal jars. If you are shopping for a FoodSaver machine so you can seal jars, make sure that the machine has the Accessory Port

Jar Sealer Attachments

I purchased a set of the jar sealer attachments. The set included the hose and two jar attachment lids; one wide mouth sized and one regular mouth sized. 

In just a few easy steps, you can seal food into jars:

  • place dry food such as rice, pasta or beans into the Mason jar
  • lay the flat lid on top of the jar
  • press the correct size of jar sealer - wide mouth or regular - over the lid and jar
  • insert the hose into the jar sealer and into the FoodSaver
  • move the FoodSaver lever to the "operate" position
  • press the button for "vacuum"
  • after hearing the vacuuming begin then end, and after the light turns off, move the lever to the open position (releasing the pressure)
  • remove the jar sealer from the jar
  • gently check the lid to test for a seal
  • label the lid with the food item and date
  • I add the ring to help keep the lid secure in case I bump the jar - but I do not screw the ring on tightly
If you are a visual learner, I have prepared a very brief video to show how I seal my jars:


Important Vacuum Sealing Flour Caution

Because flour and similar items are finely ground, the action of the vacuum sealing process can pull the flour into the accessories. So you'll need to use some sort of barrier between the flour and the vacuum sealer.  I have seen some folks use a piece of cloth or paper towel inside the top of the jar when vacuum sealing flour into jars. However, I do not feel that I'd be coordinated enough to insert the cloth correctly. While I MUCH prefer vacuum sealing in jars, flour is the one thing I prefer to use the FoodSaver plastic bags for. I learned to seal using a bag in a bag; the flour in either a clean paper lunch bag or the bag it is packaged in then sealed in the FoodSaver plastic bag.

Why I Vacuum Seal My Food

While living at my last apartment, I had purchased some bulk rice and beans. Because I was feeding only one or two people I did not go through those those bulk items very quickly. One day, I opened the cupboard to find a bag of rice with a swarm of moths inside. It was like a bad scary movie. I did some research and that was when I learned that the eggs of these insects can be present in dry foods before they reach our homes. But I was also living an a metro apartment complex where the exterminators were frequently seen onsite to battle a variety of creepy things. So really, it's hard to tell where my rice infestation came from. But it was disgusting. And I never want it to happen again.

Now I live in my single dwelling home. I do not have to be concerned about what might be living in someone else's home just on the other side of my wall. But I have a new risk for bugs. Rather than purchasing my groceries every day or two in meal-sized portions as I usually did living in a metro area, I now purchase items in bulk. My goal is to go to the store for non-perishable items only once every month or two. But that increases the opportunity for these hitchhiking eggs to hatch.

I LOVE the option of vacuum sealing in jars. I can easily see what I have. Jars are more secure (I have seen videos of people discovering rodents have chewed through plastic tubs used to store their vacuum sealed bags). If I have a large jar of vacuum sealed pasta, I can open the jar and use a very small amount and reseal the jar. 

I would say that I am saving money by buying in bulk but with today's extreme inflation I do not feel as though I am saving money. However, I am protecting the food I have invested a good deal of money in and I am reducing the number of times I need to drive to the store. There have also been times that pasta is not available on the store shelves but I am able to relax knowing that I have a little of my own in a jar at home. 


Note: The author may receive a commission from purchases made using links found in this article. “As an Amazon Associate, Ebay (EPN) and/or Esty (Awin) Affiliate, I (we) earn from qualifying purchases.”


Sunday, June 5, 2022

The Best Cosmetics Storage Holder - According to Me and Others!

Makeup Cosmetics Organizer

Even though I don't wear much makeup, I do have specific items for that 'five-minute face.'

For decades, the frugal me would use little storage baskets or small decorative gift boxes with lids to store cosmetics. The problem with putting makeup in a box is digging to find what you need and forgetting about the items buried in the bottom.

A Five Drawer Stackable Transparent Makeup Organizer

After researching various products, I decided to get "A 5 Drawer Stackable, Transparent Makeup Organizer." The one I purchased on Amazon Canada is here. Unfortunately, I couldn't find the exact same one on Amazon USA; however, I did locate an even larger acrylic stackable makeup holder on Amazon USA here.

Be sure to check out the sizes. I have two stackable items that fit low enough against my mirror.

The Organizational Problem I Solved

To do my five-minute face, I use specific items and pulling each one out was taking up surface area on my vanity table. 

I've wanted a better organizing system for cosmetics for years but was never willing to treat myself! I'm so glad I finally bought myself this bonus gift!


As you can see in the above photo, each cosmetic drawer is sorted according to what I use. Best of all, when I need something, I simply pull the drawer open, use the item, put it back, and close the drawer. Nothing has to go onto the vanity table, taking up space.

Here's How I Sorted My Own Personal Cosmetics Unit Based on What I Use:

  1. The top drawer has eye makeup
  2. The second drawer has lip related items, nail files, scissors, and clippers
  3. The third drawer has blush and brushes
  4. The fourth drawer has mascara and my favorite under-the-eye brightener. 
  5. The fifth drawer holds some musk oil, some cream, and hair bands
Since I essentially use everything until it's gone, I don't have drawers or containers filled with old, unused makeup. For that reason, two stackable organizers are perfect.


In the above photo, notice that the bottom drawer is deeper. That's another reason I selected these two stackables. The top stackables are narrower drawers, but I needed at least one deeper drawer.


Here's a close-up photo of the narrow drawers. As you can see, the cosmetics in this drawer (mascara and under the eye cream) fit perfectly fine.


What I like about this unit is being able to put an eyeshadow collection box directly on top. It fits nicely. I made sure the width of the organizer would comfortably fit the eyeshadow box.


Notice the thickness and quality of the plastic. This is NOT a cheap flimsy piece of plastic. When you slide the drawers open, they stay in position nicely. Don't pull them too far because they'll come out. However, that's not an issue either because they quickly go back in place. 

Notice the non-slip black sheet that's included in each drawer. The non-slip insert is not only ideal for keeping things in place but also adds a decorative element.


You don't have to stack them. If your space is more conducive to a side-by-side storage system, you can position them beside each other.

Where to Get This Cosmetics Organizer - A Re-Cap

The makeup organizer above, that I purchased on Amazon Canada is here. Unfortunately, I couldn't find the exact same one on Amazon USA, however, I located an even larger acrylic stackable makeup holder on Amazon USA here. It's just as nice.


Note: The author may receive a commission from purchases made using links found in this article. “As an Amazon Associate, Ebay (EPN) and/or Esty (Awin) Affiliate, I (we) earn from qualifying purchases.”


Saturday, June 4, 2022

National Cheese Day - A Holiday Review

National Cheese Day is celebrated each year on June 4th.


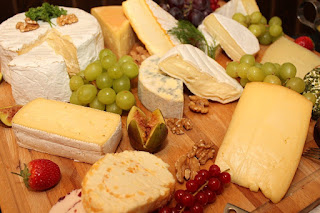
Image of a selection of cheeses

They say that the art of cheese making is so ancient that it predates recorded history. It is such a popular food staple that it can still satisfy any craving even after thousands of years. 

Interesting Cheese Facts:


  • Among the healthiest cheeses (which are better for lactose intolerance) are feta and goat cheese.
  • Cottage cheese (including ricotta) contain a muscle-building protein ~ up to 11 grams in a single serving.
  • For people with hypertension, Swiss cheese is a good option as it is naturally lower in sodium.
  • Did you know that cheeses are more flavorful at room temperature?  Just let them stand for one-half hour before serving. 

  • There are seven types of cheese:  

    1.  Fresh
    2.  Aged fresh
    3.  Soft white rind
    4.  Semi-soft
    5.  Hard
    6.  Blue
    7.  Flavor added


The most popular cheese is mozzarella. And it is a good source of calcium. Try the tip below for a tasty and healthy snack when you are not enjoying it on your favorite pizza! 


Image of a tray of cheese, tomatoes and basil
Image Source: Pixabay

Tip: Melt some part-skim mozzarella on sliced tomatoes and basil to boost your calcium intake for the day. 


Other Cheese Holidays


  • January 20 – National Cheese Lover's Day
  • April 12 - National Grilled Cheese Day
  • April 17 – National Cheese Ball Day
  • October 15 – National Cheese Curd Day

  • February 13 – National Cheddar Day


A neighborhood cat
Cheddar the Cat: Photos from Kimberly Austin Daly

*National Cheddar Day reminds me of a happy personal story:  My daughter has a very friendly neighborhood cat who regularly visits their home. He is an orange tabby named Cheddar! Cheddar recently got lost during a severe thunderstorm and the owners and my daughter posted descriptions and pictures of Cheddar on Facebook to locate him when he didn't come home. After 3 days, the postings resulted in locating Cheddar, who is back with his family and his favorite neighbors (my daughter & son-in-law). 


Summary


So, enjoy your favorite cheese in chunk, slice or dip form. Or baked in a favorite cheese dish (macaroni & cheese), added to grilled burgers to make a cheeseburger, or in dozens of different ways. Even a cat with a cheese name! :)


Mark June 4th on your calendar to be sure and celebrate National Cheese Day. 


National Cheese Day
June 4

A selection of cheeses
Source: Pixabay


For related reviews about cheese, click on ReviewThisReviews:Cheese


*National Cheese Day review written by Wednesday Elf


A Cookbook for Cheese Lovers ~


I Love Cheese Cookbook book cover
Found on Amazon


Note: The author may receive a commission from purchases made using links found in this article. “As an Amazon Associate, Ebay (EPN) and/or Esty (Awin) Affiliate, I (we) earn from qualifying purchases.”


Friday, June 3, 2022

McIntosh Van Gogh Fine China Tea Mug with Lid & Infuser Review

Van Gogh Mug
I love my new Van Gogh fine china lidded tea mug that my son gave me for Mother's Day this year.  Not only is it beautiful, it is quite serviceable.  

The mug came with an infuser which allows me to steep my loose tea leaves in the mug, plus a lid to cover it while it steeps. 

The infuser basket fits right inside the top of the mug. The lid has an opening that allows it to slip over the basket tab and completely cover the mug. The lid can be used with or without the basket inserted. 

The basket could also easily accommodate a tea bag, but I was thrilled to be able to simply pour my loose leaf tea in the basket, pour water over it, put the lid on, and let it steep. It is nice to eliminate the need for a tea bag. I enjoy being able to purchase loose leaf tea blends that allow me to add or mix flavors as desired.

The mug and lid are made of fine bone china, therefore it is very lightweight even when it is filled with tea. The lid could also be inverted to use as a coaster.

Previously, I have always covered my tea mugs with a saucer while the tea steeps.  It is wonderful to have a perfectly fitted matching lid with this beautiful tea mug, which I will, no doubt, use every day.


Van Gogh Designs on Fine China Tea Mugs

 McIntosh Van Gogh Almond Blossom Fine Bone China (15 oz) Tea Mug with Lid and Infuser in Matching Gift BoxCheck Price The design on my mug is the Vincent Van Gogh "Almond Blossoms".  Since blue is my favorite color, it was the perfect gift choice for me. 

Thanks to Van Gogh's style, the Almond Blossoms painting looks a lot like my favorite flowering tree, the dogwood. Thus, when I look at the lovely blue mug with the ivory blossom tree, it all represents my "favorites" to me, especially since it was a gift from my favorite son.  Okay, you got me!  He is my only son, but he is still my favorite son in the whole world.

The mug, lid and basket are all dishwasher and microwave safe.  I did wash them in the dishwasher before and after the first use without any issues.  While I may choose to wash them by hand, it is nice to know they can be washed in the dishwasher.

The mug, lid and infuser set are available in several Van Gogh designs. Each comes in a matching gift box. They are all lovely!  I do believe my son has hit on a new collection that he could add to each year for several years to come. 

Read More Product Reviews On
ReviewThisProducts.com


House of Sylvestermouse


Note: The author may receive a commission from purchases made using links found in this article. “As an Amazon Associate, Ebay (EPN) and/or Esty (Awin) Affiliate, I (we) earn from qualifying purchases.”


Thursday, June 2, 2022

Coleman Camp Oven Review

coleman camp oven

Who knew a Coleman Camp Oven could prove to be an essential baking tool at home? When I purchased this oven for a camping trip, it never once crossed my mind that I would find myself thankful for its use during an extended power outage at my primary residence. I have actually used it more at home during the pandemic than I would ever have imagined.

cinnamon rolls

Deliciousness! That is the word I associate with my little camping bakery. Imagine waking up to the irresistible aroma of fresh-out-of-the oven hot cinnamon rolls. Oh my yes! One might even make up an excuse for a staycation if this is how we roll.

homemade pizza

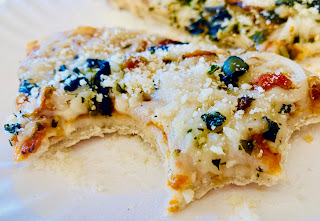
And that's only the start of the day. How about some homemade pizza for lunch? Such a breeze to bake in your Coleman oven. I found it best to bake the pizza on the top rack in the oven, though some cooks use a pizza stone on the bottom rack with very good results.

folded up coleman camp oven

Getting back to the oven itself, let's take a look at a few of the great features, along with more baking tips. When first unboxing the oven, I was pretty surprised at how compact it folds up for storage and travel. Very impressive design. It takes up almost no room in the Rubbermaid tote I use for organizing my camping kitchen gear. Included in the box: Coleman Camp Oven, two baking racks, and instructions.

Set-up takes less than 30 seconds. Open a couple of latches, unfold the oven, lock the latches, and pop in the two racks. Didn't even break a sweat.

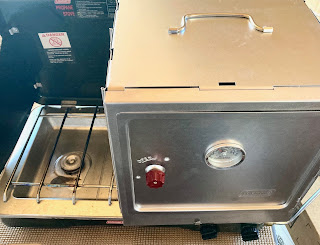
ready to use coleman camp oven

The oven sits over the top of a burner on my Coleman propane stove. To bake with the oven, you do need the stove and a full one-pound bottle of propane. I made the mistake of starting a pan of muffins with a partially empty propane canister attached to the stove. The propane ran out before the muffins had finished baking. Lesson learned. 

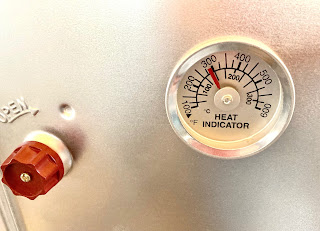
coleman camp oven heat indicator gauge

You will note the heat indicator gauge on the front door of the camp oven. I keep an eye on the temperature as the oven initially preheats and also while my food is cooking. It only takes about a minute for each 100 degrees of heat gain. Amazing!

cinnamon rolls

That said, the most important thing I have learned about baking temperatures with my Coleman oven is to bake things at a lower temp than what is recommended on the recipe or package. I get perfect muffins and cinnamon rolls when I bake them 100 degrees below the temperature I would use in a regular home oven (250 degrees instead of 350 degrees). They bake for about the same length of time.

coleman camp oven

Finally, it is important to use this camp oven out of the wind. If you are cooking outdoors on a windy day, or a chilly day, a windbreak makes a huge difference. Some owners of this oven cover it with a small welding blanket to help conserve heat when cooking outside in conditions that would make the oven work harder and longer. They do this because the oven has vent slots where heat can escape. I haven't tried this, but I appreciate the tip, and could see myself making use of this idea.

For a very moderate price, the Coleman Camp Oven is a winning addition to any camper's kitchen. And, as I have experienced this year, it is invaluable for those temporarily unable to use their regular home oven. It definitely perked me up on days when I would have had no other way to bake my meals. I can honestly say I am happy I made this purchase. Enough said. Let's eat!

homemade pizza with a bite out of it


You may also be interested in this related review by a writing colleague: Coleman Classic Stove


Note: The author may receive a commission from purchases made using links found in this article. “As an Amazon Associate, Ebay (EPN) and/or Esty (Awin) Affiliate, I (we) earn from qualifying purchases.”


Wednesday, June 1, 2022

Dieting is Hard Work, But Health and Wellness is So Important! A Product Review

Dieting is never easy.  Putting on the pounds happens when we aren't looking and unless you are blessed with an amazing  metabolism that burns everything (all the calories) you will probably gain some weight over the years.

Man with a measuring tape around his waist

                                                             Image by Michal Jarmoluk from Pixabay


It seems that women in particular have a much harder time to loose the extra pounds than our counterparts.  Why?  Well let's just say that hormones have a lot to do with that excess and why we can't seem to drop those pounds as easily.

Now I know that if you have been reading Review This Reviews, you will have come across some really good articles about a diet that seems to work for just about everyone.  Margaret Schindel and Barbara Cipak Tremblay have written about their journey with weight loss using the Keto Diet!  These two ladies are good friends of mine and while I was sceptical, I did trust that their journeys using this new way of eating were in fact the truth!

Well two years ago, I made the decision that it was high time that I took on a weight loss program again.  I had done many stints with Weight Watchers and Crash Dieting (of all kinds) and had limited success!  The problem was that none of that weight loss was sustainable for me.

I was at a point in my life where my knees hurt so badly and the excess weight that I had on my frame was not at all helping me feel better.  So after looking at this "new" weight loss system, I decided to jump on board and give it my best effort.

I am happy to say that in the last 2 years I have lost over 80 pounds and the amazing part of this is that I have kept that weight off and not regressed!  Has it been easy?  NO!  Dieting is never easy but I must say that this has been the best way for me to lose these pounds and not feel like I was missing out on life.  In my opinion, this is where many diets fail.  You feel so deprived that you break down and over indulge.  The slope is slippery once you start down that road, as I'm sure many of you are already aware.

Barbara and Margaret have done a great job in making me aware of ways to cook, bake, and all the great ways to enjoy food even in company.  No feeling like you have to watch others enjoy their meals while you nibble on a plate of greens that even Mr. Bunny might turn his nose up at.

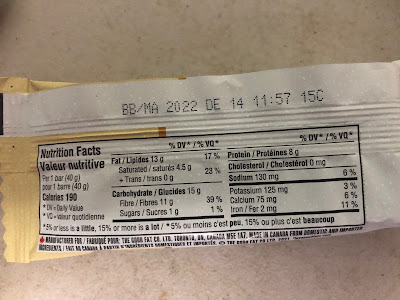
My own personal downfall is the need for sweets.  Any diet will definitely cut most of the sweets right out of the picture.  Sugar is after all one of the biggest reasons we have a weight problem to begin with.  Enter what I have found to be a life saver in my diet lifestyle!  They are called "Love Good Fats".  
love good fats packaging

love good fats package


These bars are full of nuts and good things that are on the Keto Diet.  They are Keto Certified, Gluten Free, Kosher, and non-GMO!  Made in Canada, these bars are delicious to say the least!  When I am feeling like I'm deprived of those sweet wonders that my friends are all indulging in, I make sure I have one of my Love Good Fats Bars with me!  (I actually take two or three because my friends all want to try them too).  Now I have a special treat just for me and my feelings of deprivation are not weighing me down (pardon the pun).

I would highly recommend these bars if you are on a Keto type diet, they are tasty, full of good fats, low in sugars and other hidden calorie boosters too.  

Right now in the US, you can get some of these Love Good Fats bars on Amazon, but in Canada, you can order them directly from the company! 


 I am checking into the ability for our American friends to order directly from the company as well and will update this when I have an answer for you.  I have looked into the bars available in the States and it seems that you only have the Mint Chocolate bars available.  In Canada, we have many more options.  I will update and hopefully you too can enjoy the nutty ones we are able to purchase.   

UPDATE!!!!! You can go to the Store Locator page and see where Love Good Fats are available closer to your own State!  Just follow this link:Store Locator

Just one caveat, with Keto dieting and these Love Good Fats bars, it's very hard to stop at one!  But, if you are having success with the Keto Lifestyle, then you know how to tell yourself that one is enough or to plan your meals so that your Carb counts can be within the range you need for your own personal dieting style.

I hope this Review helps you on your journey to a healthier and more sustainable way of life and that you do take the time to read some of Barbara's or Margaret\s Keto Reviews.  They are both full of excellent information that will help you on this journey through life. 


These are just a few of the many articles that I'm sure you will find interesting and very easy to follow and make yourself.   ReviewThisReviews.com and look for articles by Barbara (Brite-Ideas) or Margaret Schindel  you will come up with more information to help you become a successful Weight Loss Warrior!


Note: The author may receive a commission from purchases made using links found in this article. “As an Amazon Associate, Ebay (EPN) and/or Esty (Awin) Affiliate, I (we) earn from qualifying purchases.”


Most Recent Reviews on Review This Reviews


Search for Reviews by Subject, Author or Title

The Review This Reviews Contributors


SylvestermouseSylvestermouseDawn Rae BDawn Rae BMbgPhotoMbgPhotoBrite-IdeasBrite-IdeasWednesday ElfWednesday ElfOlivia MorrisOlivia MorrisTreasures by BrendaTreasures by BrendaThe Savvy AgeThe Savvy AgeMargaret SchindelMargaret SchindelRaintree AnnieRaintree AnnieLou16Lou16Sam MonacoSam MonacoTracey BoyerTracey BoyerRenaissance WomanRenaissance WomanBarbRadBarbRadBev OwensBev OwensBuckHawkBuckHawkDecorating for EventsDecorating for EventsHeather426Heather426Coletta TeskeColetta TeskeMissMerFaeryMissMerFaeryMickie_GMickie_G


Review This Reviews is Dedicated to the Memory of Our Beloved Friend and Fellow Contributor

Susan DeppnerSusan Deppner

We may be apart, but
You Are Not Forgotten


“As an Amazon Associate, Ebay (EPN) and or Etsy (Awin) Affiliate, I (we) earn from purchases.” Disclosure Statement

X