I wish I could say they are fast, but they do require time for raising. I have not found a way to start the cinnamon rolls in advance and bake them later. This is a recipe you will want to prepare and bake on the same day. Therefore, you either need to serve them for brunch, or get up before sunrise to start the dough. Either way, these cinnamon rolls are worth it!
It looks like a lot of instructions when you read the recipe below, but they are still fairly easy to make. I simply give enough details that even the inexperienced baker will have success with the recipe. Please do not let the appearance of difficulty or length keep you from baking these divine cinnamon rolls.
I will warn you in advance, the recipe makes 12 cinnamon rolls, but most of us can only eat one. They are that big and filling.
Set out 1/4 Stick (4 Tablespoons) of Butter to Soften plus a little more to grease baking pan & bowl (should set out about 30 minutes before needed)
Set out the mixing bowls & other supplies you will need. I use the following:
Deep bowl for mixing (flour tends to blow when mixing, so use a deep bowl)
Large glass bowl for raising
Hand Held Mixer
13 x 9 Baking Pan
Cutting board for kneading
Clean the counter top for rolling out dough to 18" x 12" size (Note: I have a 18 x 12 glass microwave plate from an old microwave that is perfect for this. If you can find one, it will save a lot of mess and clean-up time. Otherwise, I recommend the pastry mat with measurements featured below)
Preparation
Grease large glass bowl for raising
Flour Cutting Board
for kneading
Warm Milk & Buttermilk in microwave (stir every 15 seconds to
avoid burning)
Directions
In a large, deep mixing bowl, dissolve yeast in warm water
Add warm milk, warm buttermilk, sugar, softened butter, salt and 4 cups of flour. Beat (mixer) on medium speed until smooth.
By hand, spoon or fork, Stir in remaining flour to form a soft dough (dough will still be sticky)
Turn onto a floured cutting board surface, knead 6-8 minutes. (Dough should be smooth and elastic.)
Place in a greased bowl, turning over once to grease top of the dough ball.
Cover and let rise in a warm place for 1 hour
After the hour, Grease 13 x 9 baking pan
Flour clean counter or rolling surface & rolling pin
Melt 1/4 Cup Butter in microwave
Combine Brown Sugar, Instant Coffee Granules and Cinnamon
Punch Dough down, turn onto floured surface and roll out to 18" x 12" rectangle.
Brush with melted butter
Sprinkle brown sugar mixture over buttered dough to within ½” of edges. Use all of the mixture
Starting with long edge, Roll up Jelly-roll style and Pinch seam to seal
Cut into 12 slices
Place rolls, cut side up, in greased baking pan
Cover and let rise 30 minutes (will double again)
Preheat oven to 350 – Bake 25 – 28 minutes until golden brown
In a small bowl, beat icing ingredients until smooth and spread over rolls
Instructions:
Beat softened cream cheese and butter together with an electric mixer in a large bowl until creamy. Mix in the milk and vanilla, then gradually mix in the confectioners sugar and salt until smooth.
There are a few things in this post that may cause questions or uncertainty. Therefore, I am featuring a deep mixing bowl that I recommend for mixing dough. It won't keep the flour from "blowing", but it will keep more of it contained in the bowl. Also, saigon cinnamon is not the average, everyday cinnamon most of us have on our spice rack. It is a bolder, stronger tasting cinnamon that really gives the cinnamon rolls the needed "kick" that sets them apart from others.
Note: The author may receive a commission from purchases made using links found in this article. “As an Amazon Associate, Ebay (EPN) and/or Esty (Awin) Affiliate, I (we) earn from qualifying purchases.”
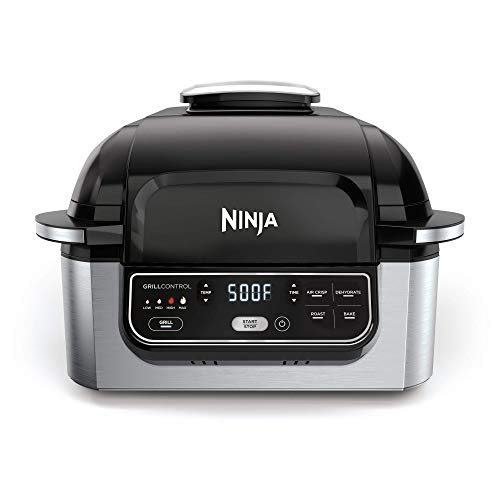
Our daughter got this Ninja Foodi Grill as a Christmas gift and I just have
to tell you how amazing this kitchen gadget really is.
Fran and I are both retired but we both work part-time jobs. On the days
that we work, we don't always prepare a meal for when we get
home.
With the Ninja Foodi Grill, we have a nice hot meal in 30 minutes or less.
You can grill, air fry, bake, roast, and dehydrate with the Foodi Grill.
Take foods from frozen to grilled juicy perfection in 30 minutes or
less.
Ninja Foodi Grill Features and Settings:
Grill Control, Low, Medium, High, and Max
Time Setting button in minutes
Air Crisp Setting
Dehydrate Setting
Roast and Bake Settings
Above is a photo of everything in the Ninja Foodi Grill box:
Recipe Book
Quick Start Guide
Owner's Guide
Foodi Grill
Splatter Shield
Removeable Cooking Pot
Grill Grate
Crisper Basket
Cleaning Brush
The recipe book has 15 great recipes for you to try. There are also charts
for grilling, air frying, and frozen food. The charts give you the amount of
food, preparation tips, Cooking temperatures, and recommended cooking
times.
We made these Sausage and Pepper Grinders, the recipe is on page 26 of the
included recipe book.
First, Fran cut 2 bell peppers and one onion and tossed them in a plastic
bag with 2 tablespoons of canola oil.
Then, insert the grill grate and close the hood. Select Grill, set the
temperature to low, and set the time to 28 minutes. Then, select start/stop
to begin preheating. The unit will beep to indicate that's time to add the
food, I love this feature it really takes the guesswork out of
preheating.
Add the peppers and onions on top of the grill grate and close the hood.
The timer will begin to count down. Grill the peppers and onions for 12
minutes, when the timer counts down to 16 minutes lift the hood, place them
in a bowl and cover with tin foil for later.
Add the sausage and close the hood, the timer will begin to count down
again. We cooked the sausage for 7 minutes per side for a total of 14
minutes. The recipe cooks the sausage for 6 minutes per side but I added 2
minutes at the beginning of the process knowing that I wanted my sausage
cooked a little more.
Lift the hood and remove the sausage. There will be 2 minutes left on the
timer, add your sausage rolls on the grill top and close the hood for the
last 2 minutes. Now you'll have nice toasty rolls for your sandwich. These
sausage grinders were delicious, I went a little overboard and ate 2 of them
myself.
I like the fact you can cook your whole meal by setting one time. We've
also made shrimp and fish fillets in the air crisper from frozen to
perfection.
Last week I made a couple of ribeye steaks. I brushed them with canola oil,
seasoned them, and grilled them for 6 minutes per side, they were a perfect
medium-rare. Let's say someone in the family likes their steak cooked
medium, all you have to do is leave one steak on the grill and add another
minute or two.
So far this has been a great addition to our kitchen gadgets. We've been
having a lot of fun experimenting with different foods and time
settings.
By the way, the splatter screen, removable cooking pot, grill grate, and
crisper basket are really easy to clean.
Note: The author may receive a commission from purchases made using links found in this article. “As an Amazon Associate, Ebay (EPN) and/or Esty (Awin) Affiliate, I (we) earn from qualifying purchases.”
I enjoy trying new recipes, especially when they are decorative and fun to make. I have always referred to that as Fun Food created while crafting in the kitchen. It combines my two favorite things to do: cooking & crafting.
I decided to make the Hot Cocoa Bombs as a special treat for my family on Christmas Eve. They were fantasic! Truly the best hot cocoa or hot chocolate I have ever tasted and we all enjoyed watching them "explode" inside the mug.
This delicious hot drink would be a wonderful treat for any holiday party, gathering, or just for fun!
Hot Cocoa Bomb Recipe
I looked at several existing recipes before I decided to combine ideas instead of using just one.
To start, I liked the idea to create a round ball by "gluing" two pieces together. I promptly ordered 2 sets of large sphere shaped silicone molds which would make 12 round hot cocoa bombs. I have worked with silicone molds many times and love them!
An alternative to gluing two pieces together would be to simply cover each filled 1/2 sphere with a layer of melted chocolate chips. I will try this at some point in the future. Decorating a flat surface would be fun and would still provide the same tasty treat.
Mini Marshmallows, chopped peppermint, chopped toffee (for filling)
Sprinkles or Chocolate shaving for decorating
Directions for Making Hot Cocoa Bombs
Melt 1 1/2 cups chocolate chips in the microwave in 15 second intervals, stirring in between cook times until fully melted
Using a spoon, smooth 2 teaspoons of melted chocolate (for each cavity) up the sides and around the bottom (save any leftovers and don't wash your bowl yet)
Set in the refrigerator for 30 minutes
Lay the silicone mold face down on a cookie tray and carefully "roll" the silicone cups from the chocolate bomb pieces one at at time. (take your time! You don't want to break the chocolate bomb pieces)
Fill 6 cavities with 1 Tablespoon hot cocoa mix, 6 or 7 mini marshmallows and/or other selected fillings
Melt about a teaspoon chocolate chips and use this as the "glue" to attach the top sphere to the lower filled sphere
Set in the refrigerator for 30 minutes
Decorate your cocoa bombs with sprinkles, chocolate shavings, chocolate drizzle, etc.
To serve, pour hot milk over the chocolate bomb and watch for melting drama to unfold! Of course, you will need a spoon to stir the ingredients the bomb has "exploded".
I found that melted chocolate chips were not a great consistancy for drizzle and did not make beautiful thin drizzles, but since the hot cocoa bombs are so big, it didn't really matter. If you want a pretty thin drizzle, I recommend buying melting chocolate and using a drizzle spoon.
Note: The author may receive a commission from purchases made using links found in this article. “As an Amazon Associate, Ebay (EPN) and/or Esty (Awin) Affiliate, I (we) earn from qualifying purchases.”
Today, I'm delighted to share my review of my luscious new hot chocolate
recipe, just in time for Christmas and other winter holiday celebrations and
the long, chilly weather during the months that follow them.
Once you taste this decadent cold-weather treat, you'll never want to settle
for ordinary hot cocoa again! It's so rich, thick, intensely chocolaty, and
indulgent, no one who tastes it will ever guess—or even believe—that this
fabulous beverage is also sugar-free and very low in carbohydrates. That means
you can enjoy it with your family and friends, even if some of are following a
low carb or ketogenic diet.
My carb-loving husband and I, both serious hot chocolate snobs, agree that
it's The Ultimate Hot Chocolate Recipe, keto or not!
Gourmet Hot Chocolate Any Chocolate Connoisseur Will Love (Just Don't Tell
Them It's Keto!)
'Tis the season for hot chocolate! During Christmas and other winter holidays,
and straight through the cold weather months, hot cocoa a welcome indulgence,
warming us from the inside out after we come in from the cold (and especially
after we've been playing outside in the snow...or shoveling it!).
Unfortunately, for those of us who follow a low carb or ketogenic diet, most
keto recipes for low carb hot chocolate just aren't all that tasty or
satisfying.
After trying and being disappointed by five or six different keto recipes for
hot cocoa and a couple of low carb hot chocolate mixes, I finally realized the
only way to find a keto hot chocolate recipe that would live up to my very
high expectations standards would be to develop one myself.
It took a lot of experimentation, but the final result definitely has
been worth all the time and effort I invested into the process. In fact, this
is the closest thing I've ever sipped to the gold-standard
chocolat chaudL'Africain at the world-famous
Angelina café in the Rue de Rivoli in Paris (where I had the good fortunate to enjoy a
cup once, many years ago).
That's why I'm confident that my recipe truly is worthy of the title, The
Ultimate Keto Hot Chocolate Recipe. In fact, second only to Angelina's iconic
L'Africain, I think this may well be The Ultimate Hot Chocolate Recipe,
period.
As my fellow Review This Reviews contributor Wednesday Elf explained in her
recent review of National Cocoa Day (which is just five days away, on December 13), although both terms for
this beloved beverage are often used interchangeably, the main difference is
whether they are made with real chocolate (often ground) or with cocoa
powder.
As I experimented with different combinations and proportions of ingredients
for my recipe, I found that mixing my favorite Dutched cocoa powder,
sugar-free chocolate chips, and Good Dee's Sipping Chocolate low carb hot
cocoa mix resulted in the perfect, intense, dark chocolate flavor I wanted.
Combining the cocoa and dark chocolate with macadamia milk (instead of the
more commonly used almond milk), heavy cream, and 1/8 teaspoon per serving of
xanthan gum, and then using a handheld immersion blender (aka stick blender)
to emulsify all the ingredients and thicken the mixture, worked
synergistically provided the rich, creamy taste and smooth, luxurious
consistency that other low carb hot chocolate recipes and mixes I had tried
lacked. Salt and pure vanilla extract to complement the dark chocolate flavor
that, together with the smoothness and creaminess rounded out the flavor
profile, smoothing out the intense, dark chocolate flavor with to create The
Ultimate Keto Hot Chocolate.
Regular, Mint, and Salted Caramel Keto Hot Chocolate
Once I had perfected the recipe, I decided to take this challenge to the next
level, creating low carb versions of my husband's favorite hot cocoa flavors
that we could both could enjoy: keto mint hot chocolate and keto salted
caramel hot chocolate.
I hadn't thought this recipe could get any better, but I was mistaken. The
mint and salted caramel variations turned out to be even more delicious than
the original version!
Years ago, I developed a fabulous sugar, fat, and calorie-laden hot
chocolate recipe for my husband, and it spoiled us both for any other hot
cocoa. I never wrote down the recipe or measured the ingredients; it was
all in my head, and I just tasted and adjusted the amounts and proportions
as I went along each time I made it.
Unfortunately, after I made the decision for medical reasons to follow
a ketogenic diet, I stopped making my husband's favorite winter treat because I
could no longer taste and adjust the flavor during the process (because of
the sugar). And we both missed it a lot.
So, I challenged myself to come up with a new low carb hot chocolate
recipe that would taste as rich and decadent as my original recipe, and
could meet or exceed my husband's extremely high standards for his
favorite beverage.
I succeeded beyond either of our wildest dreams. Now, I'm sharing the
recipe so you and those you love can enjoy it, too, whether or not they
are watching their sugar or carbohydrate intake.
Prep Time: 10 minutes
Cook Time:
10 minutes
Total Time:
20 minutes
Recipe Yield:
Four servings (approximately 6 fluid ounces per serving)
3/8 to 1/2 teaspoon salt (I used fine Himalayan pink crystal salt, which
contains beneficial amounts of 84 trace elements and iron, and is
less processed than regular table salt)
Measure the dry ingredients (Good Dee's Sipping Chocolate, Ghirardelli
Majestic Premium unsweetened cocoa powder, granulated BochaSweet sugar
replacement, xanthan gum, and salt) into a small bowl. Mix well
(pressing out any lumps of cocoa) and set aside.
Pour the Milkadamia unsweetened vanilla macadamia milk into a 2-cup
Pyrex glass measuring cup and microwave for 60 seconds or until hot.
Remove from microwave.
Place the sugar-free chocolate chips and ghee or butter into a 4-cup
Pyrex glass measuring cup. Microwave on high for 45–60 seconds,
depending on how powerful your microwave is. Stir the mixture well to
melt as much of the chocolate as possible, then repeat, stirring until
the chocolate is completely melted.
Stir the hot macadamia milk into the melted chocolate mixture in the
4-cup Pyrex measuring cup until well incorporated. Then, microwave for
another 60 seconds.
Stir in the dry ingredients, and then use an immersion blender (without
any attachments) to blend the contents of the measuring cup. (I find it
helpful to glide the immersion blender slowly over the bottom of the cup
and tilt it slightly in different directions.)
Add the heavy cream, then blend with the immersion blender for 20–30
seconds, until the mixture thickens slightly.
Microwave on high for 30–60 seconds, or until very hot, and stir in the
vanilla extract.
Divide evenly among four small mugs or two large mugs. Top with optional
whipped cream, if desired. Serve immediately.
Keto Mint Hot Chocolate Recipe Variation
For the best peppermint or mint hot chocolate you’ve ever tasted:
Replace the vanilla extract with 3/8 to 1/2 teaspoon (to taste) of pure
peppermint extract or pure mint extract.
I highly recommend using either Watkins Pure Peppermint Extract or
Watkins Pure Mint Extract (which contains a blend of spearmint and peppermint oils). Either
one will let you enjoy the fresh, minty flavor of a traditional candy can
stirrer in your hot cocoa, but without all the sugar, corn syrup, and
artificial flavoring and food coloring.
Keto Salted Caramel Hot Chocolate Recipe Variation
Transform this beverage into a keto salted caramel hot chocolate so
divine, it will make you close your eyes and purr with pleasure when you
take your first sip! Just make these simple tweaks to my original recipe:
This sumptuous hot chocolate is even better topped with a dollop of
lightly sweetened whipped cream. Here's how to make a delicious low carb
version.
At least 30–60 minutes before you plan to make this Ultimate Keto Hot
Chocolate Recipe, put some heavy whipping cream in a mixing bowl, stir
in a few drops of vanilla, mint, or peppermint extract, and sweeten to
taste with your favorite keto-friendly, natural, powdered sweetener
(confectioner's sugar replacement), such as powdered BochaSweet,
powdered monkfruit allulose blend sweetener, or powdered allulose. Place
the mixing bowl with the flavored cream in the refrigerator to chill,
along with a wire balloon whisk or the whisk attachment of your electric
mixer.
After making the hot chocolate recipe through step 6 (before you heat
the hot chocolate mixture for the last time and stir in the extract),
whip the cold, flavored, lightly sweetened cream in the chilled bowl
with the chilled whisk.
Finish preparing the hot chocolate recipe (steps 7 and 8), topping each
mug with a cloud of freshly whipped cream. Finish the whipped cream
topping with a light dusting of unsweetened cocoa, if desired.
Recipe Notes
Good Dee’s Sipping Chocolate is a key ingredient in this recipe! You can
order it, as well as the Good Dee’s Dark Chocolate Chips, either on
Amazon or on the Good Dee’s website. Consider adding some of the
delicious Good Dee’s keto cookie mix flavors I’ve reviewed previously to
your cart while you’re at it. After all, what’s better than cookies and
hot cocoa on a chilly day, especially around the holidays?
Note: If you don't get Amazon Prime free shipping, or the
Good Dee's products you want are out of stock on Amazon, or you'd prefer
to shop the full selection of Good Dee's products, you can save 15% off your total purchase price any time you
use my Good Dee's website affiliate shopping link and enter my unique discount coupon code GOODDEES15MRS during
checkout.
Using Ghirardelli Majestic Premium Cocoa makes a big difference in the
taste of this decadent hot chocolate. The more expensive
nib-alkalization process gives it a richer, smoother, better flavor.
Even though the generous 2-pound (32-ounce) canister looks as though it
would be a lifetime supply, I use this extraordinary cocoa powder so
often in this and other recipes, such as my luscious low carb keto
chocolate yogurt chip pudding parfait recipe (my favorite quick and easy
breakfast, lunch, dinner, dessert, or snack when I’m in the mood for
something sweet), that I have to replenish my supply a few times a year.
If you are unable to get the Ghirardelli Majestic Premium
and need to substitute a different brand or formula, please make sure to
choose a high-quality,
unsweetened, alkalized or Dutch-processed cocoa
powder. Although your hot chocolate won't taste the same as my original
recipe, if you use a different brand of alkalized or Dutch-processed
(aka Dutched or "Dutch"), it should still be delicious!
Making this hot beverage in a large, flat-bottomed Pyrex glass 4-cup
measuring cup lets you can see what's at the bottom of the hot mixture,
so you know whether the chocolate chips have melted completely and, if
so, whether all the melted chocolate has been incorporated into the hot
macadamia milk and melted butter mixture.
Using an immersion blender on medium speed creates the perfect
consistency. If you don't own one, you can use a regular blender, and
use a slim silicone scraper to make sure you get all of your delicious
hot beverage out of the container. My decades-old stick blender was a
gift from someone who knew how much I enjoy cooking and baking, and that
model was discontinued long ago. However, if you're looking for a good
one, the powerful
Müeller Austria Ultra-Stick 500 Watt 9-Speed Stainless Steel
Immersion Blender
has more than 20,000 5-star ratings on Amazon.
Nutrition Facts
I entered this recipe and its variations into Carb Manager to help me
calculate and track the calories, macros, and other nutrition data, based
on the specific ingredients and brands I used. I usually drink one-quarter
of the recipe, while my husband prefers to indulge in a larger portion.
So, here are the nutrition facts for both the smaller, typical serving
size (6 fluid ounces) and a double-size serving (12 fluid ounces).
The Ultimate Keto Hot Chocolate Recipe (Original, Mint, or Peppermint)
Nutrition Facts
One quarter of this recipe (6 fluid ounce serving) contains 1 net carb,
136 calories, 4.7 grams of dietary fiber, 2.8 grams of protein, and 13
grams of fat.
Half the recipe (12 fluid ounce serving)contains 2 net carbs, 272
calories, 9.4 grams of dietary fiber, 5.7 grams of protein, and 26.1 grams
of fat.
The Ultimate Keto Salted Caramel Hot Chocolate Recipe Nutrition
Facts
One quarter of this recipe (6 fluid ounce serving) contains 1 net carb,
136 calories, 4.7 grams of dietary fiber, 2.8 grams of protein, and 13
grams of fat.
Half the recipe (12 fluid ounce serving) contains 2 net carbs, 272
calories, 9.4 grams of dietary fiber, 5.7 grams of protein, and 26.1 grams
of fat.
Note: The author may receive a commission from purchases made using links found in this article. “As an Amazon Associate, Ebay (EPN) and/or Esty (Awin) Affiliate, I (we) earn from qualifying purchases.”
Thanksgiving dinners in America, and the dishes we serve, may seem to be
the traditional dinner everyone eats on this most thankful day of the year.
Not so. What each family considers to be the perfect dishes on this
'turkey day' may be completely different to someone living in a different
part of the country. What is traditional for you depends on where you live
and also the culture you grew up in. Let's explore a few different
regions and see what is commonly served for Thanksgiving dinner.
*A few recipe links are sprinkled throughout the following food
descriptions if you want to try adding them to your Thanksgiving
menu.
Turkey or Other Main Meats
Baked turkey with stuffing is the traditional Thanksgiving Day main
dish.
Fried turkey is popular in the South, especially in Texas.
Ham is often served in addition to turkey, especially for large
gatherings.
Stuffing
Image Source: Pixabay
The South prefers cornbread stuffing with their turkey
In the New England states you will find clams or oysters mixed with the
breadcrumbs in the stuffing.
In the Northeast, the stuffing is made with sausage.
The Southwest is known for their Tex-Mex style stuffing due to their
large Latino population. A favorite one is
Blue Cornmeal Chorizo Stuffing, which includes Chorizo sausage and serrano peppers in the blue corn
bread crumbs.
Side Dishes
Image Sources: Pixabay & AllRecipes
Creamed onions
made with pearl onions and heavy cream is a tradition in New
England.
Saurkraut is a staple for Thanksgiving dinner in Maryland, particularly
in Baltimore due to their large German-American population. And Maryland
crab cakes and corn-on-the-cob is often served.
Italian-Americans in New Jersey & parts of New York State
traditionally serve Manicotti (ricotta-stuffed crepe pasta topped with
marinara sauce) before the turkey is served. Or lasagna and baked ziti
with meatballs are known to grace the table as well.
The Northeastern quadrant of the country insists on homemade cranberry
relish or sauce with this holiday dinner.
The West and Southwest states serve a sweetened, fruity pasta salad which
is made with pasta, pineapples, mandarin oranges, Cool Whip, and
marshmallow topping. It's called
Frog Eye Salad.
In Utah, Jell-O salad is an important side dish for Thanksgiving
dinner.
The most traditional side dish in the Midwest is Green Bean
Casserole.
In the upper Midwest, German Potato Salad is a favorite side
dish.
In Minnesota and Wisconsin,
wild rice casserole
is a tradition. Ingredients include mushrooms, pecans, and onions, and
other variations.
Desserts
Image Source: Pixabay
Pumpkin pie always seems to be the traditional Thanksgiving dessert, but
this is actually a mainly Northeastern states dessert.
The South is famous for their Sweet Potato Pie.
New England is known for it's
Hasty Pudding
(originally known as Indian Pudding), a delicious and simple dessert made
with cornmeal, molasses, brown sugar, and spices. It's usually topped with
whipped cream or scoop of ice cream.
The Midwest Region favors Cherry Pie over Pumpkin.
Other Regional T-Day Dinner Traditions
Source: Pixabay
In New Mexico and other Southwestern states, the food word is
'spicy'. It's popular to add chile to everything, gravy, stuffing,
and even a chile-rub for the turkey.
Southern traditions include a large variety of foods for the Thanksgiving
table, including several types of macaroni and cheese, okra pickles,
cornbread, and sweet potatoes with marshmallow topping. And, of course,
lots of collard greens.
Happy Thanksgiving
What is your favorite dish or combination of dishes for Thanksgiving
Dinner?
Whatever your Thanksgiving menu includes, the contributors of
ReviewThisReviews wish you a Happy Thanksgiving.
*Regional Thanksgiving Dinners written by (c) Wednesday Elf
(11/21/2020)
Note: The author may receive a commission from purchases made using links found in this article. “As an Amazon Associate, Ebay (EPN) and/or Esty (Awin) Affiliate, I (we) earn from qualifying purchases.”