Showing posts with label Crafts. Show all posts

Monday, November 5, 2018

Reviewing the Teamoy Tunisian Crochet Hook Case

The Teamoy Tunisian Crochet Hook Case
Organization is not my strong suit. So I'm really happy when I find something that helps me to be more organized. I have found the Teamoy Tunisian Crochet Hook Case and I'm thrilled about how roomy, well-made, and helpful this little case is. Not only does it hold my brand new Tunisian Crochet Hooks, there is plenty of room for my other crochet hooks and other small supplies. 


Teamoy Tunisian Crochet Hook Case


This case is tall and thin; made to hold Tunisian crochet hooks (crochet hooks that are very similar in length and size to a single knitting needle). 

This little soft-sided case has two main zippered sections, Within each of those sections there is a variety of pockets and elastic bands that can organize longer crochet hooks (or knitting needles), traditional crochet hooks, as well as smaller supplies such as my locking stitch markers.

Not only are the crochet hooks held in by elasticized straps, the ends tuck in under flaps. This awesome design is going to prevent my clumsy self from accidentally dumping the contents out onto the floor each time I open the case. At this point, I can't imagine anything falling out accidentally. The zippers seem like quality zippers; not those cheapo zippers that are on many items.

This case is made from a "high quality and durable material, water-resistant and easy to clean up". There are also several colors/prints to choose from. I chose the cute cat print. 

The BEST feature about this case was the small price tag. It cost only $16.99 ! 

The only small complaint I have about this case, and it may be a complaint specifically to me, is the smell of the case when it arrived. It was wrapped in a sealed plastic bag. The smell of the "durable material" was strong when I opened that sealed packaging. It had an oily, "plastic" smell that bothered me (I am very sensitive to some chemical smells). I wiped off the case with a damp, slightly soapy cloth and then let the case air out before I spent time checking out all of the little pockets. There is no lingering odor.

If you crochet (or knit) and are in need of some organization, Teamoy may have a case for you.


If you'd like to see my first Tunisian crochet project (with gorgeous DK Colors yarn) check out my post here

my first Tunisian Crochet on Treasures, Travel, and Tales 


Note: The author may receive a commission from purchases made using links found in this article. “As an Amazon Associate, Ebay (EPN) and/or Esty (Awin) Affiliate, I (we) earn from qualifying purchases.”


Wednesday, October 3, 2018

Cool Nights, Crafty Nights, How to Get Through the Fall

When Summer gives way to Fall, all of a sudden we find ourselves looking for ways to keep busy indoors instead of outdoors.  It seems the older I get the more I like the idea of hunkering down in the quiet comfort of my home.  Let's Review some ways to make this time productive and fun!

Looking back over the last few months I realize that I did not want to come indoors at all.  Summer was glorious this year, with warm sunny days and warm evenings too!  Alas, all good things must come to an end, especially when you live in the north!

Fall is a great time to get cracking on all those things you wanted to do but didn't.  Fall is also that gateway to all kinds of Holidays that require your time and talents. It's a wonderful time to try your hand at making something crafty too.  Decorating your space was never easier, with themes provided by the Holidays.  So to that end, we will start getting all our crafts in order! Or we will try something new!

painting, paint brush and paints


Crafting gives our hands a chance to make something unique and beautiful.  It lets us express some of our hidden talents.  We see something we like and we just know that we could do that too!  So when we are indoors instead of running around outside, we can sit and give our hands a chance to make something that we have never done before.

Halloween and Thanksgiving are great times to try our hands at crafty ideas. We could start by  making special goodie bags for the children that visit our door on Halloween night.  If you have a little more time, maybe we could make something a little more personalized for our family who will visit during Thanksgiving.
Both of these holidays can launch us onto a new hobby.

Now unless you are reviving a hobby that you once invested in, I would not suggest that you go all out and purchase all the items you might be needing for a new hobby.  Head to your nearest  Dollar Tree! It's a great place to start a new hobby and you can do it on-line.  You just never know what you will find there that will twig an idea!  There are hundreds of items available that you might be able to use to fuel your creative genius.  From yarns, to paints, beads, canvases and findings, you know you will have a great time picking out the things that will be transformed under your hands.  Don't spend a lot of money on a craft or hobby until you are sure it is something that you will continue to do.  

There are a great number of "How To" books that will walk you through all stages of a new hobby.  Knitting, crocheting, leatherwork, macrame, rug hooking, drawing and so many more hobbies can be learned through the pages of a great How To book!  I've chosen just  a few to get you started.  There are also many You Tube videos that will give you a "working" look at how to make some things.  I guess what I'm saying is that your indoor time during these upcoming cold months can be productive and fun.  You just might find that you have a talent for a certain hobby. 


I have several writer friends right here on the REVIEW THIS REVIEWS team, that are so talented they have their own ETSY  shops, where they turn their hobbies into a small business.  All the contributors here are passionate about some form of hobby!  Greeting Cards, knitting, crocheting, photography it's all covered by our contributors.

If you don't feel inclined to make things yourself,  I would suggest that shopping at the Etsy Mall will help you find something beautiful, hand made and will help to support someone who is working hard to make things beautiful.   

craft and hobby collage


Note: The author may receive a commission from purchases made using links found in this article. “As an Amazon Associate, Ebay (EPN) and/or Esty (Awin) Affiliate, I (we) earn from qualifying purchases.”


Saturday, July 28, 2018

How To Make The Easiest Cuticle Oil Ever

How to make the easiest cuticle oil ever
Photo's by Lou16
Today I'm going to review how to make the easiest cuticle oil ever. Once you see how easy it is you'll wonder why you haven't always made your own DIY cuticle oil!

Don't use a cuticle oil? You're not alone, it's a step many people miss out when they do their nails at home. I must admit, but cuticles were in pretty bad shape and I would just rub my hand cream into them and think 'oh well, that's just my cuticles!'

This year I've decided to treat myself my getting my nails done once a month (well it's about every three weeks, but my husband thinks it's a monthly thing LOL!) and I do love it when they pop on the cuticle oil at the end. My cuticles are looking much better, but they would look even better if I used it a little bit more often.

Now I like the idea of using natural products and not having some of the additives that you find in some skincare/personal care products being present. I also know that lemon oil is great for softening cuticles, I just had to look for some cuticle oil recipes ...

There are so many recipes for DIY cuticle oil that they would make your head spin, but many of them used so many ingredients that it just seem such an effort. Using sweet almond oil, jojoba oil, vitamin E oil and about 5 different essential oils just seemed a lot for me to recommend to people, after all we don't have all these ingredients just lying around the house do we?

Well I found a recipe that used olive oil and just two essential oils and I changed the essential oils (based on my own aromatherapy knowledge, and on what I had on hand) and I've come up with the easiest cuticle oil ever -

How to make the easiest DIY cuticle oil ever - every thing ready to begin - olive oil, lemon oil, lavender oil, bottle and funnel

Easy DIY Cuticle Oil That Your Nails Will Love!


4 tbsp extra virgin olive oil
2 drops pure lemon essential oil
2 drops pure lavender essential oil.

Simply mix the ingredients together and keep in a bottle, I recommend seeing if you can find a nail polish style of bottle with a nail polish brush to keep it in (they didn't have any at my local store) or even a roller bottle.

These type of bottles will made it easier to apply, but aren't essential.   As you can see from my photo I just used a test tube style bottle (as I had it on hand) and I use a Q-tip to add the oil around my nails. I will let you know, however, that I have some roller bottles on order.

Lemon oil is fantastic for softening hard skin which is why it's a perfect addition to a cuticle oil. Lavender oil is a very nourishing oil, softening and just great for skin. The combination of these two oils works fantastically to help keep your cuticles looking fabulous and as an added bonus, using a cuticle oil after a manicure actually helps it stay looking beautiful for longer something I've only just found out!

                                                                                                                                                              
EXTRA TIP - if you take vitamin E capsules then simple pierce one of them and squeeze the contents into the cuticle oil.  It will make the oil even more moisturizing and rich (a much cheaper alternative to adding vitamin E oil!).
                                                                                                                                                                                                                                                                                                                             
It's very important that you use pure essential oils and not synthetic ones when making your own skincare as each essential oil brings it's own benefits and fragrant oils don't have these benefits.

I love to use Arbonne's essential oils when available, if I'm after an oil that they don't have then I make sure that the one I buy is 100% pure essential oil.

Aromatherapy Isn't Just About DIY Skincare!


You can use essential oils for lots of different things, here's a few articles that you might find interesting ...

How Aromatherapy can Help StressHow Aromatherapy Can Help Stress
Aromatherapy has proven to be very successful at helping to relieve stress, simply by using certain essential oils stress and conditions caused by stress can be alleveiated.

Essential Oil Room Humidifier and DiffuserEssential Oil Room Humidifier and Diffuser
Using essential oils in a humidifier or diffuser can add a lovely atmosphere to a room as essential oils can really help to work on your emotions from relaxing you or making you more upbeat.

Reviewing Uses for Tea Tree OilReviewing Uses for Tea Tree Oil
The herbaceous fragrance of tea tree doesn't begin to hint at how many uses there are for this essential oil from medicinal to beauty to household uses this is one very versatile essential oil.


How to make the easiest cuticle oil with only 4 ingredients
PIN ME


Note: The author may receive a commission from purchases made using links found in this article. “As an Amazon Associate, Ebay (EPN) and/or Esty (Awin) Affiliate, I (we) earn from qualifying purchases.”


Thursday, June 21, 2018

DIY Mercury Glass


diy mercury glass vase
It's time for a DIY project for the true romantics out there.  Is there anything lovelier than fresh cut flowers in an antiqued mercury glass vase?  Perhaps the reason mercury glass is such a popular centerpiece at weddings is the nostalgic effect it has on us.  I absolutely love the understated beauty and elegance of silvered glass.  The look, and the effect, is way too wonderful to save only for special occasions.  

I invite you to follow along with me and transform your own gorgeous flower vessels.  It takes very little time and money to create the beautiful mercury glass effect presented here.  In less than an hour, you can be enjoying your own timeless centerpiece.  If you're like me, you'll get hooked and create any number of these mercury glass vases for yourself and for gifting to friends and family.  This is a gift you can be sure will be used and appreciated.


products needed for diy mercury glass
What You Will Need
* Glass vase
* White vinegar
* Water
* Misting pump bottle
* Paper towels

Optional
* Tarp or plastic drop cloth
* Wooden dowel rod
* Gloves

Steps 1-5
  1. Mix one cup of white vinegar with one cup of water.  Pour into misting bottle.
  2. Use a paper towel or soft cloth to wipe your glass clean.
  3. Protect work surfaces with a tarp, newspapers, or a drop cloth.  
  4. Test mister to ensure you will get a very fine spray.
  5. Shake up your spray paint for two minutes.
glass container vase

Step 6
Depending on the type of glass container you are painting, you may find it very helpful to use a dowel rod.  Supporting your vase with a dowel makes it easy to mist and spray all of the surfaces at the same time (without getting paint on your hands or fingerprints on your vase).  It also enables you to spray the bottom of the vase without waiting for the paint to dry on the sides of the container.

When I was painting the test tube vases, I used short dowel rods that I stood on end in an old piece of wood.  All I did was drill some holes in a two-by-four.  Then, I stacked each test tube on a dowel, leaving enough space in between to give me room to maneuver with the mister and spray paint.


spray painted

Steps 7-8
Spray a very fine mist of the vinegar water on your vase.  The key to success is to start with a very light coating of the mist.  If you get large, running droplets, go ahead and wipe it down with a paper towel and start again.

Immediately spray over the mist with a light coat of the Looking Glass spray paint.  You will repeat these steps two to three times, so it is important not to try to get all of the silvering done all at once.  Light layering is essential to getting the desired vintage look of mercury glass.


painting progress diy mercury glass

Step 9
Very gently dab all over the misted and painted surface of the glass with a clean and dry paper towel. You want to blot up all spots of water and any larger droplets of paint.  This step creates the aged look of the silvered glass.


diy mercury glass vase

Step 10
Repeat the misting, painting, and blotting process until you are happy with the final effect.  I repeated the process three times on the vases pictured in this tutorial.

diy mercury glass vase with flowers

Step 11
Once the paint is dry, experiment with arranging your favorite flowers in your gorgeous mercury glass vases.  They look really nice in groupings of various sizes and shapes.

diy mercury glass holders with flowers
In this example, I placed three mercury glass test tubes in an antique bed spring.  The addition of a beveled mirror base created stability and an interesting reflective quality.  Peonies seemed just right for this type of vintage floral arrangement.


diy mercury glass vase with flowers

Mercury glass centerpieces don't have to be expensive to look like you spent big bucks at a floral shop.  Use the glass you already have at home.  It is so easy to upcycle any ordinary jar or cheap vase into something extraordinary.  There is something incredibly satisfying about giving a face-lift to a common, plain item.

We all hold the power of transformation in our hands.  Let's go create and share some beauty today.


Note: The author may receive a commission from purchases made using links found in this article. “As an Amazon Associate, Ebay (EPN) and/or Esty (Awin) Affiliate, I (we) earn from qualifying purchases.”


Saturday, June 9, 2018

A Review of Creativity on Review This!

Painting of a kitchen scene by artist Kimberly Austin Daly
(c) Kimberly Austin Daly, Artist*
Creativity Lives in Everyone!

My daughter is an artist.  She studied art in college, graduating with a degree in Fine Arts. But her creativity in this field has been present since she was old enough to hold a crayon.  All her life she has been compelled to draw & paint.  I've always admired her artistic ability because I can't draw a straight line with a ruler! :-)

*Artwork is the property of Kimberly Daly, Artist/Illustrator.  Copyright: Do not copy.  Permission granted for display in this story.


Bob playing the guitar
My hubby was a fine musician, having studied the violin for 14 years, then played the guitar for many more years and even had his own 'trio' during the 'folk music' era of our college days.
Greg playing guitar
Today my son plays guitar and several other instruments and has his own local band with a group of fellow musicians.  I can't play any instrument and have no musical ability.

My brother sings and plays guitar.  My mother and sister could sing up a storm. I can't carry a tune in a bucket!  

Crocheted plush animals
Coastal Crochet Crafts on Etsy

I used to say to my talented family that I had no 'talent' for anything, until they reminded me that my crochet and needlework crafting was MY creative ability.  


Creative Talent is in Everyone


You don't have to be able to sing or dance, play an instrument or draw to be talented.  Creativity in ANY area is a talent all its own.  It was a nice reminder that we all have some form of creative talent, whether its in the arts & crafts field, music or dance, or simply being a wonderful cook.  Being able to express ourselves in writing is also a creative endeavor.  


Highlighting a Few Reviews Written by Our Talented Contributors on Review This!


Our team of contributors who write for Review This! review many products and do music, book and movie reviews, in addition to a wide range of other topics.  They are also very creative, sharing a variety of crafts, tutorials of DIY projects, cooking and baking recipes, and photography and gardening tips.  The following are a few examples of this team's creative talents.


Crafts Reviews


Image of DIY Christmas Tree Ornaments
(c) Dawn Rae
How to Make Easy Christmas Tree Ornaments by Dawn Rae.  Dawn gives us easy step-by-step instructions on how to create with your children these simple, yet lovely, ornaments for your holiday tree.


Crochet poncho pattern
(c) Bev Owens

For crochet crafters, Bev Owens tells us about this easy pattern you can use to create your own handmade poncho in her review titled Reviewing A Crochet Poncho Pattern.


Crochet bluebird sitting on a branch
(c) Wednesday-Elf

Wednesday-Elf loves to crochet, particularly stuffed animals.  Handmade crafts are her favorite, as shown in this A Bird in the Hand-i-Craft article.  In addition to her own crochet crafting, she enjoys sharing the creative talents of many other fiber art creators on Etsy.


DIY Projects


DIY Mason Jar Bird Feeder
(c) RenaisanceWoman2010)
Clever & creative Diana (RenaissanceWoman2010) gives us a tutorial for a DIY Mason Jar Bird Feeder using a regular canning jar, a pretty plate or bowl, and a few other simple supplies (glue, wire, and a chick feeder base). Then just add bird seed and watch the local feathered friends in your area flock to your new bird feeder. 


Photography Tips


Lighthouse photo
(c) mbgphoto
Several of the Review This contributors are photographers, but Mary Beth Granger (mbgphoto) goes one step further with sharing her fabulous photography tips for all of us to learn to take even better photographs. She shares the tips she's learned from taking photography classes and doing LOTS of practice. I would imagine Mary Beth seldom goes anywhere without a camera. Her favorite subjects are lighthouses! Check out her Review of Photography Tips for some helpful advice for your own photographs. 


Recipe Reviews


Cupcake Cake Cookbook book cover
(c) Sylvestermouse

Sylvestermouse is our creative baker here on Review This! She loves to put together fancy cakes and cupcakes.  A quick look at one of her favorite cookbooks for baking (the Cupcake Cakes Cookbook) will give you an idea of some of the fun and clever ideas she often incorporates into her baking.


Gardening Tips


image of flowers
Olivia Morris is one of our resident gardeners.  In her How to Grow Your Way to Happiness and a Great Garden, she shares some tips for your spring planting. 


Articles on Creativity


For more articles on these creative reviews, click on each subject below:


What do you consider your 'creative' talent?  


(c) Review of Creativity by Wednesday Elf


Note: The author may receive a commission from purchases made using links found in this article. “As an Amazon Associate, Ebay (EPN) and/or Esty (Awin) Affiliate, I (we) earn from qualifying purchases.”


Thursday, June 7, 2018

Modern Masters Metal Effects Paint Review

copper weather vane
If you were to offer me something bright, shiny, and new, or, on the other hand, something with the rich patina of age, I would choose the luster of an item that shows signs of life every time.  The best example I can give is that of a copper weather vane.  I have always loved the verdigris patina of weathered copper.  So, when I discovered Modern Masters Metal Effects paints, I just knew I had to explore the possibilities of being able to speed up a process that normally takes place over many years.

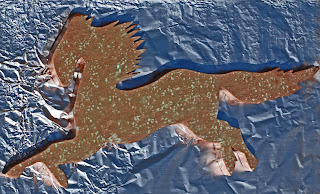
I was given a custom-made folk art weather vane many years ago.  Because of the loveliness of the wood grain, and because I didn't want to risk ruining what was a very meaningful gift, I'd been reluctant to paint or stain the weather vane with ordinary finishes.  Until I found the right product, I decided to leave my special art piece unfinished.

When I recently came across some online videos of how Modern Masters paints and patina activators had completely transformed normal household items (like vases, frames, furniture, garden statues, and planters), I knew the day had come to give my weather vane the finish it deserved and had waited for all this time.  I stopped by Hobby Lobby to pick up the Modern Masters copper paint and green patina kit and got started right away.

painting a weather vane
My first experiment with patina application.
You can finish a small project in a couple of days.  First, you apply two coats of their uniquely formulated primer.  Once those coats have dried, you then apply the first coat of your metal effects paint.  For the second application of copper paint, you work quickly to spray on the patina activator while the paint is still wet.  Then the really fascinating process begins.  Over the course of a few minutes, you will begin to see evidence of oxidation taking place.  The green patina begins to appear and will become more visible over the next several hours.  Your painted item will become more and more lovely with time.  The patina continues to evolve just as it would if you left copper outside to weather naturally.

patina brushed copper weather vane
Patina brushed in the direction of the grain.
Though I followed the directions, and spritzed on the patina activator as instructed, my first results were not what I wanted.  The verdigris patina was too speckled for my taste.  I decided to brush on a new coat of copper paint and begin again.  That is the beauty of this process:  you can redo until you are satisfied.  It doesn't take long to figure out what works best given the vision you have for a piece.  I found that lightly brushing the wet patina solution in the direction of the wood grain produced the best results.  It created a sense of movement and freedom that honors the true spirit of this horse.

I have been asked about whether or not the metal effects paint must be sealed.  The copper and bronze finishes are self-protective (no topcoat needed).  You are encouraged to seal the iron paint with rust patina.  There is a Modern Masters product specifically made for that purpose.  It is called Permacoat X-Treme Sealer.

The wonder of this product is that it works on so many different materials (wood, metal, plastic, stone, paper, etc.).  You have the choice of copper, bronze, and iron metal effects, along with green, blue, or rust patina activators.  I have purchased all three kits and have more projects currently in progress.  At the moment, I am restoring two vintage portholes recovered from ships.  They are getting the bronze treatment just as soon as I finish removing all of the salt, rust, paint, and caulk from their surfaces.  I will post photos throughout that process.

My other ongoing project involves the iron paint with rust activator.  I am refinishing some reclaimed doors I purchased from the Habitat for Humanity ReStore.  Those doors are going in the She Shed I built a while back.  I'll keep you posted with the results of that experiment as I determine which direction I'm heading with that design.  I'm thinking I might try a mixed media approach or play with some stencils when activating the patina.  And, of course, it won't stop at that.  I've been going through my jewelry box with the thought of giving some items a new look.  Check out my Pinterest Modern Masters Metal Effects board for inspiration.

As you can probably tell, I am totally sold on Modern Masters Metal Effects paints.  I highly recommend this creative medium.  You can purchase the product in kits or individually.  The paints and patina solutions come in a number of different quantities, making it easy and affordable to customize based on the size of your project.  Go have some fun with your own metal effects adventure in patina painting!  You will be amazed.


Note: The author may receive a commission from purchases made using links found in this article. “As an Amazon Associate, Ebay (EPN) and/or Esty (Awin) Affiliate, I (we) earn from qualifying purchases.”


Thursday, May 17, 2018

DIY Mason Jar Bird Feeder - Tutorial and Product Review

diy mason jar bird feeder and hummingbird
One of my favorite things in all the world is to spend time observing and photographing wild birds.  Most avid bird-watchers and photographers know that providing food is one way to ensure a steady stream of visitors and photo moments.  For some time now, I have wanted to make a new feeder for the birds that bring me such great pleasure.

Right away I knew that a mason jar bird feeder would be perfect for my country home.  Who doesn't love the charm of the ever-popular mason jar?  I thought I would share this project and a few tips for those out there who might also enjoy treating their feathered friends.  It is likely you already have most of what is needed for this easy do-it-yourself craft.  Let's get started.


Supplies Needed

  1. A regular mouth canning jar.
  2. A chick feeder base.
  3. A bowl or plate for the canopy over the jar.
  4. E6000 glue (or another super strength clear adhesive).
  5. Birdseed.
  6. Chain or picture wire (plant or basket hanger).
  7. Optional: Decorative knob.
dish for diy mason jar bird feeder
Step One:  Acquire a regular mouth canning jar and proportionately sized dish for its canopy.  You can find inexpensive mason jars at thrift stores, any of the dollar stores, craft stores, etc.  Though I already had some canning jars at home, I fell in love with The Pioneer Woman's embossed Betsy mason jars.  In addition to being especially lovely, the jars are 32 ounces, which means you won't have to fill your bird feeder as often as with smaller containers.

chick feeder base
Step Two:  Buy a screw-on chick feeder base that fits a regular mouth mason jar.  Most feed stores will have them, or you can purchase one online.  I get mine locally from either Tractor Supply Company or Big-R.  Typically, I pay $2.99-$3.99, depending on whether I buy a plastic or a galvanized metal feeder.  There are usually a few colors from which to choose.  My store has red, green, yellow, purple, and the galvanized silver feeders.


drilling a hole in a dish
Step Three:  Determine if you are going to hang your feeder or place it on a post.  If you plan to hang your bird feeder, you may wish to use a decorative knob on the canopy (to provide an anchor point for a chain or hanging wire).  The ceramic knob I chose couldn't be glued on, so I used my Dremel and a tile bit to drill a hole in the center of my canopy dish.  The bit worked perfectly and created a very neat little hole for the screw that holds the knob in place.  Tip:  Keep the surface wet and go slow while you are drilling.  Angle the bit slightly.


dish with screw through it
Step Four:  Insert a screw and use two washers (one for the interior screw and one for the exterior knob) to protect the bowl's surface.  I used a 3/4-inch long machine screw (#8) that fit the thickness of the bowl and the knob threads.  Tip:  Be careful not to over-tighten the screw.  You wouldn't want to crack that beautiful bowl (part of the vintage floral pasta bowl set by The Pioneer Woman).  *You can skip steps three and four if you choose a scalloped edge bowl and hook your plant hanger chains between the rounded curves.


mason jar and e6000 glue
Step Five:  Apply E6000 glue on the bottom rim of the mason jar (around the entire rim).  Follow the instructions on the glue label to ensure the best adhesion results.


glass jar attached to dish
Step Six:  Center bottom of mason jar inside canopy bowl and apply gentle pressure while the glue is bonding.  Set aside for the glue to cure.  Depending on the temperature and weather conditions, curing time can take 1-2 days.  It's important not to rush this step.

*In this photo, you are looking down inside the open mouth of the jar.  You can see how it is centered over the screw for the canopy knob.  Tip: Use a flathead screw so the jar rim can sit flush on the bowl.


diy mason jar bird feeder
Step Seven:  After the glue is fully cured, fill mason jar with birdseed.  I used safflower seed.  Supposedly, squirrels won't bother a feeder with this kind of seed.  It is also said to keep bully birds from hogging all of the seed.  Safflower seed attracts the kind of birds I am hoping to feed.  I plan to hang my feeder, but decided to wait one extra day to ensure the glue is totally cured.

Because my hummingbirds are attracted to red feeders, I am thoughtfully considering the best location for this bird feeder.  You can see from the introductory photo on this page that the first bird to check out my new feeder was a hummer.

I love how my DIY mason jar bird feeder project turned out (so much so that I am making more than one feeder).  In addition to the Betsy mason jars, the dishes I purchased for the canopies are a part of The Pioneer Woman Collection.  The pattern on the red bowl matches the embossed pattern on the glass jar.  I bought everything at Walmart.

Now I'm excited to see who shows up at the feeder today. 


Note: The author may receive a commission from purchases made using links found in this article. “As an Amazon Associate, Ebay (EPN) and/or Esty (Awin) Affiliate, I (we) earn from qualifying purchases.”


Saturday, April 28, 2018

Crobots – An Amigurumi Robots Crochet Pattern Book Review

Robot image
Pixabay Image w/Text by Fotojet
Robots have fascinated people for many years and are especially popular with children. No doubt the favorite robot in recent years is R2D2 from Star Wars!  The robots, androids and artificial intelligence we have seen are machines made of metal or some other hard material which are fascinating to watch and fun to look at, but not to hold. 

How about if we made playtime toy robots out of something soft, such as yarn?  If you were to crochet a yarn robot, it might be called a CROBOT


Crobots


Crobots book cover
Crobots: 20 Amigurumi Robots to Make
In this crochet pattern book called Crobots by Nelly Pailloux, there are instructions to create 20 tiny creatures which are cute and cuddly and adorable. 

Each Crobot pattern includes a color photo of the finished 'robot', an ingredients list showing you everything you need to match the photos in each section, along with instructions for creating them.  Each Crobot is crocheted in sections, then joined together. The instructions also include a Blueprint page showing you how the sections fit together. 


Example of a Crobot creature page of instructions

Many of these crobot creatures are decorated with beads, sequins, buttons, jewelry fasteners, and even nails & wire springs. 

A crocheted Crobot
Big Bot Created for an Anime Shop
This is Big Bot made using sequins for eyes and a spring nose.This version of a Crobot looks really cute if you are making it for an adult Sci-Fi, Steampunk or Anime Fan to perhaps decorate a work space or give as a unique gift.  

Toy Crobot (crocheted robot) from the Crobots pattern book
Thinker I call Snow Bot

But I crochet primarily for children, so my version of these crobots are finished with simple embroidery to keep them soft & safe all over. Whichever version you choose, these tiny Crobot robots are fun to make in crochet. They include a Space Mouse, a Cosmic Bear, a Dogbot, a Catbot, a Zombiebot, a Geisha Girl, a Ninjabot, an Alienbot and a dozen more.  They each take very small amount of yarn and are fun to make. 


A Few Examples of Crobots I Created from this Book

Image of the Crobots crochet pattern book with some handmade examples


The Thinker


A plush doll called The Thinker looking at his crochet pattern in the Crobots crochet book
This quiet little doll is called THINKER in the Crobot crochet book.  I decided he looked like a Snow Bot and crocheted him in white acrylic yarn filled with soft polyfil toy stuffing. He has burgundy ears on his large Amigurumi head, and embroidered features. His spindly embroidered arms and sweet wistful face show off the fact that he is a thinker who likes to sit quietly and figure things out. He's the perfect companion for a quiet child. He'd also sit quietly on someone's desk at work to help them concentrate.

Sammy the stuffed snow bot robot doll measures just 5 inches tall. He's soft and sweet and ready-to-ship. 


Matryoshka the Housekeeping Crobot


A Babushka doll in plush crochet looking at her crochet pattern
Burgundy Babushka Robot Doll

In the Crobot pattern book, Matryoshka is described as having a babushka mother and a robot for a father, making her quite technical at heart with the rivets, dials and switches shown in the pattern.  I decided she'd make just a sweet babushka doll, so her features are embroidered.  My version is round and soft and comfortable for little hands to hold.

My cute little Babuska doll is hand-crocheted in burgundy acrylic yarn with a white face with embroidered features. She is softly stuffed with polyfil toy stuffing and measures just 4 inches tall. 

Burgundy Babuska doll will fit nicely in a pocket for a child to carry around to play with. She is very squeezable in her round shape and would fit perfectly on someone's desk at work as a cheerful presence. She could also make an excellent stress ball and wouldn't mind at all if you squeeze her. :)

Burgundy Babuska would also make a cute Valentine's Gift, stocking stuffer, or a cute gift for little girls for a birthday or anytime gift.


Geisha


Geisha Girl Amigurumi Doll in crochet
Geisha Girl Amigurumi Doll
This is a Geisha Girl Amigurumi Doll who is a sweet and shy little doll dressed in Geisha Girl style. 

She measures 6 inches tall and has a sweet hand-embroidered face. 

Her elaborate hairstyle has red ties and she is wearing little sandals on her feet. 

Geisha Girl Doll is hand-crocheted in acrylic yarn in black and white with a Sunshine print Kimono. 

She is filled with new polyfil and is ready-to-ship to a toybox near you or be a friendly companion on your desktop.  


Past Examples


Collage of  crochet pattern book, The Crobots, with examples of crocheted robots

A few other examples of Crobots (a Baby Bot and a Sumo Robot Doll) I have made from this book are shown above.  These have sold, but can be recreated by a request through my Etsy Shop, Coastal Crochet Crafts.


Crobots Summary


A Collage of the crochet pattern book 'Crobots'
Crobots Craft Book is Available on Amazon

This is a unique and interesting little crochet pattern book for crafters who like to make little dolls, especially with a Sci-Fi or Steampunk theme to them. 


(c) 2018 by Wednesday Elf


Note: The author may receive a commission from purchases made using links found in this article. “As an Amazon Associate, Ebay (EPN) and/or Esty (Awin) Affiliate, I (we) earn from qualifying purchases.”


Most Recent Reviews on Review This Reviews


Search for Reviews by Subject, Author or Title

The Review This Reviews Contributors


SylvestermouseSylvestermouseDawn Rae BDawn Rae BMbgPhotoMbgPhotoBrite-IdeasBrite-IdeasWednesday ElfWednesday ElfOlivia MorrisOlivia MorrisTreasures by BrendaTreasures by BrendaThe Savvy AgeThe Savvy AgeMargaret SchindelMargaret SchindelRaintree AnnieRaintree AnnieLou16Lou16Sam MonacoSam MonacoTracey BoyerTracey BoyerRenaissance WomanRenaissance WomanBarbRadBarbRadBev OwensBev OwensBuckHawkBuckHawkDecorating for EventsDecorating for EventsHeather426Heather426Coletta TeskeColetta TeskeMissMerFaeryMissMerFaeryMickie_GMickie_G


Review This Reviews is Dedicated to the Memory of Our Beloved Friend and Fellow Contributor

Susan DeppnerSusan Deppner

We may be apart, but
You Are Not Forgotten


“As an Amazon Associate, Ebay (EPN) and or Etsy (Awin) Affiliate, I (we) earn from purchases.” Disclosure Statement

X