Showing posts with label Crafts. Show all posts

Monday, March 19, 2018

Reviewing Locking Stitch Markers

Locking stitch markers.
People who crochet and knit know that accuracy plays a role in having a good-looking finished product. I have crocheted off and on for years but only just discovered these fabulous and inexpensive stitch markers. I have noticed that using these little gadgets improved the looks of my finished items immediately and gives them a more professional appearance. Stitch markers completely take the guesswork out of the next round or next row.


Locking Stitch Markers


While watching a video crochet tutorial, the talented crochet artist was using stitch markers to mark the beginning of her round.
Note: when you crochet in circles, such as some ponchos, slippers, etc, that is called a round. Round is a row that connects the end to the beginning. 
The light bulb went on. That was a huge Aha moment for me. I've always had trouble connecting the rounds correctly - ending up with too many or too few stitches, or having a section that doesn't look like the other sections.

This flower is an example. It may be a very small issue that some would not notice, but the inconsistency in the appearance bothers me. The arrow shows where I joined the row, but didn't join it to the correct stitch. Every time I look at the flower, I notice that irregularity.


The little green stitch is not joined to the correct stitch

Prior to owning these little gadgets, I'd typically not mark the stitch at all. That led to problems with the finished item not looking correct (like the photo above). Or I'd use items like a paperclip or a piece of yarn to mark a stitch.  The problems I had with using those things were that I'd end up crocheting over the piece of yarn and make a mess. Or the paperclip would snag my item... or just fall out of the place it was meant to mark. 

Using stitch markers has already improved the looks of my finished items. 

I prefer the little plastic "safety pin" (locking) type. They stay in place, don't snag the yarn, and are easy to use. You simply use it like a safety pin, marking the first stitch in a round (which typically is the stitch you join the last stitch of the round to). 


Of course, there are other varieties if you don't care for the locking style. Other styles include: split ring, bulb safety pin, and even bulb safety pins with Swarovski crystals - for a little bling with your yarn.
Crystaletts stitch makers

Related Links:


Bev Owens shares a review of the Crochet Plain Blanket Pattern. It is a gorgeous two-color plaid blanket. In that review, she shares how to find both the free written pattern and the video tutorial. I agree with Bev, Yarnspirations and The Crochet Crowd are great places to get wonderful crochet patterns and instructions.

Wednesday Elf shares a review of a book Baby Crochet. I know that the internet is a quick and easy place to obtain crochet patterns and instructions, but I've had favorite crochet patterns that are lost because the site is no longer available. Avoid that problem with your own printed copy of the crochet patterns. 

My crochet adventures are located on my own blog Treasures, Travel, and Tales. There you can find an eclectic collection of how I spend my time, as well as the crochet flower pattern review from the photo above. You can also find a post about my newest passion, round loom knitting. Making hats for the grandbabies is great fun!


Note: The author may receive a commission from purchases made using links found in this article. “As an Amazon Associate, Ebay (EPN) and/or Esty (Awin) Affiliate, I (we) earn from qualifying purchases.”


Saturday, February 17, 2018

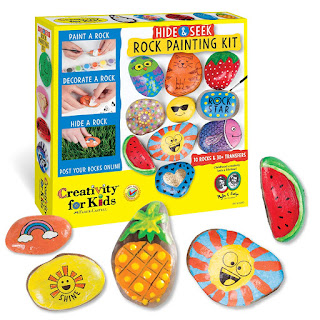
Reviewing Hide & Seek Rock Painting Kit by Creativity for Kids

Hide & Seek Rock Painting Kit for kids
Hide & Seek Rock Painting Kit
While working part time in a retail shop over the holidays,  I checked out a 'grandmother' and her purchase. The minute I saw what she was buying for a grandchild ~ this Rock Painting Kit ~ I knew immediately that it was the perfect Christmas gift for MY grandson as well.  Naturally, by the end of my work day, I had purchased my own kit to send to my artistically inclined 8-year-old grandson David. 

David loves to draw, color and paint, and is a very creative child, so it is not surprising that 'Creativity for Kids' has a variety of creative kits that appeal to kids like him. 


Creativity for Kids Company


Creativity for Kids is a division of the Faber-Castell company, established in 1761 by the cabinet maker Kaspar Faber and  is one of the oldest industrial companies in the world.  

The company is the world’s leading manufacturer of wood-cased pencils with a varied range of products for writing, drawing and creative design.

Faber-Castell acquired Creativity for Kids, the leading U.S. specialty manufacturer of creative activity products for children of all ages, in 1999 and is now headquartered in Cleveland, Ohio.  The next year (2000) the company introduced Children’s Art Products, which are a line of playing and learning art supplies for children.  

The creative kits include a wide variety of artistic play from painting, jewelry making, garden crafts, lighting crafts, science-related invention kits, and a host of other kits in many fields.

You can see the whole range of kits at their website.


Hide & Seek Rock Painting Kit


The kit I chose for my grandson, David, age 8,  was the Hide & Seek Rock Painting Kit.  


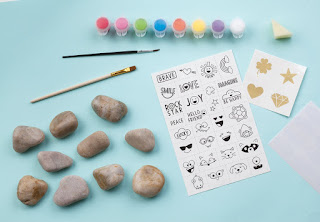
Contents of Hide & Seek Rock Painting Kit
Image from Amazon of kit contents
The kit comes with 10 River Rocks, 8 paint colors, 2 paint brushes, 20 transfer designs, tracking stickers, a transfer sponge and instructions.  

This rock painting kit is called 'Hide & Seek' because you can hide the rocks outside and leave clues on the company's Facebook page for people to go and find your rocks. The online link is printed on the package.

I thought this would be a fun project for David & Tyler who love to spend time outside in parks in their area. And when they finish painting all the rocks that came in the kit, they can find more rocks in parks and woods to continue using the kit.


Grandson with their finished painted rocks from the Hide & Seek Rock Painting Kit
David & Tyler with their painted rocks (c) Elf
The age group for this craft activity kit states it is for children 6 years and up, but David's little 3-1/2 year old brother enjoyed 'painting' the rocks too and both  enjoyed the projects (as you can see in the photo).

The company's motto states:

“Rock Painting is a fun way for you, your friends and family to spread kindness, encouragement and happiness throughout your community – one rock at a time."

Creativity for Kids helps develop children's problem solving and critical thinking skills. I found this rock painting kit to be a fun and delightful educational toy for my young grandsons.


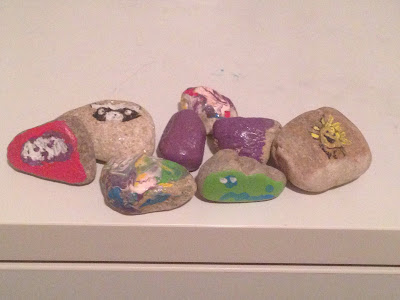
My Grandsons' Collection of Painted Rocks!


Collection of painted rocks


More Toy Reviews can be found at: 


(c) Wednesday Elf 2/17/2018


Note: The author may receive a commission from purchases made using links found in this article. “As an Amazon Associate, Ebay (EPN) and/or Esty (Awin) Affiliate, I (we) earn from qualifying purchases.”


Wednesday, December 13, 2017

Amazing Hobby Kits That Will Encourage Dexterity and Fun! A Hobby Review

Kids love to use their hands! Let's Review how to help them make beautiful and fun things!

Christmas is just days away and everyone, kids and grown ups too, are looking forward to those fun family times that they can spend together.  Making great memories is all part of the fun at Christmas time.  Those memories are made up of the times we play together, learn together and just have some fun together. So let's get down to Reviewing some great ways to make memories and get those children using their creative juices in fun and crafty ways.

I can't think of a better way of making lasting memories than sharing what we love!  It's so easy to do, with a little foresight and planning your children and grandchildren will be so engaged in something new.


hobby kits, sewing and crafts
Crafts that keep their hands busy are especially wonderful.  They will learn new skills  and make something that they can share with their friends too.  These crafts like embroidery, can easily be taught to those children in the 7 to 9 year range or older.  They have enough dexterity in their fingers to handle the tiny details.  They can try to make something extra special with several different kits that you can put together yourself or there are kits available that have everything needed to complete a project from start to finish.

Whether it's knitting or sewing, origami (paper folding), or needlepoint, little hands love to try and we as parents and grandparents love to share!  Premade kits are available and generally they have a great range of ages that are capable of following the instructions!  You don't want to overwhelm them with something too difficult for their little hands to accomplish.

I personally love this kit from Amazon!  You see I was a dressmaker for many, many years and my love for sewing started out when I was 7 or 8.  I made pillows and little critters for everyone.  My mother whose 86 now, still has a pillow that I made for her!  So if sewing is one of your favorite pastimes, this kit would be a perfect way to share that love!

So many projects and they are all very interesting and creative too! You don't have to invest a lot of money into a craft, just find out if that particular craft resonates with your young ones. If not, then they will still have learned a lesson in creativity!

Maybe your little one's hands aren't ready for those really small motor skills or they are much more interested in putting their visions and ideas onto paper!  One of my granddaughters is a master at drawing and loves to do that more than anything.


man drawing with daughter
Her poor dad is always running out of computer paper because my little Miss Addie, has drawn on each and every page available to her.  We needed to find something for her so that her Dad could keep his paper where he needed it and she could draw to her hearts content.  We found a great compromise and she is over the moon about it too!

Have you heard of Boogie Boards?  They are similar to the "Etch-a-Sketch" that we had in our day, but easier to use.  Kids can draw on the pad with a stylus and then erase it at will.  It's great for long road trips when you know the children will get restless, and a great way for kids to use their hands creatively.

Now if you have a budding scientist in your midst, then I would suggest one of the many kits that are available for them too. They can Tumble rocks or grow their own crystals, or even make their own soaps and beauty products. There are kits for knitting and crochet, macrame and T-shirt printing. Anything that is hobby related has a book or several books to give children ideas and projects that will keep their hands busy.

Grammie Olivia's Hobby Central
This is one of my favorite pages on Amazon. All of my grandchildren will be getting something special from these pages, because there is just so much to choose from.  Please let me know if you find that special something for your children or grandchildren!  Have fun making memories and great crafts too!

My friend Bev, just did a great review on a Science Lab that would be perfect for little girls too, you can check out her Review right here!


pictures are courtesy of Pixabay.com


Note: The author may receive a commission from purchases made using links found in this article. “As an Amazon Associate, Ebay (EPN) and/or Esty (Awin) Affiliate, I (we) earn from qualifying purchases.”


Friday, December 1, 2017

Bead & Sequin Christmas Ornament Kits Review

Bead & Sequin Ornament Kits Review

Make Your Own Treasured Keepsake with Beaded Christmas Ornament Kits

Handmade beaded Christmas ornaments are a fabulous gift to give to just about anyone.  My own Christmas tree is loaded with Christmas tree ornaments that have been given to me over the years.  I have a whole collection of ornaments from my grandmother.  Since she is no longer with me, I cherish them more now than I did the day I received them.

I have keepsake ornaments that my parents gave to me and beautiful handmade beaded ornaments that my mother made for me when I was still a child.  I also have handmade ornaments from my children.  Now that they are grown, it is a walk in the past to touch the ornaments those precious little hands made.

Giving Christmas ornaments as Christmas gifts has become a family tradition in our home.  Why not make your own beaded Christmas ornaments and start a new family tradition today?


Beaded Ornament Handmade by My Mother


This is one of the ornaments that my mother made for me when I was a little girl. It is approximately 45 years old. It is one of my greatest treasures.

In my minds eye, I can still see my mom sitting at the kitchen table, placing each bead, each sequin in just the right place to make this lovely keepsake.  Year after year, this ornament finds it's special place on our tree.

Beaded Christmas Ornament Kits


An Ornament I Made for Our Son

I made this spider ornament for my son 22 years ago.  Each year, regardless of when I decorate our Christmas tree, I hold the little spider aside for my son to add to the tree.  To this day, our tree is not completely finished until he comes home and hangs the spider on the tree. 


Beaded Christmas Ornament Kits


I made the spider long before the internet and computers became a household "utility".  I have never gone back to write my own instructions online.


This Was A Gift I Made for Our Daughter

I chose to make this ornament for my daughter because her favorite color is purple.  However, there is another meaning behind the color choice.  Purple is a combination of red and blue, the warmest and coolest colors, therefore purple is considered to be the ideal color.  Thus, an ideal beaded ornament for an ideal daughter!


 Beaded Christmas Ornament Kits


I Made This Ornament for Each of Our Children

In addition to the ornaments I made with the individual child in mind, I have also made matching ornaments over the years for both of our children. The green carousel ornament is one that I made for both children. 

Beaded Christmas Ornament Kits

Ornament Kits or Instruction Books

I personally prefer the ornament kits because they come prepackaged with everything needed to complete a beaded ornament, except the craft glue.   However, sometimes a kit is not available in a specific color or design.  Then I pull out my trusty books and buy the supplies required separately. 

Either way, the gift of a handmade ornament is special to the recipient and will be a cherished treasure, just as the ones I have shared above, for decades to come.

 Christmas Crafts for Kids,36 Sets Christmas Beaded Ornament KitCheck Price Vintage Walco Holiday Silver Bells Beaded Ornament Kit Makes 3Check Price Sunrise Craft & Hobby Ruby #56 Collector Ornament Ornament KitCheck Price Beaded Ornament Covers: A Beginner's GuideCheck Price


Beaded Ornament Kits

Because of my on love for making beaded ornaments, I have several beaded ornament kits available in my own Ebay store.  My inventory changes often simply because they sell out and additional kits are not always available from the suppliers.

Here are a few that I currently have in stock:


RSS feeds don't always load properly. If the feed is not showing above, you can see the ornament kits available in my Ebay store by clicking here!


See More Craft Reviews at
ReviewThisCrafts.com

Where you will find some awesome Craft Reviews & Tutorials like these, and more!


Bead & Sequin Christmas Ornament Kits Reviewed by:
House of Sylvestermouse


Note: The author may receive a commission from purchases made using links found in this article. “As an Amazon Associate, Ebay (EPN) and/or Esty (Awin) Affiliate, I (we) earn from qualifying purchases.”


Monday, November 27, 2017

How to Make Easy Christmas Tree Ornaments

Ornaments made with love. 
Today I am reviewing an easy way to make beautiful Christmas tree ornaments using tri-beads. This is a great project to make with children. 

The best ornaments I've ever placed on my Christmas tree over the years were these ornaments made by my children made in school and given to me as gifts. The ornaments were special because they were made by my children. They were beautiful then because they were made by children's hands. They are beautiful still today because of the sparkling colors.

Yes, I wrote that they are beautiful still today. These ornaments are durable. I still have those ornaments from years ago. I loved these ornaments so much that I have replicated the project with the students at work. Over the years, I've sent many children home with these ornaments as gifts for their caregivers.

Now I'm sharing the step-by-step instructions how to make these incredibly simple ornaments with the children in your life. Or perhaps you want to make your own ornaments. I have to admit that sometimes I make these ornaments when I'm alone and have used them for decorations when wrapping gifts. There are many ways to enjoy these easy-to-make decorations. 

Finally, remember that the best gift you can give this season is the gift of your time and attention. Especially when you are spending time with a children. 

Materials:
plastic tri-beads 
pipe cleaners (either tinsel or chenille)
1/8" wide ribbons (optional)

Tools:
heavy-duty scissors
pliers 


Instructions:
Gather your beads and pipe cleaners. Ribbon is options (but preferred by the children).

Gather your tools. Heavy-duty scissors or wire cutters are needed to cut the pipe cleaners. And pliers to bend the wire tips are optional but highly recommended.

Be aware: Take care when cutting pipe cleaners. This project is extremely easy, with the exception of trimming the pipe cleaners. The wire is sometimes difficult to cut and the tips of the pipe cleaners are "pokey". Younger children may need to be supervised closely to ensure they don't poke or scratch themselves.


Candy Cane Ornament Instructions:


1. To make the candy cane bead ornament, knot the end of the pipe cleaner and pull the knot tight.

2. Carefully cut the end off; just below the knot. If a sharp end remains, bend it with the pliers or your fingers toward the knot, tucking it into the bulk of the knot (in order to be safe for little fingers)

3. Allow the child to slide beads onto the pipe cleaner; snugging the beads up against the knot. The tri-beads fit together beautifully and create a "round" shape. Some children like the traditional red and white candy cane stripes. Some children prefer psychedelic colors. Have fun with it.


4. Fill the pipe cleaner to the desired length; making sure to leave enough material to make a knot.( make the knot shape loosely then work to snug the knot up toward the last bead in order to hold the design together snugly).


5. Note the knot is snugged up to the last bead. Check the end for any sharp points and bend it up, out of the way, if needed (a point is visible in the photos. It is probably not unsafe to leave it, but I prefer to  bend it out of the way - just to be safe.

Finish the candy cane with a bow if desired. The ornament can be hung in the tree by the hook of the cane. Or traditional ornament hooks can be purchased and added. Occasionally, the children choose to use the ribbon for a loop at the top of the candy cane for hanging. 


Wreath Ornament Instructions:


1. Making a wreath is similar to making the candy cane except, Do Not knot either end. Thread the beads onto the pipe cleaner and gather them in the middle of the pipe cleaner.

2. Leave approximately 2" or more of empty pipe cleaner at each end. Bend the ornament into a round shape and begin to tie a know at the top (as though you are tying the first portion of a shoelace knot).

3. Pull the ends together, twisting lightly to form a single pipe cleaner from the two ends.

4. Bend the end down to form a loop; wrapping the very end around the portion of the pipe cleaner that is holding the bead. If there is a point piece remaining (as shown) use the pliers, or your fingers, to carefully wrap it more tightly around in order to hide the end.

5. Add ribbons as desired.


And with that, you have the finished products. Happy Holidays to you and yours. And remember to give the gift of your time and attention.

Note: This article was previously published elsewhere. The instructions and photographs are by the author.


Note: The author may receive a commission from purchases made using links found in this article. “As an Amazon Associate, Ebay (EPN) and/or Esty (Awin) Affiliate, I (we) earn from qualifying purchases.”


Tuesday, July 4, 2017

Crochet Plaid Blanket Pattern Reviewed

A Perfect Gift For His Man Cave

crochet needles and yarn
Crochet A Blanket For Him Image courtesy of Pixabay.com
Today, I'll be reviewing a crochet plaid blanket pattern that I plan to make for my son-in-law for Christmas. As I write this it is the 4th of July but now is the time to plan for making things like this to be sure that it is, in fact, finished before Christmas morning arrives.

I found this wonderful pattern at Yarnspirations.com. It is called the Buffalo Plaid Afghan and it is free to download and print. Actually, on the page it not only lets you get the pattern but you can purchase your yarn there, too; if you so desire. 

The pattern was created to celebrate the 150th birthday of our friends to the north, Canada. That is pretty neat in and of itself. What caught my eye was the manliness of the design. It is sometimes difficult to find things that we crocheters can do for the men in our lives. Oh, sure, we can do a scarf or a hat. We can hook up a pair of socks for them and we can even do other blankets. The options for a blanket are usually just picking a color scheme that might appeal to a guy, though. In my opinion a plaid blanket is perfect for a man. 

I've mentioned in other articles that I like to visit Mikey at The Crochet Crowd and watch his tutorials. Well, he has a tutorial on the blanket I want to make using this pattern!


The pattern and the video recommend that you use blanket yarn which is a thicker option of yarn. It is kind of bulky and works up pretty fast. You can choose any color combination that you want; it doesn't have to be in the red and black. Personally, I do not care to work with the bulkier yarns so when I start the one that I will make, I plan to substitute the yarn for a standard 4 ply yarn and use a smaller hook than is recommended in the pattern. That is the fun thing about crochet, you can usually adapt a pattern to suit your own tastes.

As you can see by the video this crochet plaid blanket will work up pretty quickly. It is just a matter of creating the mesh work and then doing the overlay crochet to finish it off. I love this pattern and I think that my son-in-law will love the blanket when I give it to him. If time allows, I may do one for my hubby, too.

For some additional ideas for things to create in crochet for the men in your lives, you might enjoy this set of patterns.


I know it is only July but if you plan to craft some gifts for the holidays; it is time to look for the patterns, get your supplies and start working on them. I love making things for gifts for my family. How about you? Do you craft items for gifts?


Note: The author may receive a commission from purchases made using links found in this article. “As an Amazon Associate, Ebay (EPN) and/or Esty (Awin) Affiliate, I (we) earn from qualifying purchases.”


Friday, June 23, 2017

Complete Guide to Needlework by Reader's Digest Reviewed

Complete Guide to Needlework Reviewed on Review This!
I have a very extensive craft library in my craft room, but there are a few books that stand out as the very best.  The Complete Guide to Needlework by Reader's Digest is by far the very best craft reference book I own.  I refer to it more often than any other book in my library.

Actually, I use the book for reference, but anyone who wanted to learn basic techniques in embroidery, smocking, quilting, needlepoint, knitting, crochet, tatting, or just about any other needlework technique, will find excellent "how-to" guides for beginners in this book.


Complete Guide to Needlework by Reader's Digest


 Reader's Digest COMPLETE GUIDE TO NEEDLEWORKI know this book was published in 1979, but it is far from outdated.  Basic needlework techniques don't change with time.  As a matter of fact, we need these types of instructional books to ensure the techniques won't be lost in time.

Because I enjoy all of these crafts, I tend to set one aside for a while and pick up another.  Eventually, I go back to the first one and I need to refresh my memory on certain stitches or even reading a pattern.  I pull this book off the shelf, look it up and, voilà, I am ready to stitch again! 

For example, I recently came across "featherstitch" in an embroidery pattern.  I sat staring into space as if the vision of how to make that stitch would miraculously appear before my eyes.  It only "miraculously appeared" when I pulled my Complete Guide to Needlework down and looked it up.  On page 214, I found exactly what I needed.  A verbal description as well as excellent illustrations.  

I have also found that I tend to forget certain crochet pattern abbreviations if I have not used them in a while.  For those of you who crochet, you will laugh when I tell you I recently had to look up what "dec" meant on a pattern.  Yes, I was embarrassed when my trusty book gave me the answer, but amazingly, the pages didn't laugh at me.  Another crocheter would have laughed with reckless abandon.


Patterns in Complete Guide to Needlework


Complete Guide to Needlework Book Reviewed on Review This!
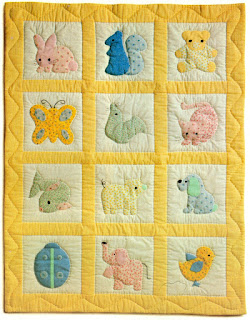
There are also some wonderful patterns in the Complete Guide to Needlework by Reader's Digest.  I tend to forget that those are there.  While flipping through the book today, I came across this awesome pattern for a baby quilt appliqued with baby animals.  The pattern includes the drawn animals and gives the instructions on how to enlarge the animals on a grid.  I love the detail!  It is so wonderful to have a step by step tutorial with the pattern.  

This particular pattern uses several needlework techniques to complete the baby quilt as shown.  Applique, quilting and embroidery are all a part of this fabulous piece, but you could make the quilt based on your own skill level.  Leave off the quilting and the embroidery to simplify it.  It would be an excellent way to learn how to enlarge the pattern with a grid and make a lovely applique baby quilt that would be forever treasured.

There are patterns for many of the needlework techniques.  It truly is a "complete" guide to needlework!

Read More Book Reviews at
ReviewThisBooks.com


Complete Guide to Needlework by Reader's Digest Book Review Written by:
House of Sylvestermouse


Note: The author may receive a commission from purchases made using links found in this article. “As an Amazon Associate, Ebay (EPN) and/or Esty (Awin) Affiliate, I (we) earn from qualifying purchases.”


Saturday, April 29, 2017

A Bird in the Hand-i-Craft

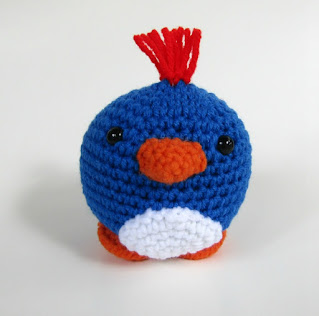
Plush toy bluebird
Bluebird Plush Toy in Crochet
 A review of crafty toy birds.

There are several 'Bird Days' throughout the year, with the first one occurring on January 5th (National Bird Day).  This reminded me that I wanted to show off some of the bird handicrafts I have come across in my crafting journey. 


Whether crafty birds are carved out of wood as toys, room decor or jewelry, knitted or crocheted as cute plush animals, or sewn into soft pillow toys, they all make adorable toys for children to play with or teens or college kids to use to decorate their room. Birds appeal to many people and the choices in hand-crafted items are truly unique. 


Wooden Seagull Ornament


Wooden Seagull Ornament
Hand cut out of maple using a scroll saw, this seagull coastal scene ornament is sanded smooth and finished with Danish penetrating oil. A cabled cotton cord is included to hang the ornament.  Ornament size is 3" diameter by 1/4 inch thick. 

Seagull wooden ornament is handmade by Susan in Missouri and available in her Etsy Shop Ooh Look It's a Rabbit.


Bird (Owl) Lanyard


hand-crafted owl lanyard
Hand-crafted Owl Lanyard
Both a useful and a decorative item, lanyards for I.D. badges or keys come in very handy. For bird fanciers, this owl fabric lanyard from Kathie of CutePurseNalities on Etsy is handmade using 100% cotton fabric and a silver swivel clip. 

The fabric has adorable little owls in green, brown, orange, red, yellow and blue on a white background.


Amigurumi Bird Stuffed Toy


Amigurumi Animal Plush Bluebird
Amigurumi Animal Plush Bluebird on Etsy
Cute & cuddly, this roly-poly bluebird is handmade in royal blue and white acrylic yarn. The beak and feet are orange and bluebird has red tuffs on top of his head.

Bluebird's eyes are plastic craft eyes and he is filled with soft new polyester fiberfill. Little bird measures approximately 4 x 4 inches. He's a cute round roly-poly animal just the right size for little hands to hold. 


Plush bluebird toy in the Etsy shop of Coastal Crochet Crafts has been sold, but contact this crochet website to order your own. :) 


Hand-Sewn Hummingbird Softie


Hummingbird hand-sewn soft toy
Hummingbird Hand-Sewn Soft Toy

This Hummingbird is great for playing or decorating your child's room. Wonderful for Baby as a first toy or for a child to play with. It makes a great gift for a Baby Shower!

I love Hummingbirds they are fun to watch - so busy ... so cute and colorful. I always wanted to hold one ... and now you can too ;-).  Hummingbird plushie measures 8 x 4 x 2.5 inches (across wings the measurement is 12 inches).


You can find this delightful hummingbird hand-sewn toy in the Etsy shop of RB Query of California. 


For other craft items and ideas, check out the reviews at


Related Links:


Note: The author may receive a commission from purchases made using links found in this article. “As an Amazon Associate, Ebay (EPN) and/or Esty (Awin) Affiliate, I (we) earn from qualifying purchases.”


Tuesday, April 18, 2017

Crochet Baby Blanket Pattern Reviewed

Modern Baby Blanket To Crochet

sleeping baby
Napping baby image from Pixabay.com
I recently crocheted a project using a crochet baby blanket pattern from Yarnspirations. It was so much fun that I thought reviewing it for you here today would also be a great idea. 

What I loved about this pattern was that it had a more contemporary look to it and a little whimsy, too. You see the blanket is mostly a solid color with the words #NAPS centered in the middle of the blanket. These types of blankets are often referred to as "graphghans". 

I think most will appreciate that the pattern is so versatile and you have the option of doing it in any color combination that you choose to. As you will see in the video tutorial the pattern is shown in black and white which could be used for either gender of baby. I opted for a pretty princess pink yarn and did the wording in a lime green. Unfortunately, I forgot to take pictures of the completed blanket before I gave it to a new Mom as a gift. 


The video gives good instructions for making the blanket and was quite helpful to watch before I began my little project. You might find it helpful to visit the Crochet Crowd page that shows both the tutorial for the blanket and a very good tutorial on doing graph work with the tapestry technique. You can find that page here.

Not only did I think this crochet baby blanket pattern was cute but I also had never used the tapestry technique before. So, this was a learning process for me. It was really simple to do and honestly did not take much time. I found it useful to sit at a table when I came to the area where I needed to work the graph for the letters. I could put the graph on the table and mark off the rows as I crocheted.

It turned out so adorable and it inspired me to create my own graph for a blanket for the holidays. I will show you the completed project when I am finished. Instead of the #NAPS for a baby, I created a graph with the words #SANTA. I will be doing it in a pretty Christmas Red with white lettering.

Even though I have been crocheting for many years, it is always fun to try something new. I think if you love to crochet that you will enjoy working with this pattern. If you do not know how to crochet and really do not want to learn, you could probably find a friend who could make the blanket for you. 


Note: The author may receive a commission from purchases made using links found in this article. “As an Amazon Associate, Ebay (EPN) and/or Esty (Awin) Affiliate, I (we) earn from qualifying purchases.”


Most Recent Reviews on Review This Reviews


Search for Reviews by Subject, Author or Title

The Review This Reviews Contributors


SylvestermouseSylvestermouseDawn Rae BDawn Rae BMbgPhotoMbgPhotoBrite-IdeasBrite-IdeasWednesday ElfWednesday ElfOlivia MorrisOlivia MorrisTreasures by BrendaTreasures by BrendaThe Savvy AgeThe Savvy AgeMargaret SchindelMargaret SchindelRaintree AnnieRaintree AnnieLou16Lou16Sam MonacoSam MonacoTracey BoyerTracey BoyerRenaissance WomanRenaissance WomanBarbRadBarbRadBev OwensBev OwensBuckHawkBuckHawkDecorating for EventsDecorating for EventsHeather426Heather426Coletta TeskeColetta TeskeMissMerFaeryMissMerFaeryMickie_GMickie_G


Review This Reviews is Dedicated to the Memory of Our Beloved Friend and Fellow Contributor

Susan DeppnerSusan Deppner

We may be apart, but
You Are Not Forgotten


“As an Amazon Associate, Ebay (EPN) and or Etsy (Awin) Affiliate, I (we) earn from purchases.” Disclosure Statement

X