Sunday, August 15, 2021

Review of a Quality Mini Blender-Chopper

Check Out This Brand of Mini-Chopper for a Quality Product

I recommend this mini-chopper because it's lasted us nearly fifteen years.

As most of us know, it's rare for any appliance to last that long. 

What makes this mini-chopper special isn't fancy features; in my opinion, it's the company that makes it. 

A Black & Decker Product - In Business Since 1910

We've always been a fan of this company and its products. They established their beginnings in 1910 in Baltimore, Maryland, as a small machine shop. Their products range from heavy equipment, hardware, home accessories, fastening systems, power tools, and home appliances. A Black & Decker drill was even used on the moon in the early 1970s for the Apollo 15 and 16 missions. In 2010 they merged with Stanley Works to become Stanley Black & Decker.

On a personal note, my mother worked for their company in the mid-1970s. Where I'm from, Black & Decker has been known for manufacturing solid products.

What's the Big Deal About a Mini-Chopper Anyway?

I'm not one for a lot of counter appliances. I find hauling out an appliance to be time-consuming. I prefer to cut, chop and mix as much as I can without a lot of extra equipment to store and wash. However, I've made an exception for this one product. 

Our Black & Decker Mini Chopper - It's over 15 years old and still going strong

I use the mini-chopper for anything that needs shredding, cutting, or chopping. I especially like it for chopping garlic and onions. I'll chop one, two, or three heads of garlic in one go. Tonight was a chicken broccoli casserole, and its main feature was lots of garlic. Thanks to this handy item, I can dice a lot of garlic at once.

In our house, we've had to replace numerous appliances over that same time period. However, not this mini-chopper - it has never broken or needed any type of repair.

Our 15-year-old+ Black & Decker Mini Chopper

Not repairing or replacing an appliance for over fifteen years automatically earns said appliance a five-star rating. This little gadget is well made!

If you're looking for an affordable hostess gift or a small gift for someone, don't hesitate to choose the Black & Decker Mini Chopper. It's something that will absolutely get used, and best of all, last.

You can find the mini-chopper here on Amazon. You'll notice that our mini-chopper has a completely different look. Of course, the reason being, it's fifteen years old!

Don't hesitate to choose this product. Five stars.


Note: The author may receive a commission from purchases made using links found in this article. “As an Amazon Associate, Ebay (EPN) and/or Esty (Awin) Affiliate, I (we) earn from qualifying purchases.”


Saturday, August 14, 2021

Review of National Kool-Aid Day

Image of cups of Kool-aid

National Kool-Aid Day is celebrated every year on the second Friday in August. The day was likely created by Kraft Foods, the owner and marketer of the Kool-Aid brand. 


History


Kool-Aid was invented by Edwin Perkins of Nebraska in 1927 in his mother's kitchen. He originally created it as a concentrate called “Fruit Smack”. To save on shipping costs, Perkins removed the water content and marketed it in powder form as “Kool-Aid”. There were six original flavors: cherry, grape, lemon, orange, root beer and raspberry. Over the years, many other flavors were added.


Fun Kool-Aid Facts


  • In the 1960s, a packet of Kool-Aid cost just 10 cents. 
  • Do you remember the 1960's cartoon Kool-Aid Kids"?
  • Monkees fans trivia: Davey Jones appeared in the Kool-Aid commercials during the 1960s.
  • Did You Know? Kool-Aid is the official soft drink of the state of Nebraska.


More Things to do with Kool-Aid


Packets of Kool-Aid


Color Easter Eggs with Kool-Aid as described by Dawn Rae in her Sharpies - a Great Way to Personalize Easter Eggs review.

Make a Brew-Ha-Ha Punch for your Halloween Party with the Kool-Aid recipe in Sylvestermouse's Wicked Brews and Beverages Halloween recipes review.


Make Kool-Aid Play Dough for a fun activity for the kids. Try this easy recipe from the Growing a Jeweled Rose Website


More Kool-Aid Activities to create in this Play Learn Grow blog by Growing a Jeweled Rose, such as Kool-Aid finger paints and sidewalk chalk paint. A fun group of Kool-Aid crafts for kids. 


And – best of all – make some Kool-Aid Popsicles. They are a favorite of kids everywhere for a cooling off treat on a hot summer day. Grape was always MY kids' favorite. Silicone Popsicle molds make this treat quick & easy to do.


Summary


Grape Kool-Aid package


Kool-Aid is the favorite sugary soft drink of kids. Always perfect on a hot summer day.


Come celebrate National Kool-Aid Day on the second Friday of August each year – or on any summer day you crave a cool glass of your favorite flavor of Kool-Aid.


National Kool-Aid Day Holiday Review written by

Wednesday Elf


Note: The author may receive a commission from purchases made using links found in this article. “As an Amazon Associate, Ebay (EPN) and/or Esty (Awin) Affiliate, I (we) earn from qualifying purchases.”


Friday, August 13, 2021

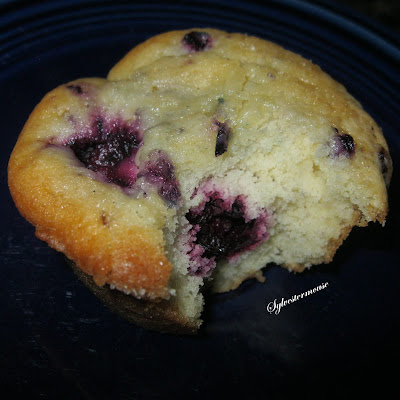
Delicious Blackberry Muffin Recipe Reviewed

Blackberry Muffin Recipe
Fresh blackberries are always an invitation to bake something delicious!  When I recently purchased some blackberries at our local farmer's market, I made Blackberry Muffins as soon as I got home.  Today, I am sharing my personal blackberry muffin recipe here so you, too, can enjoy this delicious treat. 

My recipe makes 18 muffins which seems like a lot at first glance. However, it didn't take my family long to devour these delicious muffins.  

For either of us, when we pair these muffins with coffee, we are in a breakfast feast heaven.  While I would normally say that the serving size is one muffin, in our home, the serving size is two or more muffins.  They really are that good!
 

The Muffin Batter & Muffin Tins 

This is a muffin recipe, not to be confused with cupcakes.  The muffin batter is thicker and won't pour like a cake batter.  I "spoon" my muffin batter into muffin tins.  I bake them in non-stick muffin tins, therefore paper liners are not required.  I do grease the non-stick tins with Crisco shortening and these muffins turn out easily.


My Blackberry Muffin Recipe

Prep Time Cook Time Ready In Yields
20 min. 20-25 min. 45 min. 18 servings

Ingredients 

    blackberry muffin recipe
  • 1¼ cups of sugar (plus extra for sprinkling)
  • 1/2 cup butter, softened  (extra for brushing tops)
  • 2 cups all-purpose flour
  • 2 teaspoons baking powder
  • 1/2 teaspoon salt
  • 2 large eggs
  • 1/2 cup milk
  • 2 cups fresh blackberries  
  •  

    Directions

    1. Preheat the oven to 375° 
    2. Grease non-stick muffin tins with Crisco shortening
    3. In a large mixing bowl, cream sugar and butter together.  Beat in one egg at a time (adding a total of 2 eggs)
    4. In a separate bowl, combine the flour, baking powder and salt
    5. Gradually mix flour mixture into butter mixture alternating with milk & beating well after each addition.  
    6. Fold in Blackberries (do not use the mixer & beaters here)
    7. Spoon batter into greased muffin tins, approximately 2/3 full in each muffin cup
    8. Sprinkle tops with sugar
    9. Bake at 375° for 20-25 minutes, until a toothpick inserted in the center comes out clean
    10. Using a small silicone pastry brush, brush muffins with melted butter as soon as they are out of the oven and put back in the oven for 2 minutes 
    11. Let Cool for 5 minutes, remove from muffin tins & serve


    Recommended Baking Essentials

     Wilton Non-Stick 6-Cup Standard Muffin Pan, Set of 2Check Price OXO Good Grips Silicone Basting & Pastry Brush - SmallCheck Price LILPARTNER Hand Mixer ElectricCheck Price Tovolo Stainless Steel Mixing (7.5 Quart)Check Price


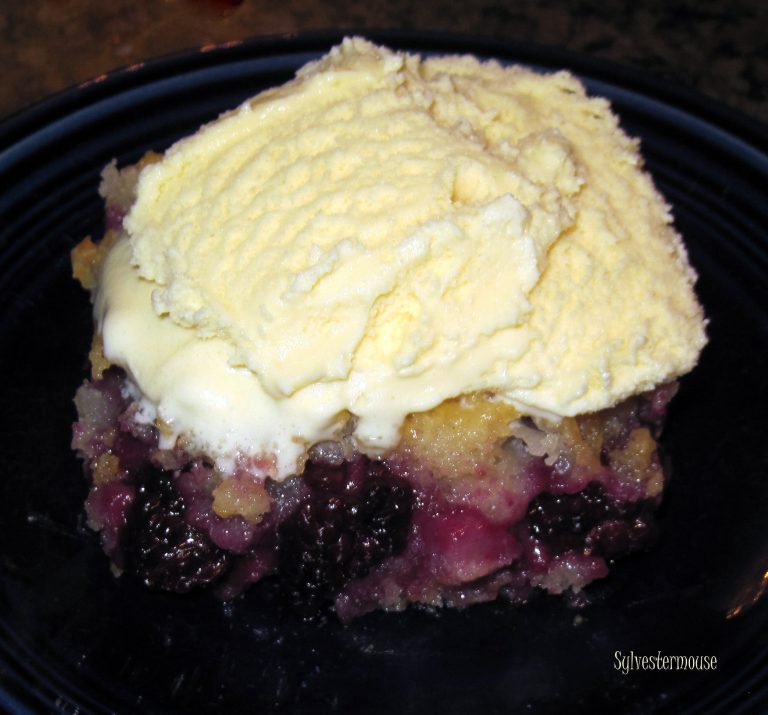
    Or, Try a Blackberry Fruit Cobbler!

    Easy Blackberry Cobbler Recipe


    Check Out More Recipe Reviews at
    ReviewThisRecipes.com


    Delicious Blackberry Muffin Recipe Reviewed Written by:
    House of Sylvestermouse


    © 2021 Cynthia Sylvestermouse


    Note: The author may receive a commission from purchases made using links found in this article. “As an Amazon Associate, Ebay (EPN) and/or Esty (Awin) Affiliate, I (we) earn from qualifying purchases.”


Thursday, August 12, 2021

Book Review of The Beekeeper's Promise


bee
The Beekeeper's Promise is a work of historical fiction that takes place in the World War II era.  It portrays two women of courage.  The first is Eliane, who lives in a small town in France during the the war and the second is Abi who visits that small town in 2017. The chapters in the book alternate between Eliane's story and Abi's story.

First Storyline

Eliane lives in rural France and we hear her story starting in the late 1930's near the beginning of World War II.  She lives on the Count Comte's Bellevue estate and she is employed as a kitchen assistant in the main chateau.  One of the duties she loves is taking care of the many beehives.  She does an excellent job and the Count arranges for some additional beehives to be moved from a nearby farm for Eliane to also mange.  When the beehives are moved Matthieu oversees the move and Eliane and Matthieu soon develop a close relationship.
The story then evolves as the chateau is taken over by the Nazi's and the Count moves out to a side cottage.   Eliane continues on with her duties with the bees and in the kitchen.  Without giving away more of the story I will say that Eliane and many of the others become involved in the war effort.  The French resistance is very much a part of this novel and the courage of those involved is evident.  I found it to be a very interesting and educating book.

Second Storyline

Abi, who lives near London, is recovering from an accident and severe depression.  Her friend talks her into attending a Yoga retreat in a small French town.  During the retreat Abi wanders off into the French countryside and gets herself lost.  A storm comes up and Abi is rescued by Sara who is driving by in the area.  Sara brings her to her home to wait out the storm.  It turns out that her home is the former estate of Count Comte.  Sara and her husband Thomas have turned the estate into a wedding venue.  It is the height of the wedding season and a key employee has taken ill.  Abi stays to help and during her stay Sara tells her the story of Eliane.  Through this story, which is told gradually over the weeks that Abi is working at the wedding venue, Abi realizes that she too can be strong and face the future.


My Recommendation

This was a book that I thoroughly enjoyed.  In fact I think I will recommend it for my book club to read.  I loved all of the characters and the author, Fiona Valpy, did an excellent job of making me feel that I was part of the story.  It was one of those books that carried the characters with me long after I had finished reading.


Note: The author may receive a commission from purchases made using links found in this article. “As an Amazon Associate, Ebay (EPN) and/or Esty (Awin) Affiliate, I (we) earn from qualifying purchases.”


Wednesday, August 11, 2021

The Best Wet Brushes for Detangling Your Hair Without Damage

Detangling hair without damaging it requires time and a gentle touch. Removing snarls from wet hair requires even more patience and gentleness. A detangling brush aka “wet brush” with flexible, ball-tipped bristles is the best hair care tool for getting tangles out of not only wet but also dry tresses, especially for long, thick, curly, long or damaged hair that gets knotted easily.

In today’s review, I'll explain why and when it's important to use "wet brushes" and sharing my favorite detangling brushes to help protect the health and beauty of your mane.

Detangling Hairbrushes - Minimize dullness, frizz & breakage
Using a detangling brush aka "wet brush" to remove snarls and tangles gently helps minimize damage to your hair's protective cuticle

A “Wet Brush” Helps Remove Snarls Gently Without Damaging Your Hair

If you are lucky enough to have the type of hair that rarely gets knots and can be combed through easily, without tugging, after a shampoo or swim, I envy you! For everyone else, whose locks are prone to tangling and breaking (especially when wet), there are two very important things you will need to minimize damage to your mane when you are trying to persuade your snarled strands to separate.

The first is plenty of patience, since you will need to coax the strands apart only a few inches at a time, starting with the last two or three inches and slowly working your way up toward the scalp, moving to the next section only after the one you are working on is completely tangle-free.

The second thing you will need is a good quality "wet brush", i.e., a detangling brush designed to help you remove snarls from either dry or wet hair.

Keeping the Hair Shaft's Cuticle Healthy Is the Key to Smooth, Shiny, Strong Hair

Cuticle Damage = Fragile, Dull, Frizzy Hair and Split Ends

When we talk about hair, we usually are referring to the shaft (the visible portion outside the scalp). The cortex, which forms the majority of the shaft, is responsible for the hair's strength/elasticity, color and texture. (Very thick hairs may also have a thin core called the medulla.) The hair shaft's outermost layer, the cuticle, is composed of smooth, flat keratin cells arranged compactly in overlapping, downward-facing rows, similar to roof tiles or fish scales. The cuticle protects the cortex (and medulla, if there is one) against damage and controls how much moisture can enter it. 

The health of your hair depends largely on the integrity of the cuticle. If the cuticle is abraded, worn away, stretched, cracked, or otherwise damaged, it can no longer protect the cortex. Without an intact protective cuticle, the helix-shaped keratin protein strands (which are like coiled springs) are no longer held securely in place and can stick out, creating a frizzy appearance and weakening the hair fibers.

Healthy hair looks shiny because the cuticle is smooth and intact, so light reflects off a smooth surface at the same angle. Damaged hair looks dull because the cuticle's overlapping cells no longer lay down flat, so light refracts off the uneven surface at different angles. 

Since hair grows from the roots, the ends are the oldest part and, therefore, have had the most cumulative exposure to physical, chemical and environmental damage. The cuticle on the ends of the shaft has had the most wear and tear, and the exposed cortex is what we call split ends. (For more information about the chemical, mechanical and environmental factors that cause hair damage, please see my Olaplex No.0 Intensive Bond Building Hair Treatment + No.3 Hair Perfector Product Review.)

The Benefits of Using a Wet Brush for Detangling Dry or Wet Hair

Thinner, More Flexible Bristles Are Gentler on Snarled Tresses

Paddle brushes and other hairbrushes designed to be used only on dry hair often have thick, stiff bristles. For example, 100% boar bristle brushes are good for adding shine to healthy tresses because they help distribute the oils from the scalp along the shaft.

However, because these shorter, stiff bristles have very little “give,” when they encounter a snag they tend to get stuck in the knot. Since the hair is more elastic and more fragile, especially when it is wet, those tangled strands will break rather than slide apart when they are under tension from the stiff bristles.

By contrast, a "wet brush" designed specifically for detangling both wet and dry hair has smooth, flexible bristles that can glide along the strands without abrading the cuticle or causing tears or cracks. Some stretching and breaking is inevitable when you are trying to brush out snarls, especially if your hair is long, thick, wavy, fragile or damaged and tangles easily even when it is dry. But a detangling brush, especially one with long, ball-tipped bristles, will help minimize the damage to the cuticle when used on dry or wet hair.

Use a "Wet Brush" to Detangle Dry Hair Before a Shampoo or Swim, Then Towel Dry and Detangle Again

When your hair is wet, the shaft absorbs water and swells, causing the edges of the protective cuticle's overlapping "tiles" (cells) to lift a bit, exposing more of the softer and more porous cortex layer.  That's why your tresses are weaker and more vulnerable to stretching, breaking, and other damage than when they are dry, and why it's important to use a brush with thin, flexible, rounded or ball-tipped bristles and slide it through the strands slowly and gently.

Before you shampoo or go for a swim, it's a good idea to use a "wet brush" to detangle your hair while it's still dry, so there will be fewer knots and snarls to unravel after you get out of the water, when your wet hair will be more vulnerable to damage from a brush.

Make sure to dry your wet hair with a soft, very absorbent microfiber hair towel or turban to gently wick away as much moisture as possible before you begin to detangle, brush or style it. (See my VOLO Hero Premium Microfiber Hair Towel Product Review to learn more about the hair towel/turban that has earned my highest recommendation.) Then use a “wet brush” with thin, flexible and, ideally, ball-tipped bristles to gently ease any tangled strands apart and minimize potential damage to the all-important protective cuticle layer.

Always Use a Detangling Brush to Remove Snarls, Whether Your Hair Is Wet or Dry

If you find a lot of strands in your shower drain or your hairbrush, or if your mane is frizzy, breaks or gets tangled easily even when it's dry, those are signs that the cuticle has been damaged.

If that's the case (as it is for most of us who are past our twenties), you definitely will benefit from using a detangling brush on your dry hair, either exclusively or to remove any snarls before you use your regular hairbrush.

My Picks for the Best Wet Brushes (AKA Detangling Brushes)

Many years ago, the stylist at my hair salon explained that the reason my formerly smooth, silky long locks were becoming frizzy, dull, brittle and increasingly prone to snarls was the cumulative damage to the cuticle from decades of coloring, highlighting and heat styling. One of the things he recommended was to stop using my beloved (and expensive) Kent boar bristle hairbrush and switch to a good quality "wet brush" instead, since the more detangling I had to do, the more damage a brush with dense clusters of short, stiff, boar bristles would create. Since then, I have tried several different brands and styles of detangling brushes and the Wet Brush brand has worked the best for me.

Wet Brush makes many different styles and models of detangling brushes, all featuring the brand's smooth, ball-tipped, flexible IntelliFlex bristles that glide through snarls more easily than others I have tried. In fact, Wet Brush states that independent clinical trials showed that the brand's exclusive IntelliFlex bristles are less damaging than a traditional styling brush and use less force than another leading detangling brush. The brand says its IntelliFlex bristles cause 19% less damage and use 56% less force.

Another advantage of the ball-tipped bristles is that they are good for massaging the scalp gently, without causing any damage.

Wet Brush Pro Flex Dry PaddleFor the past several years, I have been using the Wet Brush Pro Flex Dry Paddle, a vented paddle detangling brush with a flexible head that conforms to the scalp better than a traditional, rigid brush head.

This Wet Brush model is one of several styles that are vented to promote air flow while blow drying. (I assume "dry paddle" means "drying paddle.") When I was blow drying my hair, the wide vents worked really well for that purpose 

I have been using this brush on my long, easily tangled mane for several years and it has held up fine. However, there have been some customer reviews complaining that this and other vented Wet Brush models break too easily. If they were using enough force to break the sturdy plastic, I suspect that they were tugging too hard and trying to force the bristles through stubborn knots and snarls, rather than using the bristles to gently work them apart to avoid damaging the cuticle and causing the enmeshed strands to break. If my guess is correct, then the allegedly premature breakage of the brush head may well have been caused by user error, rather than a materials or design flaw.

Last year, I decided to stop blow drying my hair, so I no longer need a vented paddle detangling brush. These days, after I towel-dry and detangle my tresses, either I let it finish air drying naturally or use my oval hot air brush, which is virtually identical to the REVLON One-Step Hair Dryer And Volumizer Hot Air Brush and produces very similar results to what I could achieve with a blow dryer and a vented round brush, but much more easily.

As a result, I have been looking at some of the company's non-vented models. Here are the front-runners under consideration.

  • The Original Wet Brush detangler. This was the brand's first product, which appears to still be its most popular model.

Original Wet Brush detanglerI had purchased an Original Wet Brush detangler in basic black quite a few years ago, which was my first introduction to this brand. I used that one for several years, until my checked luggage went astray when we flew home from a trip abroad and never turned up. Fortunately, it was one of the less expensive items I had to replace! (That was when I decided to try one of the company's then-new vented paddle brushes.)

Since I no longer need a vented paddle brush for blow drying, I'm seriously considering going back to The Original Wet Brush, especially now that it comes in a gorgeous new aqua color that is exclusive to Amazon. 

I love any shade of aqua, turquoise, teal, etc., so the Amazon-exclusive edition of this tried-and-true detangling brush is very appealing.

If aqua isn't your color, you'll be happy to know that it also comes in black as well as a rainbow of other colors, as well as in vibrant prints, such as daisy garden, dark floral, Aztec, sea life and even fun leopard, tiger and zebra animal prints. No matter your color preferences or taste, you're sure to find something you like among the many choices. (There's even a Wet Brush with a pink unicorn print, twinkling LED lights and the saying, "follow your dreams" that many teenage girls would probably adore!)

  • The Wet Brush Shine Enhancer. This style has a mix of long IntelliFlex bristles and spaced-out tufts of shorter boar bristles. It's great for detangling and brushing second-day hair in one go.

Wet Brush Shine Enhancer

The smooth, ball-tipped, flexible IntelliFlex bristles glide through the hair, allowing you to work out snarls gently without damaging the cuticle. At the same time, the shorter boar bristle tufts help redistribute the oils from your scalp along the length of the shaft, smoothing down the cuticle and adding shine. 

Since the boar bristles are fairly short, the much longer IntelliFlex bristles only allow them to glide along the surface layers of the hair, where the shine is needed, without penetrating deeper and getting caught in any knots or snarls.

It's also fantastic for brushing out dry shampoo, which for some reason always makes my long hair tangle like crazy, even though I always use a detangling brush before applying the dry shampoo to my roots! 

Although it is theoretically okay to use on wet or dry strands, I would be reluctant to use a brush with even short boar bristles on my long, damaged hair when it is still damp. So, I probably will end up getting the Original Wet Brush for detangling just before going into the water and after my hair has been towel dried, and also the Wet Brush Shine Enhancer on my dry hair as my "regular" brush, since my hair is in need of frequent detangling even when it is dry. 

Wet Brush now makes a line of round blow-drying brushes with different types of bristles designed to stand up to the heat of a blow dryer. If I ever go back to blow-drying my hair, I will definitely look into getting one of these, rather than a vented paddle brush.

The brand recently introduced the Wet Brush Go Green Collection, a line of "earth-friendly" detangling brushes, treatment brushes and treatment combs that feature handles made from "an all-natural biodegradable plant starch" that it claims "will naturally break down in a landfill within 5 years." 

Although this collection is too new for me to feel confident about the durability of the plant-based plastic that  provides their structure, I will be interested to see the reviews in another year or two. I would be thrilled to have a more environmentally friendly option for my favorite detangling hairbrush!

Wet Brushes for Men, Kids and Pets

Men's hair needs TLC, too, which is why there is Wet Brush Men's Detangler. It is longer and narrower than the women's models and is designed to be used on "straight, curly, textured, thick and wavy hair including beards." It has the same signature IntelliFlex bristles and works well on both wet and dry hair, The guys, however, have to settle for a couple of basic color choices.

Anyone who either had long hair when they were a kid or has had a long-haired young daughter or son knows that brushing out those tangled locks can be a daily or nightly battle between the parent and child. Fortunately, there is also a Wet Brush Kids Detangler to take the tears out of this dreaded routine task. The kids' version is a smaller-scale version of the Original detangling brush and comes in cheerful prints, including one with ice cream bars. 

The company also makes detangling and grooming brushes and combs for pets, which I think would make great gifts for pet owners.


The Best Wet Brushes for Detangling Your Hair Without Damage product review by Margaret Schindel

Read My Other Hair Care Reviews:

Olaplex No.0 Intensive Bond Building Hair Treatment + No.3 Hair Perfector Product Review

VOLO Hero Premium Microfiber Hair Towel Product Review

Read More Beauty Reviews From Our Contributors

Read More of My Product Reviews

Read More Product Reviews by Our Review This Reviews Contributors


Note: The author may receive a commission from purchases made using links found in this article. “As an Amazon Associate, Ebay (EPN) and/or Esty (Awin) Affiliate, I (we) earn from qualifying purchases.”


Tuesday, August 10, 2021

Julia Child's Apron

Learn a bit more about Julia Child, the famous television chef and author's apron!

The pandemic world sent many people who previously spent little time cooking into their kitchens where many learned that a good apron protects your clothing from stains and can also keep your kitchen tools (and your cellphone) close at hand. There are many styles of aprons but, if you want to follow the lead of Julia Child, the famous American chef, cooking teacher, author, and television personality, you should know that she preferred her aprons plain and sturdy. Pretty and frilly, she felt, is not useful. She once said of a pretty apron that was gifted to her, "Oh, Dearie, dainty doesn't do in the kitchen."

That quote comes from EllynAnne Geisel’s 2002 HuffPost interview with Julia Child on the eve of her ninetieth birthday. They discussed Child’s apron memory and Child told Geisel that she had not worn an apron at all until she met her husband Paul and that she then adopted the Cordon Bleu tradition of wearing a blue denim apron with a towel draped over the ties at the waist. It makes sense that the Cordon Bleu (and Child) wanted an apron that was simple and serviceable and that the towel is better for wiping hands on than the apron.

On Geisel’s blog post, she says that she recorded an hour-long interview with Child and that the recording is safely tucked away for safekeeping. Wouldn’t you like to hear that interview? 

In the 1970s, Child was a cooking icon and Saturday Night Live created a parody skit. According to the L.A. Times, Child was delighted and agreed that “cooking is often messy...” When faced with mess, Child continued on and was, I am sure, glad she had her apron on.

AN APRON LIKE THE ONE JULIA CHILD WORE?


I went looking and could not find an apron exactly like the one that Julia Child wore. However, I found this interesting denim apron by Chef Works that should prove suitably durable and that has two pockets and a tie for tucking that all important towel into. Shown here is the full-length bistro apron that is available with or without a bib as well as in varying lengths. Find Chef Works' denim bistro apron on Amazon here.

Here's an apron, reminiscent of the one Julia Child wore. Denim, with pockets for kitchen tools and an all-important tie for tucking your towl into.


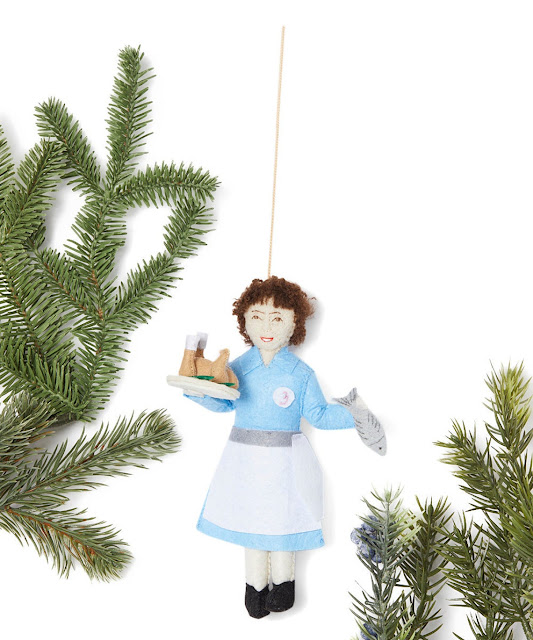
JULIA CHILD APRON ADORNED ORNAMENT AND DOLL


Julia Child fabric ornament by Silk Road Bazaar


Julia Child wooden peg doll by Peg and Plum.

In my search, I also found these two great gift ideas. That is, a Julia Child fabric ornament by Silk Road Bazaar and a Julia Child wooden peg doll by Peg and Plum both of which wear an apron, are from Etsy and would make unusual gifts for any fan of the television chef.

--------------------------------------------------------

If you’re curious about the famous chef, you have probably already seen the movie Julie and Julia  starring Meryl Streep and Amy Adams. But did you know that in 2021, HBO picked up a new television drama series called Julia? It is currently in production with no release date available as of yet but I know some of us are waiting to watch the series.

See you
in the kitchen!
Brenda

Quick Links:

Sizzlin' Hot BBQ Aprons
Julia Child picture used via Creative Commons license CC BY-SA 4.0.


Note: The author may receive a commission from purchases made using links found in this article. “As an Amazon Associate, Ebay (EPN) and/or Esty (Awin) Affiliate, I (we) earn from qualifying purchases.”


Monday, August 9, 2021

Reviewing Growing Annual Sweet Pea Plants And Flowers

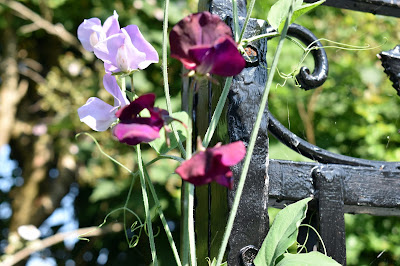
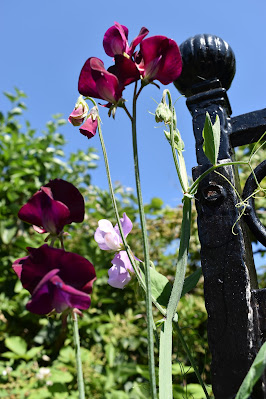
sweet pea flowering plant growing on wrought iron

 
Of all the annual flowers I think sweet peas are my favourite. I love the beautiful flowers and the delicious scent. They are climbers and so great to have flowers that take up very little space. They are also so beautiful in a vase in the house.

They are annuals which means that they set seeds, grow and produce flowers and seed pods, then die all in one year. You cannot usually keep them from year to year, but you can buy new seeds each year quite inexpensively. 

Sweet peas are so easy to grow and care for and are worth anyone having a go. This article is about growing and enjoying sweet peas, not growing them for showing or breeding which is more specialised. 

sweet pea flowering plant


 Buying Sweet Peas Seeds


 You can buy sweet pea seeds from many places. Here are a couple of things to look out for.

I love my sweet peas to be scented so if you do want scent make sure it says scented on the packet.

Some scents are stronger than others and that is a personal choice. Check carefully if you prefer a floral, fruity, musky, fresh or heavy scent. 

If you are wanting a particular colour then you will need to look specifically for that colour. I often buy a packet of just white or cream. If you are planning to pick them for a wedding these colours are particularly beautiful. 

Many seed packets are mixed colours but you may choose from pinks and purples to burgundy and reds. 

Some Sweet Peas are the older or even heritage varieties, others are more modern so again it is a choice of what you enjoy. There really is something for everyone! 

sweet pea plant against wood fence


 Sowing Your Sweet Pea Seeds


 There are a huge variety of sweet pea seeds for sale. You can buy them in multi-colored packs or packs of for example cream or white only. Check the packet carefully for if they are fragrant or not as well.

Some will have longer stems than others so if you really want to grow them mainly for the house it is better to choose long-stemmed varieties for vases. Otherwise, it does not matter. There are heritage and new varieties and really we are spoiled for choice! 

 Once you have made your choice or like me decided you cannot choose so buy several different packets, you can sow seeds in Spring or in Autumn. 

The autumn sowing will mean earlier flowers but you will need to look after them over autumn/winter. This means you will need a frost-free place for them to be all autumn and winter and will need to keep an eye on them.

 The Spring sowing will result in later flowers but the whole process is during spring and summer and you will not need a special place for them.

 I generally sow in Spring but if I had space in a greenhouse or cold frame I would do an autumn sowing as well to prolong the flowering season. 

 Sweet peas are not too fussy about soil. For the seeds, I use a mix of any ordinary compost with some grit added for extra drainage.

 Sweet peas generally germinate well. I sow mine in either small pots or plug trays or even in toilet roll holders. They do develop long roots so a taller container is better.  Any container that is not too large but is long enough for nice deep roots to form is good.

pink sweet pea flowers


 Planting Out Sweet Pea Plants


Once you can see the roots have formed well and the plants have several proper leaves we can think about planting out. However, it is very important that we only plant out after the frosts have finished for the year. This can be tricky to predict but know your local weather conditions from year to year.

Where I live we are usually safe from late May/early June. Then it is simply a matter of digging a hole slightly larger than the plants' rootball and you can plant the whole plug out into the garden. Carefully fill in around the planting hole and gently firm in. 

 It is worth noting that If you have kept your plants in warm sheltered conditions then I would advise that you take them out in the daytime and back in at night for a period of one to two weeks to acclimatize them to outdoor conditions gradually before planting out for good.

a variety of sweet pea flowers

Do only plant out strong healthy plants. If they are too thin and weak or struggling they will quickly become prey to slugs and will not grow well or at all. So plant out only the strong growing healthy ones. The weaker ones can either be discarded or I like to give them a chance by continuing to grow on in a small pot. Give them all a really good soaking with water after you have planted them. 

I would advise planting out on a day that is not too hot and sunny just so that they do not get too stressed. A warm but not too hot day is about right. They do like moisture-retentive soil which is fine on our clay mix soil. However, if you have sandy or chalky soil it is best to dig a large hole much bigger than the area you are going to plant in and fill it with good compost, manure or similar to enrich the soil. Then put your supports in and plant the sweet peas. 

 Sweet peas can also be planted out into large pots and grown up a tripod in the pot. I think they look rather lovely this way and you can see all the way around the pot which makes for better viewing and easier picking. The soil can be ordinary compost with a little grit or perlite mixed in for better drainage.

Sweet peas do like a sunny spot if possible. In a large pot they will require much more watering than in the ground, so never let them dry out, the soil must be kept moist. 

deep red sweet pea flowers


 Tieing in Sweet Peas


Most sweet peas are self-climbers so they produce curly tendrils that latch on to any support and grow upwards. Some do need tieing in regularly as they have no tendrils. I usually buy the self-clinging ones and provide support for them to grow up.

Support can be anything from canes with string, a tripod with additional string, or another tall plant they can scramble up. I have grown mine this year up Bamboo canes and also alongside our Metal Garden Swing Seat tied in with ordinary string. 

I tie in a few stems to begin with to give them a good start, then every so often if they are growing too far out from the support. I just use soft string and tie loosely so as not to damage the stems. 

sweet pea flowering plant against wood fence


 Picking Sweet Pea Flowers. 


This is the beauty of sweet peas, you must regularly pick the flowers! For many plants, you have to make the decision to either pick the flowers for a display in the home or to have the flowers in the garden. With sweet peas, you get the best of both worlds!! You must pick the flowers in order to get more flowers! 

So usually once a week I go over all our sweet peas in the back garden. Then once a week on another day I pick all those in the front garden. That way I always have sweet peas in the garden and a vase or two of sweet peas in the house.

an arrangement of sweet pea flowers in a variety of colors


When you pick them use a sharp pair of scissors and cut right at the base of the stem so that you get as long a stem as possible. Put them in water immediately. I carry a jar of water with me and they go in straightaway. Then I can transfer to a prettier jar, glass, or vase in the house. 

 If you don't pick the flowers regularly they will quickly go to seed and you will see these seed pods like in the photo.
I left these without picking to show you and now there will be no more flowers on that specific plant for the rest of the year. So the motto is to keep picking the flowers!!  

sweet pea plant seed pods


 Watering And Feeding Sweet Pea Plants.


 If it rains regularly you may not need to water at all. However, we have been having a heatwave here and so I do water the ground thoroughly soaking it about once or twice a week. Do not water the plant's leaves only the soil.

Once the flowers start to appear I give them a fertiliser feed about once a week with a high potash feed, something like a tomato feed is good, but if I forget they are always just fine.


Sweet Pea Flowers In The Home


The flowers are so pretty and the scent is so gorgeous that it would not be summer without sweet peas in our home. They can scent a room beautifully and look so pretty. I just pick them with longest stems possible and pop them in a vase or as here in a wine glass. I like them to look natural and so I just pop them in the vase as they fall.

 Some people may want to do more flower arranging or make a gorgeous arrangement with other flowers which would be stunning.  I just pop them in a vase by themselves which I think looks pretty.  They last around a week in the vase then by then there are more from the garden. 

 Flowers are always fleeting though and so for a more permanent record of the flowers and plants in our garden and countryside, I do take a lot of photos each year and make some into greetings cards and gifts, you can see some of them on my Blog Raintree Earth Design. 

However you grow them in the garden or in a container, to enjoy in the garden or pick for the home, Sweet peas are such easy beautiful annuals to grow and enjoy. Adults and children can grow them and they are a lovely introduction to growing annuals.

 Their scent is so beautiful and there are many different scents, the colours are many and varied and you will never tire of them.

sweet pea flowers in a glass vase


More Gardening  And Wildlife Articles


Reviewing The Growing And Care Of Bottlebrush Plant


Note: The author may receive a commission from purchases made using links found in this article. “As an Amazon Associate, Ebay (EPN) and/or Esty (Awin) Affiliate, I (we) earn from qualifying purchases.”


Most Recent Reviews on Review This Reviews


Search for Reviews by Subject, Author or Title

The Review This Reviews Contributors


SylvestermouseSylvestermouseDawn Rae BDawn Rae BMbgPhotoMbgPhotoBrite-IdeasBrite-IdeasWednesday ElfWednesday ElfOlivia MorrisOlivia MorrisTreasures by BrendaTreasures by BrendaThe Savvy AgeThe Savvy AgeMargaret SchindelMargaret SchindelRaintree AnnieRaintree AnnieLou16Lou16Sam MonacoSam MonacoTracey BoyerTracey BoyerRenaissance WomanRenaissance WomanBarbRadBarbRadBev OwensBev OwensBuckHawkBuckHawkDecorating for EventsDecorating for EventsHeather426Heather426Coletta TeskeColetta TeskeMissMerFaeryMissMerFaeryMickie_GMickie_G


Review This Reviews is Dedicated to the Memory of Our Beloved Friend and Fellow Contributor

Susan DeppnerSusan Deppner

We may be apart, but
You Are Not Forgotten


“As an Amazon Associate, Ebay (EPN) and or Etsy (Awin) Affiliate, I (we) earn from purchases.” Disclosure Statement

X