Showing posts with label Gardening. Show all posts

Wednesday, February 22, 2017

How to Grow Your Way to Happiness and a Great Garden A Review

Growing My Way to Happiness!  A Review!


Many studies have shown that Growing a Garden reduces stress and increases your happiness with just getting your hands dirty. As I review this idea of growing seeds for the garden, I agree that these studies are true.  I know that in my own life, as February is coming to a close, I start to look for those little signs that spring is indeed on it's way.  Little sprouts coming out of the ground are cause for me to jump for joy!  My husband still doesn't understand that completely.  Oh well, I can't explain it any more than to say my heart does indeed leap with joy, and I know that better days are ahead.  No more Seasonal Affected Disease and no more need to sit under lamps to get us out of our "funk".  The countdown is on for when we can really get our fingers into the ground and just feel wonderful.

galanthus bulbs, snow bells, spring bulbs
Snow Bells in Spring
https://pixabay.com/en/flower-rod-snowdrop-garden-nature-2080981/


So now that February is almost done and we can honestly say that Spring is just around the corner, it's time to get those seeds started that we saved from last year.  Just to be on the safe side though,  don't start just yet.  It is still February!

Preparation is the Key to Successful Spring Seed Growing

All of my die hard gardening friends have already been to at least one "Seedy Weekend".  What is that, you might ask?  Well, for anyone who lives in an Urban area with either Greenhouses or a Botanical Garden nearby, most of these will have a late winter get together called a "Seedy Saturday or Sunday".  The whole point of the weekend being that gardeners get together to share the abundance of seeds that they have saved from their own gardens and share with others for seeds that they might have.  It increases the number of seeds any gardener has and let's them share stories of their own particular gardens with like minded people.  It really is a social for gardeners who have missed being outdoors during the winter months.  If you are in the Toronto area for a visit, this weekend is the Toronto Botanical Gardens Seedy Saturday(Feb. 25),  so come on over for some fun and some great new seeds.

Back to preparation for Seed Sowing

Make sure you have purchased new seedling soil for your seeds. You never want to reuse soil from previous years, as they might be harboring bacteria that will be harmful to new seedlings.  This special seedling soil is composed of  a mix that contains very little "soil or dirt",  rather it is made up of moss, vermiculite and perlite.  These can be purchased separately and mixed together one part of each, or you can purchase it premixed.  You can fill up your home made containers, using newspapers, or half egg shells, or half a toilet paper tube.  All of these would be perfect for seed starts and are bio-degradable. It also makes it so much easier to plant in the garden afterwards because you just plant the whole thing into the ground.  No need to disturb young forming roots.

seedlings, starter tubes, repurposing toilet paper tubes
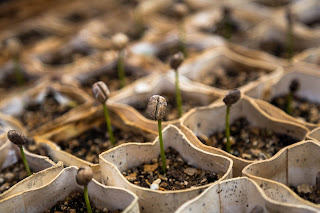
https://pixabay.com/en/macro-nursery-plants-seedlings-1840261/

Have whatever containers you choose to set up for your seeding, on heat mats. You are trying to make the seeds think it's May with nice warm soil to grow in.  Warm soil and lots of light are the two most important things you need to start your indoor seeds off right.  If you just plant seeds into little pots and set them on a window sill, you will surely get the seeds to grow, but they will suffer in a few weeks time.  Why?  Well it's really just too early for them to growing without some added help.  Warming the soil with heat mats is akin to being outdoors in May.  The sun warms up the soil outdoors so that seeds will germinate and grow.  The days are getting longer with more hours of sunshine available than in March, so that the seedlings that are growing in the ground will be hardy and strong.  Indoors we need to mimic the garden in May as much as possible if we want strong seedlings.  Without the added attention of heat and light, your seedlings will be tall, lanky and very spindly looking.  Most often they will fall over because the stalks are not strong enough to hold them upright.  Once that happens you can almost count the days to total death of the seedling.  All that work is gone and you have to start over again, if you have enough seeds.  If you don't you will be buying more seeds in short order to start all over again.  

Indoor Gardening Done Right

If you decide that you really want to grow your seeds from scratch in the early months of March and April, then be prepared to have the right set up in place.  Yes there is a bit of effort involved, but  the end result will be well worth the effort.  You can purchase an indoor garden set up with shelves, heat mats and lights all in one unit.  This is usually more than enough for your average home gardener.  You are not going to become a commercial greenhouse operation, but you will have lots of seedlings for your garden and maybe some friends too.  Doing it this way is a little expensive, but you would have the unit for years to come.  I prefer the doing my seeds with heat mats and grow lights that I have purchased separately.  For my garden needs, this is more than enough space to grow seeds.  You have to decide for yourself which set up is right for you!


With some of these choices you can start your own indoor gardening center and have some really good success with it too. The heat mats are inexpensive and will provide that much needed warmth at the soil level. The grow lights are also inexpensive and will help to keep your seedlings compact and strong.  The additional light with at least 8 to 12 hours of light, will mimic the days in May and June. Or if you really want to guarantee success, you can try one of the Areo Grow Systems for indoor herb gardens.  They have the lights and warmth built right into the unit, so that your success with these is almost a given.  Gardening is a joy especially for us northerners.  We love our changing seasons, but the change from Winter to Spring is the one that we seem to love the best.

Happy Gardening and Seed Sowing to all of you!


Note: The author may receive a commission from purchases made using links found in this article. “As an Amazon Associate, Ebay (EPN) and/or Esty (Awin) Affiliate, I (we) earn from qualifying purchases.”


Tuesday, February 7, 2017

Birdhouse Selection Process Reviewed

Your Birdhouse Selection Is More Important Than You Might Think

I wanted to take a little time today to discuss some important things to remember about the process of birdhouse selection. You might be thinking what process? I just find one that will be cute in my yard, hang it and the birds will come. Well, that may be one way but I can tell you it won't bring you much success if you are actually hoping to encourage birds to nest in your yard.

If you do not care whether birds actually nest in the birdhouse, you can pick something that suits your taste and reflects your personality for your yard or garden. My husband and I would get a real kick out of a birdhouse like the one below but I doubt that we would have much luck actually getting a bird to use it to lay their eggs and hatch their offspring.

Birds are not attracted by what we humans think is cute, pretty or quirky. They want safety for themselves and their young. So, there are things that we should take into consideration if we want to provide a place for our feathered friends to call home.

Important Things To Consider In Your Birdhouse Selection

  • Sizing
  • Heating and Cooling
  • Proper drainage
  • Safety
  • Mounting and accessibility
It is a good idea to research the species of bird that you hope to attract and find out what size entrance hole is best for them. The size of the floor space is important, also. You want enough room for the adult bird and the growing young to be able to move around. The distance from the floor to the entrance hole is also important. 

The materials that the birdhouse is made of is important, too. Wood is your best bet because it can stay cool in the summer and provide warmth in the winter. 

Look to see if the birdhouse provides drainage. You do not want water to stay inside where it can start to grow mold or bacteria. A nice overhang on the roof will also help to keep water out of the birdhouse.

A lot of the pre-made birdhouses have a perch. Most bird species do not require a perch at their nest. The perch actually allows an unsafe area where a predator has an easier way to get into the inside of the nesting area. Painted or stained birdhouses can be toxic to our feathered friends so natural wood is safer to use. 

You should also select a birdhouse that is easy to mount and has one side that you can open. You will need to open the birdhouse to clean it. There are several ways to mount the different styles of birdhouses but your best bet is to have it on a pole. Predators will have a more difficult time with a pole than a tree or fence. 

Research Before You Buy

I feel that if you really want to successfully encourage birds to nest in your yard or garden that a little research can help you make a good decision. Perhaps invest in a book that gives you the information you will need.

The book above has been produced in association with the National Audubon Society. Advice from them can be trusted for a safe and inviting birdhouse. It covers several species of birds to build a birdhouse for, from the little wren to even raptors.

As I write this article, we are approaching the time of the year that birds begin to choose a place to nest and bring the next generation of their species into the world. If you want to be a part of that, find a safe birdhouse to place in your backyard or garden. 


Note: The author may receive a commission from purchases made using links found in this article. “As an Amazon Associate, Ebay (EPN) and/or Esty (Awin) Affiliate, I (we) earn from qualifying purchases.”


Monday, February 6, 2017

Sloggers Rain and Garden Shoe Review


I recently purchased a pair of Sloggers rain boots and I love them so much that I am immediately shopping for a pair of Sloggers shoes.  You may have heard of Sloggers brand boots and shoes, but I hadn't until recently. This review is to help spread the word about this awesome footwear brand. These waterproof boots and shoes are comfortable, colorful, and within my budget. Who could ask for more?


Why Buy Sloggers Rain and Garden Shoe?


Sloggers brand shoes have a following of repeat customers who give high ratings. It is because of this brand loyalty and favorable reviews that led me to find a local store and try a pair on.

I hate boots. I really don't care much for shoes. I have a terrible time finding footwear that fits well and I can't stand cracking open my wallet to buy a pair of uncomfortable shoes.  But as much as I am outside, I really need a good pair of waterproof boots.  Sloggers are not carried at my local stores so I drove up the road a bit to try a pair on.

As soon as I tried them on I immediately knew I wanted not only one pair, but at least two.  I was able to remain focused on my budget and with the purchase I went to make (one pair of rain boots) but I also tried on the garden shoes and booties. As a result, I've got a pair of the shoes in my shopping cart and ready to click the "check out" button.

Have you ever touched something and knew immediately that it was high quality and well-made? That was my thought as soon as I tried on my first pair of boots. I don't know how they make this material - almost sheer yet clearly thick and very durable - but I love it. You can see the light shining through and the outline of my fingers yet the material is thick.


view from the inside of my boot - sheer, flexible, and durable

I am quite sure that the shoes will be something I can wear in comfort all day and keep dry feet as I move from indoors to outdoors and in again. The flexibility of the shoe feels nearly like being in a pair of thick socks yet the soles protect the bottoms of your feet. 

These are the reasons I highly recommend Sloggers women's garden and rain shoes:

  • waterproof
  • flexible and comfortable upper material
  • durable and quality materials and manufacturing
  • heavy duty deep lug sole - provides excellent traction 
  • does not make the "clacky" sound of hard plastic soles that comes with many inexpensive shoe soles
  • lightweight
  • large variety of patterns and colors
  • made in the US

The following are three of the MANY colors and designs offered. Whether you are looking for floral, animal print, polka dot, cow, chicken, or leaf designs and in bright or muted colors, you can find them at Sloggers.

Color: Flower Power

Color: Leopard Print


Color: Black & White Polka Dot


Note: The author may receive a commission from purchases made using links found in this article. “As an Amazon Associate, Ebay (EPN) and/or Esty (Awin) Affiliate, I (we) earn from qualifying purchases.”


Friday, February 3, 2017

Wooden Birdhouse for Eastern Bluebirds Reviewed

Eastern Bluebirds photo by Sylvestermouse

How to Attract Bluebirds to Your Backyard!

Every year I look forward to the arrival of the Eastern Bluebirds to our backyard.  We owned our first bluebird birdhouse over 30 years ago, but I remember well how excited we were when our first bluebird couple built their nest our our wooden birdhouse.  Now, I watch for them year after year.  The thrill of seeing them investigate our bluebird birdhouse for the possibility of a home never decreases.

Just this morning, my husband excitedly whispered from the backdoor of our home, "The bluebirds are back!  Grab your camera!"  I must admit, I was very surprised.  It is still a little early for them to arrive, but I grabbed my robe and slippers and headed for the door.


The Eastern Bluebird


As you would expect, Eastern Bluebirds are blue.  They have pinkish-orange throats and breasts with white bellies.  They are small birds with bodies about 6" - 8" long.  Their wingspan can easily be measured up to 12½" and they weigh approximately 1 ounce.  They may be small, but they make a tremendous visual impact when perching on a gray fence, bare tree branch, or on their birdhouse.  They are stunningly gorgeous subjects for photographers.

Eastern Bluebird photo by Sylvestermouse


Eastern Bluebirds mostly eat berries and insects, therefore they prefer to live close to trees or wooded areas.  One thing to keep in mind, they like the ground under their nesting area to be clear of debris.  I've always believed that was a natural instinct to avoid areas where predators may be hiding. 

Eastern Bluebirds have been known to live up to 10 years in the wild.  You may well have the same couple return for several years to set up their nest and lay their eggs in your birdhouse. 


The Bluebird House


There are a few considerations when selecting and setting up a birdhouse for Eastern Bluebirds.   The first consideration is obvious, do you have Eastern Bluebirds in your area?  Once you have identified them, then all you really need is the right wooden birdhouse set facing the right direction, at the right height.

There are a few considerations when selecting and setting up a birdhouse for Eastern Bluebirds. Find out all about them here.
The Female Inspects the Birdhouse While the Male Stands Watch
Later, he will gather twigs & materials and bring them to her once she is inside building the nest.

 
The birdhouse selection does matter!  An Eastern Bluebird requires a small opening that will serve to protect their nest and eggs from predators.  

As I said earlier, placement matters.  A bluebird house must face east for bluebirds to nest.  It should also be nailed approximately 5' off the ground to a fence or on a post.  As you can see in the photos, our bluebird house is nailed to a fence.

Since the Eastern Bluebirds build their nests in the spring, you need to have your birdhouse up and ready to occupy in early spring.   It doesn't take long to nail up the perfect ready-made birdhouse like the one featured above!

Eastern Bluebird photo by Sylvestermouse


For More Gardening Tips, Join Me at Easy Backyard Gardening

Wooden Birdhouse for Eastern Bluebirds Reviewed Written by:
House of Sylvestermouse


Note: The author may receive a commission from purchases made using links found in this article. “As an Amazon Associate, Ebay (EPN) and/or Esty (Awin) Affiliate, I (we) earn from qualifying purchases.”


Saturday, November 19, 2016

Preparing for Winter's Backyard Birds

red cardinal on white birdhouse
Backyard Bird World

It's time to review how to prepare your backyard for those charming birds that will spend the Winter months with us. It's not a difficult job, but it's a fun time to share the chores with children. Once the preparation is complete, you and the kids will enjoy a chance to see many different types of birds, even in the snow.


A Simple Preparation Process


Preparation for the Winter birds in your backyard involves a few easy chores.
  • Clean out birdbaths
  • Empty and clean all of your bird feeders
  • Repair or replace any damaged bird feeders
  • Fill feeders with a winter mix of seeds
Before you put away your outdoor hose, it's a good time to clean out your bird baths. Use a scrub brush on any concrete or porous surface baths in order to get any debris left. Then fill the bird bath with fresh water. And that chore is done.

Next tackle your bird feeders (www.backyardbirdworld.com/bird-watching/window-bird-feeders/). Make sure to empty any old feed and seed hulls. Clean them by either washing in mild soapy water, rinsing well, or wipe clean with a damp cloth.  This is the perfect time to check for any damage. Cracks in a bird feeder will only get worse with freezing temperatures. Repair the ones you can, but replace those you can't.

The last step is the most fun. Fill your bird feeders with good appropriate seed mixes. There are many options available on the market. Some are designed for all seasons, some are designed just for the winter months. So choose which is best for the birds that enjoy your backyard.

A Word About Birdhouses in Winter


Personally, I refrain from even touching my bird houses once they securely in place. Many of my backyard birds return to the same nest in the same house year after year. They handle repairing the nest as needed. I don't want to add my human scent to their protected baby-rearing home.

Choose a New Bird Feeder


yellow goldfinch and red cardinal on bird feeder
www.Backyard Bird World
If I don't need to replace a bird feeder, then I choose a new one just to offer more feeding stations for my backyard birds. My favorite is a window feeder. I have several already, but adding another one just makes viewing the Winter birds easier.

Window feeders are mounted to the outside of your window with suction cups. Most are very easy to remove for cleaning and refilling. Once it's filled with food, the birds have no problem finding it.

So take a little time to prepare your backyard (www.backyardbirdworld.com/bird-houses-feeders/get-your-birdfeeders-ready-for-fall) for the birds that will share Winter with you. The chores are not difficult and it's a great time to show children the value of backyard birds. Make it an annual family event.


Posted by: BuckHawk
Buckhawk

About This Contributor

BuckHawk decribes herself as "Basically a lazy person who prefers the easy things in life." So that's what she writes about. Easy home decorating, easy recipes, easy entertaining. But, she is also a lover of animals, gardening and crafting. You'll find her writing all over the Web, but with Review This Reviews! she has the opportunity to write about all of her loves.


Note: The author may receive a commission from purchases made using links found in this article. “As an Amazon Associate, Ebay (EPN) and/or Esty (Awin) Affiliate, I (we) earn from qualifying purchases.”


Friday, September 23, 2016

How to Create a Beautiful Fall Harvest Display for Your Yard or Porch

Reviewing Outdoor Fall Displays

Learn how to create a beautiful fall harvest display in yards or porch, capture the brilliance of flowers and combine it with the great harvest fest. As the weather starts to cool down and the leaves start to change colors, everything appears to be gradually preparing for a long winter's sleep.  While the fall colors are beautiful, our yards don't seem quite as vibrant and colorful as they have been.  We desire a way to hold on to the beautiful summer flowers and green lawns, but to still embrace the gorgeous fall changes.  Some of us have found the perfect solution.  

It isn't time to really start decorating for Halloween, but we can start decorating our yards for fall in a way that will compliment the Halloween decor when it is time.  Plus, thanks to the milder weather, we can leave these fall displays intact until Thanksgiving.  By creating a beautiful fall harvest display in our yards or on our porch, we capture the brilliance of flowers and combine it with the great harvest fest.  Some of the vegetables or flowers may have to be replaced over the course of the next few months, but the backdrops and foundations can easily remain.

Start by choosing a beautiful setting in front of a tree with the dramatic fall color leaves, like a maple tree.  Or, build your display on your front porch where it will be better protected from weather.

Here are Some Ideas for Creating a
Beautiful Fall Harvest Display for your Yard or Porch


Learn how to create a beautiful fall harvest display in yards or porch, capture the brilliance of flowers and combine it with the great harvest fest.


Foundations for a Fall Harvest Display


As with any creation, a strong, firm foundation will ensure the longevity of your fall yard display.   There are a variety of of items that are easy to obtain, or perhaps that you already have on hand, that make the perfect display base or foundation.

Decorative Hay Bales

20 in. and 32 in. PVC Hay Bale Set - Reusable hay bales

  1. Hay Bales
  2. Wooden Benches
  3. Wagons
  4. Wooden Crates
  5. Wheel Barrow 
  6. Wicker Baskets
  7. Wooden Baskets

Note:  The featured hay bales are PVC Hay Bales made for decorative purposes.  If you build your fall display with real hay, you can later use the hay to mulch your flower or vegetable garden, to prevent soil erosion, or to protect and cover seeds.


Learn how to create a beautiful fall harvest display in yards or porch, capture the brilliance of flowers and combine it with the great harvest fest.


Decorative Items for a Fall Yard Display 


 5' Scarecrow Fall Harvest Halloween DecorationCheck Price
Once we have our foundation in place, we can start adding the fun, decorative items that we have chosen.  I usually add my main feature next which is most often an owl or a happy scarecrow.  You can always make your own scarecrow by stuffing old clothes with straw, creating a face or mask, and topping him off with an old hat.  Or, you can purchase a ready made scarecrow.

Additional Fall Decoration Suggestions for Your Display
  1.  Pumpkins 
  2.  Gourds
  3.  Leaves
  4.  Flowers:  Mums, Sunflowers, etc.
  5.  Plants:  Ornamental Cabbage or Kale 
  6.  Ornamental Grass
  7.  Tall Corn Stalks
  8.  Indian Corn  
  9.  Pine Cones
  10.  Sting of Lights
  11.  A Bunch of Acorns  (You would need a bunch of acorns in a basket for them to show on the display.  Or, you could stuff the bottom of the basket and put the acorns on the top) 


If you build your display on your porch, you could even make a fall wreath for your front door that coordinates with your display.


Check Out More Fall Reviews  Here
on Review This Reviews!


"How to Create a Beautiful Fall Harvest Display for Your Yard or Porch Written by:

House of Sylvestermouse


Note: The author may receive a commission from purchases made using links found in this article. “As an Amazon Associate, Ebay (EPN) and/or Esty (Awin) Affiliate, I (we) earn from qualifying purchases.”


Wednesday, September 14, 2016

Garden Review: Outstanding Spring Gardens are Planned Out in the Fall

spring flowers collage

Outstanding Gardens don't just happen, they are planned out by gardeners who know what to plant and how to plant it!  Now is the Time!  Spring Planting must be done in the Fall, for beauty next year when the snow has melted.


Here is the List of Bulbs that I plan on planting this fall, for a radiant, colorful garden.  I love to have flowers blooming all the time.  So I plan these bulbs accordingly.  There are many bulbs that will grow in early spring, mid-spring and late-spring almost summer. 


Grammie Olivia's List

  1.  Tulips (some of these will be early, mid-spring and late)
  2.  Daffodils or Narcissus
  3.  Crocus
  4.  Hyacinths (they smell incredible)
  5.  Anemones
  6.  Alliums 
  7.  Muscari or Grape Hyacinths
  8.  English Bluebells
  9.  Galanthus or Snow Drops
  10.  Iris

This is just the starters list.  From here I will go and pick out the Tulips that will grow at the different times in the spring and I will also decide on what colors I want.  I will plan to plant these in groups of 3 or 5 or 7.  Always, always plant in odd numbers!  Any master gardener that I have spoken to has reiterated that Rule!  Think about that when you are purchasing as well.  If you buy a dozen tulips, you will have 4 groups of 3 bulbs to plant.  That will also make a nice show in your garden.  Do the same thing with the Daffodils/Narcisus that you plan to purchase.  Figure out how many of each kind you will need to fill the spot in your garden and then try to make it an uneven number.   If you can't I would prefer to see 4 planted in the same spot as opposed to 3 in one spot and 1 all alone.  Even gardeners will make exceptions to the Rule!

a variety of beautiful spring flowers
Beautiful Spring Bulbs

Planting the bulbs is a little more tricky than just plopping them into a hole in the ground.  Although that might work with some bulbs, it is not an encouraged practice.  Once you have purchased your bulbs, make sure that you have the time and instructions for how deep these bulbs should go in the ground.  A rule of thumb is about 3 to 5 times the size of the bulb is how deep the hole should be!   Now that gives you some playing room too.  If you plant tulips 4 to 5 inches deep, then when back filling the hole, you could actually plant some smaller bulbs on top at the three inch level and then fill the hole right up.  Doing this will fill in your garden with color as these bulbs start to grow.  You can also use this trick if you are planning on using bulbs in containers.  Different sized bulbs get planted at different depths.  Just remember that 5 times(roughly) the size of the bulb, is how deep you want to plant it.


flower bulbs in pots
Picture courtesy of Pixabay.com
Bulbs generally are planted with the pointed side up and the more rounded side down into the ground.  This picture is just to show you that and not to be used as a guide to depth of planting.   These are grown in a greenhouse with totally different conditions than you will have. 


As you can see Tulips and Daffodils come in several different colors and combinations.  So many plants now are bred for their color and growing characteristics.   All of these are beautiful.  Planting bulbs is an activity that the children and grandchildren can easily help you with.


It's even easier if you are doing it in containers.  Here are some instructions for you to make it easier!   Make sure your planter has drainage holes, bulbs don't mind being cold over the winter months.   So plant a container full of bulbs to make your springtime even better.   Follow the depth planting chart found here so that you know your bulbs will be planted correctly.  Do plan your container in such a way that the bigger bulbs are at the bottom and the smaller ones towards the top.  Keep this container in a garden shed or garage in a cooler, or surrounded with a batt of insulation.  They don't mind getting really cold, but they don't want to be frozen and thawed and frozen and thawed again.  They need to stay dormant, until the days start warming up.  When it's the end of February or so, you can un-blanket your container give it a drink and move it into a sheltered spot in the garden.  In a few weeks time, you will be rewarded with green sprouts coming out of the planter.  


bulb planting chart 

This chart comes from Proflowers.com


It is a comprehensive guide to all kinds of bulbs that I have mentioned here in this post as  well as others that you might consider growing.

Planting bulbs is a joy for you and for all your family and friends that will enjoy the fruits of your labor.

If you look at the chart you will see that it is full of information about the differences between bulbs, corms, rhizomes and tubers.

There is a detailed zone map for  your particular zone.  Just look on the map and co-relate the color to your Hardiness Zone.

If you are in Florida, there will be plants that won't do as well as if you are in Colorado or elsewhere.

It also reiterates what I have told you earlier in how deep to plant all your bulbs.

This chart also takes you through bulbs and corms that can be planted in summer and fall as well as spring.

The only time of year when you do not want to plant anything is in the middle of the winter.  By then the ground is frozen and you really don't want to be outside for any length of time anyways.

If you forgot to plant bulbs in the fall and you  want to plant them, try planting them in a pot as large as possible and keep them in a garage or some sheltered area.  They may just surprise you and grow, or they will die.  If they manage to grow you are a winner and if not, you really haven't lost anything more than you would have by not trying.


Please feel free to join me on Pinterest where there is a host of information for gardeners of all levels of expertise. https://www.pinterest.com/haydnsgrammie/weekend-gardener/


Note: The author may receive a commission from purchases made using links found in this article. “As an Amazon Associate, Ebay (EPN) and/or Esty (Awin) Affiliate, I (we) earn from qualifying purchases.”


Thursday, August 18, 2016

Reviewing New Grandmother Gifts

The message on this new grandma necklace makes it the perfect gift for a new grandmother.
Every Time a Baby Is Born So Is a Grandma
by GutsyGoodness on Etsy
Our family is expecting a miracle. In fact, the blessed event is coming up fast. Yes, in just a few short months I'm going to be a grandma! It's taken time for the reality to sink in, but I was thinking about it today and suddenly decided to go online window shopping for something for myself, the future new grandmother. Here are some items that I've added to my wish list, each of which I think would make a fabulous new grandmother gift.

I absolutely love this vintage pendant necklace. The message reads, "Every time a baby is born, so is a Grandma." That sentiment is perfect for me since I'm new at this grandparenting thing. I adore the vintage look of the antique bronze pendant and, even though I'm not sure yet what my grandmother name will be, "Grandma" on the charm works fine for now.

The necklace also comes with a birthstone charm. I'll have to decide if I want to go with the probable, calculated birth month or if I want to choose a different birthstone to start with, either my own or that of my son, the dad to be (actually, I love that idea). There are more add-on charms and other options available with this piece, including the length and type of chain. The shop owner packages the necklace in a beautiful box that includes an encouraging note about new grandmothers that puts a fitting finishing touch on this absolutely perfect gift.

Sharing Activities With the New "Grand"


For grandmothers who enjoy gardening, a custom-made Grandma's Garden sign is a great gift idea.
Grandma's Garden Sign
by BobsWoodSignShop on Etsy
Recently, my daughter-in-law, the mom of this soon-to-be-here baby, asked me if I had been thinking of things I might want to do someday with my new grandchild. Funny she should ask, because actually I had given that some thought.

One of the pastimes I enjoy is working in my little garden and, when he or she is older, I'd love to plant the seed of loving growing things in that tiny tot's little head. That's why this new grandma would like to have a "Grandma's Garden"sign like this one. It's one of those items that, when I saw it, I really wanted it. I may wait until my future grandparent nickname is settled, though, since Bob of Bob's Wood Sign Shop on Etsy takes special orders!

These mother-daughter aprons are perfect for a grandmother and granddaughter, too!
Pink Mother-Daughter Aprons
by GrandmaJackies on Etsy


Another activity I'm looking forward to when spending time with my future grandchild is cooking. That's something I fondly remember doing with both of my grandmothers, with my mom, and then eventually with my sons. So whether this kiddo is a girl or a boy, I'm sure we'll spend lots of time together working in the kitchen.

If it's a girl, I'll choose these grandmother-granddaughter pink checked aprons for the two of us. I like the aprons, but I especially like this simple photo that shopkeeper GrandmaJackies included in her Etsy listing. Reminds me of when I was the little girl helping in the kitchen.


A Title To Live Up To


This pretty, floral Best Grandma Ever mug would make a perfect gift for any new grandmother.
Best Grandma Ever Mug
by Willow and Olive on Etsy

Becoming a new grandmother has been pretty easy on my part, so far. I mean, well, you know. My son and daughter-in-law are doing all the work and before long, voilà, we'll be grandparents. The job of being a good grandmother isn't something I plan on taking lightly, though. I want to be a good influence and do the best job I possibly can do to be the best grandmother I can be. This beautiful floral "Best Grandma Ever" mug is something I'd like to have so I can be reminded daily (though I'm not likely to forget) that I will have a truly important title to live up to.

So, these are the new grandmother gifts I've picked out for myself. How did I do? Do you have a favorite? Have any new grandparenting advice to share? I hope you'll let me know in a comment below.

Enjoy this review of several fabulous gift ideas for a new grandmother. | ReviewThisReviews.com
Thanks for sharing!
~Susan
Click here to read more of my reviews.


Posted by Susan Deppner

Susan Deppner

About the Author

Susan Deppner is a baby boomer, a cancer survivor, and a Southerner who believes in the Golden Rule. She enjoys writing about food, faith, and fitness; health, home, and holidays; people, places, pets, and patriotism, and more. Follow Susan on Twitter, Facebook, and Pinterest.


Note: The author may receive a commission from purchases made using links found in this article. “As an Amazon Associate, Ebay (EPN) and/or Esty (Awin) Affiliate, I (we) earn from qualifying purchases.”


Wednesday, August 3, 2016

Review Some of Grammie Olivia's Favorite Things

Grammieknows is what my darling little ones tell everyone, whenever I answer a question for them. 

Sometimes the answers are true and other times they are a story that makes absolutely no sense, but has them laughing in the aisles.  My propensity for telling tales has earned me the moniker of being a know it all.....So I guess the nickname Grammieknows fits pretty good.


white trilliums flowers
Trilliums 2016 from  Grammie Olivia's Garden. 


What Grammie does Know is, that gardening is a balm for the soul and works nicely to make a body tired, so that sleep can, eventually make the body rest.  Working in the garden not only makes the body tired, but it is great exercise.  As we age, we need that exercise to keep us moving one step at a time.  You know (and Grammieknows) if you don't use it, you'll lose it!  It is so true with exercise, if you don't move those muscles, arthritis and weakness will take over.  


muscle medicine
Muscle Medicine


Gardening also provides a way for you to enjoy the beauty that is all around.  From the ground right up to the sky, flowers and plants make the world a more beautiful place. It doesn't stop at the ground level either.  All those flowers planted in garden beds, encourage bees, butterflies, birds and small animals to gather and enjoy the work of your hands.

backyard wildlife book

Finding great tools to use to make the job easier is also a lot of fun.  I have my special tools that I just can't be without!  Like any other craftsman, looking for new tools is a joy and I love sharing those great finds.  You can see some of the tools I love in another Review This Article, I love my tools.


Being green minded, may be avante garde today, but I have been that way for a long time.  I don't encourage the use of chemicals in any way, shape, or form.  There are natural solutions to every problem and I try to search those out.  When something works particularly well, you will find me sharing that with everyone who will listen. 


Recipe for Homemade Weed Killer

Like my favorite weed killer, that is made up of Vinegar, Salt and Dawn (Blue) Dishwashing liquid.  I know you want the recipe now....  So, it's one gallon White Vinegar,  2 cups of Salt, and 1/2 cup of Dawn.  Always shake it up well, before applying.  Put it into your sprayer or divide it up into several different spray bottles (make sure you label them) and use early in the morning(on a dry day) for your weed issues.


Gardening is such an incredible opportunity to stand on God's earth and work to make the world a better place to live, breathe, and be!


You will find me on Review This, or on my website, www.grammieknowshow.com and sometimes on Facebook posting things of interest to gardeners  and those who enjoy flowers and nature at https://www.facebook.com/GrammieKnowsWeekendGardeners.
The other places where Grammie Olivia posts things of interest include  Pinterest for fun and lots of interesting subjects that just tickle her funny bone.  You can check out some of the interesting things Grammie Olivia finds online right there.  


I love to hear from others, so use one or all of the platforms I have shared with you to drop me a line.  I will answer, because after all, GrammieKnows.


Note: The author may receive a commission from purchases made using links found in this article. “As an Amazon Associate, Ebay (EPN) and/or Esty (Awin) Affiliate, I (we) earn from qualifying purchases.”


Wednesday, June 22, 2016

Green Thumbs Love Daylilies!

What grows without too much trouble, looks beautiful and makes gardeners all over the world smile?

You could answer with a multitude of plant names and I'm sure that some gardeners, somewhere, would agree with almost any suggestion.  The answer I'm looking for right now is Daylilies!

With over 30,000 different cultivars, you know that the plant world has taken this plant and just loved it so much that developing a new cultivar is like finding gold.

Hemorocallis is the proper name for the genus of Daylilies and comes from the Greek words Hemera (day) and Kallos (beautiful). So the Latin name is very appropriate and a straight translation. They are called Daylilies because each flower usually lasts only one day.  One every stem though you can have 5 to 10 buds.  So they last a lot longer than one day.  July and August are the greatest months for Daylilies.  They are  blooming like crazy during the summer months.

yellow daylilies
                                      Picture from my garden, please don't copy.

With over 30,000 different cultivars, it is highly unlikely that you will ever see all of these beauties in one place.  There are gardeners all over the world who use their gardening skills to breed new cultivars of Daylilies in the hopes of bringing another beauty into being.

variety of daylilies
Picture Wikimedia Commons


Developing new cultivars is not for the faint-hearted gardener.  It can take 3 to 5 years and sometimes longer to develop a new strain and then it must be tested to make sure it comes true to it's cross and does not revert back to one of the parent lilies.

When I first fell in love with Daylilies, they just happened to be the most ordinary Daylily. Ordinary in the sense that they are common and found all over the world.  They are just plain orange, but bloom with lots of buds on each stem, so they flower for a long time.  Most people call them Tiger Lilies.  

Today I have a few more Daylilies that are quite beautiful.  I have fallen in love with one called Devil's Delight, that is a dark red/burgundy with a green throat.  Ruffled edges on the petals make it look like a ladies evening gown.  That root cost me a small fortune and looking at my pictures I realize I have never taken her picture.  Sorry, I would have loved to share her with you.

I have neighbors go by my garden asking me for a root of that particular Daylily, but I am not so keen to share it.  

The other one that I really like is called Moonlight Dance ( see the picture above)  and she is yellow with a halo of darker orange and the edges are also the dark orange and ruffled as well.  They remind me of ballerina tutus.

This weekend June 24-26th there is a Daylily Festival in Tennessee.  If you are close by, I would say go and be prepared to be awed by over 200 varieties of Daylilies.


pink daylilies
Photo by Ken Oakes 

Why Grow Daylilies?


As I was telling you earlier, there are so many Daylily cultivars, that I'm sure no one has seen them all in one place at one time. Why are there so many?  Well I'd like to guess that it's partially due to the ease with which you can grow this plant. While it is originally from the Eurasian area, China, Korea and Japan, daylilies have found their way around the world and can grow in a variety of settings.

They can be large flowered with multiple petals, or large with singular petals. Some have stripes or rings, some are ruffled and others are not. Colors vary from the common orange, to dark reds, violets, pinks, yellows and everything in between.

Their root systems are so strong that they will get denser and denser as the years go by.

If you leave a clump of daylilies growing without any interference, it may take a pick ax to dig it out again. I tend to let mine grow for a year without disturbance, and then the next year, I will go in and remove some of the roots for planting elsewhere or sharing with friends and family.

The large strap shaped leaves look like a giant spider plant, until the spikes of flowers begin to show in mid-July. Then prepare yourself for some breath-taking beauty.

Some are scented and re-bloom later in the year as well, but not all of them. It's hard for any plant to be this beautiful and smell nice too! Whatever you don't get in scent is certainly made up for, by the depths of colors and intricacies in this plant.

Can I make some suggestions for your garden?


If you have never grown Daylilies I would start with this one, The Stella d'Oro is a rebloomer, meaning that it will bloom more than once.  It is beautiful in it's golden color and it smells nice too! You will not be disappointed with this plant.


yellow daylilies25 Bareroot Stella D'Oros Daylilies--1-2 fan


Do you want to learn more?


I only made one suggestion for your garden because I could not possibly choose the others for you.
Rather,  I would suggest getting this book, for some really nice summer time reading and dreaming.

You will enjoy seeing the multitudes of daylilies within the pages and the descriptions of what makes each one "special".  It will also open your eyes to at least 1700 different cultivars that are available.

This book will become bookmarked with your choices in colors and types of daylilies.  Leave it out in the open for your children to see, so next time there is a gift giving opportunity, they will know at least one thing that you would love to have in your garden. If you are inclined you could even use some sticky notes to mark out your favorites.........Sneaky, right?


daylilies encyclopedia bookThe New Encyclopedia of Daylilies: More Than 1700 Outstanding 
Selections

I prefer to be this kind of sneaky and get something that I really want in my garden than to have my kids bring me cut flowers that will surely last only a few days.  This way, your plants will come back year after year becoming more beautiful with the passing of time.  They will be a living reminder of the gift given once and enjoyed ever after.


Just one word of caution, once you have one daylily in your garden, you will want more!  


Note: The author may receive a commission from purchases made using links found in this article. “As an Amazon Associate, Ebay (EPN) and/or Esty (Awin) Affiliate, I (we) earn from qualifying purchases.”


Wednesday, May 18, 2016

Lady Bugs are So Cool

ladybug on a leaf
Now you must admit, this little red and black bug really is quite cute to look at!  When I review the benefits of having these Lady Bugs in the garden, I can't help myself, I am happy, and smiling.

These little bugs are the kind that you want to see in your garden! They are wanted for their ability to eat immense numbers of "bad bugs" that gardeners and farmers all over the world seem to have. Surprisingly, they are fairly long lived as bugs go! They have a life span of 2 to 3 years. Did you know that? According to the National Geographic that's what a lifetime for a lady bug is!

Others tend to think that lady bugs live a few months to a couple of years, I've never been able to follow just one to find out for myself which estimate is correct!

From the time I was a young girl (not so many years ago) I have always loved these little critters. I did not know then, that these were some of the best bugs to have around. That was long before I became a gardener or had any inkling of getting my hands dirty!  I just know that I liked them even when I was younger.   If one would happen to land on me, my day just seemed to be great!


Lady Bugs are Beneficial to Gardens


While most bugs in the garden tend to hide, these little guys just seem to scream, "Here I am!"

I can remember my sister and I going out to the garden to hunt these lady bugs and see who could get more of them........It was a game that we would play for hours. When we had enough of them gathered in a jar, my mother would immediately take us out to the tomato garden and watch us release our beauties right there. She would be pleased as punch that she now had her own "army" to do some of the gardening work!

My sister and I wouldn't mind either, because we could go out and watch them all day long. Now that I am all grown up, I think back to those Lady Bug hunting days with a smile on my lips, because I still go out to my garden to look for my little lovelies! But, I also look for ways to encourage them to stay in my garden! That means planting things that will in effect also draw aphids. That is not hard to do, because aphids have got to be one of the biggest garden pests going and they are attracted to many different kinds of flowers, including roses. So if you are a lover of roses, you just might want to also become a lover of Lady Bugs!


ladybugs collage
Lady Bugs are a favorite for many people.  There are many different items available with lady bugs as their motif.  From jewelry to coffee mugs. games and books, all use the lovely red/black and white coloring of the lady bugs to enchant and captivate their audience. I think that's one of the reasons you will find them in so many places.

I can remember when we first had our children. My sweetling ( one of hubbie's pet names)  was a budding carpenter (woodworker) and decided that he would build our baby's crib! He did a great job and while it was painted a very plain white, we wanted something to brighten up the new baby's bedroom. Well,  of course I went out looking for lady bugs! Truth be known, at the time they were hard to find, and I didn't trust my artistic ability. We searched and searched and searched (this was pre-internet days) and could not find what we wanted.

The baby's grandparents were on the way to Switzerland and there they found some beautiful ladybug decals. So, when they were back home, the decals were the first things to find a special place, and that was on the headboard and foot-board of the new crib........ Today I would have found some pictures and painted them on the crib myself, but like I said earlier, I didn't trust my artistic abilities at that time. How things have changed. Since that time (almost 45 years ago) lady bugs and insects in general have been given a whole new spotlight on the decorator's radar. You can find all kinds of bugs, beetles, insects and more to decorate your child's room. Not to mention flowers, and trees and a host of other "earth friendly" decorating ideas.


The Charm of Lady Bugs 


Lady Bugs are considered to be good luck, so if you get one to visit you, you are lucky too! There is something charming about Lady Bugs, and I don't really know why they stand out. It could be their color as those cute little red, black and bits of white, just make me smile. Maybe it's the whole idea that they are beneficial bugs that makes them desired, all I know is that,every time I wear my  Lady Bug pin, someone comments on it. There are rhymes that are told about Lady Bugs, stories that are written about Lady Bugs and a whole lot more. The bottom line is that lady bugs with their primary colors are wonderful ways to get children involved with their surroundings and get them thinking in earth friendly terms. I think the earth would appreciate having some youngsters interested in keeping the world green and healthy!
>
Start small and work your way up to some real Earth Friendly activities! Budding entomologists, scientists, gardeners, are being formed just by awareness, and you can't start too early for that.

Get your little ones started on the road to learning about the earth and it's bugs with - a host of stories and books about the critters around them!

A deep love for all things of the earth are possible if you take the time to encourage that activity. Children are a natural place to start, because their curiosity is boundless.

ladybug girl book Feed that curiosity with books, games and puzzles and who knows, you just might be encouraging the next generation of "earth sciences" scientists.


Even grown ups love lady bugs, so let your inner child out and enjoy what you did as a child.  Lady bugs are not just for kids to enjoy! If you loved them as a child, there is nothing stopping you from loving them now too!


Grammie Olivia loves to write on Review This, and offer a few suggestions for you to enjoy with your youngsters.  She is an Amazon Affiliate and if you click on her links, she will be paid a small commission. And because she loves LadyBugs so much you just know she will have them on her website`s banner!http://grammieknowshow.com/


ladybug banner


Note: The author may receive a commission from purchases made using links found in this article. “As an Amazon Associate, Ebay (EPN) and/or Esty (Awin) Affiliate, I (we) earn from qualifying purchases.”


Most Recent Reviews on Review This Reviews


Search for Reviews by Subject, Author or Title

The Review This Reviews Contributors


SylvestermouseSylvestermouseDawn Rae BDawn Rae BMbgPhotoMbgPhotoBrite-IdeasBrite-IdeasWednesday ElfWednesday ElfOlivia MorrisOlivia MorrisTreasures by BrendaTreasures by BrendaThe Savvy AgeThe Savvy AgeMargaret SchindelMargaret SchindelRaintree AnnieRaintree AnnieLou16Lou16Sam MonacoSam MonacoTracey BoyerTracey BoyerRenaissance WomanRenaissance WomanBarbRadBarbRadBev OwensBev OwensBuckHawkBuckHawkDecorating for EventsDecorating for EventsHeather426Heather426Coletta TeskeColetta TeskeMissMerFaeryMissMerFaeryMickie_GMickie_G


Review This Reviews is Dedicated to the Memory of Our Beloved Friend and Fellow Contributor

Susan DeppnerSusan Deppner

We may be apart, but
You Are Not Forgotten


“As an Amazon Associate, Ebay (EPN) and or Etsy (Awin) Affiliate, I (we) earn from purchases.” Disclosure Statement

X