Showing posts with label close up photography. Show all posts

Thursday, August 13, 2015

Creative Flower Photography

pink flower photo by mbgphoto

Getting Creative with Flower Photography

Use your Imagination to Create Beautiful Flower Photos


Everybody takes pictures of flowers and it takes minimal effort to take some really nice shots. With just a bit of practice and patience you can take some unique photos that will really stand out.

When you are photographing flowers you need to first remember some basic tips.

1. Look for flowers that are in good shape. That may seem obvious but it is amazing how many times I start to take a photo of a flower only to realize that the weather has gotten the best of it and it is on the downhill side. Take the time to look for the best flowers.
2. Use a tripod to get a steady image.
3. Kneel down to get the best angle.
4. Shoot when there is little or no wind.
5. Early morning or late evening shots are best.

Now that you know some of the basic rules, don't be afraid to break them. Any of the above rules can be changed to fit your creative needs.

I took all the photos on this page with my Sony D57 DSLR camera but I will tell you that I have taken nice flower shots with my point and shoot camera and even with my camera phone. So you see, you are not limited with the equipment you have with you. The big thing is to enjoy what you are doing and try something different. You will be happily surprised by the results.

Happy Photographing

all photos by mbgphoto

Single out One Flower

Single out one flower to photograph


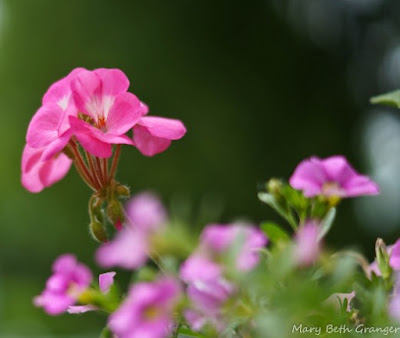
One technique to use in flower photography is to focus in on a single flower within a group of flowers. This geranium is a single bloom within a pot that is sitting on my patio. If I were to photograph the entire pot it would look pretty but rather ordinary. The geranium would blend in with the rest of the pink flowers in the pot. It didn't particularly look interesting until I zoomed in on it and looked at it apart from the other flowers.

 
To create this photo I used a 50mm lens and set it on aperture priority. I used an f stop of 1.8. By doing this I was able to focus in on the one bloom and put the rest of the flowers in a blur. The background then washed out completely and became a nice green backing.
If you are using a point and shoot camera try putting it on the macro setting (look for the little flower symbol) and it will give you similar setting to capture the individual flower. Be sure to get as close to the flower as the camera will allow.

Learn from Others

One of the best places to get ideas is to look at the works of others. View the photos, imagine what they did to get the image and then try to recreate it. Once you have mastered the techniques it will become increasingly easier to use you imagination to create unique images of your own.

photographing flowers
Click Here to View on Amazon


Try a Closeup Filter

flower photo using closeup filter


A closeup filter on your camera will allow you to get in even closer and pick up the very small details. In this photo I am using a Cokin closeup filter on my 50mm lens. You will note that when I do this I only get a small portion of the flower in focus and the rest is a blur. You will need to have your camera on a tripod to get this type of shot.

This is a great way to get raindrops on a flower petal.

Daisies up Close

daisies up close

DSLR

If you are looking for a good basic DSLR camera, I highly recommend looking at Sony. I have been shooting with Sony products for the last 8 years and have been very satisfied. When I started I virtually knew nothing about the DSLR cameras and the instructions and books I read with my camera were very helpful. This camera is great for the beginner as well as the more advanced photographer.


Using Props

close up photo - using props


Props can be useful in capturing a unique flower photo. I took this photo for an assignment for my photography class to take an unique flower photo.

To set up for the photo I used a few props. I had a small pot of Gerbera daisies that I sat on a chair in front of our glass patio doors. I then took a black velveteen skirt that I draped over the back of the chair. I set up my tripod in front of the chair and started shooting from various angles. I was using a 70-300 mm zoom lens on my Sony DSLR.

I had taken several shots of the front of the flower and they turned out great but not really anything different so I decided to shoot from just below and behind the flower. I love the way the flower petals are bending down to give just a touch of the peach colored front of the flower. The black skirt gives a great background to make the bloom pop out in the photo.


Capturing a Bouquet

photographing a bouquet


If you receive a special bouquet of flowers it is nice to have a photo to remember the occasion. This is a bouquet that I received for Mothers Day. I took several shots of the whole bouquet with the vase but I think that this shot taken from above the flowers turned out best. I sat the bouquet on the floor and then stood above it to photograph the flowers.

Shooting flowers indoors is a great way to practice different techniques. You don't have to worry about the wind or insects getting in your way. I place my flowers near an open window to capture the outdoor light.

Shooting after the Rain

Shooting after the rain
You can never go wrong shooting flowers right after a rain storm. I love to capture them before the raindrops are gone. When there is no rain for days, try spraying them with a fine mist. It can take the place of the real thing or perhaps you catch some flowers right after the sprinkler goes off.


Favorite Flower Photos


daisy photo by mbgphoto

Photography Techniques

Sometimes I need a nudge to get my creative juices flowing. Reading or looking through photography books usually does the trick. Here is one on flower photography.

photographing flowers
Click Here to View on Amazon

Zazzle Products

I enjoy turning my flower photographs into Zazzle products.  Here are a few of  my Greeting Cards.


Note: The author may receive a commission from purchases made using links found in this article. “As an Amazon Associate, Ebay (EPN) and/or Esty (Awin) Affiliate, I (we) earn from qualifying purchases.”


Thursday, July 23, 2015

Review of Photography Tips

Class Offers Helpful Tips

bleeding heart image by mbgphoto
It is a good idea for every photographer to review some of the basic techniques for photography from time to time. I have taken many classes over the years and I always think I will remember the techniques I have learned and I do for a time. But then, I will find myself falling back into old habits or trying new techniques and forgetting to use some of the basics. 

For that reason, I think it is great to have a review of basics on a regular basis. In the nature photography class I am taking the instructor used the second session to go over some of the basic techniques. He reminded us of things like using a tripod, watching your vantage point, taking both vertical and horizontal shots and watching your background. 

 On this page I will be sharing some of the tips he gave us and showing you photos that I have taken using these techniques. 

 The first photo here is one I took of a bleeding heart flower. I set my aperture on a 5.6 and zoomed in to get a closeup. The resulting photo shows the flower in detail and a soft blurr for the background. 

 All photos on this page are my own-mbgphoto. 


Photographing Waterfalls 

Photographing waterfalls - photo by mbgphoto


I love photographing waterfalls. When I come to a waterfall i usually shoot it at a variety of speeds. It is a great way to learn how your camera works at various speeds. Here are the tips the instructor gave us get that smooth blurring look in the water.
  • Set your camera to your lowest ISO
  • Set your speed at 1/15 sec or slower
  • Always use a tripod

The photo above is one I took of a waterfall at Missouri Botanical Garden.


Pop Up Reflectors are Great Tools

plow photo by mbgphoto
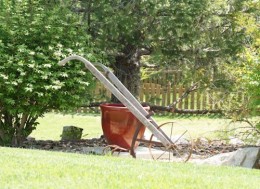
In this photo and the one below you can see the difference a reflector can make in a photo. I was with my friend photographing a garden when I came upon this old plow.

The first photo I took had a glare from the sun on the wheel. I kept moving around but could not get rid of the glare, so I asked my friend to help. She stepped just outside of my frame and held the black side of the reflector over the wheel to block the sunlight. 

It was amazing, as she lifted the reflector to block the sun I looked at my camera screen and it was if someone was drawing a dark line around the wheel. The light spot disappeared and you could clearly see the wheel.  The resulting photo is shown below.

Plow Using Reflector to Shade the Sun


plow photo by mbgphoto - using reflector


The reflector below is the type I used for these photos.


photography reflectors
Click here to View Amazon Link


Watch Your Background and Foreground - frame your photos

lighthouse photo by mbgphoto
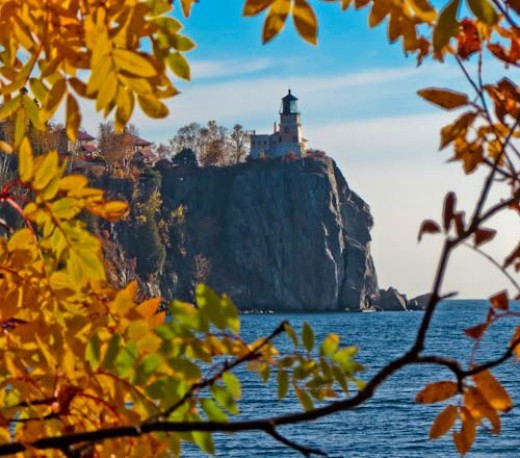
In our class the instructor spent quite a bit of time talking about backgrounds and framing your photo. So many times we get so caught up into getting the object we are photographing to look just right that we forget to look at what else might be in the photo. There is nothing more distracting than having an unwanted person or object behind our main subject. The instructor suggested that before you click the photo you should run your eyes around the perimeter of the photo to make sure you are only including what you want in the photo.
 
Foregrounds are also important and if you can find an object to frame your photo it can give your picture a very focused look. In the photo above I used falls leaves to frame the Split Rock lighthouse in the distance. In order to do this I climbed up on a rock and made sure the branches of the tree framed the outside perimeter of my photo.

Make Your own Background

flower with black background
Sometimes the best way to get the background you desire for your photo is to make your own background. In our class several different ways to make backgrounds were suggested. The instructor carries squares of fabrics in various colors in his camera bag. A black or a green piece of fabric draped behind a flower can give you a great backdrop. This way just the flower is in the photo and it gives you a dramatic look.

In this photo I used a velvet skirt and draped it over my kitchen chair. I then sat the plant on the chair to get this image.


Use a Polarizer - a must for the serious photographer

autumn tree by mbgphoto
Our instructor suggested that if you were only getting one filter for your camera the one you should get is a polarizer. I completely agree. A polarizer will cut down on glare and really make the colors pop in your photo. It is like having sunglasses for your camera. A polarizer is particular useful when shooting foliage and fall colors. 

The items below are made from photographs I took of Split Rock Lighthouse in Minnesota.  I love taking photos of lighthouses from lots of different vantage points. 

by mbgphoto

I learn at lot from studying the tips found in photography books.  I highly recommend Scott Kelby's series on digital photography.  The book below is the first in the series.

digital photography
Click on Photo to view book on Amazon


Note: The author may receive a commission from purchases made using links found in this article. “As an Amazon Associate, Ebay (EPN) and/or Esty (Awin) Affiliate, I (we) earn from qualifying purchases.”


Thursday, May 22, 2014

Macro/Close Up Photography


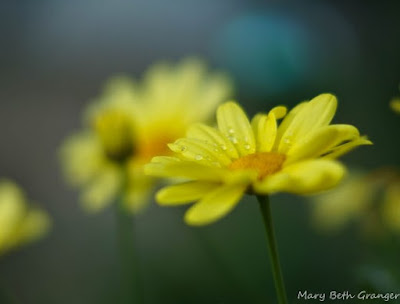
close up photo of a yellow daisy photo by mbgphoto


Taking photos close up can really be a lot of fun.  You see the world in a whole new light.  I am always amazed by the details in flowers when I get close up.  In the last session of our nature photography class the instructor talked about equipment for macro and close up photography.  If this would be my primary focus for photos I would want to buy a macro lens but they are rather costly and my primary focus is lighthouses and landscapes.  The instructor suggested several alternatives.  The one that seemed to fit my needs was to buy a 50mm 1.4 or 1.8 lens and then to get extension tubes for even closer shots.

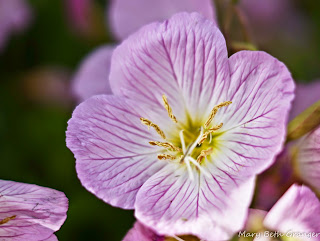
The photo above was taken with the 50 mm lens at at 1.8 aperture. I have a bit to learn about getting the focus in the right spots, but overall I am very pleased with my first results.  The 1.8 aperture allows a lot of light into the camera and I am able to focus at a very close range.  The daisy above was taken with this camera.  You will not how just the very center of the flower is completely in focus.  The primrose below is another of my first tries with the new lens.
close up photo of a primrose photo by mbgphoto


Close up and Macro photography can be a lot of fun.  I hope you have enjoyed the tips on this page.  Happy Photographing!!

Stop by my page for the latest tips on Field Photography http://www.squidoo.com/field-photography-tips


Note: The author may receive a commission from purchases made using links found in this article. “As an Amazon Associate, Ebay (EPN) and/or Esty (Awin) Affiliate, I (we) earn from qualifying purchases.”

Thursday, May 8, 2014

Field Photography and Close Ups

yellow flower photo by mbgphoto
This is the third post in my series on the Nature Photography Class I am taking.  Each week we have a homework assignment and the assignment for this past week was to take an artistic photo of a flower.  The photo above is the one I submitted.  It is the backside of a Gerbera daisy.  In order to take the photo I made my own background by draping a black velvet skirt over a chair and sitting the potted plant on the chair.  I used my tripod and zoomed in close to capture this photo.  Here is the photo of the front of that same flower.  The instructor said that although the front flower was a good one he enjoyed the photo of the back since it was a side people usually don't see.  He also said it was good that I did not center the back flower photo.  It gives it more interest.
pink flower photo by mbgphoto

Field Photography

In the class we talked a bit about field photography with an emphasis on what to bring when you go into the field to photograph.  The main point that I got from this was that you should think careful about what you want to photograph and not try to bring all your gear but rather just what will be needed.  Here are some considerations and items to pack in your bag to overcome them.

  • Wet Grass/Mud--carry a folded up heavy duty trash bag to kneel or sit on.
  • Wind- consider carrying an umbrella to use to block the wind
  • Controlling light- reflectors in various colors-black,white, gold, silver
  • Transporting gear- pick a bag that is lightweight and fits what you are doing....you wouldn't want a heavy bag for a longer hike

Macro  Photography

We also discussed macro and closeup photography in the class.  The instructor said the difference is that macro photography would be taking a photo  at 1/2 life size or greater.  Less than that it would be close up photography.  He said most macro settings on cameras are really close up photography.  He talked about several options for taking macro photos.
  • Macro Lenses--these are great for getting small details.  The lens come in a variety of size and the instructor said if you were to get just one he would suggest something in the 70-80 mm range.  Macro lenses are a bit on the expensive size so you may want to consider the next less expensive option.
  • Extension tubes--these tubes help you to get macro photos without the expense of the macro lens.  They can be purchased usually in sets of 3 and can be used in combination with any lens...zoom or otherwise.
  • Diopter lenses- these lenses will magnify and help in macro photography.  They DO NOT work well with zoom lenses.
  • Focus Rails--this is a great tool that can be attached to your tripod to move the camera back and forth when you are focusing.  Much easier than trying to move tripod to focus.


Note: The author may receive a commission from purchases made using links found in this article. “As an Amazon Associate, Ebay (EPN) and/or Esty (Awin) Affiliate, I (we) earn from qualifying purchases.”


Thursday, March 20, 2014

Perspective in Photography


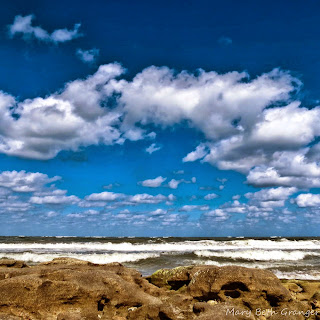
When I take photographs of landscapes, most of the time I am standing up and shooting with a wide angle lens.  I have been reading a lot of articles on perspective and challenging myself to look at things differently.  I have found if I get lower to the ground and get a bit more of the foreground into view I get a different and very pleasing composition.  In this first photo I am crouching down a bit to get more of the rocks in the foreground in the photo.


beach scene photo by mbgphoto


Look at the different look you get when you get really low and make the foreground pop out.  In this photo I am sitting on one of the rocks and holding  my camera low.
beach & sky photo by mbgphoto

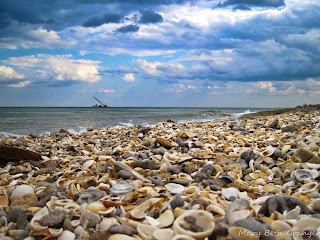
In this photo I get even lower.  I am was walking on the beach with my Canon point and shoot camera and I bent down and held my camera in the middle of the shells.  I love the effect this got me with all the shells up close and the sky in the background.
seashells on the beach photo by mbgphoto


Flower photos are always fun, but again be sure to change your perspective.  Everyone seems to take flowers while they are standing up and looking down at the flower.  In this photo I sat down in front of the flowers and zoomed in on one flower to create a different look.
yellow flower photo by mbgphoto


Note: The author may receive a commission from purchases made using links found in this article. “As an Amazon Associate, Ebay (EPN) and/or Esty (Awin) Affiliate, I (we) earn from qualifying purchases.”


Most Recent Reviews on Review This Reviews


Search for Reviews by Subject, Author or Title

The Review This Reviews Contributors


SylvestermouseSylvestermouseDawn Rae BDawn Rae BMbgPhotoMbgPhotoBrite-IdeasBrite-IdeasWednesday ElfWednesday ElfOlivia MorrisOlivia MorrisTreasures by BrendaTreasures by BrendaThe Savvy AgeThe Savvy AgeMargaret SchindelMargaret SchindelRaintree AnnieRaintree AnnieLou16Lou16Sam MonacoSam MonacoTracey BoyerTracey BoyerCheryl Paton Cheryl PatonRenaissance WomanRenaissance WomanBarbRadBarbRadBev OwensBev OwensBuckHawkBuckHawkDecorating for EventsDecorating for EventsHeather426Heather426Coletta TeskeColetta TeskeMissMerFaeryMissMerFaeryMickie_GMickie_G


Review This Reviews is Dedicated to the Memory of Our Beloved Friend and Fellow Contributor

Susan DeppnerSusan Deppner

We may be apart, but
You Are Not Forgotten


“As an Amazon Associate, Ebay (EPN) and or Etsy (Awin) Affiliate, I (we) earn from purchases.” Disclosure Statement

X