Showing posts with label Food Review. Show all posts

Tuesday, January 2, 2018

Ghee Butter Reviewed

The Recipe Called For Ghee

chunks of butter
Image of butter courtesy of pixabay.com
After Santa brought me my InstantPot pressure cooker, I noticed some of the recipes called for ghee butter. I will admit right here in front of all of you that I had no idea what that meant. So, of course I looked it up.

Turns out it is used often in Indian cuisine but has found a place with cooks around the world. The short answer would be that it is basically clarified butter to use in cooking. 

That was the simple explanation and really doesn't do ghee justice. To make this improvement (my opinion) on regular butter the butter is melted and simmered until all of the water evaporates and the milk solids fall to the bottom. In essence a butter oil is created in the process. 

Not only does this taste like butter (it is actually) but it supposed to be better for us. The bad fats have been removed and most folks who have a problem with lactose intolerance find that ghee doesn't bother them. What I like about it is that it doesn't burn like regular butter does when you are trying to saute items. The burn temperature is much higher with ghee. No smoking problem or burnt taste if you aren't careful. That is one reason it is recommended when making InstantPot recipes.

 It has a long shelf-life, too. Out of the refrigerator it should be good for two to three months and if kept in the fridge it should be good for about one year. As much as I have started cooking with it, I won't have to worry about it going bad. I'll use it up before it has a chance to expire!

Personally, I think the foods that I have used it in taste better. That might be my imagination but it is my opinion none the less. There has been no noticeable loss of taste to me or my husband and we love our butter!

I'm glad that I took the time to research what the recipes were calling for and then ordered it to try. It is now something that I will keep in my pantry from now on. How about you? Have you tried ghee? 


Note: The author may receive a commission from purchases made using links found in this article. “As an Amazon Associate, Ebay (EPN) and/or Esty (Awin) Affiliate, I (we) earn from qualifying purchases.”


Friday, July 28, 2017

How to Grill the Perfect Steaks - Beginner Tips Reviewed

Learning to Grill the Perfect Steaks

Easy Instructions:  How to Grill the Perfect Steak
I decided to learn how to grill steaks myself after reading so many great recipes and ideas for the grill written by my fellow online writers. 

In our family, it has always been the man's job to cook out.  Previously, I just accepted the gift gratefully and I was content to defer to my dad, one of my brothers, or to my husband's expertise on the grill.  However, with visions of kebabs and grilled pound cake, I was inspired to learn how to use the grill. 

I photographed all of my husband's steps to preparing the grill and preparing the food.  Now I will be ready to grill our next steaks.   I am willing to share my new knowledge.  Perhaps, this article will help you get started too.  

So, let's have some fun!


Choose your Steaks Carefully

Although they were expensive, we chose to cook 4 USDA Choice Rib Eye Steaks.  They weighted 3.82 lbs total weight.  They were purchased the same day we cooked them and they were never frozen.  In this photo, they have already been seasoned and are ready to grill, but I have included our steak preparation instructions below


Selecting the Right Steaks to Grill


What You Need to Cook the Best Steaks You will Ever Eat!

In our family, grilling steaks was always man's work. 
After decades of relying on my father, brothers and husband,
I decided to learn how to grill steaks to perfection myself. 
Let me show you how!

    Grilling Supplies for Great Steaks
  • A Grill
  • Charcoal
  • Chimney Grill Starter
  • A Sheet of Newspaper
  • A Match or Lighter
  • Food ~ We chose 4 Rib Eye Steaks ~ Total weight: 3.82 lbs.
  • Seasonings ~ We only use salt, pepper and olive oil lightly rubbed on steaks 

Setting up the Grill

Slide Through the Photos using the Arrows at the Bottom of thia Google Slides Frame


  • Start with a clean grill
  • Stuff a sheet of newspaper in the bottom
    of your chimney grill starter
  • Turn over starter and fill the chimney grill starter with Charcoal
  • Light the paper at the base of the chimney grill starter with a match or long lighter
  • Wait for charcoal to get ready. It will be mostly gray. This takes approx.
    35 - 45 min.
  • When the charcoal is ready, use a pot holder on the handle of your chimney grill starter and dump the charcoal into the grill.
  • Carefully place the grill rack in place over the hot charcoal on the lowest level closest to the charcoal.
The grill we used is named Maude.  She is my dad's grill and she is over 30 years old - Her handles are gone and her paint is worn, but she still cooks! 

Using a Chimney Grill Starter

  The Chimney Grill Starter is a lot safer than flicking a lit match at lighter fluid doused charcoal.
Food tastes better without the use of lighter fluid too!


Preparing Your Steaks to Grill


If you do it our way, it is really easy and absolutely delicious!  Do not poke or pierce the steak with a fork, knife or any utensil at any point in the preparation or cooking process.  This will allow the meat to retain all of it's flavor and juices.
    How to Grill the Perfect Steak
  • Rub Olive Oil lightly on both sides of each steak
  • Salt and Pepper both sides of each steak
  • Place seasoned steaks on the grill rack
  • Cover grill and steaks for 9 minutes
  • Turn steaks ~ ONLY ONCE
  • Cover grill again and cook an additional 7 minutes for medium or 12 minutes for medium well.
  • Remove steaks from the grill and wrap in aluminum foil.  Allow to rest in the aluminum foil for 5 minutes before you eat.

Step by Step Photos of the Grilling Process

grilling steaks process
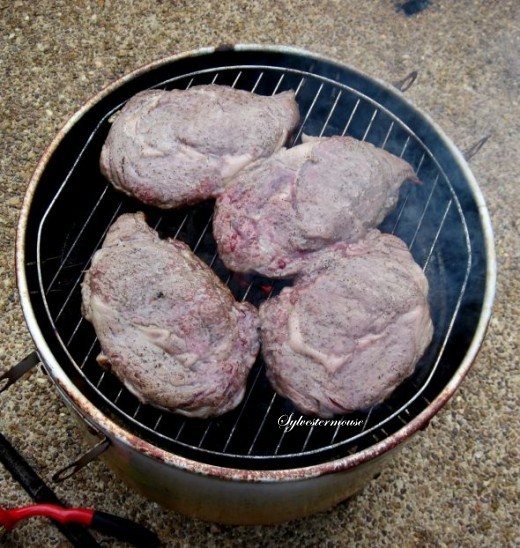
Turn Steaks Only ONCE
cooking steaks on the grill Cover grill again and cook an additional 9 minutes for medium rare or 12 minutes for medium well.
grilled steaks 
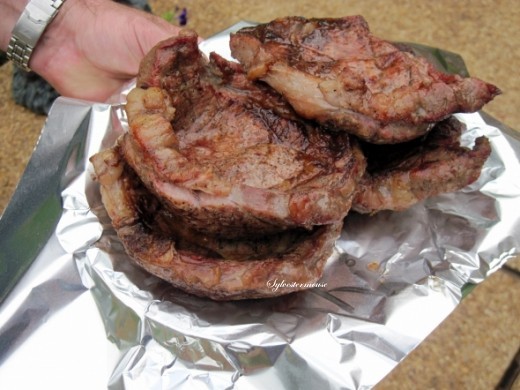
Remove steaks from the grill and wrap in aluminum foil. Allow to set for 5 minutes before you eat.

How to Grill the Perfect Steak - Step by Step Instructions for Beginners
This is my cut steak. I like mine cooked medium well.
I thought you might like to see the inside color of one of
our finished steaks.
This one grilled for a total of 21 minutes.


Now, Isn't that easy!  These steaks are quite delicious too.  They are best you will ever taste anywhere.


More Cooking & Grilling Fun

Join me at Cooking for the Holidays for More Cooking Tips & Recipes


You may also wish to try Grilling Shrimp on the Grill with this Easy Recipe from Sam's Place
For a Recommended Grill, check out this review of the Char-Griller Duo 5050 written by Dawn Rae


Check Out More Recipe & Food Reviews at
ReviewThisRecipes.com


How to Grill the Perfect Steaks - Beginner Tips Reviewed Written by:
House of Sylvestermouse


Note: The author may receive a commission from purchases made using links found in this article. “As an Amazon Associate, Ebay (EPN) and/or Esty (Awin) Affiliate, I (we) earn from qualifying purchases.”


Saturday, May 27, 2017

Review of Byrd's Famous Cookies

Byrd's Famous Cookies tin
The Byrd Cookie Company has been an established company in Savannah, Georgia since 1924.  At that time, Ben T. Byrd, Sr. began baking small batches of cookies from his bakery, packing them in wooden crates, and personally delivering them to neighborhood markets in his Model T Ford.

Later, Ben's son, BT Byrd, Jr. had the idea of packing these bite sized confections in tins, so that they would travel better.  It wasn't long before Byrd became a gourmet food company, shipping cookies to other markets outside Savannah. By then, Byrd, Jr. had become known as "Cookie" Byrd!

Cookie Byrd's daughter Kay, and her husband, were the third generation of the Byrd family to run the company and today their daughter Stephanie continues with the 91 years of baking the famous Byrd cookies.

Each generation has developed new recipes and innovative ideas and the company has expanded its marketplace worldwide.  Their “recipe for success” includes its continued tradition of hard work, superior product quality, and outstanding customer service. They continue to bake in small batches to deliver the superior cookies their customers expect. 


Byrd's Famous Cookies tin

Byrd's Famous Cookies - Scotch Oatmeal
Scotch Oatmeal Cookie

The classic Byrd Cookie is it's Scotch Oatmeal cookie currently available.


A Few of Byrd's Famous Cookie Flavors


Key Lime Cooler

Byrd's Key Lime Cooler Cookies
Byrd's Key Lime Cooler
To this day, the Key Lime Cooler cookie remains the company's best selling cookie. It is the first cookie to ever win the Dessert of the Year award at the NASFT Fancy Food Show. 


The Key Lime Cooler is a thin bite-size cookie bursting with the same deliciously tart-but-sweet flavor as key lime pie. This classic cookie has a powdered sugar coating.


Georgia Peach Cookies


Byrd's Georgia Peach Cookies
Byrd's Georgia Peach Cookie


This award winning 'Flavor of Georgia' cookie has a sweet Georgia peach taste. Byrd takes the tangy goodness of a tree ripened peach and coats it with powdered sugar with a flavorful sweet cream taste. 


Favorite Bite Sized Cookies of the Low Country


Byrd's Famous Cookies packages
Byrd's Famous Cookies from Savannah's Iconic Cookie Bakery
byrds
This famous Savannah company is located virtually across the Savannah River from the South Carolina Low Country, which includes the coastal area from Myrtle Beach to Charleston and Hilton Head. Thus, having a Byrd cookie named for the Low Country fits right in with this area.

Byrd's Famous Cookies Of Savannah include these favorite bite-sized cookies of the Low Country. They come in a gift ready Post Card style 6 Oz.Tin and include the Key Lime Coolers, Georgia Peach, Benne Wafers, Almond Shortbread, Chocolate Chip, and Scotch Oatmeal.


For a list of all the current flavors of Byrd's Famous Cookies, Click here on their Website.


Byrd's Famous Cookies Stores


Byrd's Famous Cookies store at City Market in Savannah, Georgia
Byrds Famous Cookies at City Market

The flagship store is located at the bakery at 6700 Waters Avenue in Savannah and other stores are located in City Market in the Savannah Historic District and on the famous River Street located along the Savannah River.  You can shop for a selection of gifts, gourmet items, and curated selection of boutique wines. In addition, of course, to all the cookie flavors Byrd is famous for.  


Bakery Tours


Take a tour of Byrd's Bakery when you visit Savannah, Georgia.  You will be able to smell the cookies before you even enter the door.  Whether you are a tourist visiting the city or locals who want to arrange field trips for school children and Scout troops, it's a fun tour. You'll get to know the history and legacy of this multi-generational cookie company on your guided tour and delight in lots of cookie tasting!  Tours are available  Monday-Friday 10AM-4PM and a tour can be booked in advance by emailing stacy@byrdcookiecompany.com or call 912.721.1551.


May your cookie jar never be empty!


Byrd's Famous Cookies bite-size package
Byrd's Famous Bite-Size Cookies


  A yummy Article written by Wednesday Elf  (c) 5/27/2017


Note: The author may receive a commission from purchases made using links found in this article. “As an Amazon Associate, Ebay (EPN) and/or Esty (Awin) Affiliate, I (we) earn from qualifying purchases.”


Friday, May 26, 2017

Hidden Valley Pasta Salad Mix Reviewed

Hidden Valley Pasta Salad Reviewed
I rarely get very excited over boxed food, but this Hidden Valley Pasta Salad mix caught my eye when I was in the grocery store a few weeks ago.  

With the hot weather of summer fast approaching, the idea of a cold pasta salad was very appealing.  I thought, why not?  I'll give it a try.  Worst case, I wasted a few dollars and end up tossing it in the trash. 

However, I was pleasantly surprised!


Hidden Valley Pasta Salad - Original Ranch


HIDDEN VALLEY PASTA SALAD ORIGINAL RANCH 7.9 OZHIDDEN VALLEY PASTA SALAD ORIGINAL RANCH 7.9 OZAs it turns out, this is by far the best pasta salad I have ever tasted, bar none.  It took less than 15 minutes to cook the pasta, stir in the sauce and add the required mayonnaise and milk.  With the first bite, I was absolutely shocked at how delicious it tasted. 

I couldn't eat all of the pasta salad I made that day all at one time and I wasn't about to throw it away.  I put the leftovers in the refrigerator.  For the next two days I ate the leftover pasta salad for lunch.  In fact, it was even better the second and third day after the ingredients had "married" overnight.  Plus, after being refrigerated, it was cold and made for a very nice lunch on the warm days that followed. 

I'm pretty excited about the discovery of the Hidden Valley Pasta mixes.   For this first adventure, I made the Original Ranch pasta salad. But, I will definitely be trying the Southwest Ranch next. 

Not only is it great for my own lunch, but I would willingly serve the pasta salad for the holidays, at a ladies luncheon, or as a side for dinner.  It is always nice to have something fast and easy to prepare whether I am cooking just for myself, feeding my family, or entertaining guests. 


Add Vegetables or Meat to Your Pasta Salad


For lunch, I prefer pasta salad without meat, but you can add ham, bacon, chicken or other chopped meat in with the pasta to make a fabulous dinner.  Or, you might want to add fresh vegetables instead.  How do I know it would be fabulous?  Because the base pasta salad is fabulous, so adding a tasty meat or fresh vegetables would simply give it a new twist.


Check Out More Recipe & Food Reviews at
ReviewThisRecipes.com


Other Recommended Pasta Recipes


Easy Pasta RecipeEasy Pasta Recipe from Cooking for the Holidays
This is likely to be the easiest pasta recipe ever! My grandmother originally introduced all of us to this fast and easy recipe decades ago.

Buttery Pasta and Shrimp Recipe ReviewButtery Pasta and Shrimp Recipe Review - On Review This!
This shrimp/pasta buttery combination has become a standard for company dinners and has also become a family favorite for Christmas Eve dinner every year.

TexMex Lasagna Recipe ReviewedTexMex Lasagna Recipe Reviewed on Review This!
Typically one thinks of lasagna as a classic Italian dish. Today I want to share a recipe that I created for TexMex Lasagna. It is a little twist to an old favorite


Hidden Valley Pasta Salad Mix Review Written by:
House of Sylvestermouse


Note: The author may receive a commission from purchases made using links found in this article. “As an Amazon Associate, Ebay (EPN) and/or Esty (Awin) Affiliate, I (we) earn from qualifying purchases.”


Thursday, May 4, 2017

Best Tasting Stevia

 The Best Tasting Stevia~A Review of Kal Stevia

Kal Stevia

Stevia is an ancient herb that is very sweet and has zero calories, so it's come to the forefront in the diet industry since it seems we're always searching for sugar substitutes . Because I have trouble metabolizing sugar, (and many people do and don't know it) I ditched sugar a long time ago. 

But that doesn't mean I ditched my sweet tooth at all. No I still love sweet stuff, even though supposedly if you stop eating sugar your cravings will subside. Not in my case! For years I have been searching for a sugar substitute that is healthy for me and has no calories or carbohydrates.

So when I first heard of Stevia I got all excited. It's from a plant and is all natural and tastes sweet with no bitter aftertaste like so many artificial sweeteners have. But my excitement soon turned to disappointment because when I decided to embark on a quest to find the best Stevia, I found that most Stevia is not that sweet tasting unless you use gobs of it, and it's expensive. 

But that all changed when I found Kal Stevia. Kal Stevia is the best tasting brand of Stevia hands down. I've tried them all so I can tell you that without a doubt Kal is the best brand of Stevia. Read on for my review of it, and to get your hands on it!


Stevia, How Do You Pronounce It?

I actually get a little irked about this sometimes. If I go into a Health food or Vitamin store and can't find the Stevia by myself, I will ask someone for it. Since Stevia is actually from the leaves of a South American plant, it makes sense that the original cultivators of it get to name it. They pronounce it Steh(with a soft e like eh-vee-ah with the emphasis on the second syllable. So Steh-vee-ah. (because i is pronounced ee in Spanish)

Our Anglicized version of these types of Spanish words would render it Steh-vee-ah, same letter pronunciation, but the emphasis switches to the first syllable. (Don't ask me why we do this, I don' t know, it's just a curiosity of translation, I guess.) So it would be Steh-vee-ah.

But somehow someone decided to really change it up and pronounce it Stee-vee-ah with the emphasis on the first syllable..Now they even say it wrong on the TV commercials too. 

So even though I'm a Certified Herbalist and know exactly the origin and pronunciation of it, they will shoot back at me :"It's Stee-vee-ah."  And I never ask how to pronounce it, they just feel compelled to correct me. 

So if that happens to you, feel free to give them an etymology lesson, that's what I sometimes do. Hey, they asked for it when they corrected me without my asking. It's really Steh-vee-ah, not Stee-vee-ah.

*From here on out, all the products can be purchased from Amazon by simple clicking on any photo.

Best Stevia Products
Best Tasting Stevia Sweetener

The incredible Kal Stevia powder makes all food taste sweeter and not bitter. You only need a tiny amount. In fact, if you are used to other sweeteners and having to use way more than the box tells you is necessary to get that sweet taste we crave, you are in for a sweet surprise because Kal Stevia actually tells the truth on its bottle. You don't need very much at all! 

I use it on everything and a bottle lasts me 2 to 3 months. I even use it in my No-Cookies, which are no bake cookies (and now they are diet cookies!). I just use 1/4th of the sugar called for, and use the equivalent amount of Stevia for the other 3/4ths. I find you do need a little sugar in baked goods to get the right texture.


Kal Pure Stevia Extract Powder -- 3.5 oz

 This is the brand and bottle of Stevia that I use. Delicious, and you only need a tiny amount, so it lasts a long time!

Kal Stevia Extract Powder, 1.3 oz powder

If you're not sure, you can buy it in the smaller size and give it a try. I buy the larger one because I already know I love it and it's cheaper that way. But this one is great for traveling.

Kal Stevia Extract Powder

If you like extra fiber in your diet, this one has added fiber in the form of FOS. 

Best Stevia Liquid Sweetener

Kal also makes incredible liquid Stevia products. For coffee and hot cocoa lovers, they have now added flavored Stevia to make it easy to get your "Starbuck like" coffee drinks and it's way less expensive that way too. I love the Vanilla one! But now that they have Chocolate Cardamom, that's next on my list!!!

These liquid sweeteners are great for cold drinks, but would also work great in recipes. My hint about that is to put the Stevia in last, no matter what the recipe says. And if you are baking a dessert using Stevia, it seems to take a little less than you would think. But if you make a mistake and your recipe is not as sweet as you would like, quickly make a glaze to put over it. 

A simple syrup made from Stevia poured over your dessert will make it more elegant and solve the sweetener problem. Just boil a cup of water and a half teaspoon of sugar, turn off the heat and add a teaspoon of real butter, and Stevia to taste. Stir for a simple syrup. Poured on a dessert it's delicious! Or add some Kal Stevia Syrup on top. Even easier! (purchase below)

Pure Stevia Liquid Extracts 

 I carry one of these around in my purse because it takes up less room, and being liquid, it dissolves faster in iced tea. Click on a bottle to see more flavors. 


Kal~Best Brand of Stevia

Another natural sweetener is Luo Han which is extracted from a fruit tree in China and made into tea or a paste from which the sweetener is manufactured. Some people think that bringing Stevia and Luo Han together makes the best tasting Stevia products. I like Luo Han, and the Kal version of this marriage of sweeteners is also the best one in my opinion. 


I still prefer pure Stevia, but my sister-in-law uses the combination here and says it's much better for baking. I don't bake that much any more. But her diet cookies are really delicious, so if you bake and want to make diet versions of your favorite baked goods, try the Stevia plus Luo Han. (pronounced low hawn)

Now you can have sweets without guilt any time you want! 


Note: The author may receive a commission from purchases made using links found in this article. “As an Amazon Associate, Ebay (EPN) and/or Esty (Awin) Affiliate, I (we) earn from qualifying purchases.”


Friday, October 28, 2016

Instructions for Easy Stenciled Cupcakes for Halloween

Decorate Halloween Cupcakes with Stencils Reviewed

Stenciling cupcakes is a fun and easy way to decorate a cupcake. I am sharing simple step by step in instructions for stenciling Halloween Cupcakes along with lots of photos and tips.
Stenciling cupcakes is a fun way to decorate cupcakes. Using stencils is a pretty easy way to decorate beautiful Halloween cupcakes that are certain to be a frightening fantastic addition to your party table.

By simply using stencils, confectioners sugar or sanding sugar, you too will be able to create tasty treats that double as great Halloween decorations.

If you can't find the cupcake stencil you want, why not use a small cookie cutter?

Let me show you exactly what I am talking about and what your guests will be talking about at your Halloween party when you make these creepy cupcakes!


Choose the Right Cupcake Recipe


Stenciling cupcakes is a fun and easy way to decorate a cupcake. I am sharing simple step by step in instructions for stenciling Halloween Cupcakes along with lots of photos and tips.
For convenience, I used boxed cake mixes to make my cupcakes. I baked 12 large Triple Chocolate Fudge with a Betty Crocker Super Moist cake mix and 12 large Lemon Supreme cupcakes with Duncan Hines Moist Deluxe cake mix. 

I selected these flavors because I knew I would not be icing all of them and I wanted cupcakes that would taste good without icing.

Delicious filled cupcakes would be ideal for these stenciled cupcakes for Halloween since they will not be frosted.

Here are a few recipes you might like for your frost-less cupcakes.

Recipes for Cupcakes that are Delicious Without Icing


Supplies You Will Need to Get Started Stenciling

Supplies for Stenciled Halloween Cupcakes
  • Baked Cupcakes ~ I baked Triple Chocolate Fudge and Lemon cupcakes
  • Stencils or Cookie Cutters
  • Confectioners Sugar
  • Sanding Sugar ~ your choice of colors
Decorators note:  An essential tool for decorating with Confectioner's sugar is a cup with a mesh top.


Recommended Powdered Sugar Shaker


With Stainless Steel Mesh Dome Lid 


This cup will allow you to literally sprinkle confectioners sugar onto your cupcake once the stencil is in place. It will cut down on the mess often associated with decorating with confectioner's sugar.


Directions for Stenciling Cupcakes


  1. Using Cupcake Stencils - Place the stencil on the cupcake
  2. Sprinkle Cupcake with Confectioners Sugar then Slowly
  3. Gently Lift Stencil Off of Cupcake

Easy Stenciled Cupcakes for Halloween


Use A Cookie Cutter to Stencil

If you don't have stencils on hand, you could also use a small cookie cutter.  Owls and ghosts were not included in my stencil pack, but I wanted cupcakes decorated with them.  Since I love owls and ghosts at Halloween, I used my cookie cutters.  It is the same process, you simply have to make sure you have a good hold on the cookie cutter and have it firmly pressed against the cupcake top so the powdered sugar doesn't escape the sides. 

Stenciling Iced Cupcakes


Stenciling cupcakes that have icing is a little messier and a bit more tricky, but can certainly be done!  

To stencil an image on icing or frosting, you would want to use sanding sugar instead of powdered sugar.  The sanding sugar does have an added "sparkle" benefit.

You do need to be extremely careful when you lift the stencil or cookie cutter off the icing to keep from dropping excess sugar outside of the image lines.  The icing tends to try to hold on to your stencil.  I recommend lifting it straight up and off the cupcake  without tilting the stencil.

Directions for Stenciling Cupcakes with Sanding Sugar


  1. Using Cupcake Stencils - Place the stencil or cookie cutter on the frosted cupcake
  2. Sprinkle Sanding Sugar on the Cupcake,  then Slowly
  3. Gently Lift the Stencil Straight Up & Off of Cupcake 


Cupcakes for Halloween Stenciled with Sanding Sugar

 These Cupcakes were Decorated with
Lemon Frosting and Brown Sanding Sugar


Using Cookie Cutters & Stencils to Decorate Cupcakes


Stenciling cupcakes is a fun and easy way to decorate a cupcake. I am sharing simple step by step in instructions for stenciling Halloween Cupcakes along with lots of photos and tips.
Black Cat Cupcake
Lemon Cupcake & Black Sanding Sugar
When you decorate your Halloween cupcakes with stencils or cookie cutters, your variety is limited only by your cookie cutters, stencils and supplies.   I have dozens of cookie cutters and several packs of Halloween stencils.  I enjoy playing around with them and seeing what unique cupcakes I can create.  Now, everybody knows you can't celebrate Halloween without the black cat.  Isn't he spectacular on his golden moon cupcake!

They are also great for cakes! 


You can see my directions on how to stencil a Halloween cake by clicking this link to Cooking for the Holidays


Supplies Used in This Article


Confectioners Sugar is available in most grocery stores.  A variety of sanding sugar colors is not as easily obtained.  I purchase mine online.  

I also purchase my cookie cutters and stencils online. 


The Stencils


The stencils used in this article are an older pack of Martha Stewart Halloween stencils - M230600 (UPC #015586743364). The pack includes the bat, 2 jack o' lantern faces, the witch, the spider, the web, the skull & crossbones and the raven. (Neither the raven nor the web are shown on the front of the package.)  The only place I could find them at the time of writing this article was on eBay.


Since eBay inventory changes constantly, I recommend checking here again soon if you don't see exactly what you want right now.


See More Recipes On ReviewThisRecipes.com


More Recipes by Sylvestermouse
Peach Cobbler RecipeQuick and Easy Peach Cobbler Recipe
My mother's peach cobbler is one of my favorite desserts.  Actually, it is my favorite breakfast too. I have even been known to eat it for lunch.


Peanut Butter Fudge RecipePeanut Butter Fudge Recipe
This is my mother's recipe for Peanut Butter Fudge.  I have never seen it published anywhere else, but it is the best I have ever tasted.


"This Tutorial for Easy Stenciled Cupcakes for Halloween" Written by:
House of Sylvestermouse


Note: The author may receive a commission from purchases made using links found in this article. “As an Amazon Associate, Ebay (EPN) and/or Esty (Awin) Affiliate, I (we) earn from qualifying purchases.”


Tuesday, September 6, 2016

Soft Foods: Potatoes Reviewed

Potatoes Are A Perfect Soft Food For Dentures Or Tender Gums From Oral Surgery

potatoes
I'll be reviewing ideas for serving potatoes to yourself or the family member who has tender gums from prepping for dentures or oral surgery of any kind, today.

There is the obvious idea of mashed potatoes but they do not have to be the traditional serving. Trust me, you begin to want some kind of variety with your soft foods as it takes months for your gums to heal after having your teeth pulled and while you are adjusting to your new dentures.

So, for some variety in those mashed potatoes add different items to the dish. Personally, I love to add some minced garlic from time to time. They are also good with some shredded cheese. Sour cream and chives is another way to spice up those good old mashed potatoes. One evening I cooked some baby spinach leaves until tender and added those with a touch of sour cream and it was absolutely delicious!

One of my favorite potato dishes is creamed peas with red potatoes. This dish is a great source when soft foods are called for.

Creamed Peas With Red Potatoes

Ingredients:
1 1/2 pounds of red potatoes 
1 1/2 cups of frozen baby peas
3 tbsp sliced green onions
4 tsp butter
4 tsp all purpose flour
1 cup milk

Directions:
Scrub potatoes and cut into fourths (smaller if you like). Cook potatoes in boiled salted water for about 15 to 20 minutes or until soft. Drain and set aside.

Cook peas and onions in a small amount of boiling salted water for about 8 to 10 minutes. Drain and set aside. 

Make a thin white sauce by melting the butter, slowly adding the flour while stirring. Add a dash of salt and pepper. Slowly add milk while stirring the sauce. 

Combine the peas and potatoes, add the white sauce and mix together well. 

This is a wonderful addition to any meal whether you need soft foods or not! 

Another choice for potatoes is the traditional baked potato. Just make sure that it is cooked soft enough that you can mash it with your fork and you will be able to eat it without hurting those tender gums. Your choice of toppings are up to you, making sure that the toppings are not going to take too much chewing.

Cheesy Potatoes With Olives

Another potato dish that I fix often and even more while my gums have been tender is a cheesy twist on hash browns. 

Ingredients:
1 pkg frozen hash browns
1 cup sour cream
1 1/2 cups shredded cheddar cheese (sharp is really good in this recipe)
10 to 12 Green Olives stuffed with pimento diced
Salt
Black Pepper

Directions: 
Allow hash browns to partially thaw enough that you can break them apart easily.

Pre-heat oven to 350 degrees.

Combine the sour cream, cheese and diced olives in a bowl. Add a dash of salt and black pepper.

Lightly oil a casserole dish. (I actually use butter to coat the sides and bottom). Mix the hash browns with the sour cream and cheese mixture and place into the casserole dish. Bake for 25 to 30 minutes.

I am not sure that I would have ever made this recipe if I had not been served it one evening at a friend's house many years ago. Those olives really add a nice variation to cheesy potatoes! Kind of salty and tangy, it is really scrumptious!

These are just a few ideas for preparing potatoes as a soft food option for tender gums. The wonderful thing is that every single one of these potato ideas are delicious at any time! What is your favorite way to eat potatoes?


Note: The author may receive a commission from purchases made using links found in this article. “As an Amazon Associate, Ebay (EPN) and/or Esty (Awin) Affiliate, I (we) earn from qualifying purchases.”


Tuesday, August 30, 2016

Soft Foods: Sweet Potatoes Reviewed

When Cooked Sweet Potatoes Are A Great Option For Soft Foods

sweet potatoes
Image by Llez
Continuing in my series of soft foods for those who are going through the process of getting dentures, today we review the options of the wonderfully nutritious sweet potato. 

I have a couple of ways that I serve the tuber root that is naturally sweet in my home. I will share both ways with you in this article. One is extremely simple while the other takes a little preparation; both are really good!

Before we get to a couple of ways to enjoy the sweet potato, I thought you might be interested in the nutritional values of the sweet potato. It is a good source of simple starches, complex carbohydrates, fiber, protein, vitamin A, several of the B vitamins, vitamin C and vitamin E. It contains the minerals of calcium, iron, potassium and a few others. Did you know that a sweet potato has more potassium than a banana? 

OK, so one of the simplest ways to serve sweet potatoes to your family is to use a can of the item shown below. 

I know the can says "yams" but they actually use sweet potatoes. Many people interchange the words yams and sweet potato incorrectly. They are not really the same thing but that is another topic for another day.

I will tell you these canned sweet potatoes are seasoned so deliciously that all I do is just heat them up. The syrup has cinnamon, nutmeg and brown sugar...no need for anything else! They are really tasty just as they are.

The darker the color of the pulp of the sweet potato ... the more beta-carotene (vitamin A) it has.

The Sweet Potato Recipe That My Daughters Love The Most

I've been fixing this Sweet Potato Casserole for about 36 years and my daughters just absolutely love it. I didn't make it for Thanksgiving one year and I was just about disowned by my oldest daughter. She now makes it for her family, too.

Ingredients:
2 (15 oz) cans of sweet potatoes
1 (14 oz) can pineapple tidbits, (undrained)
4 Tbsp butter
4 Tbsp firmly packed dark brown sugar
1 1/2 cups miniature marshmallows
Butter

Directions:
Pre-heat oven to 350 degrees.

Drain the sweet potatoes and discard the liquid. Drain the pineapple tidbits, saving the juice from the can. 

Melt the 4 tbsp of butter.

In a medium sized bowl mash the potatoes with a potato masher. Add the melted butter and brown sugar. Stir until it is combined well.

Stir in the pineapple juice until you have the desired consistency. Fold in the pineapple tidbits and the marshmallows.

Butter a 1 1/2 quart casserole dish and spoon in the potato mixture. 

Bake in a 350 degree oven for 30 minutes. 

You might not think that pineapple would be good with sweet potatoes but you would be incorrect. This is really a delicious addition to the typical sweet potatoes that have the melted marshmallows we are accustomed to. The pineapple adds a bit of tartness that works well with the sweetness from the brown sugar and marshmallows.

Whether you need soft foods in your diet or not, sweet potatoes are an excellent choice to include with your meals. In fact, the CSPI (Center for Science in the Public Interest) rated the sweet potato the most nutritious vegetable of all to eat.  


Note: The author may receive a commission from purchases made using links found in this article. “As an Amazon Associate, Ebay (EPN) and/or Esty (Awin) Affiliate, I (we) earn from qualifying purchases.”


Most Recent Reviews on Review This Reviews


Search for Reviews by Subject, Author or Title

The Review This Reviews Contributors


SylvestermouseSylvestermouseDawn Rae BDawn Rae BMbgPhotoMbgPhotoBrite-IdeasBrite-IdeasWednesday ElfWednesday ElfOlivia MorrisOlivia MorrisTreasures by BrendaTreasures by BrendaThe Savvy AgeThe Savvy AgeMargaret SchindelMargaret SchindelRaintree AnnieRaintree AnnieLou16Lou16Sam MonacoSam MonacoTracey BoyerTracey BoyerRenaissance WomanRenaissance WomanBarbRadBarbRadBev OwensBev OwensBuckHawkBuckHawkDecorating for EventsDecorating for EventsHeather426Heather426Coletta TeskeColetta TeskeMissMerFaeryMissMerFaeryMickie_GMickie_G


Review This Reviews is Dedicated to the Memory of Our Beloved Friend and Fellow Contributor

Susan DeppnerSusan Deppner

We may be apart, but
You Are Not Forgotten


“As an Amazon Associate, Ebay (EPN) and or Etsy (Awin) Affiliate, I (we) earn from purchases.” Disclosure Statement

X