|
|
Stoningham Connecticut |
Thursday, March 25, 2021
Review of The Shadow Box by Luanne Rice
Wednesday, March 24, 2021
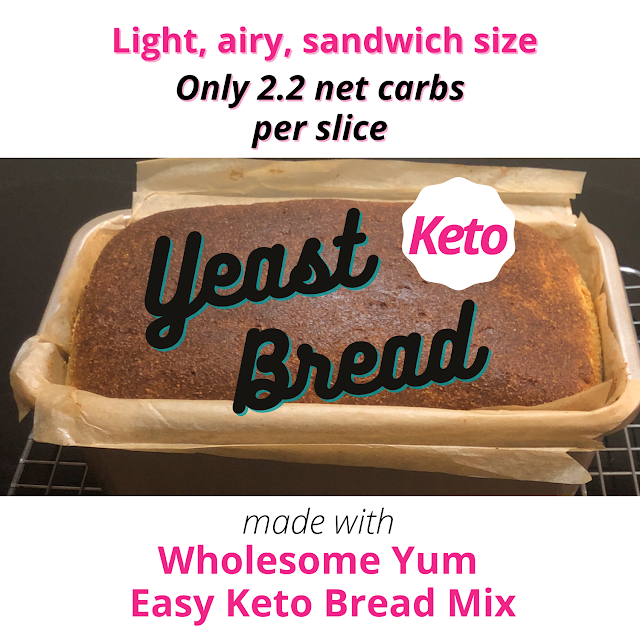
Wholesome Yum Keto Bread Mix and Yeast Bread Recipe
|
| Delicious keto bread that isn't heavy, dense, or crumbly! |
When I began my successful keto diet journey in 2019, Maya Krampf's popular Wholesome Yum website and The Wholesome Yum Easy Keto Cookbook (which I have recommended in my Keto Gift Guide and other posts here on Review This Reviews) quickly became two of my go-to resources for quick and easy, healthy keto recipes and reliable information about the ketogenic approach to eating. Maya also has developed a line of high quality, low carb, gluten free, keto food products made with clean ingredients (including her excellent Besti keto-friendly sweeteners), and new products continue to be added to her Wholesome Yum Foods online shop.
The Wholesome Yum Keto Bread Mix that launched on December 21, 2020 is one of Maya's newest products. I think it's also one of her best!
A few days ago, she also published a new Keto Yeast Bread Recipe for this bread mix that delivers even more impressive and delicious results. I’m excited to share my in-depth product review of this excellent Wholesome Yum mix and compare the differences in between the loaves I've made with original recipe and the new keto yeast bread recipe.

|
| This keto bread mix has all the pre-measured dry ingredients for a delicious, fresh-baked loaf |
Wholesome Yum Keto Bread Mix, Original Recipe (No Yeast)
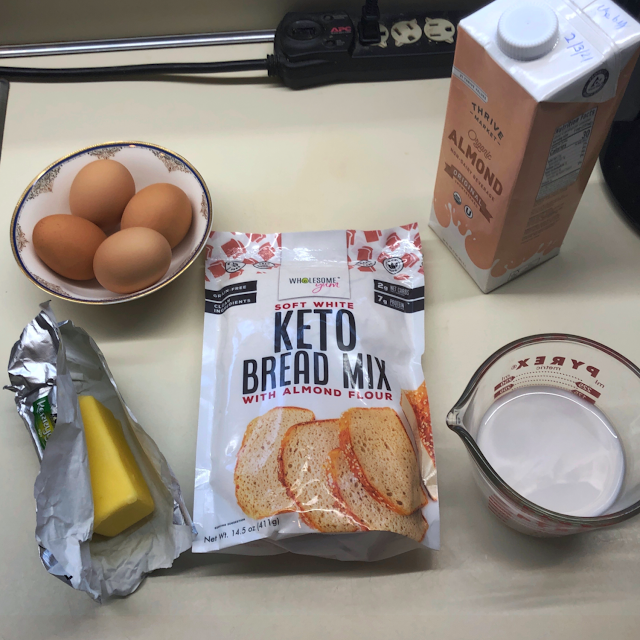
The directions currently printed on the bag require just three ingredients in addition to the packaged mix: 6 tablespoons of butter, 4 large eggs, and 3/4 cup (6 ounces) of unsweetened almond milk.
You can replace the almond milk with a different keto-friendly milk, if you wish.
Line the Loaf Pan With Baking Parchment Paper
The recipe calls for the prepared bread mix to be baked in an 8" x 4" loaf pan lined with baking parchment paper, with the parchment paper overhanging at least the two long sides of the pan.
However, the 8.5" x 4.5" OXO Good Grips Non-Stick Pro Loaf Pan I have been using (see my product review) has worked fine.

|
| Make sure the parchment paper overhangs the long sides of the pan |
I have been lining the pan with unbleached If You Care Parchment Baking Paper, which is chlorine-free and compostable. It's also silicone coated, and nothing sticks to it!
For environmental reasons, the box doesn't have a serrated metal cutting strip. Since the larger, softer cardboard "teeth" don't cut as cleanly as the metal ones, I just use scissors to trim the a sheet of the desired length.
Allow Time to Bring the Ingredients to Room Temperature
All the ingredients should be at room temperature when make the keto bread dough/batter.
Note: Although there is an asterisked line to this effect in the printed directions on the bag, it's easy to miss, not only because the very small type is hard to read, but also because there are no corresponding asterisks attached to the individual ingredients. (A single asterisk with no corresponding reference is meaningless.) It would be helpful if this were fixed during the next packaging print run.
When a recipe calls for room temperature ingredients, they should be at approximately 70 °F (21 °C), with the exception of butter. Room temperature butter should be a bit cooler, roughly 65 °F (18 °C). It has reached the correct temperature when it is still a bit cool to the touch and retains its shape, but has softened enough to leave an indentation when pressed with a fingertip.
|
| One bag of mix + butter, eggs, and almond milk = quick and easy keto bread! |
Why Using Room Temperature Ingredients Matters When Making The Keto Bread Mix Batter
Using room temperature butter, eggs, and almond milk allows the butter to cream properly and the eggs and butter to be fully incorporated into the creamed butter, so there are no remaining clumps of butter after the dry ingredients in the Wholesome Yum Keto Bread Mix are added.
Conversely, using ingredients that are too warm or too cold will likely produce less-than-optimal results.
When I tried the Wholesome Yum Keto Bread Mix for the first time this January, the New England winter meant that our north-facing kitchen (with its large expanse of windows) was quite chilly. As a result, even after sitting out on the counter for a couple of hours, my "room temperature" eggs, and almond milk were much cooler than 70 °F (21 °C), and even my butter was colder than 65 °F (18 °C) and had very little "give" when pressed with a fingertip.
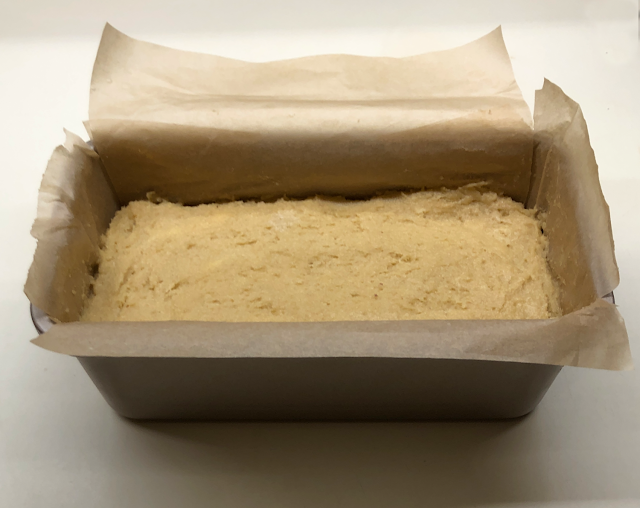
As a result, even after being creamed at high speed with my trusty KitchenAid mixer for for nearly 15 minutes, the butter never softened fully, and when I added the eggs and almond milk to it, they wouldn't incorporate smoothly, no matter how long I beat the mixture.
You can see in following photo that the first batch of keto bread dough/batter didn't come together as smoothly as it should and would have if my kitchen hadn't been so chilly.
|
| A cold kitchen made my butter a bit uncooperative! |
In retrospect, I could have put the unshelled, room temperature eggs in a bowl of warm water for 5–10 minutes and warmed the almond milk gently on the stovetop or in the microwave. However, the butter still would have been a problem, since using any form of added heat to soften butter without melting it is a tricky proposition.
The Wholesome Yum Keto Bread Mix Recipe Is Pretty Forgiving

|
| The first loaf I made with this keto bread mix turned out well, even with the too-cool ingredients |
Making low carb, gluten-free bread with Wholesome Yum Keto Bread Mix was easy. The hard part was waiting until the next day, as the package directions recommend, before slicing into the loaf so I could taste it!

|
| A lighter, less dense texture than most keto bread |
Although it is possible to find low carb bread recipes that don't contain almond flour, most of them do. Ground almonds are heavier than grain flours, lack gluten for structure, and interact differently with leavening agents. As a result, most loaves made from a keto bread recipe are pretty dense, and tend to crumble easily.
So, when I cut into the loaf I made with the Wholesome Yum Keto Bread Mix, I was very pleased to see small air pockets, indicating a somewhat lighter, less dense texture than most low carb bread made with almond flour. (You can see the air pockets better in the close-up photo of my half-sandwich.)
Not only did it make great toast, it also was less crumbly than most other keto-friendly almond flour breads, which allowed me to make a sandwich that didn't fall apart as soon as I bit into it!

|
|
My sweet half-sandwich on keto bread made with the Wholesome Yum mix
(Note: For scale, this is a salad plate.) |
After making a great slice of toast, the next thing I tried was a sandwich. I had just received my order of keto-friendly Good Good sweet raspberry jam (which is currently out of stock, but other flavors are available, including Good Good Sweet Blueberry Jam) and ChocZero Chocolate Hazelnut Spread (a keto diet friendly alternative to Nutella), so I decided to cut a slice in half and make myself a raspberry-chocolate hazelnut half-sandwich. (Hey, don't knock it until you try it! I like to think of it as a 21st-century update to the Fluffernutter, a lunchbox favorite back in the 1960s, when I was a kid, that I can't imagine eating today.)
I was able to eat my half-sandwich without the bread crumbling or breaking, which was a major improvement over most other keto bread recipes or mixes I had tried.
The New Keto Yeast Bread Recipe Makes an Even Better Low Carb Loaf
Even though I was pleased with the results I was getting from Maya's new keto bread mix and had already begun to write a product review of it for Review This Reviews, I was extremely excited by her revelation last month in one of the Wholesome Yum Facebook groups I belong to that she had been working on a keto yeast bread recipe for the new mix and thought she was close to perfecting it.
I knew that adding yeast to the batter/dough would result in a taller loaf with a lighter, airier, more sponge-like texture and might also give the bread some of the flavor characteristics of conventional yeast breads.
I decided to hold off on my product review of the bread mix until the new recipe had been published, so I could compare it to the original and confirm or correct my assumptions about the effects of adding yeast to the batter.

|
| Feeding the yeast with inulin allows this keto yeast bread recipe to be 100% sugar free |
The Yeast Bread Version of the Recipe Adds Two Ingredients
Active Dry Yeast
You can use any brand of active dry yeast, such as Fleischmann's or Red Star. I decided to order my favorite from my BK (before keto) baking, SAF-Instant Premium Yeast - Red, which is widely used by professional bakers and consistently produces superior results with any type of bread, pizza, croissant, or other unsweetened doughs.
I discovered the red SAF-Instant Premium Yeast many years ago on the King Arthur Baking website (a reliable source of baking expertise and a go-to resource for baking enthusiasts). The fact that it's the yeast they use most often in their test kitchens was a good enough endorsement for me!
In addition to improving bread dough baking results, a 1-pound vacuum-sealed bag/brick of SAF-instant yeast ends up costing much, much less per use than the 4-ounce jars or strips of three individual packets of active dry yeast sold in supermarkets.
I keep mine in the freezer in an airtight container, where it remains good for years, and unopened packages have a two-year shelf life.
Tip: If you're not following a low carb or keto diet, use SAF-Instant Premium Yeast - Gold, rather than the one in the red package, for making conventional sweet dough recipes.
Inulin Powder
In this recipe, the active dry yeast is fed with powdered inulin, a soluble fiber and prebiotic, instead of the sugar or other high glycemic index sweeteners that recipes typically used for that purpose.
I was in such a rush to order inulin powder for this recipe that I inadvertently ordered a huge 2.2-pound bag of it on Amazon (with free Amazon Prime delivery)! However, since it you need only one teaspoon of it per 2¼ teaspoons (or one packet) of active dry yeast, I recommend buying a smaller package, such as this 8-ounce bag of 100% pure inulin powder that is made in the USA (in Utah) from non-GMO Jerusalem artichokes, sometimes called sunchokes.
Wholesome Yum Keto Yeast Bread Recipe
To make the keto yeast bread recipe, you start by mixing the batter according to the original recipe, then fold in active dry yeast bloomed in lukewarm water mixed with inulin powder, and set the covered yeast batter aside in a warm spot to proof. After the yeast bread batter/dough has been allowed to rise for an hour, it is transferred to the parchment-line loaf pan and baked at the same temperature, and for the same length of time, as the original recipe. And, like the original recipe, the baked loaf should be removed to a cooling rack and left until it has cooled completely (overnight, if possible) before you slice into it.
Here are the ingredients, tools, supplies, and equipment you will need to make Maya's new keto yeast bread recipe.
Ingredients:
- 2¼ teaspoons (or 1 packet) active dry yeast
- 1/4 cup (59 ml) lukewarm water, 105–115 °F (41–46 °C)
- 1 teaspoon of inulin powder *
- 1 bag Wholesome Yum Keto Bread Mix
- 6 tablespoons butter **
- 4 large eggs ** (not medium, extra-large, or jumbo size)
- 3/4 cup (6 fl. oz.) unsweetened almond milk ** ***
Tools, Supplies, and Equipment:
- A hand mixer or stand mixer
- A large mixing bowl
- A rubber scraper (to scrape the bowl and beaters)
- Plastic wrap (to cover the bowl of prepared yeast dough before setting it aside to proof/rise) ****
- An 8" x 4" loaf pan
- Baking parchment paper to line the pan (I highly recommend using unbleached baking parchment)
- A cooling rack
* The inulin powder is a prebiotic fiber that is used in this recipe to feed the yeast. It is a keto-friendly alternative to feeding the yeast with sugar, honey, or other high-glycemic sweeteners that can elevate your blood glucose and insulin levels. If you follow a strict sugar-free or keto diet and want to ensure that your keto bread is absolutely sugar free, the inulin in this recipe is an essential ingredient that cannot be substituted. However, for people whose dietary requirements and preferences are less strict, the recipe also offers the option to replace the teaspoon of inulin powder with a teaspoon of coconut sugar.
** At room temperature
*** Use plain, unsweetened almond milk for this recipe. Unless the package specifically says "unsweetened almond milk," assume it contains added sugar, and is not suitable for a low carb, sugar-free, or keto diet.
**** I recommend biodegradable, reusable beeswax food wrap as a more sustainable and environmentally friendly alternative to disposable plastic wrap (aka cling film). It's available either precut or in rolled sheets that you can cut to size, as needed. Although I own and use both types, I'd suggest buying an uncut roll to ensure that you'll have a large enough piece to cover your large mixing bowl while the keto bread batter is proofing.
Directions:
Follow Maya's full Keto Yeast Bread Recipe on Wholesome Yum, which provides not only step-by-step directions with photos, but also helpful tips, refrigerator and freezer storage instructions, and an FAQ that answers questions such as as whether yeast and inulin are keto-friendly ingredients.
This Keto Yeast Bread Recipe Turned Out Even Better The Second Time!
Update 4/8/21: Last weekend, we finally had a warm-ish spring day here in New England (a "balmy" 58 degrees Fahrenheit, lol!). I had just finished the last slice from my first loaf, and hoped that my room temperature eggs, butter and nut milk would be warmer and more cooperative this time. Indeed, they were! I was able to get the butter to cream properly, so it was nicely pale and fluffy. And the eggs and nut milk (I used macadamia nut milk this time) were fully incorporated into the creamed butter, so there were no large lumps of butter in my yeast bread batter, which made it much easier to smooth the top after transferring it to the parchment paper-lined loaf pan.

|
| My second keto yeast bread loaf |
Comparing Wholesome Yum Keto Bread Mix Original and Keto Yeast Bread Recipes
Height
When I followed the original Wholesome Yum Keto Bread Mix recipe printed on the bag, the top of the baked loaf remained lower than the rim of the baking pan.

|
| The basic recipe without yeast produces a shorter loaf |
However, when I followed the new keto yeast bread recipe, the batter's volume increased considerably as it proofed, which produced a baked loaf that was taller than baking pan.

|
| Adding yeast to the original batter recipe produces a larger, taller loaf that rises above the pan rim |
Size and Texture
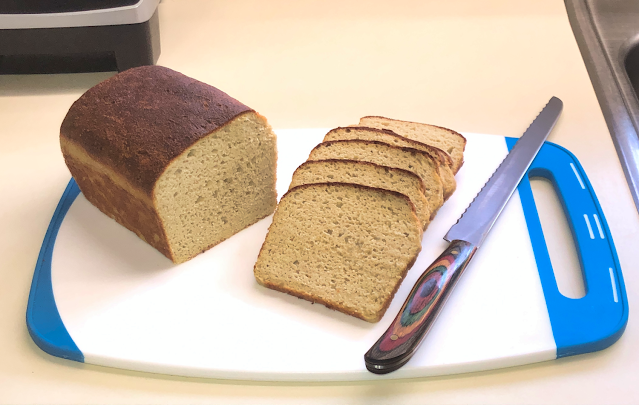
The recipe printed on the bag produced slices that were slightly larger, and had more air pockets and a lighter texture, than typical keto breads.
As you can see, the slices of this loaf, which was made with the Wholesome Yum Keto Yeast Bread Recipe, were significantly larger and had many more air pockets and and an even lighter texture vs. those cut from previous loaf made with the original Wholesome Yum Keto Bread Mix recipe.
Time and Effort
The time it takes to bloom the yeast and fold it into the prepared batter is minimal.
However, the yeasted dough also needs to be covered and set aside to proof before it is transferred to the parchment paper-lined pan, which add 60 minutes to the total time, start-to-finish.
On the other hand, since the batter doesn't need to be monitored while it's proofing, that time can be spent elsewhere, on other activities.
Bottom Line
Unless I'm pressed for time or can't start baking until later in the day, I consider the superior loaf produced with Maya's new Wholesome Yum Keto Yeast Bread Recipe well worth the minimal additional effort and the one-hour delay while the batter is proofing.
However, even without the addition of yeast, the Wholesome Yum Keto Bread Mix is a convenient, time-saving, and delicious option for making freshly baked, keto-friendly bread.
Wholesome Yum Keto Bread Mix and Yeast Bread Recipe by Margaret Schindel
Posts About My Keto Diet Journey
My First Year on The Keto Diet
Preparing to Succeed on the Keto Diet, Part One
Preparing to Succeed on the Keto Diet, Part Two
Low Carb Muffins & Cupcakes: Treats to Enjoy on a Keto Diet
Low Carb Keto Chocolate Yogurt Granola Chip Pudding Recipe
Good Dee’s Keto Cookie Low Carb Baking Mix Review
Hamama Microgreens Growing Kit Review & Success Tips
My Favorite Hamama Microgreens Seed Quilt Accessories
Keto Cheddar Cheese Biscuits With Chives Recipe
The Ultimate Keto Hot Chocolate Recipe
The Best Low Carb Keto Gift Ideas: Keto Gift Guide
The Best Low Carb Keto Cinnamon Muffins
Wholesome Yum Keto Bread Mix and Yeast Bread Recipe
The Good Chocolate 100% Organic No Sugar Dark Chocolate Review
The Best Advice to Maintain Your Keto Diet Weight Loss
My New Irresistibly Delicious Keto Cheese Crackers Recipe
Luscious Low Carb Keto Triple Peppermint Cheesecake Brownies Recipe
Quick & Easy Livlo Blueberry Scones Keto Baking Mix Review
Snack Better With The Best Healthy Keto Cookie Dough Bites
The Best Quick and Easy Low Carb Keto Pizza Recipe
The Best Quick and Easy Low Carb Keto Shortcake Cupcakes Recipe
Comparing the Best Keto-Friendly Chocolate Hazelnut Spreads - No Added Sugars
The Best Low Carb Keto Sandwich and Burger Buns Mix
Blueberry Biscuit Scones — New, Easy, Low Carb Keto Recipe
The Best Keto Pizza Crust Mix With 0 Net Carbs
An Unusual, Delicious Strawberry Chocolate Tea With 0 Calories
Delicious Sugar-Free Keto Cookies That OREO Fans Will Love
Healthy Pistachio Cherry Chocolate Chip Marshmallow Cereal Treats Recipe
Easy, Decadent, High Protein, Sugar-Free Rocky Road Cottage Cheese Ice Cream
The Best Quick & Easy Low Carb Sausage and Ricotta Calzones
How to Make Refreshing Vanilla Italian Soda (With or Without Cream)
Reviews of the Keto Diet by Barbara C. (aka Brite-Ideas)
How I Stayed Committed to the Ketogenic Way of Eating
Read More Recipe Reviews by Our Review This Reviews Contributors
Read More Product Reviews by Our Review This Reviews Contributors
Read More Reviews About Health and Wellness by Our Review This Reviews Contributors
Tuesday, March 23, 2021
Battery Daddy Organizer
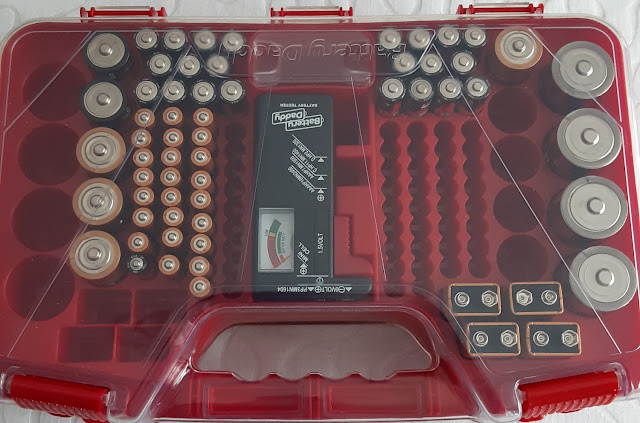 |
| The Battery Daddy Organizer Reviewed |
When my cousin first told me about this battery daddy
organizer, I thought, do I really need one of these? But after thinking about it
for a while I did need a place to store and organize all my batteries.
I realized there are so many gadgets around the house that
need batteries. Television and game remotes, flashlights, toys that the kids
play with, smoke alarms, and so many more.
Whenever we needed batteries for something it was always a
mad dash to the closet to see if we had any available. We had batteries all
over the house, closets, drawers, and shelves down in the basement.
I think that AA batteries are the most popular, but then
whenever we needed AAA, we never seemed to have them on hand. Then there are
the 9-Volt batteries that are most popular in smoke alarms, forget about it because
I never had those in the house.
The Battery Daddy Storage System Front Side Stores:
22 AAs
70 AAAs
10 Cs
8 Ds
12 Button Cells
The backside will store 54 more AAs and 2 more AAAs. Oh,
and by the way, the battery daddy also comes with a battery tester that will
display Good, Low, or Replace.
This really comes in handy for those batteries you have
laying around the house. So many times, I have picked up a battery, looked at
it, and then I ask Fran, are these any good?
I know what you are thinking why do need that many
batteries? Well, if you are like me you really do not need that many batteries. You do not have to fill
the case to capacity, just have enough of every type of battery that you use around
the house.
Besides, batteries are expensive I think if you were to
fill this case with batteries you may have to take out a loan.
The other thing that I thought of, is how long do batteries
last in storage? I did not know so I looked it up and found that most batteries
will last 5 to 10 years in storage. Batteries have an expiration date printed
on the battery. And you will still get battery life from them after that date.
Now I have all my batteries in one place and the battery
daddy easily fits in a drawer or on a shelf. I do not have to worry if I have
the right battery for a gadget because I know that I do.
Find more Product Reviews here: ReviewThisProductReviews.com
 Ontel Battery Daddy 180 Battery Organizer and Storage Case with Tester, 1 CountCheck the Price
Monday, March 22, 2021
Ribbit! Froggy Voice App Reviewed
Whose ribbit is that? I found 'that' a question which frequently comes to mind when listening to the chirps, ribbits, boinks, jingles, peeps, trills and croaks calling from a pond, wetland or even your backyard at night.
Why Are Frogs & Toads So Valuable To Our Ecosystem
These peeps, chirps and ribbits are vital to the health of the wetlands, ponds/lakes, marshes, vernal ponds. But the larger picture is the direct relation of the health of frogs and toads to the health of the ecosystem and stormwater management in this area.
Frogs and toads are indicator species. Sensitive to changes in the environment, the health of these species are indicators of the health of our ecosystem. That's the thumbnail! But oh so much more goes into why It Is Not Easy Being Green.
Froggy Voice is an app designed to help you distinguish the calls of each species specifically for the species in the River Rouge Watershed and the annual Frog & Toad Survey. I learned about this app at the Frog & Toad Survey Workshops by the Friends Of The Rouge to train volunteers to participate in their annual Frog & Toad Survey.
This hyper local app is a practical and purposeful tool for the surveyors as well as an educational tool for anyone interested in learning how to distinguish the calls of frogs and toads and appreciate their contribution to a healthy ecosystem.
Practical App
For novice surveyors Froggy Voice helps accentuate the training to assist new surveyors of the nuances of the calls of each species. The app contains 12 frog calls and 2 toad calls with the caveat this app is specifically designed for species found in the River Rouge Watershed.
For experienced surveyors the app is a helpful reminder of the calls of the frogs and toads found in the watershed. The annual frog and toad survey season is short and occurs March through June in my area.
Multicaller Function
For both the novice and experienced surveyors the Multicaller function is extremely helpful to distinguish the 'who is who' when hearing frog calls from different species simultaneously.
A virtual mix and match of frog sounds can be accomplished in a click of the mouse. The user simply clicks the icons of the desired frog species to hear the combination of frog calls. An invaluable feature for on site surveying when you hear multiple frog calls to ensure accuracy for your survey.
Responsiveness
Froggy Voice is a responsive app which can be accessed via desktop or mobile. I have used the app on desktop, iOS mobile and android devices and found the app performs equally across all platforms.
Last weekend my survey partner and I headed out to our survey area and as novices loved the ability to have the mobile version of the app on our phones. So easy, so convenient and so helpful!
If interested in learning more about how frogs and toads directly relate to the health of your environment, your neighborhood, and your wetlands additional resources are below.
Resources
Frog & Toad Surveying, Friends of The Rouge (FOTR)
Rouge River Watershed Amphibian Assessment, Rouge River Advisory Council,
Froggy Voice by Bingle
Rouge River National Wet Weather Demonstration Project, Alliance of the Rouge Communities
2020 Frog & Survey Results, FOTR
Sunday, March 21, 2021
Growing Vegetables In Outdoor Containers Reviewed.
Can You Grow Vegetables If You Only Have A Patio Or Balcony?
Many people would like to grow vegetables but either do not have a garden at all or just a small garden. I do not have a huge garden, it is not small but not really big enough for me to grow all the lovely decorative plants I like to grow and also everything I like to have for nature and grow vegetables. Really I need acres!
For the past few years, I have become increasingly interested in growing vegetables and so three years ago we started. As there is no space left in the garden, it had to all be in pots.
The first year we only decided to grow veg in March and so had to get on with it really quickly as many seeds need to be sown in March or April. So I did not have time to do research or much reading before I started planting.
In some ways, this was a good thing as I did not get a chance to be worried about it though I could have done with some basic advice. However, to my amazement, most of the crops were a success!
|
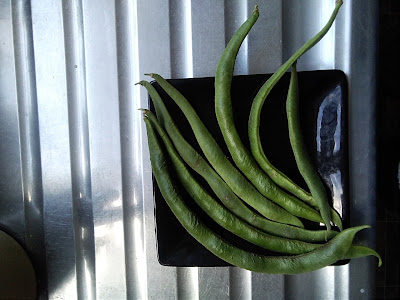
| Beautiful Home Grown Beans |
Is It Possible To Grow Vegetables In Outdoor Containers?
Last year I grew the same vegetables and improved upon my skill after reading some good books which helped me to understand vegetable growing in containers and what I was doing.
This year I have just started growing my container vegetable garden again and even branched out to some other seeds to try.
I think you just have to give it a go and see what happens. After all, plants always want to grow. If we give them the right conditions they will do their best to grow as big and strong as they can.
This book "Grow All You Can Eat in 3 Square Feet" is one I used to get me going with vegetable growing. It covers how to grow a range of vegetables in a limited space in pots, windowboxes, various containers and how to organise raised beds. I found it easy to navigate and I liked the pictures to give me inspiration. A decent book especially if you are new to vegetable container gardening.
You may have a small garden, or it might already be filled with your decorative plants and flowers and you do not wish to turn over a section to vegetable growing. Or maybe you do not have a garden but perhaps you have a balcony or a courtyard or even space outside your door. Even people who have large gardens may not have soil conditions suitable for all vegetable growing. So yes I would say it is possible to grow veg in pots with just a few conditions.
Below are a few tips and suggestions from my own experience for starting to grow vegetables and salads in a container garden.
Tips For Growing Vegetables In Containers Outdoors
1. It is advisable to use good quality compost to fill your containers. I try to always get a high-quality peat-free garden compost that is a good all-rounder. If you can't get compost each year you can use garden soil but this depends on your garden soil, of course, if you have a garden. Ours is heavy claggy clay and while strong plants do very well in it, seeds always suffer and rarely germinate well.
So I have to buy good vegetable growing compost and this year I have also bought specific seed compost for starting off the seeds that I will then transplant into bigger pots. You will need to feed your veg throughout the year as well. I find a tomato feed or vegetable feed liquid is good.
2. For vegetables that are remaining where they are sown choose the largest containers you can. This makes sowing easier and you will not have to water quite so much. Soil always dries out quicker in a container.
I do start off many of my bigger vegetables in small pots first then transplant them to the large pots. However, the smaller the pot the more watering you will need to do.
Containers of metal while they look great will heat up too much and your veg will suffer. If possible try not to have black containers which will also heat up more quickly.
However, I do have black plastic containers which are Ok if I shade them with other plants or keep them in semi-shade. Choose containers of clay or plastic and if terracotta do line with a plastic bag or old compost bag and make drainage holes, to help prevent it drying out so fast.
You can theoretically use any container for veg growing and I have been known to use large yogurt pots and even old washing up bowls with drainage holes punched through!
There are containers to avoid though and that is any that have ever held any poison or chemicals and avoid old tyres which may leach chemicals to your veg. You do not want to be eating any form of chemical!
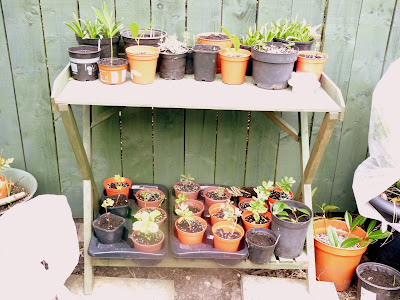
|
| Vegetables And Flowers Started Off In Small Pots |
3. Get a watering can with a rose attachment or a hosepipe with a gentle spray or mist setting for watering the young plants and seeds. You do not want to wash away seeds or destroy young seedlings with a harsh blast of water.
4. Always water the compost first then sow the seeds. This means for the initial stages you will not wash away the seeds into a clump while watering. Then read the instructions carefully, some seeds require a light covering of compost or vermiculite, others need light to germinate and should not be covered.
5. Try to place your pots in the best position for the specific seeds - for most vegetables they need a sunny spot but for some they will cope well or need semi-shade. The huge advantage of pots is that they can be moved if needed.
6. When you have sown your seeds do label the containers with the name of the seeds and the date! I forgot to do this with many of the pots in the first year and I thought I would remember what I had sown in each pot, but how wrong I was!
7. Put a few sticks in the compost to dissuade the neighbourhood cats, local foxes, or other wildlife from using your nice soft compost as a toilet until the plants grow up.
8. Do not have a monoculture of vegetables. Either place your containers amongst other plants that are in the ground or pot up some flowering plants, wildflowers and herbs and place them in amongst the vegetables. That way not only will you attract more beneficial pollinators to help but will also attract predators to deal with any pests that will lay eggs or eat your vegetables.
The carrot fly for example is attracted by the scent of the carrot so if we plant other strong scents nearby like mint or chives, it confuses the carrot fly who cannot find the carrots! I do not use any pesticides or chemicals at all in our garden and that goes for the vegetables as well. So it is important to me to work with nature on this and attract all the wildlife I possibly can into our garden. Yes, I do lose some vegetables to pests but I gain so much more in terms of healthy food and beneficial wildlife.

|
| Flowers Planted Near Container Vegetable Garden |
Which Vegetables Can We Grow In Outdoor Containers?
It is always best if you simply grow what you love to eat! You can try anything given a big enough pot. However, some crops like asparagus take a long time to reach maturity and are not so suitable for growing in pots.
Crops like squashes generally take up a lot of space and need more than most containers, though it might be possible with a small variety if you really wanted to try. Especially if you are starting out it is advisable to stick with easier growing varieties. Success breeds success and as we get more confident we can try more difficult veg.
You can try anything you like. Here are just a few suggestions from my own experience. Probably the easiest crops to grow in containers outside are the Salad Varieties then vegetables like Beetroot, Rocket, Radish, Broad beans, Baby Carrots, Potatoes and Runner Beans. You can easily buy a wide variety of seeds online.
1. Rocket is very quick and easy to grow and I have had success growing it in a wide variety of containers. Sow a little every week for a good supply.
2. Onions-I buy setting onions rather than seeds as they are so much easier. I simply place them in the container at the required distance and depth.
3.Potatoes in a bag. This is my most successful way of growing potatoes. I choose potatoes that say they do well in containers. It is important to exclude light from the developing tubers so I simply use 2 compost bags turned inside out and punch drainage holes in the bottom and sides with scissors/ Then a layer of compost and put 2 maybe 3 potatoes in then cover deeply with more compost as they grow. Simply empty the bag out for harvesting. So much easier than digging in heavy soil!
4.Radish is very easy to grow and does well in pretty much any container. Sow a few, then do succession sowing every couple of weeks for a crop all summer.

|
| Beautiful Home Grown Radish |
5. Carrots but I would advise you to use a tall container and also try a baby carrot variety so they do not need the depth that a garden soil can provide.
I do find carrots take up a container for a long time and are small so sometimes wonder if they are worth it but they are my fave vegetable so deserve a place here.
They are a vegetable I would always struggle to grow in my heavy soil anyway as soon as they hit a block they will fork and grow distorted so a container or raised bed will always be the way I will grow carrots. Do be aware that carrots must not dry out as again they will grow distorted. One big advantage of growing in a container is that you can easily protect it from carrot fly by placing it high up or by covering it with a light layer of fleece.
6.Leafy salads from lettuce to oriental mixes and mustards I grow in shallow containers as they are generally a quick-growing crop. I also sow them in between other vegetables like the slower-growing onions.
7.Runner Beans usually require a really big deep pot and supporting canes. I make the canes out of our Cornus or thinner tree branch cuttings.
8.Broad beans are easy to grow and need well-drained soil and if a taller variety, will need staking. Smaller varieties may not need much support.
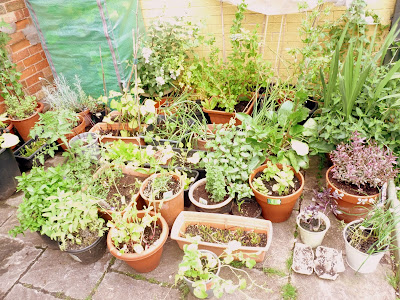
|
| Our Container Vegetable Garden! |
So if you do not have a garden and need or want to grow vegetables do gather together some containers and give it a go! You may have some failures, but you will have many successes.
There is nothing like eating vegetables and salads you have grown from seed and nurtured. You have just picked it and minutes later it is on your plate. You know absolutely what is in it and that it is free from chemicals and has not traveled miles to reach you.
In my opinion, homegrown vegetables always taste better than anything you buy, they are fun to grow and you will feel so proud of yourself. So garden or no garden, in my experience you certainly can grow your own vegetables as a container garden.
More Gardening Articles
Most Recent Reviews on Review This Reviews
Search for Reviews by Subject, Author or Title
The Review This Reviews Contributors
 Sylvestermouse
 Dawn Rae B
 MbgPhoto
 Brite-Ideas
 Wednesday Elf
 Olivia Morris
 Treasures by Brenda
 The Savvy Age
 Margaret Schindel
 Raintree Annie
 Lou16
Lou16 Sam Monaco
 Renaissance Woman
 BarbRad
 Bev Owens
 BuckHawk
 Decorating for Events
 Heather426
 Coletta Teske
 MissMerFaery
 Mickie_G
Review This Reviews is Dedicated to the Memory of Our Beloved Friend and Fellow Contributor
We may be apart, but
You Are Not Forgotten


