Showing posts with label Sam Monaco. Show all posts

Sunday, July 18, 2021

Radio Red Flyer Wagon - Reviewed


Radio Red Flyer Wagon Reviewed

Four wheels, a box, and a handle, what could be simpler. What I’ve just described is a whole bunch of fun with your kids or your grandchildren. 

The Radio Flyer Red Wagon, we bought one when our grandson Bobby was almost 2 years old. We have had such wonderful times taking walks around the neighborhood, to the local playground, and to parks with all of our grandchildren.


Are you thinking about joining the gym to get yourself in shape? Save your money, just take the kids for a stroll in the red wagon, and you’ll get plenty of exercise, especially if you take on some hills, and I mean going up the hills not down.

Every ride we used as a time to learn new things with our grandchildren. In the spring when everything is blooming we would point out the different flowers and trees in bloom. In the fall when the leaves were turning all of the vibrant colors, we would collect them and talk about what makes them change colors.

Bobby is going to be 16 years old now, so he is a little too big to fit in the wagon. His little brother Tyler also had so much fun with this wagon, Tyler is now 10 years old.

Now the fun is with our two granddaughters Giada and Guiles. Every time they visit they enjoy the wagon rides just as much.

Radio Red Flyer Wagon

A few years ago we decorated our wagon for the local village, July 4th celebration. The village held a contest and a parade for the best-decorated bikes. So, we decorated the wagon, we didn't win but we sure had a lot of fun.

Red Flyer Wagon Features:

The wagon is made of sturdy plastic; it has 2-fold up seats, and seat belts to hold your precious cargo securely. There are four molded cup holders so you can bring along the kids’ favorite drinks. The wagon has the National Parenting Center’s Seal of Approval.

If you have kids or grandchildren the Radio Red Flyer Wagon makes a perfect gift. Our wagon is now 14 years old and still in great shape. We have made memories for a lifetime with our wagon.

This is the wagon we have but they make so many different styles. Check them out and find one that's right for you.

Radio Flyer Pathfinder Wagon, Base Red, 39Radio Flyer Pathfinder Wagon, Base Red, 39Radio Flyer Pathfinder Wagon, Base Red, 39


Find more Product Reviews on Review This Here:


Note: The author may receive a commission from purchases made using links found in this article. “As an Amazon Associate, Ebay (EPN) and/or Esty (Awin) Affiliate, I (we) earn from qualifying purchases.”


Tuesday, July 13, 2021

Weather Tech Floor Liner Cleaner and Protector - Reviewed


Weather Tech Floor Liner Cleaner and Protector - Reviewed

We had our Kia Sorento about a year before we decided to make the investment into our Weather Tech floor liners. I am sure you have all seen the advertisements on television.

Weather Tech floor liners are laser cut to your specific vehicle and are always a perfect fit. I have to say that these floor liners are well worth the money. But this post is not about the floor liners, it is about keeping them looking like new.

The winter months here in Western New York can be brutal on your vehicle, especially the floor mats. After the first winter with our new Weather Tech floor liners, it was time to clean up the car.

I removed the floor liners and scrubbed them with soap and water using a scrub brush. They were clean, but they did not look clean. The winter dirt and scuff marks seemed to be permanent.

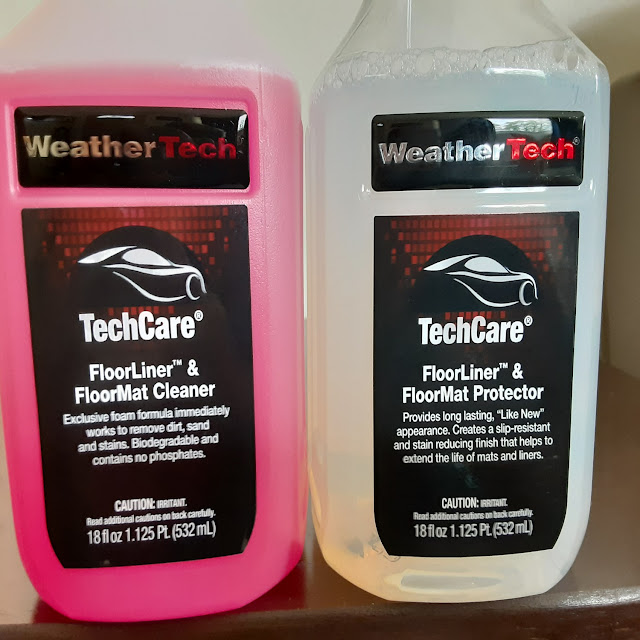
So, I did what anyone else would do, I searched online to see what was recommended to clean and make my floor liners look new again. What I found was the Weather Tech Floor Liner and Floor Mat Cleaner, and the Weather Tech Floor Liner and Floor Mat Protector.

Weather Tech Floor Mat Cleaner:

“Exclusive foam formula immediately works to remove dirt, sand, and stains. Biodegradable and contains no phosphates.”

Weather Tech Floor Mat Protector:

“Provide long-lasting “Like New” appearance. Creates a slip-resistant and stain-reducing finish that helps extend the life of the mats and liners.”

The above are the statements on the product labels, and I must tell you they are true statements. The Weather Tech Cleaner and Protector have my floor liners looking like new with truly little effort from me.

Berore
Before
This is a before photo of my Weather Tech Floor liner. Keep in mind that this photo is after I had already scrubbed it with soap and water.

After
After
Here is the photo after I used the Weather Tech cleaner and Protector, it looks brand new just like it came out of the box.

If you do not have Weather Tech Floor Liners, you can buy them here.

If you do have Weather Tech Floor Liners and want them looking like new, I highly recommend the cleaner and protector. I am so pleased with the new look of my floor liners.

Weathertech TechCare FloorLiner and FloorMat Cleaner/Protector KitWeathertech TechCare FloorLiner and FloorMat Cleaner/Protector KitWeathertech TechCare FloorLiner and FloorMat Cleaner/Protector Kit


Note: The author may receive a commission from purchases made using links found in this article. “As an Amazon Associate, Ebay (EPN) and/or Esty (Awin) Affiliate, I (we) earn from qualifying purchases.”


Tuesday, June 29, 2021

ThermoPro TP-20 and TP-18 Food Thermometers Reviewed


ThermoPro TP-20

Three years ago I received my Char-Griller offset smoker as a Father's Day gift. I was so excited and could not wait to use it. My Char-Griller is a combination smoker and charcoal grill.

As I was in a hurry to get started, I quickly realized that I needed some additional tools to help control the temperatures of the grill and the food. Even though the grill has a thermometer on the lid of the grill the temperatures can vary by 40 to 50 degrees throughout the grill.

After much research, I found the ThermoPro TP-20 remote food thermometer with dual probes. Now, I can remotely monitor the internal temperature of the food that I'm cooking along with the inside temperature of the grill.

ThermoPro TP-20 Features:

LCD Display (Liquid Crystal Display) - Displays all icons temperatures and time
Dual probe temperature display
Programmable alert with preset temperatures for different foods
Tolerance for internal food temperature is + or - 1.8 degrees
Displays in Fahrenheit or Celsius
Count down or count up timer
Remote Transmitter

The dual probes allow me to monitor the internal temperature of two types of meat or two sections of a large piece of meat.

With the 40 to 50-degree variance that I mentioned earlier, you want to be sure that you are cooking the meat at the proper temperature.
 
I always use the second probe to monitor the grill temperature of the cooking surface of my grill. The unit comes with a handy clip so you can clip the probe onto the grill grates. With the remote transmitter, I can monitor the grill and the food from anywhere. 

ThermoPro Instant ReadTP-18:

I have the old-style meat thermometers but you have to insert them into the meat and wait for the temperature to read. When your cooking over a hot surface this presents a problem.

The TP-18 is an ultra-fast digital instant-read thermometer you will get reading in about two seconds. This comes in handy for checking different portions of the meat while cooking. 

I also use both the TP-20 and TP-18 while cooking inside. The wires on the TP-20 are long enough to have the probe inserted into your favorite roast in the oven and have the monitor on the countertop.

I am very satisfied with the performance of both of my ThermoPro thermometers for the past three years and would recommend them to anybody.

Check out just a few of my favorite smoking recipes:

Long Smoke Pulled PorkLong Smoke Pulled PorkLong Smoke Pulled PorkSmoked Bone in Chicken BreastsSmoked Bone-in Chicken BreastsSmoked Bone in Chicken BreastsSlow Smoke Pork RibsSlow Smoke Pork RibsSlow Smoke Pork Ribs


Find More Product Reviews on ReviewThisReviewThisProductReviews.com


ThermoPro TP18 Ultra Fast Thermocouple Digital Instant Read Meat Thermometer for Grilling BBQ Smoker Kitchen Food Cooking Thermometer for Oil Deep Fry Candy ThermometerThermoPro TP18 Ultra Fast Thermocouple Digital Instant Read Meat Thermometer for Grilling BBQ Smoker Kitchen Food Cooking Thermometer for Oil Deep Fry Candy ThermometerCheck the PriceThermoPro TP-20 500FT Wireless Meat Thermometer with Dual Meat Probe, Digital Cooking Food Meat Thermometer Wireless for Smoker BBQ Grill Thermometer, 2.67 x 4.94 x 1.10ThermoPro TP-20 500FT Wireless Meat Thermometer with Dual Meat Probe, Digital Cooking Food Meat Thermometer Wireless for Smoker BBQ Grill Thermometer, 2.67 x 4.94 x 1.10Check the Price


Note: The author may receive a commission from purchases made using links found in this article. “As an Amazon Associate, Ebay (EPN) and/or Esty (Awin) Affiliate, I (we) earn from qualifying purchases.”


Monday, May 31, 2021

How to Install a New Faucet


How to install a new faucet
How to install a new faucet - Reviewed

It was time to replace that old bathroom faucet. It was an old single lever push, pull-type, and was difficult to turn on and off, especially for our youngest grandson.

Replacing a faucet whether it is a bathroom faucet or a kitchen faucet is not that difficult. But sometimes Murphy’s Law takes over, and what can go wrong, will go wrong. The problem I had was my shut-off valves were frozen so I could not turn off the water under the sink. This was not a problem, I just had to turn off the main water supply and replace the shut-off valves and supply lines under the sink. But this review will only instruct you on how to install a new faucet.

 I am by no means an expert and I am not a plumber by trade. I can tell you how to do this because I have done it many times before.

Installing a new Faucet Step-by-Step:

Step 1

The first thing you need to do is to turn off the water supply. Most bathroom and kitchen sinks have shut-off valves under the sink, if not you will have to turn off the main water supply.

Step 2

Once you are sure the water is off, turn the faucet on to let the water out. Then, remove the hot and cold supply lines using an adjustable wrench. You will also have to unlatch the sink stopper lever from to ball lever on the drain. Leave the ball lever in the drain, as you will need to attach the new sink stopper lever to it later.

Step 3

Now remove the retaining nuts that are holding the old faucet, a basin wrench is the handiest tool for this task. After removing the old faucet measure the hole pattern on the sink. Make sure you purchase a new faucet that will fit the hole pattern in your sink.

Step 4

After removing the old faucet, clean any residue left behind with a tub and tile cleaner and paper towels. If you must use a putty knife, use a plastic one.

Step 5

Your new faucet will have a built-in gasket, but you will still need a bead of caulk or plumber’s putty around each hole. This is needed to make a good seal.

Step 6

Place the new faucet and fasten the retaining nuts to hold it in place. It’s always a good idea to have somebody hold the new faucet in place while you get the new basin nuts snug. Be careful not to over tighten, you can use the basin wrench, but I like to just hand tighten.

Step 7

Now fasten the hot and the cold-water supply line to the new faucet. You may need to wrap Teflon tape around the new faucet threads. Follow the manufacturer's instructions on the new faucet. Now, it is time to connect the sink stopper lever to the ball lever in the drain. You will find several adjustments on the sink stopper lever.

Step 8

Remove the aerator from the new faucet and turn on the water supply. Then, turn on the cold water. The aerator is the little screen inside the faucet spout. This is to make that it does not clog with any debris that may be in the water lines. Replace the aerator and check for leaks. That is all there is to it.

Find more  Crafts & DIY projects on Review This here: ReviewThisCrafts.com

This basin wrench will be your best friend when replacing a faucet.

Superior Tool 03811 Eleven Inch Basin Wrench-Infinitely Adjustable 11Superior Tool 03811 Eleven Inch Basin Wrench-Infinitely Adjustable 11Superior Tool 03811 Eleven Inch Basin Wrench-Infinitely Adjustable 11


Note: The author may receive a commission from purchases made using links found in this article. “As an Amazon Associate, Ebay (EPN) and/or Esty (Awin) Affiliate, I (we) earn from qualifying purchases.”


Tuesday, May 4, 2021

How to Maximize Space in a Small Bedroom


How to maximize space in a small bedroom
Making the best of a small room - reviewed

We have a nice 3 bedroom home with plenty of room. Although, one of the bedrooms happens to be a small 8' x 10' room. This is the room that our granddaughters stay in when they come for a visit.

We had a bookcase full of books and toys, along with a tote full of toys and a full size bed in this small room. This did not leave much room for the girls to play.

Fran decided that it was time for a makeover in this room. First she emptied the bookcase and got rid of it. We needed to make the best of this space so the girls had room to play. For those of you who don't know who Fran is, she is my better half forever.

This small room makeover was all Fran, all I did was assemble all of the furniture and place it where she wanted it. 

Maximize Space in a small room:

Ellen Corner DeskEllen Corner DeskCheck the Price


First Fran wanted a space where the girls could do some projects such as crafts, drawing, coloring, or reading.

We moved the full-sized bed to one corner of the room and placed this corner desk in the opposite diagonal corner of the room.

The corner desk measures 42" across and has a drawer and shelves for storage. 


Vanity StoolVanity StoolCheck the Price


Since a desk chair would take up too much space, Fran decided on this vanity stool.

This stool fits perfectly under the desk when it is not in use. When it is pulled out for use there is still plenty of room to get by between the stool and the bed. Did I mention that the cushion top is very comfortable.


Storage CubeStorage CubeCheck the Price

Now, it was time to clean up all of that clutter and empty that tote full of small toys, crayons, and makers. Fran picked out this cube storage organizer.

This was a perfect fit next to the desk and along the wall to fill the space to the entrance door of the room.

These storage cubes are a great idea for craft rooms, bedrooms, playrooms, or a small office.

The cube has six storage spaces and each space will hold 60 pounds.


Sorbus Foldable Storage CubeSorbus Foldable Storage CubeCheck the Price


To store all of those little things Fran found these colorful foldable storage cubes.

They fit perfectly into the cubes of the storage organizer. These a perfect for games, crayons, makers, and small toys.


Fran hand picked every one of these items for a specific purpose in this small bedroom. She created a comfortable and useable space for our granddaughters. This was an easy project for me, as I said earlier all I had to do was assemble. All of these items were easy to assemble and all had excellent assembly instructions.

child sitting at a corner desk

Here is a photo of our youngest granddaughter hard at play using their new corner desk. They are very happy with the new changes to their room away from home.

Find more reviews on this topic on Review This Here:


Note: The author may receive a commission from purchases made using links found in this article. “As an Amazon Associate, Ebay (EPN) and/or Esty (Awin) Affiliate, I (we) earn from qualifying purchases.”


Tuesday, April 6, 2021

The Homeplace Saga Books Reviewed


The Homeplace Saga Books Reviewed

Author William Leverne Smith has Integrated his deep passion for genealogy study and family history into the Homeplace Saga series of books. He has created this fictional community and brings the characters to life in this four-book series.

Back to the Homeplace

Murder by the Homeplace

The Homeplace Revisited

Christmas at the Homeplace

Back to the Homeplace

The book begins in February of 1987, just after Mildred Bevins passed away. The funeral and the unusual terms of the will of Frank and Mildred Bevins bring all four children and their families back to the family farm, The Homeplace.

The farm is located in Oak Springs Missouri in the Ozark Mountains and has been in the family for over 150 years. Bart Bevins is especially concerned about the terms of the will, as he is the only one who stayed in Oak Springs to run the family farm. 

You will meet and come to know each member of the Bevins family. Learn about their different backgrounds, and their family secrets, and see how each of them struggles to hold onto their share of the family legacy. All while dealing with their own family secrets and problems.


Murder by the Homeplace

This is a short story that begins one week after the end of “Back to the Homeplace” A body is found on the Bevins' property. This brings some of the secondary characters from the first novel to the main characters in this short story.  Introducing Penny Nixon a part-time reporter for the local newspaper. Penny springs into action and begins a series of interviews hoping for a story when the body is found. Penny is warned by her father who is also the editor of the newspaper to keep it to a human-interest story and do not get too involved. You will see how dangerously close that she comes to interviewing the real killer.


The Homeplace Revisited

The family saga continues, now in 1996 nine years later. The family has survived so much conflict, but there is more to come. 

Learn how the grandchildren of Frank and Mildred Bevins carry on, side by side with their parents to run the family business now known as the“The Bevins Trust”.

 How they continue the family legacy and continue to build Oak Springs into a thriving small community of family and friends. 

Christmas at the Homeplace

Continued in 1996 Karen (Bevins) Winslow the oldest daughter of Frank and Mildred is expecting all of her children to return home to Oak Springs for Christmas. Will they all make it? Find out, along with some other surprises that may change the inner workings of the family business “The Bevins Trust”. This one was special to me, as I finished reading it on Christmas Eve.

For me, these four books were a wonderful read, as I have a big family myself. Oak Springs and the characters in these books were so real to me; it was like I lived there and knew every one of them.

This series of books takes you on a journey with the Bevins family,  starting in February of 1987 and ending in December of 1996.

The author places news blurbs at the beginning of every chapter. I enjoyed reading what was in the news on that day. So the reader has a little history lesson.

A quote from the author William Leverne Smith: “May everyone have a homeplace, if only in your mind.”

Find more Book Reviews here: ReviewThisBooks.com


Note: The author may receive a commission from purchases made using links found in this article. “As an Amazon Associate, Ebay (EPN) and/or Esty (Awin) Affiliate, I (we) earn from qualifying purchases.”


Tuesday, March 23, 2021

Battery Daddy Organizer


Battery Daddy Organizer
The Battery Daddy Organizer Reviewed

When my cousin first told me about this battery daddy organizer, I thought, do I really need one of these? But after thinking about it for a while I did need a place to store and organize all my batteries.

I realized there are so many gadgets around the house that need batteries. Television and game remotes, flashlights, toys that the kids play with, smoke alarms, and so many more.

Whenever we needed batteries for something it was always a mad dash to the closet to see if we had any available. We had batteries all over the house, closets, drawers, and shelves down in the basement.

I think that AA batteries are the most popular, but then whenever we needed AAA, we never seemed to have them on hand. Then there are the 9-Volt batteries that are most popular in smoke alarms, forget about it because I never had those in the house.

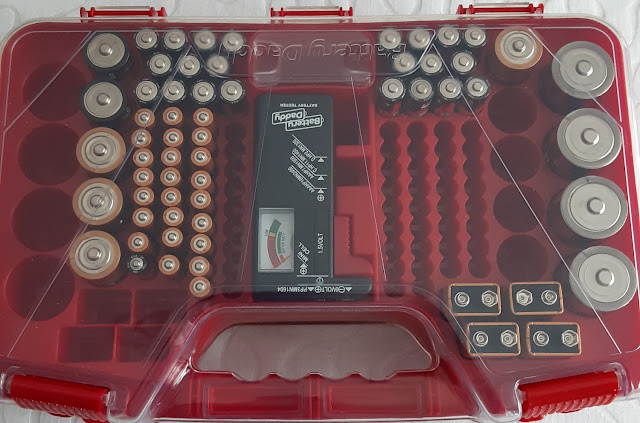
The Battery Daddy Storage System Front Side Stores:

22 AAs

70 AAAs

10 Cs

8 Ds

12 Button Cells

The backside will store 54 more AAs and 2 more AAAs. Oh, and by the way, the battery daddy also comes with a battery tester that will display Good, Low, or Replace.

This really comes in handy for those batteries you have laying around the house. So many times, I have picked up a battery, looked at it, and then I ask Fran, are these any good?

I know what you are thinking why do need that many batteries? Well, if you are like me you really do not need that many batteries. You do not have to fill the case to capacity, just have enough of every type of battery that you use around the house.

Besides, batteries are expensive I think if you were to fill this case with batteries you may have to take out a loan.

The other thing that I thought of, is how long do batteries last in storage? I did not know so I looked it up and found that most batteries will last 5 to 10 years in storage. Batteries have an expiration date printed on the battery. And you will still get battery life from them after that date.

Now I have all my batteries in one place and the battery daddy easily fits in a drawer or on a shelf. I do not have to worry if I have the right battery for a gadget because I know that I do.

Find more Product Reviews here: ReviewThisProductReviews.com

Ontel Battery Daddy 180 Battery Organizer and Storage Case with Tester, 1 CountOntel Battery Daddy 180 Battery Organizer and Storage Case with Tester, 1 CountCheck the Price


Note: The author may receive a commission from purchases made using links found in this article. “As an Amazon Associate, Ebay (EPN) and/or Esty (Awin) Affiliate, I (we) earn from qualifying purchases.”


Tuesday, March 2, 2021

Mantis Tiller Review


Mantis Tiller ReviewSpringtime and the warmer weather will be here soon.  The warm weather will finally bring us outside to start cleaning up the yard. It's a time to get the deck or patio in shape, clean up the lawn furniture and get ready for a beautiful summer.


Once the yard is cleaned up, you’ll want to get the flower beds and garden ready to plant.


This usually requires a lot of digging, bending, and raking. I can’t think of a better tool than the Mantis Tiller/Cultivator to help you with all of this work. Well, you’re still going to have to do some work, but this tool makes it so much easier.


I’ve had my Mantis Tiller for more than 10 years now, and it still runs like it’s brand new. I’ve used it year after year to till my garden, flower beds, and around shrubs.


 We planted a brand new garden for my daughter, and it easily tilled through the untouched sod. The handles just fold down and the Mantis fits in the trunk of my car or stores easily in my garage.


Mantis Tiller Features:


Easy fast start technology.

Comes with a handy carrying handle.

Weighs only 21 pounds so it's easy to move around.

A 9-inch wide pattern for digging and weeding.

Tines dig down 10-inches for cultivating.

Reverse the tines for weeding and only dig down 2-3-inches


What I like the best is that the tines pull off of the shaft with a simple pull of a cotter pin, and can be reversed for two different jobs. One position is for cultivating and will dig about 10 inches deep for planting your flowers or plants in your vegetable garden. The other position will only dig 3 to 4 inches deep, this is really handy for easy weeding around plants and shrubs.


My Tiller also has the border edger attachment with a wheel; this makes short work of edging around walkways and the driveway for that nice clean look.


A few years ago my outside drains were clogged with mud, and not draining, causing the rainwater to just settle around the foundation of my house. 
I decided to abandon the old drain on the side of the house that was clogged and replace it with a new PVC pipe to the street. This required me to dig a trench from the edge of the house to the street a total of about 30 feet.


So, short of digging this trench with a shovel and pick, I used my  Mantis Tiller to do the digging for me. I set the tines in cultivate position and shoveled the dirt out as I went along, this made the job so much easier.


You can also buy these attachments for the Mantis Tiller for complete lawn care:


Aerator - Will cut tiny slits in your lawn to allow nutrients and water to reach roots.

Border Edger -  Make nice clean edges around sidewalks and driveways.

Dethatcher - Will remove dead grass early in the spring to promote growth.

If you have a garden, and flower beds and like to keep a neat lawn, I highly recommend The Mantis Tiller Cultivator.


Find more Product Reviews here: ReviewThisProductReviews.com


Find more Gardening Tips here: ReviewThisGardening.com


Mantis 7920 2-Cycle Plus Tiller/CultivatorMantis 7920 2-Cycle Plus Tiller/CultivatorChech the Price


Note: The author may receive a commission from purchases made using links found in this article. “As an Amazon Associate, Ebay (EPN) and/or Esty (Awin) Affiliate, I (we) earn from qualifying purchases.”


Tuesday, February 9, 2021

Ninja Foodi Grill Review


Ninja Foodi Grill Review

Our daughter got this Ninja Foodi Grill as a Christmas gift and I just have to tell you how amazing this kitchen gadget really is.

Fran and I are both retired but we both work part-time jobs. On the days that we work, we don't always prepare a meal for when we get home. 

With the Ninja Foodi Grill, we have a nice hot meal in 30 minutes or less. You can grill, air fry, bake, roast, and dehydrate with the Foodi Grill. Take foods from frozen to grilled juicy perfection in 30 minutes or less.

Ninja Foodi Grill Features and Settings:

Grill Control, Low, Medium, High, and Max

Time Setting button in minutes

Air Crisp Setting

Dehydrate Setting

Roast and Bake Settings

Ninja Foodi Grill accessories

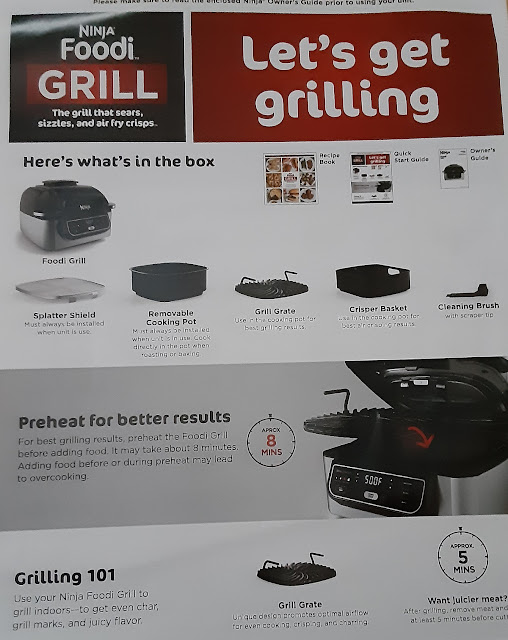
Above is a photo of everything in the Ninja Foodi Grill box:

Recipe Book
Quick Start Guide
Owner's Guide
Foodi Grill
Splatter Shield
Removeable Cooking Pot
Grill Grate
Crisper Basket
Cleaning Brush

The recipe book has 15 great recipes for you to try. There are also charts for grilling, air frying, and frozen food. The charts give you the amount of food, preparation tips, Cooking temperatures, and recommended cooking times. 

Sausage and Grilled Peppers

We made these Sausage and Pepper Grinders, the recipe is on page 26 of the included recipe book. 

Grilled peppers and onions

First, Fran cut 2 bell peppers and one onion and tossed them in a plastic bag with 2 tablespoons of canola oil. 

Then, insert the grill grate and close the hood. Select Grill, set the temperature to low, and set the time to 28 minutes. Then, select start/stop to begin preheating. The unit will beep to indicate that's time to add the food, I love this feature it really takes the guesswork out of preheating. 

Add the peppers and onions on top of the grill grate and close the hood. The timer will begin to count down. Grill the peppers and onions for 12 minutes, when the timer counts down to 16 minutes lift the hood, place them in a bowl and cover with tin foil for later.

Grilled Sausage

Add the sausage and close the hood, the timer will begin to count down again. We cooked the sausage for 7 minutes per side for a total of 14 minutes. The recipe cooks the sausage for 6 minutes per side but I added 2 minutes at the beginning of the process knowing that I wanted my sausage cooked a little more.

Lift the hood and remove the sausage. There will be 2 minutes left on the timer, add your sausage rolls on the grill top and close the hood for the last 2 minutes. Now you'll have nice toasty rolls for your sandwich. These sausage grinders were delicious, I went a little overboard and ate 2 of them myself.

I like the fact you can cook your whole meal by setting one time. We've also made shrimp and fish fillets in the air crisper from frozen to perfection.

Last week I made a couple of ribeye steaks. I brushed them with canola oil, seasoned them, and grilled them for 6 minutes per side, they were a perfect medium-rare. Let's say someone in the family likes their steak cooked medium, all you have to do is leave one steak on the grill and add another minute or two.

So far this has been a great addition to our kitchen gadgets. We've been having a lot of fun experimenting with different foods and time settings.

By the way, the splatter screen, removable cooking pot, grill grate, and crisper basket are really easy to clean.

Find more Product Reviews Here: ReviewThisProductReviews.com

Ninja Foodi 5-in-1 4-qt. Air Fryer, Roast, Bake, Dehydrate Indoor Electric Grill (AG301), 10inch x 10inch, Black and Silver (Renewed)Ninja Foodi 5-in-1 4-qt. Air Fryer, Roast, Bake, Dehydrate Indoor Electric Grill (AG301), 10inch x 10inch, Black and Silver (Renewed)Check the Price


Find more Recipes Here: ReviewThisRecipes.com


Note: The author may receive a commission from purchases made using links found in this article. “As an Amazon Associate, Ebay (EPN) and/or Esty (Awin) Affiliate, I (we) earn from qualifying purchases.”


Most Recent Reviews on Review This Reviews


Search for Reviews by Subject, Author or Title

The Review This Reviews Contributors


SylvestermouseSylvestermouseDawn Rae BDawn Rae BMbgPhotoMbgPhotoBrite-IdeasBrite-IdeasWednesday ElfWednesday ElfOlivia MorrisOlivia MorrisTreasures by BrendaTreasures by BrendaThe Savvy AgeThe Savvy AgeMargaret SchindelMargaret SchindelRaintree AnnieRaintree AnnieLou16Lou16Sam MonacoSam MonacoTracey BoyerTracey BoyerRenaissance WomanRenaissance WomanBarbRadBarbRadBev OwensBev OwensBuckHawkBuckHawkDecorating for EventsDecorating for EventsHeather426Heather426Coletta TeskeColetta TeskeMissMerFaeryMissMerFaeryMickie_GMickie_G


Review This Reviews is Dedicated to the Memory of Our Beloved Friend and Fellow Contributor

Susan DeppnerSusan Deppner

We may be apart, but
You Are Not Forgotten


“As an Amazon Associate, Ebay (EPN) and or Etsy (Awin) Affiliate, I (we) earn from purchases.” Disclosure Statement

X