Pizza is the most popular food in the world, according to
TasteAtlas. A 2019 online survey of more than 2,000 U.S. adults ages 18 and older
conducted by The Harris Poll on behalf of California Pizza Kitchen found that
pizza was the #1 food Americans would choose if they could eat only one
food for the rest of their lives.
Take-out pizzas from your local pizzeria and ready-to-bake frozen pizzas from
the supermarket can be convenient and often tasty. Unfortunately, most are
very high in calories, fat and carbs. Homemade keto pizza crusts based on
variations of the popular "fathead dough" are a reasonable alternative to
traditional pizzas crusts made with wheat flour for someone on a gluten-free
or low carb diet. Making your own pizza with high-quality, fresh, wholesome
ingredients also lets you control the nutrition of both the crust and the
toppings. It can also be messy and, depending on the recipe, possibly
time-consuming.
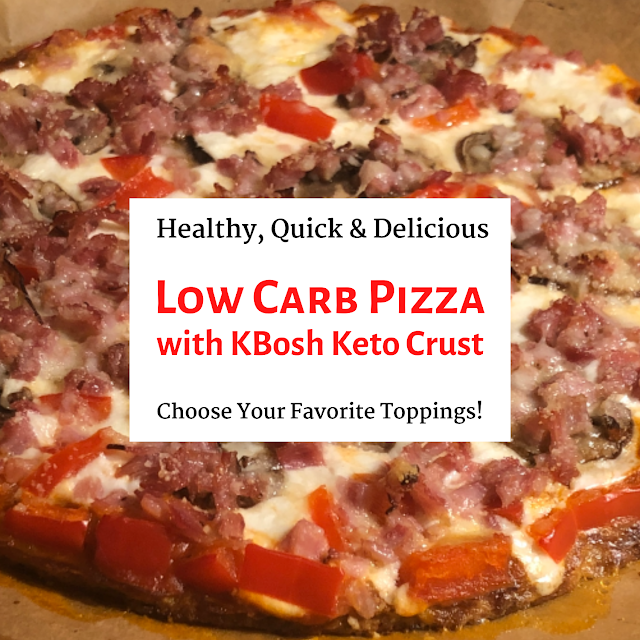
In this review, I’ll share a delicious, quick and easy low carb keto pizza
recipe that you can get on the table in just 30 minutes from start to finish,
using a frozen KBosh keto crust and your choice of low carb toppings. These gluten-free, keto-friendly
frozen crusts are extremely low in calories as well as carbohydrates and come
in several different flavors, both sweet and savory. They are also very thin,
so they crisp up quickly and allow your favorite toppings to be the center of
attention.
This quick and easy low carb keto pizza recipe is intended as a starting point
that you can customize to your taste with your choices of KBosh keto crust
flavors and yummy toppings.
|
|
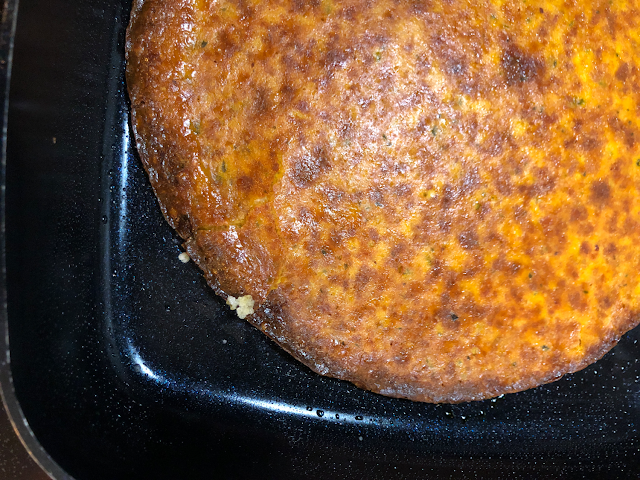
This quick and easy low carb keto pizza recipe can be on the table in
as little as 30 minutes!
|
Takeout Pizzas Are Loaded With Carbs and Calories
My husband and I are both pizza lovers and “foodies.” Until a few years ago,
getting a large takeout pizza and a couple of big side salads was a frequent
mid-week ritual for us. Our favorite was Bertucci’s Sporkie pizza, a wheat
flour crust layered with sweet Italian sausage, ricotta, shredded mozzarella,
grated Pecorino Romano and house-made tomato sauce, with extra toppings of
roasted eggplant and caramelized onions. This scrumptious pie has a fabulous
flavor and texture, but the nutritional profile is less than stellar. The
large pies are cut into eight slices, and based on my calculation
using Bertucci’s Main Menu Nutritional Information, our usual serving (1.5 slices) of a large Sporkie pizza with added roasted
eggplant and caramelized onions weighs in at a whopping 840 calories, 13g of
saturated fat, 60g of cholesterol, 1,815 mg of sodium, 76.5g of carbohydrates,
6g of fiber, 20 mg of sugar and 28.5g of protein!
After a serious health scare in 2019
gave me the motivation to lose nearly 60 pounds on a ketogenic weight loss
diet, I decided to adopt a healthy, low carb lifestyle and find healthier, low
carb alternatives to my favorite high-carb foods, and Sporkies became a thing
of the past for us. I'm still hoping to perfect a delicious and easy keto
pizza recipe with a crust that resembles the ones served at Bertucci's, so I
can make a low carb version of our beloved Sporkie with roasted eggplant and
caramelized onions. In the meantime, however, I have been experimenting with
different, healthier, low carb pizza crust options.
|
|
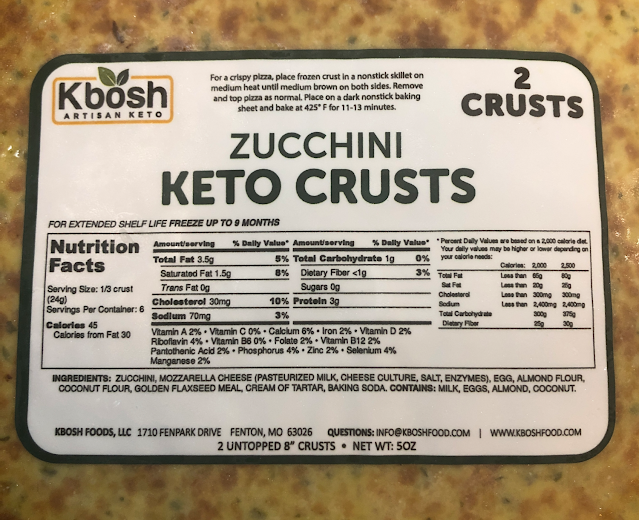
Each KBosh Keto Crust has just 45 calories and less than 1
carbohydrate per serving!
|
Fathead Dough Keto Pizza Crusts vs. KBosh Keto Crusts
The most popular low carb and keto pizza recipes feature thin crusts made with
some variation on "fathead dough," made with mozzarella cheese, butter or
cream cheese, egg, coconut and/or almond flour and sometimes additional
ingredients. Two good ones to try are the
Keto Magic Mozzarella Dough recipe
from All Day I Dream About Food and
The Best Keto Pizza Recipe (Fathead Dough)
from Wholesome Yum. Although I haven't yet found a recipe that produces a low
carb pizza crust with the taste, texture and aroma of a traditional, wheat
flour-based crust, these fathead dough variations offer a tasty and satisfying
alternative for people who are watching their carbs.
KBosh Keto Crusts are made from many of the same ingredients as fathead dough,
but they also contain low carb vegetables, such as cauliflower, zucchini,
pumpkin, spinach or broccoli, depending on which flavor you choose. This gives
them a somewhat different taste and texture than fathead dough type crusts and
makes them lower in calories, fat and carbohydrates than regular fathead dough
keto pizza crusts.
-
Ready to Use. Keto pizza crusts made from fathead dough
need to be made from scratch. KBosh Keto Crusts arrive frozen and don't
need to be thawed. Just remove the package from the freezer, gently
separate the two crusts and crisp them up in a nonstick frying pan for a
few minutes before adding your toppings and baking.
-
Lower in Net Carbs. Fathead dough based pizza crusts
typically have 2–3.5 net carbs per serving. All KBosh keto pizza crust
flavors have only 1 net carb per serving except the chocolate zucchini
dessert pizza crust, which has 2 net carbs per serving.
-
The Entire KBosh Keto Pizza Crust (3 Servings) Has Just 3 Net Carbs and
120 Calories! That's low enough to allow you to indulge in an entire pizza with
low carb toppings, if you are so inclined.
KBosh keto pizza crusts are also gluten-free and much lower in calories and
carbohydrates than other popular gluten-free pizza crusts, such as Udi's Gluten Free Pizza Crust (200 calories and 34g of carbohydrates per 1/2-crust serving) and
CauliPower All About the Base cauliflower pizza crust (170 calories and 28g of
carbs per 1/3-crust serving).
Note: I also plan to try a few keto pizza crust mixes and will share any
that I can recommend in a future product review.
|
|
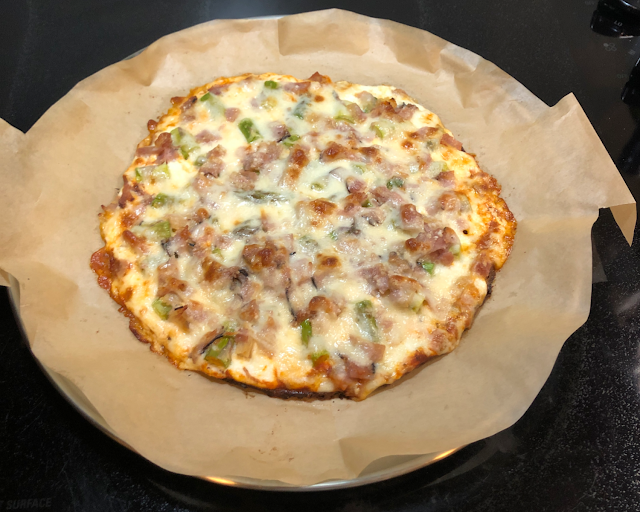
I made this delicious, quick and easy low carb pizza using a KBosh
zucchini keto pizza crust topped with sauce, three kinds of cheese,
asparagus and ham. Here it is fresh from the oven, ready to devour!
|
Customize Your Pizza Topping Choices to Suit Your Preferences and
Nutritional Macros
Another great thing about making your own homemade pizzas is that you can
easily tailor your choices of pizza crust and toppings to suit your mood,
the contents of your fridge and pantry, your low carb or keto macros, and
the rest of your day's meal plan.
For example, I can lower the carbs and increase the
protein by skipping the pizza sauce and topping my keto pizza crust with
whole milk mozzarella, crumbled bacon
or sausage, and maybe some fresh asparagus and mushrooms. On days when I can afford a few more carbs, I might add some
low carb pizza sauce and fresh red bell pepper and
swap out the bacon or sausage for diced or julienned deli ham.
Quick and Easy Low Carb Pizza Recipe With KBosh Keto Crust
Prep Time:
12-15 minutes
Cook Time:
12-15 minutes
Total Time:
24-30 minutes
Servings:
3 Servings
Ingredients
-
Low carb pizza sauce with no added sugar, such as Rao's Homemade All Natural Pizza Sauce, Yo Mama's Classic Pizza Sauce, or Thrive Market Pizza Sauce
- Whole milk ricotta cheese
- Whole or part-skim mozzarella cheese, shredded or whole
- Fresh or frozen, sliced or chopped, raw or cooked mushrooms, asparagus, bell
peppers, red onions artichoke hearts or other low carb vegetables, roasted
garlic gloves
- Sliced olives
- Anchovies
- Cooked and crumbled ground beef, pork, turkey, chicken, or bulk sausage
- Cooked and crumbled bacon
- Cooked low carb breakfast, Italian or other sausage links, cut into coins,
half moons, chunks or 1/3" to 1/2" dice OR cooked, crumbled, bulk low carb
sausage meat
- Thinly sliced deli ham, diced or julienned
- Fresh herbs, such as oregano, thyme, rosemary or basil leaves
- Freshly grated, aged Parmigiana Romano cheese, as a final topping (optional) and to
patch any tears or cracks that may develop while manipulating the fragile
crust before it is baked.
Tools, Supplies & Equipment Needed
Instructions
1. If using a pizza stone, place it on an oven rack in a cold oven. Preheat
the oven to 425 °F.
Important tip: Never put a cold pizza stone into a hot oven! These stones
are usually made of either ceramic or cordierite, materials that can
withstand high heat but must be heated gradually to avoid thermal shock,
which could cause them to crack.
|
|
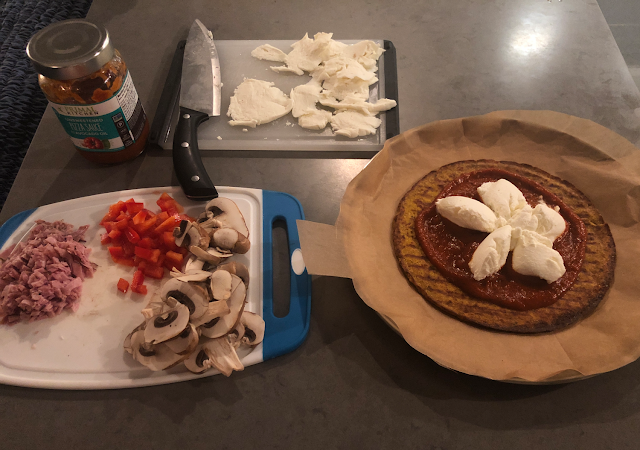
All the ingredients for my KBosh keto crust low carb pizza
(excluding the grated Parmigiano Reggiano cheese and olive oil),
prepped and ready to assemble.
|
2. Set out and prep your choice of toppings.
|
|
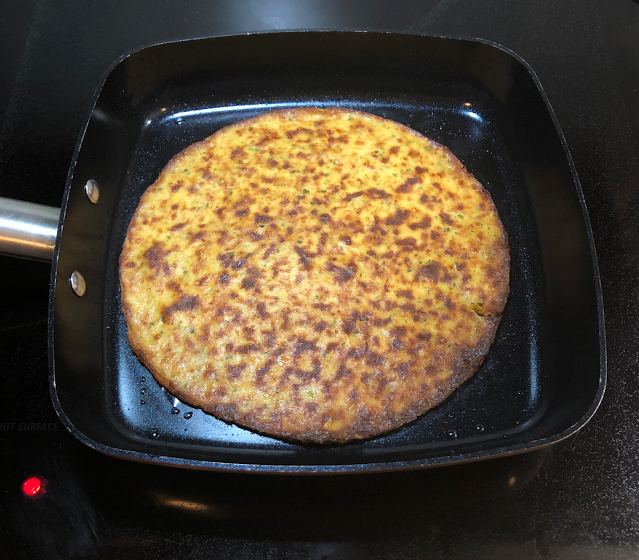
I forgot to take a photo when I was browning the KBosh pumpkin
zucchini keto crust, but here is the KBosh zucchini keto crust I used
for my three-cheese, fresh asparagus, ham low carb pizza.
|
3. Lightly oil the nonstick skillet with olive or avocado oil and preheat it
for a minute or two over medium to medium-high heat. (Read why you
should never preheat an empty nonstick pan.) While the pan is preheating, remove the KBosh keto crust package from the
freezer. Cut open the plastic sleeve and carefully separate the two crusts.
Slide the extra crust back into the plastic sleeve, seal it inside a large
zippered freezer bag and return it to the freezer for storage.
Gently peel away the parchment from the remaining frozen crust and use the tip
of the knife or spatula, if necessary, to carefully pry off the dessicant
packet. Place the crust in the lightly oiled, preheated skillet and and
pan-toast each side for 2–3 minutes, using the extra-wide, 6-inch slotted
spatula to help you lift the edges to check the color and to turn over the
crust after the first side is a rich medium brown. (Using an extra-wide turner
to flip the fragile KBosh keto crust helps to lower the chances of causing
tears or cracks.)
Tip: The KBosh crusts are very thin and somewhat fragile until they have
been browned on both sides. To separate the frozen crusts, I slide the tip
of a dinner knife or thin spatula between the parchment paper separators and
slowly and carefully work my way around from the edges toward the
center.If the crust develops any cracks or tears as you are separating the frozen
crusts, prying off the dessicant packet or flipping the crust as you are
browning it, see my quick and easy KBosh keto crust tear repair trick,
below. Using freshly grated Parmigiano-Romano cheese and heat to "glue" the
cracked or torn edges together works like a charm!
|
|
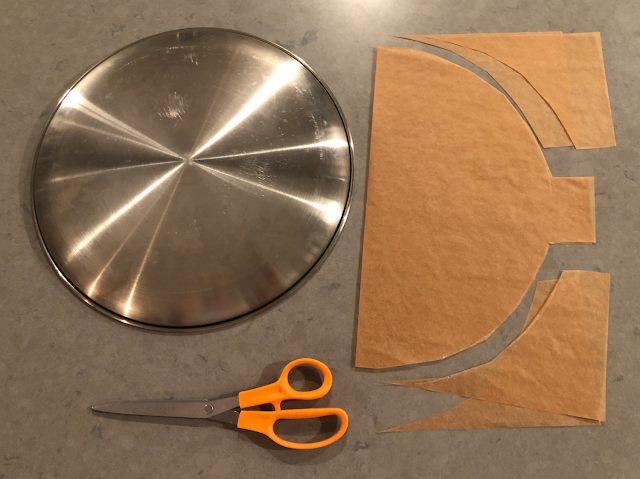
If using a round pizza baking pan, fold the parchment paper in half
crosswise, then center the pan on the folded edge and trace around the
rim, then trim off the excess, leaving a center gap for tab
handles.
|
4. While the crust is browning, trim the sheet of unbleached baking parchment
to fit your stainless steel pizza pan (if using) or fold the sheet of baking
parchment in half lengthwise. Center the stainless steel pizza baking pan on
the fold and trace around the edges to make a cutting template, leaving a
2-inch gap in the center to allow for tabs that will serve as handles. Trim
the parchment along the guidelines as shown in the photo, then unfold the
paper liner and center it on the stainless steel pizza pan.
Note: If you are using a dark nonstick baking sheet instead of the stainless
steel pizza pan, I still recommend lining it with baking parchment to help
absorb moisture from the crust and ensure that it doesn't stick to the baking
sheet.
|
|
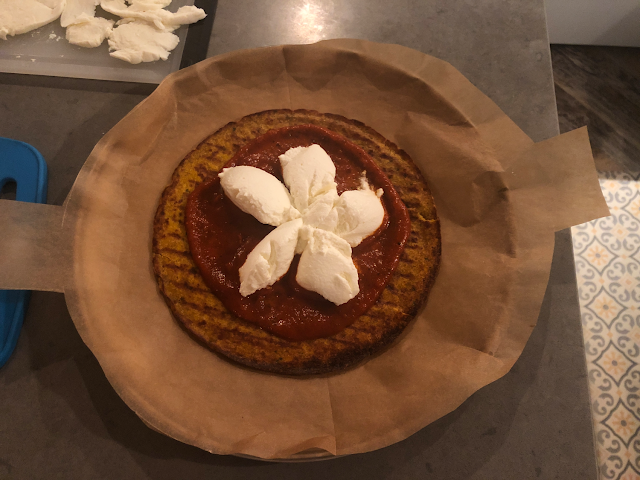
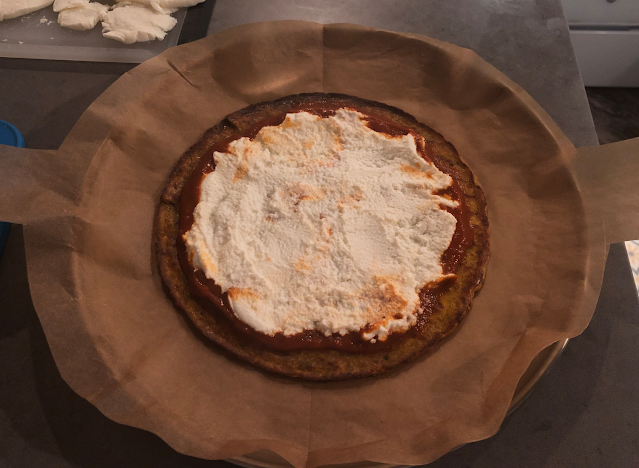
For a solid layer of ricotta over pizza sauce, place large, oval
spoonfuls of ricotta in a flower pattern.
|
|
|
Then, with the back of the spoon. gently spread the cheese to fill in
the gaps between the "petals."
|
5. When both sides of the KBosh keto crust have been cooked to the desired
doneness, remove the pan from the heat and allow the crust to cool for a few
minutes. Then, using the extra-wide slotted turner, gently transfer the cooled
crust to the prepared stainless steel pizza pan or dark nonstick baking sheet,
centering the crust on the parchment liner. Spread a thin layer of your pizza
sauce, pesto or other sauce over the crust, leaving a generous margin of bare
crust around the edges, especially if you plan to add a layer of ricotta
cheese. You can add small dollops of ricotta evenly spaced on top of the sauce
layer or, for a solid layer of ricotta over the sauce, use a larger spoon to
scoop and place large, closely spaced mounds and then use gentle pressure to
spread the soft cheese and fill in the gaps, as shown.
|
|
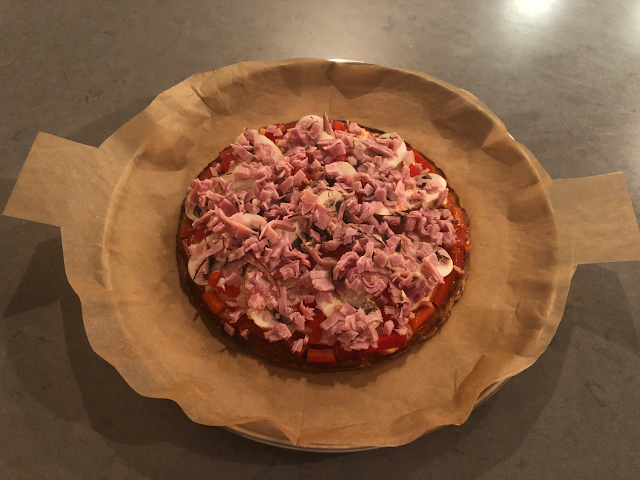
I topped the sauce and cheese on this KBosh pumpkin zucchini crust
with red peppers and Portobello mushrooms, then sprinkled julienned ham across the top,
distributing everything evenly.
|
6. Layer your remaining toppings in whichever order you prefer, taking care to
distribute all the toppings evenly among all the slices.
I usually decide the layering order for each pizza based on the specific
characteristics of the toppings I have chosen, including whether they are raw
or cooked. For example, here is how I layered my toppings on the KBosh
pumpkin-zucchini keto crust pizza I made last week while my husband and I were
away on vacation. I started with a thin layer of pizza sauce, topped with a
thicker layer of whole milk ricotta and then a layer of sliced whole milk
mozzarella cheese. The vegetables came next. First, I built a low "retainining
wall" from short pieces of fresh red bell pepper strips around the perimeter
to help limit the spread of the melting ricotta and mozzarella layers in the
hot oven. Then, I arranged fresh Portobello mushroom slices over the cheese in
a symmetrical pattern (for even distribution) and tucked more red bell pepper
pieces in between. Then I sprinkled julienned deli ham over the vegetables,
added a dusting of freshly grated Parmigiano Reggiano cheese and a light
drizzle of olive oil before placing my pan of "loaded" low carb keto pizza
into the hot oven, atop the preheated pizza stone.
|
|
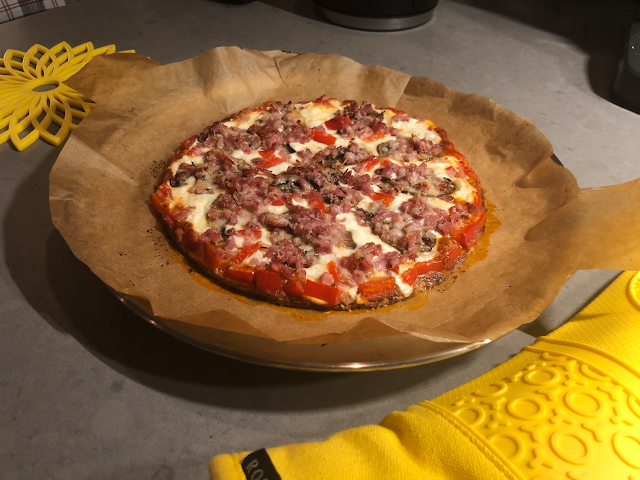
This low carb keto pizza with sauce, ricotta, mozzarella, red
peppers, Portobello mushrooms, julienned ham, freshly grated
Parmigiano Reggiano cheese and olive oil smelled amazing, hot from
the oven!
|
7. Protect your hands with oven mitts, then open the oven and
carefully place the stainless steel pie pan on the preheated pizza stone.
Close the oven and bake the pie for 11–13 minutes, or until the cheese has
melted and started to brown lightly. Carefully remove the pan from the
oven and transfer it to a rack, then let it cool for a few minutes to let
the crust and toppings set up a bit. Use the tabs you left on both sides of the parchment paper liner to transfer the pizza onto a cutting board. Use a pizza wheel or,
preferably, a rocker-style pizza cutter (which won't drag the melted
cheese around as you cut) to cut the pie into four or six slices. Serve each person 2–3 slices, along with a knife and fork if you make a "loaded" pizza with lots of toppings, like the ones in the photos. (The thin, flourless, gluten-free crust isn't sturdy enough to support that much weight
if you pick up the slice with your fingers.)
Note: Each KBosh keto crust serves 3, according to the packaging, and 1/3 of a
pie is a good serving size. However, since the calories and carbs are so
low, my husband and I often cut the baked pie into four large slices and
eat two large slices each.
Quick & Easy KBosh Keto Crust Tear Repair Trick
My Secret? Use Freshly Grated Parmigiano-Reggiano Cheese as a Strong, Tasty
"Hot Glue" for Repairing Any Cracks or Tears!
The two frozen keto crusts usually are stuck together pretty firmly inside the
plastic sleeve, despite the parchment paper separators. Being both very thin
and frozen hard makes them fragile until they have been crisped up. They may
crack (or an edge may break off) when you are trying to separate the frozen
crusts or pry off the dessicant packet. Also, when you are pan-toasting a
frozen KBosh keto crust, it will remain fragile until it has been properly
browned on both sides and allowed to cool and crisp up, (which is why I highly
recommend using a 6-inch-wide spatula/turner for lifting, flipping and
transferring these crusts from the skillet to the parchment lined pan).
Fortunately, even if an edge breaks off completely, there's an effective,
quick and easy fix.

|
|
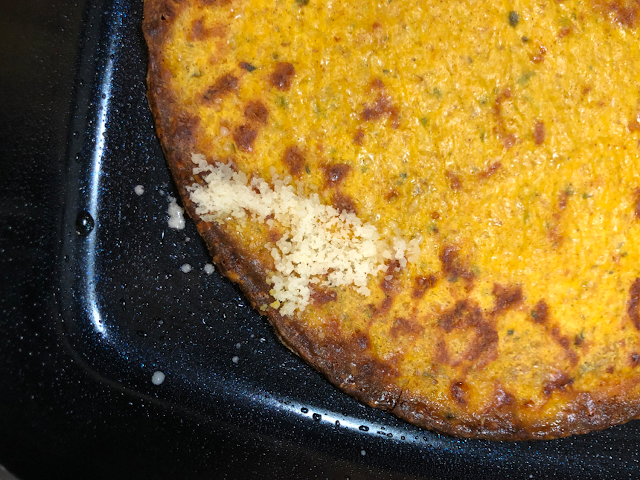
See how one edge of this KBosh keto crust broke off completely? No
worries! I started the repair by placing the pieces in the preheated,
lightly oiled skillet, aligning the broken edges as closely as
possible.
|
If a piece breaks off the outer edge while you are separating the two frozen
crusts, lay both parts of the broken crust in the preheated, oiled skillet,
taking care to align the broken edges. Then, sprinkle a generous line of
freshly grated Parmigiano Romano along the entire length of the broken edges,
as shown in the photos.
|
|
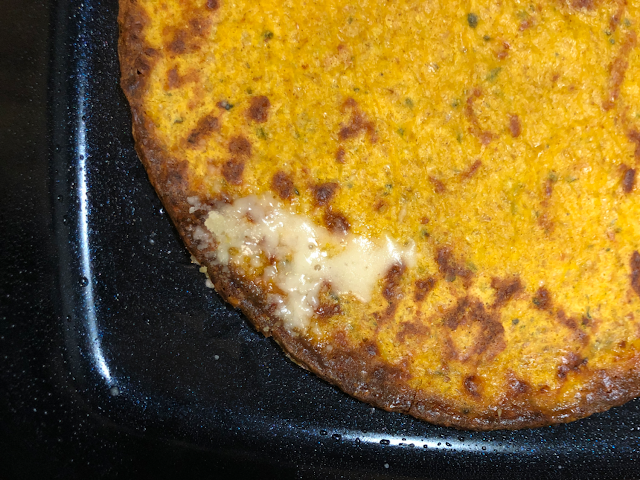
Sprinkle freshly grated, aged Parmigiano Reggiano cheese over the
entire break and heat (or continue to heat) the KBosh keto crust.
|
As the crust heats up, within 30–60 seconds, the grated cheese will melt and
form a sturdy patch across the broken edges.
|
|
After 30-60 seconds, the cheese will melt.
|
If the crust tears or breaks when you are checking for doneness or turning the
crust over to brown the other side, patch the crack or break the same way,
keeping the crust in the pan until the cheese has melted fully.
This repair trick works so well that I sometimes sprinkle a light, even layer
of freshly grated Parmigiano Reggiano cheese across the top of my frozen KBosh
keto pizza crust as soon as I add it to the nonstick skillet. This has several
benefits. It adds flavor; it helps to reinforce the fragile crust as it is
browning (I usually oil the skillet a bit more when I do this); and it helps
prevent the pizza sauce from soaking into the crust. Just make sure you flip
the crust when you transfer it to the parchment paper so the
Parmigiano-Reggiano cheese layer is facing up!
|
|
As you can see, when I flipped over the crust to brown the other
side, the melted cheese formed a sturdy patch that made the torn area
one solid piece again.
|
Important: Don't try to substitute shelf-stable parmesan cheese that
contains cellulose (basically sawdust - ugh!) as an anti-caking agent. For
this purpose, you WANT the grated cheese to stick together so it melts into
a stronger, more solid patch over your tear or crack!
KBosh Keto Pizza Crusts: A Delicious Investment in Healthy Eating
Like most keto-friendly prepared foods with healthy, high-quality, nutritious
ingredients, KBosh keto crusts aren't inexpensive. But for the price of a
takeout pizza, I can have a delicious, hot, low carb pizza made with fresh,
healthy ingredients on the table in just 30 minutes, without leaving the
comfort of my home.
After a long day, it's well worth it to me to be able to serve my family a
yummy, healthy, low carb, high protein dinner with lots of flavor and very
little effort.
The Best Quick and Easy Low Carb Keto Pizza Recipe by Margaret Schindel
Posts About My Keto Diet Journey
My First Year on The Keto Diet
Preparing to Succeed on the Keto Diet, Part One
Preparing to Succeed on the Keto Diet, Part Two
Low Carb Muffins & Cupcakes: Treats to Enjoy on a Keto Diet
Low Carb Keto Chocolate Yogurt Granola Chip Pudding Recipe
Good Dee’s Keto Cookie Low Carb Baking Mix Review
Hamama Microgreens Growing Kit Review & Success Tips
My Favorite Hamama Microgreens Seed Quilt Accessories
Keto Cheddar Cheese Biscuits With Chives Recipe
The Ultimate Keto Hot Chocolate Recipe
The Best Low Carb Keto Gift Ideas: Keto Gift Guide
The Best Low Carb Keto Cinnamon Muffins
Wholesome Yum Keto Bread Mix and Yeast Bread Recipe
The Good Chocolate 100% Organic No Sugar Dark Chocolate Review
The Best Advice to Maintain Your Keto Diet Weight Loss
My New Irresistibly Delicious Keto Cheese Crackers Recipe
Luscious Low Carb Keto Triple Peppermint Cheesecake Brownies Recipe
Quick & Easy Livlo Blueberry Scones Keto Baking Mix Review
Snack Better With The Best Healthy Keto Cookie Dough Bites
The Best Quick and Easy Low Carb Keto Pizza Recipe
The Best Quick and Easy Low Carb Keto Shortcake Cupcakes Recipe
Comparing the Best Keto-Friendly Chocolate Hazelnut Spreads - No Added
Sugars
The Best Low Carb Keto Sandwich and Burger Buns Mix
Blueberry Biscuit Scones — New, Easy, Low Carb Keto Recipe
The Best Keto Pizza Crust Mix With 0 Net Carbs
An Unusual, Delicious Strawberry Chocolate Tea With 0 Calories
Delicious Sugar-Free Keto Cookies That OREO Fans Will Love
Healthy Pistachio Cherry Chocolate Chip Marshmallow Cereal Treats
Recipe
Easy, Decadent, High Protein, Sugar-Free Rocky Road Cottage Cheese Ice
Cream
The Best Quick & Easy Low Carb Sausage and Ricotta Calzones
How to Make Refreshing Vanilla Italian Soda (With or Without Cream)
Reviews of the Keto Diet by Barbara C. (aka Brite-Ideas)
My Personal Keto Testimonial
How I Stayed Committed to the Ketogenic Way of Eating
Read More Recipe Reviews by Our Review This Reviews Contributors
Read More Product Reviews by Our Review This Reviews Contributors
Note: The author may receive a commission from purchases made using links found in this article. “As an Amazon Associate, Ebay (EPN) and/or Esty (Awin) Affiliate, I (we) earn from qualifying purchases.”


